
WordPressサイトの投稿やページにフィルタをかけることで、ユーザーが探しているコンテンツを見つけやすくなります。最新のチュートリアル、製品レビュー、特定のトピックのいずれを検索している場合でも、フィルター機能は閲覧体験を向上させます。
しかし、WordPressはデフォルトでフィルタリングオプションを追加する簡単な方法を提供していません。これは、ユーザーが欲しいものを見つけるために、無数の投稿をふるいにかけなくてはならないことを意味し、フラストレーションにつながる可能性がある。
私たちは、この問題を解決するためにいくつかの研究を行い、さまざまな方法をテストしました。いくつかのツールを試した結果、SearchWP、WPCode、Search & Filterプラグインを使えば、投稿やページにフィルターを素早く簡単に追加できることがわかりました。
この記事では、3つの異なる方法を使って、WordPressで投稿やページを簡単にフィルターできるようにする方法を紹介します。

なぜWordPressの投稿やページにフィルター機能を追加するのか?
コンテンツで溢れかえっているWordPressサイトを訪問して、必要なものを探すのに苦労したことはありませんか?これはユーザーにとってフラストレーションのたまる体験であり、サイトを完全に放棄してしまう原因になります。
検索エンジンはユーザーエクスペリエンスをランキング要因のひとつと考えているため、最終的にはSEOに悪影響を及ぼしかねません。直帰率が高く、エンゲージメントが低いサイトは、検索エンジンから価値が低いとみなされる可能性があります。
幸いなことに、WordPressサイトに検索とフィルター機能を実装するという簡単な解決策があります。この強力なツールを使えば、ユーザーは特定の条件に基づいてコンテンツを絞り込むことができ、探しているものを簡単に見つけることができます。
検索とフィルター機能は、WordPressブログだけに適しているわけではない。何千ものスレッドがあるフォーラムのようなサイトにも最適です。そうすることで、ユーザーはトピック、日付、著者で適切なディスカッションを検索することができる。
また、ポッドキャスト・サイトがあれば、リスナーはその機能を使って好みのエピソードを探すことができる。
そこで、WordPressサイトの投稿やページをユーザーにフィルタリングさせる3つの簡単な方法をご紹介します。以下のクイックリンクからお好きな方法に飛べます:
準備はいいかい?さっそく始めよう!
方法1:SearchWPで投稿とページをフィルターする(推奨)
SearchWPは強力なWordPress検索プラグインで、あなたのサイトにフィルター機能を追加するのに一番おすすめです。とてもユーザーフレンドリーなので、初心者の方にもおすすめです。
注:SearchWPは無料版を提供していませんので、プレミアムプランを購入する必要があります。あなたは私たちの包括的なSearchWPレビューでプラグインについてさらに詳しく学ぶことができます。
SearchWPを使ってフィルター設定付きのカスタム検索フォームを作成する方法をステップバイステップでご紹介します。
ステップ1:SearchWPのインストールとセットアップ
まず、SearchWPプラグインをインストールして有効化する必要があります。初めての方は、WordPressプラグインのインストール方法が参考になります。
アクティベートされると、SearchWP ” Settingsに行くことができます。その後、’一般’タブで、先に進み、それをアクティブにするためにライセンスキーを入力します。
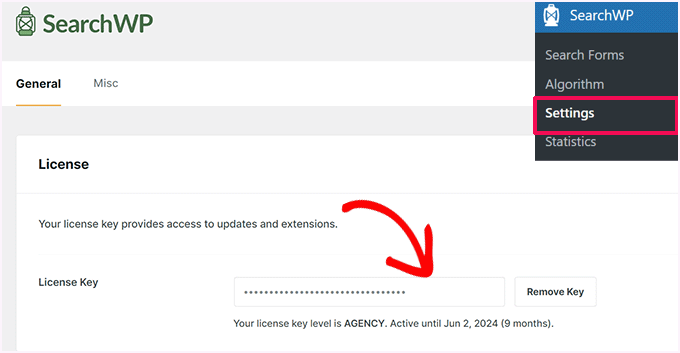
では、SearchWP ” Algorithmにアクセスしてみよう。ここでは、デフォルトの検索エンジンを編集するか、追加の検索エンジンを作成することができます。
デフォルトのエンジンでは、ページ、投稿、メディアファイル、コメントを検索することができ、一般的なWordPressブログには適している。
一方、追加検索エンジンは、カテゴリー、タグ、カスタム投稿タイプ、カスタムタクソノミーのような他のソースを使用することができます。これは、WooCommerceウェブサイトのためのeCommerce商品フィルターのような、ブログ以外のコンテンツ検索とフィルターフォームを作成するのに便利かもしれません。
このチュートリアルでは、デフォルトのエンジンを使用し、その設定を調整します。そのためには、「ソースと設定」をクリックします。

投稿とページをフィルターする検索とフィルター機能を作るので、WordPressの検索エンジンのソースとしてページと投稿を含めるだけだ。
また、キーワードが完全に一致しない場合でもSearchWPが結果を表示できる「キーワードステム」機能も有効化しました。
設定に満足したら、『完了』をクリックすればいい。

ステップ2:検索エンジンの微調整
選択したすべてのソース(ここでは投稿とページ)のセクションが表示されます。
各ソースには「適用属性の関連性」のスライダーがあります。これらのスライダーは、検索結果をランキングする際にSearchWPが各属性に与える重み付けを決定する。
もっと簡単に言えば、重み付けの高い属性と一致するコンテンツは、検索結果の上位に表示されるということだ。
例えば、’投稿コンテンツ’属性を’投稿タイトル’属性よりも重視すると、SearchWPは検索キーワードがコンテンツ内に表示される結果を優先する。

これらのスライダーはお好みに応じて調整できます。
また、「属性の追加/削除」をクリックすることもできる。
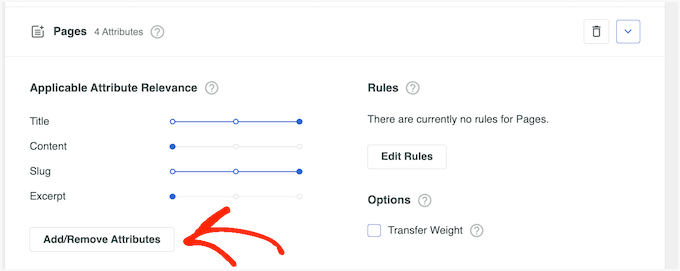
ポップアップが表示され、属性を追加または削除することができます。
例えば、カスタム・タクソノミーやカスタム・フィールドを入れて検索可能にすることもできる。

もう一つの強力な機能は、検索結果から特定のコンテンツを含めたり除外したりするルールを作成できることである。
これを行うには、「ルールの編集」ボタンをクリックするだけです。
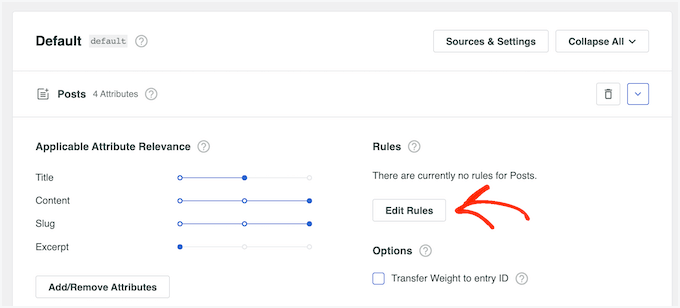
この設定により、無関係なコンテンツをフィルターにかけたり、特定のカテゴリーを強調表示したりすることができます。
次のポップアップで、「Add Rule」をクリックします。

ドロップダウンメニューをクリックし、’Only show entries if’または’Exclude entries if’を選択する。
次に、コンテンツが特定のタクソノミーの一部である場合、特定の日付範囲内に公開された場合、または特定のIDを持つ場合に、そのコンテンツを除外するか含めるかを選択できます。
別のルールを追加するには、「ルールの追加」ボタンをクリックし、上記と同じプロセスを繰り返すだけです。ルールの設定に満足したら、「完了」をクリックします。

必要であれば、他の検索入力ソースについても同じプロセスを繰り返すことができる。
検索エンジンに満足したら、ページのトップに戻って『保存』をクリックする。
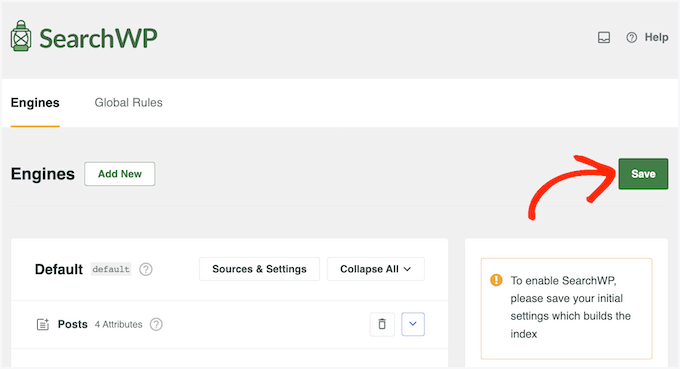
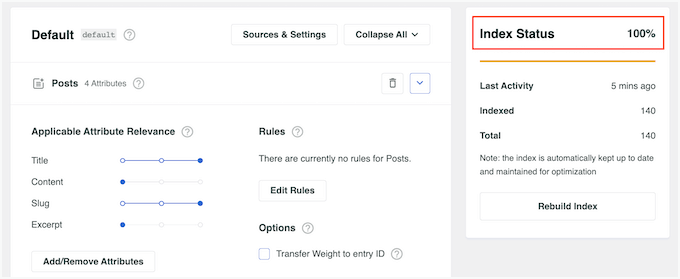
SearchWPはインデックスを再構築しますが、これには数分かかる場合があります。
Index Status 100%’ と表示されたら、SearchWPがすべてのコンテンツと検索エンジンのルールをインデックスしたことを意味します。
ステップ3: カスタム検索フォームの作成
検索エンジンが設定されたので、フィルターオプションを備えたユーザーフレンドリーな検索フォームを作ってみよう。
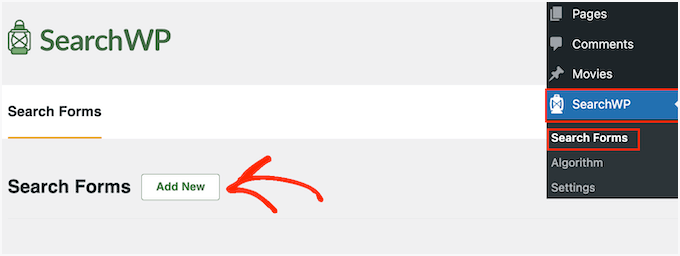
手始めに、SearchWP ” Search Formsにアクセスして、「新規追加」をクリックしましょう。
次の画面では、まずフォームにわかりやすい名前をつけます。
これは内部で参照するためのものなので、名前は覚えやすいものであれば何でも構いません。

次にレイアウトを選ぶ。
このチュートリアルでは、最もフィルターメニューが多い「Combined」オプションを使用します。

ここで、「カスタムスタイリング」セクションまでスクロールダウンし、「カテゴリー検索」と「高度な検索」の両方のオプションを選択することができます。これで、フォームにすべてのフィルタリング機能が含まれるようになります。
検索バーの下に検索キーワードを追加したい場合は、オプションで「クイック検索」を設定できます。
次に、「エンジン」メニューで、先ほど作成した検索エンジンを選択する。
結果」に関しては、どの検索結果ページを使用するかを選択することができます:初期設定のWordPressの結果またはSearchWPのバージョン。

検索の種類』で、『投稿』と『ページ』を選択しよう。
その下に、フィルターメニューに含めたいカテゴリー名を追加することができる。
フィールド・ラベル」には、検索フィールドに表示されるプレースホルダー・テキストを入力する。

先ほど「クイック検索」を選択した場合は、「クイック検索項目」にユーザーがよく検索する用語を含めることができます。
Advanced Search Filter/s」では、「Authors(著者)」、「Post Types(投稿タイプ)」、「Tags(タグ)」など、ユーザーに提供したいフィルタリングオプションを選択するだけです。

最後に、’Form Style’ と ‘Button Style’ で、あなたのサイトのデザインに合わせて検索フォームの外観をカスタマイズしてください。
検索フォームの色、フォント、形状を変更することができます。

すべての設定が終わったら、上にスクロールして戻ることができる。
次に、「保存」をクリックして検索フォームを作成します。

ステップ 4: 検索・フィルターフォームの埋め込み
SearchWP プラグインを使えば、ホームページや ウィジェット対応エリアのようなフロントエンドに検索フォームを簡単に埋め込むことができます。ここでは WordPress ブロックエディターと Search Form ブロックを使ってページに追加するデモを行います。
まず、フォームを追加したいページか投稿を開きます。そして、「+ブロックの追加」アイコンをクリックし、「検索フォーム」を検索してみよう。

ブロック設定」サイドバーで、ドロップダウンメニューから作成したフォームを選択します。
最後に、’Publish’または’Update’をクリックするだけで、検索フォームが表示されます。

詳しくは、ステップ・バイ・ステップのガイドをご覧ください:
あるいは、ショートコードを使ってフォームを表示することもできます。
これを行うには、SearchWP ” Search Formsで特定のフォームのショートコードを見つけ、’Shortcode’ カラムにあるコードをコピーする必要があります。
WordPressでショートコードを追加する方法については、こちらをご覧ください。

検索フォームとフィルターオプションの設定により、サイト訪問者は探しているコンテンツを簡単に見つけることができます。
これはユーザーエクスペリエンスを向上させるだけでなく、ユーザーにさまざまなカテゴリーを探検してもらい、より多くの価値あるコンテンツを発見してもらうことにもつながる。

方法2:カスタムコードで投稿とページをフィルターする(上級者向け)
次の方法は、カスタムコードを使用します。初心者の方にとって、このプロセスは敷居が高く感じるかもしれませんが、私たちはあなたのサイトでスムーズに動作するようにコードを試行錯誤しています。
さらに、市場で最高のコード・スニペット・プラグインであるWPCodeを使用します。このプラグインを使えば、サイトのファイルを直接扱うことなくカスタマイザーのコードを安全に挿入できるので、サイトを壊してしまう可能性が低くなります。
最初のステップは、WPCodeのインストールと有効化です。詳しくは、WordPressプラグインのインストール方法をご覧ください。
注: このチュートリアルには無料のWPCodeプラグインを使用することもできますが、プレミアムプラグインにアップグレードすることで、クラウドベースのコードスニペットライブラリ、WooCommerceインテグレーションなどを利用できるようになります。
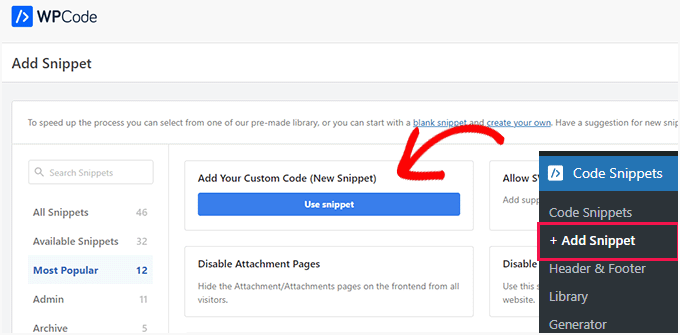
それが完了したら、WordPressの管理エリアにあるCode Snippets ” + Add Snippetに 行くことができます。
次に、「カスタムコードを追加(新規スニペット)」を選択し、「スニペットを使用」ボタンをクリックしましょう。
さて、追加するコード・スニペットには2つのタイプがある。ひとつずつ見ていこう:
WordPressフィルターコードの追加
このコードは、ユーザーが検索フォームで選択したオプションに基づいて検索結果をフィルタリングするようWordPressに指示します。後で説明する、検索フォームを作成する別のコードスニペットと連動します。
まず、新しいスニペットに名前をつける必要があります。WordPress Search Filter」のようなシンプルなものでも構いません。
次に、「コードタイプ」を「PHPスニペット」に変更する必要がある。

次に、以下のコードをコピー&ペーストして、「コード・プレビュー」ボックスに入れてください:
1 2 3 4 5 6 7 8 9 10 11 12 13 14 15 16 17 18 19 20 21 22 23 24 25 26 27 28 29 30 31 32 33 34 35 36 37 38 39 40 41 42 | function wpb_filter_posts($query) {if ($query->is_main_query() && $query->is_search) {// Category filterif (isset($_GET['category'])) {$category = get_category_by_slug($_GET['category']);if ($category) {$query->set('cat', $category->term_id);}}// Published date filter based on URL structure$url_path = parse_url($_SERVER['REQUEST_URI'], PHP_URL_PATH);$url_parts = explode('/', trim($url_path, '/'));if (count($url_parts) >= 4 && is_numeric($url_parts[0]) && is_numeric($url_parts[1]) && is_numeric($url_parts[2])) {$year = $url_parts[0];$month = $url_parts[1];$day = $url_parts[2];$query->set('date_query', array(array('year' => $year,'month' => $month,'day' => $day,),));}// Include posts without categories or tags$query->set('post_status', 'publish');$query->set('post_type', 'post');$query->set('posts_per_page', -1);// Include post typesif (isset($_GET['post_type']) && $_GET['post_type'] == 'page') {$query->set('post_type', array('page'));} else {$query->set('post_type', array('post', 'page', 'custom_post_type'));}}}add_action('pre_get_posts', 'wpb_filter_posts'); |
このコード・スニペットは、ユーザーが検索フォームでフィルターを選択したかどうかをチェックします。例えば、カテゴリーフィルターが選択された場合、このコードはそのカテゴリーを識別し、そのカテゴリーに属する投稿のみを表示します。
また、ユーザーが選択した特定の年、月、日を探すことで、結果を日付でフィルターすることもできる。
最後に、コードタイプは、ユーザーが投稿だけを見たいのか、ページだけを見たいのか、すべての投稿タイプ(カスタム投稿タイプを含む)を見たいのかに基づいて、結果をチェックし、フィルタリングします。
コードを貼り付けたら、「Insert Location」セクションまでスクロールダウンしてください。デフォルトでは、「Insert Method」は「Auto Insert」、「Location」は「Run Everywhere」になっています。
WordPressテーマのfunctions.phpファイルにコードを追加して正しく動作するように、これらの設定はそのままにしておくことができます。
そして、コード・スニペットを有効化して「スニペットを保存」をクリックするだけだ。

WordPressの検索フォームコードを追加する
この次のコードはカスタム検索フォームを作成するもので、後でショートコードを使って埋め込むことができる。
同じ手順を繰り返すことで、WPCodeを使ってカスタムコードを追加することができます。そして、このコードに ‘WordPress Search Form’ という名前をつけ、コードタイプを ‘PHP Snippet’ に変更します。

下のコード・スニペットを「コード・プレビュー」ボックスに貼り付けてください:
1 2 3 4 5 6 7 8 9 10 11 12 13 14 15 16 17 18 19 20 21 22 23 24 25 26 27 28 29 30 31 32 33 34 35 36 37 38 39 40 41 42 43 44 45 46 47 48 49 50 51 52 53 54 55 56 57 58 59 60 61 | function wpb_filter_posts_form() {$categories = get_categories();$tags = get_tags();$post_types = get_post_types(array('public' => true));$output = '<form action="' . home_url('/') . '" method="get">';$output .= '<input type="search" name="s" placeholder="Search...">';// Category dropdown$output .= '<select name="category">';$output .= '<option value="" selected>All Categories</option>';foreach ($categories as $category) {$output .= '<option value="' . $category->slug . '">' . $category->name . '</option>';}$output .= '</select>';// Tag dropdown$output .= '<select name="tag">';$output .= '<option value="" selected>All Tags</option>';foreach ($tags as $tag) {$output .= '<option value="' . $tag->slug . '">' . $tag->name . '</option>';}$output .= '</select>';// Post type dropdown$output .= '<select name="post_type">';$output .= '<option value="all" selected>All Post Types</option>';foreach ($post_types as $post_type) {$post_type_object = get_post_type_object($post_type);$output .= '<option value="' . $post_type . '">' . $post_type_object->label . '</option>';}$output .= '</select>';// Year dropdown$output .= '<select name="year">';$output .= '<option value="">Select Year</option>';for ($year = date('Y'); $year >= 2000; $year--) {$output .= '<option value="' . $year . '">' . $year . '</option>';}$output .= '</select>';// Month dropdown$output .= '<select name="month">';$output .= '<option value="">Select Month</option>';for ($month = 1; $month <= 12; $month++) {$output .= '<option value="' . sprintf('%02d', $month) . '">' . date('F', mktime(0, 0, 0, $month, 1)) . '</option>';}$output .= '</select>';// Day dropdown$output .= '<select name="day">';$output .= '<option value="">Select Day</option>';for ($day = 1; $day <= 31; $day++) {$output .= '<option value="' . sprintf('%02d', $day) . '">' . $day . '</option>';}$output .= '</select>';$output .= '<input type="submit" value="Search">';$output .= '</form>';return $output;}add_shortcode('wpb_filter_posts_form', 'wpb_filter_posts_form'); |
このコードは[wpb_filter_posts_form]というショートコードを作成し、ユーザーがサイトを検索できるフォームを追加します。このフォームにはキーワード検索バーとフィルター用のドロップダウンメニューがあります。
コードタイプは、検索バーのドロップダウンメニューのために、あなたのサイトからカテゴリー、タグ、利用可能な投稿タイプを取得します。ユーザーは検索結果を絞り込むために特定のカテゴリー、タグ、投稿タイプを選択することができます。
さらに、このコードには年、月、日のドロップダウンが含まれており、日付によるフィルタをさらに正確に設定することができます。最後に、選択したフィルターで検索を開始する送信ボタンを追加します。
先ほどのコードと同様に、「挿入方法」の設定はそのままで大丈夫です。そして、コードを有効にして保存するだけです。
検索フォームのショートコードを埋め込む
この段階で、[wpb_filter_posts_form]ショートコードを投稿、ページ、テーマテンプレート、またはウィジェット対応エリアに追加できます。詳しくは、WordPressでショートコードを追加する方法のガイドをご覧ください。
今回は、カスタム検索ページにショートコードを追加する。同じことをしたい場合は、WordPressで新規ページを作成してください。
次に、必要なブロックタイプを使って検索ページをカスタマイズします。例えば、画像やテキストを追加して、読者に検索バーの使い方を教えることができます。
その後、「+ Add Block」ボタンをクリックし、「Shortcode」ブロックを選択します。

完了したら、適切なフィールドに[wpb_filter_posts_form]ショートコードを挿入するだけです。
次のステップは、’Publish’、’Update’、または’Save’ボタンを押して、変更をライブにすることです。

新しいカスタム検索フォームが表示されるはずです。
デモサイトではこんな感じです:

方法3:Search & Filterプラグイン(無料)で投稿とページをフィルターする。
最後の方法は、無料で利用できるSearch & Filterプラグインを使う方法です。WordPressのブログページで検索とフィルター機能を素早く簡単に有効にする方法をお探しなら、これは素晴らしいオプションだ。
インストーラをインストールし、有効化する。 サーチ&フィルタープラグインをインストールして有効化することです。詳しくは、WordPressプラグインのインストール方法のステップバイステップガイドをご覧ください。
プラグインを有効化すると、WordPressの管理エリアに「検索とフィルター」という新しいメニュー項目が追加されます。それをクリックすると、プラグインの使用方法に関する詳細なドキュメンテーションが記載された使用方法のページに移動します。

Search & Filterプラグインには、フィルターオプションを表示するための異なるパラメータを受け付けるショートコードが付属しています。このショートコードは投稿、ページ、またはテキストウィジェット内で使用できます:
[searchandfilter fields="search,category,post_tag"]]。
これにより、検索、カテゴリー、タグフィールドによるフィルターオプションが表示されます:

このプラグインのクールなところは、ショートコードタグを編集することで、フィルターオプションをカスタマイズできることだ。
例えば、カテゴリー、タグ、投稿タイプ、日付フィールドを検索バーに含めたい場合は、このショートコードを使う必要がある:
[searchandfilter fields="search,category,post_tag,post_types,post_date"]]。
こんな感じだ:

ドロップダウンメニューを使いたくない場合は、チェックボックスを使い、各フィールドにラベルを追加することもできます。
以下のショートコードでは、カテゴリーオプションのチェックボックスとともに検索バーを表示するようプラグインに指示しています:
[searchandfilter headings="カテゴリーを選択:" types="checkbox" fields="カテゴリー"].
下記の例をご覧ください:

さらに、1つのショートコードで、いくつかのフィルターオプションにチェックボックスを使い、他のオプションにドロップダウンメニューを使うようにプラグインに指示することもできます。
これは、投稿タイプ、カテゴリー、タグを検索バーに含めるために使用したショートコードです。投稿タイプのオプションにチェックボックスを使うようにプラグインに依頼しました:
[searchandfilter headings="投稿タイプ、カテゴリー、タグ" types="checkbox, select, select" fields="post_types,category,post_tag"].
ショートコードの使用方法については、プラグインのドキュメンテーションを参照してください。

ボーナスのヒントWordPressサイトにライブAjax検索を追加する
ユーザーに投稿やページをフィルターさせる方法がわかったところで、さらに一歩進んでライブAjax検索で検索体験を向上させることができる。
ライブAjax検索は、ユーザーがクエリーを入力している最中に検索結果を表示するリアルタイム技術を使用しています。つまり、ページの更新を待つ必要がありません。検索結果は即座に表示され、訪問者にとって検索プロセスがより速く便利になります。

より高速な検索エクスペリエンスは、ユーザーをサイトに長く留まらせ、ページビューを増やし、直帰率を下げることを意味します。
SearchWP Live Ajax Searchと呼ばれる無料のプラグインを使えば、簡単にこの機能をサイトに追加することができます。詳しくは、サイトにライブAjax検索を追加する方法についてのWordPressチュートリアルをお読みください。
この記事で、WordPressで投稿やページをユーザーにフィルタリングさせる方法を知っていただけたでしょうか。また、ウェブディレクトリの作り方や、サイト内検索を改善するWordPress検索プラグインのエキスパートピックもご覧ください。
If you liked this article, then please subscribe to our YouTube Channel for WordPress video tutorials. You can also find us on Twitter and Facebook.
 in 2024")


Himanshu Gautam
hi
I am using this plugin
is there any option to select a category without hitting the submit button?
Marwan Nour
Hello there,
I am trying to implement Search & Filter in a website that’s both in Arabic and in English. The English version of the Search & Filter is working well however in the Arabic Version, after hitting search, I am redirected to the English Version of the search page with the results in English. Can anyone help me with that issue please? Thank you
WPBeginner Support
You would want to reach out to the plugin’s support to see if this could be a conflict with the plugin and the translation plugin you’re using.
Admin
Tom Ale
Hi, I am using WordPress with Gantry.
I installed this plugin and used a shortcode. It appears where it suppose to be. When clicking the button to filter content, nothing happens. Did anyone face this problem? Help, please.
Sébastien Albert
Hi,
Search & Filter looks great. But could you tell me if it can do that :
I would have a filter on tags but only on one category which I could define…
Thanks a lot
Sebastien
Soumik Sadman Anwar
How can I create filter options in a single post?
For example, If I am interested in writing a post “Necessary Tools to Build A Website” and want to include filter options like Purpose Based Tools (like SEO, Design etc.) and the Price option (Free or Paid), how do I do it?
Pavel
Great plugin, but have some limitations and bugs.
1. No Reset button.
2. When I uncheck all checkboxes and press Submit, it transfers to the front page.
Maybe there’s an option Show all?
Wolney Mamede
First of all, thanks for the post.
I would like to know if it is possible to filter the search from the group of fields, created from the “Advanced Custom Fields – v. 4.4.12” plugin.
Also by default, the search would be restricted to a custom post type from the “Custom Post Type UI – v. 1.5.8” plugin.
Sultan Haider
Hi, I had created employ database on tablepress and i want to filter in front end employ according to year wise for example if i select 2013 this shows only those employ which join in 2013.
i have perform lot of research but i cant find free pluggin according to my need.
please help me for suggestion.
thanks
Christine
Thanks a lot for the comprehensive article. Do you know if it is also possible to have only certain tags in the dropdowns?
Pawan
Great Job. just one last question. Instead of searching the post, is it possible to search category using the search string? I would like to show all the possible post in search page and then the category if it matches the search string (partially or fully).
Maz
Hi,
Great as always.
I just wonder would the use of this plugin be recommended on a site with many posts? Will it not lead to slower load time?
Thanks
Matus
Could you please give us a little bit deeper look to your behind the scenes? (in Blueprint post you write only what you’re using – you can also write if you want, how to properly set up plugins, themes…)
For example tutorial on 10 tips and trick to masterize or customize Genesis Framework would be really really helpful.
Patxi
Hi WPBeginner!
In relation to the filters of new taxonomies, a question of initiation, how I can visualize in the post a new taxonomy for a second type of labels that later I can filter with this plugin?
It would be an interesting topic.
Thanks for you post!
Omer Causey
Your suggestions for allowing users to filter posts are welcome, but the explanation of how and where to insert the required shortcode is beyond this beginner’s understanding.
WPBeginner Support
Hi Omer,
You can add the shortcode in a post or page. If you want to display the filter site-wide then you will need to edit your WordPress theme files and use the template tag instead.
Admin