WordPressサイトを長年運営する中で、ドメイン変更、サイト再構築、セキュリティアップグレードなど、様々な理由で数え切れないほどのサイト全体の完全リダイレクトを行ってきました。サイトのパフォーマンスとユーザーエクスペリエンスを維持するためには、確実なリダイレクト戦略が不可欠であることを学びました。
多くのウェブサイト所有者が直面する課題は、リダイレクトが技術的すぎるということではなく、特定の状況にどの方法が最適かわからないということです。私たちは数十のサイトで様々なリダイレクト技術をテストし、最も確実に機能するものを見つけるためにアプローチを洗練させてきました。
今日、私たちはサイト全体の完全リダイレクトに使用している段階的な方法を共有します。この実績のあるアプローチは、あなたの時間を節約し、サイトにどのような変更を加えても、訪問者が常に正しい場所にたどり着くことを保証します。

WordPressでサイト全体の完全リダイレクトを行う理由
サイト全体の完全リダイレクトにより、トラフィックや検索エンジンのランキングを失うことなく、ウェブサイト全体を新しい場所に移動できます。ユーザーがブラウザにウェブサイトの古いURLを入力すると、新しいドメインに自動的にリダイレクトされます。
また、長年にわたって構築したすべてのバックリンクを維持し、新しいウェブサイトのドメイン名に誘導するのに役立ちます。ユーザーは新しいドメインで既存のコンテンツを簡単に見つけることができます。
サイト全体の 301 リダイレクトは、リンク切れや 404エラー の発生を防ぎます。これらは、WordPress SEO とユーザーエクスペリエンスにとって悪影響となる可能性があります。
技術的な観点から見ると、サイト全体の完全なリダイレクトは 301 リダイレクトです。このタイプのリダイレクトは、ウェブページが新しい場所に恒久的に移動したことを検索エンジンに伝えます。
これは、キーワードランキング とトラフィックにとって最も有益なリダイレクトタイプであり、古いドメインのSEO権限を新しいドメインに引き継ぐのに役立ちます。
それでは、WordPressでサイト全体の 301 リダイレクトを設定する方法を見てみましょう。
編集者注: WordPressのサイト全体を新しいドメインにリダイレクトする前に、まずすべてのコンテンツを転送することが重要です。 WordPressサイトのエクスポート方法 に関するチュートリアルを使用するか、 WordPressを新しいドメインに移行する方法 (SEOを失わずに)のステップバイステップガイドに従ってください。
WordPressでサイト全体の完全なリダイレクトを行う方法
WordPressサイト全体の簡単なリダイレクト設定方法は、All in One SEO (AIOSEO)を使用することです。これはWordPress向けの最高のSEOプラグインであり、300万人以上のプロフェッショナルに利用されています。
AIOSEOは、専門家を雇う必要なく、ウェブサイトを検索エンジン向けに最適化するのに役立ちます。さらに、強力なリダイレクションマネージャーを提供しており、SEOランキングを失うことなくユーザーを新しいドメインに適切にリダイレクトできると同時に、404エラーも追跡できます。
このチュートリアルでは、リダイレクションマネージャーが含まれているため、AIOSEO Proバージョンを使用します。また、WordPressサイトの最適化を開始して検索エンジンのトラフィックを増やすために必要なすべての基本機能が含まれているAIOSEO無料版もあります。
まず、AIOSEOプラグインをインストールして有効化する必要があります。詳細については、WordPressプラグインのインストール方法に関するガイドをご覧ください。
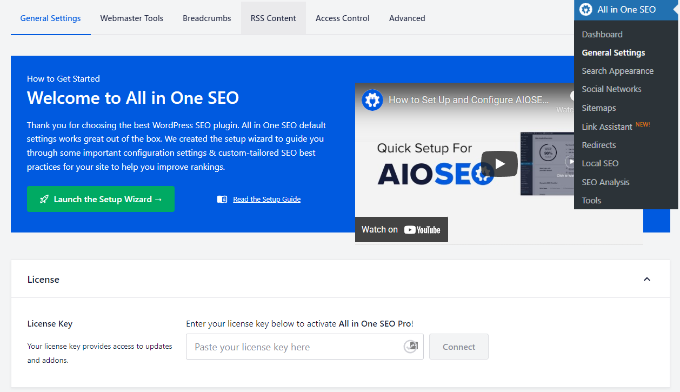
有効化したら、WordPressダッシュボードからAll in One SEO » General Settingsに移動し、ライセンスキーを入力できます。キーはAIOSEOアカウントエリアで見つけることができます。

ウェブサイトにAIOSEOを設定し、サイトを検索向けに最適化するには、セットアップウィザードを起動し、画面の指示に従ってください。詳細については、WordPressでAIOSEOを設定する方法に関するガイドをご覧ください。
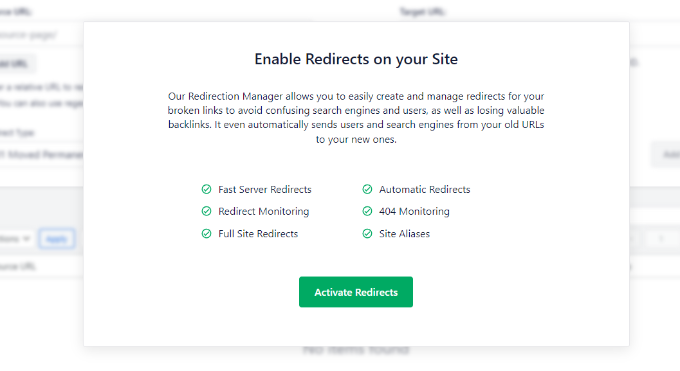
次に、WordPress管理パネルからAll in One SEO » Redirectsに移動し、「Redirectsを有効化」ボタンをクリックします。

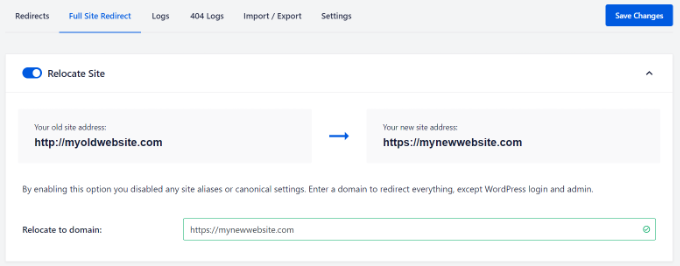
アドオンが有効になったら、Redirectsの下にある「Full Site Redirect」タブに移動できます。
その後、「Relocate Site」トグルをクリックして、さらにオプションを表示します。

これで、ウェブサイトの新しい場所を入力できるフィールドが表示されます。
「Relocate to domain」フィールドに新しいURLを入力し、「変更を保存」ボタンをクリックするだけです。プラグインは、WordPressのログインページと管理画面を除き、すべてを自動的にリダイレクトします。

新しいリダイレクトが機能しているか確認するには、ブラウザに古いURLを入力するだけで、新しいドメインに自動的にリダイレクトされるはずです。
WordPressで壊れたリンクを追跡して修正する
新しいドメイン名に移動すると、サイトの一部のリンクが壊れて404エラーが発生する可能性があります。しかし、AIOSEOを使用すると、WordPressで壊れたリンクを簡単に追跡し、リダイレクトマネージャーを使用して修正できます。
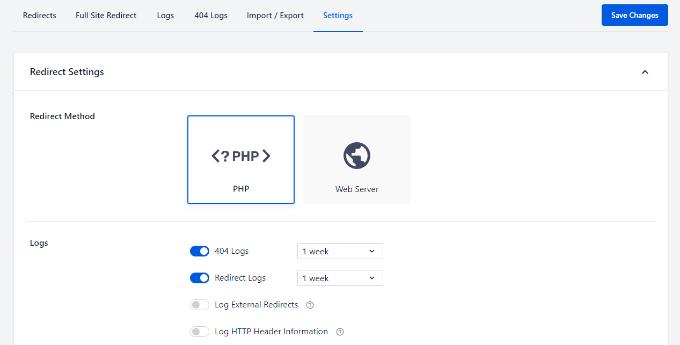
WordPress管理画面からAll in One SEO » Redirectsに移動し、「Settings」タブをクリックします。次に、トグルをクリックして404ログとリダイレクトログを有効にします。

この機能を有効にすると、AIOSEOはあなたのウェブサイトで404エラーの記録を開始します。最初にログに何も表示されないことに注意してください。オプションを有効にした後にのみ404エラーの記録が開始されます。
誰かがあなたのWordPressサイトで404エラーを発生させると、リダイレクトの下にある「404 Logs」タブに移動することでログを表示できます。

壊れたリンクを修正するには、「Add Redirect」オプションをクリックするだけです。次に、「Target URL」フィールドに新しい場所を入力し、リダイレクトタイプを選択します。
これらの詳細を追加したら、「Add Redirect」ボタンをクリックするだけです。

詳細については、WordPressで壊れたリンクを追跡して修正する方法に関するガイドに従ってください。
動画チュートリアル
フルサイトリダイレクトに関するよくある質問
以下は、WordPressでフルサイトリダイレクトを行うことについてよく寄せられる質問です。これらは、プロセスに関する残りの混乱を解消するのに役立つはずです。
1. フルサイトリダイレクトはSEOランキングに悪影響を与えますか?
正しく行われた場合、301リダイレクトを使用したフルサイトリダイレクトは、SEOバリューのほとんどを維持するはずです。検索エンジンは、ウェブサイトが移動する必要がある場合があることを理解しており、古いURLから新しいURLにランキングパワーを転送します。ただし、検索エンジンが変更を処理する間、数週間はランキングが一時的に低下する可能性があります。
2. フルサイトリダイレクトが有効になるまでどのくらい時間がかかりますか?
リダイレクト自体は、実装すればすぐに機能します。ただし、検索エンジンがリダイレクトされたすべてのURLを完全に処理し、インデックスを更新するには、数日から数週間かかる場合があります。ほとんどのユーザーはリダイレクトがすぐに機能することに気づきますが、SEOのメリットが完全に現れるまでには4〜6週間かかることがあります。
3. プラグインなしでWordPressサイトをリダイレクトできますか?
はい、.htaccessファイルを使用するか、ホスティングプロバイダーのコントロールパネルを通じて、サイト全体の完全なリダイレクトを設定できます。ただし、WordPressリダイレクトプラグインを使用すると、初心者にとっては簡単で、プロセスをより細かく制御できます。プラグインを使用すると、後でリダイレクトを管理および変更することも簡単になります。
4. サイト全体の移動における301リダイレクトと302リダイレクトの違いは何ですか?
301リダイレクトは、移動が永続的であることを検索エンジンに伝え、SEOの価値を新しい場所に転送します。302リダイレクトは一時的な移動を示し、SEOのメリットを伝えません。サイト全体の移動には、検索ランキングを維持するために、ほぼ常に301リダイレクトを使用する必要があります。
5. 個々のページをすべて個別にリダイレクトする必要がありますか?
いいえ、サイト全体の(フルサイト)リダイレクトを設定することで、URL構造を維持したまま、古いドメインのすべてのページを新しいドメインに自動的にリダイレクトできます。これにより、誰かがoldsite.com/aboutにアクセスした場合、個々のページごとにリダイレクトを設定する必要なく、自動的にnewsite.com/aboutに送信されます。
6. サイト全体の(フルサイト)リダイレクトが正しく機能しているかどうかのテスト方法は?
プライベートブラウザーウィンドウで古いURLにアクセスして、新しい場所に正しくリダイレクトされるかを確認することで、リダイレクトをテストできます。また、オンラインのリダイレクトチェッカーツールを使用すると、リダイレクトが正しく機能しているかを確認し、正しいリダイレクトタイプ(301対302)が使用されているかを確認できます。
この記事がWordPressでサイト全体の(フルサイト)リダイレクトを行う方法を学ぶのに役立ったことを願っています。また、WordPressでページまたはURLをリダイレクトする方法に関するガイドや、おすすめのWordPressリダイレクトプラグインもご覧ください。
この記事が気に入ったら、WordPressのビデオチュートリアルについては、YouTubeチャンネルを購読してください。 TwitterやFacebookでもフォローできます。


Shah
おっしゃる通り、プラグインはWordPressのログインページ以外のすべてをリダイレクトしますが、それはログインページは以前のドメイン名を使用するということでしょうか、それともどういうことでしょうか?理解できませんでした。古いドメインを保持し、毎年更新し続ける必要がありますか。
お役に立てるご返信をいただけると幸いです。
WPBeginnerサポート
正しいです。これは、必要に応じてログインしてリダイレクトをキャンセルできることを意味します。ドメインを継続的に更新する必要はありません。主に、ユーザーがまだ古いドメインを使用している間は、古いドメインを更新することが推奨されます。
管理者
イジー・ヴァネック
ウェブサイトには約1300の記事があります。ドメインを変更したい場合、どのように進めればよいですか?ウェブサイトを新しいホスティングと新しいドメインに移行し、元のドメインはそのままにして、各URLを新しいドメインにリダイレクトするように設定しますか?これは1300件のリダイレクトを設定する必要があるということですか?それとも、AIO SEOでこのリダイレクトを設定し、URLのドメイン名だけを置き換えて、適切なURLにリダイレクトするように機能するのですか?少し混乱しています。
WPBeginnerサポート
まず、新しいサイトを設定し、コンテンツが新しいホストに正しくインポートされていることを確認する必要があります。その後、手動でリダイレクトを作成するか、AIOSEOを使用してリダイレクトプロセスを処理させることができます。パーマリンクが変更されていない限り、サイトを新しいドメインに移行するために、はるかに少ないリダイレクトルールを使用できます。
管理者
イジー・ヴァネック
パーマネントリンクは同じで、メインのドメインのみが変更されます。アドバイスありがとうございます。AIO SEO PROを使用して、時間があるときに解決を試みます。また、彼らのサポートが私を助けてくれるかもしれません。返信ありがとうございます。
THANKGOD JONATHAN
チュートリアルをありがとうございます。しかし、すでに多くのコンテンツがあるウェブサイトの場合、個別に404エラーを修正するのは困難で、時間もかかると思います。どのように対処すればよいですか?
WPBeginnerサポート
記事の最初の方法は、404エラーを心配することなく、より大きなサイトを移行するのに役立つように設計されています。
管理者