
長年WordPressサイトを運営してきて、小さな変更が大きな違いを生むことを学びました。そのひとつが、投稿日の表示方法です。
ほとんどのブログでは、投稿が公開された正確な日付を表示するのが普通です。しかし、’2日前’や’昨日’のような相対的な日付を使用する方が読者にとって良い場合があります。これらの日付は、あなたのコンテンツがいかに新しく、関連性のあるものであるかを素早く人々に伝え、彼らがそれを読む可能性を高めることができる。
このガイドでは、WordPressサイトに相対的な日付を表示する3つの簡単な方法を紹介します:Dateブロックを使う方法、プラグインを使う方法、そして簡単なコードです。

なぜ絶対/正確な日付よりも相対的な日付を表示するのか?
FacebookやTwitterのようなソーシャルメディア・プラットフォームで、投稿の日付が正確な日付ではなく「2時間前」や「3日前」と表示されていることにお気づきだろうか。これは相対日付形式と呼ばれるものです。
絶対日付(’2024年8月21日’など)とは異なり、WordPressの相対日付は、読者にコンテンツの鮮度を素早く伝えることができます。
例を見てみよう。特定の日付ではなく「2日前」の日付の投稿を見た訪問者は、それが最近のコンテンツであることを即座に知る。こうすることで、読者は今日の日付を考えたり、暗算したりすることなく、どの投稿が新しく、チェックする価値があるのかをすぐに見分けることができる。
しかし、相対的な日付がすべてのタイプのサイトに適しているわけではないことは注目に値する。
例えば、歴史的なブログや正確な日付が重要なサイトを運営している場合は、絶対的な日付を先頭に固定表示する方が良いかもしれません。重要なのは、WordPressサイトに相対日付を追加するかどうかを決める際に、コンテンツの種類と閲覧者の好みを考慮することです。
それでは、WordPressで相対日付を追加する3つの方法を見ていきましょう。WordPress 6.7以降、WordPressの日付ブロックで相対日付を使用できるようになりましたが、このオプションは最もカスタマイズしやすいものではありません。
また、このプロセスを簡単にするプラグインを見つけ、よりコントロールしやすいコード方式を考えました。以下のクイックリンクから、お好みの方法にスキップすることができます:
方法1:WordPressの日付ブロックを使う(迅速かつ無料)
WordPressの日付ブロックは、相対日付を使用するように設定できることをご存知ですか?これは、プラグインをインストールしたり、WordPressウェブサイトにカスタムコードを追加することなく、相対日付を表示する最も簡単な方法です。
しかし、この方法には2つの欠点がある。第一に、それほど多くのカスタマイズができない。例えば、日付を「X分前」や「X時間前」ではなく、「今日」や「昨日」として表示することはできない。
第二に、WordPressの日付ブロックは、ブロックWordPressテーマのテンプレートで使用できますが、クラシックテーマのテンプレートでは使用できません。クラシックテーマを使用している場合は、方法2または方法3に従うことをお勧めします。
このチュートリアルでは、ブロックテーマの「投稿メタ」テンプレート部分にあるWordPressの日付ブロックをカスタマイズして、相対的な日付を表示する方法を紹介します。これにはフルサイトエディタを使用します。
このテンプレート部分は、投稿者、カテゴリー、公開日などのブログ投稿に関する情報を表示する役割を担っています。
とはいえ、Dateブロックはブロックエディターで投稿やページに追加しても機能します。
プロからのアドバイス: WordPressの管理画面にテーマカスタマイザーメニューが表示されない場合は、ブロックテーマを使っている可能性があります。
まず、外観 ” エディターで サイトエディターを開きます。

WordPressテーマをカスタマイズするためのオプションがいくつか表示されます。
ここで「パターン」をクリックする。

次のページでは、テーマが持つすべてのパターンとテンプレートパーツが表示されます。
メタ情報を投稿する」オプションを選択するだけです。

投稿メタ情報のテンプレート部分が表示されるはずです。
ここで、WordPressの日付ブロックである「投稿日」と書かれたブロックをクリックします。クリックすると、右側にブロック設定のサイドバーが開きます。
デフォルトのフォーマット』設定を無効にし、『3ヶ月前』のフォーマットを選択します。
投稿へのリンク」設定を有効にしておくと、日付ブロックが紹介されているブログ記事にリンクします。投稿が最初に公開された日ではなく、最後に更新された日を表示したい場合は、‘Display last modified date’を有効にすることもできます。
完了したら、「保存」をクリックするだけだ。
これで、相対日付を使用したウェブサイト全体の「Post Meta」テンプレートのすべてのインスタンスが表示されるはずです。
方法2:Meks Time Agoプラグインを使う(無料でカスタマイズ可能)
WordPressで相対的な日時を表示するシンプルなプラグインをお探しなら、おすすめのプラグインがあります。私たちが試したすべての相対日付プラグインの中で、Meks Time Agoは初心者にとって最も簡単なプラグインの一つです。しかも無料で、クラシックテーマでもブロックテーマでも使えます。
とはいえ、この方法は、日付を「X秒前」や「X日前」ではなく、「今日」や「昨日」にしたい場合にも使えない。しかし、どの投稿に相対的な日付を追加するか、さらには’ago’という単語を置き換えるといったカスタマイズは可能だ。
Meks Time Agoを使用するには、管理エリアにWordPressプラグインをインストールし、有効化してください。
その後、ダッシュボードの設定 ” 一般に 進みます。下にスクロールすると、Meks Time Agoのプラグイン設定があります。
")
最初に有効にしなければならない設定は、’time ago’フォーマットを適用する場所です。ここでは、投稿が最初に公開された相対的な日付を表示するために、’Date’と’Time’を選択する必要があります。
また、投稿が最初に公開された時刻ではなく、最後に更新された時刻を表示したい場合は、「日付(更新日)」または「時刻(更新時刻)」を選択することもできます。
また、分、時、日、月のうち、特定の数より過去の投稿にこの日付フォーマットを適用するかどうかも選択できます。
私たちは12カ月に決めた。
")
次に、日付フォーマットの「ago」の位置を変更することができる。
多くの人がこの文言に慣れ親しんでいるため、相対的な日付の後に置くことにした。

最後に、必要に応じて「ago」を別のキーワードに置き換えることができる。空白にすることもできる。
そうしたら、『変更を保存』をクリックするだけです。

これだけだ!これで、投稿の日付がすべて相対日付になりました。変更内容をモバイル、デスクトップ、タブレットで表示して、すべてが正しく表示されているかどうかを確認できます。
例を挙げよう:

方法3:カスタムコードを使用する(高度だが、よりカスタマイズ可能)
この方法にはカスタマイザー・コードが必要で、前回説明したように、日付を「X分前」や「X時間前」ではなく、「今日」や「昨日」として表示したい場合は、この方法を選択したほうがよい。
でも、怖がらないでください!ステップ・バイ・ステップで説明していきます。さらに、WPCodeと呼ばれるコードスニペットプラグインを使用し、サイトを壊すことなく安全かつ簡単にカスタマイザーを追加することができます。
プラグインについては、WPCodeのレビューでさらに詳しくご紹介しています。
まず、管理エリアにWordPressプラグインをインストールし、有効化します。
その後、Code Snippets ” + Add Snippetに移動する必要があります。そして、「カスタムコードの追加(新規スニペット)」を選択し、「+カスタム・スニペットの追加」ボタンをクリックします。

新しいカスタムコードに名前を付けます。Relative Date Formatted with Time」のような簡単なものでよい。
また、コードタイプを「PHPスニペット」に変更する。

それが完了したら、以下のコード・スニペットをコピー&ペーストしてコード・プレビュー・ボックスに貼り付けるだけです:
1 2 3 4 5 6 7 8 9 10 11 12 13 14 15 16 17 18 19 20 21 22 23 24 25 26 27 28 29 30 31 32 33 34 35 36 37 38 39 40 41 42 43 44 45 46 47 48 49 50 51 52 53 54 55 56 57 58 59 60 61 62 63 64 65 66 67 | /** * Converts a timestamp into a human-readable relative date string. * * @param int $timestamp The timestamp to convert * @return string The human-readable relative date string */function human_readable_relative_date( $timestamp ) { $time_difference = time() - $timest // Calculate the time difference between now and the timestamp $seconds_in_a_day = 86400; // Number of seconds in a day if ( $time_difference < 0 ) { return 'Date is in the future'; // Handle future dates } elseif ( $time_difference < $seconds_in_a_day ) { return 'Today at ' . date( 'H:i', $timestamp ); // Handle same-day dates } elseif ( $time_difference < 2 * $seconds_in_a_day ) { return 'Yesterday at ' . date( 'H:i', $timestamp ); // Handle one-day-old dates } elseif ( $time_difference < 7 * $seconds_in_a_day ) { $days = floor( $time_difference / $seconds_in_a_day ); // Calculate full days ago return $days . ($days == 1 ? ' day' : ' days') . ' ago at ' . date( 'H:i', $timestamp ); // Handle dates within the last week } elseif ( $time_difference < 30 * $seconds_in_a_day ) { $weeks = floor( $time_difference / ( 7 * $seconds_in_a_day ) ); // Calculate full weeks ago return $weeks . ($weeks == 1 ? ' week' : ' weeks') . ' ago at ' . date( 'H:i', $timestamp ); // Handle dates within the last month } elseif ( $time_difference < 365 * $seconds_in_a_day ) { $months = floor( $time_difference / ( 30 * $seconds_in_a_day ) ); // Calculate full months ago return $months . ($months == 1 ? ' month' : ' months') . ' ago at ' . date( 'H:i', $timestamp ); // Handle dates within the last year } else { $years = floor( $time_difference / ( 365 * $seconds_in_a_day ) ); // Calculate full years ago return $years . ($years == 1 ? ' year' : ' years') . ' ago at ' . date( 'H:i', $timestamp ); // Handle dates older than a year }}/** * Shortcode function to convert a given timestamp or date to a human-readable relative date string. * * @param array $atts Shortcode attributes * @return string The human-readable relative date string */function relative_date_shortcode( $atts ) { $attributes = shortcode_atts( array( 'timestamp' => '', // Default value for 'timestamp' attribute 'date' => '', // Default value for 'date' attribute ), $atts ); // If no timestamp or date attribute provided, use the post's published date if ( empty($attributes['timestamp']) && empty($attributes['date']) ) { global $post; if ( !is_null($post) ) { $attributes['timestamp'] = get_the_time('U', $post->ID); // Get the post's timestamp } } elseif ( !empty($attributes['date']) ) { $attributes['timestamp'] = strtotime($attributes['date']); // Convert 'date' attribute to timestamp } // Validate the timestamp if ( !empty($attributes['timestamp']) && is_numeric($attributes['timestamp']) ) { return human_readable_relative_date( $attributes['timestamp'] ); // Return the human-readable relative date } else { return 'Invalid timestamp or date'; // Return an error message if the timestamp is invalid }}add_shortcode( 'relative_date', 'relative_date_shortcode' ); // Register the shortcode |
最初の関数、human_readable_relative_dateは、日付をユーザーフレンドリーなフォーマットに変更する。
例えば、「今日の午後2時30分」や「3日前の午前10時15分」を表示することができる。これにより、読者は投稿が何日前のものかを理解しやすくなる。
2番目の関数relative_date_shortcodeは、WordPressで使用できるショートコードを作成します。このショートコードを使えば、テーマファイルを変更することなく、簡単にコンテンツに相対日付を追加することができます。
このコードを使用することで、投稿日時をよりユーザーフレンドリーにすることができます。読者は、あなたのコンテンツがどれだけ新しいものかをすぐに知ることができ、あなたのサイトをより最新で魅力的なものにすることができます。
次に、「インサーター」セクションまでスクロールダウンする。次に、「挿入方法」で「自動挿入」を、「場所」で「フロントエンドのみ」を選択します。

右上の’Inactive’トグルを’Active’に変更し、’Save Snippet’ボタンをクリックする。
コードを有効化した状態で、WordPressブログで相対日付を有効化する方法を見てみましょう。使用しているテーマの種類によって手順は異なります。
ブロックテーマで相対日付書式を追加する方法
ブロックテーマを使用している場合は、WordPressの日付ブロックを投稿メタテンプレート部分に作成したショートコードに置き換えるだけです。
まず、アピアランス ” エディター にアクセスしてください。
フルサイトエディタのメインメニューが表示されます。
パターン』をクリックしてください。
これで、ブロックテーマが提供するすべてのパターンとテンプレートパーツが表示されるはずです。
ここで、「Post Meta」オプションを選択する。
まず、既存のDateブロックを削除して、ショートコードに置き換える必要がある。
これを行うには、日付ブロックをクリックします。
クリックするのが難しい場合は、上部の「リスト表示」ボタンをクリックし、「日付」ブロックを選択すればよい。そして、三点メニューをクリックして『削除』を選ぶ。

日付」ブロックを削除して、「ショートコード」ブロックを投稿メタ情報に追加します。
ページ上の任意の場所で「+」ボタンをクリックし、ショートコード・ブロックをドラッグ&ドロップすることで実行できる。

その後、以下のショートコードをブロックタイプに入力する:
[relative_date] |
それが終わったら、『保存』をクリックするだけだ。

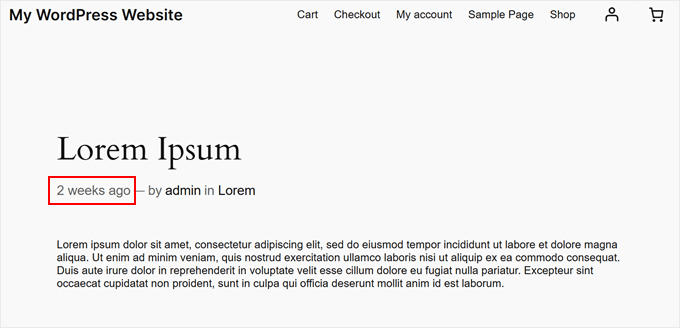
これで個別投稿テンプレートは相対日付を使用するようになります。
デモサイトではこんな感じです:

クラシックテーマで相対日付書式を追加する方法
WordPressクラシックテーマで相対日付を追加するプロセスは少し異なり、より専門的です。クラシックテーマごとに設定が異なるからです。
しかし、我慢してください。無料のWordPressテーマであれ、プレミアムWordPressテーマであれ、あなた自身でそれを行う方法を簡単に理解できるように、私たちはあなたに例を示します。
クラシックテーマのカスタマイズを初めて行う場合は、ステージングサイトまたはWordPressサイトのローカルバージョンで行うことをお勧めします。こうすることで、コードの編集によって予期せぬエラーが発生しても、本番サイトに影響を与えることはありません。
最初のステップは、投稿メタデータを表示するテーマファイルを見つけることです。これは
- 個別投稿ファイル(通常single.phpという名前)
- 投稿コンテンツを表示するテンプレート部分(content.phpのようなもの)
- 投稿情報を表示するための関数を含むテンプレートタグファイル(一般的な名前はtemplate-tags.php)。
経験則として、投稿日を表示するコード行を探すべきです。これらの行は通常、the_date()、 the_time()、get_the_date()、get_the_time()、get_the_modified_date()、またはget_the_modified_time()のようなWordPress関数を呼び出します。
ヘルプが必要な場合は、簡単なプラグインを使用して編集するWordPressテーマファイルを見つける方法について、ステップバイステップのガイドがあります。また、WordPressテーマ開発者に連絡するか、そのドキュメンテーションをチェックすることで、より多くのサポートを得ることができます。
私たちのケースでは、投稿日を表示するレスポンシブのファイルはtemplate-tags.phpです。以下は、テーマが正確な公開日を表示するために使用していたオリジナルのコードです:
1 2 3 4 5 6 7 8 9 10 11 12 13 14 15 16 17 18 19 20 21 22 23 24 25 26 27 28 29 30 31 32 | if ( ! function_exists( 'twentysixteen_entry_date' ) ) : /** * Prints HTML with date information for current post. * * Create your own twentysixteen_entry_date() function to override in a child theme. * * @since Twenty Sixteen 1.0 */ function twentysixteen_entry_date() { $time_string = '<time class="entry-date published updated" datetime="%1$s">%2$s</time>'; if ( get_the_time( 'U' ) !== get_the_modified_time( 'U' ) ) { $time_string = '<time class="entry-date published" datetime="%1$s">%2$s</time><time class="updated" datetime="%3$s">%4$s</time>'; } $time_string = sprintf( $time_string, esc_attr( get_the_date( 'c' ) ), get_the_date(), esc_attr( get_the_modified_date( 'c' ) ), get_the_modified_date() ); printf( '<span class="posted-on"><span class="screen-reader-text">%1$s </span><a href="%2$s" rel="bookmark">%3$s</a></span>', /* translators: Hidden accessibility text. */ _x( 'Posted on', 'Used before publish date.', 'twentysixteen' ), esc_url( get_permalink() ), $time_string ); }endif; |
ファイル自体を編集するには、FTPまたはWordPressホスティングサービスのファイルマネージャーでファイルを開きます。
あなたがBluehostユーザーの場合は、Webホスティングアカウントにログインしてファイルマネージャを使用することができます。次に、ダッシュボードで、 “ウェブサイト “タブをクリックし、カスタマイズしようとしているサイトの “設定 “を選択します。

サイトの設定ページが開きます。
詳細設定」タブに切り替え、ファイルマネージャーセクションの「管理」ボタンをクリックします。

これでBluehostのファイルマネージャになるはずです。
ファイル名はtemplate-tags.phpなので、public_html ” wp-content ” theme-name ” inc.

いくつかのファイルが表示されます。
ここで、template-tags.phpを選んでください。ファイルを右クリックし、「編集」を選択する。

次に、公開日を表示するレスポンシブのコードを探します。
CTRL/CommandキーとFキーを使ってこれを行うことができる。

さて、この特定のコードを編集して、先にWPCodeを使って追加したhuman_readable_relative_date関数を呼び出すようにします。
以下は、元のコードをif ( ! function_exists( 'twentysixteen_entry_date' ) ) :からendif;に置き換えたものである:
1 2 3 4 5 6 7 8 9 10 11 12 13 14 15 16 17 18 19 20 21 22 23 24 25 26 27 | if ( ! function_exists( 'twentysixteen_entry_date' ) ) : /** * Prints HTML with date information for current post. * * Create your own twentysixteen_entry_date() function to override in a child theme. * * @since Twenty Sixteen 1.0 */ function twentysixteen_entry_date() { // Get the post's published timestamp $published_timestamp = get_the_time('U'); // Generate the human-readable relative date $relative_date = human_readable_relative_date( $published_timestamp ); // Output the relative date printf( '<span class="posted-on"><span class="screen-reader-text">%1$s </span><a href="%2$s" rel="bookmark">%3$s</a></span>', /* translators: Hidden accessibility text. */ _x( 'Posted on', 'Used before publish date.', 'twentysixteen' ), esc_url( get_permalink() ), $relative_date ); }endif; |
コードを変更したら、「変更を保存」ボタンをクリックします。

もしあなたのコードがうまくいかず、あなたが全くの初心者であれば、OpenAIのChatGPTのようなAIツールを使って、あなたのコードの何が間違っているのかを突き止めることをお勧めします。
以下のコードを使ってXをしようとしているのですが、うまくいきません。何が問題なのか、教えてもらえますか?
とはいえ、もしあなたのコードが機能していれば、個別投稿テンプレートにはこのように表示されるはずです:

WordPressブログをカスタマイズするボーナスのヒント
WordPressの投稿に相対的な日付を追加する以外にも、ブログをカスタマイズする方法はたくさんあります。いくつかのアイデアを紹介しよう:
- WordPressでカテゴリーごとにスタイルを変える方法
- WordPress投稿にプログレスバーを追加する方法
- WordPressの投稿サムネイルに初期設定のフォールバック画像を設定する方法
- WordPressで投稿ごとにスタイルを変える方法
- WordPress投稿にプログレスバーを追加する方法
- カテゴリー:WordPressで再訪問者に新規投稿を強調表示する方法
- WordPressでパンくずナビゲーション・リンクを表示する方法
この投稿がWordPressで相対日付を表示する方法を学ぶのにお役に立てば幸いです。また、WordPress のエキスパートが選ぶドラッグ&ドロップで使えるページビルダーや、WordPress サイトの編集方法に関する究極のガイドもご覧ください。
If you liked this article, then please subscribe to our YouTube Channel for WordPress video tutorials. You can also find us on Twitter and Facebook.


 in 2024")

Ziaul Hai
I want to know how to remove relative dates. My wordpress theme shows the relative date by default. But I am not able to change that.
WPBeginner Support
You could replace the relative_post_the_date with the PHP in this article depending on how you want it to display but if you reach out to your theme’s support they may have a built-in method to disable this style of date.
Admin
Sreeharsh
Hi, I’m getting wrong time stamp using Meks Time Ago plugin in my homescreen. For a 9 hour ago post, its showing 2 weeks ago. Please help me solve it.
Thank you.