WordPressで動画ギャラリーを作りたいですか?
WordPressの初期設定では、投稿やページに動画を埋め込むことができます。しかし、動画をたくさん追加すると、サイトの表示速度が遅くなり、ホスティングサービスのサーバーの容量が大きくなってしまいます。
この投稿では、サイトのパフォーマンスに影響を与えることなく、プロフェッショナルなYouTube動画ギャラリーを簡単に作成する方法をご紹介します。

なぜWordPressで動画ギャラリーを作るのか?
人々は動画を見るのが大好きだ。実際、私たちのブログ統計の究極のリストによると、動画のある投稿は、動画のない投稿よりも83%多くのトラフィックを獲得しています。
オンラインストアを運営しているのであれば、動画はさらに売上を伸ばすことができる。専門家によると、88%の人が動画を見て商品やサービスを購入したことがあるという。
WordPressの初期設定では、投稿、ページ、サイドバーなどのウィジェット対応エリアに動画を追加することができます。しかし、WordPressにビルトインされているブロックやツールを使って素敵なギャラリーレイアウトを作るのは難しいです。
WordPressは動画のホスティングサービスや再生にも最適化されていません。サイトにたくさんの動画をアップロードすると、読み込み時間が長くなり、訪問者のエクスペリエンスが低下することがよくあるので、WordPressで直接動画をアップロードすべきではありません。
その代わりに、YouTubeのような動画ホスティングサービスを利用することをお勧めします。YouTubeチャンネルを持てば、サイトのパフォーマンスに影響を与えることなく、WordPressに動画をすべて埋め込むことができます。
それでは、WordPressで動画ギャラリーを作成する方法を見ていきましょう。
動画ギャラリープラグインのインストール方法
WordPressサイトにYouTube動画ギャラリーを追加する最も簡単な方法は、Smash Balloon YouTube Feedプラグインを使用することです。WordPress用のYouTube動画ギャラリープラグインとして、160万以上のサイトで使用されています。
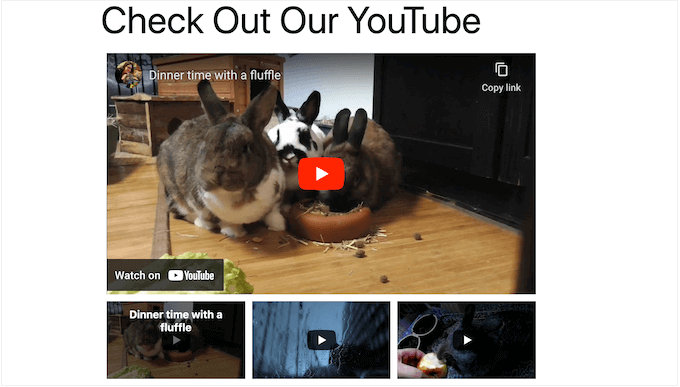
注: WordPressでYouTubeチャンネルの最新動画を表示できるYouTube Feed Freeプラグインがあります。しかし、YouTubeのプレイリストやお気に入り、ライブストリームなどを埋め込むことができるProバージョンを使用することにする。
すでにYouTubeチャンネルを持っているなら、WordPressにすべての動画を簡単に埋め込むことができます。チャンネルを持っていない場合は、チャンネルを作成し、WordPressサイトに埋め込みたい動画をすべてアップロードする必要があります。
これで Smash Balloon YouTube Feed プラグインのインストールと有効化の準備は完了です。詳しくは、WordPressプラグインのインストール方法のステップバイステップガイドをご覧ください。
有効化した後、YouTube Feed ” Settingsにアクセスし、’License Key’フィールドにライセンスキーを入力してください。
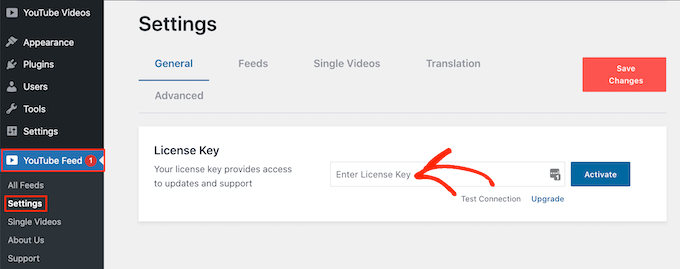
この情報は、Smash Balloonサイトのお客様のアカウントに記載されています。
キーを入力したら、「有効化」ボタンをクリックします。
WordPressサイトをYouTubeに接続する方法
プラグインを有効化したら、YouTubeチャンネルに接続します。YouTube Feed ” Settings画面で、’Add Source’ボタンを選択します。
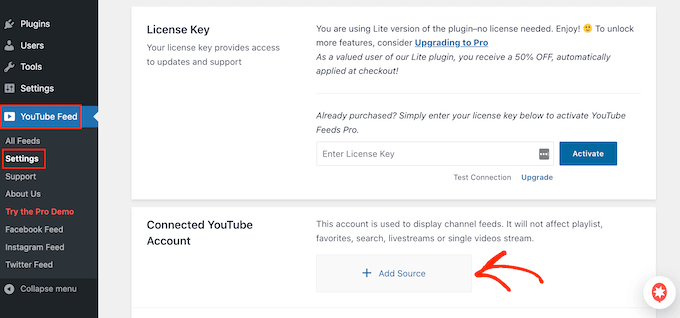
次の画面で、「Googleを通じてYouTubeに接続」をクリックします。これでSmash BalloonにGoogleアカウントがすべて表示されます。
リストからアカウントを選択するか、「別のアカウントを使用」をクリックします。
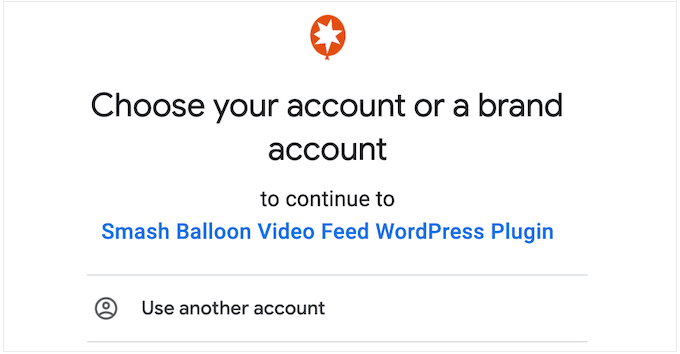
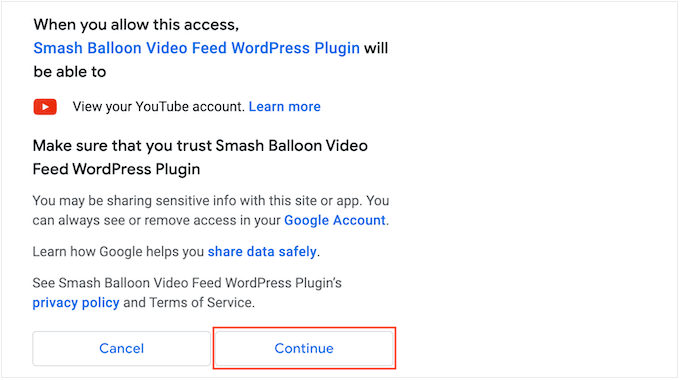
その後、Smash BalloonがあなたのYouTubeチャンネルにアクセスできるという警告が表示されます。
よろしければ、「続ける」ボタンをクリックしてください。
Smash BalloonがYouTubeチャンネルのIDまたはユーザー名を尋ねます。
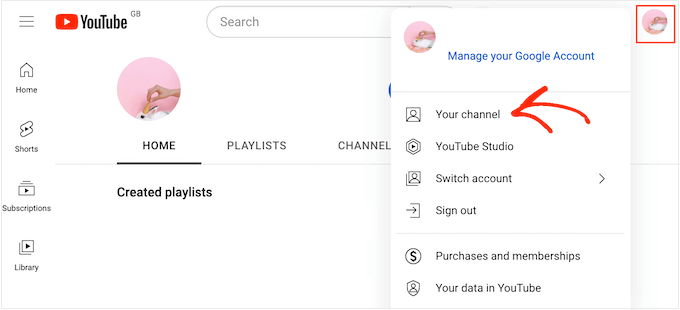
この情報を得るには、YouTubeのサイトにアクセスし、右上のプロフィール写真をクリックします。その後、「あなたのチャンネル」を選択します。
アドレスバーを見てください。user/」の後にテキストがあれば、それがYouTubeチャンネルのユーザー名です。
channel/」と表示され、数字とアルファベットの文字列が表示されれば、これがチャンネルIDである。
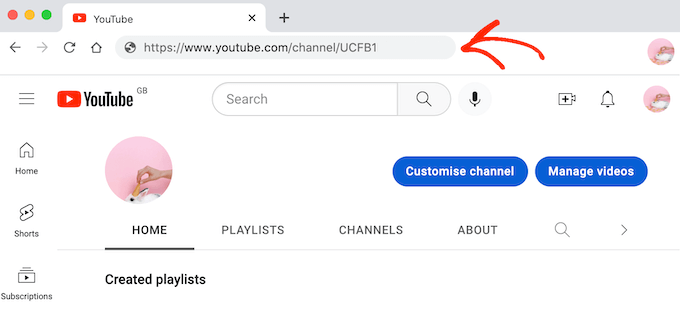
値をコピーしてWordPressダッシュボードに戻るだけです。
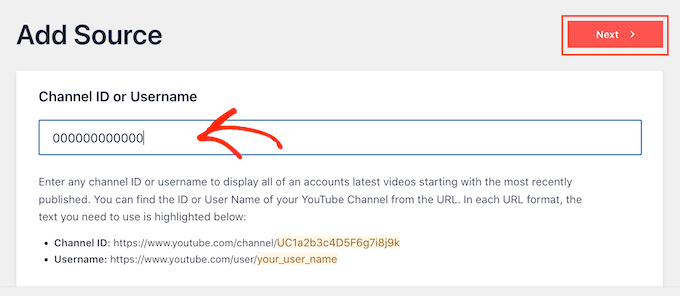
ここで、初期設定では「Enter Channel ID or Username」と表示されているフィールドに情報を貼り付ける。準備ができたら、’Next’をクリックする。
YouTubeのAPIキーを作成する
この時点で、以下のメッセージが表示されます:APIキーが入力されていません。
混乱を避けるために、YouTube APIキーを作成し、プラグインの設定に追加することをお勧めします。

新しいタブでGoogle Consoleにアクセスし、Googleアカウントでログインします。
コンソールにログインしたら、ツールバーのドロップダウンメニューをクリックします。初期設定では、最新の Google Console プロジェクトの名前が表示されるため、異なるテキストが表示される可能性があります。
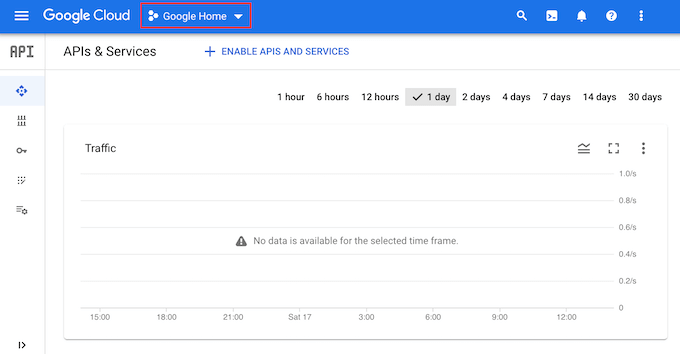
Google Cloud Console に初めてログインする場合は、利用規約に同意する必要があります。
それが終わったら、『新規プロジェクト』をクリックする。
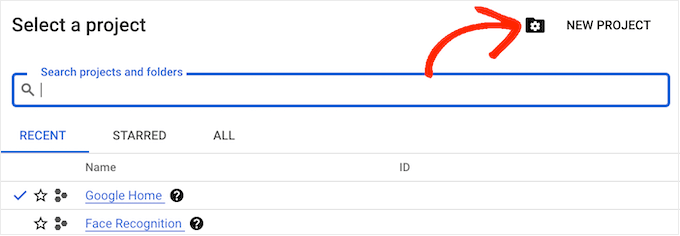
プロジェクトの名前を入力します。これは参考用なので、好きなものを使ってください。その後、「作成」をクリックします。
ツールバーで「検索」アイコンをクリックし、「YouTube Data API」と入力する。Marketplace’でYouTube Data APIを見つけてクリックする。
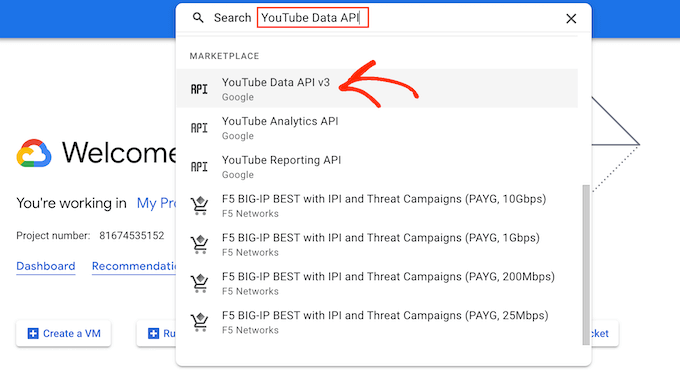
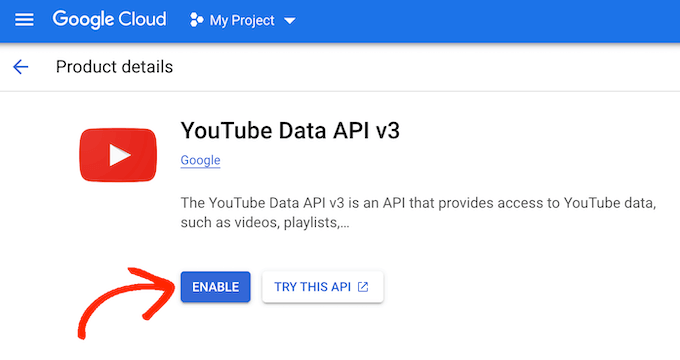
YouTubeのAPIキーを有効化する画面になります。
これを行うには、「有効化」ボタンをクリックします。
左側のメニューで「ログイン情報」を選択する。
次に、「ログイン情報を作成」をクリックします。
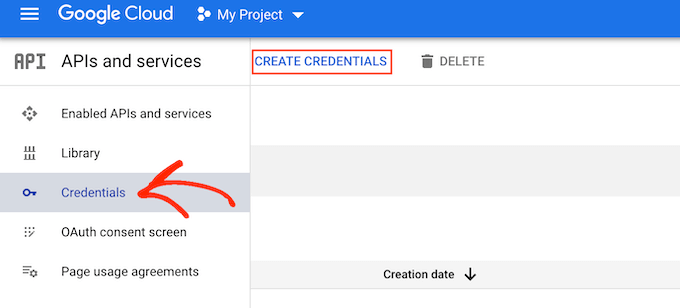
外観のドロップダウンメニューで、’API key’をクリックする。
しばらくすると、「APIキーが作成されました」というメッセージが表示されます。この情報をSmash Balloonプラグインに追加する必要があるので、メモしておきましょう。
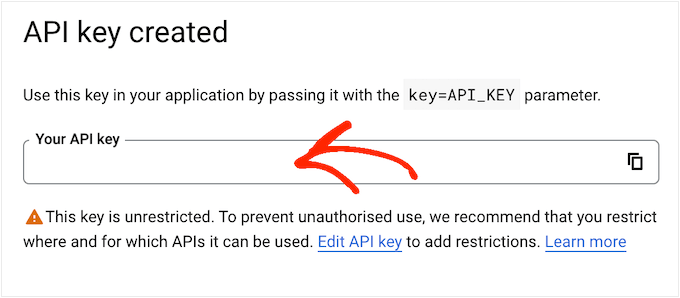
すべてのAPIキーは初期設定では無制限です。他の人があなたの権限なしにキーを使用するのを防ぐには、「APIキーを編集する」リンクをクリックしてキーを制限することをお勧めします。
すべてのキーが表示された画面が開きます。先ほど作成したYouTubeキーをクリックしてください。
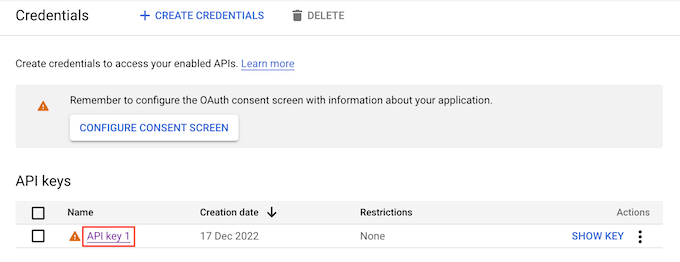
注:誤ってポップアップを閉じてしまっても、慌てないでください。左側のメニューから’ログイン情報’を選択すれば、同じ画面にアクセスできます。同様に、APIキーを記録していない場合は、’キーを表示’をクリックするだけで、ログイン情報が表示されます。
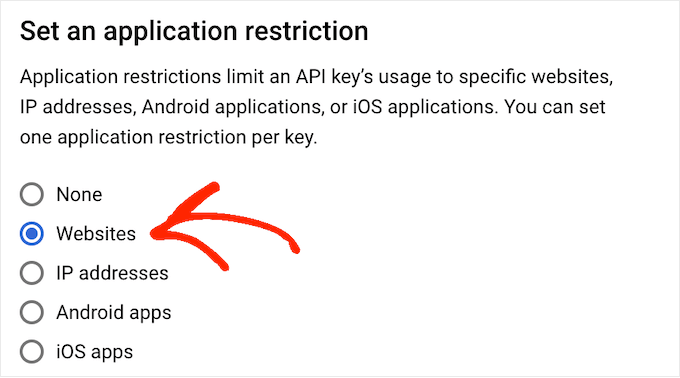
アプリケーションの制限を設定」で「ウェブサイト」オプションを選択します。
サイトの制限」で「追加」をクリックします。
WordPressサイトのアドレスを入力し、「完了」をクリックします。
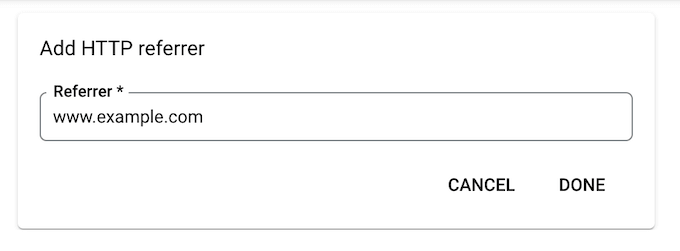
YouTube用フィードがAPIにアクセスできるようにするには、www.googleapis.com と入力し、「完了」をクリックする必要もある。
APIの制限」で、「キーを制限する」の隣にあるラジオボタンをクリックする。
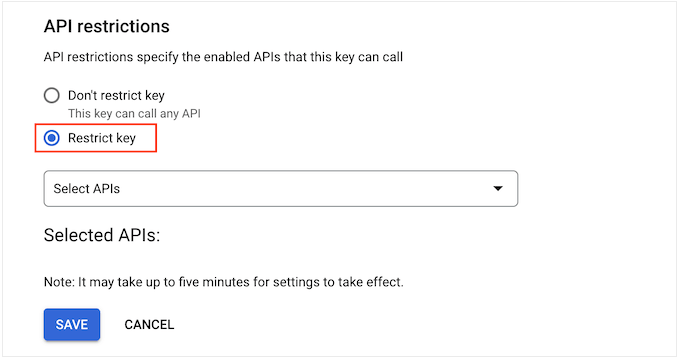
それが完了したら、’Select APIs’ ドロップダウンメニューをクリックし、’YouTube Data API’ の隣のボックスにチェックを入れる。
その後、『OK』をクリックする。
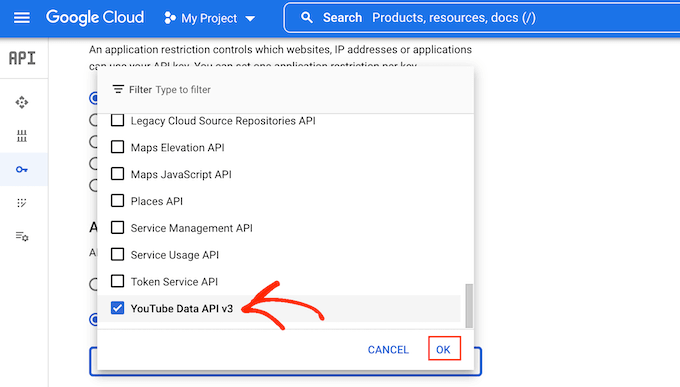
APIキーの設定に問題がなければ、「保存」ボタンをクリックしてください。
これでWordPressサイトにAPIキーを追加する準備ができました。WordPressダッシュボードに戻り、YouTube Feed ” Settingsに進みます。
ここで、「API Key」フィールドにキーを貼り付け、「Add」をクリックする。

WordPressで動画ギャラリーを作成する方法
WordPressとYouTubeを接続すれば、YouTubeチャンネルの最新動画をWordPressで簡単に表示できる。
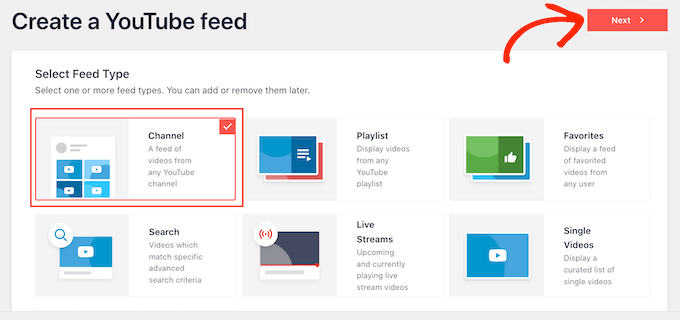
YouTube Feed ” All Feedsにアクセスし、’Add New’をクリックするだけです。
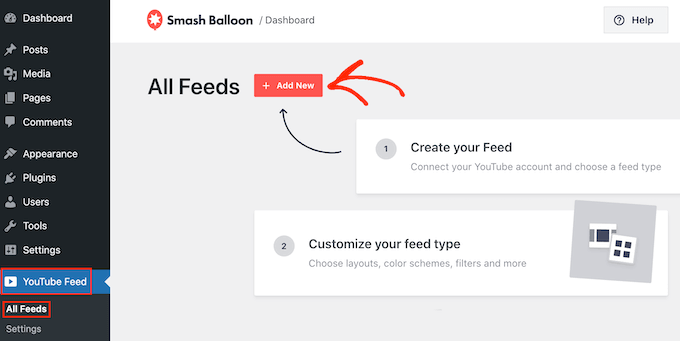
Smash Balloon YouTube Feed Proでは、プレイリスト、ライブストリーム、個別動画など、さまざまな種類のYouTubeコンテンツをすべて埋め込むことができます。
複数のソーシャルプラットフォームからの投稿を組み合わせてソーシャルウォールを作成することもできます。例えば、Facebookの投稿ステータスを埋め込み、ツイートを表示し、Instagramの写真を表示し、YouTubeの動画を表示し、すべて1つのギャラリーにすることができます。
YouTubeギャラリーを作成するには、’チャンネル’を選択し、’次へ’をクリックします。
次の作業は、YouTube動画フィードの出発点として使用するテンプレートを選択することです。テンプレートはすべてカスタマイズ可能なので、ギャラリーをどのように見せたいかによってデザインを微調整することができます。
動画ギャラリーを作成するには、「ギャラリー」テンプレートを選択し、「次へ」をクリックします。
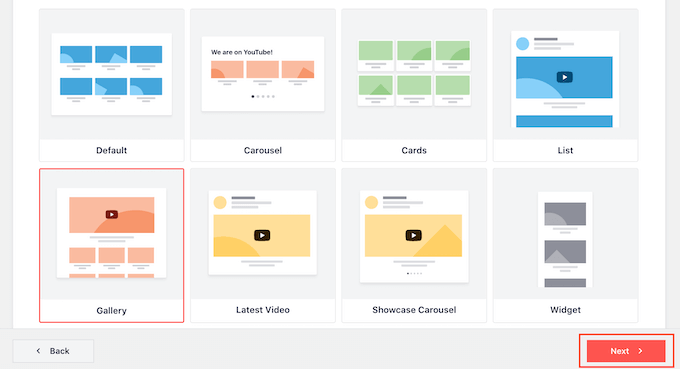
Smash BalloonはYouTubeギャラリーを作成します。これは良いスタートですが、WordPressブログやサイト上で動画がどのように見えるかを微調整することもできます。
YouTubeギャラリーをカスタマイズする方法
新しいフィードを作成するたびに、Smash Balloonは自動的にエディターに移動します。ここでは、右側にギャラリーのプレビュー、左側にいくつかの設定が表示されます。
これらのオプションのほとんどは自明だが、いくつかの重要なエリアを手短に説明しよう。
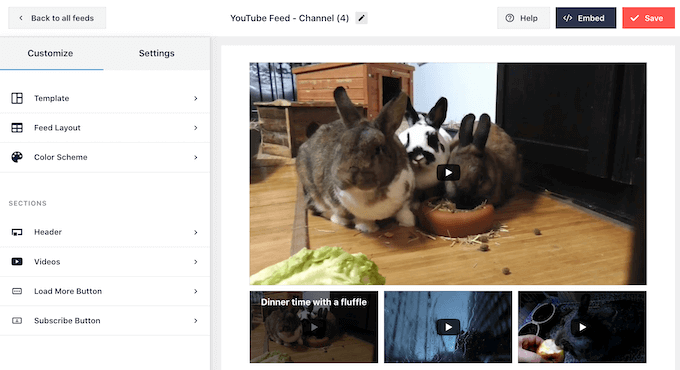
フィードの見た目に満足できない場合は、「テンプレート」メニューオプションをクリックして、別のテンプレートを試すことができます。
次に、「変更」ボタンを選択する。
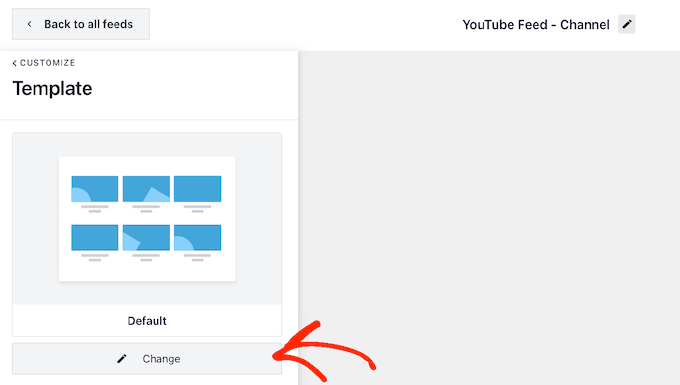
使用できるすべてのテンプレートを表示するポップアップが開きます。
使いたいテンプレートをクリックし、「更新」をクリックするだけ。
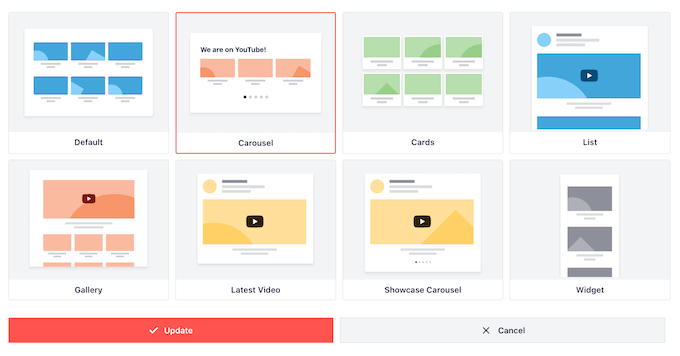
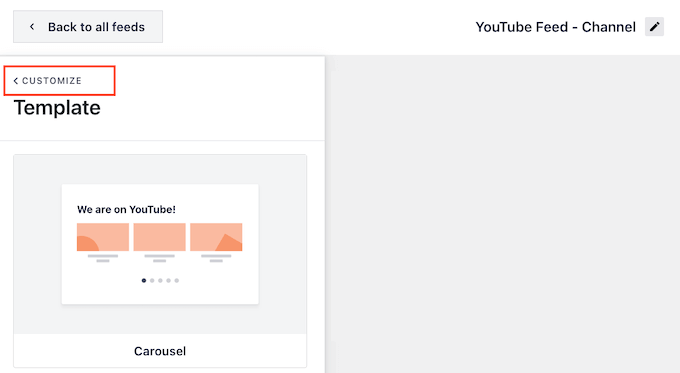
その後、「カスタマイザー」リンクをクリックする。
Smash Balloonの設定画面に戻ります。
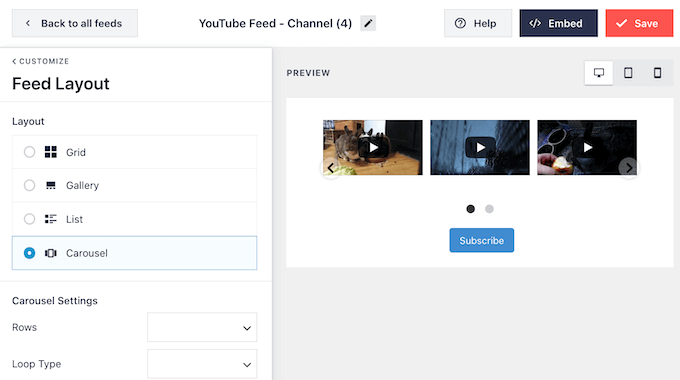
次に、「フィードレイアウト」をクリックして、動画の表示方法を変更できます。
この画面では、グリッド、ギャラリー、リスト、カルーセルのレイアウトを切り替えることができます。
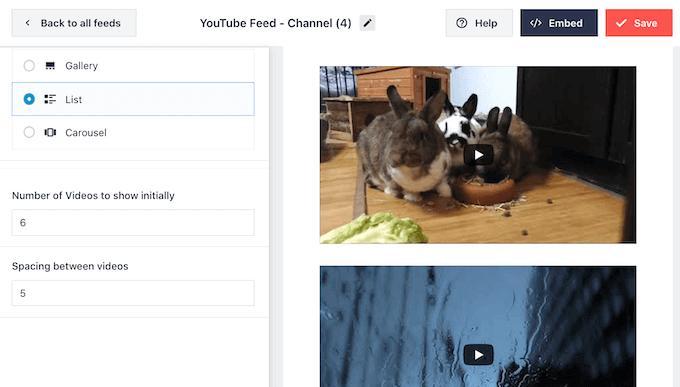
選択したレイアウトによっては、いくつかの追加設定にアクセスできる。
例えば、「リスト」を選択すると、Smash Balloonが表示する動画の数を変更したり、YouTube動画の間にスペースを作ったりすることができます。
変更を加えると、プレビューは自動的に更新されますので、さまざまな設定を試して、あなたの動画ギャラリーに最適な設定を確認することができます。
ソーシャルメディアの統計によると、消費者の90%がモバイル端末で動画を視聴しており、70%の人がスマートフォンやタブレットを使ってYouTubeを閲覧しています。このことを念頭に置いて、動画ギャラリーがデスクトップと同じようにモバイルでも良く見えるようにしたいと思うでしょう。
デスクトップコンピューター、タブレット、スマートフォンでは、右上のボタンでフィードをプレビューできます。
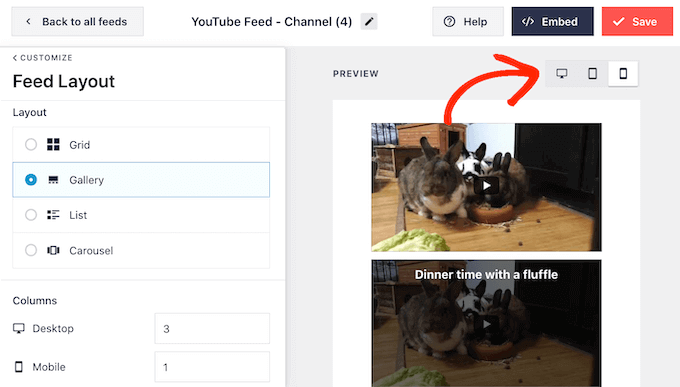
WordPressサイトのモバイル版をテストした後、スマートフォンやタブレットで表示する動画の数を変更したくなるかもしれません。こうすることで、ギャラリーがより小さなタブレットやスマートフォンの画面に快適に収まるようになります。
ギャラリーレイアウトを使用している場合、Smash Balloonはすでにモバイル端末とデスクトップコンピューターで異なるカラム数を表示しています。
初期設定を変更するには、「カラム」セクションに新しい数字を入力するだけです。
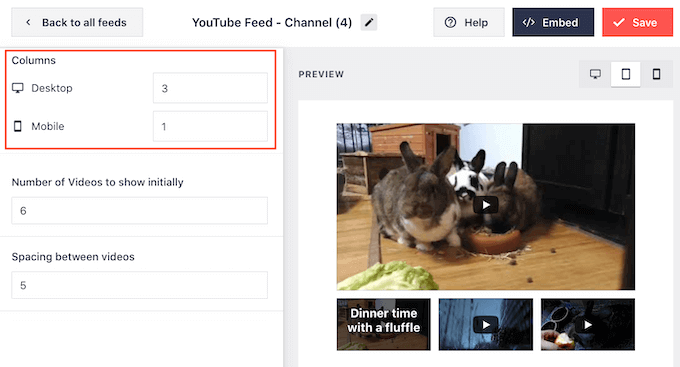
変更が完了したら、「カスタマイズ」をクリックしてSmash Balloonのメイン設定画面に戻ります。
これで次のオプション「配色」を検討する準備が整った。
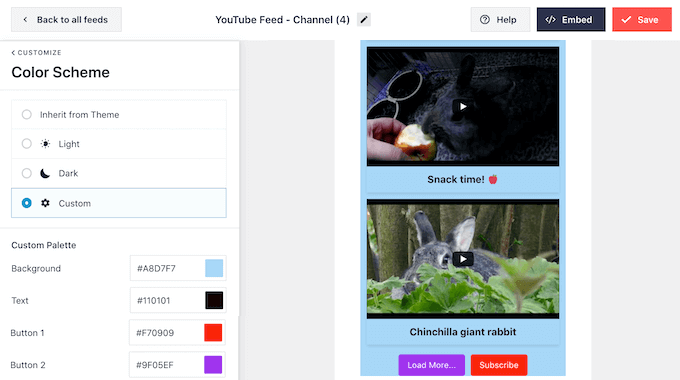
初期設定では、Smash BalloonはWordPressテーマと同じ配色を使用しています。お好みで「ライト」または「ダーク」配色に切り替えることもできます。
カスタム」を選択し、設定を使ってリンクの色やテキストの色、背景色の変更などを行うことで、独自の配色を作ることもできる。
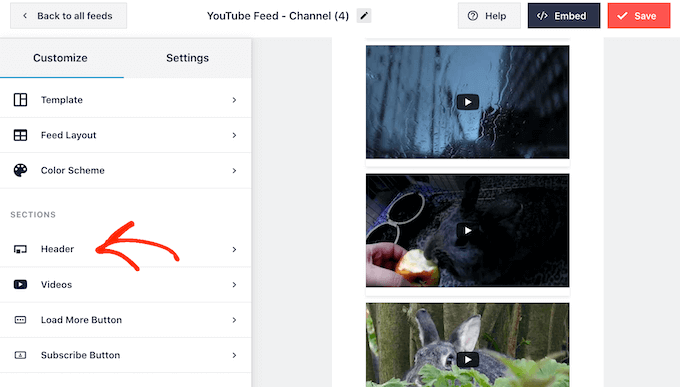
次に、動画ギャラリーの上にヘッダーを追加するとよいでしょう。このヘッダーには、あなたのYouTubeプロフィール画像とチャンネル名が表示されるので、訪問者はコンテンツがどこから来たのか正確に知ることができます。
ヘッダーセクションを追加するには、左側のメニューから「ヘッダー」をクリックします。
この画面で「有効化」スライダーをクリックし、グレーから青に変える。
ヘッダーセクションを追加した後、コントロールを使って標準とテキストのヘッダースタイルを切り替えることができます。
Text’を選択した場合、テキストの色とフォントサイズを変更することができます。初期設定では、このヘッダーには’We are on YouTube’というメッセージが表示されます。テキスト’ボックスに入力することで、独自のメッセージに置き換えることができます。
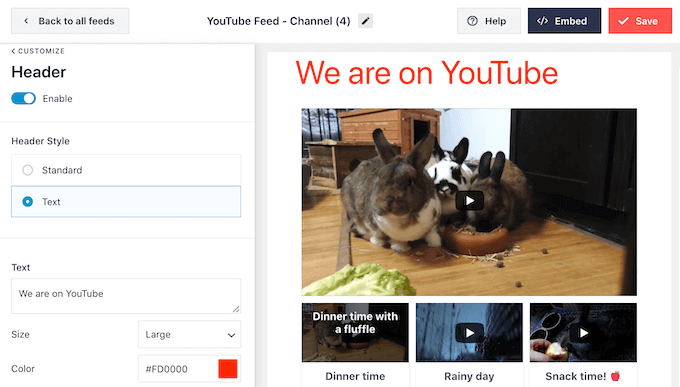
ヘッダーの見た目に満足したら、次の設定画面は「動画」です。
この画面では、各動画の初期設定、マウスオーバー時、再生時の見え方を微調整することができます。各オプションを順番に見ていきましょう。
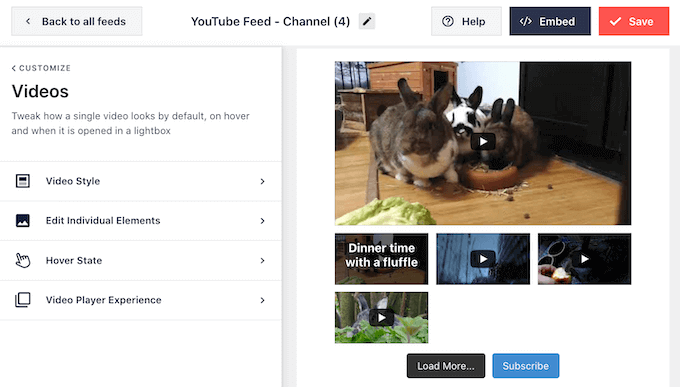
動画スタイル」では、ボックス型と通常のレイアウトを切り替えることができる。
Boxed」を選ぶと、背景色を変えたり、ボックスシャドウをつけたり、枠線の半径を大きくして角をカーブさせたりすることができる。
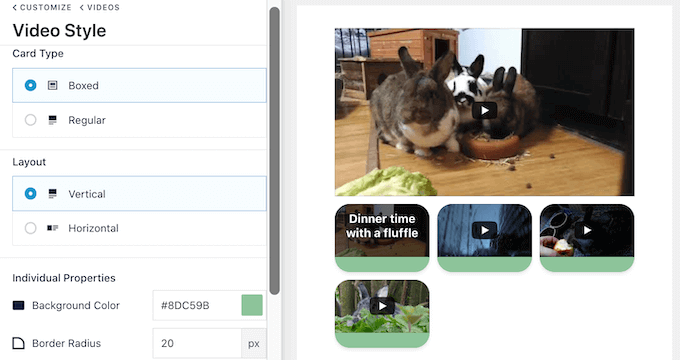
また、動画を横長レイアウトで表示するか、縦長レイアウトで表示するかも選択できます。
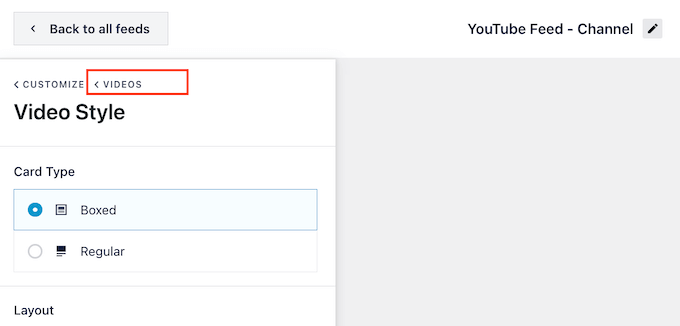
変更が完了したら、「動画」リンクをクリックします。これで前の画面に戻り、’Edit Individual Elements’を選択できます。
ここでは、各動画からさまざまな要素を追加したり削除したりすることができます。
例えば、動画のタイトル、説明、日付をカスタマイズできます。
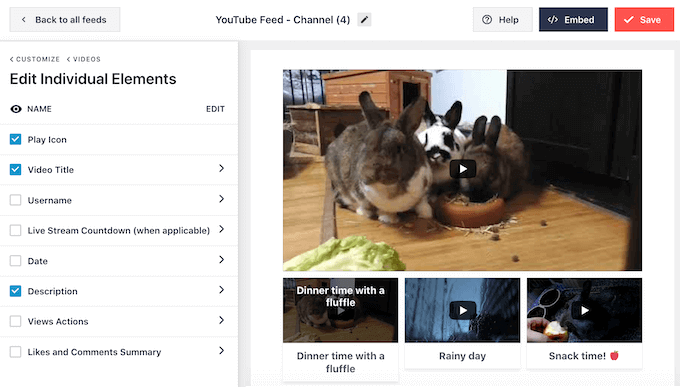
また、YouTubeの個々の要素の色やサイズは、その要素の名前をクリックして変更することができます。
いくつかの要素には追加設定があります。例えば、「説明」を選択した場合、Smash Balloonが表示する最大文字数を設定できます。
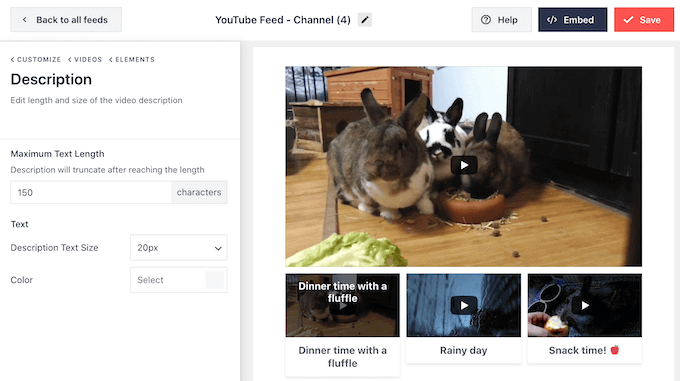
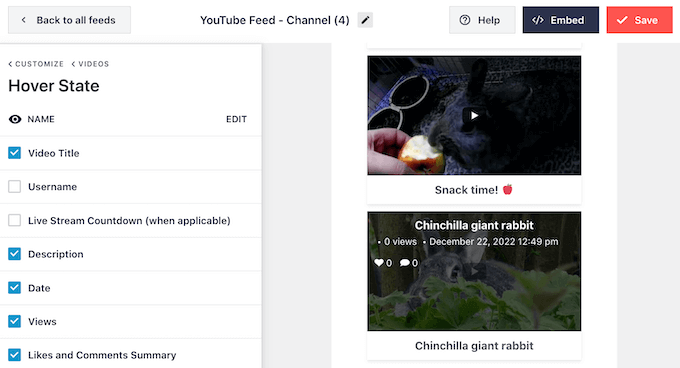
設定が終わったら、「マウスオーバー状態」の設定に移ることができる。
ここでは、訪問者が動画の上にマウスオーバーしたときに表示されるコンテンツを変更することができます。
訪問者が動画をクリックすると、埋め込まれた動画プレーヤーで再生が始まります。動画プレーヤーのエクスペリエンス」をクリックすると、プレーヤーの動作や外観を変更できます。
ここでは、プレーヤーの縦横比を変更したり、動画の再生を自動的に開始するか、訪問者が再生ボタンをクリックするまで待機するかを選択できます。
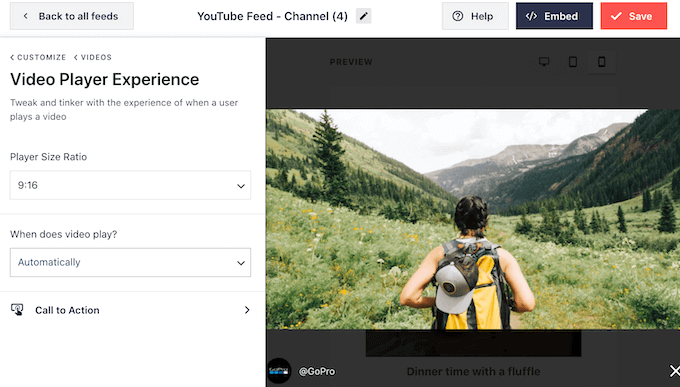
Call to Action’を選択した場合、動画が終了したとき、または訪問者が再生を一時停止したときの動作を変更することができます。
初期設定では、Smash Balloonは関連動画を表示することで、YouTubeチャンネルのエンゲージメントを高めようとしています。代わりにカスタムリンクを表示することもできます。例えば、WooCommerceストアを運営している場合、最も人気のあるWooCommerce製品にリンクを貼ることができます。
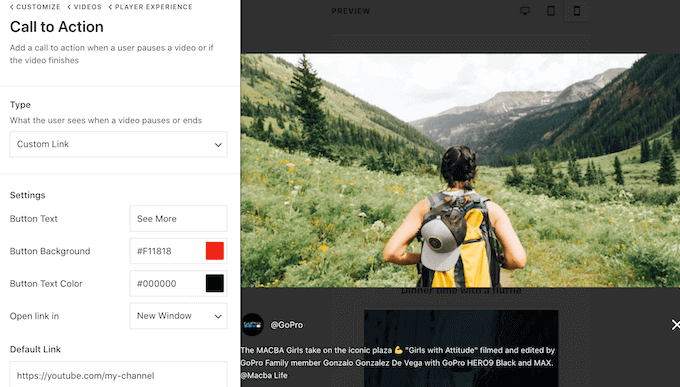
プレーヤーに満足がいったら、「カスタマイズ」をクリックしてSmash Balloonエディターのメイン画面に戻ることができます。
その後、左側のメニューから「Load More Button」オプションを選択する。
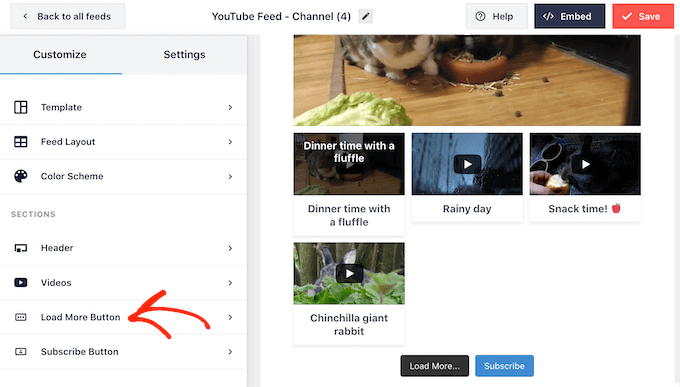
もっと見る」ボタンは、訪問者が簡単に動画をスクロールできるようにします。これにより、YouTubeでのエンゲージメントを高め、サイト訪問者をより長く滞在させることができます。
とはいえ、ボタンの背景色、マウスオーバーの状態、テキストの色を変えることで、ボタンを目立たせることもできる。
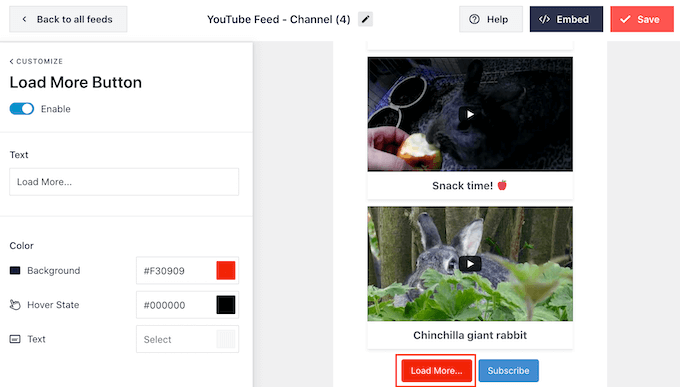
このボタンは初期設定では「Load More…」と表示されますが、「Text」フィールドに入力してカスタマイザーメッセージを追加することができます。
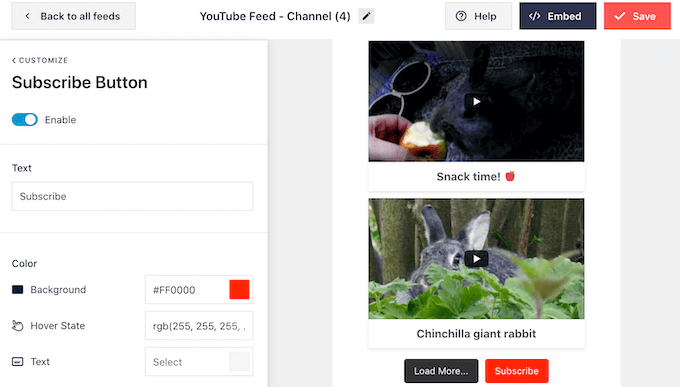
初期設定では、Smash Balloonは動画ギャラリーの下に「購読者」ボタンを表示します。
このボタンは、訪問者がYouTubeチャンネルに参加しやすくするためのもので、Smash Balloonのメイン設定画面から「購読者ボタン」を選択してカスタマイズすることができます。
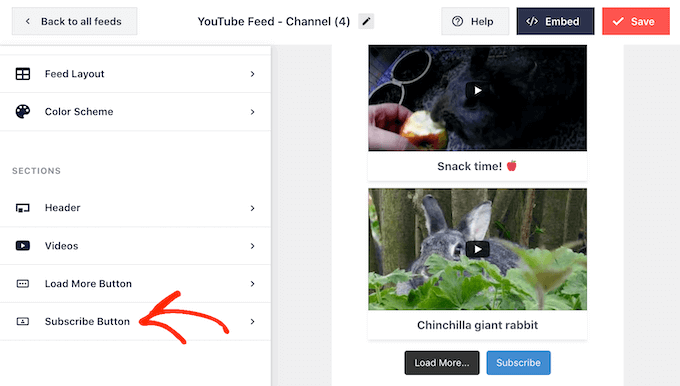
この画面では、ボタンの背景色、マウスオーバーの状態、テキストの色を変更できます。
テキスト」ボックスに入力して、「購読者」を自分のメッセージに置き換えることもできます。
動画ギャラリーの外観に満足したら、’保存’をクリックして変更を保存することを忘れないでください。これであなたのサイトにギャラリーを追加する準備ができました。
WordPressに動画ギャラリーを埋め込む方法
ブロック、ウィジェット、ショートコードを使ってWordPressにYouTubeギャラリーを追加できます。
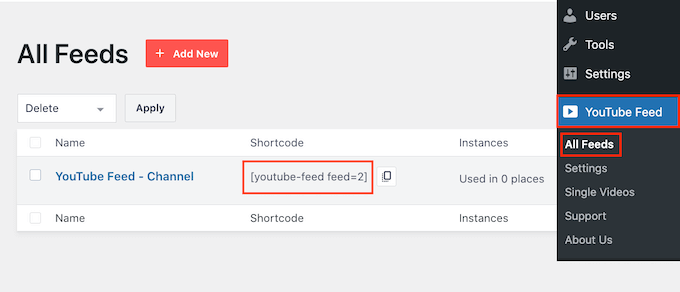
Smash Balloonを使用して複数のフィードを作成した場合、ブロックやウィジェットを使用してギャラリーを追加する場合は、ギャラリーのコードを知っておく必要があります。
コードを取得するには、YouTube Feed “ All Feedsに 行き、’Shortcode’の下にあるテキストをコピーしてください。
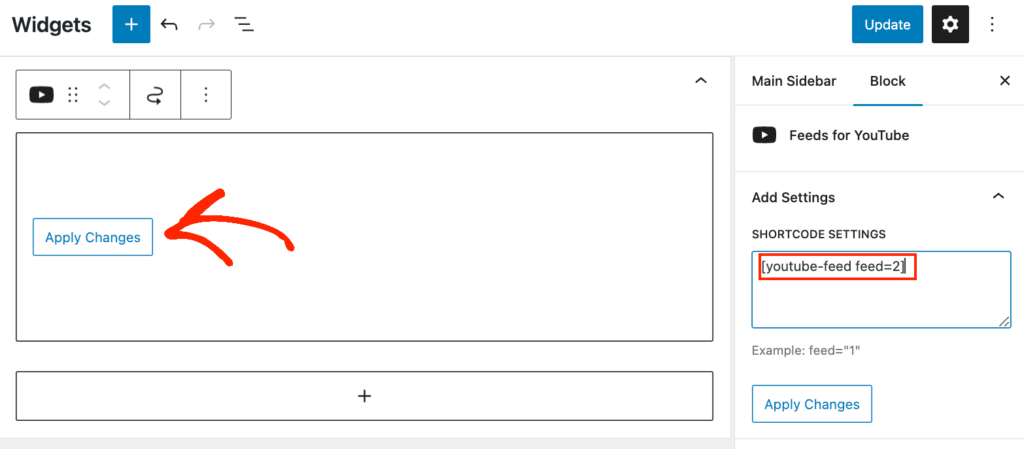
次の例では、youtube-feed feed=2を使う必要がある。
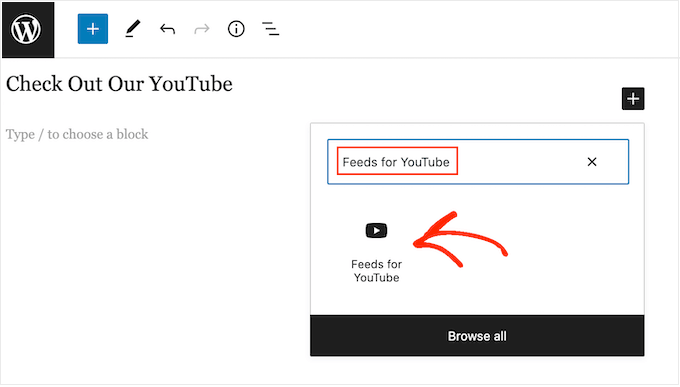
動画ギャラリーをページや投稿に埋め込みたい場合は、「YouTube用フィード」ブロックを使用することをお勧めします。
まず、YouTube動画ギャラリーを埋め込みたいページまたは投稿を開きます。次に、’+’アイコンをクリックして新規ブロックを追加し、’Feed for YouTube’と入力し始める。
適切なブロックが表示されたら、クリックして投稿またはページに追加します。
初期設定では、Smash Balloonのフィードがブロックに表示されます。別のフィードを使用したい場合は、右側のメニューにある「ショートコードの設定」をクリックしてください。
このボックスにショートコードを追加することができます。ショートコードを追加したら、「変更を適用」ボタンをクリックしてください。
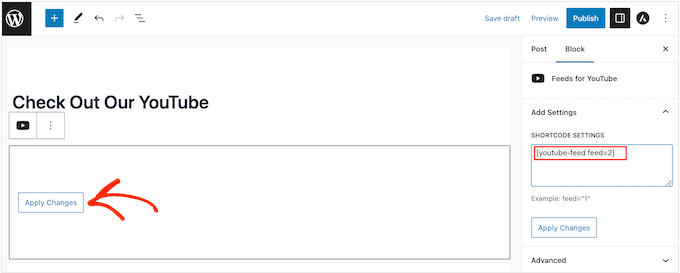
ブロックにYouTubeチャンネルの動画がすべて表示されるようになります。ページを公開または更新するだけで、YouTubeソーシャルメディアフィードがライブになります。
もう一つのオプションは、サイドバーなどのウィジェット対応エリアにフィードを追加することです。これにより、サイト全体にギャラリーを表示することができます。
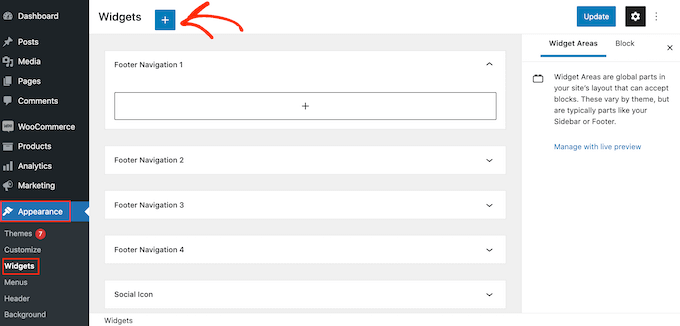
これを行うには、WordPressダッシュボードの外観 ” ウィジェットに移動し、青い「+」ボタンをクリックするだけです。
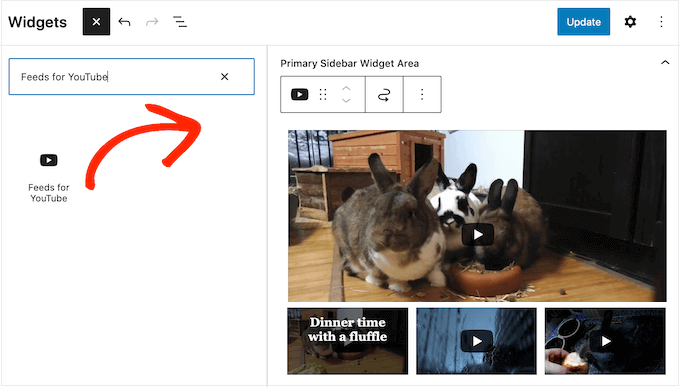
検索バーに「Feed for YouTube」と入力して、適切なウィジェットを見つけよう。
その後、動画ギャラリーを表示したいエリアにドラッグするだけです。
初期設定では、ウィジェットはYouTube Feed Proプラグインを使用して作成したフィードのいずれかを表示します。代わりに別のフィードを表示するには、「ショートコード設定」ボックスにフィードのコードをタイプし、「変更を適用」をクリックしてください。
更新」ボタンをクリックして、ウィジェットをライブにすることができます。
詳しくは、ウィジェットの追加と使用方法のステップバイステップガイドをご覧ください。
ショートコードを使用して、動画ギャラリーを任意のページ、投稿日、ウィジェット対応エリアに埋め込むこともできます。ショートコードを取得するには、YouTube Feed “ All Feedsに行き、’Shortcode’カラムの値をコピーするだけです。
そして、このコードをサイトに追加するだけです。詳しくは、WordPressでショートコードを追加する方法の詳細ガイドをご覧ください。
最後に、ブロックが有効化されたテーマを使っている場合は、フルサイトエディターを使ってサイト上の任意の場所にYouTube用フィードブロックを追加することができます。
WordPressのダッシュボードで、外観 ” エディターと進みます。
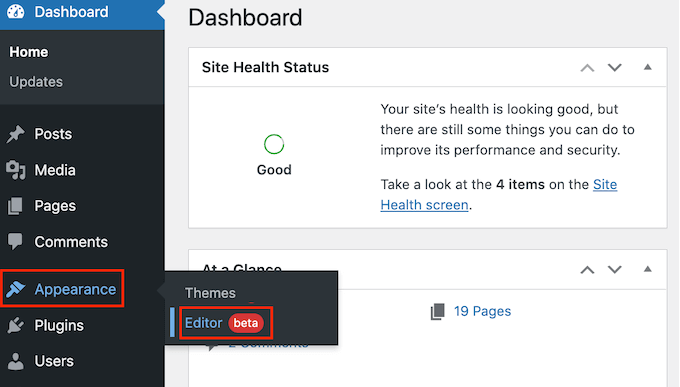
初期設定では、フルサイトエディターはテーマのホームテンプレートを表示します。
YouTube動画ギャラリーを別のテンプレートに追加したい場合は、左側のメニューから「テンプレート」をクリックしてください。
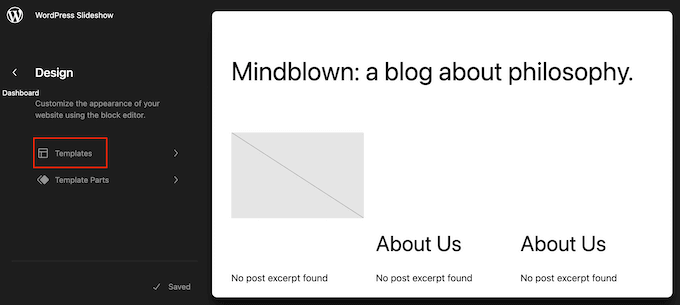
エディターにはWordPressテーマを構成するすべてのテンプレートのリストが表示されます。
編集したいテンプレートをクリックしてください。
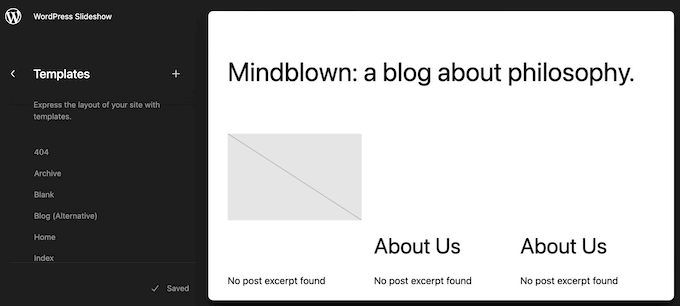
WordPressにテンプレートのプレビューが表示されます。
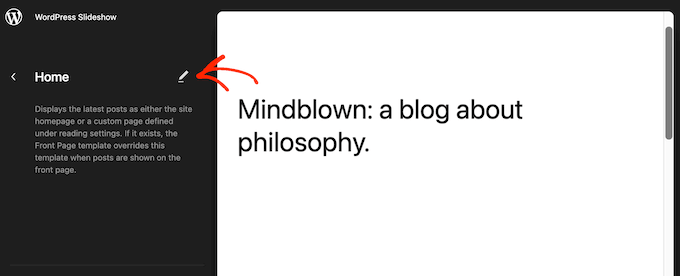
ギャラリーをサイトのこの部分に追加してよろしければ、鉛筆のアイコンをクリックしてください。
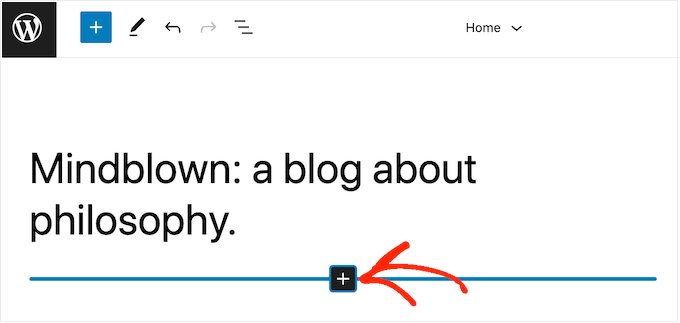
テンプレートを選択したら、YouTube動画を表示したいエリアにマウスオーバーします。
そして、青い「+」が外観に表示されたら、それをクリックする。
それができたら、『Feed For YouTube』と入力し始める。
適切なブロックが外観されたら、クリックしてテンプレートに追加する。
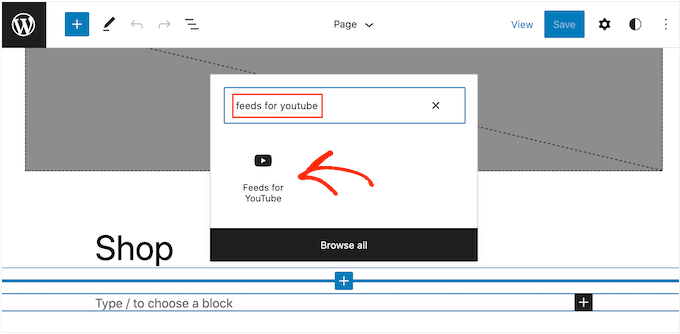
いつものように、Smash Balloonは初期設定でフィードを表示します。YouTubeギャラリーでない場合は、上記と全く同じ手順でギャラリーのショートコードを追加してください。
動画ギャラリーをWordPressの投稿に変換する
ここまで、Smash Balloon を使って動画ギャラリーを作成し、サイトの他の部分とぴったり合うようにカスタマイズする方法を見てきました。このプラグインには、ギャラリーの動画をWordPress投稿に変換するなどの他にもいくつかの機能があります。
プラグインを使えば、YouTubeチャンネルの動画を使った投稿を素早く簡単に作成することができます。その後、使い慣れたWordPressダッシュボードとツールを使って、その投稿に他のコンテンツを追加することができます。
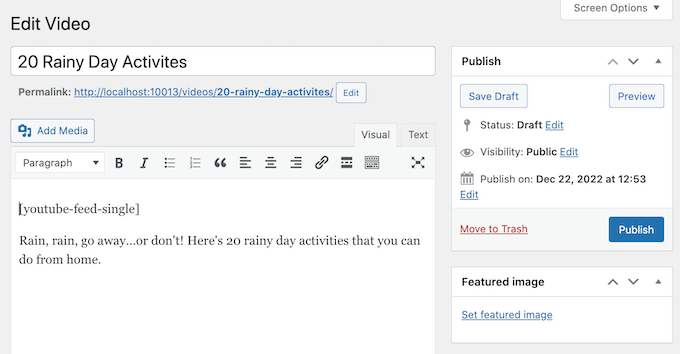
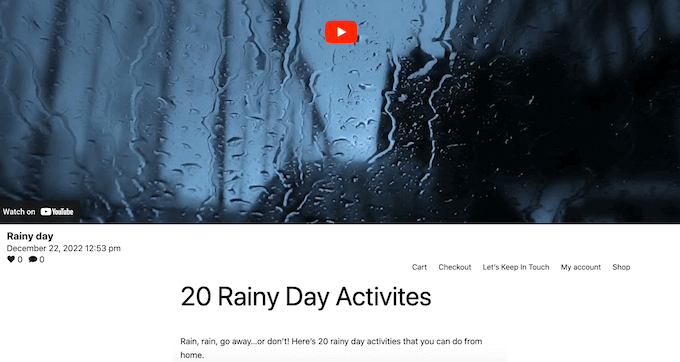
投稿を公開すると、Smash Balloonは画面上部に動画を表示し、タイトルや公開日などの情報も表示します。
その他のコンテンツは動画の下に表示されます。
これは、ブログ投稿に各動画を手動で埋め込むよりもはるかに高速です。また、個々の動画を共有するのも簡単です。例えば、ソーシャルメディアで宣伝したり、メールマガジンに追加することで、特定の投稿に人々を誘導することができます。
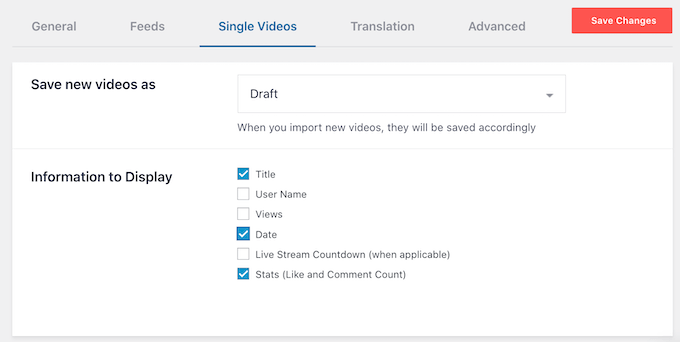
最初の作業は、YouTubeフィード“ 設定にアクセスして、各動画の下に表示される情報を選択することです。
ここで、「個別動画」タブを選択します。
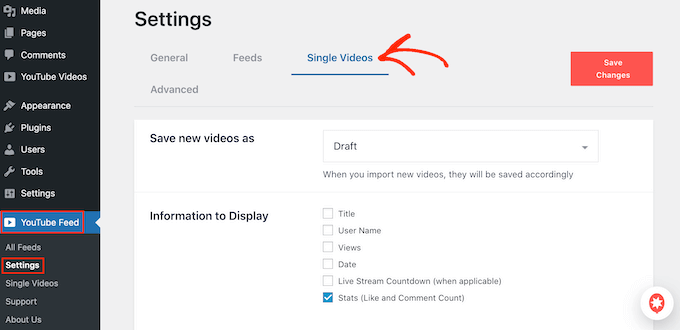
表示したい各情報の横にあるボックスにチェックを入れるだけです。
変更を保存」をクリックして、設定を保存することを忘れないでください。
その後、YouTube Feed ” Single Videosを開きます。ここには、Smash Balloonを使ってWordPressに接続したすべてのYouTubeチャンネルが表示されます。
使いたいチャンネルを見つけて、その名前をクリックするだけ。
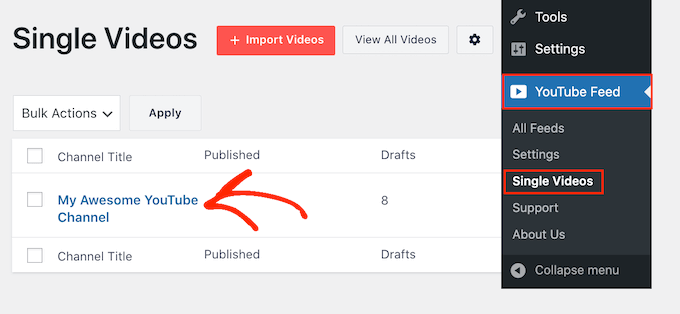
このチャンネルの動画がすべて表示されます。
投稿にしたい動画を見つけて、「編集」リンクをクリックするだけです。
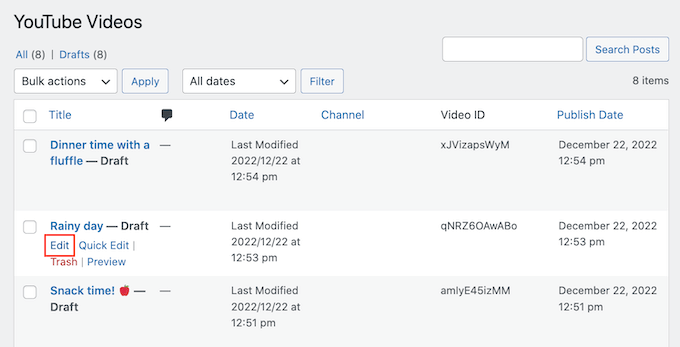
WordPress標準のコンテンツエディターを使って、投稿にブロックやテキスト、その他のコンテンツを追加できるようになりました。
投稿と動画を公開する準備ができたら、通常通り「公開する」ボタンをクリックするだけです。これで、あなたのサイトにアクセスすると、新しい動画投稿が表示されます。
関連WordPressサイトにTikTok動画ギャラリーを作成したい場合は、Smash BalloonがTikTokフィードProプラグインも提供しています。ステップバイステップの手順については、WordPressにTikTok動画を埋め込む方法をご覧ください。
この投稿がWordPressで動画ギャラリーを作成するのにお役に立てば幸いです。また、WordPressサイトを高速化する方法や、専門家が選ぶ最高のソーシャルメディアプラグインもご覧ください。
If you liked this article, then please subscribe to our YouTube Channel for WordPress video tutorials. You can also find us on Twitter and Facebook.


Lyn
I’m looking for something that will enable me to insert a gallery of videos but ONLY select videos from the channel – in this instance only 4 – not the entire feed. Is there a plugin that does that?
WPBeginner Support
If the videos are in a playlist, the plugin has a pro version that allows you to specify the playlist to display
Admin
Kim
I followed all the steps and inserted the short code into a shortcode block on my wp blog post. when i preview all i see is the shortcode. Am I missing a step? I’ve tried looking everywhere to no avail. Please help!
WPBeginner Support
You may want to make sure there are no missed typos or you could use the Envira Gallery block if the issue continues
Admin
Blessmond Alebna Ayinbire
Thanks for your article. I have a different problem. Anytime I share a link from my WordPress site, the thumbnail is my site identity logo instead of the featured image in the post. Please help…
WPBeginner Support
For that, you would want to take a look at our article here: https://www.wpbeginner.com/wp-tutorials/how-to-fix-facebook-incorrect-thumbnail-issue-in-wordpress/
Admin
Sujal
I can’t able to find the youtube user id, need urgent help!
WPBeginner Support
Currently, you should be able to click the settings next to your YouTube account in the top right and open up advanced to find it.
Admin
rishabh
I tried using this plugin but it’s giving an error. It’s not displaying video. Error Type: Forbidden
WPBeginner Support
We mention two plugins in this article, you would want to reach out to the support for the plugin you are using for them to assist you with this error.
Admin
Kiran More
can not see Insert videos option in wordpress?
Eric
Hello, I’m new to WordPress. If I install this plugin, will it work with all themes? Can I use it to create new / custom thumbnails for all my videos? Is it a one time fee to buy the plugin or are there recurring subscription fees? Thanks…
Gaurav Khurana
The youtube plugin is not updated for the last 2 years. Will it be fine to use it on long term basis ?
WPBeginner Support
Hi Gaurav,
We have reached out to plugin author. Meanwhile, we tested the plugin and found that it still works perfectly.
Admin