WordPressから送信するメールのデフォルトの送信者名とメールアドレスを変更したい場合は、こちらをご覧ください。
初期設定では、WordPressはWordPress通知メールの送信者名として「WordPress」をすべて使用します。しかし、私たちの専門家の意見では、これはプロフェッショナルに見えません。
そこで、ビジネスネームやカスタマイザーに変更することもできます。ビジネスネームを入れたメールを送信することで、メールの開封率やクリック率を高めることができると考えています。
この投稿では、WordPressの送信メールの初期設定である送信者名とメールアドレスを簡単に変更する方法をご紹介します。

WordPressで初期設定の送信者情報を変更すべき理由とは?
WordPressは、サイト管理者だけでなく、サイトの他のユーザーにもいくつかのメール通知を送信します。
これには、パスワード忘れメール、サイトエラーや回復メール、新規ユーザー登録などの重要なメール通知が含まれます。
初期設定では、送信者名として「WordPress」、送信者のメールとして存在しないメールアドレス(wordpress@yourdomain.com)が使用されます。
多くのスパムフィルター機能は、WordPressのメールを迷惑メールと判断してブロックします。時には、スパムフォルダーにすら入らず、フィルターによってすぐに削除されてしまうこともあります。
このトピックについては、WordPressでメールが送信されない問題の解決方法をご覧ください。
送信メール通知は重要であり、自社のブランドとメールアドレスを使うべきである。そうすることで、ブランドの信憑性が増し、ユーザー間での知名度も上がります。
例えば、オンラインストアを運営している場合、カスタマイザーに送信者名を指定してメール通知を受け取りたいでしょう。
サイト用の無料ビジネスメールアドレスを5分で取得する方法については、こちらのガイドをご覧ください。
それでは、WordPressのメール通知の送信者名とメールアドレスの初期設定を変更する方法を見てみましょう。
このチュートリアルでは、複数の方法について説明しました。以下のリンクからお好きな方法にジャンプしてください。
方法1.WP Mail SMTPを使って初期設定の送信者名とメールを変更する。
この方法は簡単で、すべてのWordPressユーザーにお勧めします。
この方法では、WP Mail SMTP Proプラグインを使用します。これは、300万人以上のサイトオーナーに使用されている、最高のWordPress SMTPプラグインです。

このプラグインを使うと、WordPressで送信するメールの初期設定の送信者名とメールアドレスを簡単に変更することができます。WordPressのメール到達性の問題を解決するのにも役立ちます。
まず、WP Mail SMTP Proプラグインをインストールして有効化する必要があります。詳しくは、WordPressプラグインのインストール方法のステップバイステップガイドをご覧ください。
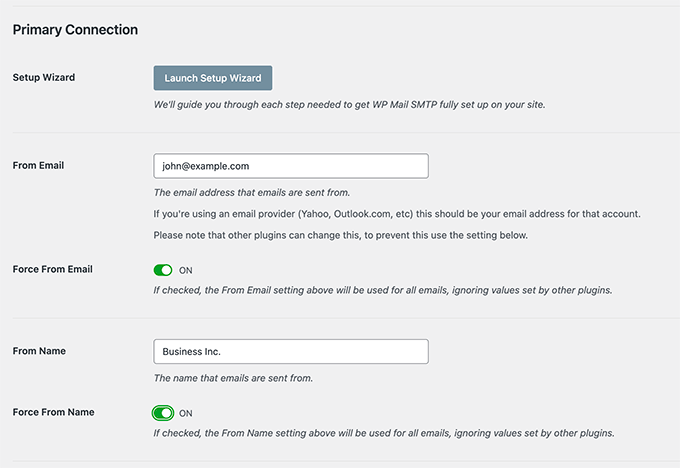
有効化したら、WP Mail SMTP ” Settingsにアクセスしてプラグイン設定を行います。最優先の接続」では、WordPressのメール送信に使用するメールアドレスと名前を入力します。
以下に、WordPressのメールを送信するSMTPサーバーを設定するオプションを示します。初期設定では、プラグインはWordPressホスティングサービスが提供するPHPメソッドを使用しますが、これは信頼性が低いです。
WordPressのメールを適切に送信するために、リストアップされたSMTPサービスのいずれかを使用して、到達性を保証することをお勧めします。
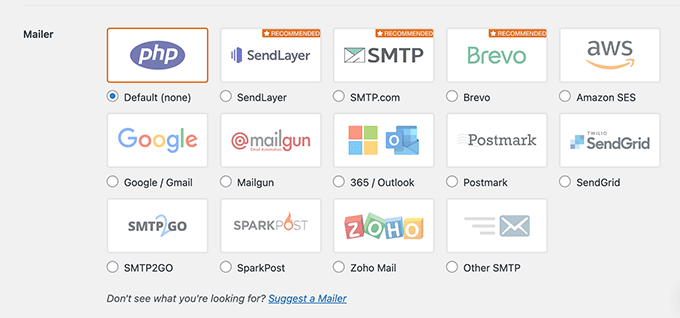
SMTPサービスを選択した場合は、画面の指示に従ってプラグインとSMTPサービスプロバイダーを接続してください。
Save Settings(設定を保存)」ボタンをクリックして変更を保存することを忘れないでください。
WordPressメールのテスト
WP Mail SMTP Proでは、WordPressのメール設定をテストすることもできます。WP Mail SMTP ” Toolsページに行き、’Email Test’ タブに切り替えるだけです。
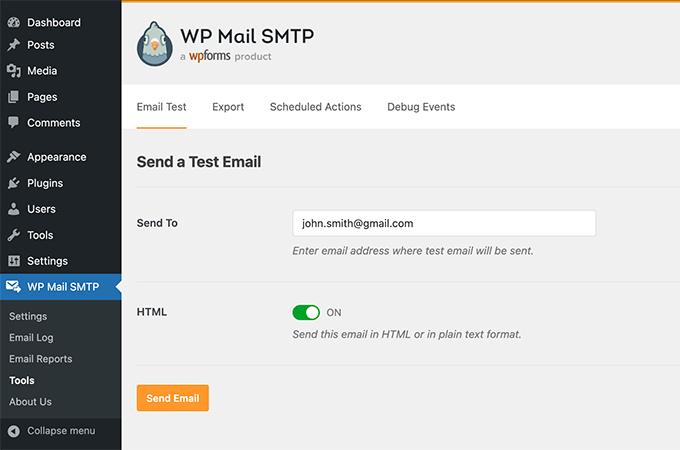
ここから、アクセス可能なメールアドレスをプロバイダーに入力し、「メールを送信」ボタンをクリックするだけです。
プラグインは、あなたが提供したアドレスにテストメールを送信します。受信トレイでWordPressのメールが受信できるか、送信者名と送信者メールアドレスが正しいか確認できます。
WP Mail SMTPは、WooCommerce、WPFormsなど、WordPressで人気のあるプラグインすべてとシームレスに動作することがテストしてわかりました。
詳しい手順については、WordPressのメール送信にSMTPを使用する方法の投稿をご覧ください。
方法2: WP Change Email Senderを使って初期設定の送信者名とメールを変更する。
この方法は、SMTPサービスを使用していない場合、または最初の方法がうまくいかない場合にのみお勧めします。
この方法を使用しても、WordPressメールの到達性が向上したり、メールのトラブルシューティングが簡単になるわけではありません。しかし、WordPressのメールが機能している場合は、送信者名とメールアドレスを変更することができます。
まず、WP Change Email Senderプラグインをインストールして有効化する必要があります。詳しくは、WordPressプラグインのインストール方法のステップバイステップガイドをご覧ください。
有効化した後、WordPress管理エリアの設定 ” 一般ページに移動する必要があります。下の方に「送信者名」と「送信者メールアドレス」の欄があります。
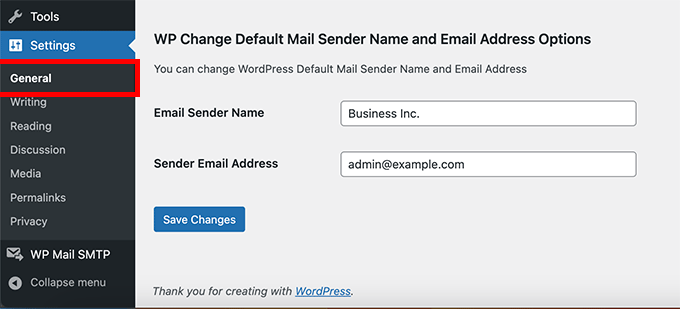
WordPressの送信メールに使用する名前とメールアドレスを入力します。
変更を保存」ボタンをクリックして、設定を保存することを忘れないでください。
これですべてです。WordPressの通知メールに、プラグイン設定で入力した名前とメールアドレスが表示されるようになります。
プラグインにはメール設定をテストするためのプロバイダーはありません。新規ユーザーの作成、パスワードリセットのリクエストなど、WordPress通知メールを生成するアクションを実行することで可能です。
方法3:WPCodeを使って送信者名とメールアドレスを変更する。
送信者名とメールアドレスを変更するもう一つの優れた方法は、WordPressサイトにコードスニペットを追加することです。
WordPressにコードを追加する最も簡単で安全な方法であるWPCodeをお勧めします。
通常は、functions.phpファイルにコードを追加する必要がありますが、WPCodeを使えば、数回クリックするだけで、簡単にこのコードスニペットを追加することができます。
それだけでなく、WPCodeはあなたのサイトをカスタマイズするのに役立つ他の多くのスニペットを持っています。さらに、カスタマイザーも簡単に追加することができます。
まず、無料のWPCodeプラグインをインストールする必要があります。
次に、Code Snippets “ Add Snippet to your WordPress admin dashboardをクリックします。検索バーに’sender’と入力し、’Change Outgoing Email Sender’の下にある’Use snippet’ボタンを押してください。
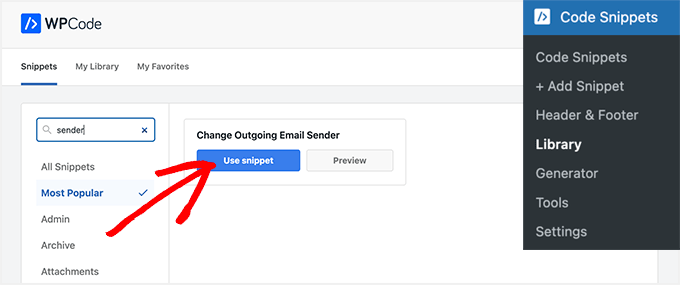
すると、スニペットの編集ページに移動します。
ここで、コード・スニペット内の送信者のメールと名前を更新する必要がある。
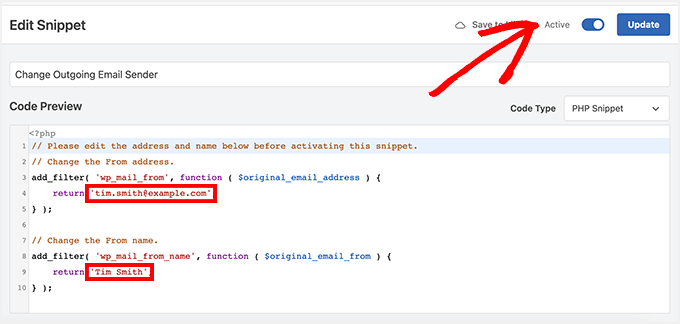
次に、トグルを「有効化」に切り替え、「更新」ボタンをクリックする。
WPCodeを使用する利点の一つは、事前に作成されたスニペットでいっぱいのライブラリが付属していることです。自動更新を無効化したり、SVGファイルをアップロードできるようにしたり、初期設定のブロックエディターの代わりにクラシックエディターを使用したりなど、サイトの他のプラグインを置き換えるものが見つかる可能性が高いです。
ライブラリを使用する必要はありません。また、ライブラリを検索する代わりに「カスタムコードを追加(新規スニペット)」ボタンを選択することで、必要な他のコードを追加することもできます。
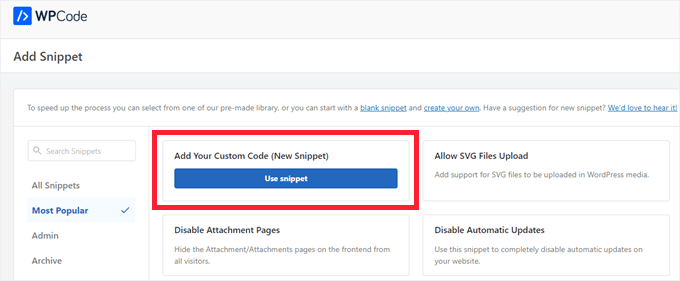
あとはすべて、自分のコードを貼り付け、サイト上のどこに表示するかを決めるだけだ。
例えば、以下のスニペットをコピー&ペーストして、WPCodeのカスタムコードスニペットに貼り付け、送信者名とメールを変更するようにカスタマイズすることができます。
1 2 3 4 5 6 7 8 9 10 | // Please edit the address and name below.// Change the From address.add_filter( 'wp_mail_from', function ( $original_email_address ) { return 'tim.smith@example.com';} );// Change the From name.add_filter( 'wp_mail_from_name', function ( $original_email_from ) { return 'Tim Smith';} ); |
ボーナス:WordPressでフルネームを変更する
メールの送信者名を変更する以外にも、WordPressではフルネームを変更することもできます。これは、あなたが書いた投稿に表示される名前です。
あなたのサイトに「jsmith204」のようなプロらしくないユーザーネームがあると、サイトの信頼性に悪影響を及ぼし、ユーザーがWordPressブログを探そうとしなくなる可能性があります。

その場合は、WordPressのダッシュボードからユーザー ” プロフィールのページにアクセスして、ユーザー名を変更することをお勧めします。
ここで「名前」セクションまでスクロールダウンし、ファーストネーム、ラストネーム、ニックネームを追加する。
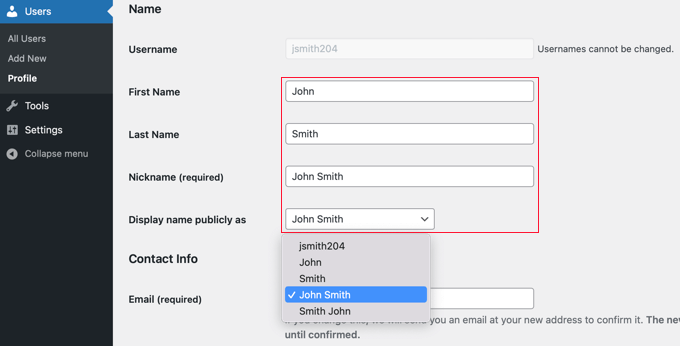
次に、「Display name publicly as」ドロップダウンメニューをクリックし、新しいユーザー名を選択します。
完了したら、「変更を保存」ボタンをクリックして設定を保存します。詳しくは、WordPressでフルネームを追加・変更する方法のチュートリアルをご覧ください。
WordPressの送信メールの送信者名とメールアドレスを変更する方法について、この投稿がお役に立てれば幸いです。WordPressのメール設定に関する他のWordPressガイドもご覧ください。
メール設定のためのWordPressベストガイド
- WordPressメール設定の正しい方法
- WordPressでユーザー名とユーザーメールを制限する方法
- WordPress更新通知メールの設定方法
- WPBeginnerでメールリストを増やすために使っている実証済みの方法
- WordPressメールトラッキングの設定方法(開封、クリックなど)
- 中小企業に最適なメールマーケティングサービス
- 最高のドラッグ&ドロップWordPressページビルダー
If you liked this article, then please subscribe to our YouTube Channel for WordPress video tutorials. You can also find us on Twitter and Facebook.


Bogdan
Thanks a lot. Super useful!
WPBeginner Support
Glad you found it useful!
Admin
Afshan
Its updating contact form 7 sender name and email.
How to make it only applicable for core WordPress emailing not for contact form 7?
WPBeginner Support
You would need to uncheck the force email and reach out to your contact form’s support for how to set it in the plugin.
Admin
Ana Bella
Thank you so much! 2nd option worked and was so easy to setup!
WPBeginner Support
Glad our guide was helpful
Admin
Sam
I used method 3 as a snippet… worked great, thank you!
WPBeginner Support
You’re welcome!
Admin
Cameron Johnson
Hey thanks for the code it works amazing! Is there a way to change the email sender name for only the new order email and remain the rest of them the same? Thanks!
WPBeginner Support
For that, you would want to reach out to the support for the ecommerce plugin you’re using for if they have an option to set that up.
Admin
Pieter
Thanks a lot!
I used method 3 and it works great!
WPBeginner Support
You’re welcome, glad our guide was helpful
Admin
Jonathan
Hi I tried out the method of adding the code snippet to my functions. One problem that came up is that now my site is sending an extra email with no subject or content(only a blank template) along with the other notifications. After removing the code snippet it still sends these emails. After removing the code do I need to run a remove_filter() or something similar?
WPBeginner Support
You would want to check that it isn’t being sent by one of your other plugins, this code should only change the values for the sender name. What the code modifies would be removed when you remove the code.
Admin
Felipe
I used the Snippets plugin and it did update the from address and the name, but the name shows “my name, WordPress” Any idea what could be causing it?
WPBeginner Support
You may want to ensure you set the sender email as well to ensure that isn’t part of the issue.
Admin
Mrunal
I copy pasted this code into my theme’s functions.php file. Changed the email address and the name. then when i try to refresh the page, I saw the code being displayed on top of my website. I tried using the plugin as well. and the plugin didn’t work either. Please help.
WPBeginner Support
For the code not working, you would want to ensure the code is not after a ?> in your functions.php file. For the plugin not working you may want to reach out to the plugin’s support for them to take a look at possible conflicts.
Admin
Reza Baleghi
I just pasted the code and changed it as I wanted.
It works perfectly!
Thanks for saving lots of time.
WPBeginner Support
Glad our guide was helpful
Admin
adil
Thanks alot you are the best
WPBeginner Support
You’re welcome
Admin
EA
This was extremely helpful, thank you!
WPBeginner Support
You’re welcome, glad our guide was helpful
Admin
M Asif Raza
Fantastic. Its really worked for me and I have done what I wanted in few minutes. Thanks for this Blog Post
WPBeginner Support
Glad our guide was helpful
Admin
Syam
im using method 2, It work very well, thanks
WPBeginner Support
Glad our recommendation was helpful
Admin
Ruth
This works perfectly, but too well!
It overrides the from address in Gravity Forms notifications. Is there a way to only have it apply to the network administrator? We have a WordPress network, not a single site.
WPBeginner Support
You would want to reach out to the plugin’s support for preventing it from overriding your forms for what it sounds like you’re wanting.
Admin
Livingstone
The code worked perfectly. Thanks
WPBeginner Support
Glad our recommendation could help
Admin
Rebecca
This worked, thanks!
However, it still says “via server.example.com”. Anyway around this?
WPBeginner Support
Hi Rebecca,
This is the server used to send the email. You can read our article on how to fix WordPress not sending email issue and use WP Mail SMTP plugin to fix these issues. It will allow you to change sender name and use proper SMTP server to send emails.
Admin
R
Thanks, works!
Patrizio Racco
This worked for me. Much appreciated
Thank you
TH
Hi.
The emails sent from my wordpress website show extra information for the sender name ‘myemailname via msv40-sh-cicadas.mschosting.com’
How do I remove the ‘via msv40-sh-cicadas.mschosting.com’?
How do I set it up my site’s email so that it only shows myemailname?
I have done email authentication on my cpanel.
I deactivated all plugins to check but still the same.
Thanks for the help.
TH
Anil
I have also same problem. any one can help me
Swayam Dhawan
Thanks for the Code Specifically, It helped me to not to increase my number of plugins.
Vaibhav Bajpai
Thanks! It worked.
MELLOR
Hi thanks for putting this in. It works for anything that doesn’t populate these fields, as per Gravity Forms example above, but because this is an output filter it changes anything you send to these values.
I can code but not WordPress, but I will take your template code above and pop in a conditional test for the known wordpress values…
if $original_email_from = “WordPress” then change it,
likewise if $original_email_address = “wordpress@” then change it.
Otherwise leave well alone.
Then it will work for any calling plugin that does fill these or any of these fields.
I chose to change the core code, unfortunately, JETPACK puts these values back in when it calls wp_mail so my default value change was useless because they only changed if the values where not given….lol
On the flip side, the FILTER you gave above comes in AFTER everything else, so it obliterates even the values from plugins like Gravity.
So if anyone can code the conditional statement – only change if it contains the values “WordPress” (and possibly any derivatives) then that will definately fix all scenarios.
If there’s no one to hand, then I will possible get it done in a while for my own site so that it doesn’t look like a phishing site whenever it emails anyone… lol because the from name won’t match my identity or domain or ssl certificate. Until then I have switched off JetPack.
Many thanks for the base code, it will really help me work out the rest.
Bryan
Hi Syed, I noticed that while it works for other notifications, it didn’t work for the initial new user registration email. When a new user registers on my site, it is still not using the updated sender namer and email. Do you know why?
Emmanuel
Great, it worked perfectly. Thank you
Christian
Thank you. It works perfect!
Joshua
Wow, it works…
Aurélien Denis
I’ve been using this method for years… but be careful it’s not compatible with plugins like Gravity Forms who already change this.
WPBeginner Support
If you are using a contact form plugin like WPForms or GravityForms, then you can set sender name and email address in plugin settings. However, this is mostly used by the emails sent by the plugin and not for the WordPress notification emails.
Admin
plu2
Thank you for this great tip.
For user friendliness you could consider removing the line numbers in the method 2 code.
WPBeginner Support
These lines are added by the plugin we use for syntax highlighting and easy embedding of code in WordPress posts. You can click on the tiny ‘code’ button at the top right corner of the snippet to view and copy the raw code with no line numbers.
Admin
Collins
It worked… thanks so much. been searching all through until i finally saw this
WPBeginner Support
Hey Collins, glad you found it helpful Don’t forget to follow us on Twitter for more WordPress tips and tutorials.
Admin
Verdi
Thank you!