長年にわたり、私たちは何千人もの読者がユーザーエクスペリエンスとビジュアルアピールの両方を向上させるためにWordPressサイトをカスタマイズするお手伝いをしてきました。ウェブデザインの実地経験から、WordPressのナビゲーションメニューにイメージアイコンを追加することで、サイトのユーザビリティが劇的に向上することを学びました。
なぜなら、イメージアイコンは訪問者に直感的な視覚的手がかりを提供し、サイトのナビゲーションを容易にするからです。そうすることで、サイトのインターフェースがよりインタラクティブで魅力的なものになり、直帰率の低下につながります。
この投稿では、WordPressのナビゲーションメニューに画像アイコンを簡単に追加する方法を紹介します。
なぜWordPressのナビゲーションメニューにイメージアイコンを追加するのか?
通常、WordPressのナビゲーションメニューはプレーンテキストのリンクです。このようなリンクは、ほとんどのサイトではうまく機能しますが、常に面白く、魅力的に見えるわけではありません。
ナビゲーションメニューにイメージアイコンを追加することで、訪問者がメニューに注目し、サイト内をもっと探索するように促すことができます。
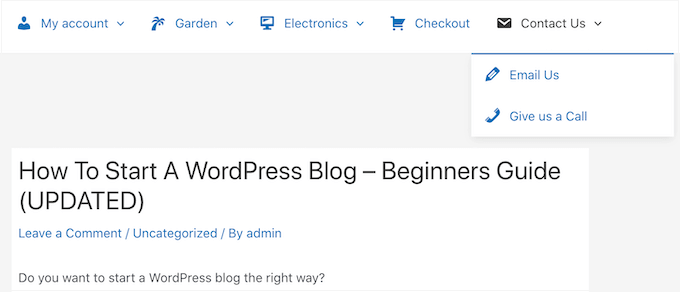
メニューに様々なオプションがある場合、Imagelyアイコンは訪問者がコンテンツをスキャンし、探しているものを見つけやすくします。WordPressでページビューを増やし、直帰率を下げる簡単な方法です。
オンラインマーケットプレイスの購入手続きリンクのように、最も重要なメニュー項目を強調するために画像アイコンを使用することもできます。
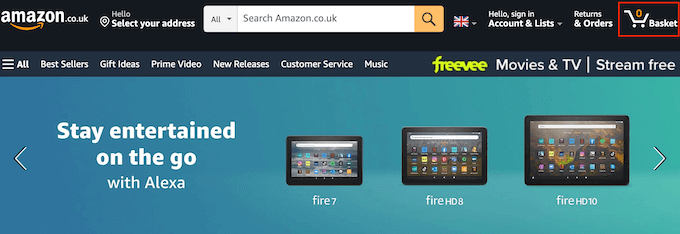
メニューに行動喚起を強調することで、多くの場合、サインアップ、販売、会員、その他のコンバージョンを得ることができる。
それでは、WordPressのナビゲーション・メニューに画像アイコンを追加する方法を見ていきましょう。以下のクイックリンクから、お好きな方法にジャンプしてください:
方法1:プラグインを使用してナビゲーションメニューに画像アイコンを追加する(迅速かつ簡単)
WordPressのメニューにアイコンを追加する最も簡単な方法は、Menu Imageを使用することです。このプラグインにはdashIconアイコンが付属しており、数回クリックするだけで追加できます。
サイトにFont Awesomeを設定していれば、Menu Imageを使ってナビゲーションメニューにアイコンを簡単に追加することができます。Font Awesomeのインストール方法の詳細については、WordPressテーマにアイコンフォントを簡単に追加する方法をご覧ください。
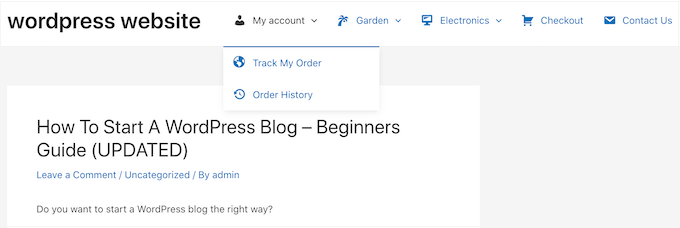
WordPressのメディアライブラリにある画像やアイコンを使うという設定もある。
最初に行う必要があるのは、Menu Imageプラグインのインストールと有効化です。詳しくはWordPressプラグインのインストール方法をご覧ください。
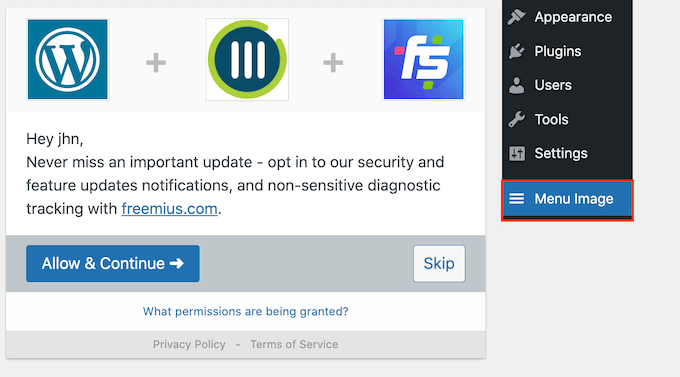
有効化したら、WordPressダッシュボードのメニュー画像を クリックします。この画面で、セキュリティと機能の通知を受け取るか、「スキップ」ボタンをクリックするかを選択できます。
プラグインの設定を行う画面に移動します。はじめに、画像アイコンに使用できるさまざまなサイズがすべて表示されます。
Font Awesomeやdashiconsのアイコンを使用する場合は、Menu Imageが自動的にサイズを変更します。ただし、メディアライブラリの画像を使用する場合は、手動でサイズを選択する必要があります。
このプラグインは、サムネイル、イメージ、ラージなどのWordPress初期設定の画像サイズをサポートしています。また、初期設定で24×24、36×36、48×48ピクセルに設定されている3つのユニークなサイズを追加します。
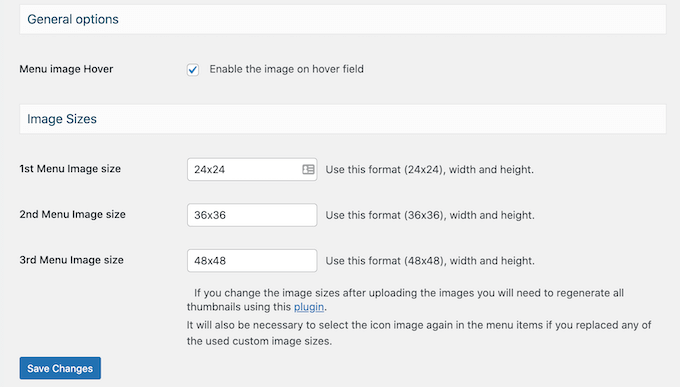
これらの設定はほとんどのサイトでうまく機能するはずですが、1番目、2番目、3番目のメニュー画像のサイズに異なる数字を入力することで、アイコンを大きくしたり小さくしたりすることができます。
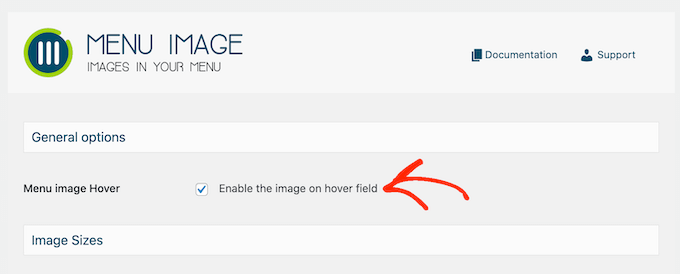
メニューにアイコンを追加する際、初期設定では「マウスオーバー時の画像」フィールドが表示されます。これにより、訪問者がそのメニュー項目にマウスオーバーしたときに、異なるアイコンを表示することができます。
この設定は、独自の画像を使用する場合にのみ有効です。dashIconsやFont Awesomeアイコンを使用する場合は、「マウスオーバー時の画像」機能を気にする必要はありません。
異なるアイコンを表示することで、訪問者がナビゲーションメニューのどこにいるかを確認しやすくなります。これは、メニューにたくさんの項目がある場合に特に有効です。例えば、現在選択されている項目を強調するために、異なる色やアイコンサイズを使用することができます。
異なるマウスオーバー効果を作成したい場合は、「マウスオーバー時の画像を有効化するフィールド」をチェックしてください。
設定が完了したら、「変更を保存」をクリックして設定を保存します。
ナビゲーションメニューにアイコンを追加するには、外観 ” メニューページにアクセスしてください。初期設定では、WordPressはサイトの主要メニューを表示します。
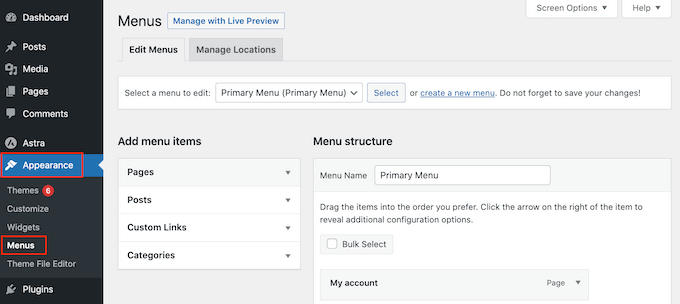
別のメニューを編集したい場合は、「編集するメニューを選択」ドロップダウンを開き、リストからメニューを選択するだけです。その後、「選択」をクリックする。
アイコンを追加したい最初のメニュー項目にマウスオーバーしてください。Menu Image」が表示されたら、クリックしてください。
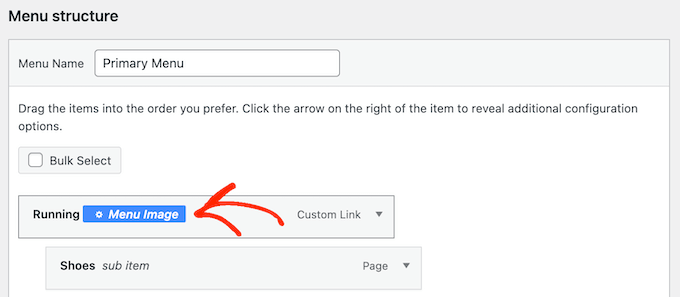
自分の画像を使うか、Font Awesomeのアイコンのような既成のアイコンを選ぶかを決めることができます。
既製のアイコンを使用するには、「アイコン」の隣にあるラジオボタンをクリックします。
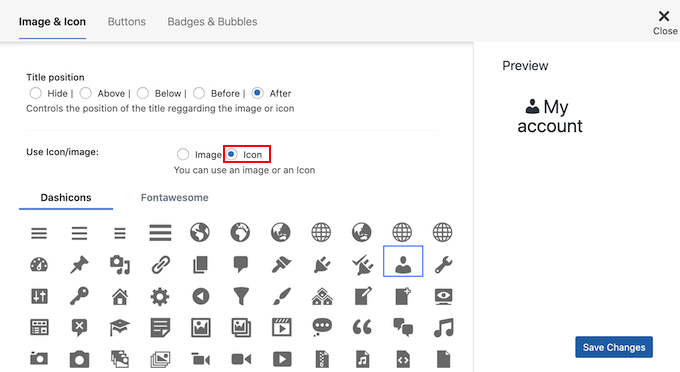
ダッシュアイコンやFont Awesomeアイコンをクリックして選択することができます。
自分の画像を使いたい場合は、「Image」の隣にあるラジオボタンを選択し、「Set Image」リンクをクリックします。
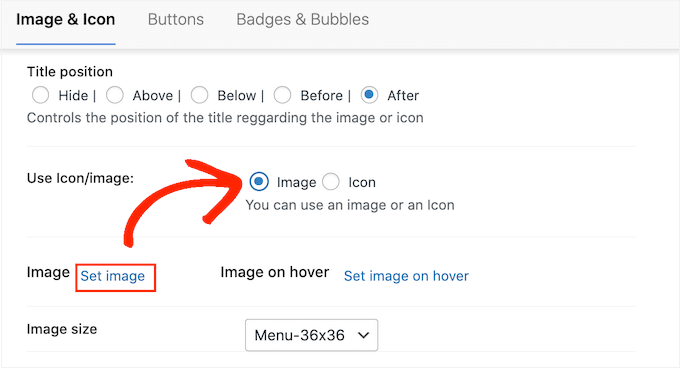
WordPressのメディアライブラリから画像を選択するか、コンピューターから新しいファイルをアップロードすることができます。
プラグインの設定で「マウスオーバー時の画像を有効化する」にチェックを入れた場合は、「マウスオーバー時の画像を設定する」もクリックする必要があります。
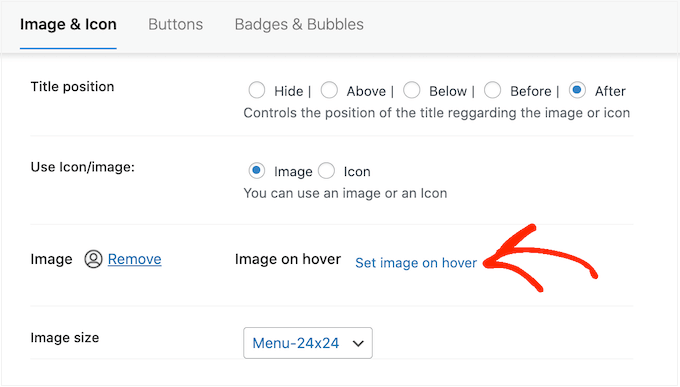
次に、ユーザーがこのメニュー項目にマウスオーバーしたときに表示する画像を選択します。
この設定を無視して、何があっても同じアイコンを表示したい場合もあるでしょう。その場合は、「マウスオーバー時に画像を設定」をクリックし、まったく同じアイコンを選択してください。
画像を選択しない場合、訪問者がマウスオーバーするとアイコンは完全に消えます。
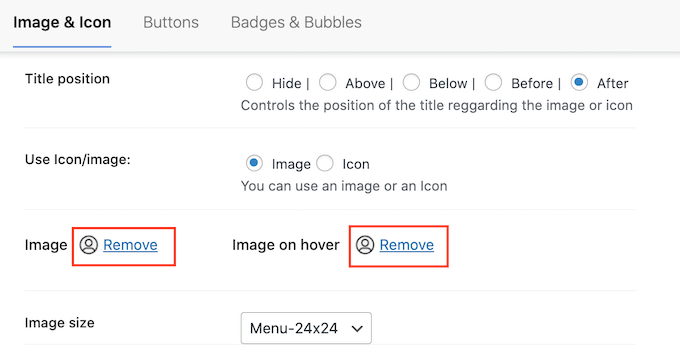
その後、Image Sizeドロップダウンを開き、リストからサイズを選択します。
すべてのアイコンに同じサイズを使うと、メニューが整理されたように見える傾向があります。しかし、最も重要な項目には大きなアイコンを使うのが良い場合もあります。
例えば、WooCommerceのようなプラグインを使用してオンラインストアを作成した場合、「購入手続き」には目立つように大きなアイコンを使用するかもしれません。
アイコンに満足したら、メニュー項目のラベルを見てみましょう。初期設定では、プラグインはアイコンの後にタイトルラベルを表示します。
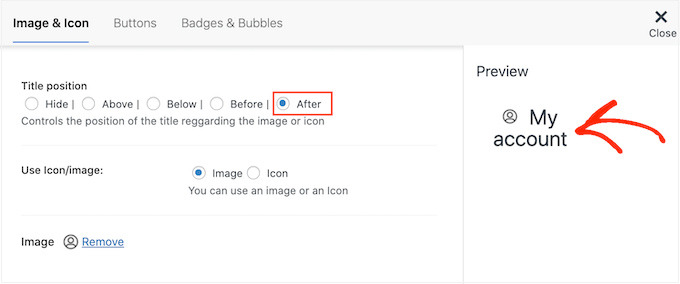
これを変更するには、「タイトル位置」セクションのラジオボタンのいずれかを選択します。
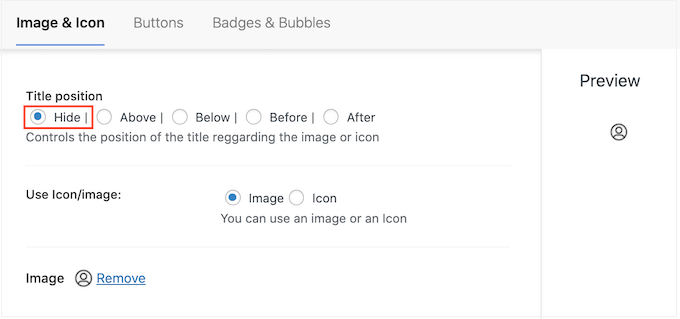
ナビゲーションラベルを完全に削除し、アイコンのみのメニューを作るという設定もあります。メニューにたくさんの項目がある場合は、この方法を使うとごちゃごちゃした印象がなくなります。
ただし、ラベルを非表示にすべきなのは、それぞれのアイコンが何を意味するかが明らかな場合だけです。不明確な場合、訪問者はWordPressブログやサイトをナビゲーションするのに苦労することになります。
ラベルを非表示にするには、「なし」の隣にあるラジオボタンを選択します。
メニュー項目の設定に満足したら、「変更を保存」をクリックします。
他のメニュー項目にアイコンを追加するには、上記と同じ手順を踏むだけです。
完了したら、「メニューを保存」ボタンを忘れずにクリックしてください。これで、WordPressサイトにアクセスすると、更新されたナビゲーションメニューが表示されます。
方法2:コードを使ってWordPressメニューにアイコンを追加する(よりカスタマイズ可能)
CSSを使ってナビゲーションメニューに画像アイコンを追加することもできます。
このように、メニューのどこにアイコンを表示するかを正確にコントロールすることができます。また、どのような画像でもアイコンとして使用できるので、独自のブランディングにも最適です。

作業を始める前に、アイコンとして使いたい画像ファイルをすべてアップロードしてください。ストックフォト、オンラインで見つけたロイヤリティフリーの画像、Canvaなどのアプリで作成したカスタムグラフィックなどです。
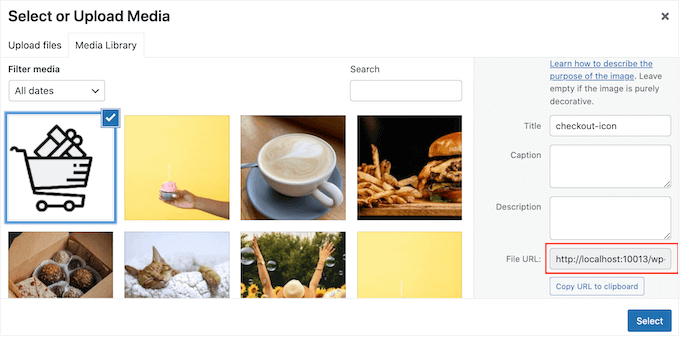
WordPressのメディアライブラリに各画像を追加したら、そのURLをコピー&メモ帳などのテキストエディターにペーストしてください。これらのリンクはすべて次のステップで必要になります。
画像のURLを見つけるには、WordPressのメディアライブラリで画像を選択し、「ファイルURL」フィールドを見るだけです。
より詳しい手順については、WordPressでアップロードした画像のURLを取得する方法をご覧ください。
その後、WordPressダッシュボードから外観 ” メニューページにアクセスする必要があります。
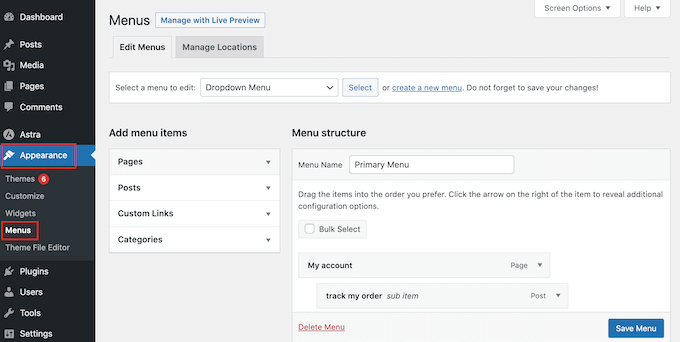
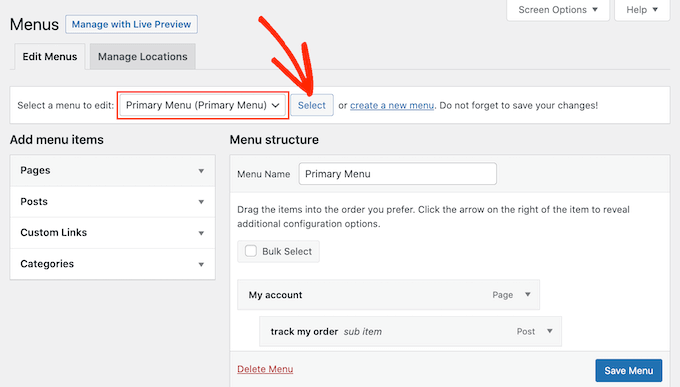
次に、「編集するメニューを選択」ドロップダウンメニューを開き、イメージアイコンを追加したいメニューを選択します。
その後、『選択』をクリックする。
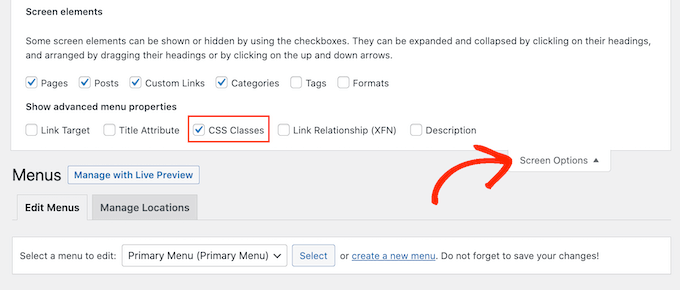
次に、「画面オプション」をクリックして、カスタマイザークラスを有効化する必要があります。
表示されたパネルで、「CSS Classes」の隣のボックスをチェックする。
これで、ナビゲーション・メニューのどの項目にもカスタムCSSクラスを追加することができる。このようにして、各メニュー項目をWordPressメディアライブラリの画像にリンクさせることができます。
これらのクラスの名前は何でもいいが、メニュー項目を識別するのに役立つものを使うのがいいだろう。
始めに、画像アイコンを追加したい最初の項目をクリックします。CSSクラス(オプション)」フィールドに、使用したいクラス名を入力します。
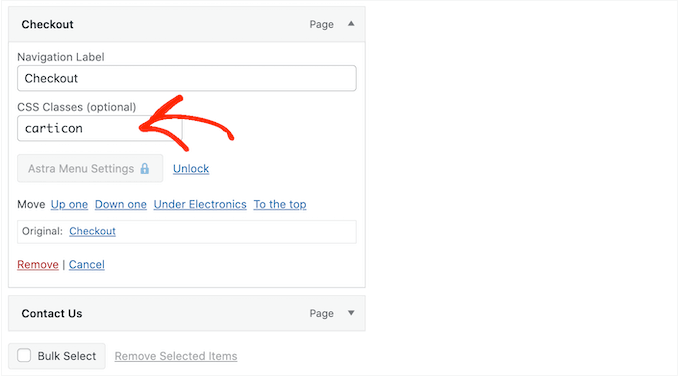
これらのカスタムCSSクラスは次のステップで使用するので、メモ帳などにメモしておこう。
同じ手順に従って、すべてのメニュー項目に区切りクラスを追加してください。その後、「メニューを保存」をクリックして設定を保存します。
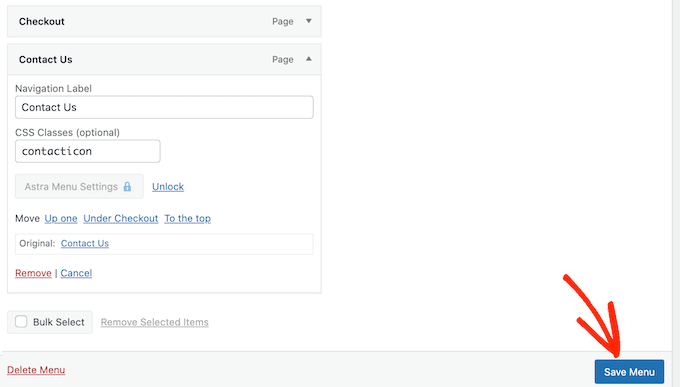
これで、CSSを使ってWordPressのナビゲーションメニューに画像アイコンを追加する準備が整いました。
WordPressのチュートリアルでは、WordPressのテーマファイルにコードスニペットを追加するように書かれていることがよくあります。しかし、そうすることはWordPressの一般的なエラーを引き起こす可能性があり、初心者にはあまり優しくありません。
WPCodeをお勧めする理由はそこにある。
100万以上のサイトで使用されているWordPressのコードスニペットプラグインで、テーマのfunctions.phpファイルを編集することなくカスタムコードを追加することができます。
最初に行う必要があるのは、無料のWPCodeプラグインをインストールして有効化することです。詳しくは、WordPressプラグインのインストール方法のステップバイステップガイドをご覧ください。
注:WPCodeには、このチュートリアルで使用できる無料プランがあります。しかし、プロバージョンにアップグレードすると、コードスニペット、スマート条件ロジックなどのクラウドライブラリがアンロックされます。
有効化したら、Code Snippets ” Add Snippetにアクセスしてください。
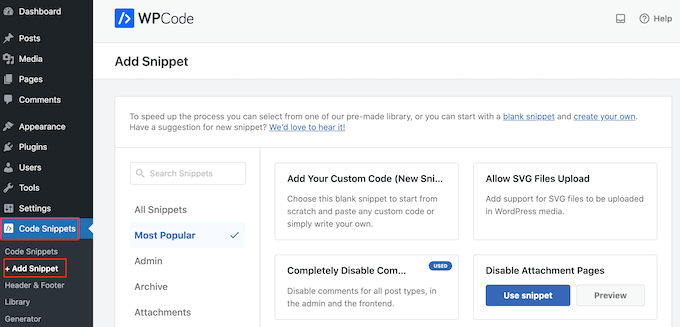
スニペットの追加」ページが表示され、WPCodeの既成スニペットライブラリを見ることができます。これらのスニペットには、XML-RPCを無効化してWordPressのセキュリティを向上させたり、WordPressが初期設定でサポートしていないファイルタイプのアップロードなどが含まれています。
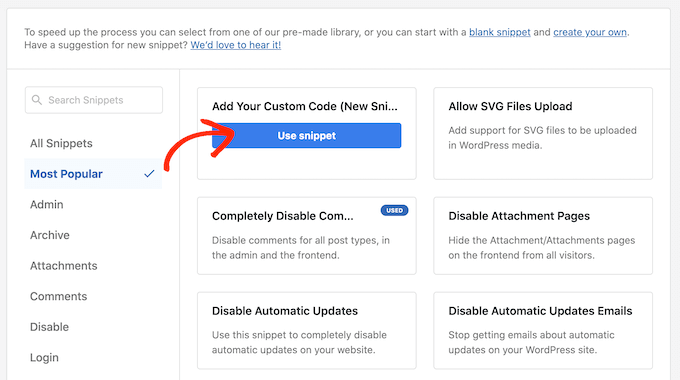
カスタムコードを追加」にマウスオーバーし、表示されたら「スニペットを使用」をクリックするだけです。
はじめに、カスタムコードスニペットのタイトルを入力します。これは、WordPressダッシュボードでスニペットを識別するのに役立つものであれば何でも構いません。
それが終わったら、「コードタイプ」のドロップダウンを開き、「CSSスニペット」を選択する。
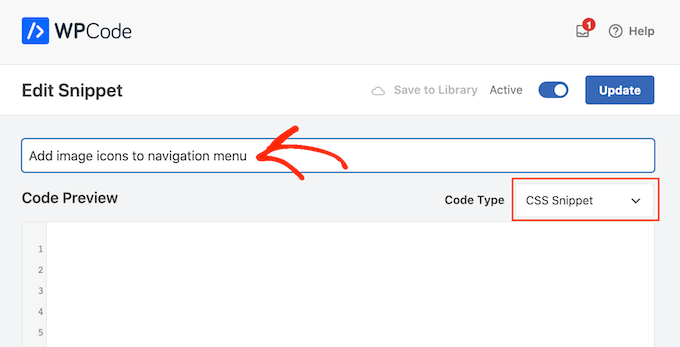
コードエディターで、表示したいアイコンごとにコードを追加する必要があります。
以下にサンプルスニペットを用意しました。.carticon’を前のステップで作成したカスタムCSSクラスに変更してください。また、URLをWordPressメディアライブラリ内の画像へのリンクに置き換える必要があります:
1 2 3 4 5 6 | .carticon {background-image: url('http://localhost:10013/wp-content/my-media/cartcheckout.png');background-repeat: no-repeat;background-position: left;padding-left: 5px;} |
重要 :コード・スニペットでは、CSSクラスの前に「.これは、WordPressにそれがクラスであり、別の種類のCSSセレクタではないことを示すものです。
上記のスニペットを、上記で作成した個々のメニュー項目ごとに調整する必要があります。
コードに満足したら、「インサーター」セクションまでスクロールしてください。WPCodeは、すべての投稿の後、フロントエンドのみ、管理者のみなど、さまざまな場所にコードを追加することができます。
WordPressブログやサイト全体にカスタムCSSコードを使用するには、「Auto Insert」がすでに選択されていなければ、「Auto Insert」をクリックしてください。
次に、「場所」のドロップダウンメニューを開き、「サイト全体のヘッダー」を選択します。
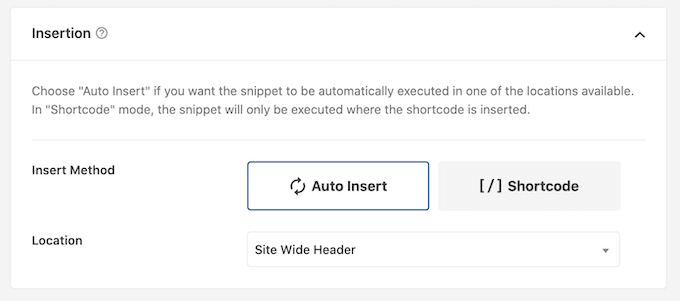
その後、画面を一番上までスクロールし、「Inactive」トグルをクリックして「Active」に変更すれば準備完了です。
最後に’Save Snippet’をクリックしてカスタムCSSを有効にします。
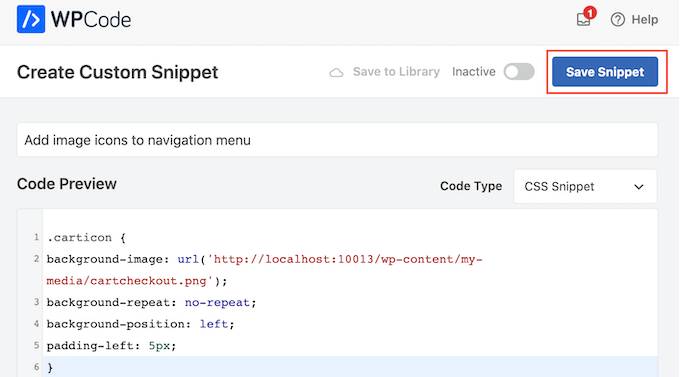
これで、あなたのサイトにアクセスすると、ナビゲーションメニューに画像アイコンがすべて表示されます。
WordPressのテーマによっては、CSSを調整して、画像アイコンを正確な位置に表示する必要があるかもしれません。その場合は、WordPressダッシュボードのCode Snippets ” Code Snippetsにアクセスしてください。
スニペットの上にマウスオーバーし、「編集」リンクが表示されたらクリックするだけです。
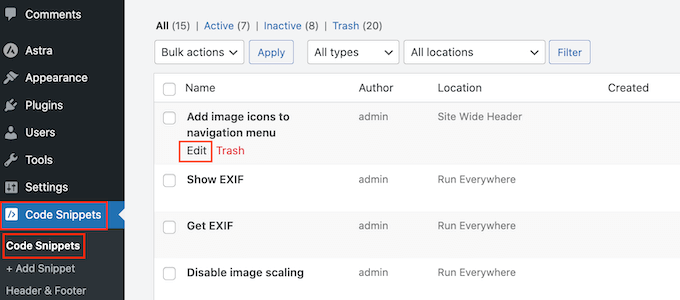
コードエディターが開き、変更を加えることができます。
ボーナス:WordPressメニューにソーシャルメディア・アイコンを追加する
メニューアイコンとは別に、WordPressのナビゲーションメニューにソーシャルメディアのアイコンを追加することもできます。こうすることで、サイト上のスペースをあまり取らずに、視覚的に魅力的な方法でソーシャルメディアのプロフィールを宣伝することができます。
これを行うには、Menu Imageプラグインを使用します。有効化したら、WordPressダッシュボードから外観 ” メニューページにアクセスし、左カラムの「カスタムリンク」タブを展開するだけです。
次に、ソーシャルメディアIDのURLを追加し、プラットフォーム名を入力します。次に、「メニューに追加」ボタンをクリックします。
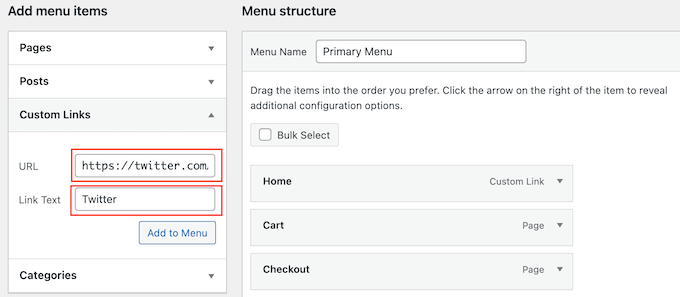
ソーシャルメディアのプロフィールがメニュー項目として追加されると、画面の右側に表示されます。
ここで、もう一度項目タブを展開し、「メニュー画像」ボタンをクリックする。
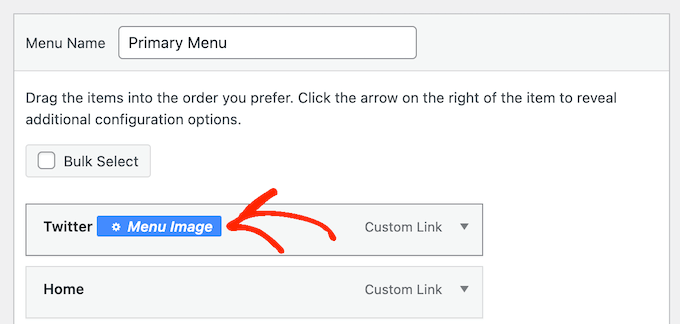
画面上に新しいプロンプトが表示されますので、「イメージの設定」リンクをクリックして、メディアライブラリからソーシャルメディアアイコンをアップロードしてください。
事前に作成されたアイコンを追加したい場合は、’アイコン’オプションを選択し、FontAwesomeからソーシャルメディアのアイコンを追加することができます。
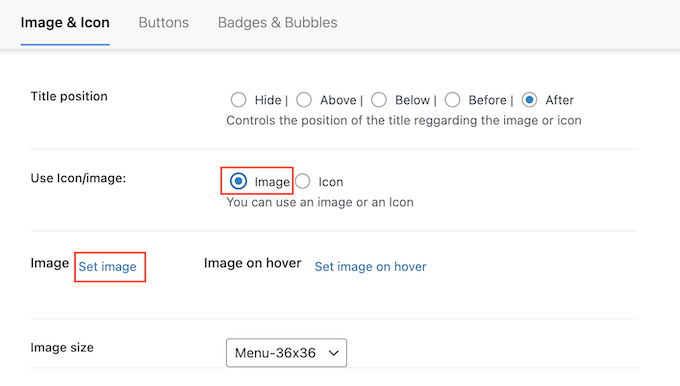
最後に「変更を保存」ボタンをクリックして、設定を保存します。
これでナビゲーションメニューにソーシャルメディアアイコンを追加することができました。詳しくは、WordPressメニューにソーシャルメディアアイコンを追加する方法のチュートリアルをご覧ください。
この投稿が、WordPressのナビゲーションメニューに画像アイコンを追加する方法を学ぶのにお役に立てば幸いです。また、WordPressでメニューに条件ロジックを追加する方法や、WordPressで先頭固定表示ナビゲーションメニューを作成する方法についてもご紹介しています。
If you liked this article, then please subscribe to our YouTube Channel for WordPress video tutorials. You can also find us on Twitter and Facebook.


Jiří Vaněk
I also use Menu Image, and I can’t praise it enough. It’s a fantastic choice when you’re a beginner and need to get icons into the menu. Previously, I struggled with implementing Font Awesome, but this is a much cleaner and better option.
JT
hi with CSS method how do have the icons placed above the menu items instead of to the side?
WPBeginner Support
It would depend on your specific theme for what would need to be added for that, for the time being we would recommend using the plugin method for what you are wanting to do.
Admin
Linsey Retcofsky
Hi, how could I modify the code to hide the menu link and only show the icon? Thanks for your help.
WPBeginner Support
You would want to use the plugin and that would allow you to do what you are wanting.
Admin
Kyle
Hi,
Im wondering if you can help me.
Using Css how would i make the posts in my menu show their respective featured image.
Thanks
WPBeginner Support
That would require more than CSS, we would recommend reaching out to your theme’s support and they should be able to assist with your featured image display
Admin
Nick
I try this plugin but facing issue while creating sub-menu. All things I set it up as per guidelines. but those menu have have sub-menu there i’m unable to see the image.
please help me out.
WPBeginner Support
We would first recommend reaching out to the plugin’s support and they should be able to assist.
Admin
Quy
thanks for useful article.
WPBeginner Support
You’re welcome
Admin
Carlos Reddy
You guys are awesome!
Thank you very much for this!
WPBeginner Support
Glad you like our content
Admin
Sotir
Hey thanks a lot for this advise
WPBeginner Support
You’re welcome
Admin
Richmond Sagoe
I used Method 2 and it worked. However, I see ‘home’ besides the icon
WPBeginner Support
This tutorial is for placing the icon next to the word in your menu. If the positioning isn’t correct, you can use inspect element to test CSS changes that you can do to the site: https://www.wpbeginner.com/wp-tutorials/basics-of-inspect-element-with-your-wordpress-site/
Admin
Jo Lee
I have done all of the above and within the menu I can see the image that I have uploaded so looks like it’s all worked but when I go to the front page of the website the images are not showing, can’t understand why it’s not working
WPBeginner Support
If you’re using the plugin you may want to reach out to the plugin’s support otherwise, you would want to reach out to your theme’s support in case it is being overridden by your theme’s settings
Admin
Saviour Ukpong
Nice one, but how do we do it with font awesome??
Christina
Love you guys!!!! You always have what I need. This is perfect!!!! Thank you!
zviryatko
Hello, I’m author of Menu Image plugin, and first of all thanks for great article and video manual! May I use link for this tutorial in plugin official description?
And feel free to contact me in case if it misses some useful features, I can add it in new releases.
Btw, there is new version with new title positions: below and above the image.
WPBeginner Support
Hi zviryatko,
Yes, please feel free to add the link and we appreciate it. However, we do not allow full copy of an article. Thank you for letting us know about the new version.
Admin
Steph Reed
Hey, I’ve been trying to get the newest version of this to work (totally breaks the menu for me, links included) and it looks like all support is dead air. @zviryatko do you intend on maintaining your plugin? I really like it when it works but I’m considering ditching it for a custom coded solution.
zviryatko
Hello Steph,
I’m doing some small steps, usually helping people with some custom css to fix their theme. But still, have some plan for fixing supports of old themes and providing a version with better support per user.
Ivan
Thanks!
hamied hassan
i would like icon to other menu i can do it by this way
NenaRahin
I can’t edit files . I want to add custom image sizes but when I try to save , it shows
“Unable to save file: Permission denied ‘/var/www/html/wp-content/plugins/menu-image/menu-image.php’ ”
The message also displays whenever I try to edit any files [by atom editor]. Can you please help. Thanks in advance
Jenna
I was wondering if there was a way to have the image line up evenly with the title? That way the image doesn’t fall in the middle but aligns on the bottom.
David
I’m sure this is going to be helpful. Especially that font-awesome will always not have enough icons.
Catalin
The plugin is not available. Please upload a new link, or change the plugin refeer.
CC
Hi There! I’ve been using Menu-Icons but there is no way to place icon ABOVE the Menu Text with that plugin. Does the Menu Image plugin allow this option? If not, how would I tweek either plugin to make this work. PS: Not a developer so the simpler/more detailed the instructions the better! Thanks much!
YJ
Hi, i added a shortcode in the description textbox there :[glt language=”English” Label=”English”],
after using this plugin, this shortcode no function and display icon only on my page,anyone can help?
Chris
that worked really well, thanks!
Geoff Cox
Hello
‘have just tried the “Menu Image” plugin and have added the Facebook and the Youtube pics form my own Media Library.
But !! I am using the Twenty Sixteen Theme which uses genericons for the social media menu and they are still there!
I want to replace them with my own images. How do I remove the genericons?
Cheers
Geoff
Amanda
This plugin isn’t working. But I do have an option for icons … but I don’t have the Font Awesome Menu Icons installed … is it possible that maybe it’s built into the theme and it’ conflicting with this plugin?
Sean Vandenberg
Sheesh, thanks. This saved me lots of time I would have spent coding otherwise. Typically, I use ionicons or font awesome for menus – but the customer is always right!
Again, super thanks!
Jay
I basically added this to the Menu label
………………………..
It basically turns the text white and my background is white.
A proper solution would be ideal.
Evik
Hi, this plugin would be perfect, if the hide of the original text would work. I prefer just having my image instead of the text and even if I set “hide”, the text is still showing, on the left of the image. Any ideas why?
Thanks for help.
Madeline
This all works great, except that each image is stuck behind the text in the navigation bar instead of sitting to the side of it. I think the problem is that each section of the nav bar menu is the exact size of the text so it’s pushing the images inwards to fit into the space. I’ve tried various things with padding, image size etc but can’t get it to work. Thanks for any help with fixing this!
Madeline
Hi guys, does anyone have any thoughts on this please? I’m really stuck and I feel like there should be a straightforward way of fixing it! Thanks,
Madeline
I found a solution so am posting in case this is of use to others. I set a ‘min-width’ element for each item in the navigation menu, and reduced padding, margins and text-size to make sure there is enough room for all the items to fit on one line. It’s not a 100% ideal solution because it will look slightly different depending on screen size, but this is the best I could come up with.
Kristine
Thank you for this! I looked all over before I found this as the solution to my client’s problem. Love that I could replace ONE BUTTON instead of EVERYTHING.
Mahilet
if you have no Navigation Label. then it deletes your menu item. for example I have a youtube icon and i don’t want any text, just a link so i have to a ‘.’ inthere
Tim Dehring
One I use heavily and recommend is Menu Icons (https://wordpress.org/plugins/menu-icons/). Allows you to choose from Font Awesome, Genericons, and many other free icon fonts for menu icons.
Mike Hale
Tim – I use Font Awesome 4 Menus https://wordpress.org/plugins/font-awesome-4-menus/ on a site, but I’ll have to check that one out. Thanks for the tip.
Tim Dehring
No problem, happy to share!