あなたは写真ブログを運営したり、ストック画像を販売したり、世界と共有したい素晴らしい写真を撮ったりしていますか?その場合、オーディエンスはあなたのEXIFデータに興味があるかもしれません。
これらのタグは、訪問者があなたの写真についてさらに詳しく知ったり、購入したい画像を見つけたりするのに役立ちます。
しかし、この情報を手作業で探し出し、個別写真に追加するのはイライラする面倒な作業だ。
この投稿では、写真にEXIFタグを自動的に追加する方法を紹介します。これにより、自分でタグを追加することなく、画像の背景にあるストーリーを共有することができます。

なぜWordPressの画像キャプションにEXIFタグを表示するのか?
あなたが写真家なら、WordPressはあなたの作品をアピールするのに最適な方法です。WordPressフォトグラファーのための美しいテーマやプラグインがたくさんあり、あなたの画像を宣伝し、ブランドを構築し、さらに多くのカスタマイザーを獲得するのに役立ちます。
しかし、すでにお気づきかもしれませんが、大きな欠点があります。WordPressの初期設定では、カメラのメーカーやモデル、解像度や露出、撮影場所や時間など、交換可能な画像ファイルフォーマット(EXIF)のタグが一切表示されないのだ。
このデータは、特にデジタル写真やグラフィックをオンラインで販売している場合、訪問者が知っておくと便利です。
EXIFタグは、読者があなたの写真についてさらに詳しく知ることができるため、写真ブログを運営している場合にも役立ちます。
このデータを取得し、手作業でサイトに追加するのは、特にさまざまな写真がある場合、時間と労力がかかります。この情報を毎回手作業で追加するのであれば、一貫性のあるデザインを作成することも難しいでしょう。
ということで、プラグインを使ってキャプションにEXIFタグを自動的に追加する方法を見てみましょう。どちらの方法も、タグを一貫した方法で表示しながら、時間を大幅に節約することができます。
以下のクイックリンクから、使いたい方法に直接ジャンプできます:
方法1:特定の写真のキャプションにEXIFタグを追加する
特定の写真にだけEXIFタグを表示したい場合があります。例えば、有名なランドマークの写真には位置情報タグを表示し、自宅の写真には非表示にすることができます。
Exif Captionを使えば、特定の写真にEXIFタグを追加できるので、コントロールしながら時間を節約できます。
最初に必要なことは、Exif Captionプラグインをインストールして有効化することです。詳しくは、WordPressプラグインのインストール方法のステップバイステップガイドをご覧ください。
有効化したら、WordPressダッシュボードのMedia ” Exif Captionにアクセスしてください。ここに、EXIFデータを持つすべての写真が表示されます。
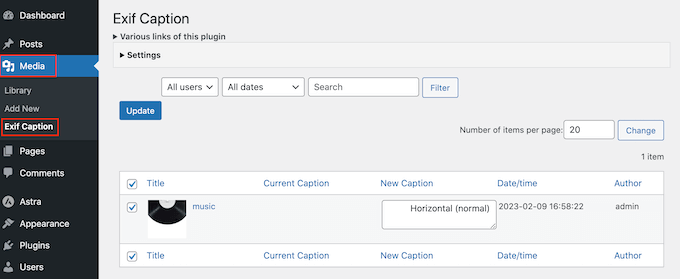
Exif Captionを設定するには、「設定」セクションをクリックして展開します。
まず、現在の画像のキャプションをEXIFデータに置き換えるか、元のキャプションの横にタグを表示するかを選択できます。
現在のキャプションを上書きしたくない場合は、「左に挿入」または「右に挿入」のいずれかを選択します。プラグインは、WordPressブログのオリジナル画像キャプションの前または後にタグを追加します。
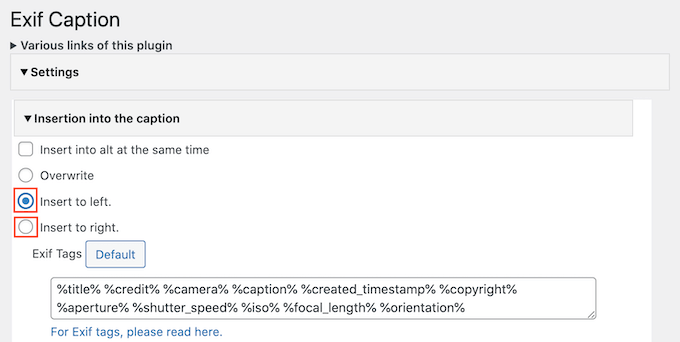
次に、画像のキャプションに追加できるすべてのEXIFタグが表示されます。
初期設定では、Exif Captionは使用可能なタグをすべて追加するので、使用したくないタグは削除してください。

タグを削除してから気が変わった場合は、「初期設定」ボタンをクリックします。これで利用可能なEXIFタグがすべて追加されます。
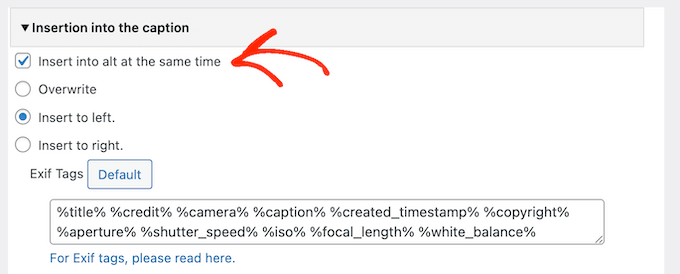
プラグインは画像のaltテキストにEXIFデータを追加することもできます。これはSEOを向上させるかもしれませんが、重複コンテンツになる可能性もあるので、慎重に使用することをお勧めします。
altテキストにEXIFタグを追加するには、「同時にaltに挿入する」にチェックを入れる。
プラグインの設定に満足したら、忘れずに「変更を保存」をクリックしてください。
これで、画像のキャプションにEXIFデータを追加する準備が整いました。画像のリストを表示し、EXIFデータを表示したい写真の横にあるボックスにチェックを入れるだけです。

これらの画像のキャプションにEXIFタグを追加するには、「更新」をクリックするだけです。
同時にaltに挿入」を選択した場合、プラグインはタグを画像のaltフィールドにもコピーします。
これで、これらの写真をページや投稿に追加するたびに、WordPressは自動的に画像のキャプションにEXIFタグを表示します。
方法2:すべての写真のEXIFデータを自動的に表示する
すべての画像にEXIFタグを表示したいですか?それなら、キャプションにこの情報を自動的に追加してくれるプラグインを使う方が理にかなっています。
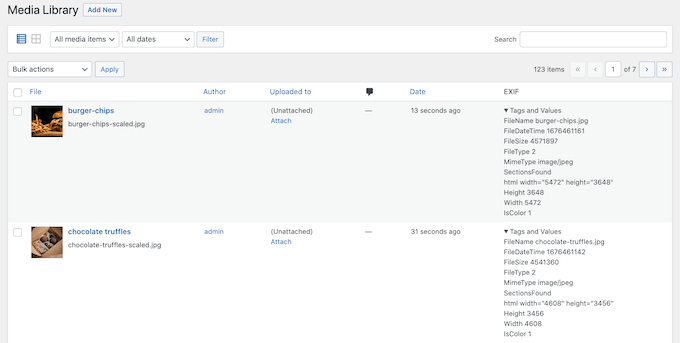
Exif Detailsは、WordPressの管理ダッシュボードに詳細なEXIF情報を表示します。また、これらのタグを画像のキャプションに自動的に追加できるので、一貫した方法で表示されます。
カスタマイザー・コードを書く必要があるので、初心者に優しい方法ではないことに注意してほしい。
Exif Detailsは、WordPressに画像を最初にアップロードしたときにEXIF情報も取得します。つまり、すでにメディアライブラリに追加した画像のEXIFタグは表示されません。
とはいえ、このプラグインは、写真ブログを始めたばかりだったり、これまでアップロードした画像の数が少なかったりする場合に最適な傾向がある。
まず、Exif Detailsプラグインをインストールして有効化する必要があります。詳しくは、WordPressプラグインのインストール方法のステップバイステップガイドをご覧ください。
有効化したら、メディア ” ライブラリを開き、’EXIF’カラムを見てください。
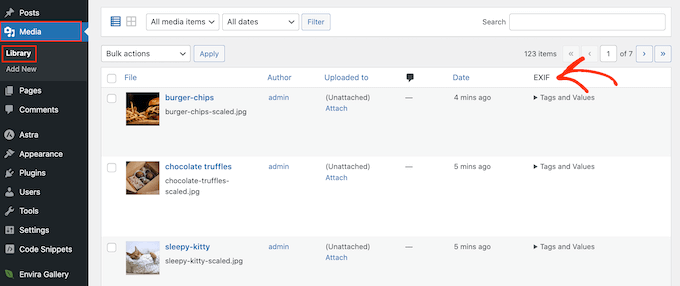
特定の画像のタグを見るには、「タグと値」テキストをクリックします。
次に、表示したいデータのEXIFコードをメモする。例えば「DateTimeOriginal」は、ファイルが作成された日時を示す。
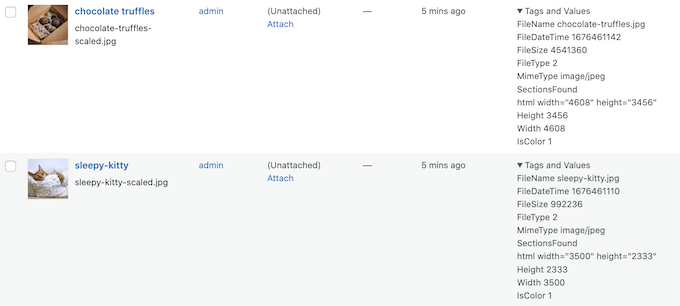
使用可能なタグの完全なリストについては、EXIFタグのページをご覧ください。
これらのタグを取得したら、WordPressにカスタマイザー・コードを追加しましょう。多くの場合、ガイドではテーマのfunctions.phpファイルを直接編集するように指示されますが、これはWordPressの一般的なエラーをすべて引き起こす可能性があります。
また、次にWordPressテーマを更新したときにカスタムコードが失われてしまいます。そのため、代わりにWPCodeを使用することをお勧めします。
WPCodeはWordPressのための最高のコードスニペットプラグインで、あなたのサイトにPHP、CSS、HTML、JavaScriptのスニペットを無制限に追加することができます。つまり、Exif Detailsだけでなく、さまざまなタスクやプラグインにすべて使用できる。
最初に行う必要があるのは、無料のWPCodeプラグインをインストールして有効化することです。詳しくは、WordPressプラグインのインストール方法のステップバイステップガイドをご覧ください。有効化したら、Code Snippets ” Add Snippetにアクセスしてください。
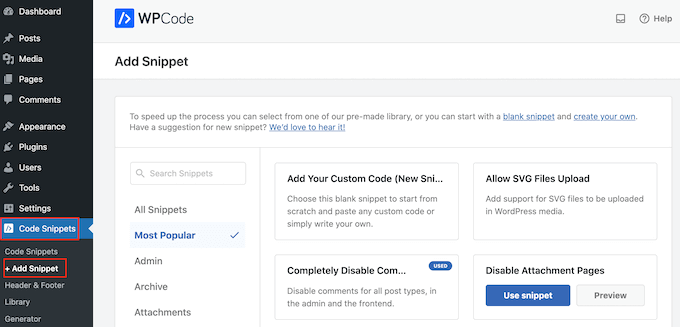
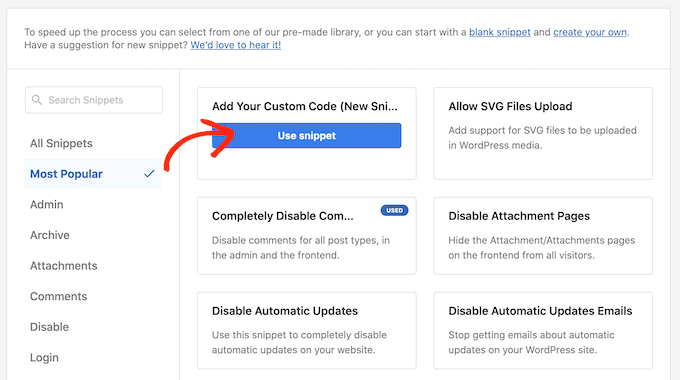
ここでは、サイトに追加できるすべての既製のWPCodeスニペットを見ることができます。管理画面にアイキャッチ画像カラムを追加するスニペット、ユーザーがサイトに画像をアップロードできるようにするスニペット、添付ファイルページを無効化するスニペットなどがあります。
カスタムコードを追加」にマウスオーバーし、表示されたら「スニペットを使用」ボタンをクリックするだけです。
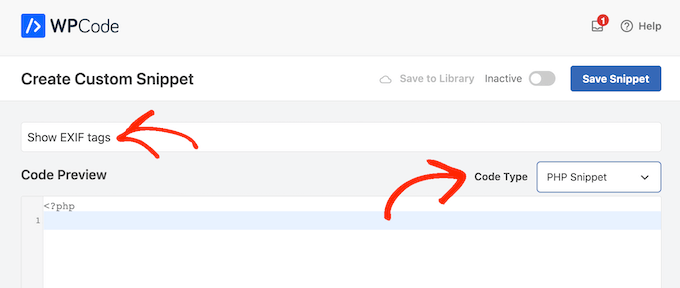
はじめに、カスタムコードスニペットのタイトルを入力します。これは、WordPressダッシュボードでスニペットを識別するのに役立つものであれば何でも構いません。
その後、「コードタイプ」のドロップダウンを開き、「PHPスニペット」を選択する。
コードプレビュー」エディターで、EXIFタグを取得し、その情報を画像のキャプションに追加するスニペットを追加する必要があります。
例えば、ファイルの撮影日時を取得するスニペットを以下に示す:
1 2 3 4 5 6 7 8 9 10 11 12 13 14 15 16 17 18 19 20 21 22 23 24 25 26 27 28 29 30 31 32 33 34 35 36 37 38 39 40 41 42 43 44 45 46 47 48 49 50 51 52 53 54 55 56 57 58 | function exif_details_change( $exifdatas, $id ) { if ( array_key_exists( 'DateTimeOriginal', $exifdatas ) ) { $shooting_date = str_replace( ':', '-', substr( $exifdatas['DateTimeOriginal'], 0, 10 ) ); $shooting_time = substr( $exifdatas['DateTimeOriginal'], 10 ); $exifdatas['DateTimeOriginal'] = $shooting_date . $shooting_time; } return $exifdatas;}add_filter( 'exif_details_data', 'exif_details_change', 10, 2 );function media_caption( $metadata, $id ) { $mime_type = get_post_mime_type( $id ); if ( in_array( $mime_type, array( 'image/jpeg', 'image/tiff' ) ) ) { do_action( 'exif_details_update', $id ); $exifdatas = get_post_meta( $id, '_exif_details', true ); if ( ! empty( $exifdatas ) ) { $camera = null; $f_number = null; $s_speed = null; $iso = null; $date = null; $googlemap = null; if ( array_key_exists( 'Model', $exifdatas ) ) { $camera = 'Camera:' . $exifdatas['Model']; } if ( array_key_exists( 'ApertureFNumber', $exifdatas ) ) { $f_number = 'F-number:' . $exifdatas['ApertureFNumber']; } if ( array_key_exists( 'ExposureTime', $exifdatas ) ) { $s_speed = 'Shutter speed:' . $exifdatas['ExposureTime']; } if ( array_key_exists( 'ISOSpeedRatings', $exifdatas ) ) { $isodata = json_decode( $exifdatas['ISOSpeedRatings'] ); if ( is_array( $isodata ) ) { $iso = 'ISO:' . $isodata[0]; } else { $iso = 'ISO:' . $isodata; } } if ( array_key_exists( 'DateTimeOriginal', $exifdatas ) ) { $date = 'Date:' . $exifdatas['DateTimeOriginal']; } if ( array_key_exists( 'latitude_dd', $exifdatas ) && array_key_exists( 'longtitude_dd', $exifdatas ) ) { $googlemap = '<a href="https://www.google.com/maps?q=' . $exifdatas['latitude_dd'] . ',' . $exifdatas['longtitude_dd'] . '">Google Map</a>'; } $caption = sprintf( '%1$s %2$s %3$s %4$s %5$s %6$s', $camera, $f_number, $s_speed, $iso, $date, $googlemap ); $caption = rtrim( $caption ); $caption = preg_replace( '/\s(?=\s)/', '', $caption ); $media_post = array( 'ID' => $id, 'post_excerpt' => $caption, ); wp_update_post( $media_post ); } } return $metadata;}add_filter( 'wp_generate_attachment_metadata', 'media_caption', 10, 2 ); |
異なるEXIFデータを表示するには、上記のコード・スニペットを調整するだけです。
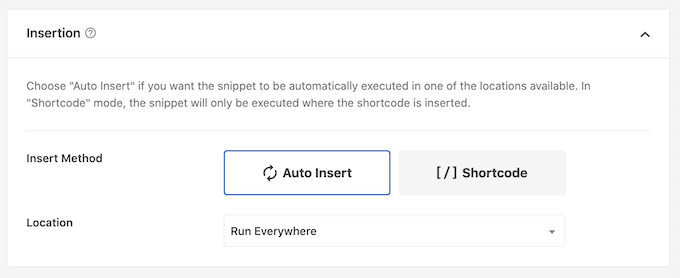
コードに満足したら、「インサーター」セクションまでスクロールしてください。WPCodeは、投稿の後、フロントエンドのみ、管理者のみなど、様々な場所にPHPを追加することができます。
カスタムPHPをWordPressサイト全体で使用したいので、すでに選択されていなければ「Auto Insert」をクリックする。次に、「Location」ドロップダウンを開き、「Run Everywhere」を選択する。
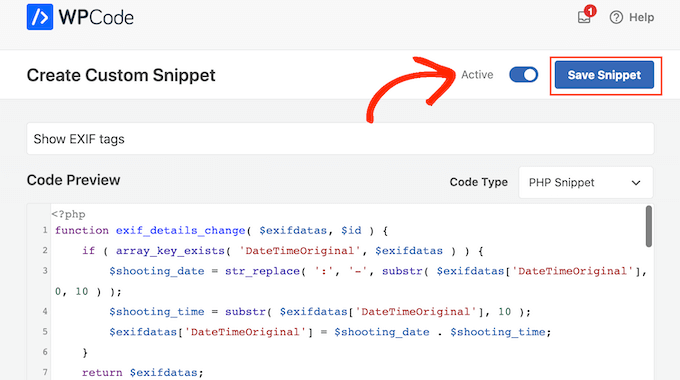
その後、画面を一番上までスクロールし、「Inactive」トグルをクリックすると、「Active」に変わります。
最後に「Save Snippet」をクリックして、PHPスニペットをライブにする。
これで、Exif Detailsは新しい画像をアップロードするたびにタグを取得します。そして、この情報を画像のキャプションに自動的に追加します。
これを試すには、メディア ” ライブラリに行き、「新規追加」をクリックする。
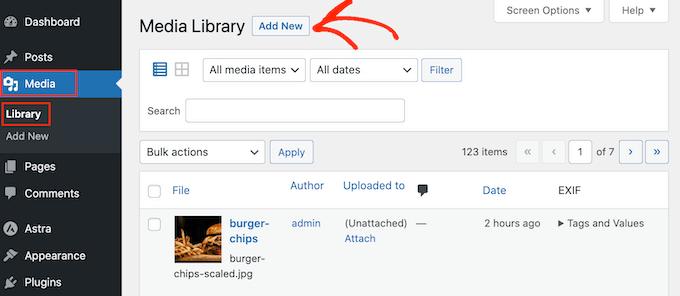
コンピューターから画像をアップロードできるようになりました。
その後、メディア ” ライブラリに戻り、クリックして画像の「タグと値」を展開する。
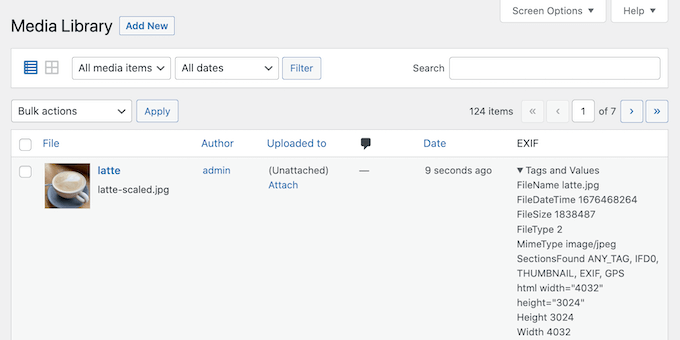
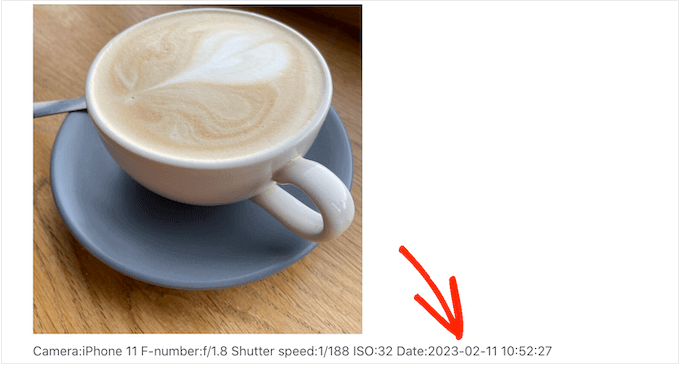
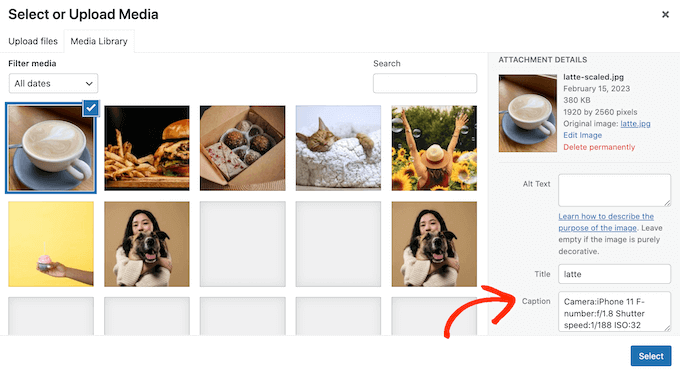
写真に正しいEXIFタグが付いていれば、WordPressは自動的にキャプションにこの情報を追加します。
たとえば、次の画像では、WordPressがすでに撮影日時を画像のキャプションに追加していることがわかる。
このチュートリアルで、WordPressでEXIFフォトタグを追加する方法を学んでいただけたら幸いです。また、アルバムでフォトギャラリーを作成する方法や、WordPressのスライダープラグインのエキスパートピックもご覧ください。
If you liked this article, then please subscribe to our YouTube Channel for WordPress video tutorials. You can also find us on Twitter and Facebook.


Have a question or suggestion? Please leave a comment to start the discussion.