
住所フィールドにオートコンプリートを追加することで、WordPressのフォームをよりユーザーフレンドリーにすることができます。ユーザーが住所を入力する際、候補の中から素早く住所を選ぶことができ、入力のスピードアップとエラーの軽減につながります。
最近、あるユーザーから、フォームのオートコンプリートの設定方法について問い合わせがありました。オートコンプリートを使えば、ユーザーはよりスムーズな操作で正確な住所入力を行うことができます。
この投稿では、Google Places APIを使ってWordPressサイトに住所オートコンプリートを追加する手順を説明します。フォームを改善し、より効率的にする簡単な方法です。

なぜWordPressにオートコンプリート・フィールドを追加するのか?
WordPressにオートコンプリートのアドレスフィールドを追加することで、サイトのユーザーエクスペリエンスを向上させることができます。
例えば、eコマースストアを経営している場合、カスタマイザーは住所を素早く入力でき、タイプミスを防ぐことができます。
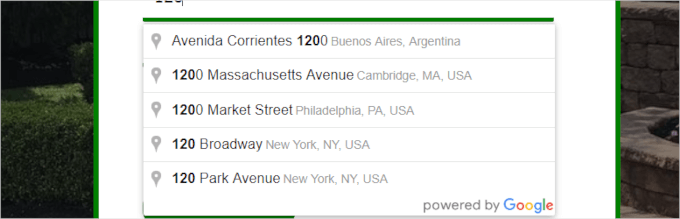
買い物客が住所を入力すると、現在地から考えられる住所が画面に表示されるので、買い物客は正しい住所を選ぶだけでよい。ユーザーに表示されるオプションはGoogle PlacesやGoogle Maps APIと連携しているため、エラーを減らすことができる。
アドレスフィールドのオートコンプリートは、ユーザーに提供できる最も便利な機能の1つです。購入手続きを素早く済ませることができれば、購入者は購入手続きを完了する可能性が高くなります。
これにより、売上が向上し、時折来店するカスタマイザーを常連客に変えることができる。
WordPressにオートコンプリートのアドレスフィールドを追加するメリットをご理解いただけたところで、ステップ・バイ・ステップでその方法をご紹介します。
この投稿で取り上げるすべてのステップを簡単に紹介しよう:
準備はいいかい?まずは動画チュートリアルから。
動画チュートリアル
文書による指示がお好きな方は、このまま読み進めてください。
ステップ1: オートコンプリートGoogleアドレスのインストールと有効化
まず最初に行う必要があるのは、オートコンプリートGoogleアドレスプラグインを インストールして有効化することです。
詳しくは、WordPressプラグインのインストール方法のステップバイステップガイドをご参照ください。
有効化したら、WordPressダッシュボードから設定 ” オートコンプリートに移動して、プラグインの設定を行いましょう。

その後、Google Places API Keyの入力を求められます。このAPIキーにより、あなたのサイトはGoogleマップと接続し、Googleマップのデータベースからオートコンプリート候補をリアルタイムで取得することができます。
ステップ2:Google Places APIキーにアクセスする
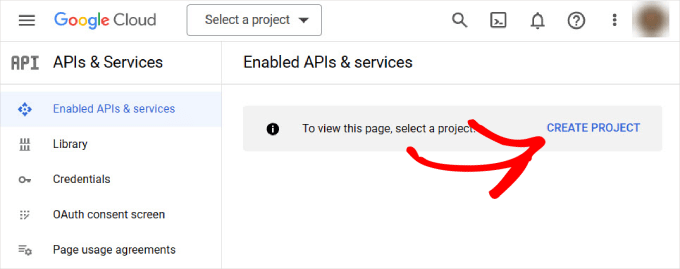
Google Places API キーにアクセスするには、Google Developer Consoleサイトにアクセスし、新規プロジェクトを作成します。
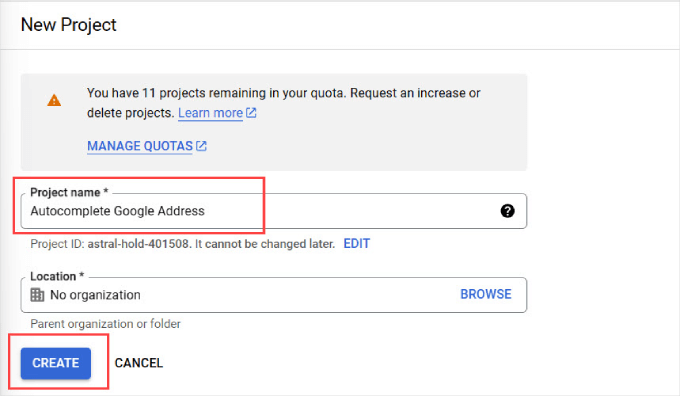
プロジェクトの名前を入力するページが表示されます。プロジェクトを簡単に識別できる名前を使用することをお勧めします。
次に、「作成」ボタンをクリックします。
接続したい組織がある場合は、’Browse’リンクをクリックすると、オプションのドロップダウンが表示されます。
数秒待つと、自動的に「API & Services」ページにリダイレクトされます。
ここから左サイドパネルに移動し、「ライブラリ」タブをクリックする。
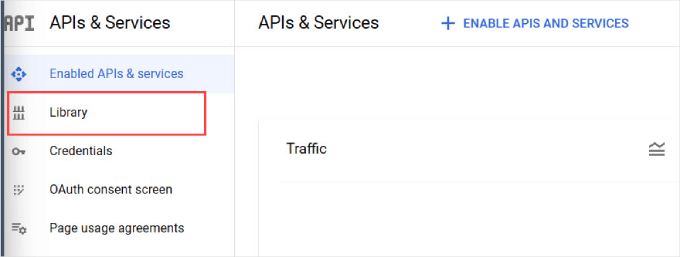
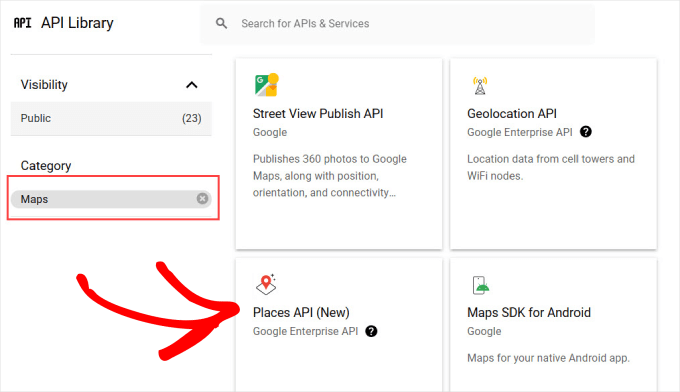
これで、プロジェクトで有効化できる一般的なGoogle APIのリストが表示されます。左側のパネルで「Maps」を選択し、マップに関連するオプションをフィルターにかけます。
ここから、「Places API」オプションを見つけてクリックする必要がある。
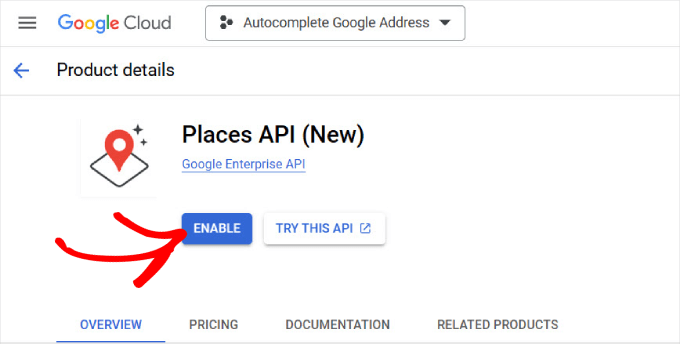
Places API」の概要ページが表示されます。
有効化」ボタンをクリックするだけで、APIが認可されます。
Google Consoleが正しく設定されていれば、APIキーのポップアップウィンドウが表示されるはずです。
ただし、Google Consoleアカウントを初めて設定する場合は、請求先情報を入力する必要があります。

これでWordPressサイトに戻ることができる。
次に、Google Consoleの’Google Place API Key’と書かれているところにAPIキーを貼り付けます。

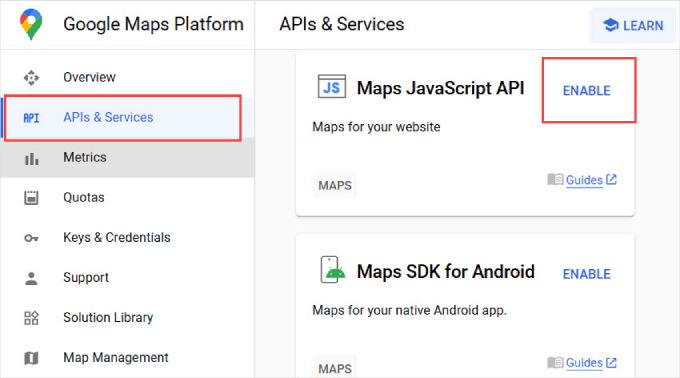
WordPressで住所のオートコンプリートが機能するようにするには、Google Maps JavaScript APIを有効化する必要があります。
つまり、Google Developer Consoleのダッシュボードから「API & Services」タブに戻るだけだ。そして、’Maps JavaScript API’を見つけて、’有効化’をクリックしたい。
これで、フォームIDの追加に移る準備ができました。
次のステップでは、住所のオートコンプリート機能を追加したい住所フィールドのフォームIDが必要です。
ステップ 3: WordPressのフォームフィールドでアドレスのオートコンプリートを有効化する
WordPress フォームビルダープラグインで作成されたフォームフィールドにオートコンプリート機能を追加することができます。
このチュートリアルではWPForms を使用します。WPFormsはドラッグ&ドロップでフォームを作成できる最高のツールであり、初心者にとって最も簡単だからです。しかし、あなたがどのお問い合わせフォームプラグインを使用していても、これらの説明は機能します。
まず、住所フィールドまたは住所フィールドのセットを持つフォームを作成する必要があります。フォームの作成が完了したら、通常と同じようにWordPressサイトにこのフォームを追加することができます。お問い合わせフォームの作成方法については、こちらをご覧ください。
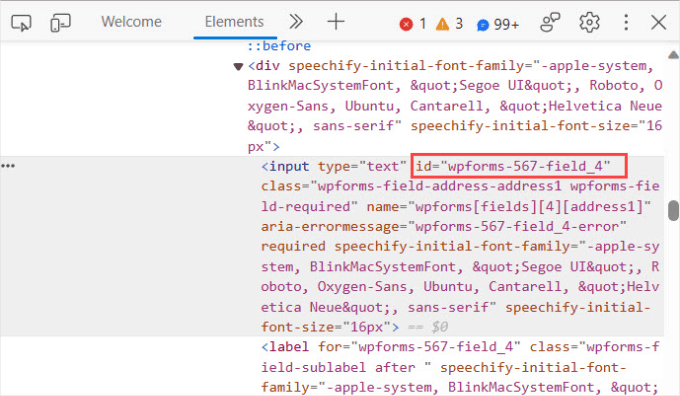
次に、フォームを追加した投稿またはページを開き、アドレスフィールドを右クリックして、ブラウザーメニューから「Inspect」を選択しましょう。
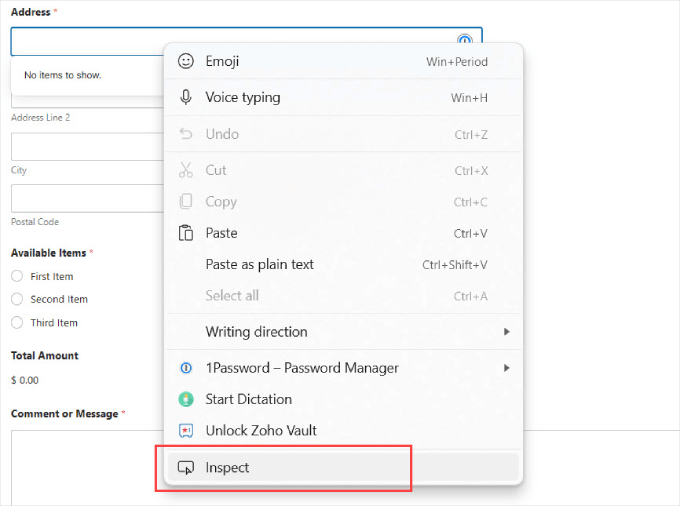
ここでは、入力フィールドのフォームID値がハイライトされた部分が表示されます。
例えば、このスクリーンショットでは、フォームのID値はwpforms-567-field_4です。
この値をコピー&ペーストしてプラグイン設定ページに貼り付けてください。
しかし、住所フォーム全体にオートコンプリート機能を追加したいでしょう。例えば、ユーザーが配送先住所全体をオートフィルできるようにしたい場合、市区町村、開始地、郵便番号をオートフィルする必要があります。
この場合、「Inspect」をクリックし、各フィールドのフォームIDを見つけて、同じプロセスを踏む必要がある。

IDをすべて取得したら、「オートコンプリート」ページの「フォームID」と書いてあるところにコピーしてください。
複数のIDを追加する場合は、以下のように各IDをコンマで区切り、引用符で囲む必要があります。

完了したら、『変更を保存』を押すのをお忘れなく。
これですべてです。フォームページにアクセスして、住所を入力してみてください。フォームフィールドにはGoogleプレイスやGoogleマップを使った候補が自動的に表示されます。

これで Google アドレスオートコンプリート機能がフォームに追加されました。ユーザーがWooCommerce ストアでチェックアウトする場合でも、ユーザー登録のサインアップを完了する場合でも、フォームに自動入力できるようになります。
ボーナスのヒントWordPressでフォームの放棄をトラッキングして減らす
フォーム放棄とは、ユーザーがフォームを送信せずに離脱してしまうことです。
フォームからの離脱を減らすことは、メールリストの増加、eコマースの売上、そしてビジネス全体の成功に影響するため重要です。調査によると、オンラインショッピング利用者の77%以上が購入手続きを完了していないそうです。
よく放棄されるフォームをトラッキングし、改善することで、このような収益損失を減らすことができます。オートコンプリートは役立ちますが、フォーム放棄の要因は他にもあります:
- オプション設定が必須に:必要のない情報を入力させることは、本当に迷惑なことです。
- 不明瞭な指示:わかりにくかったり、あいまいなフォームフィールドは、人々をあきらめさせます。
- モバイルでの使いにくさ:モバイル端末で使いにくいフォームは、大きな反感を買う可能性があります。
- 技術的な問題:フォームがうまく動作しなかったり、読み込みに時間がかかったりといった問題は、人々がフォームに記入するのを止めてしまう可能性があります。
詳しくは、WordPressでフォーム離脱をトラッキングして減らす方法をご覧ください。
WordPress で住所フィールドにオートコンプリートを追加する方法について、この投稿がお役に立てれば幸いです。また、よりインタラクティブなフォームを作成し、コンバージョンを増加させるための専門家のヒントや、WordPress フォームのカスタマイズとスタイルについてのガイドもご覧ください。
If you liked this article, then please subscribe to our YouTube Channel for WordPress video tutorials. You can also find us on Twitter and Facebook.


 in 2024")
M K Soleman Ahmed
It is not working now.
WPBeginner Support
Thank you for letting us know, we’ll be sure to take a look and find an alternative.
Admin
Vinod
autocomplete is coming in the first filed but not in zip and state fields, please advice.
WPBeginner Support
Hi Vinod,
Sadly, for that customization, you would need to reach out to the plugin’s support for if they currently support multiple fields
Admin
Mooki
It works thanks, I had searched of websites and plugins and nothing worked until I got to this helpful site
WPBeginner Support
Glad our site could help you
Admin
Fabiano Hirtz
I have a travel site, tours and transfers, I would like to install this tool, when the client selected the place of visit and the arrival was not transferred, or tour, but it is not a contact form, but rather a search form, does it work? I put the class, did everything correctly, it still does not work. Can someone help me?
Jay Kuntal
Hey, I tried a lot with getting API. It works fine when i use custom code from google on code pen. But when i put the same API on this plugin, it doesn’t work.
I have enabled two APIs – Places Web and Maps JS with credentials on Places Web.
What am i missing here
Thanks
ahmer
Hi jay,
did you get it working? i’m stuck, can’t seem to get it working.
Tess
Curious to know how to set a default country to appear first (instead of the default US addresses). Do you have any idea if there is a shortcode or some way to do this with this plugin?
BTW, I got the plugin working by just adding into the “Name” field. It works fine for me apart from wanting it to show AU addresses first.
asima
How to populate the ‘current location’ in ‘area/neighborhood ‘ select dropdown as the first select option (rest of the options coming from the database) ?
steve hajjaj
Hi there thanks for the article. I have followed the process you described but I still cannot get autocomplete to work at all. Is there something wrong with my google developers account ? as I can see the 2 APIs are enabled but cannot see any requests. Thanks
WPBeginner Support
Hi Steve,
Make sure that you are targeting the correct CSS class or ID used by your form’s address field.
Admin
Luke
I found a bug. When you type in the name of the business, the auto-completed address does NOT include the street number, only the street name (Main St, not 123 Main St). Big problem!!!
Luke
Also, the zip code is always missing!
Luke
Also, the only thing that comes through on form submission is the keys a user started typing. The address the user selects is what is shown, but not what is submitted with the form
WPBeginner Support
Hey Luke,
If you think you have found a bug, then please report it to plugin authors. They may be aware of a fix or can then work on it.
Admin
Sarah
If there is one thing we are mindful; it’s the ‘mission creep’ of Google into websites and related app areas.
Where able, we try not to engage google into our sites so as to remain ‘in control’ in what we do.
But thanks for the insight …
Camilo
Can it be possible to have the autocomplete fill out the zipcode, state and country as well? I just followed everything here and the address populates automatically but the user still has to manually input their zip code, state, and city
WPBeginner Support
Hi Camilo,
Currently it is only possible if you use the single field for complete address.
Admin
Zafar Rathore
Excellent article for autocomplete. I was looking for such a easy to go method and you guys made it.
Autocomplete really saves a lot of time for end users which ultimately contributes to user friendly environment.
Keep it up guys.
Thank you
Nicholas Johnson
I’m planned to create WP form with autocomplete, but I don’t know how to do that. After reading this post, I have an idea to create auto-complete forms.