WordPressにアップロードする前に画像を最適化することで、ウェブサイトのスピードが大幅に向上します。しかし、多くの初心者は、最適化されていない画像をアップロードしているだけで、遅いウェブサイトを持っています。
WPBeginnerでは、画像最適化のベストプラクティスを通常のブログ執筆の一環としています。すべての作者が適切な寸法の画像を作成し、さまざまなグラフィックツールを使って画像ファイルサイズを縮小するようにしています。
この投稿では、画質を落とさずにウェブパフォーマンスを高速化するために画像を最適化する方法を紹介します。また、WordPress用の自動画像最適化プラグインもご紹介します。
本書はウェブにおける画像の最適化に関する包括的なガイドであるため、わかりやすい目次を作成しました:
- What Is Image Optimization?
- What Are the Benefits of Image Optimization?
- How to Save and Optimize Images for Web Performance
- Best Image Optimization Tools and Programs
- Best Image Optimization Plugins for WordPress
- Final Thoughts and Best Practices for Image Optimization
- Expert Guides on Improving WordPress Performance
1.画像の最適化とは?
画像の最適化とは、全体的な画質を落とすことなく、可能な限り小さなファイルサイズで画像を保存し、配信するプロセスです。
このプロセスは複雑に聞こえますが、実は最近ではとても簡単です。数ある画像最適化プラグインやツールを使えば、画質を落とすことなく画像を最大80%まで自動的に圧縮することができる。
最適化された画像と最適化されていない画像の例です:
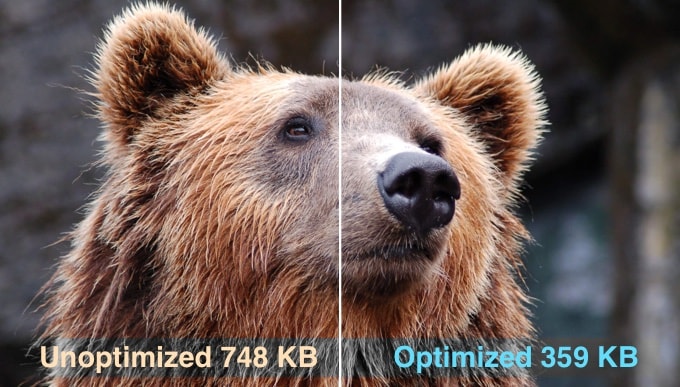
ご覧のように、適切に最適化された場合、同じ画像でも画質を落とすことなく、元の画像より最大80%小さくすることができます。この例では、画像は52%小さくなっています。
Imagelyの最適化とは?
簡単に言えば、画像の最適化は圧縮技術によって行われます。
圧縮には「非可逆」と「可逆」がある。
ロスレス圧縮は、画質をまったく損なうことなくファイルサイズ全体を縮小します。非可逆圧縮の場合、画質がわずかに低下することがありますが、訪問者に気づかれないのが理想です。
画像を最適化するとはどういうことか?
WordPressのホスティングサポートやスピードテストツールから画像を最適化するよう勧められ、何をすればよいのか悩んだことがあるかもしれません。
ウェブ用に画像を最適化することで、ファイルサイズを小さくする必要があります。その方法を順を追って説明します。
2.画像最適化のメリットとは?
画像を最適化することには多くのメリットがありますが、ここではその中でも特に知っておくべきメリットをご紹介します:
- サイトの高速化
- SEOランキングの向上
- 販売とリードの全体的なコンバージョン率の向上
- ストレージと帯域幅の削減(ホスティングサービスとCDNのコストを削減できる)
- サイトバックアップの高速化(バックアップストレージのコストを削減できる)
Imagelyは動画の次に重い項目です。HTTPアーカイブによると、画像は平均的なウェブページの総重量の42%を占めている。
検索エンジン(SEO)で上位に表示され、コンバージョン率が向上することが分かっているため、画像の最適化は、オンラインで成功したいのであれば、すべてのビジネスウェブサイトが行う必要があります。
さて、画像の最適化が本当にどれほどの違いをもたらすのか、不思議に思うかもしれない。
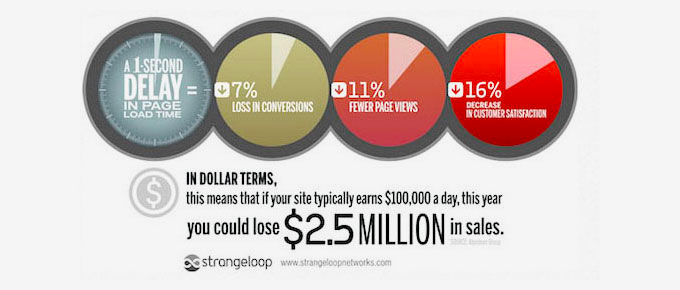
ストレンジループの調査によると、サイトの読み込み時間が1秒遅れると、売上が7%、ページビューが11%減少し、顧客満足度が16%低下するという。
サイトを高速化する理由がこれだけでは十分でない場合は、Googleなどの検索エンジンも読み込みの速いサイトをSEO的に優遇していることを知っておく必要があります。
つまり、画像をウェブ用に最適化することで、サイトのスピードアップと WordPressのSEOランキングの向上を同時に実現できるのです。
動画チュートリアル
もし、文章での説明がお望みなら、このまま読み進めてほしい。
3.ウェブパフォーマンスのための画像の保存と最適化方法
ウェブパフォーマンスのための画像最適化を成功させる鍵は、最小のファイルサイズと許容できる画質の完璧なバランスを見つけることです。
イメージの最適化において大きな権限を持つ3つのことは、以下の通りである:
- 画像ファイル形式(JPEG vs. PNG vs. GIF)
- 圧縮(圧縮率が高い=ファイルサイズが小さい)
- 画像の寸法(縦と横)
この3つの中から適切な組み合わせを選ぶことで、画像サイズを最大80%縮小することができる。
それぞれを詳しく見てみよう。
1.画像ファイル形式
ほとんどのサイトオーナーにとって、本当に重要な画像ファイル形式はJPEG、PNG、GIFの3つだけです。適切なファイルタイプを選択することは、画像の最適化において重要な権限を果たします。
物事をシンプルにするために、写真や色の多い画像にはJPEGを、シンプルな画像や透過画像にはPNGを、アニメーション画像のみにはGIFを使いたい。
それぞれのファイル形式の違いをご存じない方のために説明すると、PNG画像形式は非圧縮なので、より高画質です。欠点はファイルサイズが大きくなることです。
一方、JPEGは圧縮ファイル形式であり、ファイルサイズを大幅に小さくするために画質を若干落としている。
一方、GIFは256色しか使わず、可逆圧縮なので、アニメーション画像に最適です。
WPBeginnerでは、画像の種類に応じて3つの画像フォーマットをすべて使用しています。
2.圧縮
次に、画像の最適化で大きな権限を持つ画像圧縮がある。
画像圧縮にはさまざまな種類とレベルがあります。それぞれの設定は画像圧縮ツールによって異なります。
Adobe Photoshop、ON1 Photo、GIMP、Affinity Photoなど、ほとんどの画像編集ツールには画像圧縮機能がビルトインされています。
また、画像を普通に保存し、TinyPNGや JPEGminiのようなウェブツールを使って簡単に画像を圧縮することもできます。
手作業が必要ですが、この2つの方法を使えば、WordPressにアップロードする前に画像を圧縮することができます。
また、Optimoleや EWWW Image Optimizerのような人気のWordPressプラグインもいくつかあり、最初に画像をアップロードするときに自動的に画像を圧縮することができます。これは便利で、多くの初心者や大企業でさえ、これらの画像最適化プラグインを好んで使用しています。
WordPressプラグインの使い方については、投稿の後半で詳しく紹介する。
3.画像寸法
通常、携帯電話やデジタルカメラから写真を取り込むと、解像度が非常に高く、ファイルサイズ(縦横)も大きくなります。
通常、これらの写真の解像度は300DPIで、サイズは2000ピクセル以上です。高品質な写真は印刷物やDTPには適していますが、サイズが大きいためサイトには不向きです。
画像の寸法をより合理的なものに縮小することで、画像のファイルサイズを大幅に減らすことができます。コンピューター上の画像編集ソフトを使って、画像のサイズを変更するだけです。
例えば、解像度300DPI、画像サイズ4900×3200ピクセルの写真を最適化しました。元のファイルサイズは1.8MBでした。
圧縮率の高いJPEGフォーマットを選択し、サイズを1200×795ピクセルに変更した。ファイルサイズはわずか103KBに縮小された。これは元のファイルサイズより94%小さい。
画像最適化における3つの重要な要素がわかったところで、サイトオーナー向けの様々な画像最適化ツールを見てみましょう。
4.最高の画像最適化ツールとプログラム
先に述べたように、ほとんどの画像編集ソフトには、画像の最適化と圧縮設定が付属しています。
画像編集ソフト以外でも、ウェブ用に画像を最適化するための強力な無料画像最適化ツールがいくつかあります(数回クリックするだけ)。
特に完璧主義者の方は、WordPressにアップロードする前に、これらのツールを使って画像を最適化することをお勧めします。
この方法は、WordPressホスティングサービスのディスクスペースを節約するのに役立ち、各画像を手動で確認するため、最高の品質で最速の画像を保証します。
アドビ フォトショップ
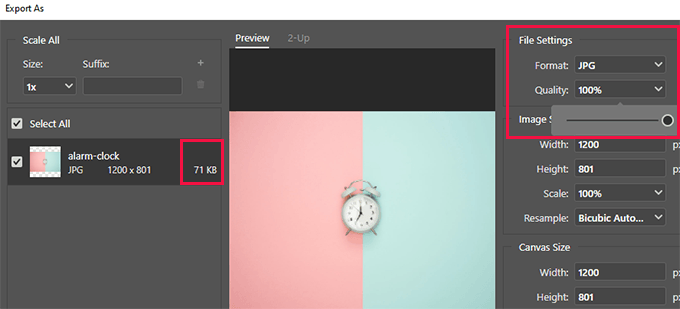
Adobe Photoshopは、ウェブ用にファイルサイズを小さくして画像を書き出すことができるプレミアム画像編集アプリケーションです。
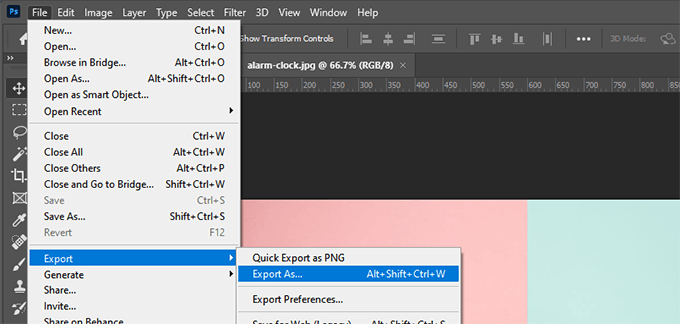
エクスポートダイアログを使って、ファイルサイズが最小になる画像ファイル形式(JPG、PNG、GIF)を選択できます。
また、画質や色、その他のオプションを減らして、ファイルサイズをさらに小さくすることもできます。
ギンプ
GIMPはAdobe Photoshopに代わるフリーでオープンソースのソフトウェアです。ウェブ用に画像を最適化するのに使える。欠点は、このリストの他のソリューションほど使いやすくないことだ。
まず、GIMPで画像を開き、ファイル ” 名前を付けてエクスポート...オプションを選択します。すると、画像のエクスポートダイアログボックスが表示されるので、そこでファイルに新しい名前を付けます。次に、「エクスポート」ボタンをクリックします。
画像の書き出しオプションが表示されます。JPEGファイルの場合、「画質」スライダーで圧縮レベルを選択し、ファイルサイズを小さくすることができます。
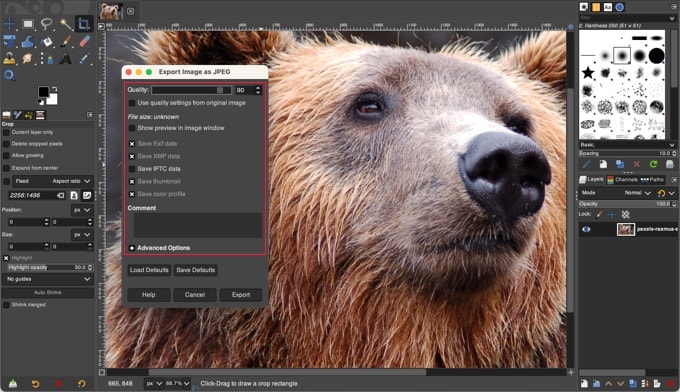
最後に、「エクスポート」ボタンをクリックして、最適化された画像ファイルを保存します。
タイニーPNG
TinyPNGは、スマートな非可逆圧縮技術を使ってPNGやJPEGファイルのサイズを縮小する無料のウェブアプリです。TinyPNGのサイトにアクセスし、ドラッグ&ドロップで画像をアップロードするだけです。
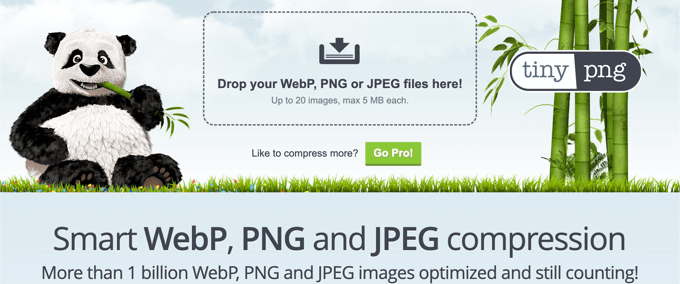
彼らは画像を圧縮し、あなたにダウンロードリンクを提供します。
また、Adobe Photoshop用の拡張機能もあり、Photoshopの内部からTinyPNGにアクセスできるため、私たちは画像編集プロセスの一環としてPhotoshopを使っています。
開発者向けには、画像を自動的に変換するAPIが用意されている。さらに、初心者のために、WordPressプラグインが用意されている。これについては後で詳しく説明する。
JPEGmini
JPEGminiはロスレス圧縮技術を使用しており、知覚される品質に影響を与えることなく画像サイズを大幅に縮小します。また、元の画像と圧縮画像の品質を比較することもできます。
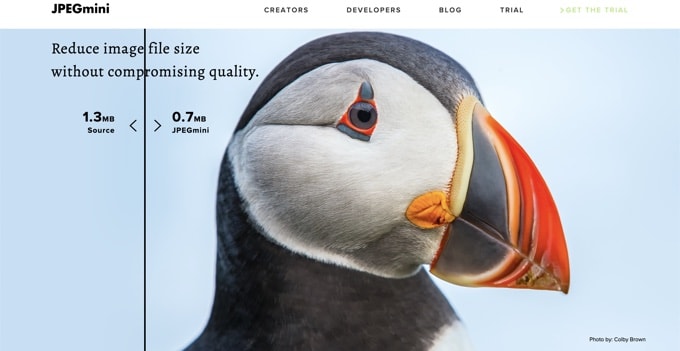
ウェブ版を無料で使うこともできるし、コンピューター用のプログラムを購入することもできる。また、サーバーのプロセスを自動化する有料APIもある。
イメージオプティム
ImageOptimは、最適な圧縮パラメータを見つけ、不要なカラープロフィールを削除することで、品質を損なうことなく画像を圧縮できるMac用ユーティリティです。
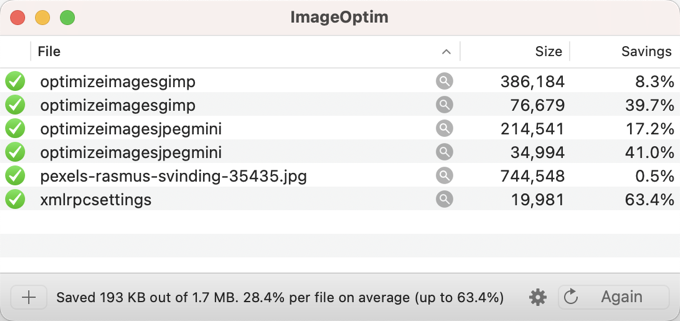
ウィンドウズでは、これに代わるものとしてトリマージュがある。
5.WordPressに最適な画像最適化プラグイン
画像を最適化する最善の方法は、WordPressにアップロードする前に行うことだと考えています。しかし、複数著者のサイトを運営していたり、自動化されたソリューションが必要な場合は、WordPressの画像圧縮プラグインをお試しください。
WordPressの画像圧縮プラグインのベストリストはこちらです:
- ThemeIsleの開発チームによる人気プラグイン、Optimole
- EWWWイメージオプティマイザー
- 上記のTinyPNGチームによるプラグイン、JPEG、PNG、WebP画像圧縮
- 人気のWP Rocketチームによるプラグイン、Imagify
- ShortPixelイメージオプティマイザ
- スマッシュ
- reSmush.it
- Envira Galleryは、画像圧縮機能を内蔵したWordPressギャラリープラグインです。
これらのWordPress画像最適化プラグインは、あなたのサイトを高速化するのに役立ちます。
6.最終的なフィードバックとイメージ最適化のベストプラクティス
もしウェブ用に最適化された画像を保存していないのであれば、今すぐそれを始める必要があります。サイトのスピードが大きく変わり、ユーザーから感謝されるでしょう。
言うまでもなく、高速なサイトはSEOに最適で、検索エンジンの順位が上がる可能性が高い。
画像の最適化以外で、サイトのスピードアップに大きく役立つのは、WordPressのキャッシュプラグインを使うことと、WordPress CDNを使うことです。
また、マネージドWordPressホスティングサービスを利用することもできます。マネージドWordPressホスティングサービスは、キャッシュとCDNの両方をプラットフォームの一部として提供していることが多いからです。
WordPressのパフォーマンス向上に関するエキスパートガイド
WordPressで画像を最適化する方法について、この記事がお役に立てば幸いです。WordPressのパフォーマンス向上に関連する他の記事もご覧ください:
- WordPressのスピードとパフォーマンスを向上させる究極のガイド
- WooCommerceのパフォーマンスを高速化する方法
- WordPressのメディアをオフロードしてサイトの速度を改善する方法
- サイトを高速化するWordPressのベストキャッシュプラグイン
- WordPressのコアウェブバイタルを最適化する方法(究極のガイド)
- WordPressで最初のバイトまでの時間(TTFB)を短縮する方法 – Expert Tips
- WordPressサイトのパフォーマンスを向上させるGTmetrixプラグインの使い方
- 最速のWordPressホスティングサービス(パフォーマンステスト)
- WordPressサイトで測定すべき重要な指標
- サイトスピードテストの正しい実施方法
- WordPressサイトのストレステスト方法
If you liked this article, then please subscribe to our YouTube Channel for WordPress video tutorials. You can also find us on Twitter and Facebook.


Jiří Vaněk
Thanks for the tutorial. Personally, I used to convert the images to .webp format first and then upload them to the web in that format. This format seems to me to be the smallest in terms of data volume and at the same time still very high quality for a good user experience. I don’t use plugins for this, but I usually convert images in online converters or in computer software.
WPBeginner Comments
The .webp format can also be a good image format to use due to it’s small file size. We happen to have a guide on how to use .webp here, including some handy plugins to convert images into .webp: https://www.wpbeginner.com/wp-tutorials/how-to-use-webp-images-in-wordpress/
Converting via a plugin can be useful because it can convert directly on the website and in bulk.
Jiří Vaněk
But if I use the plugin, won’t it take up too much space on my FTP because the original file will be there too? But I will certainly be happy to go and look at your instructions. Thanks for the link.
WPBeginner Comments
You could always delete the original files. You can use the search feature on the Media admin page to search for filetypes, such as the .png or .jpg/.jpeg extensions.
Mrteesurez
This is a comprehensive guide.
It’s essential to optimize images in order to have fast website loading and content delivery.
You quoted that images are the second heaviest after video, what of audio, is audio lighter than images and how ?
WPBeginner Comments
Audio would tend to be between images and video. That said, depending on the amount of audio and the audio filetype, this is not an exact rule and it just depends on the files in question.
Mrteesurez
Thanks for your reply, the thing is, I used to see audio files bigger in term of size than images, most images are in kilobytes while audios are usually more than that, I think the duration for a audio to be played and delivered a meaningful message also contribute to it’s size.
Michelle N
Would love to say that this has been incredibly helpful, easy to digest and implement, I appreciate all the tools provided. Thank you! – from a beginner blogger
WPBeginner Support
Glad our guide was helpful
Admin
mohadese esmaeeli
By the way, another question I have is whether, when using image optimization plugins and optimizing previously uploaded images, the new images replace the old ones? Or do the original images remain in the WordPress media library, with the optimized images alongside them?
WPBeginner Support
It would depend on the specific plugin you are using as some will replace the image while others have the option to keep the original.
Admin
Jiří Vaněk
Many of them give you a choice whether you want to keep the original images or delete them. From personal experience, I recommend keeping the original images on the website (at least as a backup).
mohadese esmaeeli
Hello,
Greetings to you. This article appears to be quite comprehensive. I became acquainted with your website a few days ago and started reading the articles. I have decided to implement the same process on my website as I read through these articles.
I quickly reached point 2, focusing on site speed. To be honest, I have been working on my site for just a few days, and I have only managed to achieve a 10% increase in site speed.
WPBeginner Support
An improvement is still an improvement, we’re glad to hear our guide is helpful
Admin
mohadese esmaeeli
Yes, that’s exactly right. In this vast and competitive world, those who are always improving their website and offering something more than their competitors will be the winners. Otherwise, we will be the losers.
Moinuddin Waheed
Having optimizes images for websites or blogs is very important for the speed of the website.
Heavy image sizes takes time to load and causes the website to slow.
I have used some of the plugins for image optimisation.
But I think best option is to use caching plugins and CDN for the websites.
it lets the website speed not only fast but also helps in retaining the visitors.
WPBeginner Support
CDNs are normally for speed instead of retention but a fast loading site does help keep your visitors and helps make them want to return
Admin
Lewis
First of all, it’s important to note that not all image file types are created equal. JPEGs are generally going to be much smaller in file size than PNGs, for example, so it’s important to choose the right file type for the job.
Additionally, when it comes to resizing images, you should always resize them before you upload them to your website. This way, you can avoid having to serve oversized images to your visitors, which can slow down your site.
Finally, I wanted to point out that there are a number of plugins available that can help you automate the process of optimizing your images. WP Smush is a great option that can help you save time and ensure that your images are always properly optimized.
WPBeginner Support
Thanks for sharing your comment
Admin
Rebecca Gelsi
This is brilliant, thank you. I’m using JPEGmini after reading this article and am so relieved to have this aspect of our site sorted.
Andy
Thanks for the normal and simple explanation. I made a few mistakes with my photo content on my site, but with the help of your explanations, I figured out exactly what I needed to do. Thank you!
WPBeginner Support
Glad our guide was helpful
Admin
Tania
So helpful!! Thank you for sharing. Quick question – If I compress my images to an optimal/acceptable KB size directly in Photoshop using the Save for web setting mentioned above, and then upload to WordPress…is there a need to also run Shortpixel or another image compression plugin? Or is that redundant?
Trying to understand if there are added benefits to using a plugin vs Photoshop. Would love to hear your thoughts. Thanks!
WPBeginner Support
The plugins are an alternative, if you optimize your images before uploading them, you wouldn’t need to use an image optimization plugin
Admin
Shiv Raj Bhatt
Great idea to optimize images for faster loading website. Thanks for the info.
WPBeginner Support
Glad you like our content
Admin
Lauren
Excellent and thorough! Thank you!
WPBeginner Support
Glad our guide was helpful
Admin
Eddier Naranjo
The optimization plugins make a copy of the “heavy” image and serve the optimized version. But that increases the storage space on the site.
Is there a way to delete the old version and leave only the optimized image?
WPBeginner Support
We would recommend checking with the support for the plugin that you are using as they normally have an option to remove the unoptimized version.
Admin