WPBeginnerでは、スクリーンショットを常に投稿に追加しています。
WordPressブログの投稿にスクリーンショットを追加することで、ステップバイステップの手順を視覚的に示したり、特定の機能を強調したり、高度なトピックに視覚的なコンテキストを提供したりすることができます。
これにより、検索エンジンのランキング、知識の保持、ユーザー体験を向上させることができる。
この初心者向けガイドでは、WordPressブログ投稿のスクリーンショットを撮る方法を順を追ってご紹介します。

ブログ投稿にスクリーンショットを撮るメリット
WordPressブログに高品質のスクリーンショットを追加することで、コンテンツをより魅力的なものにすることができます。スクリーンショットとは、モバイルやデスクトップ画面に表示されているあらゆるものの画面キャプチャやスナップショットのことです。
チュートリアルにスクリーンショットを使い、ステップバイステップでユーザーを誘導することができます。こうすることで、ソフトウェアやプラグインをセットアップする際に、どこをクリックし、何を入力すればよいかが正確にわかるようになります。
同様に、ラウンドアップやリスト投稿にもスクリーンショットを使うことができます。例えば、最高のメールマーケティングツールについて書くとします。各ツールのホームページのスクリーンショットを撮り、コンテンツに表示することができます。
スクリーンショットを撮る方法は実にさまざまなので、さまざまな端末やアプリで自分のブログのスクリーンショットを撮る方法をステップバイステップで紹介します。WordPressのプラグインを使う必要もありません。
また、簡単にご覧いただけるよう、以下のコンテンツに目次を設けました:
Droplrを使ってスクリーンショットを撮る方法
Droplrは人気の画面キャプチャアプリです。コンピューター上のスクリーンショットを簡単に撮影し、共有することができます。
Droplrは、スクリーンショットと画面録画を自動的にクラウドに保存し、他の人と共有するためのリンクを提供します。さらに、ダッシュボードからすべてのスクリーンショットを管理し、WordPressを含むあらゆるプラットフォームで高品質のコンテンツを共有できます。
Mac、Windows、Chromebook端末に対応しており、選択したエリアや画面全体をすばやくキャプチャできます。Chrome拡張機能もあるので、ブラウザーから素早くスクリーンショットを撮ることもできます。
Droplrは、Slack、Microsoft Teams、Gmail、Adobe Photoshopなどの人気アプリとも統合している。
Droplrデスクトップアプリでスクリーンショットを撮る
Droplrを使ってスクリーンショットを撮るには、まずお使いの端末にアプリをインストールする必要があります。その後、MacのメニューバーまたはWindowsのタスクバーにあるDroplrアイコンをクリックします。
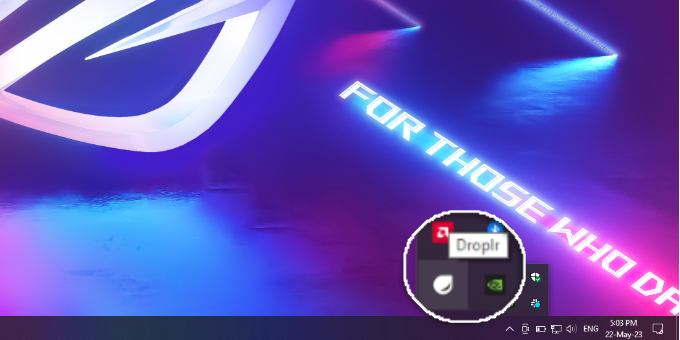
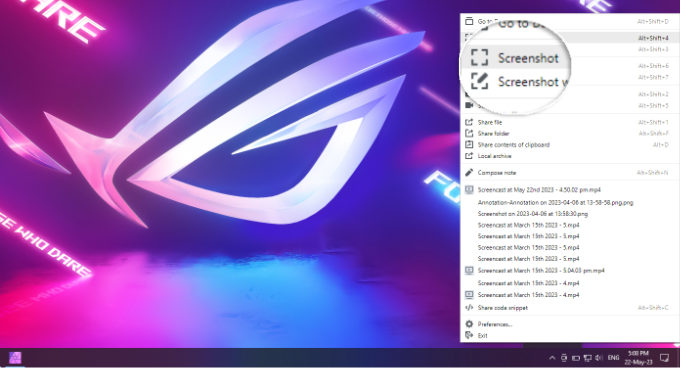
ここから、「スクリーンショット」オプションをクリックするだけです。
Macユーザーの場合は、「Option + Shift + 4」を押してもスクリーンショットを撮ることができます。Windowsの場合は、「Alt + Shift + 4」を押して、Droplrでスクリーンショットを撮ることができます。
次に、スクリーンショットを撮りたいエリアを選択します。
Droplrは、完了するとすぐにスクリーンショットをブラウザーで開きます。ここで、画像をダウンロードしたり、リンクを他の人と共有することができます。
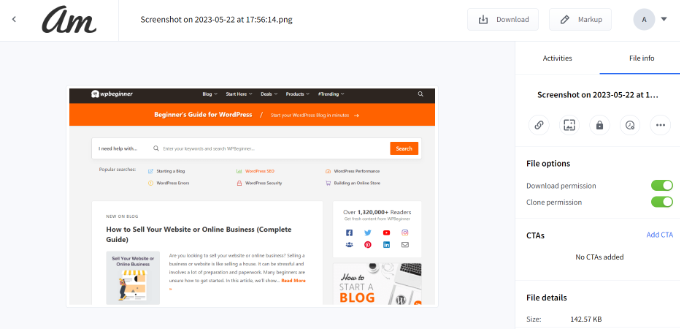
上部の「Markup」ボタンをクリックすると、スクリーンショットを編集するオプションが表示されます。
例えば、ボタンや重要な機能を指し示す矢印を追加できます。また、図形を描いたり、絵文字を追加したり、画像のさまざまな部分をぼかしたり、テキストを追加したりすることもできます。
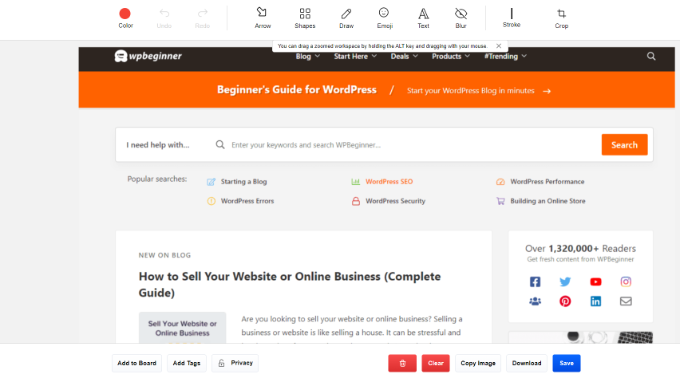
完了したら、画像を保存するかダウンロードするだけです。 それが終わったら、ブログのコンテンツに追加してください。
Droplr Chrome拡張機能を使ってスクリーンショットを撮る
Droplr Chrome拡張機能を使ってスクリーンショットや画面録画を撮ることもできます。この拡張機能はデスクトップアプリと同じように動作し、Chrome拡張ツールバーから簡単にアクセスできます。
まず、ChromeウェブストアにアクセスしてDroplr拡張機能をインストールする必要があります。
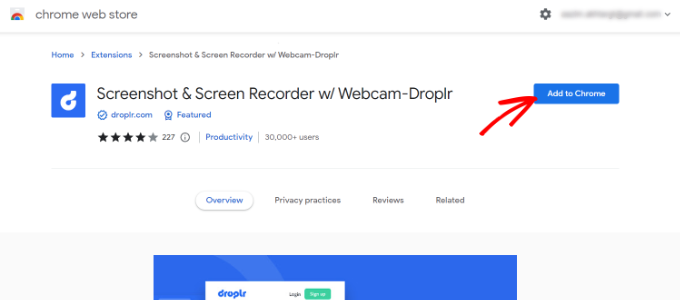
次に、「クロームに追加」をクリックします。
拡張機能を追加したら、ブラウザー上部のツールバーからDroplrアイコンをクリックします。
次に、選択したエリア、アプリケーションウィンドウ、フルスクリーン、またはページ全体をスクリーンショットすることができます。
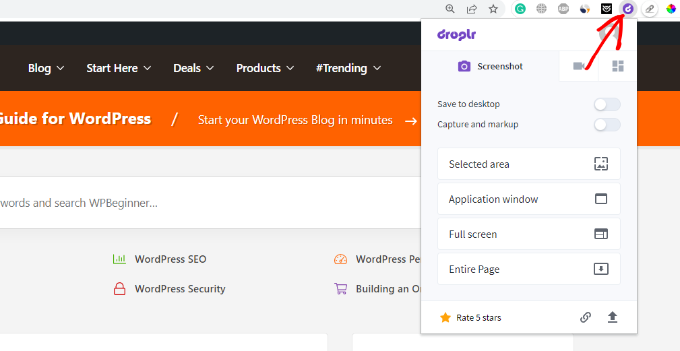
スクリーンショットを撮ると、Droplrは新しいタブで画像を開き、共有できるリンクを表示します。
Droplrでは、音声付きのチュートリアルを素早く作成するための動画スクリーンキャストを作成することもできます。ブラウザーのメニューバーにあるDroplrアイコンをクリックし、TVアイコンを選択するだけで画面を録画することができます。
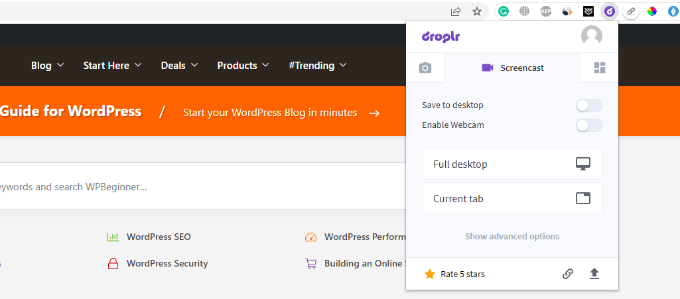
フルデスクトップ」オプションを選択した場合、録画するウィンドウを選択する必要があります。一方、「現在のタブ」オプションを使用すると、ブラウザータブをスクリーンキャストすることができます。
Macでスクリーンショットを撮る方法
Mac端末を使っていて、初めてのブログ投稿用にスクリーンショットを撮りたい場合、いくつかのオプションがある。
Mac端末では、画面全体、画面の選択部分、特定のウィンドウなどをキャプチャできます。
Mac端末で画面全体のスクリーンショットを撮るには、「Shift + Command + 3」を押すだけで、画面がキャプチャされる。
選択した部分をキャプチャしたい場合は、「Shift + Command + 4」を押します。次に、十字キー(ポインター)をクリックしてドラッグし、選択したエリアのスクリーンショットを撮ります。

特定のウィンドウのスクリーンショットを撮りたい場合は、「Shift + Command + 4」を押し、キーボードの「スペースバー」も押します。
ポインターがカメラアイコンに変わるのがわかります。カメラアイコンをウィンドウ上でドラッグすると、そのウィンドウがハイライトされ、キャプチャされます。
注意:すべてのアプリでウィンドウのスクリーンショットを撮る権限がありません。その場合、選択した部分のスクリーンショットを撮り、トリミングすることができます。
初期設定では、スクリーンショットはすべてデスクトップに保存され、ファイル名には撮影日時が、拡張子には.pngが使用されます。
Windowsでスクリーンショットを撮る方法
Windows端末でスクリーンショットを撮るには、キーボードの「PrtSc」キーを押す必要があります。これで画面全体がキャプチャされます。
次に、このスクリーンショットを Adobe PhotoshopやAffinity Photoなどの画像編集ソフトで開き、必要なエリアをトリミングしてコンピューターに保存します。
スクリーンショットを撮るもうひとつの方法は、WindowsにプリインストールされているSnippingツールを使うことだ。
このツールを使えば、画面の特定の部分をキャプチャし、自動的にクリップボードに保存することができる。
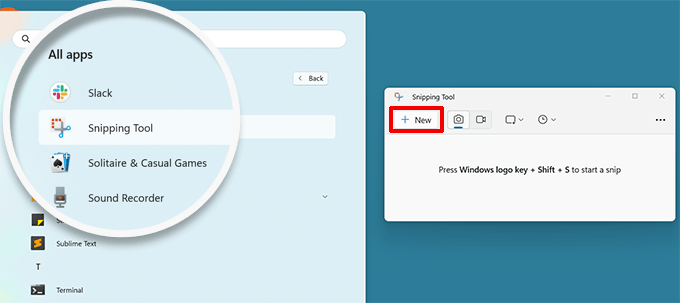
Windowsでスクリーンショットを撮るもう一つの方法は、「Windows + Shift + S」キーを押して、Snippingツールでスクリーンショットを撮り始めることです。
次に、ポインターをクリックしてドラッグし、画面上のエリアを選択します。右クリックを離すと自動的にスクリーンショットがキャプチャされます。
スクリーンショットはクリップボードに保存されるので、Adobe Photoshopのような画像編集ソフトに貼り付けてさらに変更し、コンピューターに保存することができます。
Chromebookでスクリーンショットを撮る方法
Chromebookでは、カメラアイコンのついたスクリーンショットキーをクリックするだけです。これにより、画面全体または選択したエリアのスクリーンショットが撮影されます。
そのほかに、右隅にあるクイック設定オプションをクリックして、「画面キャプチャ」オプションを選択することができます。

その後、画面全体をキャプチャするか、選択したエリアをキャプチャするかを選択する必要があります。
スクリーンショットを撮ると、自動的にクリップボードにコピーされます。
Chrome OS 64.0.3282.134以降をお使いの場合は、「電源+音量ダウン」ボタンを押すだけで、画面全体をキャプチャできます。
選択したエリアのスクリーンショットを撮るには、「Ctrl + Shift + ウィンドウの切り替え」キーを押す必要があります。次に、十字キー(ポインター)をクリックしてドラッグし、キャプチャしたいエリアを選択します。
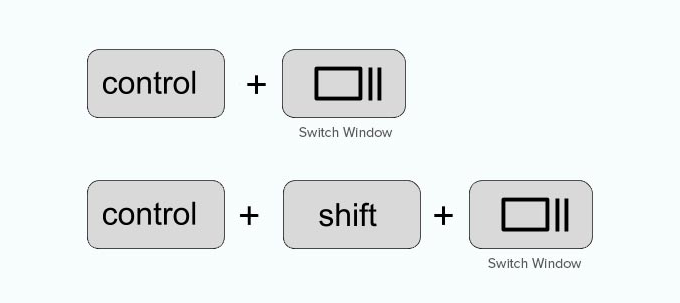
クリックを離すと、画面の右下にスクリーンショットが「ダウンロード」フォルダーに保存されたことを示す通知が表示されます。
外付け(一般的な)キーボードが添付されたChromeboxを使用している場合は、「Ctrl + F5」を押してスクリーンショットを撮ります。F5キーはChromebookの「ウィンドウ切り替え」キーと同じ働きをします。
iPhoneでスクリーンショットを撮る方法
iPhoneやその他のスマートフォンでスクリーンショットを撮るのは、実はとても簡単だ。
iPhone X以上をお使いの場合は、投稿日またはアプリを画面で開く必要があります。その後、右側の「サイド」ボタンと左側の「ボリュームアップ」ボタンを押すだけです。
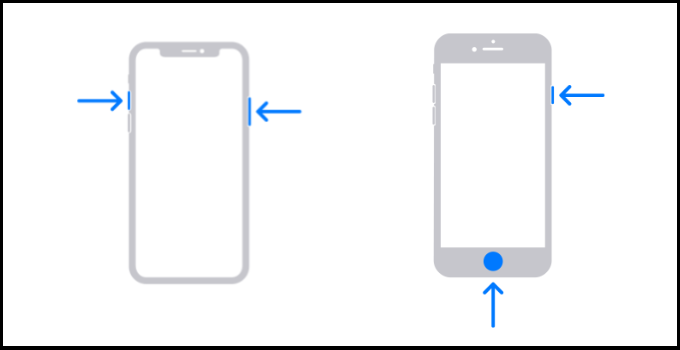
本当に〜してもよいですか?これで画面のスクリーンショットが撮影され、携帯電話の「スクリーンショット」フォルダーに保存されます。
iPhone 8以前のモデルをお使いの場合は、キャプチャしたい画面を開きます。そして、「電源+ホーム」ボタンを同時に押すだけで、スクリーンショットが撮れます。
アンドロイド携帯でスクリーンショットを撮る方法
アンドロイドOSを搭載したスマートフォン(サムスン・ギャラクシー、モトローラ、グーグル・ピクセルなど)を販売する携帯電話メーカーは多種多様だ。しかし、ほとんどの新規端末は、スクリーンショットを撮るために同じ普遍的なプロセスに従います。
Android携帯で、キャプチャしたい画面を開く必要があります。次に、「Power + Volume Down」ボタンを一緒に押します。
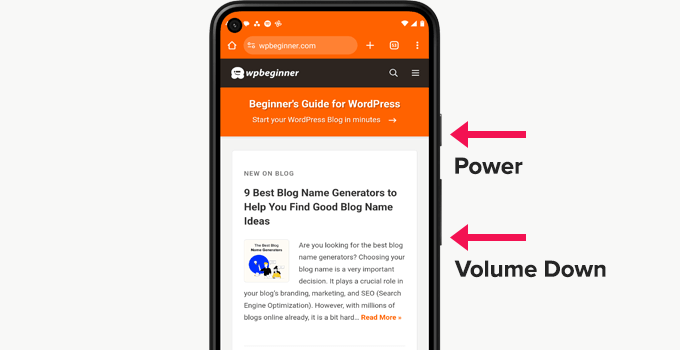
これでスクリーンショットが撮影され、フォトギャラリーに保存されます。
この投稿が、WordPressサイトで新しいブログ投稿のスクリーンショットを撮る方法を学ぶのにお役に立てば幸いです。また、ブログ投稿のためのより良い画像を作成するためのツールのエキスパートピックや、画像SEOの究極のガイドもご覧ください。
If you liked this article, then please subscribe to our YouTube Channel for WordPress video tutorials. You can also find us on Twitter and Facebook.


A Owadud Bhuiyan
I am using the light shot.
The main benefit I am getting is sharing links for the screenshot.
What’s your option regarding a light shot?
WPBeginner Support
We have not tested that at the moment but we would recommend having your images on your site itself instead of embedding from external sites when able
Admin
A Owadud Bhuiyan
Thanks for your recommendation, I never thought about it.
Jiří Vaněk
In Windows 10, I used the classic screenshot method – essentially, using the Print Screen and pasting it into a drawing tool or atc. That was quite cumbersome. Now, with the new screenshot feature in Windows 11, I’ve become so accustomed to it that it significantly eases my work. I use the Print Screen function every day, both at work (as a technician in a data center communicating with people) and while writing my blog. It’s probably the most frequently used function for me in Windows, along with Ctrl+V and Ctrl+C
Ralph
All this years and I didn’t even know windows have snipping tool option. I used to press prtsc and crop it in paint. It is 10 seconds but still… over the years this is horrible waste of time. Thank you for that info. This hits hard…
WPBeginner Support
Glad we could share this helpful tool
Admin
Jiří Vaněk
In Windows 11, the classic print screen has already been replaced by snippings, and it’s great. So Windows 11 automatically turns on snippings tool on the printscreen button.
Ahmed Omar
I was using print screen button or snipping tool in windows for loooong time.
No this will help me, more easy and efficient
Thank you from Heart
WPBeginner Support
You’re welcome
Admin
Moinuddin waheed
I have mostly used snipping tool to take the snapshot for the desired portion of the screen for my blog posts especially the tutorials or guide.
I have realised that in each of your posts there are multiple screen shots to make the description self elaborative and it makes engaging and easy to understand.
The Android part is this tutorial is especially helpful.
WPBeginner Support
Glad our guide was helpful
Admin
Susan Slater Morris
About 25 years ago I had to update some workbooks for Word and Excel. I used the print screen key then alt and v to paste the screenshot into word. I would then crop the image in word. Eventually, I found out that if I used alt and print screen together while a dialog box was on the screen it would only take a screen shot of the dialog box. That saved a lot of time.
WPBeginner Support
Thank you for sharing the tricks you used!
Admin
Pbd.news
Knowledgeable guidelines
WPBeginner Support
Thank you
Admin
Md Shahidullah
I love your blog and dairy i read your post. I started a blog site for bangladeshi reader. Can i translate your post in bangla?
WPBeginner Support
Hi Md Shahidullah,
We would appreciate if you only translate an excerpt of the article with a link back to the original article.
Admin
Florin
I was wondering if taking a picture of my computer screen that shows a copyrighted photograph will be considered copyright infringement? Same for the screenshot of a newspaper page let’s say.
Ryan M
I love Cloudshot for Windows. It’s totally free and allows me to upload to the internet with one click. I can also do instant editing before uploading or saving locally.
Bob Hatcher
I probably do a dozen screen shots a week on a PC. the Ctrl-PrintScreen combo works best. But, BY FAR the easiest graphics program is IrfanView. It’s a snap to paste the image in and then select the piece you want. GET IRFANVIEW.