ビジネスサイトが成長し、より多くの人々がサイトを訪れるようになると、多くのオーナーは、自社のサーバーが余分なトラフィックを処理できるかどうかを心配し始めます。
私たちは長年にわたって多忙なサイトを管理しているため、読者には定期的にサイトのストレステストを行うことをよくお勧めしています。このテストは、どのWordPressホスティングサービスを推奨するかを決定するのに役立ちます。
WordPressサイトのストレステストは、さまざまな状況でサイトがどのように動作するかを確認するのに役立ちます。こうすることで、サイトが高速であることを確認し、訪問者に影響を与える前に問題を修正することができます。
この投稿では、WordPressサイトのストレステストの方法を紹介します。
専門家のアドバイス 専門家に任せたいですか?WPBeginner Proスピード最適化サービスのチームは、完全なパフォーマンス監査から、SEOとユーザー体験のためのWordPressサイトの最適化まで、あらゆることに対応できます。
WordPressストレステストとは?
WordPress ストレステストでは、トラフィックが多い状況でサイトがどのように動作するかを確認できます。トラフィックの急増に備え、サイトがどのように負荷に対応するかを確認できます。
通常、サイトが耐えられるトラフィック量はWordPressホスティングサービスプランによって決まります。しかし、ストレステストは、これらの限界を見つけ、高トラフィックによって発生する可能性のある問題を発見するのに役立ちます。
たとえば、トラフィックが突然急増すると、サイトがクラッシュしてサーバーリソースをすべて使用してしまう可能性があります。同様に、どのWordPressプラグイン、テーマ、コードスニペット、画像が極端な状況で誤動作するかも確認できます。
ストレステストでは、問題を簡単に修正したり、設定ミスを修正したりすることができます。その結果、より良いユーザー体験を提供し、トラフィックの多い状況に備えることができます。
とはいえ、WordPressサイトのストレステストの方法を見てみよう。
WordPressサイトのストレステスト
WordPressサイトのパフォーマンスを測定することに関しては、PageSpeed Insights、Pingdom、GTmetrixのようなスピードテストツールがたくさんあります。
これらのツールは、サイトの読み込み速度を調べるのに役立ちますが、高いトラフィック下でサイトがどのように動作するかはわかりません。
WordPressサイトにストレスを与えるために、このチュートリアルではLoader.ioを使用します。これは、高トラフィック状況をシミュレートし、一連のテストを実行する無料のツールです。
無料のLoader.ioアカウントにサインアップする
まず、Loader.ioのサイトにアクセスし、無料アカウントを作成する必要があります。今すぐサインアップ」ボタンをクリックするだけで、簡単に始められます。

その後、ツールが提供するさまざまな料金プランが表示されます。
先に進み、「無料」料金プランを選択する。

次に、新規アカウント登録のための詳細を入力します。
Loader.ioは、会社名、メール・アドレス、パスワードを要求します。これらの情報を追加したら、reCaptchaボックスにチェックを入れ、「サインアップ」ボタンをクリックするだけです。

確認メールも届きます。受信トレイを確認し、メールに記載されているリンクをクリックしてアカウントを確認してください。
Loader.ioへの新規ホスティングサービスの追加
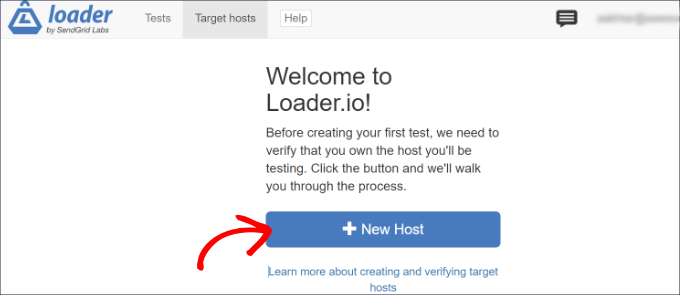
その後、’+ New Host’ボタンをクリックしてターゲットホスティングサービスを設定することができます。
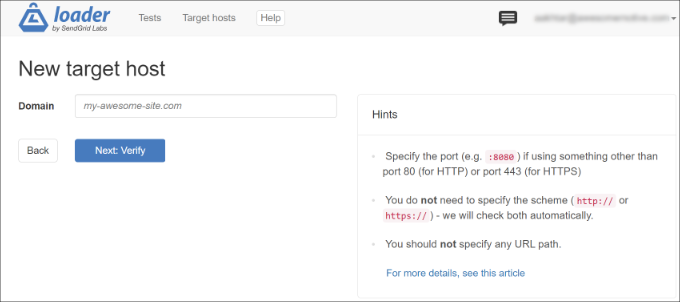
次に、ドメイン名を入力する必要があります。
完了したら、「次へ」をクリックします:Verify」ボタンをクリックします。
次に、ドメインを検証する必要があります。HTTPまたはDNSで検証することができます。
このチュートリアルでは、「Verify over HTTP」オプションを使用し、検証ファイルをダウンロードします。先に進み、’download’リンクをクリックし、コンピューターにファイルを保存してください。
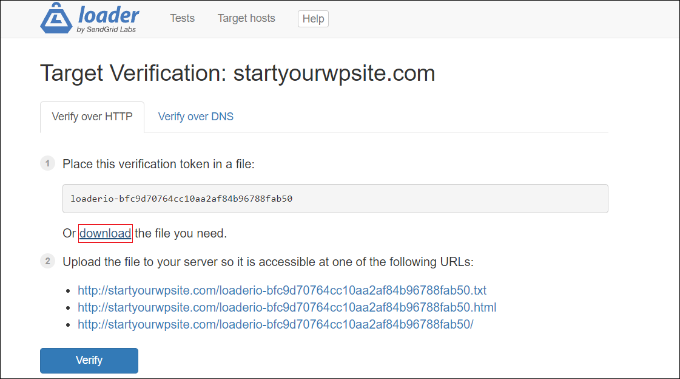
ファイルをダウンロードしたら、サイトのルート・フォルダーにアップダーする必要があります。これは通常public_htmlフォルダーと呼ばれます。
ファイルをアップロードするには、FTPクライアントを使用します。詳しくは、FTPを使ってWordPressにファイルをアップロードする方法をご覧ください。
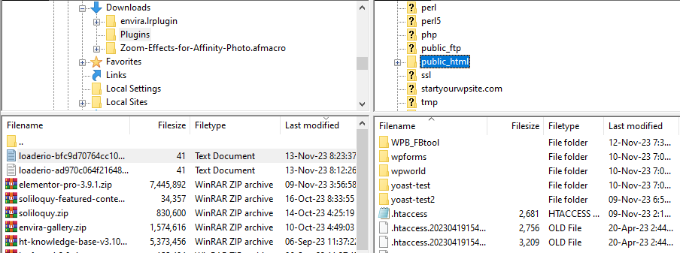
ファイルをアップロードしたら、Loader.ioのサイトに戻り、「Verify」ボタンをクリックします。
認証が完了すると、成功のメッセージが表示されます。
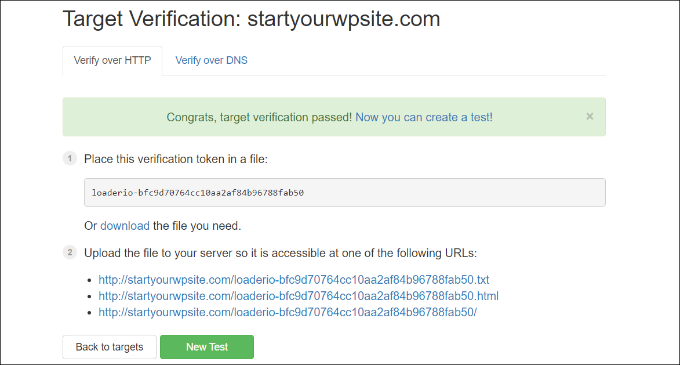
次に、’新規テスト’ボタンをクリックし、あなたのサイトのストレステストを設定する必要があります。
ストレステストの設定
次の画面では、ストレステストの設定を変更できます。テストの名前を追加することから始めることができます。
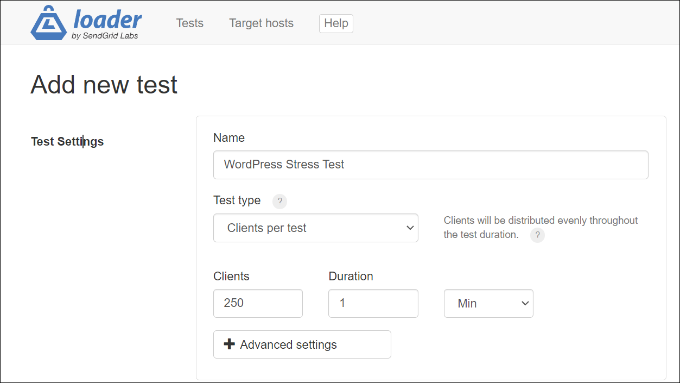
その後、テストの種類を選択する必要があります。Loader.ioは3つのテストタイプを提供しています:
- Clients per test– このテストでは、特定の数のビジターが指定された時間サイトを訪問したときにサイトがどのように機能するかをテストすることができます。クライアントの数と期間を設定できます。
- Clients per second– このシナリオでは、1秒あたりのクライアントリクエスト数を指定してサイトをテストします。
- クライアント負荷の維持 – このテストタイプでは、テスト期間中、定数のクライアントが維持されます。特定の時間、定数の負荷がある場合に、サイトにストレスを与えます。
それぞれのテストを複数回実施することをお勧めします。これにより、異なるシナリオの下でサイトが遭遇する可能性のある問題を発見することができます。
下にスクロールすると、クライアントリクエストの設定があります。一般的なテストでは、初期設定を使用することをお勧めします。
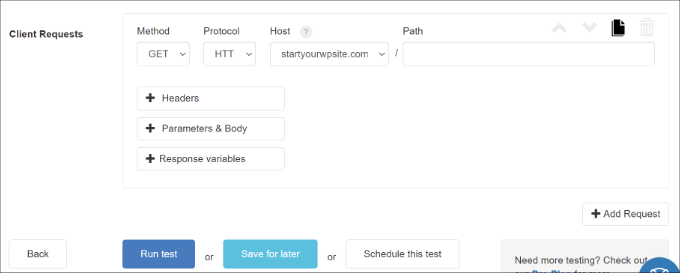
これで、WordPressサイトをストレステストする準備が整いました。テストの実行」ボタンをクリックしてください。
ストレステストの結果を分析する
Loader.ioはあなたのサイトのストレステストを実行し、結果をまとめます。その結果を分析することで、高トラフィック状況下でのサイトのパフォーマンスを確認することができます。
例えば、平均レスポンシブタイムを見ることから始めることができます。レスポンシブ時間が短ければ短いほど、サイトの読み込み速度が速いことを意味します。
テストでは、250人のクライアントが1分間サイトを訪問した場合、平均レスポンシブタイムは590ミリ秒または0.59秒でした。

これはかなりまともな数値で、高負荷時でもサイトが大幅に遅くなることはなかったことを示している。
しかし、記録された最大レスポンシブ時間は10489ミリ秒(10.489秒)でした。以下のグラフを見ると、クライアントの数と比較してレスポンスタイムがいつ跳ね上がるかがわかります。
例えば、私たちのテストでは、クライアント数が150を超えると急増し、クライアント数がほぼ200に達すると最大レスポンシブが発生した。
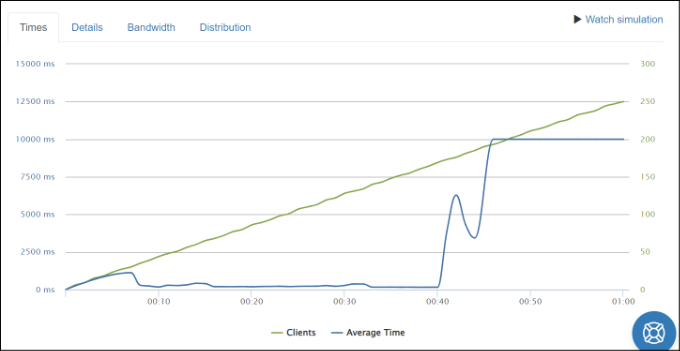
これらのインサイトを利用することで、ある一定の人数がサイトを訪れたときに、あなたのサイトがどのようなパフォーマンスを示すか、おおよその見当がつくようになる。
このステップを繰り返し、異なるシナリオで複数のテストを実行することができます。例えば、クライアントの数を増やし、期間をテストし、異なるテストタイプを使用してみてください。
レスポンスタイムとパフォーマンス向上のヒント
WordPressの負荷テストが高トラフィック状況下で遅いパフォーマンスを示した場合、サイトを高速化するためにさまざまなことを試すことができます。
ここでは、レスポンシブを改善し、高トラフィック負荷に対応するためのヒントを紹介します:
1.WordPressホスティングプランをアップグレードする – 月間訪問者数に制限のあるホスティングサービスをご利用の場合は、より高いホスティングプランへのアップグレードをご検討ください。こうすることで、より多くのサーバーリソースを得ることができ、サイトが急増したときに余分なトラフィックを処理することができます。さらに詳しく知りたい方は、最速WordPressホスティングサービスの詳細比較もご覧ください。
2.キャッシュプラグインの使用–キャッシュプラグインは、サイトのサーバーの負荷を軽減し、パフォーマンスを向上させるのに役立ちます。ウェブページをリクエストする全プロセスを経る代わりに、静的バージョンのサイトをユーザーに提供します。その結果、サイトの読み込みが速くなり、より良いユーザー体験を提供できます。
3.コンテンツデリバリーネットワーク(CDN)のセットアップ–CDNは、キャッシュされた静的コンテンツをユーザーの場所に基づいて配信するサーバーのネットワークです。サイトサーバーの負荷を下げ、レスポンシブタイムを改善するのに役立ちます。
4.画像と動画の最適化– 最適化されていない画像は、サイトのパフォーマンス問題を引き起こし、サーバーへの負荷を増加させます。まずは、大きな画像ファイルを圧縮してレスポンシブ時間を短縮しましょう。サイトに動画をホスティングしている場合は、YouTubeやVimeoにアップロードしてコンテンツに埋め込むことを検討してください。
5.使っていないプラグインやテーマを削除する – 使っていないWordPressプラグインやテーマがあったり、リソースを大量に消費している場合は、削除を検討しましょう。使用していないスクリプトを読み込んだり、サーバーリソースを大量に使用したりすることで、WordPressサイトの動作が遅くなる可能性があります。
6.WordPressサポートサービスに依頼する – WordPressのエキスパートに依頼して、サイトのスピードを最適化することもできます。ページの読み込み速度を上げるために、サイトのさまざまな要素をストレステストしてチェックします。例えば、WPBeginner サイトスピード最適化サービスでは、専門家がサイトのオーバーホールを行い、読み込み時間を改善します。
サイトのパフォーマンスを向上させるヒントについては、WordPressのスピードとパフォーマンスを向上させるガイドをご覧ください。
この投稿が WordPress サイトのストレステストの方法についてご理解いただく一助となれば幸いです。また、WordPress サイトを高トラフィックイベントに備える方法や、専門家が選ぶ最速の WordPress ホスティングサービスもご覧ください。
If you liked this article, then please subscribe to our YouTube Channel for WordPress video tutorials. You can also find us on Twitter and Facebook.


Ishmal Majid
Using the Caching Plugin and setting up CDN are really amazing ideas to maintain the performance of websites even under high traffic. This article, I would say, is a good one.
Mrteesurez
I just discovered this and I say whaaooo !.
This post is quite helpful. Some hosting companies will just highlighted the descriptions each plan ambiguously.
Now I can stress test my WordPress website. thanks.
But my question is, can this test not have real time impact on the server capacity ??
Is it sending real traffics or just an imagination.
WPBeginner Support
The test can affect your site which is why you would want to be careful that you do not test a massive number of connections using this during the peak usage time for your site.
Admin
Mrteesurez
Thanks for your reply.
I just want to confirm so that I can limit or lower the number of request I will be using during the test to avoid site crash or hosting issue.
Ralph
Woah, turns out my site is not so much ready for big spikes of readers! I’m glad that you posted on only tutorial of test, but also tips how to improve!
WPBeginner Support
Glad we could share these recommendations
Admin
A Owadud Bhuiyan
This article is very useful.
But I have a concern about my website security. Have you any blogs which help to protect my site or what should I do if my site is hacked?
Advanced Thanks.
WPBeginner Support
For security, we would recommend taking a look at our article below!
https://www.wpbeginner.com/wordpress-security/
Admin
A Owadud Bhuiyan
Thanks for sharing the link. I will now go through this.
Moinuddin Waheed
Great insights into how we can future proof our traffic load on our website. Most of us who starts a blog or a website, we tend to buy a shared hosting plan and host our website there for multiple reasons. affordability is one of the most pressing reasons for newbies like me.
How much traffic a shared hosting plan can handle without us doing anything to handle the traffic aspect?
WPBeginner Support
It would depend on your specific hosting provider, if you check with the support for your hosting provider they should be able to let you know if you wanted a method other than running a stress test.
Admin
Jiří Vaněk
Good practice also involves discussing with your web hosting support before the actual test. Starting the testing process might overload the shared server, leading to a shutdown. Be mindful of that. As for pricing, in the Czech Republic, we have virtual servers with 8GB RAM and 4 cores priced around 13 Euros per month for a Linux server. So, that pricing offer is quite good. Additionally, users can choose a data center based on their location to avoid having the server in a distant location.
Tomy Saputra
This article is very useful and helped me a lot.
WPBeginner Support
Happy to hear
Admin
Karim Twin
This is a great guide for WordPress sites that are run by beginning bloggers. It’s true that a traffic surge can shut down your site if it’s not well-optimized for a surprising increase in traffic. I honestly find this blog post useful and helpful.
Thanks to the editorial team for sharing this free guide.
WPBeginner Support
Glad you found our guide helpful
Admin
Jiří Vaněk
Thank you for the tip. I run my website on my own cloud server. For one website, I have 4 virtual CPUs and 8GB of RAM. I’ve been wanting to test how much traffic or load the server can handle for a while now. This could be an interesting test for some performance feedback.
WPBeginner Support
Glad we could share a helpful way to test
Admin
Ahmed Omar
website stress test, it looks like heart stress test.
specially during holidays offers, you need to trust your site performance.
thank you for this useful post
WPBeginner Support
You’re welcome, its a good idea to do this before having a holiday offer live ideally
Admin