私たちがお手伝いしてきた多くのサイトオーナーは、画像を大きくするためにリサイズしても、ぼやけた仕上がりになってしまうという課題に直面してきました。
ぼやけた画像は、エンゲージメントを損なうだけでなく、ブランドの信頼性を損なうことにもなりかねません。しかし、適切なツールとテクニックを使えば、画像の鮮明さを保ちながらリサイズすることができます。
このガイドでは、画質を落とさずに画像をリサイズして大きくする方法をご紹介します。そのために、私たち自身がテストした信頼できるツールだけを使用します。
なぜ画像を拡大すると画質が落ちるのか?
ビットマップはウェブで最もよく使われる画像フォーマットで、JPEGやPNGファイルはすべてビットマップ画像ファイルです。
ビットマップ画像は何千ものピクセルからできている。ピクセルを拡大すると、正方形に見える。各ピクセルは画像上の決まった位置にマッピングされているため、ビットマップと呼ばれている。

ほとんどの画像編集ソフトは、これらのピクセルを縮小または拡大して画像サイズを変更します。このため、画像を小さいサイズにリサイズしても、目に見える画質の低下はありません。
一方、WordPressで画像をリサイズして大きくすると、この拡大されたピクセルが目立ち、画像がぼやけてピクセル化したように見える。

解決策は、拡大された各ピクセルを、その周りのピクセルと同じように見えるように調整することだ。この方法はフラクタル補間または単にフラクタルと呼ばれる。
注意: 必ず最初に高解像度の画像から始めます。元画像のピクセル数が高ければ高いほど、拡大処理に有利です。これは、画像を引き伸ばしたときに扱えるディテールとデータが増えるからです。
以下のセクションでは、WordPressサイトで最も一般的な画像編集ソフトウェアを使用して、写真のサイズを変更する方法を紹介します。下のリンクをクリックするだけで、どの方法にもジャンプできます:
準備はいいかい?始めよう
方法1:GIMP(無料)を使って画像を拡大する

GIMPは、Adobe PhotoshopやAffinity Photoのようなプレミアムツールの無料代替ツールです。最小限の画質低下で画像を拡大することができます。ただし、以下の方法3で紹介するPerfect Resizeほど良い結果にはならないことをお断りしておきます。
まず最初に、無料ソフトウェアをコンピューターにダウンロードしてインストールします。MacでもWindows端末でもご利用いただけます。
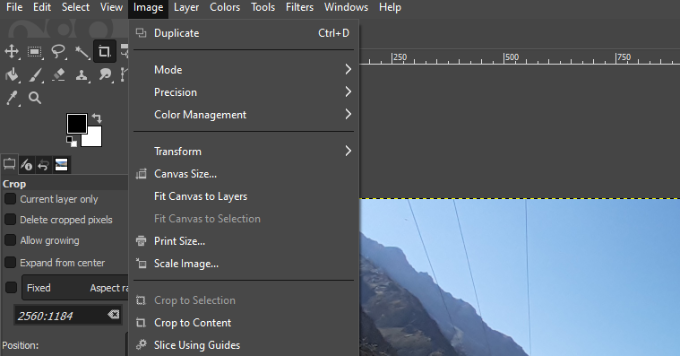
その後、Gimpでリサイズしたい画像を開き、「画像」→「画像の拡大縮小」と進みます。
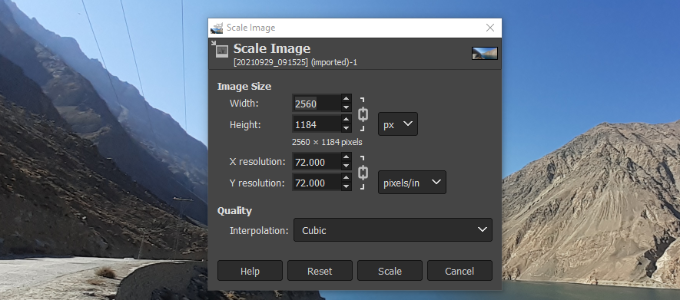
表示されるポップアップで、幅と高さを入力して希望の寸法を設定できます。
Quality」セクションで、補間方法として「Cubic」を選択しよう。完了したら、「Scale」ボタンをクリックします。
PNG、JPEG、WebP、HTMLなど、さまざまな形式で拡大画像をエクスポートできるようになりました。
方法2:Irfanview(無料)を使って画像を拡大する
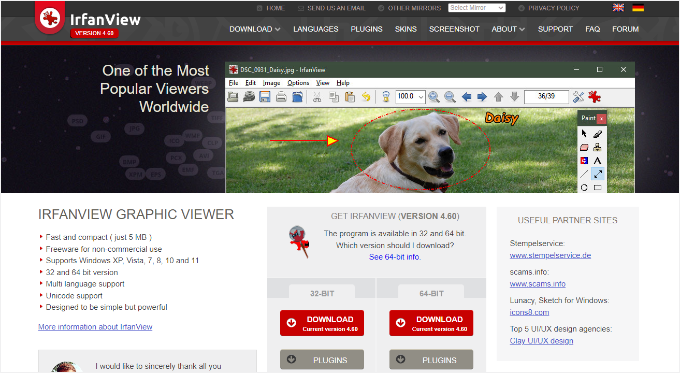
Irfanviewは、無料で使えるコンパクトな写真編集プログラムです。Windowsベースのオペレーティングシステムでのみ利用可能で、画像をリサイズして大きくするためのスマートな方法を提供します。
このツールを使い始める前に、Windowsコンピューターにインストールされていることを本当に〜してもよいですか?
インストーラをインストールしたら、Irfanviewで画像を開き、Image ” Resize/Resample と進みます。
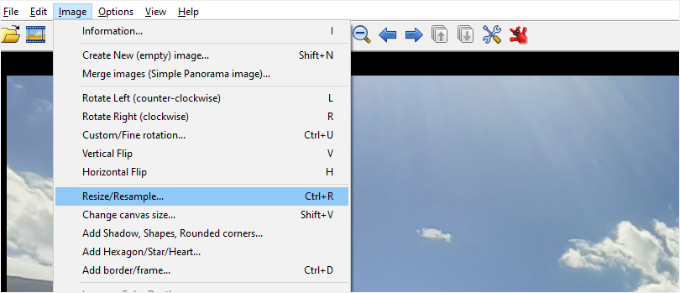
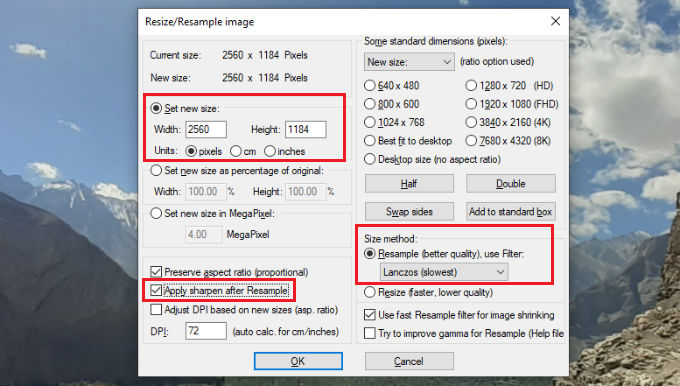
画像サイズ変更ポップアップウィンドウが表示されます。ここで、「新しいサイズを設定」フィールドに希望の画像サイズを入力し、幅と高さを定義します。
その後、’Size method’セクションで’resample’を選択することができる。フィルターのドロップダウンメニューから、’Lanczos (slowest)’ オプションを選択してみましょう。
最後に、’Apply Sharpen After Resample’(再サンプル後にシャープを適用)の隣にあるボックスをチェックし、完了したら’OK’ボタンをクリックします。
Irfanviewは画像をリサイズし、コンピューターに保存します。
フリーのツールでは、画像を大きくするリサイズがうまくできないことにお気づきかもしれません。しかし、シャープネスとコントラストを調整することで、画像を拡大し、画質の低下を最小限に抑えることができます。
とはいえ、Irfanviewのプレミアムツールを使って、拡大しても画像がシャープでクリアなままであることを確認することもできます。
方法3:ON1(プレミアム)を使って画像を拡大する
ON1 Resize AI(以前はPerfect Resizeと呼ばれていました)は、画像のサイズをスマートに変更できるツールです。
このソフトウェアは人工知能を使用しており、画像のサイズが大きくなったり、特定のエリアを拡大したい場合でも、高解像度を維持することができます。
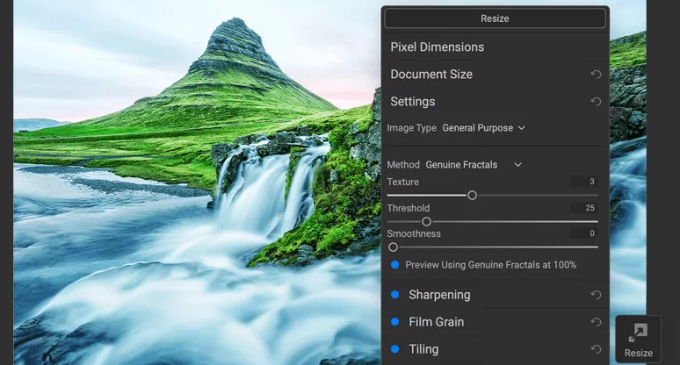
スタンドアロンソフトとして、またAdobe Photoshop、Lightroom、Capture One、Apple Photosのプラグインとして利用できる。
スタンドアロンのON1 Resize ALソフトウェアは69.99ドルで入手可能です。このソフトウェアは、高品質を維持しながら画像を拡大する高度なツールを提供し、写真家やグラフィックデザイナーにとって価値ある投資となります。
ボーナス・ヒント:ブログ投稿用のスクリーンショットの撮り方
画像を鮮明にするためにリサイズするのではなく、スクリーンショットを最初から美しく見せることができます。高品質のスクリーンショットは、WordPressブログをより魅力的にし、コンテンツを視覚的にアピールします。
Droplrのような様々なツールや、端末のビルトインアプリを使ってスクリーンショットを撮ることができます。
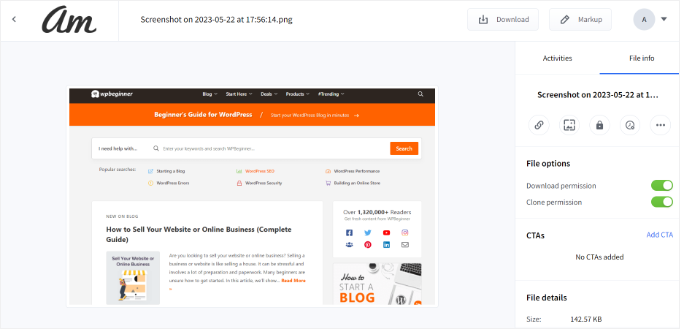
まずは、ブログ投稿用のスクリーンショットの撮り方をご覧ください。
この投稿が、画質を落とさずに画像を大きくするリサイズの方法を知る一助となれば幸いです。また、WordPressで基本的な画像編集を行う方法や、画像を管理するための優れたWordPressプラグインの厳選リストもご覧ください。
If you liked this article, then please subscribe to our YouTube Channel for WordPress video tutorials. You can also find us on Twitter and Facebook.


Shamsad
For anyone seeing this in 2022, the gimp solution worked for me. The Sinc(Lanczos3) got replaced by NoHalo. Using this and scaling, I got to resize my png.
I always find quality solution in wpbeginner. Keep up the good work.
WPBeginner Support
Thank you for sharing and glad our guide was helpful!
Admin
Dorki3
None of the above solutions helped me resize to the desired size and quality, i managed to resize the picture but the quality was very poor! thank you for the effort tho! found some nice picture software!
WPBeginner Support
Sorry that you couldn’t solve the issue on your end but glad you liked our recommendations for tools
Admin
Giorgio
Hi, with Gimp is perfect. But if I have lot of photos is there a solution for automate with gimp?
Thanks
Giorgio
WPBeginner Support
Unless I hear otherwise, we don’t have an automation tool to work with Gimp like that at the moment.
Admin
Chris Campbell
Unfortunately the instructions call for opening an image in PS and then selecting File > Automate >Perfect Resize, but there is no Perfect Resize option available. Not sure how an article this new is incorrect, but that what I’m seeing. Very frustrating now since the article encouraged me to spend $60.
WPBeginner Support
There may have been an update to the option location. If you reach out to Perfect Resize’s support they should be able to let you know where the button is currently.
Admin
Jim Barker
well the explanation of each item to use was great, except I tried to down load both free versions and neither one did anything to the picture I was trying to increase in size. it was wallet to 5×7. bummer
Peter
Hello how do you make your mobile Nokia phone photos bigger to download on a shirt
Linto
Thank you so much for this tutorial!!
Liene
Thanks for this post. I haven’t heard about IrfanView, just now downloaded and it really does its job. Great. Thanks.
Melissa
Hi!
I tried the perfect resize which I think is now called ON1, and I wasn’t able to resize from a 3 inch to an 8 inch without losing quality. I just wanted to ask you if you hay any idea why.
Thank you!
manish
i great that i have founded the solution of my big and big problem.
i thank to the programmer of Irfanview and the web site designer.
thank a lot!!!!
Dufner
I’ve used Perfect Resize software itself without Photoshop and it works better than just resizing with Photoshop without plugin. I did it at school where they had the license for the program. Never tried it in Photoshop with the Resize plugin, good to know! Thanks
anupama
plz tell me what is hooks in wordpress? what is work of hooks ..
Safura Abbas
Hi Team,
I am glad to have found my solution on this site. So very well explained and understood. Appreciate your help. I downloaded the trial version of ON1 software and my image that i was trying to enlarge for hours to print right on the paper went in vain until I found your blog. Kudos to Syed Balkhi and team for this informative site. Happy me
Thank you once again.
ashish
nice tutorial awesome
Mike
Thank you! Very useful
sedatbasman
thank you for your help.
Rebecca Cunningham
It works like magic! I’ve tried everything, and this is pure perfection. Thank you so very much.
DBlake
Rebecca…which one did you use?
Tej
Hey, I had taken a picture of some old photography but it’s looks worst. How I can increase its quality
Irineu
I have used the extension Simple Image Resizer, Chrome, and have had good results. I’m from Brazil. Congratulations.
Rosie
But it does not make images LARGER – which is the point of the article!
Anthony
This is what i’ve been looking for. PS CC has limited options for retaining image size after merging it with several other layers. Thanks a lot!
May
I’m using the Gimp resize (logo obtained but company wont resize) and it still is a resolution I cant use?
Dana
Thank you! I have been looking for a resize plug in on photoshop!–Works great!!!!
Carol
I have two questions:
1. I know next to nothing about photoshop, but I do use Lightroom 6 when editing images. Is there a way that is similar to the ways mentioned here to do the same in Lightroom?
2. In another article here on WPBeginner, someone commented that the days of lowering the photo resolution for a faster site are practically over. If so, what is the recommended mg size & dpi for most blog photos? (This is a photography blog site, so I want them to be as clear as possible.)
Thanks.
Rebecca Rose
Hi and thank you for your site. I am a rank Beginner (to put it mildly) and found your site while searching the web for information on how to resize photos for Windows Movie Maker.
Right now I want to make Slide Show “movies” for the music I compose … but, those black panels on either side of the smaller photos that I use are a real turn-off! So, I am trying my best to learn what to do … I own Photo Shop – but sadly, as yet I have never used it. After reading the above comments, I think it’s time! Any other comments you have would be VERY welcome …
Richard Cunningham
Here is a simple solution if you are challenged by loss of definition/blurring or over pixellation when you re-size an image. My problem was with a business card where I had an excellent large image in .jpg format but I could not figure out how to retain the definition quality when I reduced it using gimp.
Voila!
Assume that you have an excellent .jpg image which is A4 size and you want to reduce it to a business card size allowing for trim and bleed of 3.6 inches by 2.1 inches at 300 dpi. If you try to edit the file in Gimp, you will end up with unacceptable quality. I wasted hours!
Try this:
1. Open a new file using a 300 dpi template. Set the size parameters as you want them to be – 3.600 x 2.100.
2. Open the file you want to resize – in this case you want to downsize.
3. While in this file, hit Edit – Copy.
4. Go to the new file and hit Edit – Paste.
Check the image details and you will find that you have a perfectly defined reduced 3.6 inch by 2.1 inch image at 300 dpi !
Eshaan
How do you make an image smaller than its original size without losing quality?
And I mean really small. In pixel units “10×10”
The answer to this question will mean a lot to me!
If possible please email me the answer at
Thank you!
Tom
@Eshaan
The thing is, when reducing an image’s size, you have to lose pixels. An image of 100×100 pixels contains 10,000 different pixels, whilst an image of 10×10 only contains 100. This means shrinking a 100×100 image to 10×10 requires you drop 9900 pixels. When making an image larger, you are adding pixels, which is physically possible, unlike in shrinking
john jr.
Hi I am trying to upload files to you but it is saying that the file size is too small.
How can I fix this so I can forward the pics I like.
joycebartley
hi i am trying to download some pictures from my computer to a contest and they have to be smaller than 4mg unfortunately most of my pictures are a little above that …so how can i reduce the size of mg lower than 4?????? i hope there is an easy way to do it…..from now on should i take the picture with my cell ph up closer or farther away?????
Dan
Whilst this offers some useful techniques, and some expensive ones. I personally don’t think that you should EVER size up an image. EVER!! I have worked in Print for years as well as web and this is just a big no no, or that’s how I was taught.
Size down, never up. This is one technique I will NEVER be taking on board. But thanks for the post.
Dave
I agree with Dan. If you want the picture bigger, you need to get it from the source or retake it.
Joe Turner
Dave, that’s really not very helpful. Obviously, I would think everyone understands they should retake it, if they could. People wouldn’t need to try to look at finding the “best” of all the imperfect ways of resizing if they could just retake a photo. But most of these photos are of events or at times and/or places that can’t be revisited and going back in time is not really an option, so retaking it is usually quite impossible. I think you should realize that most people looking to upsize didn’t think they were going to need to print the photo as large as they are now looking to go, but want the best results given the circumstances they find themselves in.
Mawande
Thanks Joe
I was also shaking my head before your comment. Obviously people would rather do things right the first time, but circumstances and situation can change involuntarily and all people can do is make the best of those situations by coming up with work arounds.
Peggy Woods
I must really spend some time learning how to operate the Photoshop I purchased some time ago. I generally just resize photos by using Picasa3 for cropping and such. Going to g+ this information. Thanks!
Nora
I have only ever used Photshop to re-size images. But only to a certain extent. When you start with a low-rez image it can only be sized up to a certain extent. Open the file in Photshop, click on “image size, un-check “Resample image”, then start adjusting the pixel size under width until you reach as close to 300dpi as possible. You will see the resolution # change as you mess with the pixel size. Once you have gotten to about 300dpi click “save”. The go back and re-check “Resample image”. Click “save” again. Done.
Leon Quinn
Surely there is some way of doing this in Photoshop without a commercial plugin?
Darshan Gajara
This is splendid stuff. Can you please suggest some free Photoshop plugins to simplify photo manipulation?
Mark Narusson
Nice article thanks for sharing. You could also consider using Photoshop, make the image a smart object, enlarge the canvas then scale the image to fit. This isn’t perfect but it has got me out a fix on a few occasions.
Jim Massman
A note for anyone who’s interested in editing pictures: Image formats generally used on the Web are based upon compression algorithms and you can get into trouble easily when editing those formats unless you edit a “lossless” copy. This is an old trick I’ve used for years after seeing some horrible results… simply save the first file in a non-compression file format such as “.tif”; edit that file to your hearts content, then “File Save As” in the .jpg or .png format.
Remember that every time you open, edit, then save a .jpg or .png file, whatever compression settings your graphics editing program has been set to will “recompress” that file. Most programs allow you to determine the compression rate, so it doesn’t hurt to set the default value to the least “loss” setting. The days of ‘needing’ to smash file sizes down for fast page loads are pretty much gone… but you may not know what the program defaults have been set to.
$0.02
Jim
_.- M -._
“The days of ‘needing’ to smash file sizes down for fast page loads are pretty much gone…”
That would depend upon your definition of ‘need’, as well as some rudimentary understanding of your target audience.
Is your target audience composed entirely of urban dwellers with access to fast broadband, who only visit your site while at home? Then, *maybe* that’s true.
If, on the other hand, you’re interested in reaching any rural audience at all, then you need to keep in mind that *25%* of the population of the rural US can’t get broad band access, and that 6% of the overall US population doesn’t have broadband access.
If you still say, “Oh, I don’t care about those 16 million potential visitors”, then stop and look at it from the perspective of the mobile web. Does your visitor-base have smart phones? Do you want to support a mobile experience? (A little clue here, your answer should be ‘yes’.) Then guess again. You DO still ‘need’ to do image optimization to minimize the bandwidth requirements for your site.
If you’re a real professional in the business of providing content to users, then *YES* you need to care about the actual user experience for folks visiting your site. And, part of that *IS* still site optimization for speed.
Richard
Guys, there is no way you can enlarge or shrink a pixel. Pixel size is relative. You can only add or subtract pixels.
Akash KB
Very nice and useful tips for resizing images. Specially the ‘Perfect Resize’ Plugin for Photoshop. Resizing of images is a very common day to day activity of bloggers while adding photos to blog posts
Melissa Klotz
I love this site and a lot of your posts have been very helpful. But I’m really scratching my head on this one. Maybe it’s my eyes, maybe my monitor, but I’m seeing very little difference between the “normal resize” and the other resizes. There are plenty of other resampling options in Photoshop. I don’t understand why you would buy a $150 photoshop plugin (extremely expensive for a plugin) or download free software to do something Photoshop is inherently capable of.