スピーディーなサイトは、訪問者を満足させ、検索エンジンで上位にランキングされるために不可欠です。Googleのような検索エンジンは、サイトスピードを重要なランキング要素とみなしているからです。
WP Super Cacheは、ウェブページの静的HTMLファイルを作成する人気のプラグインです。これは、サーバーがそれほどハードワークする必要がないことを意味し、訪問者のためにあなたのサイトをより速く読み込むことができます。
WPBeginnerのスピードを改善するために、CloudflareやWP Rocketのようなパフォーマンスプラグインを使用しています。WP Super Cacheは、パフォーマンスを大幅に改善し、SEOを強化し、サイト訪問者のユーザー体験を向上させることができる無料の代替手段です。
この投稿では、WordPressサイトへのWP Super Cacheのインストールとセットアップについて説明します。各ステップについて分かりやすく説明しますので、技術に詳しくない方でも安心してついてきてください。最終的には、訪問者や検索エンジンが喜ぶ、より高速なサイトを手に入れることができるでしょう。
WP Super Cacheとは?
WP Super Cacheは、WordPressのキャッシュプラグインの中で最も人気があり、最も優れたプラグインの1つです。無料のツールで、100万以上の有効化したインストールがあります。
WP Super Cacheは、静的HTMLファイルの形であなたのサイトの各ページのキャッシュコピーを作成します。こうすることで、誰かがあなたのサイトを訪れるたびに、ウェブサイト全体をゼロからジェネレータする代わりに、コピーされたバージョンを素早く提供することができます。
その結果、WordPressサイトのスピードとパフォーマンスが劇的に向上します。キャッシュプラグインは、訪問者がページを開くのを待つ必要がないように、舞台裏で多くのステップをスキップします。
これにより、サイト訪問者のエクスペリエンスが向上します。読み込みが速いサイトは、ユーザーが投稿日やページに多くの時間を費やすため、より多くのエンゲージメントとコンバージョンにつながります。
それに加え、読み込みの速いサイトでは、WordPressのSEOや検索エンジンのランキングも向上します。Googleはウェブサイトの速度をランキング要因としているため、より高速なサイトに大きなアドバンテージを与えるからです。
さて、あなたのサイトにWP Super Cacheを設定する準備はできましたか?さっそく始めましょう!
WP Super Cacheの設定 – 簡単な方法
最初に行う必要があるのは、あなたのサイトにWP Super Cacheプラグインをインストールして有効化することです。詳しくはWordPressプラグインのインストール方法をご覧ください。
有効化した場合、WP Super Cacheは現在あなたのサイトでキャッシュが有効化されていないことを通知します。
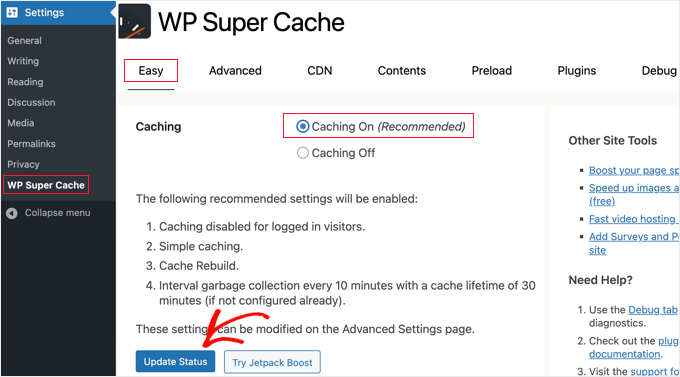
キャッシュを有効化するには、設定 ” WP Super Cacheにアクセスしてください。そして、’Easy’タブの下にある’Caching On’オプションをクリックしてください。そうしたら、「状態を更新」ボタンをクリックしてください。
キャッシュをオンにした後、「キャッシュテスター」セクションまでスクロールダウンする必要がある。
そこで’Test Cache’ボタンをクリックし、キャッシュが機能しているかどうかを確認する。
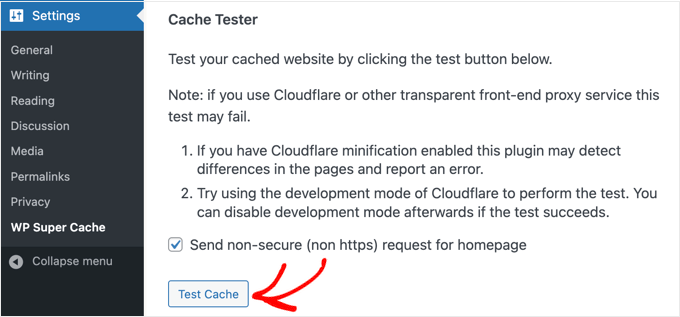
WP Super CacheはWordPressサイトを2回取得し、両方のページのタイムスタンプを比較します。両方のタイムスタンプが一致すれば、キャッシュがあなたのサイトで機能していることを意味します。
WP Super Cache 詳細設定
WP Super Cacheは強力なWordPressプラグインで、高度なオプションが豊富に用意されています。これらのオプションは、サイトのパフォーマンスをさらに向上させ、プラグインがサイトをキャッシュする方法をよりコントロールできるようにします。
キャッシュの有効化
WP Super Cacheを高度なオプションで設定するには、WP Super Cacheプラグイン設定の「Advanced」タブに移動します。次に、「キャッシュを有効化」のチェックボックスをクリックします。
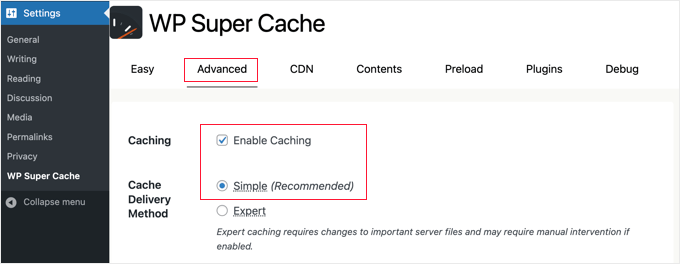
キャッシュの下に、「キャッシュ配信方法」のオプションが表示されます。初心者の方で、サーバーファイルの編集に慣れていない場合は、「シンプル」オプションを使用することをお勧めします。
キャッシュオプションを設定したら、必ず「状態を更新」ボタンをクリックしてください。
WP Super Cacheで圧縮を有効化する
圧縮により、WP Super Cacheはキャッシュされたファイルを圧縮ファイルとして提供し、ロード時間を改善します。これらのファイルはより小さく、ブラウザーによってより速くダウンロードされます。
圧縮を有効化するには、「高度な設定」タブの「その他」セクションまでスクロールダウンし、「ページを圧縮して、より速く訪問者に提供できるようにする」というボックスにチェックを入れます。

もう一度、「状態を更新」ボタンをクリックして変更を保存します。
ダイナミック・キャッシュの有効化
キャッシュ中にウェブページの特定の部分をダイナミックに保ちたい場合、WP Super Cacheはそのためのオプションを提供します。
ダイナミックキャッシュを有効化することは、特に頻繁に変更されるコンテンツを含むページがある場合に有効です。例えば、ダイナミックキャッシュを有効にすることで、広告を含むページを高速化することができます。
このオプションを有効化するには、’Advanced’セクションに移動し、’Enable dynamic caching’のチェックボックスをクリックします。

変更が終わったら、本当に〜してもよいですか?
有効期限とガベージコレクションの設定
WP Super Cacheでは、サーバーからキャッシュされたページを削除する有効期限と頻度も設定できます。
まずは、「Advanced(詳細設定)」タブの「Expiry Time & Garbage Collection(有効期限とガベージコレクション)」セクションまでスクロールして設定する。
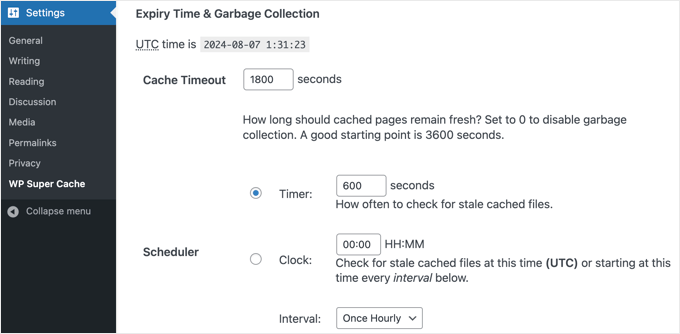
キャッシュタイムアウト’は、キャッシュされたページを削除し、新しいキャッシュを実行するようプラグインに指示します。プラグインは初期設定で1800秒に設定し、トラフィックの多いサイトには最適です。
しかし、トラフィックがそれほど多くない新規サイトの場合は、3600秒から始めるのがよいだろう。
それ以外にも、プラグインが古くなったキャッシュファイルをチェックして削除する時間をスケジュールすることができます。
選択が終わりましたら、「有効期限の変更」ボタンをクリックして変更を保存してください。
キャッシュさせたくないページを指定する
初期設定では、プラグインはサイト上のすべてのページをキャッシュします。これはキャッシュファイルのサイズを大きくし、より多くのリソースを使用する可能性があります。しかし、WP Super Cacheはキャッシュさせたくないページを選択することができます。
この機能を使用するには、’Advanced’ タブの ‘Rejected URL Strings’ セクションまでスクロールダウンしてください。テキストボックスに、プラグインにキャッシュさせたくないページのURL文字列を入力してください。
例えば、eコマースストアの場合、訪問者があまりアクセスしないページを除外してサーバーリソースを節約することができます。例えば、購入手続きページ、アカウントページ、サンキューページなどです。
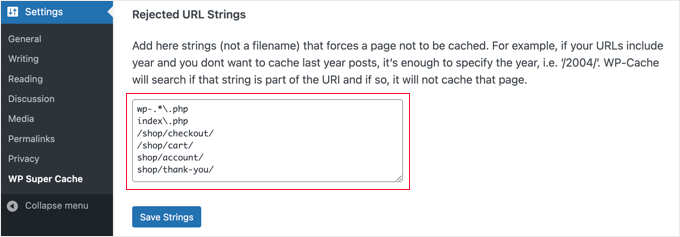
終了したら、「文字列を保存」ボタンをクリックするのをお忘れなく。
WP Super CacheをCDNと連動させる設定
コンテンツデリバリーネットワーク(CDN)サービスを使用してサイトを高速化している場合は、WP Super Cacheを設定してCDNと連動させることができます。そうでなければ、このセクションは飛ばしても大丈夫です。
CDNは、地理的に異なる場所に分散したサーバーのサイトネットワークであり、訪問者にコンテンツを迅速に配信するのに役立ちます。詳しくは、CDNが必要な理由についてのインフォグラフィックをご覧ください。
ヒント:Cloudflareは、セットアップが簡単な無料のCDNプロバイダーなので、Cloudflareを使用することをお勧めします。WordPressサイトにCloudflareの無料CDNを設定する方法については、チュートリアルをご覧ください。
WP Super CacheをCDNと連動させるには、設定のCDNタブをクリックしてください。そして、’CDNサポートを有効化’オプションの隣にあるボックスにチェックを入れてください。
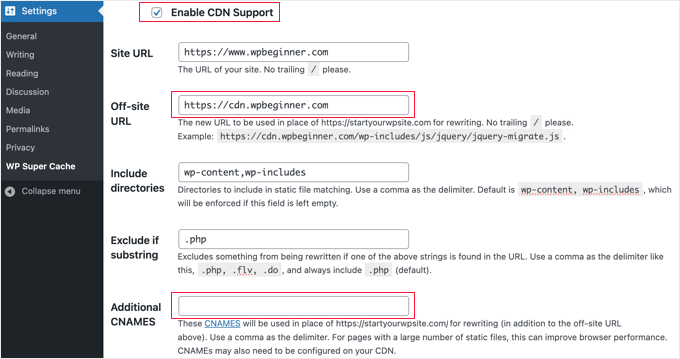
次に、「オフサイトURL」を入力する必要があります。これはCDNの’プルゾーン’で、あなたのファイルがCDNに保存されているURLです。
ここでの設定はCDNサービスによって異なるが、いくつかのヒントを紹介しよう:
- Cloudflareを使用している場合、このフィールドは空白のままにしてください。WP Super Cacheは自動的にCloudflareを検出し、動作します。
- 別のCDNサービスを使用している場合は、https://cdn.wpbeginner.co
m。本当に〜してもよいですか?’wpBeginner.com’をあなたのサイトのドメイン名に置き換えてください。 - 疑わしい場合は、CDNサービスにログインし、アカウントダッシュボードの「ドメイン」、「CDNドメイン」または「CDN URL」の設定を確認できます。
CDNに複数のURLがあることがわかっている場合は、「Additional CNAMES」フィールドに、http://cdn1.wpbeginner.com、http://cdn2.wpbeginner.com、http://cdn3.wpbeginner.com のように入力できます。そうでない場合は、このフィールドは空白のままにしてください。
その他の設定は初期設定のままで構いません。最後に、’Skip https URLs to avoid “mixed content “errors’というボックスにチェックを入れ、’Save Changes’ボタンをクリックします。
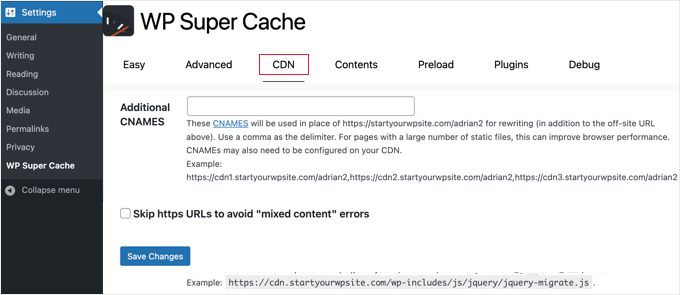
これで、あなたのサイトはCDNから静的コンテンツを提供する準備が整いました。
WP Super Cacheで静的サイトを提供する
WP Super Cacheのプリロードモードでは、すべての投稿とページにスーパーキャッシュ静的ファイルを作成し、静的なサイトを提供することができます。こうすることで、誰かがあなたのサイトにアクセスするたびに、コンテンツが素早く読み込まれます。
スーパーキャッシュ静的ファイルは、サーバーリソースを節約し、更新されなくなった古いサイトを提供し、静的コンテンツのみを提供することでサイトの速度を向上させるのに役立ちます。
まず、WP Super Cacheプラグインの「Preload」タブにアクセスしてください。次に、プリロードされたキャッシュファイルを更新する時間を設定します。
初期設定では、プラグインは600分に設定しますが、毎日複数の記事を公開する場合は、時間を短縮することができます。
WordPressサイト全体のプリロードには時間がかかり、サーバーのリソースを大量に消費することを覚えておいてください。手動でキャッシュをリフレッシュしない限り、静的ファイルの有効期限を切らしたくない場合は、0にしておくことができます。
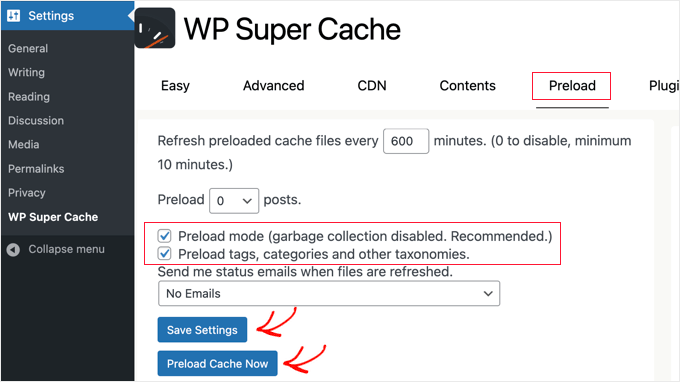
その後、’Preload mode (garbage collection disabled. Recommended)’のボックスにチェックを入れてください。サイト上のタグ、カテゴリー、その他のタクソノミーごとにプリロードを有効化することもできます。
プラグインには、ファイルが更新されるたびにメールアラートを受け取るオプションもあります。初期設定では、「メールなし」設定が使用されますが、ドロップダウンメニューからオプションを選択して変更することができます。
設定が完了したら、設定を保存して「Preload Cache Now」ボタンをクリックします。
WordPressキャッシュのエキスパートガイド
このガイドがWordPressブログにWP Super Cacheを設定するのにお役に立てば幸いです。WordPressキャッシュに関連する他の投稿もご覧ください:
- WordPressのレバレッジ・ブラウザ・キャッシュ警告を簡単に修正する方法
- WordPressのキャッシュをクリアする方法(ステップバイステップ)
- サイトを高速化するWordPressのベストキャッシュプラグイン
- LiteSpeed Cache vs. WP Rocket – どっちがいいの?
- WordPressにWP Rocketを正しくインストール・設定する方法
- 初心者のためのW3 Total Cacheインストールと設定方法
- WordPressのスピードとパフォーマンスを向上させる究極のガイド
- WooCommerceのパフォーマンスを高速化する方法
If you liked this article, then please subscribe to our YouTube Channel for WordPress video tutorials. You can also find us on Twitter and Facebook.


Anze
Hey; I have a question – so preload mode enabled does not deletes old cached files – but does that means then when preloaded files are refreshed, the old ones are deleted and replaced, or does it just adding files, which would mean space on server would eventually run out?
WPBeginner Support
When the page is preloaded a new time, the old preloaded version would be deleted and replaced.
Admin
James Omeke
Thanks so much . This was very helpful.
I got my website up and running now
WPBeginner Support
You’re welcome, glad our guide was helpful!
Admin
Mike Royden
Plug in installed, but can’t get past this;
Permalink Structure Error
A custom url or permalink structure is required for this plugin to work correctly. Please go to the Permalinks Options Page to configure your permalinks.
I have gone to the Permalinks Options Page to configure your permalinks, but can’t see where I’m going wrong. Going round in circles, please help. Thanks
WPBeginner Support
You would want to ensure your permalinks are not set to plain for that error. We recommend using the Post name structure.
Admin
Mike Royden
Sorted! Many thanks for your advice and taking the time to reply. Cheers.
Katherine
I’m trying to set up this plug in to get the best results, and I’m not tech-savvy at all. Your Wp advanced cache set up section is not the same as the current plugin advanced options.
WPBeginner Support
Thank you for letting us know, we will be sure to take a look into this and update our article when able.
Admin
Simon
I was able to speed up my homepage significantly but unfortunately it only worked for the homepage. The subpages like i.e. ‘Services’ are still really slow.
What could be the problem?
WPBeginner Support
You would want to run a speed test for that using our guide below to figure that out:
https://www.wpbeginner.com/beginners-guide/how-to-properly-run-a-website-speed-test-best-tools/
Admin
Rainey
Unable to activate the plugin. I get a warning message that a .php file already exists and I should manually delete it before using the plugin. Since I am not a techie I do not know where to go to delete the file. If you could put language in your update to the tutorial to guide us would be really helpful.
WPBeginner Support
For that error, you may want to follow our guide below:
https://www.wpbeginner.com/wp-tutorials/how-to-fix-destination-folder-already-exists-error-in-wordpress/
Admin
Paul
This post is dated. When will this post be updated? Would like to know the current status of WP Super Cache?
WPBeginner Support
Thank you for letting us know, we do not have a specific date that content will be updated but we will take a look into updating this article
Admin
Nic
Is there a way to export settings once you get done?
WPBeginner Support
At the moment WP Super Cache does not have a built-in option to export settings.
Admin
ShoaiB
Thank you for this Awesome Guide.
I’m using WP Super Cache (Version 1.7.0 ). In the above tutorial, many features are not included. plz, Update Post.
WPBeginner Support
Thank you for your request, we will look into updating the post
Admin
Christopher
not as easy as described…
A custom url or permalink structure is required for this plugin to work correctly. Please go to the Permalinks Options Page to configure your permalinks.
WPBeginner Support
Thank you for reminding us of that, we’ll be sure to look into updating the article for clarification.
Admin
Ana
Hello Support!
Thank you for all your work, I’m a complete newbie and without you, I don’t know how I’d manage.
I’m confused as regards what off-site URLs and CNames are, so I’m unable to fill in that in the form. Do I have to refer to somewhere on my page to find out or do I just create it my indicating something?
Just in case it affects somehow I’d like to inform that I run a multisite.
Thank you so much & hope you can help me,
Ana
WPBeginner Support
Hi Ana,
The off site URL is the URL of your CDN location and CNames are different pullzones you have created on your CDN server. If you are not using a CDN, then you don’t need to make any changes to these settings.
Admin
krishna
can i use this plugin for testing in localhost ??
i installed this plugin in localhost and in “Cache Contents” nothing cached
displaying this …
WP-Cache (0KB)
0 Cached Pages
0 Expired Pages
WP-Super-Cache (0KB)
0 Cached Pages
0 Expired Pages
is it because i can’t use cache plugin in localhost or some other issue ?
Hardik
There is nothing called MOD_REWRITE. Everything from that step seems completely different. Please update the tutorial.
Mike
No matter what settings I use Pingdom still gives me an F and says “The following cacheable resources have a short freshness lifetime. Specify an expiration at least one week in the future for the following resources:” and I see and “expiration not specified” message in the details. Am I missing a setting?
Akshay
Hi Team ,
Thanks for the amazing article .
I have installed WP Super Cache with cloudflare (newbie blogger).
Can you please help me, how can I integrate cloudflare with WP super cache .
I did not found any articles or vidoes for the same .
I thought of installing WP Total , but it has not releasedthe update for recent wordpress version 4.8.1
Thank You
Sumaiya
Hi, I wanted to speed up my site. I used this guide and customized the settings as you shown. But before installing this plugin I tested my site speed it was 4.20 sec. But after installing I check it was 6.78 sec. Why is it like this? please guide me well.
WPBeginner Support
Hi Sumaiya,
Please test it again. If the result persists, then deactivate the plugin.
Admin
Rajeev jaiswal
hello sir, I’m trying to integrate js and CSS code elements in twenty-seventeen WordPress theme. I use enqueue methods but it does not work, so suggest me to all about.
Sara
I just downloaded WP Super Cache and the “Advanced” Page doesn’t have the same setup (or some of the same options!) as your screenshot and instructions. Are those dates, or did I somehow end up with an older version of the plugin?
Carrie
Same here, my settings are different.
Abner
Hi guys – Thanks for sharing this. I am using wp super cache and my wordpress is 4.0.1. At first, i don’t have any problem. Until recently, having a problem. My post did not appear on my website. I tried to put the caching off and my post appear. After that, I put the caching on again. My workaround was after posting article to my website, I will put my caching off to appear the post in my website, then after a few minutes, I will put the caching to on.
Few weeks doing that, and now, when I put the caching on, my post will disappear again to my website. As of now, my caching is still off.
Thanks and hope you can help me.
WPBeginner Support
Hi Abner,
Seems like WP Super Cache is not clearing the cache when you publish new content. Please see our article on how to clear cache in WordPress.
Admin
Mark Layton
Hello Support,
Thank You for your help with this issue while trying to install WP Super Cache.
Here is a copy of issue :
Warning! Could not update /var/www/website/wp-config.php! WPCACHEHOME must be set in config file.
Warning! /var/www/website/wp-content/advanced-cache.php does not exist or cannot be updated.
1. If it already exists, please delete the file first.
2. Make /var/www/website/wp-content writable using the chmod command through your ftp or server software. (chmod 777 /var/www/website/wp-content) and refresh this page. This is only a temporary measure and you’ll have to make it read only afterwards again. (Change 777 to 755 in the previous command)
3. Refresh this page to update /var/www/website/wp-content/advanced-cache.php
If that doesn’t work, make sure the file /var/www/website/wp-content/advanced-cache.php doesn’t exist:
1. Open /var/www/website/wp-content/plugins/wp-super-cache/advanced-cache.php$wp_cache_file in a text editor.
2. Change the text CACHEHOME to /var/www/website/wp-content/plugins/wp-super-cache/
3. Save the file and copy it to /var/www/website/wp-content/advanced-cache.php and refresh this page.
Cannot continue… fix previous problems and retry.
Already use your Envira Gallery and WP Forms and those are fantastic.
Should I just use W3 Total Cache instead?
Thank You so much for your help.
Mark Layton
WPBeginner Support
Hey Mark,
You can try following the instructions shown in WP Super Cache. If you find them too complicated, then you can try W3 Total Cache. Good luck
Admin
sheikave Jhurreea
Initially my website was loading for under 8 seconds which is pretty bad. But using your tutorial I was able get 90/100 for desktop performance.
But the mobile platform it remained 74/100. Could you suggest some resources where I could look up too or what is your suggestion.
WPBeginner Support
Hey Sheikave,
Congrats! That’s impressive. You may also want to see our guide on how to fix render-blocking JavaScript and CSS in WordPress.
Admin