Facebookは、約30億人のアクティブユーザーを抱える世界最大級のソーシャルメディアサイトです。Facebookでブログ記事をシェアすることで、サイトへの訪問者を増やし、ページビューを増やすことができます。
WPBeginnerでは、ソーシャルメディアの力を理解しており、一貫してFacebookで製品やサービス、新しい記事を宣伝しています。これにより、トラフィックを促進し、エンゲージメントを高め、ビジネスの成長をサポートしています。
この投稿では、WordPressでブログ記事を公開するたびにFacebookに自動投稿する方法をご紹介します。
なぜWordPressの投稿をFacebookで自動共有するのか?
Eメールリストの構築や定期的なEメールニュースレターの配信など、オーディエンスと連絡を取り合う方法はたくさんある。それでも、フェイスブックのようなソーシャルメディアサイトの巨大なユーザーベースを無視することはできない。
最大のソーシャルメディアサイトであるFacebookは、WordPressウェブサイトの大きなトラフィック源となります。
強力なフォロワーを作るには、Facebookのオーディエンスとエンゲージすることが重要です。これは、コメントへの回答、コンテンツの共有、Facebookへの定期的な更新投稿を意味します。
そこで、WordPress用のソーシャルメディア・チートシートをご用意しました。ソーシャルメディア活動を有効化することで、時間と労力を節約することもできます。
それでは、WordPressで新しい投稿を公開するたびにFacebookに自動投稿する方法を見ていきましょう。
以下のクイックリンクからお好きな方法にジャンプしてください:
方法1:Uncanny Automatorを使ってWordPressからFacebookに自動投稿する(新規投稿)
Facebookに自動投稿する最良の方法は、Uncanny Automatorを使用することです。市場で最高のWordPress自動化プラグインであり、時間を節約し、より良いユーザーエクスペリエンスを提供し、ビジネスを成長させる強力なワークフローを作成できます。
さらに、Googleドライブ、Slack、Asana、Facebookなど、185以上のプラグイン、アプリ、サービスと統合できる。
このガイドでは、Uncanny AutomatorのProバージョンを使用します。
注: 無料のUncanny Automatorプラグインもあり、Facebookで使用できる1,000クレジットがもらえます。これらのクレジットを使用した後、Facebookへの自動投稿を続けるには、Proアカウント以上にアップグレードする必要があります。
無料のプラグインを使用する場合も、手順はほとんど同じです。
まず、Uncanny Automatorプラグインをインストールして有効化する必要があります。詳しくは、WordPressプラグインのインストール方法のステップバイステップガイドをご覧ください。
有効化すると、Uncanny Automatorの無料版のインストールも求められます。このプラグインのライトバージョンは、プロプランのベースとして使用されます。
有効化した後、Automator ” 設定ページにアクセスし、ライセンスキーを「Uncanny Automator Pro ライセンスキー」フィールドに入力します。
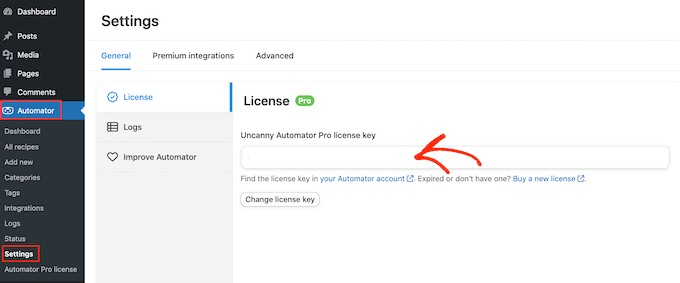
この情報は、Uncanny Automatorサイトのアカウントで確認できます。
有効化した後、’Activate license’ボタンをクリックします。
FacebookページをUncanny Automatorに接続する
Facebook用の自動ワークフローを作成する前に、FacebookページをUncanny Automatorに接続する必要があります。
この接続を行うには、Automator ” App Integrationsページにアクセスし、左の列から「Facebook Pages」タブに切り替えます。
ここで、’Connect Facebook account’を選択する。
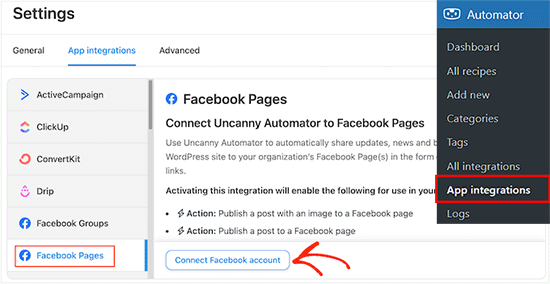
このボタンをクリックすると、Facebookアカウントにログインできるポップアップが表示されます。2 要素認証を有効化している場合は、Facebook を Uncanny Automator に接続するために、この追加チェックにも合格する必要があります。
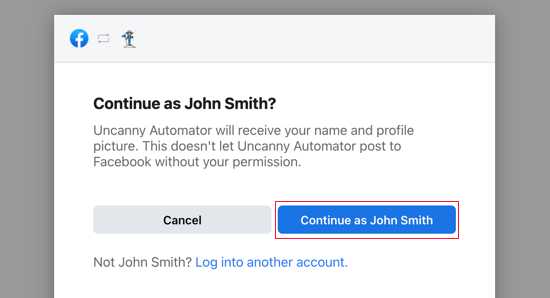
ログイン中、Facebookがあなたの名前とプロフィール写真へのアクセスをUncanny Automatorに許可するかどうかを尋ねます。よろしければ、「このまま続ける」ボタンをクリックしてください。
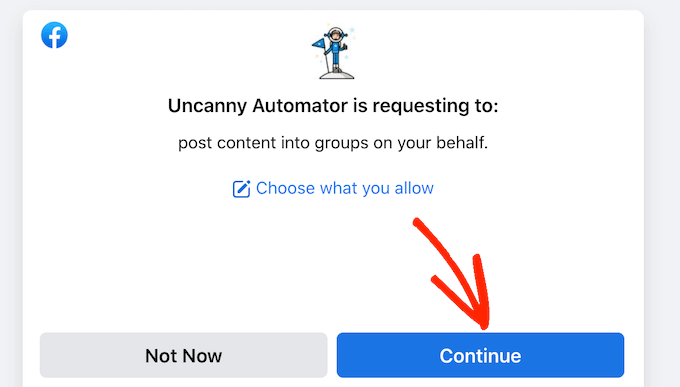
次に、Uncanny AutomatorにFacebookへの投稿を許可するかどうか尋ねられます。
そのまま『続ける』をクリックしてください。
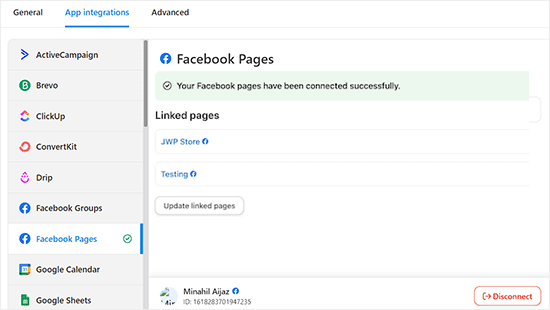
そうすると、Uncanny Automatorのダッシュボードに戻ります。
Facebookアカウントにリンクされているすべてのページが表示されます。これらは、Uncanny Automatorが自動的に投稿できるページです。
Uncanny AutomatorからFacebookに自動投稿する
これで、WordPressブログの新しい記事を公開するたびに、自動的にFacebookステータスを投稿するレシピを作成する準備ができました。
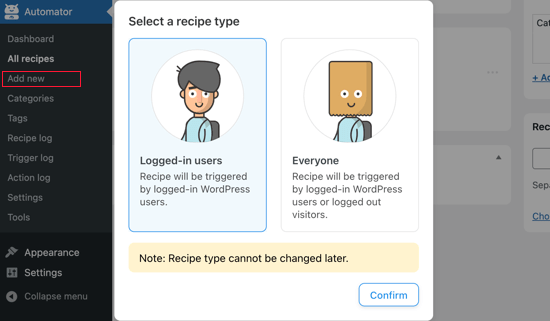
WordPressのダッシュボードにあるAutomator ” Add newにアクセスするだけです。
ログイン中’レシピを作成するか、’Everyone’レシピを作成するかを選択することができます。このレシピでは’ログイン中ユーザー’を選択し、’確認’ボタンをクリックします。
次に、「タイトル」フィールドにレシピの名前を入力します。
これはあくまで参考なので、お好きなものを使ってください。
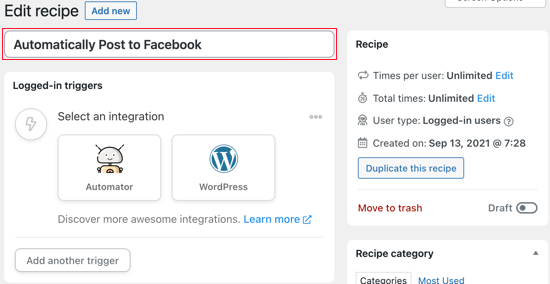
その後、アクションのトリガーとなる条件を定義しなければならない。
WordPressブログを公開するたびにFacebookに投稿したいので、「統合を選択」の「WordPress」をクリックする。
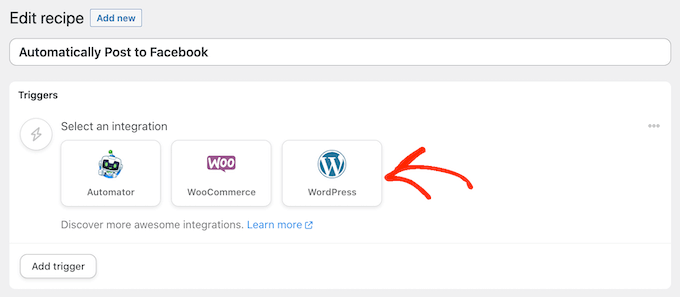
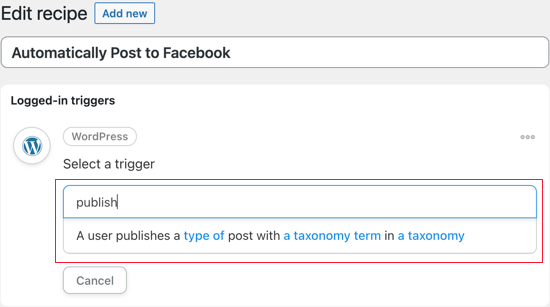
これで、WordPressウェブサイトで使用できるすべてのトリガーが表示されます。
publish」を検索し、「A user publishes a type of post with a taxonomy term in ataxonomy」というトリガーを選択します。
この例では、投稿を公開したときだけFacebookを更新し、ページは更新しません。カテゴリー: ‘投稿タイプ’ドロップダウンを開き、’投稿’を選択します。
タクソノミー」の設定を変更することで、特定のカテゴリーやタグからの投稿を共有するかどうかを決めることができる。
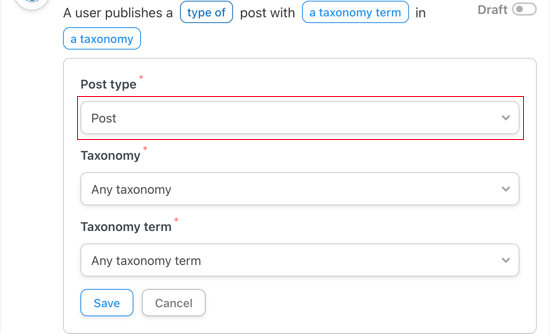
保存」をクリックして変更を保存することを忘れないでください。
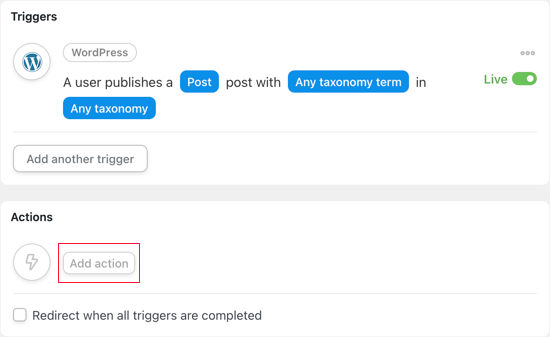
次に、投稿を公開するたびにUncanny Automatorが実行するアクションを選択する必要があります。アクションを追加] ボタンをクリックして開始します。
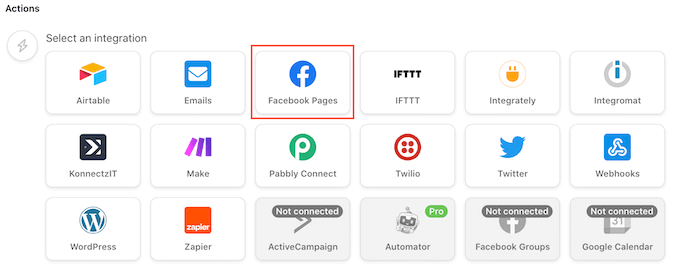
Uncanny Automatorでは、使用できる統合機能がすべて表示されるようになりました。例えば、WordPressで新しい投稿を公開すると自動的にツイートできる統合があります。
Facebookに投稿したいので、「Facebook Pages」ボタンをクリックする。
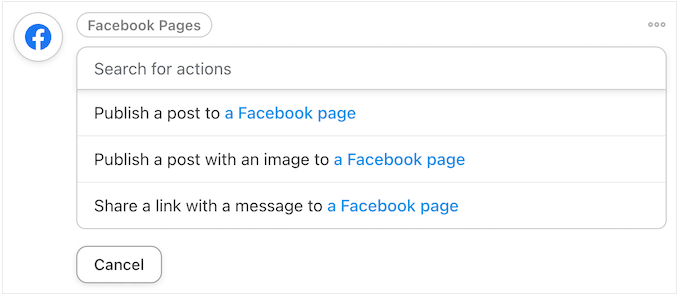
Facebookのアクションがすべて表示されます。
投稿にアイキャッチ画像がある場合は、「画像付き投稿を公開する」を選択するのがよいでしょう。しかし、Facebookの投稿に画像を追加したくない場合は、代わりに「Facebookページに投稿を公開する」を選択することができます。
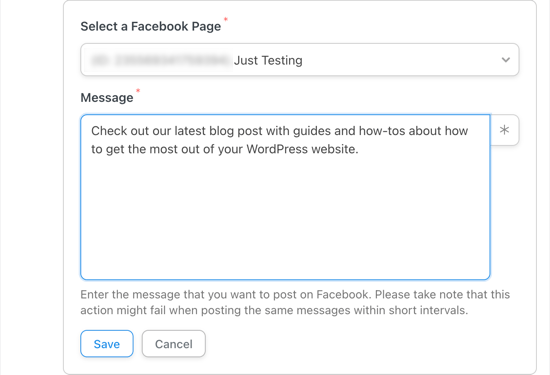
複数のFacebookページをお持ちの場合は、「Facebookページ」のドロップダウンメニューから投稿したいページを選択してください。
その後、投稿したいステータスを「メッセージ」ボックスに入力して作成します。
投稿ステータスを書くとき、トークンを使って投稿タイトルとURLをメッセージに追加する必要があります。Uncanny Automatorがあなたのステータスを投稿するとき、これらのトークンを投稿の実際の情報に置き換えます。
トークンを追加するには、「*」ボタンをクリックします。
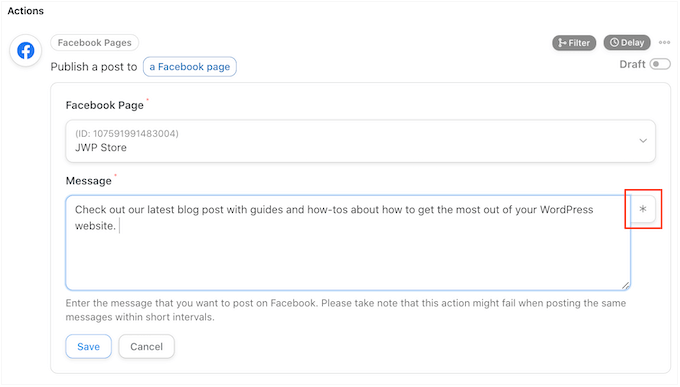
そして、「ユーザーが投稿を公開する」の次の矢印をクリックしてください。
これは投稿のすべての異なるトークンを表示します。
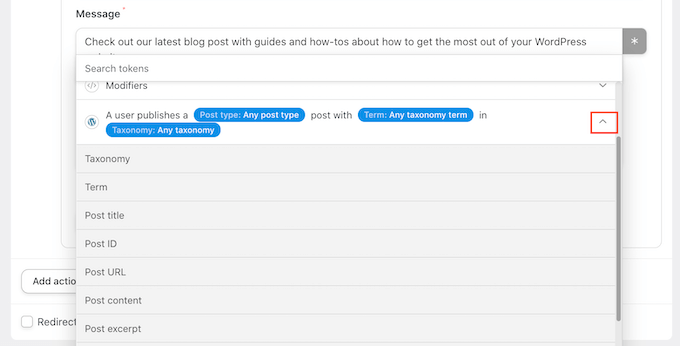
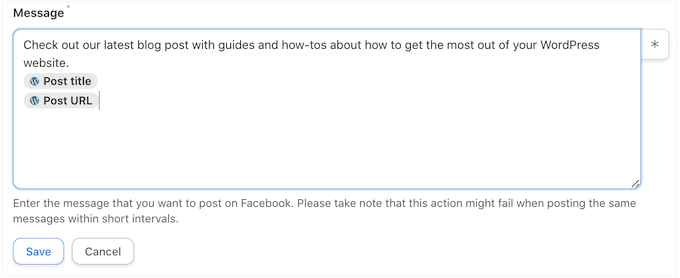
Facebookの状態に任意のトークンを追加することができます。
しかし、人々がブログ記事を訪問できるように、通常は’投稿タイトル’と’投稿URL’を選択したいでしょう。
画像付きの投稿を公開する」をアクションとして選択した場合、Uncanny Automatorにその画像がどこにあるかを知らせる必要があります。
画像URLまたはメディアライブラリID」フィールドを見つけ、その「*」ボタンをクリックする。
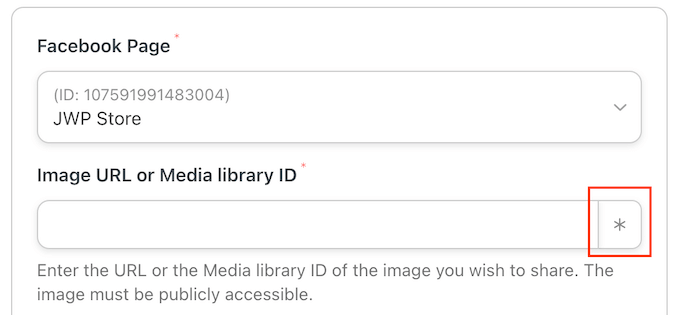
次に、’A user publishes a post…’トリガーをクリックして展開する。
ここで、「アイキャッチ画像URLを投稿」をクリックする。
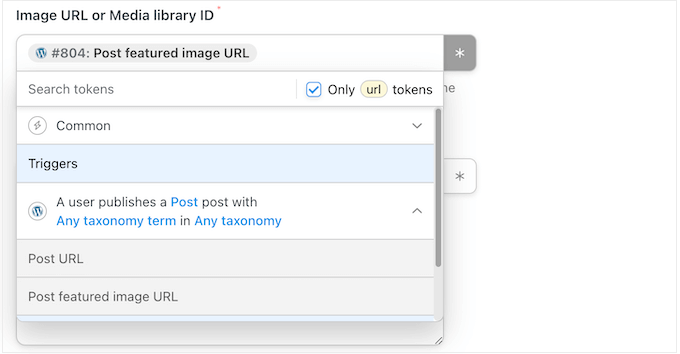
アクションの設定に満足したら、’Save’をクリックするのを忘れないでください。
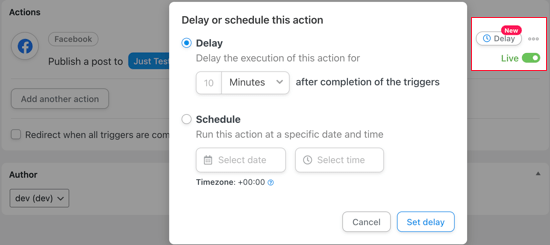
この時点で、Uncanny Automatorがブログを公開してすぐにFacebookに投稿しないように、遅延を追加することもできます。
これを行うには、「投稿を公開する」アクションにマウスオーバーし、表示されたら「遅延」をクリックします。

これで、Uncanny Automatorのアクションを遅延後にトリガーするか、特定の日付または時刻にトリガーするかを選択できます。
これにより、オーディエンスが最もオンラインになりやすい時間帯にFacebookに投稿することができる。
トリガーとアクションを設定したら、レシピを公開しましょう。
そのためには、『下書き』スイッチをクリックして、代わりに『ライブ』と表示させる。
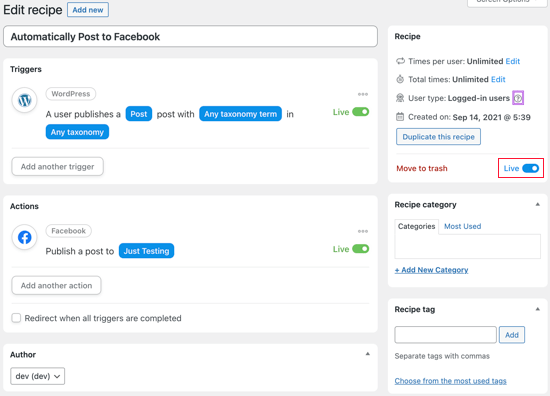
レシピが公開されると、Uncanny Automatorはあなたが投稿を公開するたびに新しいFacebookステータスを投稿します。
テストサイトで新しいブログ記事を公開したところ、Facebookページにこのように投稿が表示された。

もし正しいサムネイル画像がFacebookの状態に表示されない場合は、WordPressでFacebookのサムネイルが正しくない問題を修正する方法をご覧ください。
動画チュートリアル
もしあなたが視覚的な学習がお好きなら、WordPressからFacebookに自動投稿する方法についてのYouTubeチュートリアルをご覧ください:
方法2:ClickSocialを使ってWordPressからFacebookに自動投稿する(すべての投稿)
WordPressからFacebookに自動投稿するもう一つの方法は、ClickSocialを使うことです。これは、市場で最高のソーシャルメディアスケジューラとポスターです。
ClickSocialを使って、WordPressのダッシュボードからFacebook、Instagram、Twitterのソーシャルメディア投稿を作成し、スケジュールすることができます。
ClickSocialを使えば、復活キャンペーンを設定して、定期的にWordPressの古い投稿をFacebookで自動的に共有することもできる。
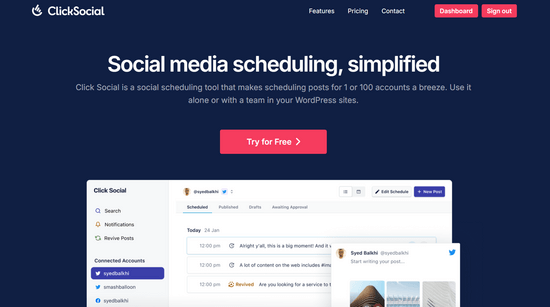
まずは、ClickSocialのウェブサイトにアクセスし、アカウントにサインアップしてください。
アカウントを取得したら、無料のClickSocialプラグインをインストールして有効化する必要があります。ヘルプが必要な場合は、WordPressプラグインのインストール方法のチュートリアルを参照してください。
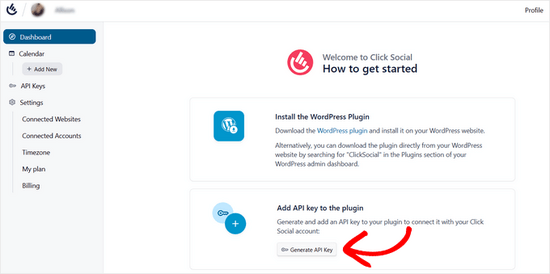
プラグインを有効にしたら、ClickSocialウェブサイトのダッシュボードに戻ってください。ここから、’Generate API Key’ボタンをクリックする必要があります。
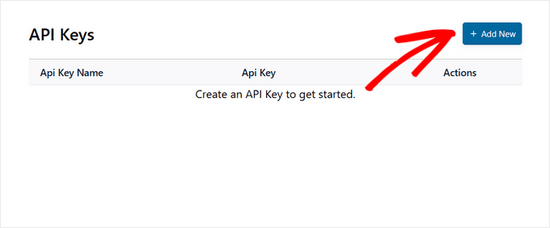
次のページで「新規追加」ボタンをクリックします。
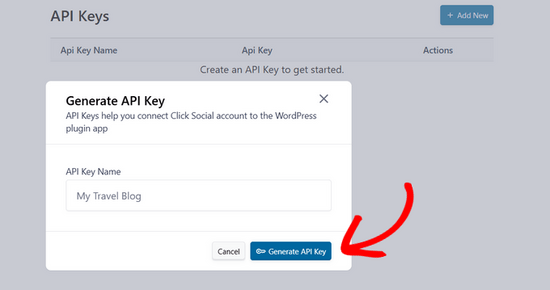
APIキーの名前を入力するポップアップが開きます。そして、「APIキーをジェネレータ」をクリックする。
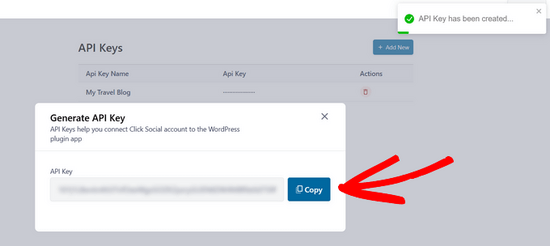
APIキーが生成されます。WordPressサイトに接続するために必要不可欠なものなので、安全に保管することを忘れないでください。
コピー』ボタンをクリックして、あなたのウェブサイトに戻ってください。
次に、WordPressダッシュボードからClickSocialメニューに移動します。そして、「Setup My Account」ボタンをクリックしてください。
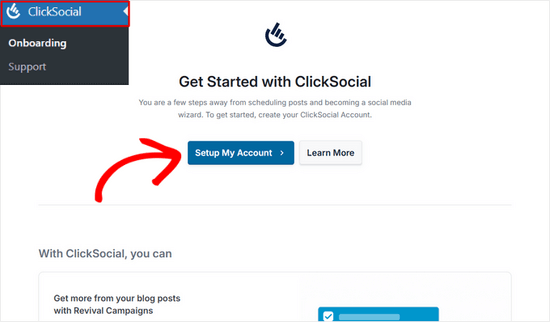
コピー&ペーストしたAPIキーをフィールドにペーストし、’Connect’ボタンをクリックします。
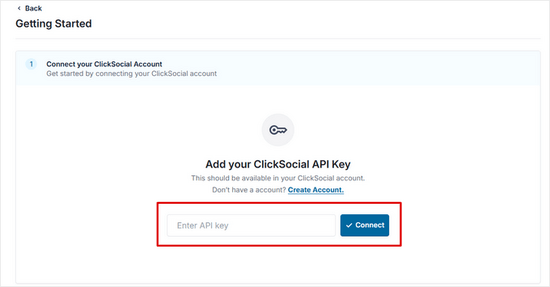
FacebookページをClickSocialに接続する
ウェブサイトがClickSocialに接続されたら、Facebookアカウントとの接続を開始できます。
そのためには、「アカウントを追加」ボタンをクリックします。
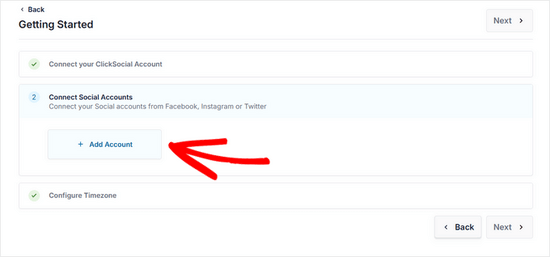
ClickSocialでは、Facebook、Instagram、Twitterに接続することができます。このチュートリアルでは、Facebookオプションを選択して接続します。
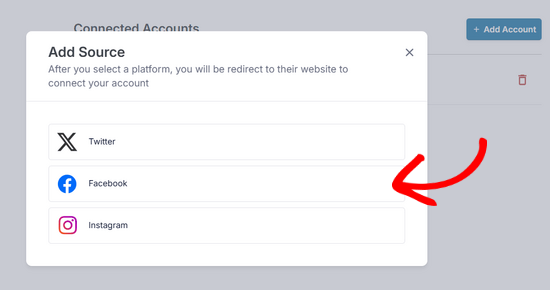
その後、Facebookにリダイレクトされます。
まず、プロフィールを選択し、「Continue」ボタンをクリックします。
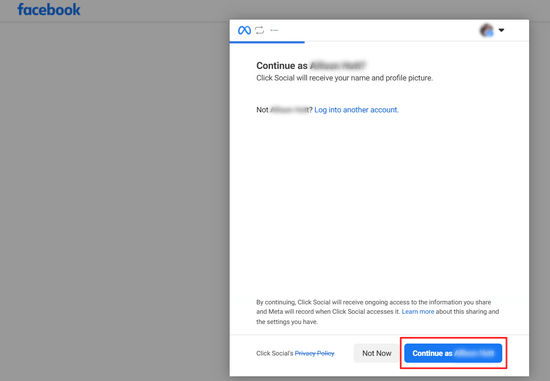
次に、ClickSocialに投稿させたいFacebookページを選択し、「Continue」をクリックします。
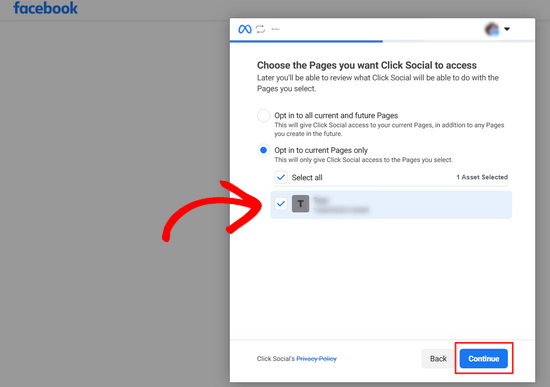
その後、Facebookに接続したビジネスを選択する必要があります。そして、「続ける」ボタンをクリックします。
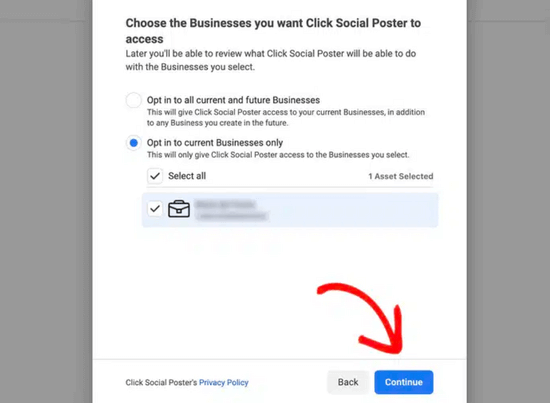
次に、ClickSocialのアクセス要求を確認することができます。これらは、ClickSocialがWordPressの投稿をFacebookで自動的に共有するためのパーミッションです。保存’をクリックして続けます。
最後に「Got it」ボタンをクリックすると、ウェブサイトに戻ります。
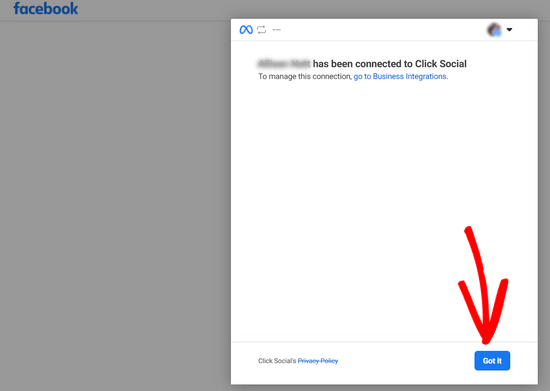
WordPressからFacebookへの自動投稿をスケジュールする前に、ClickSocialを設定する最後のステップがあります。
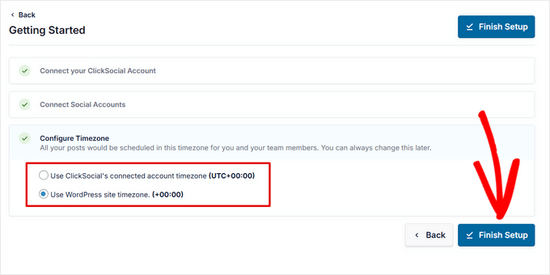
投稿がスケジュールされるタイムゾーンを選択する必要があります。このチュートリアルでは、WordPressウェブサイトと同じタイムゾーンを選択します。
その後、「セットアップを終了する」ボタンを押す。
ClickSocialで復活投稿を設定する
ClickSocialがセットアップされ、Facebookアカウントに接続されたので、WordPressの投稿をFacebookに自動的に共有するための復活キャンペーンを設定することができます。
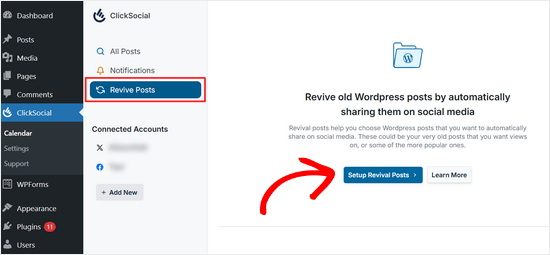
まず、ClickSocialのダッシュボードから「Revive Posts」タブに行き、「Setup Revival Posts」ボタンをクリックします。
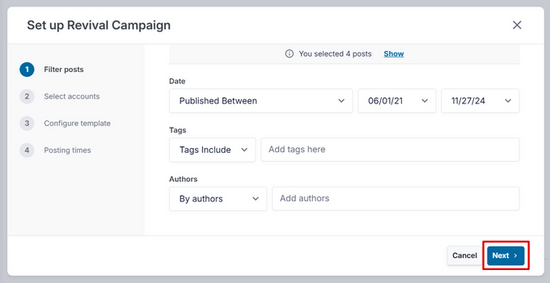
どの投稿をソーシャルメディアで自動的にシェアするかを決めるフィルターを設定することから始めよう。
公開日、タグ、著者でフィルターをかけることができます。フィルターを選択したら、「次へ」ボタンをクリックしてください。
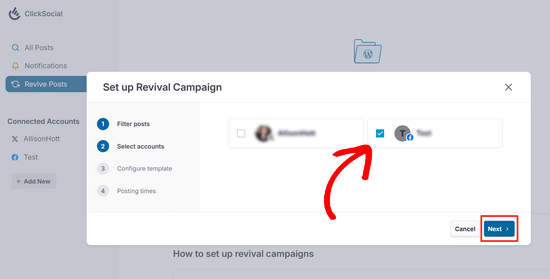
次に、投稿したいソーシャルメディアのアカウントを選択します。複数のアカウントに接続している場合は、複数のアカウントを選択できますが、このチュートリアルではFacebookだけを選択します。
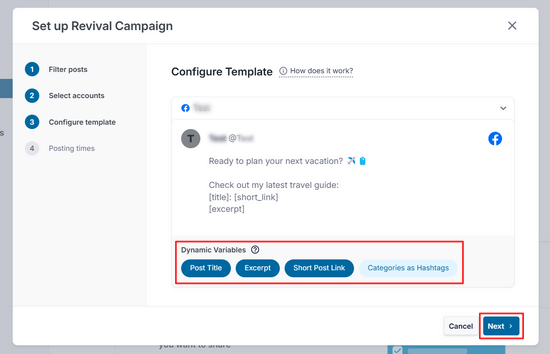
これで、Facebook投稿のテンプレートを作成できる。
手動でテキストを追加できるだけでなく、投稿タイトル、抜粋、短い投稿リンク、カテゴリーをハッシュタグとして挿入することもできる。
テンプレートに問題がなければ、「次へ」ボタンをクリックします。
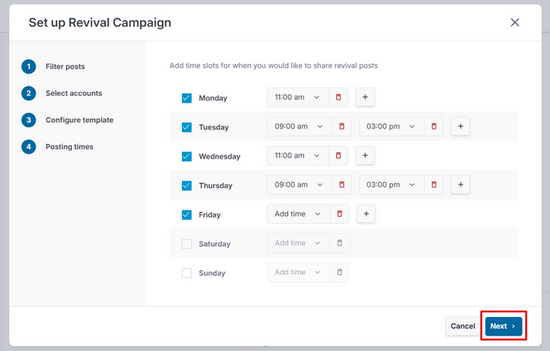
最後に、Facebookの投稿をシェアする曜日と時間を選択できます。追加」アイコンをクリックすると、1日に複数の投稿時間を追加できます。
投稿時間を選択したら、「次へ」ボタンをクリックします。
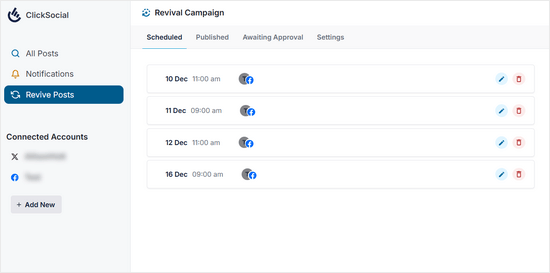
それだけだ。
Scheduled “タブで、あなたが選んだ日にブログ記事が自動的にシェアされることがわかります。
ボーナス:WordPressでカスタムFacebookフィードを作成する
WordPressからFacebookへの投稿とは別に、Facebookフィード全体をサイトに埋め込むこともできます。これにより、訪問者はサイトを離れることなくFacebookの投稿を表示することができ、ユーザーエクスペリエンスを向上させることができます。
さらに、ユーザーがあなたのFacebookページをチェックするきっかけになり、フォロワーが増える可能性もある。
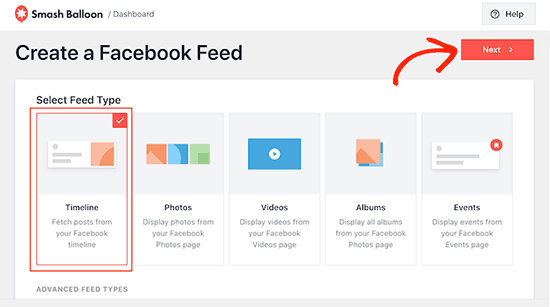
Facebookフィードを埋め込むには、Smash Balloon Facebook Feedプラグインをインストールし、有効化する必要があります。有効化したら、Facebook Feed ” All Feedsにアクセスして、’Add New’をクリックしてください。
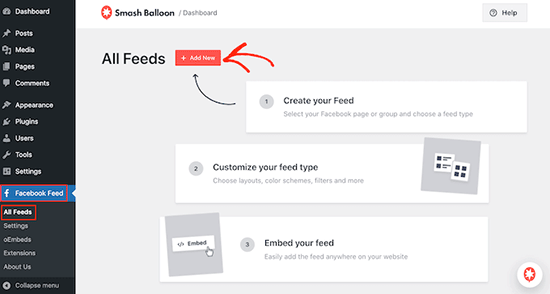
フィードの種類として「タイムライン」を選択し、「次へ」ボタンをクリックします。
その後、Smash Balloon と Facebook アカウントを接続する必要があります。詳しくは、WordPressにFacebookのグループフィードを埋め込む方法のチュートリアルをご覧ください。
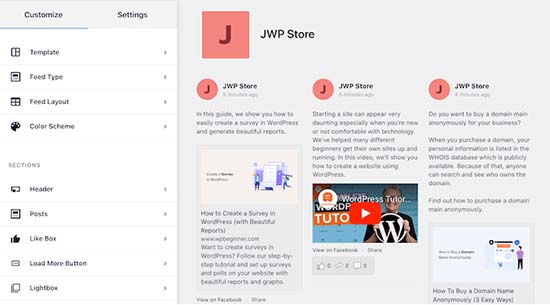
それが完了したら、Smash BalloonのビジュアルエディターでFacebookフィードを簡単にカスタマイズできます。ここでは、背景色の変更、レイアウトの選択、さまざまなボタンの追加など、さまざまなことができます。
その後、上部にある「保存」ボタンをクリックして設定を保存します。
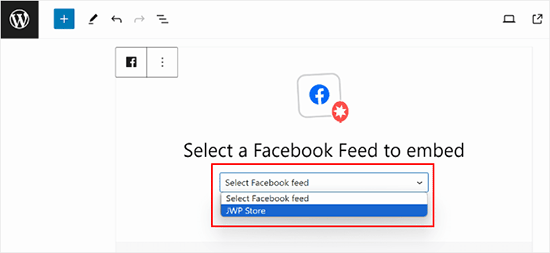
ブロックエディターを開き、メニューから「Facebookフィード」ブロックを追加します。次に、ブロック内のドロップダウンメニューから、先ほど作成したFacebookフィードを選択します。
最後に、「更新」または「公開」ボタンをクリックして、設定を保存します。詳しくは、WordPressでカスタムFacebookフィードを作成する方法のチュートリアルをご覧ください。
このチュートリアルで、WordPressからFacebookに自動投稿する方法を学んでいただけたでしょうか。また、WordPressにFacebook動画を埋め込む方法や、ブログを成長させるWordPress Facebookプラグインのエキスパートピックもご覧ください。
If you liked this article, then please subscribe to our YouTube Channel for WordPress video tutorials. You can also find us on Twitter and Facebook.


Jiří Vaněk
This will save me a relatively large amount of time with the number of articles. I manually posted articles to Facebook after they were published.
WPBeginner Support
Glad we could help simplify the process for you
Admin
Terje Pettersen
Hi. I want to enable all my users to be able, in an easy way, so that all new WordPress blogs automatically be posted on their own private facebook wall. Is that possible?
WPBeginner Support
We do not have a method we would recommend for that at the moment as there would not be an easy way for your users to disable the automated sharing. For the time being, you would want to take a look at plugins to add a share button to your posts.
Admin
G
Thanks for sharing. This has been helpful.
WPBeginner Support
Glad the guide was helpful
Admin
Beth Younker
Thanks for the info, however you fail to mention that some of these options may come at a price. For example, with WordPress you can no longer use plug-ins unless you upgrade to a business account. I find that really frustrating, as I used to be able to easily link to my FB page, but now I can’t unless I pay more money? Thanks a lot.
WPBeginner Support
For the cost of WordPress, our guides are for WordPress.org not, WordPress.com which would be part of the confusion. You can see our guide below on the differences between the two:
https://www.wpbeginner.com/beginners-guide/self-hosted-wordpress-org-vs-free-wordpress-com-infograph/
Admin
morgan kane
Does any of this methods auto-post to facebook GROUPS?
WPBeginner Support
These are for Facebook pages, Facebook limits automation for their groups at the moment.
Admin
Eduardo Rivera
Hi guys, great info as always! You should really update the 3rd option, the graph API has been deprecated and now Facebook uses another method, very intuitive and self explanatory.
WPBeginner Support
Thank you for letting us know, we will look into updating our article as soon as we are able.
Admin
ebenezer
I cant find new applet from the drop-down menu when I clicked on my username
WPBeginner Support
They may have changed their interface since this article was last updated you should still be able to use their search feature at the top of the page to find an applet.
Admin
Darlington
Please, I seem not to find your Facebook group again. Or has it been closed down?
WPBeginner Support
Our Facebook group is still active. If you visit our Facebook page and go to the groups tab on the side, you should be able to see the group there
Admin
Amanda
I found the process for Buffer much easier than described in this post. You just need to sign up for Buffer and connect your social media account(s) there, then install the WP to Buffer plugin, then hit the “Authorize” button in the plugin settings. That’s it. No access token, no callback URL, no creating an app. That is all automated with the Authorize button now, I suppose.
WPBeginner Support
Thank you for letting us know, the plugin’s authors likely updated their method to authorize since the last update of this article
Admin
M kose
I just want to learn, does this method automatically post our wordpress posts as we publish?
WPBeginner Support
Yes
Admin
Anthony
Thanks a million for the tips
Marius
This post is out-of-date after FB removed publishing to profile timeline from their API.
WPBeginner Support
Thank you for letting us know, we’ll be sure to take a look at this article
Admin
Daniel
Hi,
I tried using IFTTT but it kept telling me invalid WordPress URL. after numerous crosschecks i could see that the URL is correct.
Please, what can i do about this?
WPBeginner Support
Hi Daniel,
Make sure XML-RPC is enabled on your website. It is a WordPress feature that allows third-party services like IFTTT to connect. Some WordPress security plugins may disable it. See your security plugin settings.
Admin
Charlie
Can I use the ITTT method to link WordPress to more than one of my facebook pages??
WPBeginner Support
Hey Charlie,
Yes, you can do that.
Admin
Mariano
How can I include the post updates on ifttt? Because when is new post the notification send normal. But when is a post update it don’t send anything.
waynedpj
i am also looking for a way to update the corresponding Facebook post when an update is made to the original post on WordPress. unfortunately most options seem to only allow new posts as triggers. did you ever find a solution?
thanks.
Kylie
When I follow the steps for AccessPress Facebook Autopost (which I’ve successfully used before), and I click the box ‘Public’ to make the review public, I now get a dialogue box that asks for a Privacy Policy URL. I’ve only found sites for privacy policy URL development that cost. Is there something general that can be added for free?
Stefan
There’s now an option in WordPress for “Privacy policy”. You can find it in the administrator panel in the “Settings” submenu and than “Privacy”.
Joe
I was able to use IFTTT to share my post to Facebook. But the new issue with this, is that Facebook shows description of website, instead of the post description.
Facebook also used another image thumbnail, instead of the image I used for the post. Please how can I resolve this??
Francois
This didn’t work. When I click authorize I get this error below, even after I added my domain and page where I do my posts to the App Domain.
Can’t Load URL: The domain of this URL isn’t included in the app’s domains. To be able to load this URL, add all domains and subdomains of your app to the App Domains field in your app settings.
Samuel
Is there a way that when someone comments on our post that we share to facebook, it displays on our site.
I know we can have a facebook comment plugin that allows users to comment on post using their facebook account.
What i don’t know is, If we share our post to facebook, and someone comments on that post on facebook, how can we display that comment on our site
Nikhil
Hi. is there any plugin that uploads the posts automatically to different fb pages according to different categories . for eg: if a particular post is of category tech then it should be shared on fb tech page and if its category is of health that post should be shared on fb page corresponding to it
Sue
I have gone through the setup and posted my blog, but it’s not showing up on f.b. Just wondering what I did wrong, or is there a delay to it posting. I posted about 10 minutes ago. Thanks!
Ed
If it’s your very first post using IFTTT it will take UP TO an hour. This is stated in small print on the applet.
teslim
i am trying to use the facebook App method by i am finding it difficult to authorize my account, facebook says (Can’t Load URL: The domain of this URL isn’t included in the app’s domains. To be able to load this URL, add all domains and subdomains of your app to the App Domains field in your app settings.). please help soonest thanks..
Daniel
How do you change the post on Facebook that says…
“John Doe published an article on WordPress”
so that ‘WordPress” says something else, like your site’s URL or name?
Karen
Hello. I followed the directions to the “T” using the WordPress Plug-In method and see absolutely no postings to my FB page. I even updated a post (thinking any previous posts may not appear), and that didn’t work either. I went to my timeline and feed areas of my FB page and don’t see anything.
Please assist or I will have no other option but to deactivate this plug-in and start over.
Thank you.
isah
hey nice article i just tried this now on my site using the IFTTT method and it works like a charm. thanks for the tip
naresh
Thank a lot for creating such a very useful post.
JM Koh
Thanks for the tutorial. Does anyone know of a way to post to both the FB profile and FB page (that is joined to 1 FB account as required by FB)? Noted that the IFTTT method requires you to choose to post either to the profile or page, which is the same as Jetpack. Thanks!
Miso
Hi,
on plugin there is now an error and the account can not be authorized.
Someone told me that giving admin credentials to website is not so good idea,
so the user which posts website can not be administrator.
Sandra K
Do any of these methods work for Facebook Groups? I’m the administrator for a Closed Facebook Group and I want automate postings news and events on our website to our Facebook Group. Is that do-able?
Lori
So what is the BEST one to choose?
WPBeginner Support
IFTTT is the easiest and fastest.
Admin
Marc
However, IFTTT posts a link, not the entire post text including image, right?
WPBeginner Support
Yes, Facebook does the rest and automatically fetches a thumbnail, post title, and a short description of your post. Users will still have to visit your website to read the complete article.
iostar
Hi! I am using Zapier to post automatically on facebook and another social media based on RSS technology.
Hope it helps.
Claudio
When I try and enter my hosted wordpress info, it prompts me that I need to enable XML-RPC under my wordpress “Settings/Writing”, but I don’t see a checkbox for this.
Tâm Hoàng
Thanks
Sufyan
thank u so much for this wonderful tutorial
Pankaj Dhawan
People talk about using Buffer more and it is very famous. Never used any such technique since I am not getting enough time so I suppose IFTTT for someone like me would be ideal.
I wasnt aware of this before so, thank you for sharing this useful info.