
ブログの背景に画像が溶け込んでしまうことがある。そうすると、少し平坦に見えてしまうことがあります。しかし、WordPressの画像に枠線をつけるのはとても簡単なことです。画像をポップに見せることができるのです。
WPBeginnerでは、画像の周りにきれいな枠線を付けて、ブログの白い背景から切り離しています。この小さな変更によって、私たちのサイトはより洗練されたものになりました。
そして一番の魅力は?デザイナーになる必要も、複雑なコードをいじる必要もありません。WordPressの画像に簡単に枠線をつける方法をいくつかご紹介します。
このガイドでは、WordPressで画像の周りに枠線を簡単に追加する方法を説明します。すぐにあなたのブログをシャープに見せる準備をしましょう!

WordPressで画像に枠線を付ける理由
Imagelyはコミュニケーションのための強力なツールです。情報を素早く共有し、文字が多いページをより魅力的にすることができる。
しかし、画像がサイトの背景に溶け込んでしまうこともあります。背景画像を使用していたり、サイトの色が写真の色と似ていたりすると、その可能性が高くなります。
また、視力障害や色覚障害のある人は、画像と背景を区別するのが難しいと感じるかもしれません。さらに詳しく知りたい方は、WordPressサイトのアクセシビリティ向上に関するガイドをご覧ください。
WordPressで画像の周りに枠線を追加すると、サイトの背景と画像を明確に区別することができます。また、最も重要なビジュアルに注目を集めることができます。
それを念頭に置いて、WordPressブログで画像の周りに枠線を追加する方法を説明します。この投稿で取り上げるすべての方法を簡単に紹介します:
準備はいいかい?始めよう
方法1:カスタムCSSクラスを使用してWordPressで画像の周りに枠線を追加する
カスタムCSSクラスを作成することは、画像に枠線を追加するためのスマートで簡単な方法です。この方法を使えば、画像の枠線の設定を一箇所で定義することができます。
一度クラスを作成すれば、どんな画像にも簡単に適用できます。これは、サイト全体で複数の画像に枠線を追加する予定がある場合に最適です。
カスタムCSSクラスを作成するには、いくつかの方法があります。テーマカスタマイザー、フルサイトエディター、WPCodeプラグインを使用することができます。
WPCodeプラグインは初心者に優しいので、私たちは常にWPCodeプラグインの使用をお勧めします。さらに詳しく知りたい方は、WPCodeのレビューをご覧ください。

それでは、WPCodeプラグインをインストールして有効化しましょう。ヘルプが必要な場合は、WordPressプラグインのインストール方法のガイドを参照してください。
WPCodeの無料版を使用することもできますが、WPCode Proにアップグレードすると、コードスケジューリングや完全なリビジョン履歴など、より多くの機能がアンロックされます。
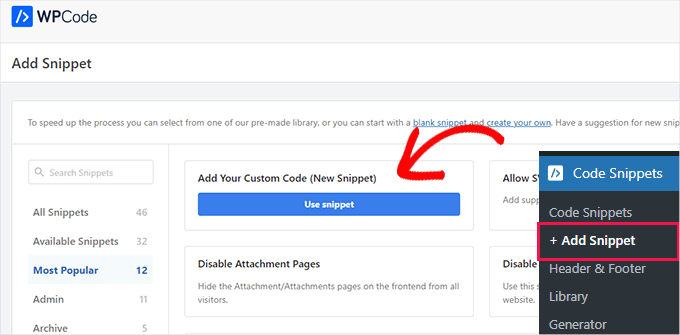
有効化したら、Code Snippets ” + Add Snippetに移動します。
次に、「カスタムコードを追加する(新規スニペット)」オプションにマウスオーバーし、「スニペットを使用する」をクリックします。
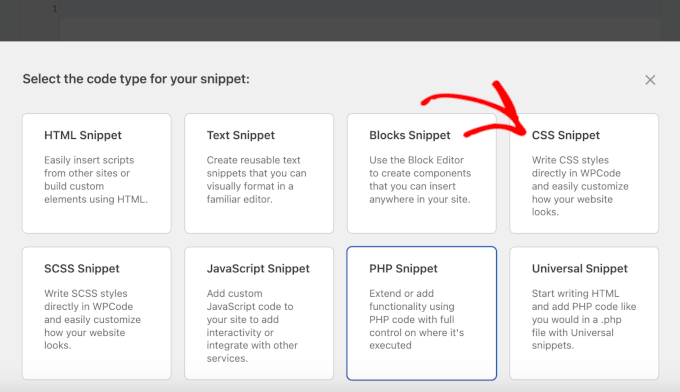
次の画面で、WPCodeはコードタイプを選択するよう求めます。
WPCodeの初期設定が’PHP Snippet’を指していることに気づくかもしれないが、ここでは’CSS Snippet’をクリックする必要がある。
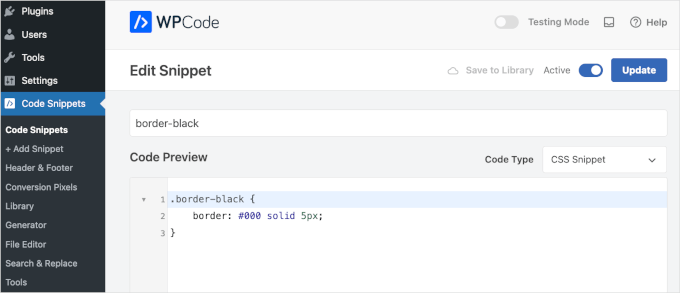
WPCodeエディターが開きます。ここから、まずカスタムスニペットの名前を作成します。例えば、’border-black’を使います。
ここで、CSSクラスを作成する際に、枠線の色と幅を指定する必要があることに注意してください。
例えば、幅にはピクセル(px)を、色には16進数のカラーコードを設定できます。ご心配なく-思ったより簡単です!
例えば、次のコードでは、幅5ピクセルの黒い枠線を作っている:
1 2 3 | .border-black { border: #000 solid 5px;} |
上のサンプル・コードでは、枠線-黒がCSSクラスの名前です(WPCodeのカスタム・コード・スニペットと同じなので、整理しやすくなっています)。
好きな名前を使うことができますが、枠線を作成するたびにCSSクラス名を入力する必要があります。それを考えると、CSSクラス名は短くて覚えやすいものにしたいものです。
あとは、このコード・スニペットをWPCodeの「コード・プレビュー」フィールドにコピーするだけだ:
その後、トグルを切り替えてスニペットを有効化し、「スニペットを保存」または「更新」ボタンをクリックします。詳しい手順については、WordPressにカスタムCSSを追加するガイドをご覧ください。
CSSクラスはいくつでも追加できます。例えば、異なる色を持つ枠線を作成することができます。
さて、画像に枠線を加えるのはとても簡単だ。
まず、WordPressのページや投稿にある画像をクリックしてください。次に、画面の右側にある「ブロック」タブを見て、そこにある「詳細設定」オプションを探します。
クリックするとセクションが拡大します。

ADDITIONAL CSS CLASS(ES)’フィールドに、画像に追加したいCSSクラスの名前を入力します。
以下の画像のように、枠線はWordPressのページエディターには表示されないことに注意してください。

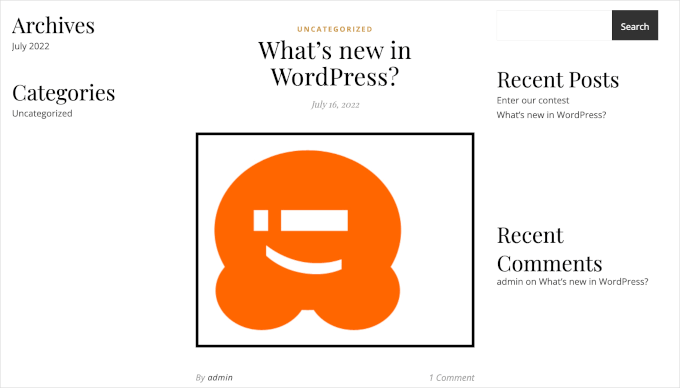
枠線が訪問者にどのように見えるかを確認するには、先に進んで「プレビュー」ボタンをクリックしてください。
これで枠線が適用された画像が表示されます。
枠線の見え方に満足したら、あとはページを公開するか更新するだけです。
方法2:WordPressで画像の周りに枠線を追加するためにページビルダーを使用する
もうひとつの方法は、ページビルダー・プラグインを使うことだ。
ドラッグ&ドロップのページビルダーを使えば、ログインページやランディングページのようなウェブページを簡単にデザイン、カスタマイズできます。コーディングのスキルがなくても、テキスト、画像、その他の要素を追加できます。
また、これらのツールを使えば、画像ごとにユニークな枠線を簡単に作成できます。ビジュアルベースのエディターを使ってデザインできるので、多くの人にとって簡単です。
WordPressのための最高のランディングページビルダーであるSeedProdをお勧めします。ユーザーフレンドリーで、プロフェッショナルなページを簡単に作成できます。
SeedProdのレビューで、このツールをお勧めする理由をご覧ください。
SeedProdには、ビルトイン枠線オプションを備えた特別な画像ブロックがあります。また、影をつけたり、間隔を調整することも簡単にできます。
注: このガイドでは、予算に関係なく画像に枠線を追加できるように、SeedProdの無料版を使用します。また、SeedProd Proバージョンもあり、200万枚のストックフォトライブラリにアクセスでき、さらにブロックも追加できます。
まず、プラグインをインストールして有効化する必要があります。 WordPressプラグインのインストール方法については、こちらをご覧ください。
有効化したら、WordPressのダッシュボードからSeedProd ” ランディングページにアクセスしましょう。

SeedProdには、プロがデザインした数百種類のテンプレートがカテゴリー別に用意されています。画面上部には、以下のようなカテゴリーがあります:
- 404ページを作る
- カスタムログインページの作成
- 美しい近日公開ページをデザインする
- そしてもっと。
デザインを見るには、テンプレートの上にマウスオーバーし、虫眼鏡のアイコンが外観に表示されたらクリックするだけです。テンプレートのプレビューが表示されます。

テンプレートの見た目に問題がなければ、先に進んで『このテンプレートを選択』をクリックする。
ページ名」フィールドに、ページの名前を入力します。初期設定では、SeedProdはこの名前をページのURLとして使用します。
自動的に作成されたURLを変更したい場合は、「ページURL」フィールドのテキストを編集するだけです。

情報を入力したら、「保存してページの編集を開始する」ボタンをクリックします。選択したテンプレートがSeedProdのドラッグ&ドロップエディターで開きます。
左側のメニューには、ドラッグ&ドロップでWordPressページに追加できるすべてのブロックが表示されます。

Image’ブロックを見つけて、ページデザインにドラッグするだけです。
それができたら、「Image」ブロックをクリックするだけで、ブロックをカスタマイズするためのすべての設定が表示されます。

左側のメニューで、『自分の画像を使う』をクリックします。
WordPressのメディアライブラリから任意の画像を選択できるようになりました。

その後、左側のメニューから「詳細」タブをクリックする。
次に、クリックして「枠線」セクションを展開します。

初期設定では、SeedProdの枠線幅の設定はすべて0になっており、画像には枠線がありません。
まず最初にしたいことは、これらの値を1以上にすることです。こうすることで、画像に目に見える枠線が追加されます。
まず、「枠線」の各欄をクリックし、大きい数字を入力するか、外観に表示される矢印ボタンを使ってください。

枠線の太さに満足したら、スタイリングを開始します。
一つのオプションは、「枠線の色」の隣のフィールドをクリックして枠線の色を変更することです。するとポップアップが開き、そこで新しい枠線の色を選ぶことができます。

SeedProdは、実線、点線、破線の3つのシンプルな枠線を提供しています。あなたのイメージに合ったものをお選びください。
これらの異なる枠線を試すには、’枠線スタイル’ドロップダウンを開き、リストからオプションを選択するだけです。

これで完成だ!他の画像にも枠線を付けたい場合は、上記と同じ手順を踏むだけです。
ページのデザインに満足したら、「保存」ボタンをクリックし、「公開する」を選択して公開します。
方法3:WordPressで画像の周りに枠線を追加するためにHTMLとCSSを使用する
HTMLとCSSを使って枠線を追加することもできます。この方法はプラグインが必須ではないので便利です。
しかし、枠線の外観をカスタマイズするにはコードを書く必要があるので、初心者には向かないかもしれません。しかし、もしあなたがちょっとしたコーディングに慣れているなら、この方法は素晴らしい柔軟性を提供します。
まずは、任意のページや投稿に画像を追加してみましょう。
それができたら、右上の3点アイコンをクリックし、「コードエディター」をクリックします。

WordPressは、ページや投稿を構成するすべてのコードを表示します。
ページに画像を追加するコードのセクションを見つけることができます。このコードはwp:imageで始まります。

ページに複数の画像がある場合は、img src=の値をチェックする。これはWordPressのメディアライブラリにある画像のURLで、画像ごとに異なります。
適切なコードのセクションを見つけたら、次のステップは、枠線を追加し、そのスタイルをコントロールするコードを書くことです。
例えば、次のコードでは、枠線の幅は3ピクセルです。また、3ピクセルのパディングとマージンを追加しています:
1 | style="border:3px solid #000000; padding:3px; margin:3px;" /> |
上のサンプルコードでは、#000000のベタで枠線の色を設定しています。000000は16進数で黒を表します。
黒い枠線を作りたくない場合は、この値を他の16進コードに置き換えることができる。
また、黒い枠線を作りたくない場合は、この値を他の16進コードに置き換えることができる。
枠線が決まったら、/></figure>セクションを探し、最初の/文字の前に直接コードを追加する必要があります。
例を見てみよう:
1 2 3 | <!-- wp:image {"id":1450,"sizeSlug":"full","linkDestination":"none"} --><figure class="wp-block-image size-full"><img src="http://localhost:10003/wp-content/uploads/2022/06/logo.jpeg" alt="" class="wp-image-1450" style="border:3px solid #000000; padding:3px; margin:3px;" /></figure><!-- /wp:image --> |
コードに満足したら、「コードエディターを終了する」をクリックしてコードエディターを終了します。
これで画像の周りに枠線が表示されるはずです。無効なHTMLであるという警告が表示されても心配しないでください。これは正常な状態であり、画像の表示には影響しません。

見た目に問題がなければ、通常通りページを更新または公開することができます。
これで、あなたのサイトにアクセスすると、画像の周りに枠線が表示されます。

ボーナスのヒント グラフィックデザインツールを使って画像の周りに枠線をつける
WordPressには枠線を追加する方法がいくつかありますが、これらのオプションはスタイルやカスタマイザーに制限がある場合があります。そこで、まず画像を編集してからWordPressにアップロードしてみてはいかがでしょうか?
そこで便利なのがグラフィックデザインツールだ。
Adobe Photoshopは、プロ向けの派手な機能をたくさん備えたビッグプレーヤーだ。もしお金をかけたくないのであれば、Affinity Photoは堅実な選択だ。
お財布を気にするのであれば、GIMP(GNU Image Manipulation Program)が便利だ。完全に無料で、オープンソースで、有料のツールでできることの多くを行うことができる。
また、GIMPは初心者にもベテランユーザーにも最適な設定だ。MacでもWindowsでも使えます。
このチュートリアルでは、GIMPを使って画像の周りに枠線を追加する方法を紹介します。

インストーラをインストールしたら、GIMPのデスクトップアプリケーションを開きます。次に、ファイル“ 開くをクリックし、ローカルドライブから編集する画像を選択します。または、GIMPのエディターにドラッグ&ドロップすることもできます。
画像がGIMPエディターに読み込まれたら、「矩形選択ツール」を使って画像の周りに枠線を引いてみよう。このツールは左上のツールバーにあります。

次に、前景色と背景色の設定をチェックしたい。
これは、GIMPが描画色を使って線を描画するためです。そのため、枠線に特定の色を使いたい場合は、描画色をクリックして調整できます。
これによりカラーピッカーが開き、マウスをカラー選択エリア上に移動させるか、色の16進コードを挿入することができます。

これが終わったら、『OK』をクリックする。
枠線の色が決まったら、次はそれを適用します。編集(Edit)“ストローク選択(Stroke Selection)にナビゲーションして、「ストローク選択(Stroke Selection)」ポップアップを開きます。
ここでは、ストロークのスタイルや線幅などを調整できる。例えば、線幅を5pxに設定しています。

枠線が画像に追加されます。
WordPressにアップロードする前に、優れたサイトスピードとパフォーマンスを維持するために画像を最適化することをお勧めします。生画像はサイズが大きいことが多いので、このステップは大きな助けになります。
GIMPでは、画像のサイズを変更して最適化することができます。
まず、イメージ ” イメージの拡大縮小 を開きます。すると「Scale Image」ポップアップが開き、「Image Size」をこのように調整できます:

画像サイズを調整したら、「Scale」ボタンをクリックします。
GIMPは画像のサイズを変更し、エディターに新しいバージョンを表示します。

完了したら、File“ Export Asで画像を保存します。
次に、プロンプトに従って保存場所とファイル名を選択します。すべてが設定できたら、先に進み、『エクスポート』をクリックする。
これで、WordPressの投稿やページに画像をアップロードすることができます。ブロックエディターで見るとこんな感じです:

以上で、グラフィックデザインツールを使って画像の周りに枠線を追加する方法を学びました!
WordPressに画像をアップロードしたいときは、いつでもこの方法を使うことができる。
WordPressで画像の周りに枠線を追加する方法について、この投稿がお役に立てれば幸いです。次に、WordPressで基本的な画像編集を行う方法についてのガイド、またはWordPressのエキスパートが選ぶ最高のアイキャッチ画像プラグインとツールもご覧ください。
If you liked this article, then please subscribe to our YouTube Channel for WordPress video tutorials. You can also find us on Twitter and Facebook.
")
 in 2024")


Reuben
Trying to get this to work using the Gutenberg editor and instead I get the following error: This block contains unexpected or invalid content.”
I know there’s no mistake. I’m adding a CSS class in the html but Gutenberg doesn’t like it.
Aboud Dandachi
The plugin you mentioned apparently hasnt been tested with the last 3 major releases of WordPress. Would not be a good idea to use it then.
WPBeginner Support
We will be sure to look into updating our article when we are able. For not tested with the version of WordPress message you would want to take a look at our article below:
https://www.wpbeginner.com/opinion/should-you-install-plugins-not-tested-with-your-wordpress-version/
Admin
Michael Torres
Very informative. Thank you for helping us as beginners.
WPBeginner Support
Thank you, glad you like our content
Admin
Joey
Excellent. Thank you for the concise and informative post.
WPBeginner Support
You’re welcome
Admin
Eduardo
Hi, nice article!
Do you know any way to put a border with a “wood style”?
I’m making a wordpress site to show landscape photos and i want to use a wood style border so people couldsee how the picture will be as a real photo frame , can you help me with this?
Thanks!
david
Very very talented article not so many people on the net and in wp word know how to make thing simple and clear !
thanks i got my beautiful nice border set nicely
dav from france
Erin
This looks beautiful, so clean.
Is there any way to have images and text (with links) within a box on wordpress. Creating a book reviews site so will have to do this many times
Connor Rickett
Nice little article. There’s a plugin for every basic thing in WordPress, which is what makes it so friendly to beginners. But, you can dive right into the guts of it if you don’t want to run a plugin for something as small as borders (especially since your site is faster without them).
It was good of you to show the child theme option, since this will add the borders to all images, past, present, and future.
You might also mention that, by changing the border width and color, you can create “boxes” and “frames” around the images, using nothing but what you’ve got up here already.