
WordPressのメニューをページやユーザーによって変更したい場合があります。ログイン中のメンバー用のユニークなメニューや、サイトの特定のセクション用の異なるナビゲーション設定が必要かもしれません。
しかし、WordPressはどこでも同じメニューを表示するので、必ずしも理想的とは言えません。すべて同じメニューは制限になりかねません。
メニューに条件ロジックを追加することで、この問題を解決することができます!
このガイドでは、WordPressのメニューをスマートにカスタマイズする方法をご紹介します。一度設定すれば、特定の条件に基づいて訪問者に表示されるメニューをコントロールすることができ、よりパーソナライズされた体験を提供することができます。
なぜWordPressのメニューに条件ロジックを追加するのか?
ナビゲーションメニューはサイトに構造を与え、訪問者が探しているものを見つけやすくします。
初期設定では、WordPressサイトはすべてのユーザー、すべての投稿とページに同じナビゲーションメニューを表示します。
しかし、ユーザーやサイト内のページによって異なるメニューを表示したい場合もあるでしょう。
例えば、オンラインストア、WordPressの会員制サイトコミュニティ、オンライン学習プラットフォームは、すべてパーソナライズされたナビゲーションメニューの恩恵を受けることができます。
条件付きロジックを使用して、ログイン中のユーザー向けにメニューをカスタマイズし、アカウントの管理、購読の更新、購入したオンラインコースの表示を行うことができます。
WordPressのメニューのアクセスコントロールのようなものです。
それを念頭に置いて、WordPressのメニューに条件付きロジックを追加する方法を紹介します。このチュートリアルで扱うトピックは以下の通りです:
- Creating New Navigation Menus in WordPress
- Showing a Different Menu to Logged-In Users in WordPress
- Showing a Different WordPress Menu Depending on User Role
- Showing a Different Menu for Different Pages in WordPress
- Hiding the Navigation Menu on Landing Pages in WordPress
- Further Reading: Doing More With WordPress Navigation Menus
準備はいいかい?始めよう
WordPressで新規ナビゲーションメニューを作成する
最初のステップは、WordPressで表示したい追加ナビゲーション・メニューを作成することです。その後、条件ロジックを使って、各メニューを表示するタイミングを決めることができる。
ここからは、クラシックエディターとブロックエディターの両方について、WordPressに条件付きメニューを追加する方法を紹介する。
クラシックエディターを使ってWordPressで新規ナビゲーションメニューを作成する
この方法はクラシックテーマユーザーに有効です。
新規ナビゲーションメニューを作成するには、WordPressダッシュボードの外観 ” メニューページに移動するだけです。すでにナビゲーションメニューがあり、サイト上ですべてのユーザーに使用している場合は、これを初期設定メニューにすることができます。
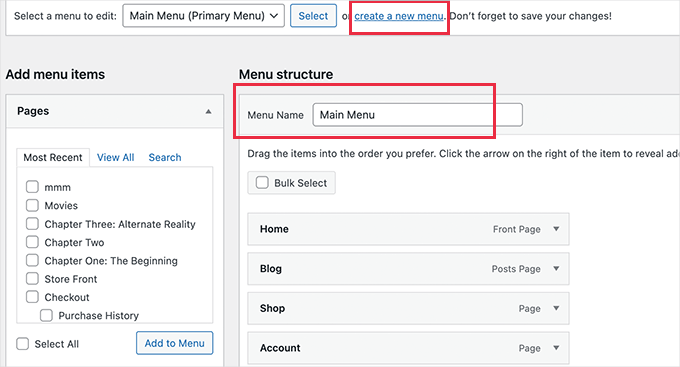
次に、「新規メニューを作成」リンクをクリックして、新しいメニュー項目を作成する必要があります。例えば、ログイン中のユーザーに表示するメニューと、WordPressの特定のページやカテゴリーに表示するメニューを作成することができます。
画面の左側に、あなたのサイトのページ一覧が表示されます。メニューに追加したいページにチェックを入れ、「メニューに追加」ボタンをクリックしてください。

画面右側のメニュー項目をドラッグ&ドロップして並べ替えることもできる。
さらにページを進むと、メニューを表示する場所を選ぶことができます。しかし、今はこのメニューに場所を割り当てる必要はありません。それは次のステップで行います。
メニューの保存」ボタンをクリックして変更を保存することを忘れないでください。
メニュー作成の詳細については、WordPressでナビゲーションメニューを追加する方法についての初心者向けガイドをご覧ください。
FSEを使用してWordPressで新規ナビゲーションメニューを作成する
フルサイト編集(FSE)でブロックテーマに新しいナビゲーションメニューを作成するには、まずWordPressダッシュボードから外観 ” エディターに移動する必要があります。
中に入ったら、「ナビゲーション」タブをクリックして展開することができる。このガイドではTwenty-Twenty Threeのテーマを使用しています。

次に、「ナビゲーション」ラベルの横にある「編集」をクリックしましょう。画面上にサイトエディターが表示されます。
ここから、あとはすべて「+」アイコンをクリックしてナビゲーションメニュー項目を追加するだけです。すると、ドロップダウンメニューが表示され、オプションを選択することができます。

より詳細な手順については、WordPressでナビゲーションメニューを追加する方法をご覧ください。
WordPressでログイン中のユーザーに別のメニューを表示する
ユーザーがサイトにログイン中か否かに応じて、異なるナビゲーションメニューを表示することはしばしば便利です。
例えば、ログアウト中のユーザーのためにログインと登録リンクを含め、ログイン中のユーザーのためにメニューにログアウトリンクを追加することができます。
WooCommerceストアを運営しているのであれば、一般ユーザーには非表示になっている項目をカスタマイザーに含めることができます。
クラシックエディターでログイン中のユーザーに異なるメニューを表示する
始めるには、Conditional Menusプラグインをインストールして有効化する必要があります。詳しくはWordPressプラグインのインストール方法をご覧ください。
有効化したら、外観 ” メニューに移動し、「ロケーションの管理」タブに切り替えます。
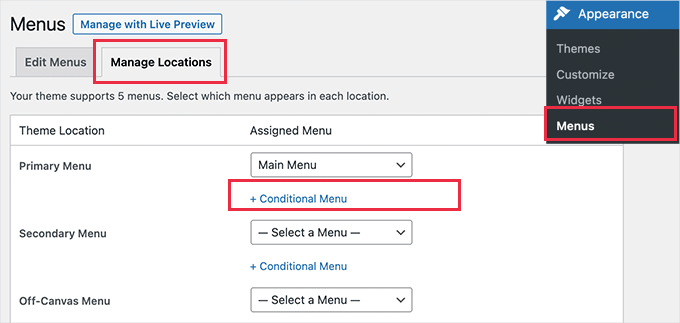
ここから、利用可能なメニューの場所と現在表示されているメニューのリストが表示されます。これらは使用しているWordPressテーマによって異なります。
例えば、私たちのデモサイトでは、「プライマリメニュー」の場所に「メインメニュー」というナビゲーションメニューが表示されています。
特定の条件に一致したときに別のメニューを表示するようにプラグインに指示するには、「+条件付きメニュー」リンクをクリックし、ドロップダウン・メニューから別のメニューを選択します。
このチュートリアルでは、「ログイン中メニュー」を選択します。
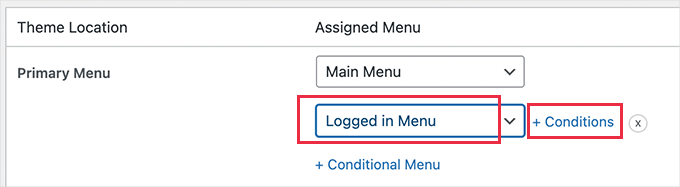
次に、「+条件」のリンクをクリックする必要がある。
するとポップアップが表示され、たくさんの条件から選ぶことができる。
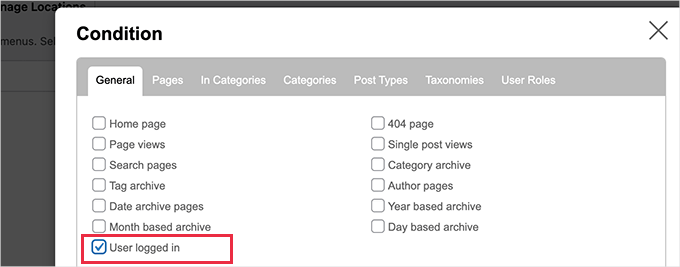
ユーザーログイン中」オプションの横にあるボックスにチェックを入れ、「保存」ボタンをクリックするだけです。
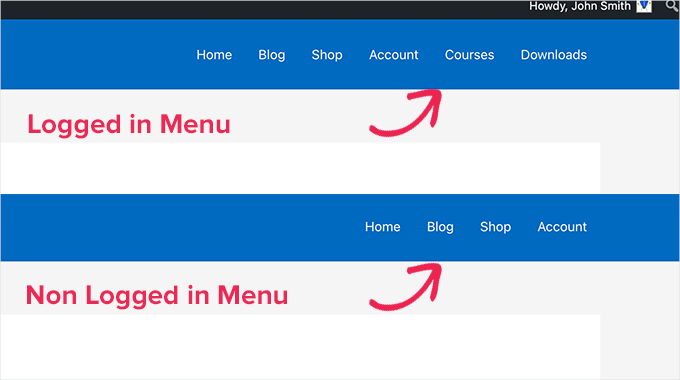
あなたのサイトにアクセスして、ログイン中のユーザーメニューを実際に見ることができるようになりました。あなたのサイトからログアウト中、他のすべてのユーザーに表示されるナビゲーションメニューを見ることができます。
さらに詳しく、コードを使った方法を知りたい方は、WordPressでログイン中のユーザーに異なるメニューを表示する方法をご覧ください。
FSEを使用したログイン中ユーザーへの異なるメニューの表示
ブロックテーマを使っているなら、Conditional Blocksプラグインが必要だ。まずはプラグインをインストールして有効化しましょう。ヘルプが必要な場合は、WordPressプラグインのインストール方法のガイドを参照してください。
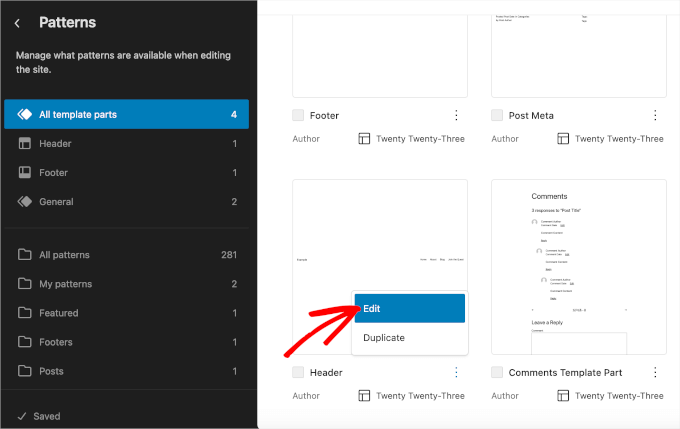
有効化した後、外観 ” エディターに移動してFSE機能を開くことができます。そして、「パターン」をクリックし、次に「すべてのテンプレートパーツ」をクリックします。
これで、フッター、ヘッダー、コメントを含むテンプレートパーツがすべて表示されるはずです。ヘッダー」セクションの3つの点をクリックし、「編集」を選択しましょう。
これでブロックエディターにリダイレクトされます。
次に、ナビゲーション・メニュー・ブロックをクリックして、条件を追加する必要があります。その後、右側のサイドパネルにある「ブロック」タブに切り替えるだけで、カスタマイザーが開始されます。
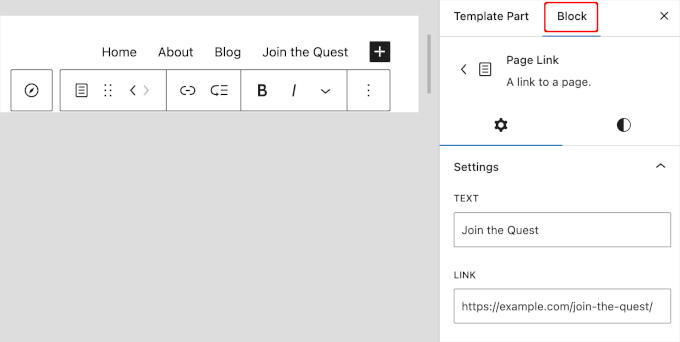
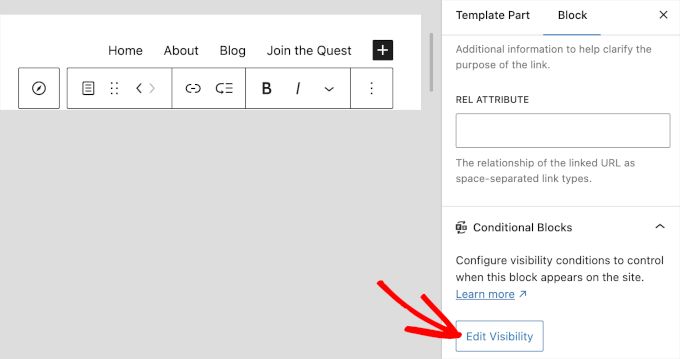
ブロック」タブを下にスクロールすると、「条件付きブロック」のセクションがあります。これをクリックすると、カスタマイズオプションが表示されます。
次に、「Edit Visibility」ボタンをクリックします。
選択したナビゲーション・メニューの条件を設定するポップアップ・ウィンドウが表示されます。
ここで、’CONDITION’ドロップダウンを開き、’User Logged In’オプションを選択します。
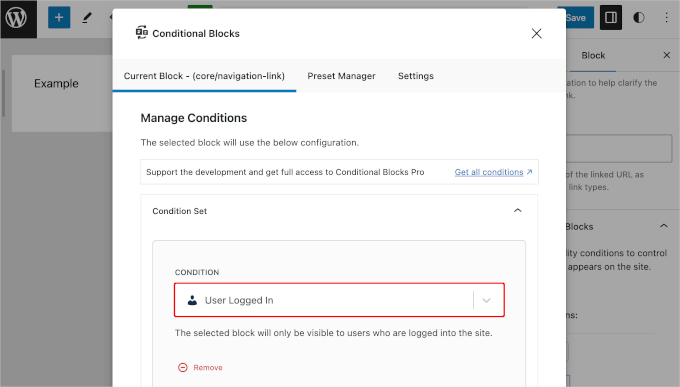
右上の「X」ボタンをクリックしてウィンドウを閉じます。
すると、「条件ブロック」セクションに条件が追加されるはずです。保存」をクリックして、ナビゲーション・メニューを更新してください。
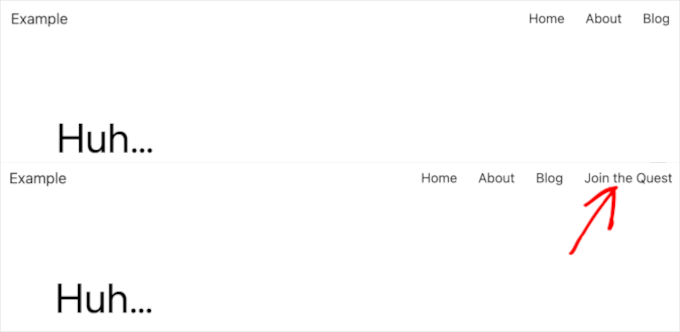
さて、あなたのサイトにアクセスした場合、ログアウト中とログイン中のユーザーではどのように見えるでしょうか:
ユーザー権限グループによって異なるWordPressメニューを表示する
ユーザーがログイン中、割り当てたユーザー権限グループによって異なるナビゲーションメニューを表示することもできます。
例えば、管理者には特別なメニュー項目を、寄稿者にはより限定された項目を含めることができます。会員制サイトでは、会員レベルによって異なるアクセスレベルを与えることができます。
クラシックエディターでユーザー権限グループによって異なるWordPressメニューを表示する
前のセクションと同様に、Conditional Menusプラグインをインストールして有効化する必要があります。
次に、外観 ” メニューのページで、「場所の管理」タブに切り替えます。

選択したユーザー権限グループに適切な条件メニューを追加する必要があります。このチュートリアルでは、’Nav Menu Administrator’メニューを選択します。
その後、「+条件」リンクをクリックして、ユーザー権限を選択することができます。

サイトの各ユーザー権限グループのチェックボックスを表示するには、「ユーザー権限」タブをクリックする必要があります。このメニューが表示されるユーザー権限グループをクリックし、「保存」ボタンをクリックして変更を保存します。
FSEを使用してユーザー権限グループによって異なるWordPressメニューを表示する
FSEのユーザー権限グループによって異なるメニューを表示するには、コンテンツコントロールプラグインを使用します。プラグインのインストールと有効化については、WordPressプラグインのインストール方法をご覧ください。
有効化したら、外観 ” エディター ” パターン ” すべてのテンプレートパーツを開きます。次に、「ヘッダー」セクションの3つの点をクリックし、「編集」を選択するだけです。
エディターでは、条件を追加するナビゲーション・メニューを選択できる。
例えば、「ブログ」ページを購読者だけに限定することにします。そこで、「ブログ」をクリックして、カスタマイズ設定を開きます。
ここから右側のパネルに移動し、「ブロックコントロール」セクションの「コントロールを有効化」スイッチを切り替えよう。
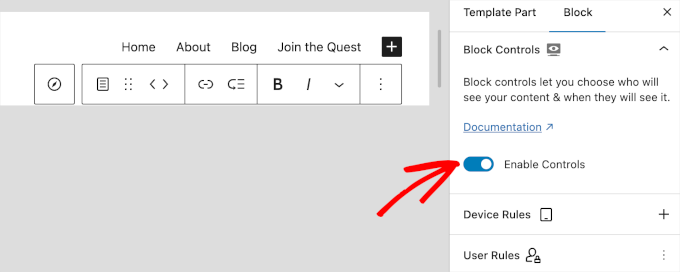
次に、「ユーザールール」セクションまでスクロールダウンして、条件を設定します。
まず、’WHO CAN SEE THIS CONTENT’ドロップダウンメニューを開き、’Logged In User’を選択します。
次に、「USER ROLE」のドロップダウンで、「Matching」を選択します。そして’CHOSEN ROLES’では’購読者’を選択しよう。
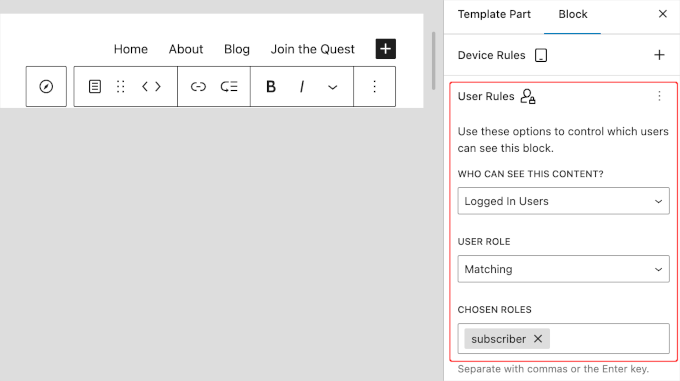
完了したら、「保存」ボタンをクリックします。
WordPressでページごとに異なるメニューを表示する
WordPressではページごとに異なるメニューを表示することができます。
例えば、プライバシーポリシーのページに、Cookie通知へのリンクのような追加メニューを表示することができます。
クラシックエディターを使ってWordPressでページごとに異なるメニューを表示する
そのためには、Conditional Menusプラグインをインストールして有効化する必要があります。その後、外観 ” メニュー “ ロケーションの管理に移動します。
適切なナビゲーション・メニューを選んだら、「+条件」リンクをクリックします。今回は、「ページ」タブをクリックしてください。あなたのサイトのすべてのページのリストが表示されます。

ナビゲーション・メニューを表示したい各ページの横にチェックマークを入れます。完了したら、「保存」ボタンをクリックしてください。
FSEを使用してWordPressでページごとに異なるメニューを表示する
ブロックテーマのユーザーは、Block Visibilityプラグインを使用できます。インストールにお困りの場合は、WordPressプラグインのインストール方法をご覧ください。
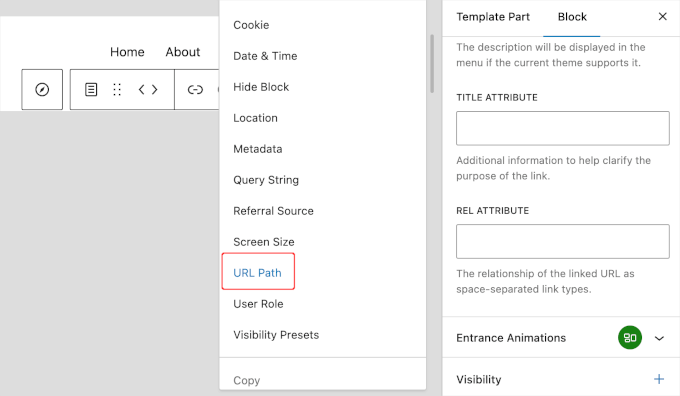
有効化したら、外観 ” エディター ” パターン ” すべてのテンプレートパーツに移動しましょう。そして、ヘッダーのエディターを開いたら、「表示」セクションに進みます。
ここからドロップダウンを開き、「URLパス」を選択します。
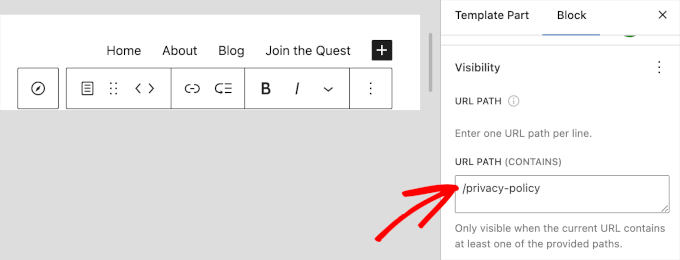
次に、プライバシーポリシーページのURLパスを「URL PATH (CONTAIN)」エリアに追加します。
URLパスとは、ウェブアドレスのうち、メインのサイト名の後に来る部分で、特定のページや項目を示す。
例えば、アドレスhttps://example.co m/about、/aboutの部分がURLパスとなる。
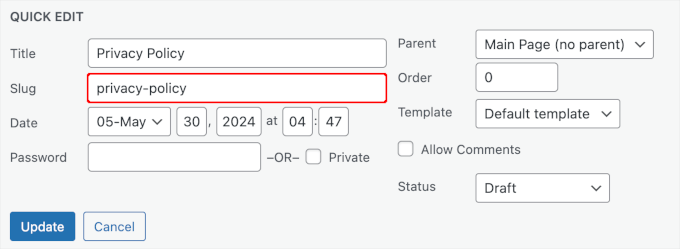
プライバシーポリシーページのURLパスがわからない場合は、ページ ” すべてのページに移動することができます。そして、プライバシーポリシーのページを見つけてマウスオーバーしてください。
クイック編集」ボタンをクリックすると、「スラッグ」セクションが表示されます。URLパスは、’/’記号の後にページのスラッグが続くようにします。
または、ページにアクセスし、ドメイン名の後のビットをコピー&ペーストするだけ。
これで完了です!保存」をクリックして変更を保存してください。
WordPressでランディングページのナビゲーションメニューを非表示にする
ランディングページなど、ナビゲーションメニューをすべて表示したくないページがサイト内にあるかもしれません。
ランディングページは、ビジネスの売上を伸ばしたり、リードを生み出したりするためにデザインされます。このようなページでは、気を散らすものを最小限に抑え、ユーザーが特定のアクションを起こすために必要な情報をすべて提供したいと思うでしょう。
ランディングページのコンバージョンを300%増加させる方法についてのガイドでは、ナビゲーションメニューやその他のリンクをページから削除することで、気が散るのを最小限に抑えることを提案しています。
クラシックエディターを使ってWordPressのランディングページのナビゲーションメニューを非表示にする
そのためにはConditional Menusプラグインを使います。今回は、条件付きメニューを選択するときに、ドロップダウンから「メニュー無効化」を選びます。

次に、「+条件」リンクをクリックして、メニューを表示するタイミングを選択しよう。
ページ」タブをクリックし、「マイランディングページ」項目の横にチェックマークを付ける。

設定を保存して適用するには、「保存」ボタンをクリックするのをお忘れなく。
FSEを使用してWordPressのランディングページのナビゲーションメニューを非表示にする
さて、ブロックテーマユーザーの場合は、Block Visibilityプラグインを使いますが、今回は「URL Path (Does Not Contain)」フィールドにURLパスを入力します。
それでは、プラグインをインストールして有効化しましょう。ヘルプが必要な場合は、WordPressプラグインのインストール方法のガイドをご覧ください。
有効化したら、外観 ” エディター ” パターン ” すべてのテンプレートパーツにアクセスしてください。ヘッダー・エディター内に入ったら、「表示」セクションを探しましょう。
ここから「URLパス」を選択し、「URLパス(コンテナなし)」フィールドにランディングページのパスを入力します。
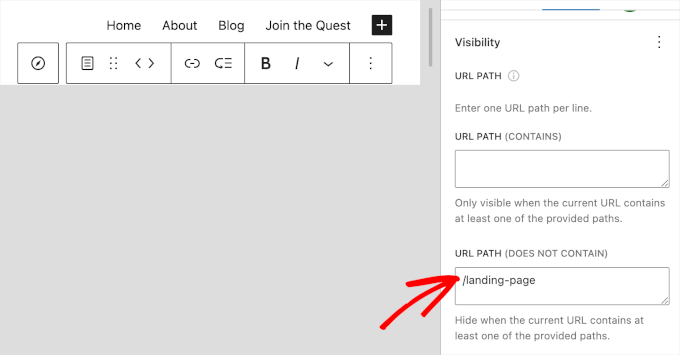
完了したら、「保存」ボタンをクリックするだけです。
さらに読むWordPressのナビゲーションメニューをもっと活用しよう
ナビゲーションメニューは強力なウェブデザインツールです。WordPressブログやサイトの最も重要なセクションにユーザーを誘導することができます。
ページやユーザー権限グループごとに異なるナビゲーションメニューが表示されるようになった今、さらにカスタマイズするにはどうすればいいのか悩むかもしれません。
ナビゲーションメニューの機能を向上させるには、以下のチュートリアルをぜひご覧ください:
- WordPressの特定のメニューにカスタム項目を追加する方法
- WordPressテーマでカスタムナビゲーションメニューを追加する方法
- WordPressでフルスクリーンのレスポンシブメニューを追加する方法
- WordPressで縦型ナビゲーションメニューを作成する方法
- WordPressサイトにメガメニューを追加する方法
- WordPressのナビゲーションメニューの作り方
- WordPressでパンくずナビゲーション・リンクを表示する方法
このチュートリアルで、WordPressのメニューに条件付きロジックを追加する方法を学んでいただけたでしょうか。次に、ページへのリンクを使わずに WordPress メニューにタイトルを追加する方法と、WordPress フォームで条件付きロジックを使用するための専門家のヒントをご覧ください。
If you liked this article, then please subscribe to our YouTube Channel for WordPress video tutorials. You can also find us on Twitter and Facebook.
")


Bet Hannon
Be VERY careful with making menus different across your site. It’s not a problem to show different menus to logged in/out users, but to meet WCAG 2.0+ accessibility standards, main menus should be consistent page to page.
WPBeginner Support
Thank you for sharing that for those attempting to have those standards for their site.
Admin
Kevin
I don’t see the “Enable conditional logic” under Appearance -> Menu. I’m using WordPress 5.7 as of March 16, 2021.
WPBeginner Support
The wording may have changed since this article but there should still be a checkbox for changing the visibility.
Admin
Laurentiu
A small feature, but very missed when a programmer is asked to work in wordpress.
WPBeginner Support
Glad you found this recommendation helpful
Admin
Richard Spatts
Thanks for this, it really helped
WPBeginner Support
You’re welcome, glad our guide helped
Admin
Richard S.
BIG Thank you for this article, it’s awesome.
Your snippet of code was perfect for a project I was working on, as was this plugin which I’m now using.
Even in 2019 this is a handy page, it’s working well on WordPress 5.2.3 (Astra Pro theme) so still very applicable.
WPBeginner Support
You’re welcome, glad our recommendation is helpful
Admin
Vasim Shaikh
I would like to ask I have added role for user Author and subscriber both then its should be display to author not subscriber. how to handle this?
WPBeginner Support
You could set it to show if the user is the role of Author
Admin
Rudolf
Really simple and easy to use plugin. Fantastic! It did not only save me a lot of time but also an organizational advantage because instead of using widget logic with different menu widgets, I create now one 1 menu with conditions per item.
Jonathan P
Thank you,
I have only used this plugin for conditions for users that are logged in or not logged in, but it works great, it really has saved me hours of messing around with code.
Kiva
Could I set up this plugin so that I can set up different menu options for each different category?
Sphelele
There is no conditional logic feature on my menu.
David
Thank you guys for sharing this. However it will display a PHP Notice on conditioned menu items and the custom condition won’t be displayed among condition options, if you don’t specify the id parameter.
Paul
Hi, I added conditions (if a string matches the server name, a menu is hidden). Great! But I would like to add even more custom conditions. Could you show an example of the code you would use to add more than on name/condition pair the custom option?
name = “If the site is not www.”
condition = www is not in SERVER_NAME
name = “Paul site.”
condition = “paul is in SERVER_NAME”
etc.
Thanks!
Isuru
This Conflicts the WP User Manager Pro, and then user manager Pro plugin functions not working due to the confliction.
as an ex: Show password tick in user registration page doesn’t work, as well as login page also not functioning well.
can you please fix this
Mo
Yep, definitely broken.
Works great for the built in conditions, but when coding custom conditions it works once and then stops working.
jban
YES!!! After 90 minutes of trying to figure this out, this article made it work for me. THANK YOU!!!
Jesus Flores
Works great!!! Thank you
Mohi
Hello
I installed this plugin, but I am getting an warning as follows :
Warning: Missing argument 2 for custom_nav_edit_walker() in /var/www/equest/wp-content/themes/wp-questrian/framework/megamenu/mega-menu.php on line 42
How to solve this warning ? Please guide me.
WPBeginner Support
Seems like the plugin is not compatible with your theme’s mega menu functionality. Please contact your theme’s support.
Admin
JMD
I have not used the If Menu plugn, but I tried the Nav Menu Roles plugin
It works but then conflicts with the Mega menu functionality of my theme.
I am hesitant to try the If Menu plugin mainly because it has not been updated in so long. It will be a matter of time before I have to remove it for sure.
Peter
Could not get this plugin to work. Not showing up i menu-items. Using: WP 4.3 / Nimwa theme.
Any suggestions on similar working plugin? Just want to hide some menu items while working on them…
Shafiq
Seems to work ok under WP 4.3.
Chuks Eke
Hi,
Could this be achieved with this plugin,
I want to have different menu for different pages or post. for example,
Home | About Us | Service | Contact
About Us [ History | Team | Career ]
Services [ Web Development | Window Application | Corporate ID ]
Is it possible with this plugin to show sub menu on side menu for About Us
Mike J
I found this plugin does not work with some themes
WPBeginner Support
Please report the themes to plugin using the support tab on the plugin page. May be they can help you with this.
Admin
Dieter
Seems to be broken under WP 4.2.2.
WPBeginner Support
What seems to be the problem? Working fine at our end.
Admin
Dieter
I stopped installation after reading WP Org PlugIn Page, there is the comment “1 person says it is broken” and in the support section is an open report which is not solved.
If I read something like this I don’t even try to install such plug in.
Jagabandhu
The plugin is not working. It’s not showing “enable conditional logic” and the plugin author is not responding from last 7 months.
Tried with disabling other plugins. But no result.
Is there any other plugin to do so!?
I need it.
WPBeginner Support
We just tested the plugin and it is working fine at our demo site. Can you test it by switching to a default theme with no other plugins activated?