Recentemente, uno dei nostri lettori ci ha chiesto come poter utilizzare Mailchimp con WordPress.
Mailchimp è uno dei più popolari servizi di email marketing e può essere facilmente utilizzato con il vostro sito web WordPress. Tuttavia, la maggior parte delle persone non sa come farlo e come sfruttare al meglio Mailchimp.
Noi di WPBeginner abbiamo oltre 16 anni di esperienza nell’aiutare gli utenti a impostare diversi servizi di email marketing sui loro siti web.
In questa guida vi mostreremo come integrare facilmente Mailchimp in WordPress e iniziare a costruire la vostra lista di e-mail.
Ecco una rapida panoramica degli argomenti trattati in questa guida:
- Why Build an Email List?
- Why Use Mailchimp With Your WordPress Site?
- Getting Started With Mailchimp
- Adding Mailchimp Email Signup Forms in WordPress
- Adding Beautiful Signup Forms Using OptinMonster
- Creating a Custom Mailchimp Signup Form With WPForms
- Automate Anything in WordPress and Mailchimp
- Bonus Tips to Grow Your Mailchimp Email List Fast
Perché creare una lista di e-mail?
Oltre il 70% degli utenti che abbandonano il vostro sito web probabilmente non tornerà mai più, a meno che non riusciate a farli iscrivere alla vostra lista di e-mail.
L’e-mail è una forma di comunicazione privata, personale e di gran lunga la più diretta su Internet. Molte persone controllano la propria casella di posta elettronica più dei feed dei social media.
Inoltre, un’e-mail rimane nella casella di posta se l’utente non compie un’azione. Sui social media, il vostro messaggio sarà presto sepolto in una timeline infinita.
Per maggiori dettagli su come l’email marketing può far crescere la vostra attività, consultate la nostra guida sul perché dovreste iniziare subito a costruire la vostra lista di email.
Perché usare Mailchimp con il vostro sito WordPress?
Mailchimp è uno dei servizi di email marketing più popolari. Perché? Perché offre un piano gratuito per sempre in cui è possibile inviare fino a 1.000 e-mail al mese a non più di 500 iscritti.
Ora, se i vostri abbonati diventano più di 500 o avete bisogno di inviare più e-mail, avrete bisogno di un piano a pagamento, che può diventare piuttosto costoso.
Oltre all’email marketing, Mailchimp offre anche strumenti di automazione di base che possono aiutarvi a far crescere il vostro business online.
Tuttavia, Mailchimp è tutt’altro che perfetto. Non è più il servizio di email marketing più semplice o più economico presente sul mercato.
Alcune alternative a Mailchimp, come Constant Contact, Drip e HubSpot, offrono strumenti di marketing automation più avanzati e più facili da usare.
Altre aziende, come Brevo (ex Sendinblue) e Kit(ex ConvertKit), offrono piani gratuiti per sempre che consentono di inviare più e-mail a più abbonati.
Detto questo, vediamo come utilizzare Mailchimp con WordPress per far crescere il vostro business e iniziare a costruire la vostra lista di email.
Come iniziare con Mailchimp
Per collegare Mailchimp al vostro sito WordPress, la prima cosa di cui avrete bisogno è un account Mailchimp.
Per iniziare, visitate il sito web di Mailchimp e fate clic sul pulsante “Iscriviti gratuitamente” in alto a destra.
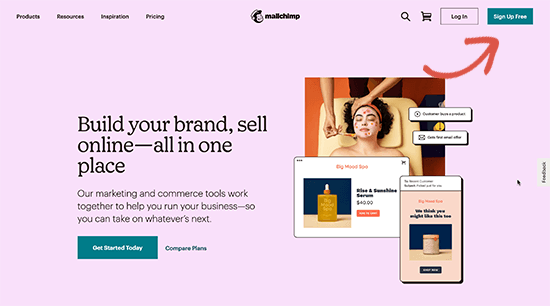
È sufficiente inserire il proprio indirizzo e-mail, creare un nome utente e una password per il proprio account e continuare a seguire le istruzioni sullo schermo per completare la configurazione dell’account.
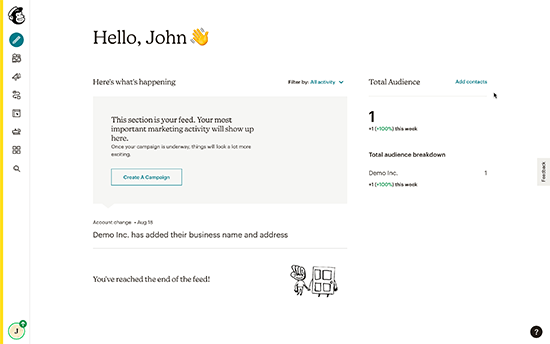
Una volta creato il vostro account, raggiungerete la vostra dashboard di Mailchimp, che si presenta così:
Aggiunta di moduli di iscrizione e-mail di Mailchimp in WordPress
Mailchimp è dotato di moduli di iscrizione integrati che potete incorporare nel vostro sito web WordPress.
È sufficiente fare clic sul pulsante Crea nella barra degli strumenti a sinistra e selezionare l’opzione Modulo di iscrizione ” Modulo incorporato.
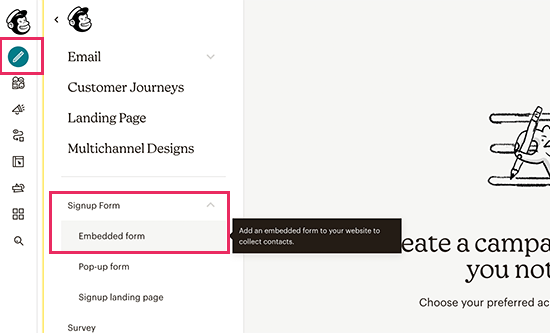
Si accede così alla pagina di configurazione del modulo.
Da qui si può scegliere quali campi del modulo visualizzare e selezionare altre opzioni per il modulo di iscrizione.
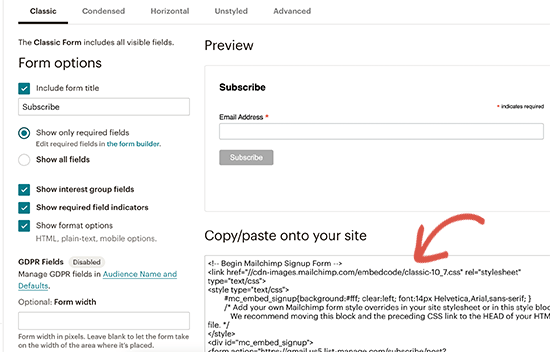
Una volta soddisfatti del modulo, è necessario copiare il codice embed visualizzato sullo schermo.
Successivamente, è necessario accedere all’area di amministrazione del sito WordPress e andare alla pagina Aspetto ” Widget. Da qui, è necessario aggiungere il blocco di widget HTML personalizzato all’area dei widget.
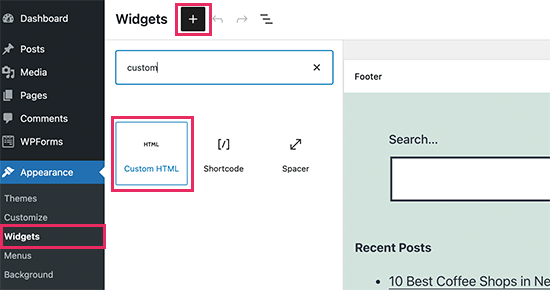
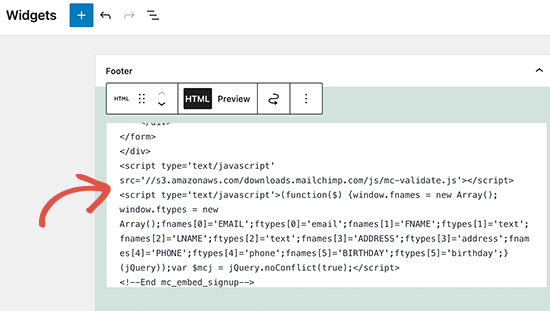
Nelle impostazioni del widget, è necessario incollare il codice copiato dal sito web di Mailchimp.
Non dimenticate di fare clic sul pulsante “Aggiorna” per salvare le impostazioni del widget.
Se si utilizza un tema a blocchi, non si avrà accesso a un’area widget. Tuttavia, è possibile aggiungere il modulo Mailchimp al sito web utilizzando l’editor completo del sito. Per maggiori dettagli, consultate la nostra guida completa all’editor completo del sito.
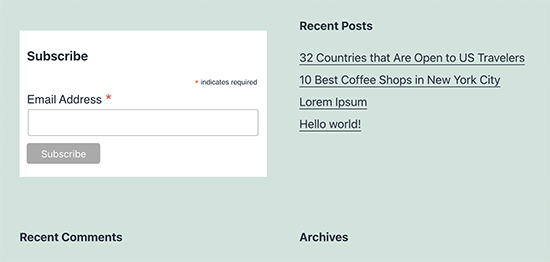
Ora è possibile visitare il proprio sito web per vedere il modulo di iscrizione di Mailchimp in azione.
Ecco come si presenta il nostro sito web dimostrativo.
È anche possibile aggiungere il codice embed ai post o alle pagine utilizzando il blocco HTML. Per maggiori dettagli, consultare la nostra guida su come modificare l’HTML in WordPress.
Aggiungere bellissimi moduli di iscrizione con OptinMonster
Mailchimp consente di creare moduli di iscrizione di base. Tuttavia, questi moduli sono difficili da personalizzare e non dispongono di molte opzioni di targeting e personalizzazione.
È qui che entra in gioco OptinMonster. È il miglior software di ottimizzazione della conversione e generazione di lead sul mercato e vi aiuta a convertire facilmente i visitatori del sito web in abbonati.
OptinMonster si integra con il vostro account Mailchimp e viene fornito con decine di bellissimi modelli e un potente costruttore di campagne.
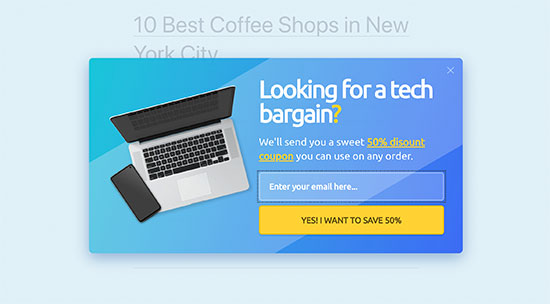
Inoltre, dispone di incredibili regole di targeting e di visualizzazione, che consentono di mostrare i moduli di iscrizione al momento giusto. Ad esempio, è possibile mostrare un popup agli utenti che stanno per lasciare il sito, mostrare una campagna diversa agli utenti di regioni specifiche e altro ancora.
Per prima cosa, è necessario iscriversi a un account OptinMonster.
Successivamente, è necessario installare e attivare il plugin OptinMonster sul proprio sito web WordPress. Per maggiori dettagli, consultate la nostra guida passo-passo su come installare un plugin di WordPress.
Questo plugin funge da connettore tra WordPress e il vostro account OptinMonster.
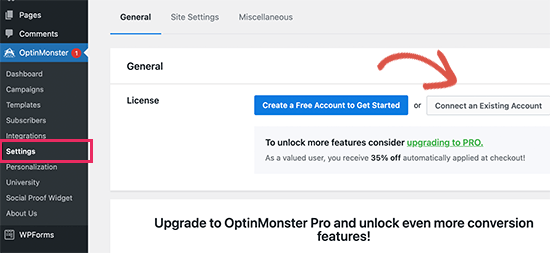
Dopo l’attivazione, è necessario visitare la pagina OptinMonster ” Impostazioni. Da qui, è sufficiente fare clic sul pulsante “Connetti all’account esistente” per integrare OptinMonster nel vostro sito web.
Ora siete pronti a creare il vostro primo modulo di iscrizione alla newsletter di Mailchimp.
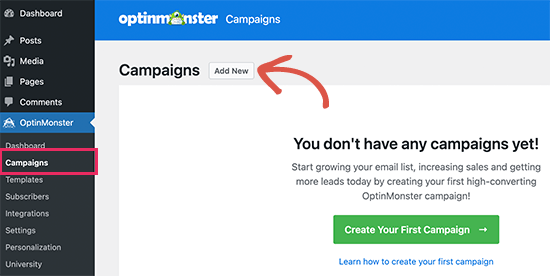
Per iniziare, andate alla pagina “Campagne” di OptinMonster e cliccate sul pulsante “Aggiungi nuovo” in alto.
Successivamente, OptinMonster vi chiederà di scegliere tra Modelli o Playbook.
I modelli sono campagne in cui si progettano le proprie campagne. I Playbook consentono di utilizzare progetti ispirati a campagne di successo gestite dalle organizzazioni più importanti del mondo.
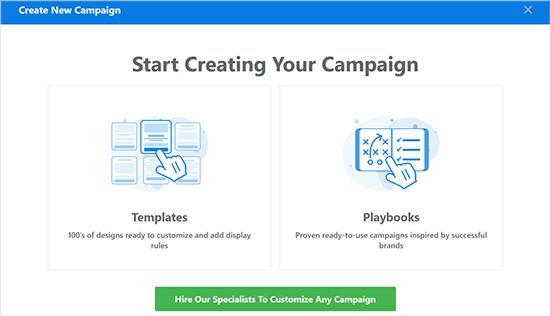
Per questo tutorial, utilizzeremo i modelli.
OptinMonster consente di creare diversi tipi di campagne, tra cui popup lightbox, barre fluttuanti, campagne inline, slide-in, fullscreen e popup spin-a-wheel gamificati.
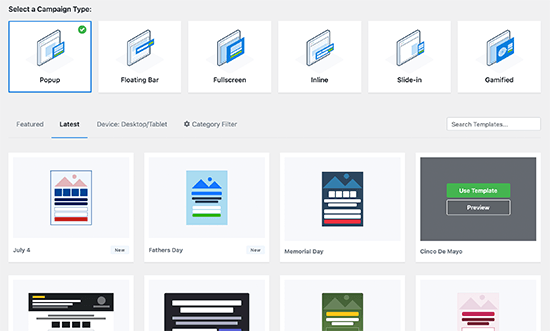
A questo punto, dovete scegliere un modello per la vostra campagna. Ci sono diversi bellissimi modelli tra cui scegliere, e potete modificarli a vostro piacimento.
Dopo aver scelto il modello, dovrete inserire un nome per la vostra campagna e lanciare il costruttore di campagne.
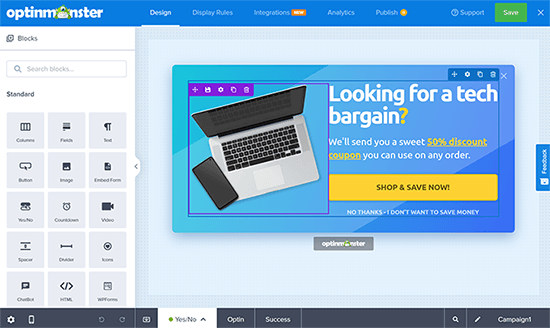
OptinMonster dispone di un’intuitiva interfaccia drag-and-drop, in cui è sufficiente puntare e cliccare per modificare qualsiasi elemento. È inoltre possibile aggiungere nuovi elementi di design chiamati blocchi per aggiungere immagini, testo, pulsanti e altro ancora.
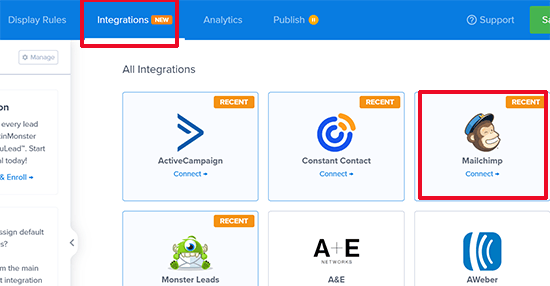
Una volta soddisfatti del design della campagna, collegatela al vostro account Mailchimp. Basta passare alla scheda Integrazioni e fare clic su “Connetti” sotto l’integrazione Mailchimp.
Successivamente, è necessario scegliere un nome per questa connessione.
Successivamente, è necessario inserire la chiave API di Mailchimp.
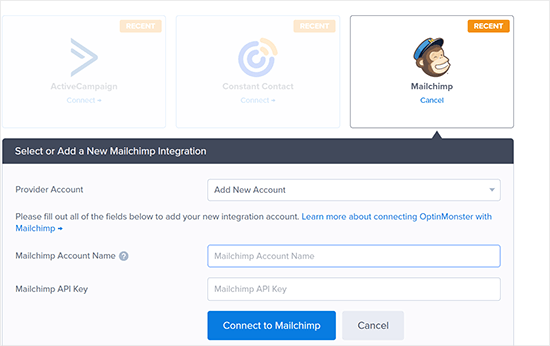
È possibile generare o individuare la chiave API di Mailchimp nel proprio account sul sito web di Mailchimp.
Dalla dashboard di Mailchimp, è sufficiente fare clic sull’icona del proprio profilo in basso a sinistra dello schermo. Quindi fare clic su Extra ” Chiavi API dal menu in alto.
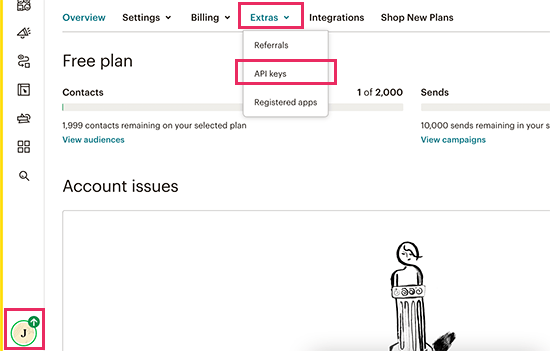
Dopo aver inserito le chiavi API nel costruttore di OptinMonster, cliccate sul pulsante “Connetti a Mailchimp”.
Successivamente, è necessario selezionare il proprio account Mailchimp e la propria lista di e-mail.
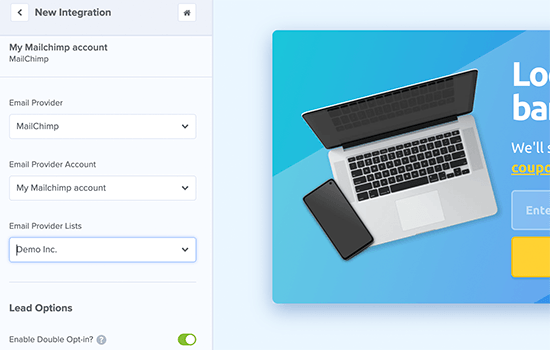
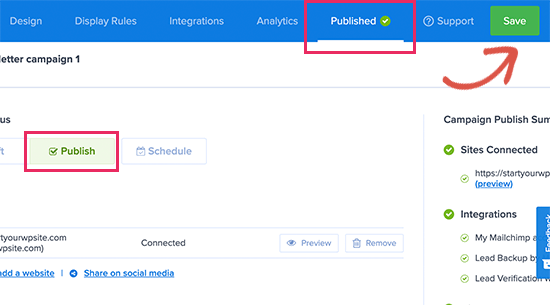
Ora potete salvare e pubblicare la vostra campagna OptinMonster.
Quindi, chiudere il costruttore di moduli.
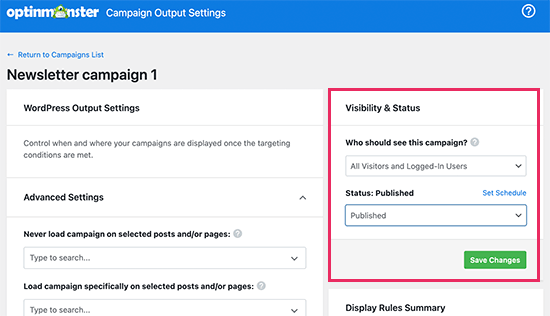
In questo modo si accede alla pagina di output della campagna sul proprio sito web WordPress.
Da qui, è necessario scegliere dove visualizzare la campagna e pubblicarla.
Ora potete visitare il vostro sito web per vedere il vostro modulo di newsletter in azione.
Ecco come appare sul nostro sito demo.
Creare un modulo di iscrizione a Mailchimp personalizzato con WPForms
WPForms è il miglior plugin per la creazione di moduli per WordPress sul mercato. Permette di creare facilmente qualsiasi tipo di modulo, compresi i moduli di iscrizione alla newsletter.
WPForms è anche uno dei migliori plugin per Mailchimp. Si integra con il vostro account Mailchimp in modo da poter salvare le iscrizioni ai moduli nella vostra lista di e-mail.
Per prima cosa, è necessario installare e attivare il plugin WPForms. Per maggiori dettagli, consultate la nostra guida passo passo su come installare un plugin di WordPress.
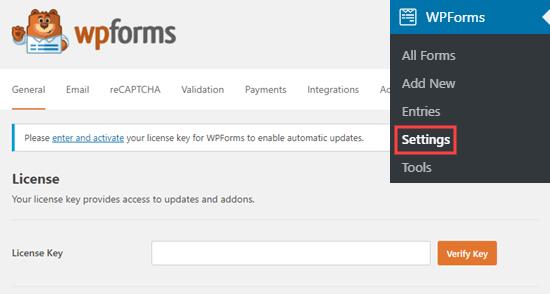
Dopo l’attivazione, è necessario visitare la pagina WPForms ” Impostazioni per inserire la chiave di licenza. Potete trovarla nel vostro account sul sito web di WPForms.
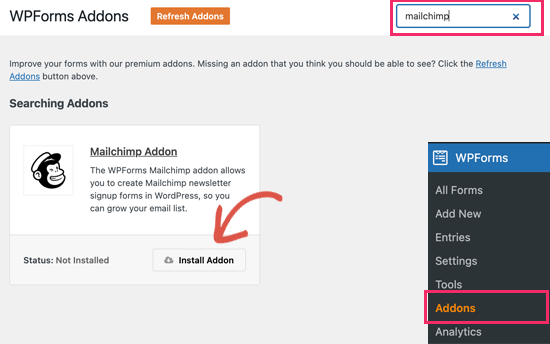
Successivamente, è necessario visitare la pagina WPForms ” Addons.
Da qui è possibile installare l’addon Mailchimp.
Ora siete pronti a creare il vostro primo modulo di iscrizione alla newsletter.
Basta andare alla pagina WPForms ” Aggiungi nuovo, inserire un titolo per il modulo e scegliere il modello Modulo di iscrizione alla newsletter.
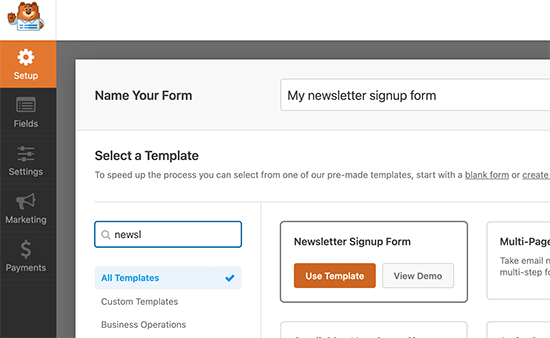
In questo modo si avvierà il costruttore di moduli con tutti i campi richiesti per il modulo di iscrizione all’elenco di e-mail.
È possibile modificare o rimuovere i campi dal modulo facendo semplicemente clic su di essi.
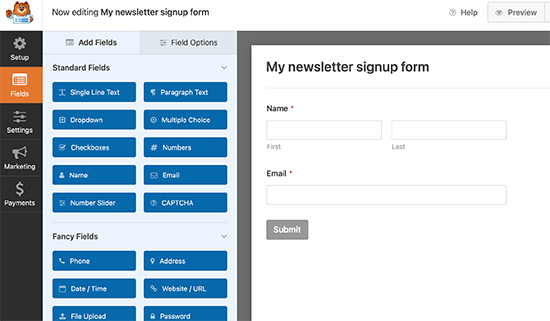
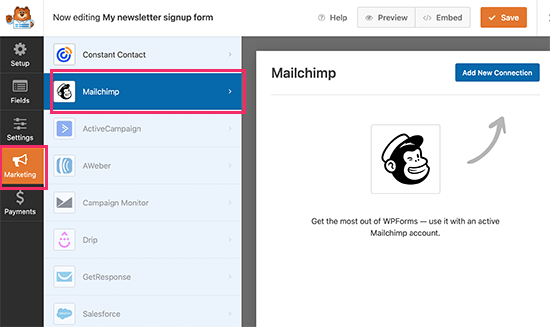
Una volta soddisfatti del modulo, passare alla scheda “Marketing” e fare clic sulla sezione Mailchimp.
Da qui è necessario fare clic sul pulsante “Aggiungi nuova connessione”.
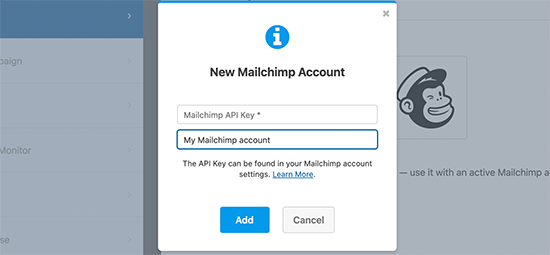
Successivamente, vi verrà chiesto di assegnare un nome alla connessione e di inserire la chiave API del vostro account Mailchimp.
Potete trovare la chiave API nel vostro account sul sito web di Mailchimp.
Successivamente, è necessario scegliere l’account Mailchimp e il pubblico.
È quindi possibile scegliere quale campo del modulo corrisponde al campo dell’e-mail.
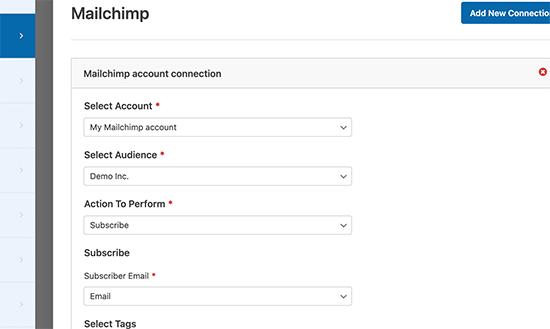
A questo punto è possibile salvare le impostazioni del modulo e uscire dal costruttore di moduli.
WPForms rende molto semplice l’aggiunta del modulo in qualsiasi punto del sito web.
Se si desidera visualizzare il modulo nella barra laterale del sito, si può andare alla pagina Aspetto ” Widget e aggiungere il blocco widget WPForms alla barra laterale o a qualsiasi area widget.
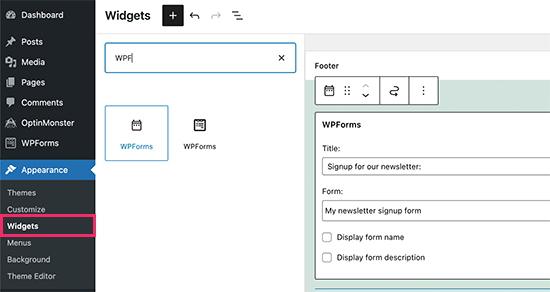
Non dimenticate di fare clic sul pulsante “Aggiorna” per salvare le impostazioni del widget.
Allo stesso modo, se si vuole aggiungere il modulo di iscrizione alla newsletter a un post o a una pagina, si può modificare il post o la pagina e aggiungere il blocco WPForms.
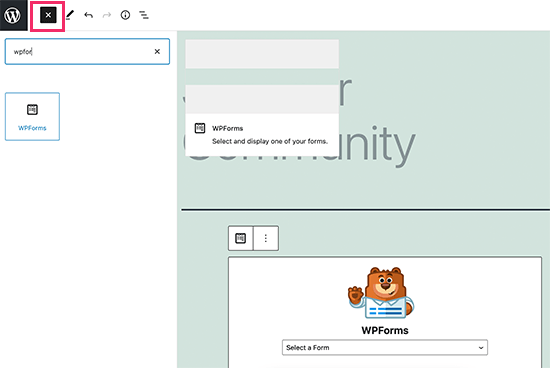
Non dimenticate di pubblicare o salvare le modifiche per aggiornare il post o la pagina.
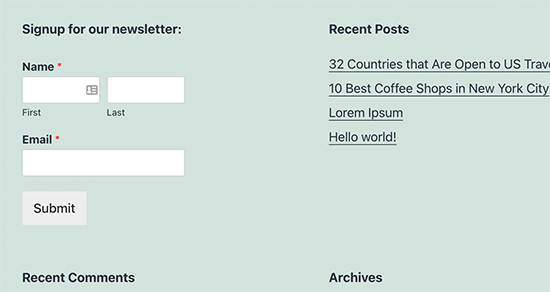
Ora è possibile visitare il proprio sito web per vedere il modulo di iscrizione alla newsletter personalizzato di Mailchimp in azione.
Automatizzare qualsiasi cosa in WordPress e Mailchimp
Le e-mail sono estremamente potenti, soprattutto quando sono personalizzate e tempestive. Con gli strumenti giusti, è possibile creare facilmente automazioni di e-mail ad alta conversione, mirate a ciascun abbonato.
Ad esempio, potreste inviare un’email automatica per mostrare prodotti simili a quelli che i vostri clienti hanno già acquistato o per inviare automaticamente agli utenti un’email quando pubblicate un nuovo articolo sul vostro sito web.
È qui che avete bisogno di Uncanny Automator. È il miglior plugin di automazione per WordPress che vi permette di creare flussi di lavoro automatizzati per il vostro sito WordPress.
Uncanny Automator funziona con tutti i principali plugin di WordPress, le piattaforme di e-commerce, i plugin di iscrizione e oltre 3000 app tramite Zapier. Si connette anche con Mailchimp, il che significa che potete creare campagne e-mail più intelligenti con pochi clic.
La prima cosa da fare è installare e attivare il plugin Uncanny Automator. Per maggiori dettagli, consultate la nostra guida passo passo su come installare un plugin di WordPress.
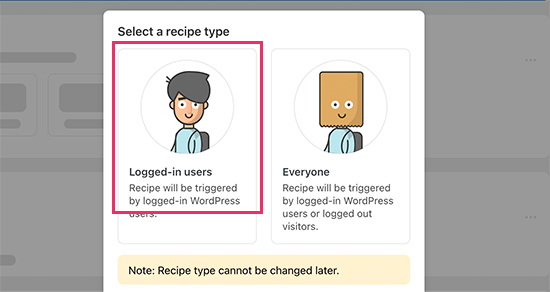
Dopo l’attivazione, è necessario visitare la pagina Automator ” Aggiungi nuovo per creare la prima ricetta. Verrà chiesto di selezionare il tipo di ricetta che si desidera creare.
Per questo tutorial, invieremo un’e-mail automatica agli abbonati ogni volta che pubblicheremo un nuovo post. Per iniziare, selezionare l’opzione “Utenti registrati”.
Successivamente, è necessario scegliere WordPress come integrazione che attiverà l’azione.
Per l’attivazione, è possibile scegliere quando un utente pubblica un post.
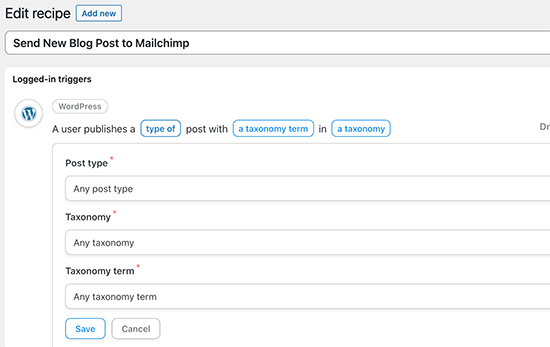
Segue la parte relativa all’azione, in cui si sceglie l’azione da attivare.
È sufficiente cliccare sull’icona di Mailchimp per collegarlo al vostro sito web.
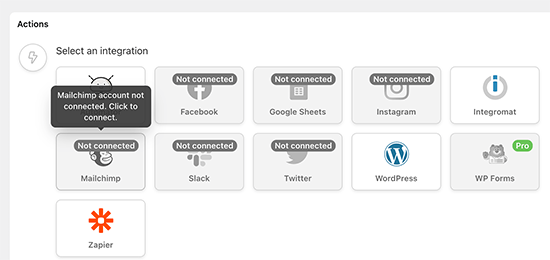
Si aprirà una finestra a comparsa in cui è necessario seguire le istruzioni sullo schermo per completare la connessione.
Una volta connessi, potrete scegliere quale azione volete eseguire sul vostro account Mailchimp.
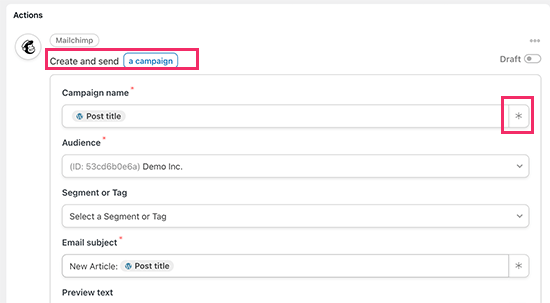
Ad esempio, qui abbiamo impostato l’invio di una nuova e-mail al nostro pubblico con il titolo del post del blog e un messaggio personalizzato.
Una volta terminato, è possibile passare la ricetta da Draft a Live.
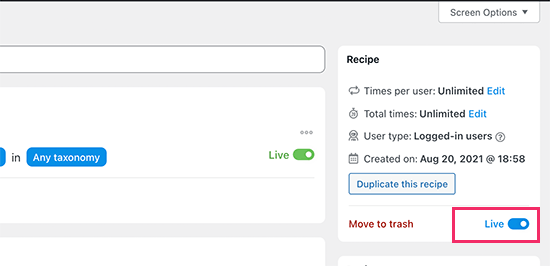
D’ora in poi, quando pubblicherete un nuovo articolo sul vostro sito web, Mailchimp invierà automaticamente un’e-mail ai vostri abbonati.
Uncanny Automator è un potente strumento per collegare Mailchimp e WordPress. Permette di automatizzare il marketing e di aumentare le vendite e le conversioni.
Suggerimenti bonus per far crescere velocemente la lista e-mail di Mailchimp
Se non promuovete la vostra lista e-mail ai visitatori del vostro sito web, state perdendo potenziali abbonati, clienti e vendite.
Di seguito sono riportati alcuni dei migliori consigli comprovati che vi aiuteranno a far crescere più velocemente la vostra newsletter Mailchimp.
1. Moduli di iscrizione multipli
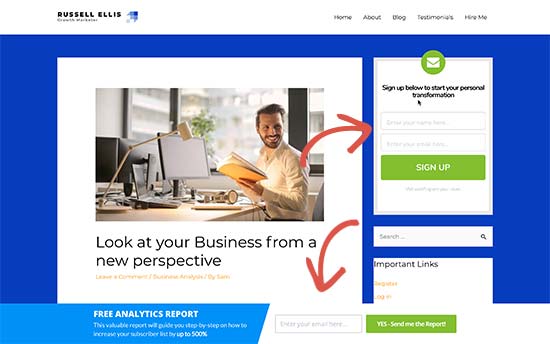
Non limitatevi ad aggiungere un solo modulo di iscrizione nella barra laterale. Date invece ai vostri utenti molte opportunità di iscriversi con più moduli di iscrizione via e-mail.
Consultate il nostro tutorial su come creare un modulo di iscrizione al banner del sito web in WordPress.
2. Usare la gamification per conquistare gli abbonati
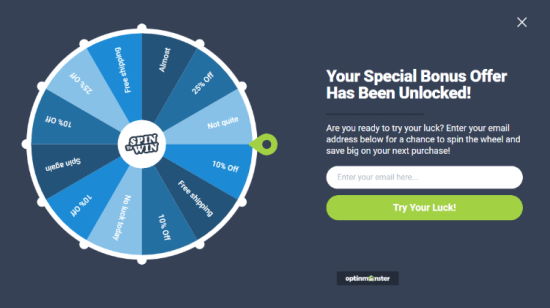
La gamification porta un’interazione divertente nei vostri moduli e-mail. Le persone sono più propense a inserire il proprio indirizzo e-mail se hanno la possibilità di vincere qualcosa in cambio.
Consultate il nostro tutorial su come aggiungere popup di vinc ita in WordPress.
3. Creare magneti guida
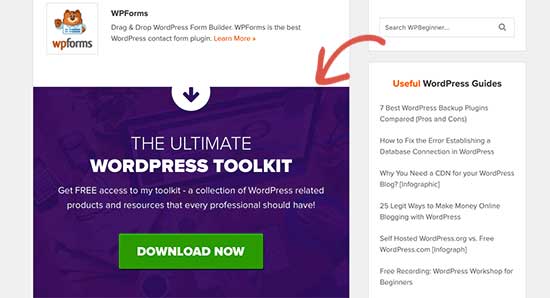
I lead magnet sono incentivi che potete offrire ai vostri utenti in cambio dell’iscrizione alla vostra lista e-mail. Ad esempio, potete inviare loro un ebook, un capitolo campione, un codice sconto e altro ancora.
Per saperne di più, consultate il nostro tutorial su come richiedere un indirizzo e-mail per scaricare un file in WordPress.
4. Utilizzare campagne mirate e personalizzazione
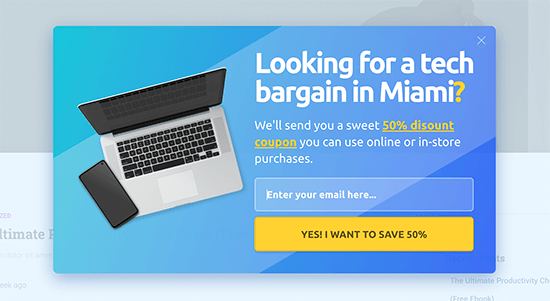
I vostri moduli di iscrizione alle e-mail otterranno un maggior numero di iscritti se verranno visualizzati dagli utenti giusti al momento giusto.
Ad esempio, potete mostrare un messaggio di benvenuto ai visitatori provenienti dai social media o un’offerta di sconto agli acquirenti che stanno per abbandonare il carrello.
Per istruzioni dettagliate, consultate la nostra guida su come mostrare contenuti personalizzati agli utenti in WordPress.
5. Tracciare le conversioni
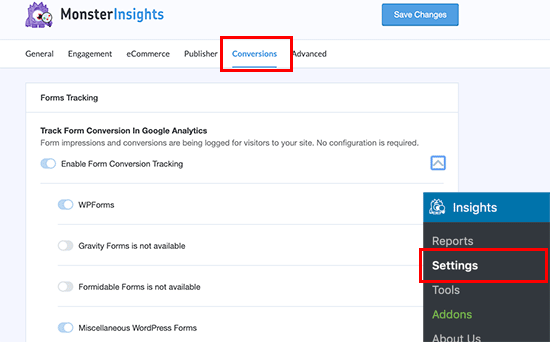
Volete sapere quali moduli vi portano più abbonati? Per questo, avrete bisogno di MonsterInsights, il miglior plugin di Google Analytics sul mercato.
MonsterInsights vi aiuta a capire quali moduli sono più efficaci per far crescere la vostra lista di e-mail. Per maggiori dettagli, consultate la nostra guida completa su come monitorare le conversioni in WordPress come un professionista.
Per saperne di più su questo argomento, consultate la nostra guida su come far crescere rapidamente la vostra lista di e-mail con altri consigli pratici.
Speriamo che questo articolo vi abbia aiutato a capire come usare Mailchimp con WordPress per costruire la vostra mailing list. Potreste anche voler consultare la nostra guida su come creare un modulo di iscrizione a Mailchimp in WordPress o la nostra scelta delle migliori alternative a Mailchimp.
Se questo articolo vi è piaciuto, iscrivetevi al nostro canale YouTube per le esercitazioni video su WordPress. Potete trovarci anche su Twitter e Facebook.


Li
All of a sudden, only my featured photo shows in my mailchimp email campaign. No other photos in my article. Would that be a WordPress or mailchimp issue? I can’t seem to find help either way
WPBeginner Support
You would want to first go through MailChimp’s troubleshooting recommendations first to ensure it is not an issue from their end.
Admin
Jiří Vaněk
Setting up Mailchimp correctly was quite difficult for me until I understood everything and set up the newsletter. Thanks for the guide.
WPBeginner Support
You’re welcome
Admin
Maria G
Is there a way to use an embedded form to allow users to update their newsletter preferences without them having to type in their email? If they’re logged into WordPress, is there a way for the MailChimp form to already be prefilled with their email address and all they have to do is select the newsletters they wish to subscribe to and submit?
WPBeginner Support
You would want to check with MailChimp for their current integration options.
Admin
Michael
I would like to make accessible the monthly MailChimp newsletters from a non-profit’s website so subscribers can access past newsletters.
Thank you for any help you can provide.
WPBeginner Support
You would need to reach out to MailChimp and they should be able to assist you with what tools they have available
Admin
Poornima M
I’m trying to add an embedded form from Mail Chimp to my WordPress website for blog subscription, but unable to see where to paste the form code inside WordPress. The Text box as mentioned in this article doesn’t seem to be the right place.
WPBeginner Support
You should be able to use a custom HTML widget now but other than that the method has not changed for embedding it on your site.
Admin
Chloé
Hello,
Is it possible to use Mailchimp if I don’t have a domain?
For example : myblog(.)wordpress(.)com
WPBeginner Support
WordPress.com does allow you to use MailChimp currently.
Admin
Tolu
Thanks for your helpful articles. My challenge is how to make a newsletter that automatically updates my subscribers on new posts. How do I place latest blog posts in an automated mail using mailchimp?
WPBeginner Support
It would depend on the newsletter tool you are using but there should be the option to set up an RSS campaign for what you’re wanting
Admin
jan
I’m really struggling with this tutorial. The “Adding MailChimp Email Signup Forms in WordPress” section looks like nothing I can find. There is nothing called, “lists page” anywhere.
WPBeginner Support
MailChimp changed lists to audience as well as a few other updates, we will be sure to look into updating this article when we are able.
Admin
P V Chowdary
I was struggling to integrate email subscription list with my blog.
This guide helped me complete from start till end.
Thank you
Colleen Wildenhaus
Is this information updated? I am on mailchimp right now trying to follow this post and I am not seeing the same information. Thank you.
Shakir
What about, MailChimp forms created in wordpress section of mailchimp, i used that form, but can’t get the email
Eric S Brister
Thanks! I was finally able to hook this up and design a welcome letter! Your information was very easy to understand, and setting it up with a cinch! I’ve been avoiding this because I thought it would be hard but this was simple thank you so much for the help!
Seth
I don’t see a widget option anywhere. Just Customize, Menus, Header, Background, Theme FAQ, and Editor. Any ideas how I can get this to work?
Shelley
There’s a MailChimp Sign-Up Form widget. Why do you recommend using a text widget?
My MailChimp Sign Up Form isn’t working; do you recommend the text widget instead?
edward
hello, my rss feed is sending only one post. How can i send all post of a day in one email?
Greg
Hello,
I am running a blog on wordpress.com with Rowling theme.
I tried to add newsletter signup using Mailchimp following this guide, but once I put the copied Mailchimp’s standard (also superslim or naked) signup form code to WordPress.com Sidebar text widget – half of the code comes up as text. Moreover, the subscribe button does not work and fields that should be filled up do not show up (only their “titles/description”.
I consulted the previous comments, but none of the solutions seem to be working.
HELP!
Vivian
I had the same issue at first. Then I found out I pasted the MailChimp’s standard text in the ‘Visual’ box instead of ‘text’ box. It’s a simple fix for me – just click ‘text’ and past the content in ‘text’ instead of visual.
Amir
Amazing Article. This is probably my favorite site on the internet, right behind Google. I’m doing so much with WordPress and I admire how much hard work you put into it. Thanks a lot brother
Terminally Pretty
Can I only install plugins if I have a wordpress business plan? I have a personal plan and when I paste the code provided by mailchimp into a text widget on my blog sidebar, it just appears like code text on my sidebar instead of an email subscribe form. I don’t know why it’s happening, please help me.
WPBeginner Support
Hello,
If you are talking about WordPress.com, then yes you’ll need a Business Plan to install plugins. For self-hosted WordPress.org website, you just go a head and install any plugin you need. For details see our comparison of WordPress.com vs WordPress.org.
Admin
Nat
So I created my first email campaign for blog updates with mailchimp. I sent out a test update and it looks great. However, I am still receiving the old automated blog updates and I dont know how to delete them, so now everytime theres a new blog, people are getting 2 update emails about the same post. How do I delete the old blog identification? I don’t have anything other then mail chimp installed for this and I don’t see any other campaign for blog updates there that I can delete. please help.
WPBeginner Support
Hi Nat,
Please check your MailChimp settings or contact their support.
Admin
yashwanth
Hi I dont find the Rss button I have the automated button instead . I would like to know how to work on with that option .
Tosin Oluwalowo
How can I make it send emails to subscribers immediately I publish?
Francesco
Thanks for the post!!
Quick question..
Is it possible to create a newsletter that dinamically takes my last 3 post? Or I should put them manually everytime?
This is a features the plugin “Newsletter” has native and it’s really useful.
Every helps is really appreciated
Francesco
Vana
Exactly what I needed!
Thank you so much! You are the best.
Will
Great article. Need help! Installed mailchimp subscriber form on my blog. I am getting notification the confirmation email is sent for double opt. Yet am not receiving the link and no emails are being added to the mailchimp list. Beyond frustrated! Any help appreciated. Seems to be a issue on many help forums.
Shelley
I have two different opt-in forms on my site, both connected to mail chimp. I have some subscribers going to mail chimp email list and some on wordpress. Any idea why this is happening?
Mackenzie Waters
This was exactly what I needed and walked me through the process so easily! Thank you!
Chris
The only reservation I have about switching from FeedBurner is that if someone unsubscribes from the RSS driving posts, but they still want to get the newsletter (or vice versa), then there is no way to accommodate that (that I can tell).
I would like my readers to have control over which content they get but not be completely committed to “all of the above” only.
MartinR
Many Thanks! I just followed these instructions to create a free MailChimp account, create a Subscribe form for posts on my self hosted WordPress site, and start a “campaign” which will email my latest post to subscribers. This is exactly what I was looking for. Again, thanks, great article!
Sunday
I followed all the instruction, but I am asked to register a custom email account with an organisation to be paid before I can continue. Where did I missed it?
James Clewlow
I followed all of the instructions correctly but when I copy and paste the link into the text widget in the sidebar it comes up as a massive link on my website.
Please help!
MartinR
in that above writeup I typed:
…Code button to add a “” at the beginning and a “” at end of the pasted link/block, SAVE, then remove the beginning and ending “” tags, SAVE again…
But the “code” tags I typed in the 1st reply got interpreted as actual HTML – you would actually see the code tags without all the spaces – hope that makes sense…
MartinR
This editor keeps interpreting what I’m trying to type as actual code tags so I’ll just say:
If you follow the first reply – what I did was add a beginning and ending code tag to surround the pasted link – via the Code button, SAVE, then remove them, SAVE again, all was well.
Camille
Hi I followed these instructions and this morning I got the email but my latest blog post isn’t in it. It’s just the template but I though it would pull the latest blog posts into the email. Just curious if you have a resource that could help me on this. Mail chimp doesn’t seem to have anything on their website. Thanks!
John E.
Hi, and thanks for a great article. I’m currently using Mailpoet but thinking of moving to Mailchimp. I want to use the RSS campaign feature, but I also want to include evergreen articles that I occasionally update, but don’t appear as new in the RSS feed. Is there any way to do this with Mailchimp? Or at least drop them manually into a template? Many thanks in advance
Dylan
Thank you so much for this! Exactly what I needed!
WPBeginner Support
Hey Dylan,
Glad you found it useful. You should also check out our YouTube Channel for WordPress video tutorials.
Admin
Stephanie O
After pasting the Mailchimp signup code on WordPress ‘text’ widget, half of the text is showing And the form appears as a text, as in you cannot click anything and the space to enter your email address/name is invisible!..
I have a wordpress.com website with the Textbook theme.
Andrew Gilbert
I have this same problem! Do I have to have a premium account for this to work?
Ella
Hi,
When you paste the signup code, a part of it dictates the style of the form which might clash with the style of your page, is easy just omit/delete this part:
#mc_embed_signup{background:#fff; clear:left; font:14px Helvetica,Arial,sans-serif; }
/* Add your own MailChimp form style overrides in your site stylesheet or in this style block.
We recommend moving this block and the preceding CSS link to the HEAD of your HTML file. */
Hope it help,
Ella
Nik Cree
Do you know of any plugins or methods to send the full post to MailChimp rather than the Excerpt. I have ‘Full Text’ rather than ‘Summary’ selected in Reading Settings, but it is still the excerpt that is going to MailChimp. Any ideas how to get the Full Post instead?
Stef J
Were you able to find an answer or solution to this? I’m struggling with the same issue.
Nik Cree
Yes – it is a setting inside the MailChimp newsletter builder.
portia lambert
I have copied and pasted my form code into the widget side bar etc and its not coming up on my website. help please!
Gerald
i want my susbcriber to pay to my paypal before they subscribe
can i achieve this with mailchimp?
WPBeginner Support
The default MailChimp forms do not have a payment option. You should check out WPForms it comes with payment options like Stripe and PayPal and also supports MailChimp.
Admin
Jim Farthing
I am trying to get mailchimp and wp on the same page, so to speak. I can setup a form to have people sign up for my updates through mailchimp with no problem. I can get people to sign up for my forum with no problem.
Having people sign up for my site and add them to mailchimp at the same time, big problem. I just cannot seem to get that one down.
I really want to use one form so that my visitors do not have to fill out two forms, one to have access to my forums and one to get on my mailing list.
What am I missing? I have tried setting up the mailchimp for wp plugin with no success, I am using ultimate membership pro and have filled out the mailchimp info there with no success.
So at this point I am pulling my hair out so any suggestions will be greatly appreciated.
Jim
Sancheo
I have that exact problem as well! Just so need to get this sorted already :/ May we find our answers soon
MPdev
I am having this issue as well. Have you already checked out the Mailchimp site?
Anu
Thanks a lot for this tutorial. I’m a mailchimp noob and this was very helpful.
Marisa Moon
I’m new to this RSS Feed concept, but upon setting it up I began to wonder if the wordpress site will still be emailing my subscribers when a new post is published. I don’t want my subscribers getting two emails on the same post. Is there a way to disable the wordpress post emails so I can just use Mail Chimp?
Another question I have is about the mail chimp campaign design. After adding the RSS Header and Items, I’m still left with a rather short description and excerpt of the post. Do I have to update the campaign with a photo from the particular blog post each time before it goes out (if I want photos in it)? I use a lot of photos in my blog post, so this RSS campaign will fall flat without the photo content. But what’s the point of this auto-sending feature if I have to go in and add the content again.
Anyways, thank you for the info. I hope to find the answers, especially about the first question.
Jordan White
Marisa,
Did you figure out how to stop WordPress from sending those automatic “new post” emails? I am having the same problem. Now that I have mailchimp, I don’t want my subscribers getting too emails.
LM
Great article and i looooove your site as I set up my new blog. I am planning to sign up for MailChimp. And although i know you recommend OptinMonster, I saw that Mailchimp also has a optin plug-in for WordPress. Do you have any thoughts on it? I’m at the stage where I don’t want to have to pay for anything else and OptimMonster has a monthly fee. I see that as an upgrade opportunity.
Marisa Moon
I don’t remember many of the differences, but I ended up going with PopUp Ally which is a free wordpress plugin. I found it had more features than mail chimp was offering and, even though it had less than optin monster, it was free. Hope this helps! I think for us new bloggers, who don’t have thousands of hits a day, we shouldn’t worry about the “monster” plugins out there just yet unless we’re ready to pay for it.
Andrea
Thank you so much! I’m looking for a free pop-up plugin too, so I’ll try the one you suggested first
Marcel
Good Tutorial. I have one problem though:
I have the double opt-in option enabled but when clicking the opt in link in the email the subscription is not directly confirmed but the user has the prove he is human. How can I disable that?
Many Thanks.
Marisa Moon
I had this same problem. I don’t think you can change it or disable it (according to mail chimp). This is what I wrote two subscribers who complained about not being able to confirm: After trying the subscription myself on several browsers, laptops, and mobile devices, I found out that the trouble is really when using a mobile device. Were you using a mobile device when you had trouble subscribing? In the screen shot attached it shows you that I cannot edit the “robot” test, so i am stuck with it. But the other image I attached is to help explain a few ways you might be able to overcome the issue. When you are asked to select images to prove you’re not a robot, the images can be blurry, they can also reappear once you’ve already clicked them, and you have to continue to click the photos even if new ones appear. Then, once you’ve clicked all of the photos that reappear (as you can see explained at the top and bottom of my photo), you click “verify”. But if you click “verify” before letting the photos run their course, then you will have to try again. If you want to skip the photographs all together, then you can click the little headphone icon that is to the left of “Verify”, and you will be taken to a screen where you can listen to people speak a sequence of numbers that you have to type out and submit. It might be easier!
Tracy
Great tutorial, as always!
I am the process of starting to use Mailchimp but was a little concerned that currently, my new blog posts are automatically sent out by Jetpack. Do I need to disable this to ensure there is no duplication?
Constance Sohodski
This is a great tutorial, but I have a question it doesn’t answer. I am in the process of creating my account. MailChimp warns me against using a gmail account, and I understand why. However, I can’t figure out how to set up an email account associated with my wordpress site. Can anyone help?
April G
Hi. I’m using Mailchimp to write a newsletter and I looked up how to embed a link to a website withtin text. But when I click on the text it doesn’t take me to the website in my code. Do you know what could be the problem?
Angela Dvorak
Hi!
I used this article successfully to set up my RSS email campaign, but then it just stopped working. The feed URL appeared to be bad. I validated it using an RSS validator and it works, but Mail Chimp is still saying its not valid. Any ideas on why that might be? I checked for typos and syntax and just not finding the source of the issue.
WPBeginner Support
We are not sure what could be causing this issue. Try disabling all your plugins and switching to a default theme. After that try to add your RSS in MailChimp. If the issue is revolved then this mean that a plugin or theme on your website is causing the issue. Alternately, you can also rechout to MailChimp support and see what they have to say.
Admin
Saeful
Thanks for the tutorial
very helpful especially for me as a beginner blogger
regards
WPBeginner Support
Hi Saeful, glad you found it helpful. Don’t forget to follow us on Facebook for more WordPress tips and tutorials.
Admin
Melinda
I am following the instructions for setting up the embedded form but I’m not getting any kind of link to paste…I’ve tried several times using the set up as shown in the tutorial. What do I need to do to see this code to use on my WP site?
Pat Mingarelli
Is there way to send an RSS email from MailChimp that shows a partial post and the featured image?
Thanks!
Pat M
Florine
Hey, I have the same problem as Kate Armstrong and the suggested solutions did not work. I tried using a different form (slim/ naked) and also to disable Javaskript, still it only shows plain text or code, no subscribe button. Do you have any idea what the problem might be and how to solve it?
Thanks!
Kamran
Sir i configure it as per your instructions , but post is not showing in the mail box , there are only facebook , twitter i cons are shown but Post is not , plz help what is the problem