
Avete intenzione di spostare il vostro sito WordPress su una nuova società di hosting o su un altro server? È una decisione importante e, comprensibilmente, probabilmente siete preoccupati per la potenziale perdita di dati e per i tempi di inattività.
Secondo la nostra esperienza, questi sono sicuramente i rischi maggiori quando si cambia hosting o si migra un sito web. Tuttavia, si può tranquillamente passare a un nuovo host o server senza compromettere l’esperienza dell’utente o il tempo di attività.
Infatti, abbiamo cambiato il sito WPBeginner da HostGator a SiteGround nel 2020. Quindi, abbiamo affrontato con successo questo processo senza impattare negativamente sui nostri lettori.
In questo tutorial passo dopo passo, vi mostreremo come migrare in modo sicuro il vostro sito WordPress su un nuovo host senza alcun tempo di inattività. Risponderemo anche alle domande più frequenti sul trasferimento di un sito WordPress a un nuovo provider di hosting.

Importante: prima di iniziare, vogliamo farvi sapere che molte società di hosting WordPress offrono un servizio di migrazione gratuito. Potrebbe non essere indicato sul loro sito web, quindi non dovete fare altro che chiedere. Di solito è gratuito, ma alcuni potrebbero richiedere un piccolo contributo.
Detto questo, vediamo i passaggi da seguire per spostare WordPress su un nuovo server di hosting (senza tempi di inattività):
Pronti? Iniziamo.
Passo 1: Scegliere il nuovo host WordPress
Se siete bloccati con un host web lento anche dopo aver ottimizzato la velocità e le prestazioni di WordPress, allora è il momento di spostare il vostro sito WordPress su un nuovo host in grado di gestire il vostro traffico crescente.
Quando si cerca un nuovo provider di hosting WordPress, è importante scegliere con cura per non dover cambiare di nuovo fornitore in tempi brevi.
Ecco chi raccomandiamo:
- Per un hosting condiviso affidabile, consigliamo di scegliere Bluehost. È ufficialmente raccomandato da WordPress.org. Utilizzando il nostro coupon Bluehost, gli utenti di WPBeginner possono usufruire di uno sconto fino al 75% e di un nome di dominio gratuito.
- Per un hosting condiviso più veloce, consigliamo Hostinger. È una delle migliori società di hosting WordPress e offre server più veloci con un’assistenza clienti eccezionale.
- Se siete alla ricerca di hosting cloud o di provider specifici per una determinata località, vi consigliamo di dare un’occhiata a SiteGround. Dispone di centri dati in tre diversi continenti.
- Se state cercando un hosting WordPress gestito, vi consigliamo di dare un’occhiata a WP Engine. È il fornitore migliore e più conosciuto del settore.
Dopo aver acquistato il nuovo hosting, NON installate WordPress. Lo faremo in una fase successiva.
Per il momento, il nuovo account di web hosting dovrebbe essere vuoto, senza file o cartelle nella directory principale.
Fase 2: Impostazione di Duplicator per una facile migrazione
La prima cosa da fare è installare e attivare il plugin Duplicator sul sito web che si desidera spostare. Per maggiori dettagli, consultate la nostra guida passo passo su come installare un plugin di WordPress.
Duplicator è il miglior plugin per la migrazione di WordPress sul mercato. È dotato di backup automatici programmati, supporto per il cloud storage, ripristino in un clic e migrazioni intelligenti.
Nota: Duplicator ha anche una versione gratuita chiamata Duplicator Lite. Può essere utilizzata per spostare il vostro sito web, ma ha funzioni limitate rispetto alla versione pro.
Una volta installato e attivato Duplicator, andare alla pagina Duplicator ” Backups nell’area di amministrazione di WordPress.
Successivamente, è necessario fare clic sul pulsante “Aggiungi nuovo” nell’angolo in alto a sinistra.
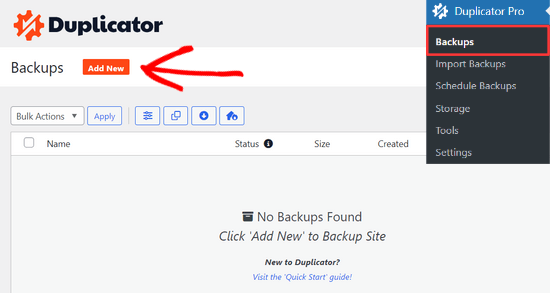
In questo modo si avvia la procedura guidata di backup di Duplicator.
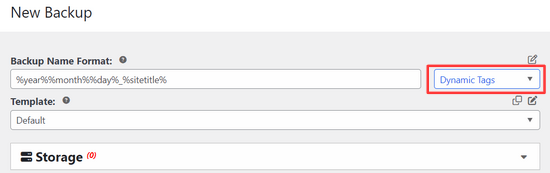
Nella schermata successiva, è possibile inserire un nome per il backup oppure utilizzare i tag dinamici per creare automaticamente un formato di nome, come la data e il titolo del sito.
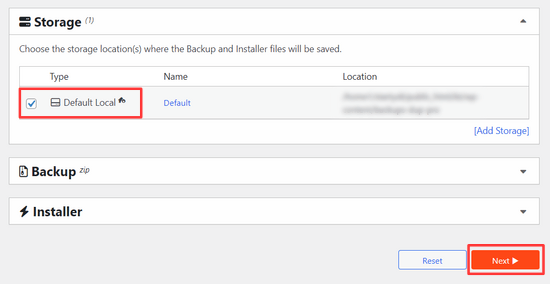
Quindi, è possibile espandere la sezione “Archiviazione” per selezionare una posizione di archiviazione. Per questa esercitazione utilizzeremo la posizione predefinita, ma è possibile aggiungere una nuova posizione, come Dropbox o Google Drive, facendo clic sul link “Aggiungi archiviazione”.
È sufficiente fare clic sul pulsante “Avanti” per continuare.
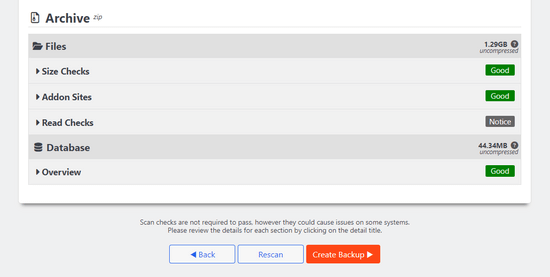
Successivamente, Duplicator scansiona il sistema per assicurarsi che tutto sia in ordine per preparare il pacchetto.
Assicuratevi che i risultati della scansione siano verificati (tutto dovrebbe essere “Buono”), quindi fate clic sul pulsante “Crea backup”.
Il processo potrebbe richiedere alcuni minuti, quindi lasciate la scheda aperta mentre il plugin svolge il suo lavoro.
Una volta completato il processo, verranno visualizzate le opzioni di download per il programma di installazione e per l’archivio. È necessario fare clic sul pulsante “Download” e selezionare l’opzione “Entrambi i file”.
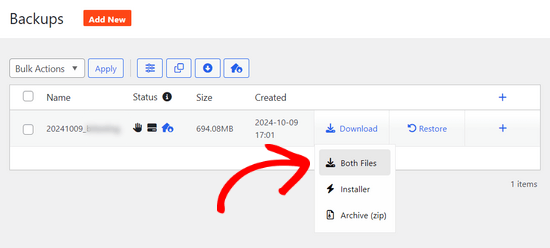
Il file di archivio è una copia del vostro sito web completo, mentre il file di installazione automatizza il processo di installazione.
Passo 3: Importare il sito WordPress nel nuovo host
Dopo aver scaricato i file dell’archivio e del programma di installazione, il passo successivo è caricarli sul nuovo host web.
È possibile farlo collegandosi al nuovo host Web tramite FTP.
Se non l’avete mai fatto prima, date un’occhiata alla nostra guida per principianti sul caricamento di file via FTP su WordPress.
Normalmente, quando si collega il client FTP, si inserisce il nome di dominio del sito web come host.
Tuttavia, poiché il nome di dominio punta ancora al vecchio host, è necessario connettersi inserendo l’indirizzo IP o il nome host del server.
Potete trovare queste informazioni nella dashboard del pannello di controllo del vostro nuovo account di hosting.

Se non riuscite a trovare queste informazioni, potete chiedere assistenza alla vostra nuova società di web hosting, che vi aiuterà.
Utilizzando il client FTP, è necessario caricare sia il file installer.php sia il file .zip dell’archivio nella directory principale del sito web.
Di solito si tratta della cartella /username/public_html/.
Anche in questo caso, se non siete sicuri, chiedete alla vostra società di web hosting.
Assicuratevi che la vostra directory principale sia completamente vuota. Alcune società di web hosting installano automaticamente WordPress al momento dell’iscrizione.
Se WordPress è installato nella directory principale, è necessario prima eliminare WordPress.
Una volta fatto ciò, è necessario caricare sia il file zip dell’archivio sia il file installer.php nella directory principale del sito.
Passo 4: modificare il file Hosts per prevenire i tempi di inattività
Una volta caricati entrambi i file sul nuovo host, è necessario accedere al file installer.php in un browser.
Normalmente, si può accedere a questo file utilizzando un URL come questo:
http://www.example.com/installer.php
Tuttavia, questo URL vi porterà al vostro vecchio host web e riceverete un errore 404. Questo perché il nome di dominio punta ancora al vecchio host web.
Normalmente, altri tutorial potrebbero dirvi di cambiare il nameserver del vostro dominio e farlo puntare alla nuova società di hosting, ma è sbagliato.
Se lo fate ora, i vostri visitatori vedranno un sito web non funzionante durante la migrazione.
Vi mostreremo come potete accedere temporaneamente al vostro nuovo sito sul vostro computer senza influenzare il vostro vecchio sito.
Questo viene fatto con il file hosts del computer.
Il file hosts può essere utilizzato per mappare i nomi di dominio a indirizzi IP specifici. In altre parole, consente di ingannare il computer facendogli credere che il sito web sia spostato anche se non lo è.
Vediamo come aggiungere una voce per il vostro nome di dominio nel file hosts in modo che punti alla vostra nuova società di hosting.
Queste modifiche vi permetteranno di accedere ai file sul nuovo host utilizzando il vostro nome di dominio, mentre il resto del mondo continuerà ad accedere al vostro sito dal vecchio host. Questo garantisce il 100% di uptime.
La prima cosa da fare è trovare l’indirizzo IP del vostro nuovo server di web hosting.
Per trovarlo, è necessario accedere alla dashboard di cPanel e fare clic sul link Espandi statistiche nella barra laterale di sinistra. L’indirizzo del vostro server sarà elencato come “Indirizzo IP condiviso”.
Ad esempio, su Hostinger, troverete l’indirizzo IP del vostro server sotto i dettagli del vostro piano di hosting.

Se si utilizza un PC Windows, è necessario aprire l’applicazione Blocco note con i privilegi di amministratore.
È sufficiente fare clic sul pulsante “Start” e cercare l’applicazione Notepad. Fare clic con il tasto destro del mouse sull’icona del Blocco note e selezionare “Esegui come amministratore”.

Verrà visualizzato un prompt UAC di Windows e sarà necessario fare clic su “Sì” per avviare Notepad con i privilegi di amministratore.
Nella schermata del Blocco note, andare su File ” Apri e spostarsi nella cartella C:\Windows\System32\drivers\etc. Da questa cartella, selezionare il file hosts e aprirlo.
Se si utilizza un Mac, è necessario aprire l’applicazione Terminale e inserire questo comando per modificare il file hosts:
sudo nano /private/etc/hosts
Sia per gli utenti Windows che per quelli Mac, nella parte inferiore del file hosts è necessario inserire l’indirizzo IP copiato e poi il nome del dominio. In questo modo:
192.168.1.22 www.example.com
Assicuratevi di sostituire l’indirizzo IP con quello copiato da cPanel e example.com con il vostro nome di dominio.
Al termine, salvare le modifiche.
Ora è possibile accedere ai propri file sul nuovo host utilizzando il nome di dominio sul proprio computer.
Importante: Non dimenticate di annullare le modifiche apportate al file hosts al termine della migrazione (passaggio 6).
Passo 5: Creare il database MySQL sul nuovo host
Prima di eseguire il programma di installazione sul nuovo host, è necessario creare un database MySQL sul nuovo account di hosting. Se avete già creato un database MySQL, potete passare al passo successivo.
Creare un database in cPanel
Accedete al cruscotto del vostro nuovo account di hosting, scorrete fino alla sezione Database e fate clic sull’icona “Database MySQL”.

Verrà visualizzato un campo per la creazione di un nuovo database.
Inserite un nome per il vostro database e fate clic sul pulsante “Crea database”.

Dopo aver creato il database MySQL, è necessario scorrere verso il basso fino alla sezione Utenti MySQL.
Quindi, fornire un nome utente e una password per il nuovo utente e fare clic sul pulsante “Crea utente”.

Successivamente, è necessario aggiungere questo utente al database. Questo darà al nome utente appena creato tutti i permessi per lavorare su quel database.
È possibile farlo scorrendo verso il basso fino alla sezione “Aggiungi utente a un database”. È sufficiente selezionare l’utente del database creato dal menu a discesa accanto all’utente, quindi selezionare il database e fare clic sul pulsante “Aggiungi”.

Il database è ora pronto per essere utilizzato con WordPress. Assicuratevi di annotare il nome del database, il nome utente e la password. Queste informazioni vi serviranno nella fase successiva.
Fase 6: avvio del processo di migrazione del Duplicatore
Ora siamo pronti a eseguire il programma di installazione. Navigate al seguente indirizzo nella finestra del browser, sostituendo example.com con il nome del vostro dominio:
http://www.example.com/installer.php

Il programma di installazione eseguirà alcuni test e mostrerà “Pass” accanto ai test di archivio e di convalida.
È necessario selezionare la casella di controllo dei termini e delle condizioni e continuare facendo clic sul pulsante “Avanti”.
A questo punto, vi verrà chiesto di inserire l’host MySQL, il nome del database, il nome utente e la password.
L’host sarà probabilmente localhost. Dopodiché, si inseriranno i dettagli del database creato nel passaggio precedente.

Successivamente, il Duplicatore deve verificare di potersi connettere al database e di poter eseguire l’installazione.
Fare clic sul pulsante “Convalida” in basso per continuare.

Se Duplicator riesce a connettersi, i risultati del test vengono visualizzati come Pass.
A questo punto è possibile selezionare la casella di controllo dei termini e delle avvertenze e fare clic sul pulsante “Avanti”.

Fare clic sul pulsante “Avanti” per continuare.
Duplicator importerà ora il database di WordPress dallo zip dell’archivio nel nuovo database.
Successivamente, verrà richiesto di aggiornare l’URL o il percorso del sito. Poiché non si cambiano i nomi di dominio, NON è necessario modificare nulla in questo punto.
È sufficiente fare clic sul pulsante “Avanti” per continuare.
Duplicator eseguirà i passaggi finali e mostrerà il pulsante di accesso.

Ora potete accedere al vostro sito WordPress sul nuovo host per verificare che tutto funzioni come previsto.
Passo 7: aggiornare i server dei nomi di dominio (DNS)
A questo punto, avete creato una copia completa del database e dei file di WordPress sul nuovo server di hosting, ma il vostro dominio punta ancora al vecchio account di web hosting.
Per aggiornare il dominio, è necessario cambiare i server dei nomi DNS. In questo modo si garantisce che gli utenti vengano indirizzati alla nuova posizione del sito web quando digitano il dominio nel loro browser.
Se avete registrato il dominio con il vostro provider di hosting, è meglio trasferire il dominio a un nuovo host.
D’altra parte, se si utilizza una società di registrazione di domini come Domain.com, GoDaddy o Network Solutions, è necessario aggiornare i server dei nomi.
Sono necessarie le informazioni sul server dei nomi DNS del nuovo host Web. Di solito si tratta di un paio di URL che assomigliano a questo:
ns1.hostname.comns2.hostname.com
In questa guida vi mostreremo come cambiare i server DNS con GoDaddy.
Per altri provider di hosting, date un’occhiata alla nostra guida sulla modifica dei nameserver dei domini.
A seconda della società di registrazione del dominio o dell’host Web, le schermate possono apparire diverse. Tuttavia, il concetto di base è lo stesso.
Dovete cercare l’area di gestione del dominio e poi cercare i server dei nomi. Se avete bisogno di assistenza per aggiornare i server dei nomi, potete chiedere alla vostra società di web hosting.
Per GoDaddy, è necessario accedere al proprio account GoDaddy e fare clic su “Domini”.
Successivamente, è necessario fare clic sul pulsante “Gestisci” accanto al nome di dominio che si desidera modificare.

Andare alla sezione “Impostazioni aggiuntive”.
Quindi, dovrete cliccare su “Gestisci DNS” per continuare.

Successivamente, è necessario scorrere verso il basso fino alla sezione “Nameservers”.
Qui, fare clic sul pulsante “Modifica”.

Innanzitutto, è necessario cambiare il menu a tendina del tipo di server dei nomi da “Predefinito” a “Personalizzato”.
Successivamente, è possibile inserire le informazioni del nuovo provider di hosting alla voce Nameservers.

Non dimenticate di fare clic sul pulsante “Salva” per memorizzare le modifiche.
La modifica dei nameserver del vostro dominio è stata effettuata con successo. Le modifiche DNS possono richiedere dalle 4 alle 48 ore per essere propagate a tutti gli utenti.
Poiché i contenuti sono gli stessi sul vecchio e sul nuovo host, i vostri utenti non noteranno alcuna differenza. La migrazione di WordPress avverrà senza soluzione di continuità e senza tempi di inattività.
Per sicurezza, vi consigliamo di aspettare a cancellare il vecchio account di hosting fino a 7 giorni dopo la migrazione.
Domande frequenti
Ecco alcune domande che molti dei nostri utenti ci pongono durante il trasferimento di WordPress da un host all’altro.
1. Come faccio a migrare il mio sito web WordPress su un altro host?
Potete migrare il vostro sito web WordPress spostando i file e il database di WordPress dal vecchio host al nuovo provider di hosting.
Alcune società di hosting offrono anche servizi gratuiti di trasferimento di siti web, ma è necessario chiedere a loro. In alternativa, potete farlo voi stessi trasferendo i file con un client FTP e importando il database tramite phpMyAdmin.
2. Posso migrare il mio sito WordPress su un altro provider di hosting?
Sì, siete liberi di migrare il vostro sito WordPress su un altro provider di hosting.
3. Posso iscrivermi al nuovo account di hosting senza registrare un nome di dominio?
Sì, è assolutamente possibile sottoscrivere un account di hosting senza registrare un nome di dominio.
Il nome di dominio e l’hosting sono due servizi diversi e non è necessariamente necessario registrare un nome di dominio quando ci si iscrive a un nuovo host. Per maggiori dettagli, consultate la nostra guida sulla differenza tra nome di dominio e hosting web.
Alcuni provider di hosting vi chiederanno di selezionare un nome di dominio come primo passo per l’acquisto dell’hosting. Inoltre, vi permetteranno di inserire un nome di dominio se ne avete già uno.
4. Devo trasferire il mio nome di dominio al nuovo host?
No, non è necessario trasferire il nome di dominio al nuovo host. Tuttavia, trasferendo il nome di dominio sul nuovo hosting sarà più facile rinnovarlo e gestirlo sotto la stessa dashboard del nuovo account di hosting.
Per saperne di più su questo argomento, consultate la nostra guida definitiva sui nomi di dominio e sul loro funzionamento.
5. Come si risolve l’errore di connessione al database in Duplicator?
Se viene visualizzato un errore di connessione al database o un errore di connessione al database in Duplicator, è probabile che siano state inserite informazioni errate per la connessione al database.
Assicuratevi che il nome del database, il nome utente MySQL e la password siano corretti. Alcune società di web hosting non utilizzano localhost come host per i loro server MySQL. In questo caso, dovrete chiedere al personale di supporto del vostro host web di fornirvi le informazioni corrette.
6. Come posso verificare se il mio sito web viene caricato dal nuovo host?
Esistono diversi strumenti online che consentono di vedere chi ospita un sito web. Dopo aver trasferito il vostro sito web sul nuovo host, potete utilizzare uno di questi strumenti che vi mostreranno il nome della società di hosting web che ospita il vostro sito.
Se non è passato molto tempo da quando avete migrato il vostro sito web e avete apportato modifiche al server dei nomi di dominio (DNS), è probabile che il vostro sito sia ancora caricato dal vecchio host. Le modifiche al nome di dominio possono richiedere fino a 48 ore per propagarsi completamente.
7. È necessario eliminare i file o i dati dal vecchio host?
Quando si cambia società di hosting, si consiglia di conservare il vecchio sito web per almeno una settimana. Dopodiché, è possibile eliminare i file dal vecchio host web. Se state cancellando il vostro account, il vostro provider di web hosting cancellerà tutti i vostri dati in base alla sua politica.
8. Per quanto tempo devo mantenere attivo il mio account sul vecchio host?
Una volta migrato il vostro sito web sul nuovo host e se non avete altri siti web ospitati presso il vostro vecchio host, potete cancellare il vostro vecchio account di web hosting.
Tuttavia, in alcuni casi, potreste aver già pagato per l’hosting annuale. Dovreste controllare la loro politica di rimborso per vedere se avete diritto a un rimborso in caso di cancellazione.
9. Come faccio a spostare un sito WordPress con SSL/HTTPS?
È necessario installare un certificato SSL sul nuovo provider di hosting. Dopodiché, si possono seguire gli stessi passi indicati sopra. Assicuratevi solo di utilizzare l’HTTPS negli URL, come https://example.com.
10. Bonus: Migrazione gratuita del sito da parte del nuovo host
Se state cercando di cambiare il vostro hosting web, ma i passaggi sopra descritti vi sembrano troppo complicati, potete scegliere i seguenti provider, che migreranno il vostro sito web per voi.
SiteGround, Hostinger e WP Engine offrono la migrazione gratuita del sito web per gli utenti di WPBeginner.
Ci auguriamo che questo tutorial vi abbia aiutato a spostare WordPress sul vostro nuovo host senza alcun tempo di inattività. Se doveste riscontrare dei problemi durante la migrazione di WordPress, vi consigliamo di consultare la nostra selezione dei migliori hosting WordPress economici o la nostra guida sugli errori più comuni di WordPress e su come risolverli.
Se questo articolo vi è piaciuto, iscrivetevi al nostro canale YouTube per le esercitazioni video su WordPress. Potete trovarci anche su Twitter e Facebook.
 in 2024")


claude
Hello,
thanks for the article.
I am moving an HTML website to WordPress changing everything; host, design, etc…
Can I build the new WordPress website and then just set the new DNS when the website is ready in order to have it online?
Or should I also follow step 4?
Thank you
Claude
WPBeginner Support
If you’re changing the DNS then you wouldn’t need to change your hosts file but when you change the DNS your site visitors would see the new site as well.
Admin
Simon Borg
I got to step six and I could not open the installer page in my browser
I just got a 404 not found page.
I did change the web address to my web address.,
WPBeginner Support
You would want to check with your hosting provider that you placed the file in the correct location
Admin
hunter
Got to the login point at the end of the duplicator. White screen of death. whaaaat!!?!?!?!?!
WPBeginner Support
There are multiple possible reasons that could have happened, for the moment you may want to take a look at our guide on how to fix that error here: https://www.wpbeginner.com/wp-tutorials/how-to-fix-the-wordpress-white-screen-of-death/
Admin
Willy
Hi, I just scan and Got Notice in File Size.
It turns out the File Size was more than 1GB,
do you have advice for it?
Thank you so much for this great tutorial
WPBeginner Support
For a site that large, you would want to reach out to your hosting provider to let them know about it and they can normally assist.
Admin
paul ellen
Three days in to my first go with WordPress working toward an on line shop scenario to go live in the new year. Just used this to move wp between to vm’s in a lab. Did exactly what it said it would on the label. Will definitely use this when I move to a go live on my hosted domain space.
WPBeginner Support
Glad our recommendation was helpful
Admin
Ezim Osai
After running the plugin, only the archive file is being downloaded without the installer. How may I correct this?
WPBeginner Support
If you reach out to the plugin’s support they should be able to take a look and help solve the issue. You could also try checking with your hosting provider to ensure they’re not preventing the file from being downloaded for some reason.
Admin
Sachin
Hi, Thanks for the tutorial. I followed it and worked well. I am able to access the migrated website from new hosting account. Only issue I am facing is, I am not able to access wp-admin page while browsing to /wp-admin Can you please provide any guidance on what should I check or look for? Thanks in Advance
WPBeginner Support
The most common reason is your browser cached the old wp-admin location and you would need to clear your caching following our guide here: https://www.wpbeginner.com/beginners-guide/how-to-clear-your-cache-in-wordpress/
Admin
Stefano
Tried today for migrating a website from an old provider to a new one.
BANG! everything got well and smoooth
I have used the free version, also, but I think I will upgrade because the guys deserve it.
WPBeginner Support
Glad you were able to successfully transfer your site
Admin
James Eric
I don’t use FTP, I just simply browse to public html folder and directly upload the file. It works fine.
WPBeginner Support
Not all hosting providers offer the file manager that you likely used
Admin
Brandon Morris
I am moving multiple websites to a new host, you say above that the files need to be uploaded to the root, is this still true for multiple websites or can a folder be created for each one? Or will this have to be done manually?
Thanks
Brandon
WPBeginner Support
If it is multiple sites then it would depend on how your new host handles multiple domains. If they create folders for your different domains then you would put each site’s content in the folder for that site.
Admin
Carl
Everything worked up until I tried to install on the new site. Then all I get is “502 Bad Gateway”
WPBeginner Support
The 502 error has multiple possible reasons to appear, you may want to go through our troubleshooting guide for that error here: https://www.wpbeginner.com/wp-tutorials/how-to-fix-the-502-bad-gateway-error-in-wordpress/
Admin
Roger Gill
Re the ‘Hosts’ file amendment.
I see directions for Windows and Mac in the tutorial. Can you help me find this file in a Linux/Ubuntu set up please.
WPBeginner Support
In Linux, it would be similar to the Mac where you would use: sudo nano /etc/hosts
Admin
Vishvala Amin
Wonderful tutorial. I have not yet transferred my website but this tutorial has given me a lot of courage. Thanks and will let you know how I get on.
WPBeginner Support
Thank you, glad our tutorial could help make the process less frightening
Admin
Michael
Great tutorial, followed all steps and everything worked correctly the first time, can’t ask for anything more than that!
WPBeginner Support
Awesome, glad our guide could help
Admin
Kelli
First, thanks so much for sharing this. I am totally new to site migration. Second, HELP!
I’m all the way to Step 6- Duplicator Step 2 of 4 and the Validation failed. It was not able to verify the host connection. I have no idea what to do next. I double checked my database info and it’s all correct unless my host is something other than “localhost” and if it is, what would it be?
Thank you in advance for any guidance one this
WPBeginner Support
If you reach out to the support for the Duplicator plugin with the entire message they should be able to assist. You may also want to check the plugin’s FAQ section to ensure there isn’t a host-specific setting that needs to be set up.
Admin
Serverental
Great post. Thanks for sharing
WPBeginner Support
You’re welcome
Admin
Nina
This is a great tutorial! I have followed each step perfectly, until I get to the step to access the installer.php. I can see in my hosts file that I have the entry correct, but when navigating in the browser, it sends me to the existing site with a 404 error. What could be wrong? Do I need to reboot my computer?
WPBeginner Support
You may need to restart your browser for the hosts file change to be seen
Admin
Erik S
Thank you so much, this guide worked perfectly! I actually already had moved to the new host and was stuck when I came across your guide and did the reverse of step 4 to install Duplicator (Edited the Host file to look at the old host address) and continued with the rest of the guide, which worked seamlessly.
WPBeginner Support
Glad our article could help
Admin
Arlene
Hi and thank you yet again for such good information (which I’ll need some time to absorb). But for the immediate future
For reasons too numerous to detail, I have done nothing with my site to date, really, other than play around with settings. And I want to try a different host IF I decide to go forward. SO….Do I need to do much beyond cancelling my current hosting contract? Though I’ll renew the domain name because hope floats etc.
Thank you for any assist, and for your site generally.
WPBeginner Support
If you have no content, other than keeping your domain you want active, you can close your hosting account until you find a host you want your site on. You shouldn’t need to do more normally.
Admin
George
I have done everything right but when I try to go to mywebsite.com/installer.php I get a 404 not found from the server. I have uploaded the files on public_html
WPBeginner Support
You may want to ensure you are looking at the correct hosting provider when trying to locate that file and that the file’s filetype was not changed for some reason.
Admin
Marek Kurek
Hi, I’m just about to move my site from Siteground to Bluehost. I need to delete WordPress at Bluehost. Do i just delete files at public_html folder or is there a different way ? Thanks !
WPBeginner Support
We would recommend creating a backup in case there are any hiccups with the transferred site but as long as your site is set up on your new host you would be able to remove the files in that folder to remove the site
Admin
Hisham
That is very helpful. Thank you.
WPBeginner Support
You’re welcome
Admin
life
hello and thank you for this great tutorial
i am beginner in wordpress and have a question :
how i can detect wordpress site theme name ?
WPBeginner Support
You would want to take a look at the methods in our article here: https://www.wpbeginner.com/wp-themes/how-to-find-which-wordpress-theme-a-site-is-using/
Admin
philip
nice tutorial…keep it up bro
WPBeginner Support
Thank you
Admin
Russell Roberts
Excellent, helpful article. Please note that some of the plugins cited in the article may not work with WordPress version 5.0 and up.
WPBeginner Support
Thank you for stating this, some may have not been tested with 5.0 and up but we will certainly keep an eye out for if one of the recommended plugins no longer works
Admin
Zach Miller
I really appreciate the level of detail in this tutorial. Good stuff! But I do think it should have been mentioned that if your site is a store or has any user interaction that gets entered into the database, then a “down for maintenance” page may be the ticket. Other wise you migrate but may be missing a user order or sign up etc from your admin on the new host. Any advice on how to smoothly handle that kind of migration? As in how would you migrate without having to block user interaction during the migration process?
WPBeginner Support
If you want to prevent that issue from happening and not use a maintenance page as you suggested then you would want to find when your store has the least amount of traffic and change the nameservers then.
Admin
Ken
What if my nameserver points to Cloudflare?
WPBeginner Support
Then you would need to update your DNS settings on Cloudflare
Admin
Stephen Duffield
This process only works if your current host is not a WordPress.com site ie a Free hosting (note I had purchase the business upgrade, but the system wasn’t coping). Duplicator & Duplicator Pro wont work for wp.com sites. Nothing works unless you use one of two host sites that they recommend. Duplicator after lots of help, ended up giving me a refund. I tried many a plugins all could not migrate a WP.com site. I now find ,myself having to start all over. This is not a good situation to be in.
WPBeginner Support
You are correct that this plugin won’t work for WordPress.com sites, our tutorials are for WordPress.org sites but for transferring from WordPress.com you would want to take a look at our guide here: https://www.wpbeginner.com/wp-tutorials/how-to-properly-move-your-blog-from-wordpress-com-to-wordpress-org/
Admin
Dan
You saved my life, instructions were so easy to follow. Ran smoothly. Thanks a lot.
Mel
I moved my website from Hostgator (using a WordPress website) to Wix. The domain remained with Godaddy. I thought I would still be able to get into WP Admin, but the page doesn’t appear. Is there any way to get access to the site via wordpress? I need to get some content off the old site.
Mel
WPBeginner Support
Hi Mel,
You can contact your hosting provider and they can assign a temporary subdomain to access your old WordPress site.
Admin
Eric Young
Thanks for creating this detailed tutorial saving me hours of time. However, I notice that if you move a site with SSL certificate (https), you need to make sure you install a SSL certificate after the move, otherwise, it simply won’t work. Also, for some shared hosting customers, they may not have cPanel available to them and they need to rely on some backup plugins such as BackupBuddy or WpDraftPlus to create a complete backup for them. For some reasons, I need to deactivate my security plugins to let BackupBuddy performs a Complete Backup, otherwise, it’ll fail.
ussay
wow! so easy to use.
Thank you very much my migration was successful
Melyssa
Hi,
I just went through the entire process. When I go to enter my website with the installer.php it’s still giving me a 404 error. Any thoughts on how to troubleshoot this?
John
It tells me
You don’t have permission to access /dup-installer/lib/dup_archive/daws/daws.php on this server.
Additionally, a 403 Forbidden error was encountered while trying to use an ErrorDocument to handle the request.
What can I do please?
Prescott Chartier
I followed the guide step by stem and all I got was a new WordPress site, none of my pages or data migrated. Any ideas?
Ei Salita
What if there is a “Notice” while trying to make the package? What to do?
prakhar
hi,
i have successfully transfered my domain name and wordpress from godaddy to aws.
now the problem is i have access to the frontend and as an admin i can login, but as i want to go to backend dashboard it says “install wordpress” why it is like so?
and when i click on any menu link or any other link on site it shows 404 error
why?
any help would be much appreciated.
thanks in advance
WPBeginner Support
Hi Prakhar,
We are not sure what may be causing this issue. You can try to start over. You may also want to take a look at our guide on how to install WordPress on AWS.
Admin
Angela Welch
This made my site migration and launch so extremely easy. I couldn’t believe there was no downtime and how seamless it really was. Thanks for the great tutorial. You just saved me from having a dreadful GoDaddy panic support call.
Joe Hoey
Great tutorial, works just fine.
However on a site with SSL cannot get it to work.
Firefox or any other browser won’t contact to the new host. I get the following errors.
“ Your connection is not secure
The owner of domain.com did not configure his or her website correctly. To protect your data against theft, Firefox has not connected to this website.
This website uses HTTP Strict Transport Security (HSTS) to indicate that Firefox can only make a secure connection. This makes it impossible to add an exception for this certificate. “
Does anyone have suggestions on how to tackle this issue.
Thanks
Eric Young
If you move a site with SSL certificate, you’ll need to install a new SSL certificate again in order to make it works.
AMAN KUMAR SINGH
Can i restore my site backup data to new host and can it affect my website seo?
WPBeginner Support
Yes you can. No it will not affect SEO if you are using the same domain name.
Admin
Jim
This was a fantastic help! Worked perfectly! Thanks!
Stoyan Penev
Thanks for the detailed guide!
What about sites with SSL – currently my website has a Let’s Encrypt certificate and the new host provides AutoSSL – can downtime/error be avoid since the latter needs the website to resolve from the new host in order to set up the certificate? And this means there will be a period when the website will load from the new host but the SSL will be missing thus resulting in an error (I think).
What is you advice in such a situation?
Regards
Eric Young
You’ll need to install a new SSL certificate after the move.
Pete
Hey, great guide as always. Love your guides actually haha. One thing I’m a bit unsure of is when uploading the php and zip file via FTP, do I drop those files directly into the /username/public_html/ folder or do I create a folder that refers to my site name within the public_html folder and drop the files there? Thanks for any help!
WPBeginner Support
Hi Pete,
It depends on your host. If your host needs each domain to have its own directory, then their servers will automatically create one when you add a domain to your hosting account. Otherwise you can upload directly to /public_html/
Admin
rusty shackleford
just wanna say cheers, this was shockingly easy to do
Eone
if I setup in localhost, how to run installer.php in step 6? I can run index.php. I tried localhost/installer.php and myipaddress/installer.php. They weren’t work. nothing in page and no error displayed in page
tolani
God bless I was able to upload my site but am seeing parent directory on my new website although i havenot delete the old site. pls direct me to how to delete old site after uploading new site
Kwasi
Thanks for the detailed walkthrough. What if the site you are transferring to already has wordpress content with a domain?
WPBeginner Support
Hi Kwasi,
If you are trying to merge two WordPress sites, then please see our article on how to merge two WordPress sites together.
Admin
Mark
Thanks so much. along with the amazing Duplicator plugin, I moved hosts without any issues. I did things offline for a few days as wasn’t too concerned about being 100% online but the process was perfectly workable.
Appreciate your guides so much!
WPBeginner Support
Hi Mark,
Glad you found the article helpful. You may also want to subscribe to our YouTube Channel for WordPress video tutorials.
Admin
Sarthak upadhyay
Hello, after transferring the host, post link will remain same or not. Means, would I have to do changes in my post link .
WPBeginner Support
Hello Sarthak,
If you are not changing the domain names, then you wouldn’t need to update links. Instead, you will just point your domain to your new host.
Admin
Chris
Great article, thank you!
The only confusion I got is when you said that the root folder should be empty. I got my domain name there already. So, the question is where should I upload my package and installer file? I guess domain folder makes more sense?
WPBeginner Support
Hi Chris,
If you are seeing your domain name as a folder then that domain name folder is the root folder of your website.
Admin