Molti utenti di WordPress preferiscono lavorare sui propri siti web utilizzando un server locale sul proprio computer. In questo modo è possibile lavorare sul sito web in modo privato prima di rendere disponibili le modifiche on line.
Alla fine, dovrete spostarlo su un server live per renderlo accessibile ai visitatori online. Questa transizione è fondamentale per garantire il corretto funzionamento del sito web on line.
Abbiamo lavorato su molti siti web locali, quindi abbiamo dovuto imparare il modo più semplice per trasferire i contenuti a siti web in carne e ossa.
In questo articolo forniremo istruzioni passo passo su come spostare WordPress da un server locale a un sito live.
Perché spostare WordPress da un server locale a un sito live?
Creare il vostro blog WordPress su un server locale è un modo sicuro per testare le modifiche apportate al vostro sito web senza influenzare i visitatori.
Una volta perfezionato il sito web, il passo successivo consiste nel passare dal server locale a un sito live.
Vi mostriamo due modi per spostare il vostro sito da un server locale a un sito live.
Il primo metodo utilizza un plugin di migrazione di WordPress ed è consigliato ai principianti.
Nel secondo metodo, vi mostreremo come spostare manualmente WordPress da un server locale a un sito live.
Potete scegliere il metodo più adatto a voi:
Prima di migrare il sito WordPress
Per migrare WordPress da un server locale a un server live è necessario disporre di alcuni elementi.
Innanzitutto, supponiamo che abbiate un sito WordPress in esecuzione su un server locale (chiamato anche localhost) sul vostro computer e che abbiate pieno accesso ad esso.
Successivamente, è necessario disporre di un nome di dominio e di un hosting web.
Abbiamo sentito innumerevoli storie di principianti che hanno iniziato con fornitori di hosting web scadenti o gratuiti e se ne sono pentiti. Secondo la nostra esperienza, la scelta del giusto fornitore di hosting è fondamentale per il successo di qualsiasi sito web.
Per facilitare la vostra decisione, vi consigliamo di utilizzare Bluehost. Si tratta di una società di hosting WordPress ufficialmente raccomandata, che offre agli utenti di WPBeginner uno sconto esclusivo + dominio e SSL gratuiti.
In pratica, potete iniziare a lavorare con soli 1,99 dollari al mese.
Se volete un’ottima alternativa a Bluehost, potete dare un’occhiata a Hostinger. Offre anche uno sconto esclusivo agli utenti di WPBeginner con un nome di dominio gratuito.
Se potete permettervi di pagare un po’ di più, allora date un’occhiata a SiteGround. Hanno anche un’offerta speciale per i lettori di WPBeginner.
Se avete bisogno di aiuto per creare il vostro sito web, seguite la nostra guida passo passo su come creare un sito web.
Infine, è necessario disporre di un programma FTP e sapere come usare l’FTP per caricare il sito del server locale sul sito live.
Siete pronti? Iniziamo la migrazione del vostro sito WordPress.
Video tutorial
Se preferite le istruzioni scritte, continuate a leggere.
Metodo 1: Trasferire WordPress dal server locale al sito live utilizzando un plugin di migrazione (consigliato)
Questo metodo è più semplice e consigliato ai principianti. Utilizzeremo un plugin di migrazione di WordPress per spostare WordPress da localhost a un sito live.
Passo 1: Installare e configurare il plugin Duplicator
Per prima cosa, è necessario installare e attivare il plugin Duplicator sul sito locale. Per maggiori dettagli, consultate la nostra guida passo-passo su come installare un plugin di WordPress.
Suggerimento professionale: Esiste anche una versione pro di Duplicator che offre backup sicuri, archiviazione su cloud, ripristino semplice del sito e altro ancora.
Dopo l’attivazione, è necessario andare alla pagina Duplicator ” Backups e fare clic sul pulsante ‘Create New’.
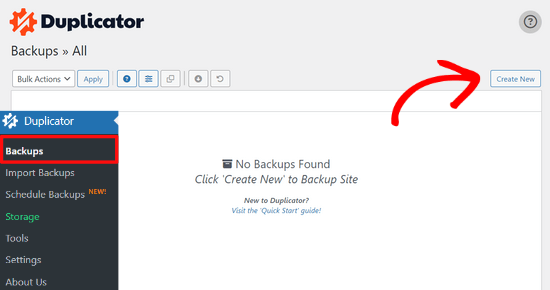
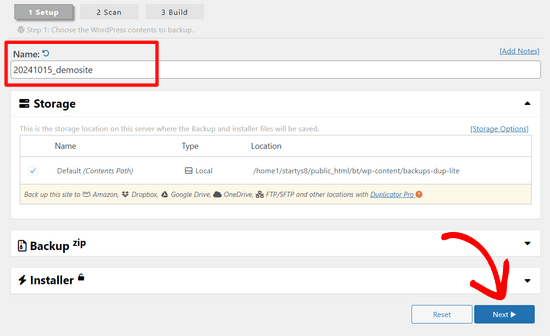
Si accede così a una schermata in cui è possibile assegnare un nome al backup.
Quindi, fare clic sul pulsante “Avanti”.
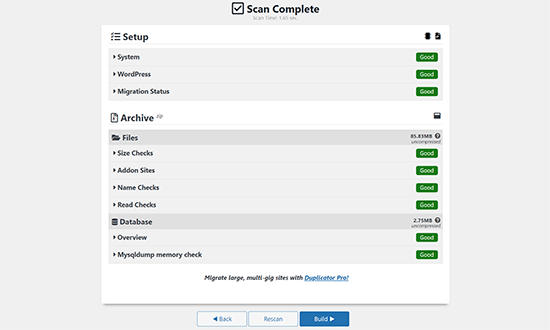
Duplicator eseguirà ora alcuni test per verificare che tutto sia in ordine.
Se tutti gli elementi sono contrassegnati da “Buono”, cliccate sul pulsante “Costruisci”.
Questo processo può richiedere alcuni minuti, a seconda delle dimensioni del sito web. È necessario lasciare aperta questa scheda fino al completamento.
Una volta terminato, verranno visualizzate le opzioni di download per i pacchetti “Installatore” e “Archivio”. È necessario fare clic sul pulsante “Scarica entrambi i file” per scaricare entrambi i file sul computer.
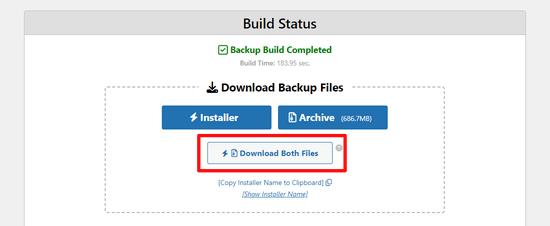
Il file “Archivio” è una copia completa del vostro sito WordPress. Include tutti i file principali di WordPress, nonché le immagini, i caricamenti, i temi, i plugin e un backup del database di WordPress.
Il file “Installer” è uno script che automatizza l’intero processo di migrazione scompattando il file di archivio contenente il vostro sito web.
Fase 2: Creare un database per il vostro sito web WordPress dal vivo
Prima di eseguire il programma di installazione o di caricare il sito web WordPress da localhost al vostro server di hosting, dovete creare un database MySQL per il vostro nuovo sito web live.
Se avete già creato un database MySQL, potete saltare questo passaggio.
Per creare un database, è necessario visitare la dashboard del cPanel del proprio account di hosting. Quindi, individuate la sezione “Database” e fate clic sull’icona “MySQL Database Wizard”.
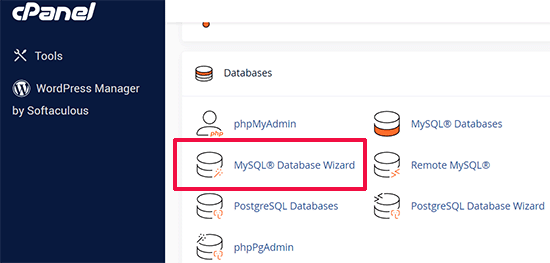
Nella schermata successiva, c’è un campo per creare un nuovo database.
È sufficiente indicare un nome per il database e fare clic sul pulsante “Crea database”.

cPanel creerà ora un nuovo database per voi.
A questo punto, è necessario inserire un nome utente e una password per il nuovo utente e fare clic sul pulsante “Crea utente”.
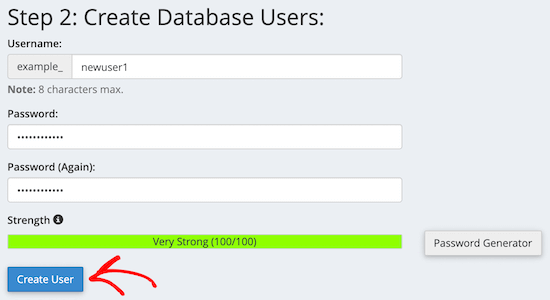
Successivamente, è necessario aggiungere l’utente appena creato al database.
Innanzitutto, fare clic sulla casella di controllo “Tutti i privilegi”.
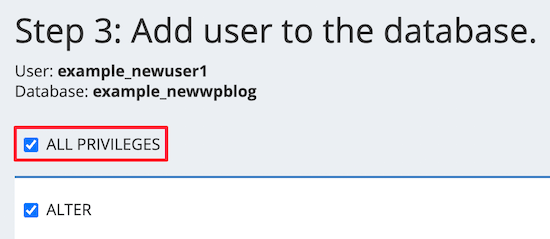
Quindi, scorrere verso il basso e fare clic sul pulsante “Applica modifiche” per salvare le modifiche.
Il database è ora pronto per essere utilizzato con il vostro sito WordPress. Assicuratevi di annotare il nome del database, il nome utente e la password. Queste informazioni vi serviranno nella fase successiva.
Fase 3: caricare i file dal server locale al sito web WordPress dal vivo
Ora è necessario caricare i file dell’archivio e del programma di installazione dal sito locale all’account di hosting.
Per prima cosa, collegatevi al vostro sito live utilizzando un client FTP. Una volta collegati, assicuratevi che la directory principale del vostro sito sia completamente vuota.
Normalmente, la directory principale è la cartella /home/public_html/.
Alcune società di hosting WordPress installano automaticamente WordPress al momento dell’iscrizione. Se sono presenti file di WordPress, è necessario eliminarli.
Successivamente, è possibile caricare i file archive.zip e installer.php da Duplicator nella cartella principale vuota.

Passo 4: esecuzione dello script di migrazione
Dopo aver caricato i file di migrazione, è necessario visitare il seguente URL nel browser:
http://example.com/installer.php
Non dimenticate di sostituire “example.com” con il vostro nome di dominio.
In questo modo si avvia la migrazione guidata di Duplicator.
Il programma di installazione eseguirà alcuni test e inizializzerà lo script.
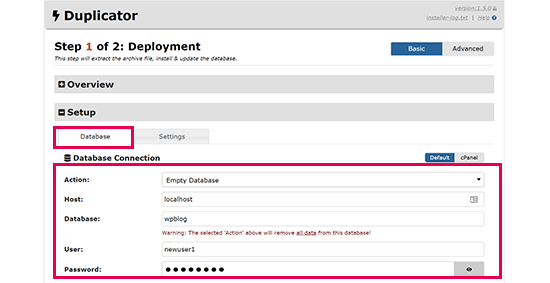
Nella sezione Setup, vi verrà chiesto di inserire l’host MySQL, il nome del database, il nome utente e la password.
L’host sarà probabilmente un host locale. Successivamente, si inseriranno i dettagli del database creato nel passo precedente.
Quindi, fare clic sul pulsante “Convalida” per verificare che i dati inseriti siano corretti.
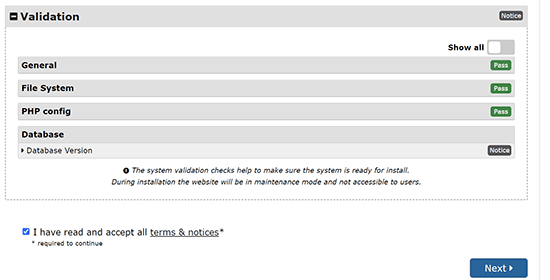
Dopodiché, fare clic sul pulsante “Avanti” per continuare.
Duplicator importerà ora il backup del database di WordPress dall’archivio al nuovo database.
Inoltre, aggiorna gli URL che puntano al sito locale e al nuovo sito live.
A questo punto è possibile fare clic sul pulsante “Admin Login” per accedere all’area di amministrazione di WordPress del sito live.

Una volta effettuato l’accesso al sito live, Duplicator pulirà automaticamente i file di installazione.
È tutto. Avete spostato con successo WordPress dal server locale al vostro sito live.
Metodo 2: Trasferire manualmente WordPress dal server locale al sito live
In questo metodo, vi mostreremo come spostare manualmente WordPress dal server locale al vostro sito live. Sarà utile se il primo metodo non funziona o se preferite farlo manualmente.
Passo 1: Esportare il database locale di WordPress
La prima cosa da fare è esportare il database locale di WordPress. Per farlo, utilizzeremo phpMyAdmin.
Se non lo conoscete, potete dare un’occhiata alla nostra guida alla gestione del database di WordPress con phpMyAdmin.
Basta andare su http://localhost/phpmyadmin/ e cliccare sul database di WordPress. Quindi, fare clic sul pulsante “Esporta” nella barra dei menu in alto.

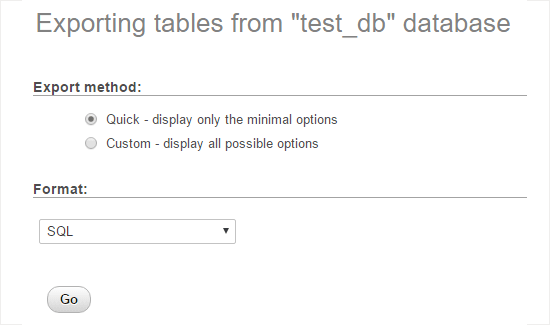
Nell’opzione “Metodo di esportazione:” si può scegliere “Rapido” o “Personalizzato”. Personalizzato vi fornirà più opzioni per esportare il vostro database.
Tuttavia, si consiglia di scegliere “Rapido” e di fare clic sul pulsante “Vai” per scaricare il database.
Passo 2: caricare i file di WordPress sul sito live
Ora è necessario spostare tutti i file del sito web sul sito live.
Per iniziare, aprite il vostro client FTP e collegatevi al vostro account di hosting web.
Una volta collegati al sito live, assicuratevi di caricare i file nella directory giusta. Ad esempio, se si vuole che il sito sia ospitato su “yoursite.com”, si dovranno caricare tutti i file nella directory public_html.
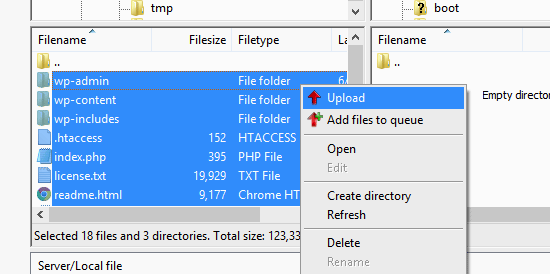
Ora selezionate i file locali di WordPress e caricateli sul vostro server live.
Passo 3: Creare un database MySQL sul sito live
Mentre il client FTP carica i file di WordPress, potete iniziare a importare il database sul server live.
La maggior parte dei fornitori di hosting WordPress offre cPanel per gestire il vostro account, quindi vi mostreremo come creare un database utilizzando cPanel.
Per prima cosa, è necessario accedere alla dashboard di cPanel e fare clic sull’icona “MySQL Database Wizard”, che si trova nella sezione “Database”.

Nella schermata successiva è possibile creare un nuovo database.
È necessario indicare un nome per il database, quindi fare clic su “Crea database”.

cPanel creerà automaticamente un nuovo database.
Successivamente, è necessario inserire un nome utente e una password per il nuovo utente e fare clic su “Crea utente”.
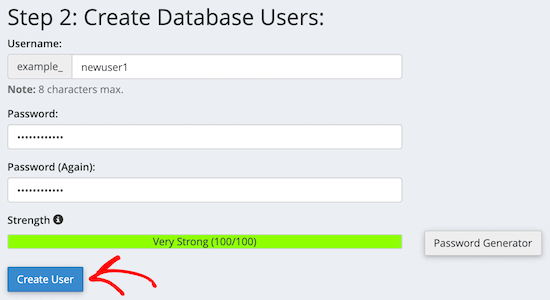
Successivamente, è necessario aggiungere l’utente appena creato al database.
Innanzitutto, selezionare la casella di controllo “Tutti i privilegi”.
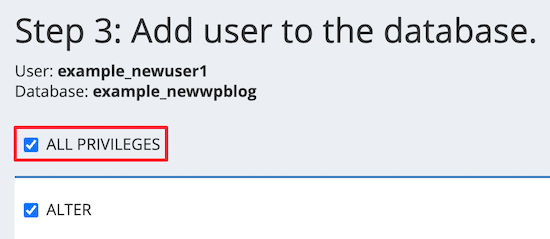
Quindi, scorrere verso il basso e fare clic su “Applica modifiche” per salvare le modifiche.
Avete creato con successo un nuovo database per il vostro sito WordPress live.
Passo 4: Importare il database di WordPress nel sito live
La fase successiva del processo consiste nell’importare il database di WordPress.
Andate nella vostra Bacheca cPanel, scorrete giù fino alla sezione “Database” e fate clic su “phpMyAdmin”.
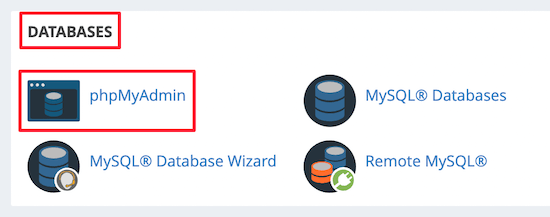
Si accede così a phpMyAdmin, dove si deve fare clic sul database appena creato. phpMyAdmin mostrerà il nuovo database senza tabelle.
Quindi, fare clic sulla scheda “Importa” nel menu superiore. Nella pagina di importazione, fare clic sul pulsante “Scegli file” e selezionare il file del database dal sito locale salvato nel primo passaggio.
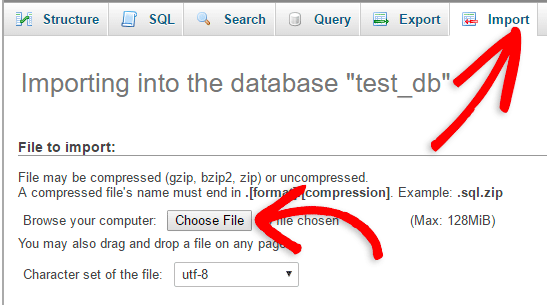
Dopodiché, fare clic sul pulsante “Vai” in fondo alla pagina. Il database verrà importato automaticamente in phpMyadmin.
Passo 5: modificare l’URL del sito
A questo punto, è necessario modificare l’URL del sito nel database in modo che si connetta con il sito WordPress attivo.
In phpMyAdmin, cercate la tabella wp_options nel database che avete appena importato.
Se si è cambiato il prefisso del database, invece di wp_options, potrebbe essere {nuovo_prefisso}_options.
Quindi, fare clic sul pulsante “Sfoglia” accanto a wp_options. Oppure, fate clic sul link nella barra laterale per aprire la pagina con l’elenco dei campi della tabella wp_options.
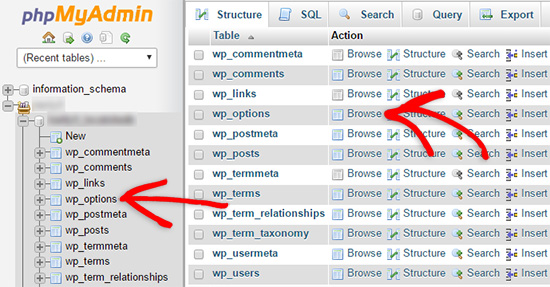
Quindi, nella colonna options_name, occorre cercare l’opzione siteurl.
Quindi, fare clic sull’icona “Modifica”.

Si apre una finestra in cui è possibile modificare il campo.
Nell’input boxed option_value, verrà visualizzato l’URL dell’installazione locale, che sarà qualcosa come http://localhost/test.
In questo campo è necessario inserire l’URL del nuovo sito, ad esempio: https://www.wpbeginner.com.
Quindi, è possibile salvare il campo facendo clic sul pulsante “Vai”.
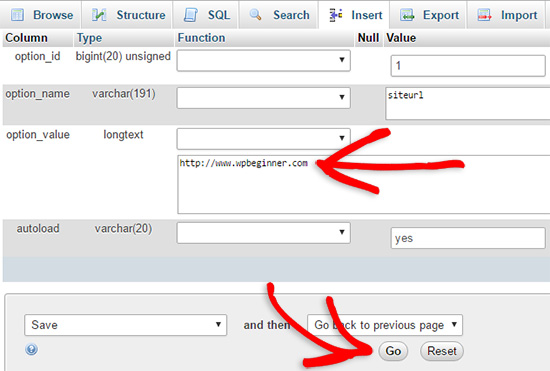
Successivamente, è necessario seguire la stessa procedura descritta sopra per il nome dell’opzione home. Il menu wp_options può essere lungo alcune pagine. Di solito, l’opzione home si trova nella seconda pagina.
Quindi, aggiornare l’URL della home, in modo che sia uguale a quello del sito live.
Passo 6: Configurare il sito live
Ora che avete importato il database e caricato i contenuti, è il momento di configurare WordPress.
A questo punto, il sito dovrebbe mostrare l’errore“Errore nello stabilire una connessione al database“.
Per risolvere il problema, collegarsi al sito web con un client FTP e aprire il file wp-config.php.
Dovrete cercare le seguenti righe di codice:
1 2 3 4 5 6 7 8 9 | // ** MySQL settings - You can get this info from your web host ** ///** The name of the database for WordPress */define( 'DB_NAME', 'database_name_here' );/** MySQL database username */define( 'DB_USER', 'username_here' );/** MySQL database password */define( 'DB_PASSWORD', 'password_here' );/** MySQL hostname */define( 'DB_HOST', 'localhost' ); |
È necessario fornire il nome del database, il nome utente e la password creati in precedenza.
Quindi, salvate il file wp-config.php e caricatelo sul vostro server di hosting WordPress.
Ora, quando si visita il sito web, questo dovrebbe essere attivo.
Dopodiché, è necessario accedere al pannello di amministrazione di WordPress e andare in Impostazioni ” Generale”. Quindi, senza modificare nulla, scorrere fino in fondo e fare clic sul pulsante “Salva modifiche”.
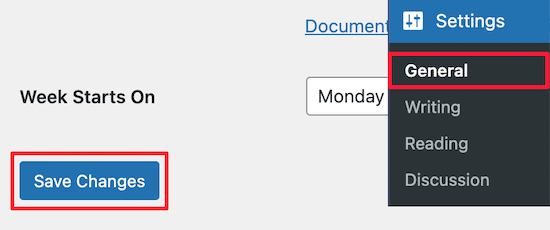
In questo modo ci si assicurerà che l’URL del sito sia corretto ovunque sia necessario.
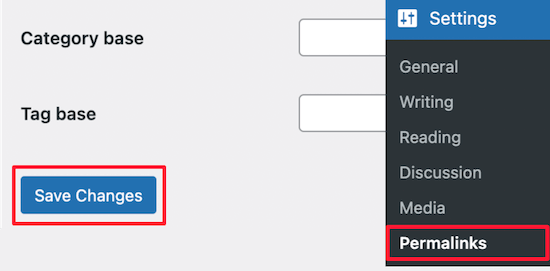
Una volta fatto, andare su Impostazioni ” Permalinks, quindi scorrere verso il basso e fare clic su “Salva modifiche” per assicurarsi che tutti i link ai post funzionino correttamente.
Passo 7: Correggere le immagini e i link rotti aggiornando i percorsi
Ogni volta che spostate un sito WordPress da un dominio a un altro o da un server locale a un sito live, vi troverete di fronte a collegamenti interrotti e immagini mancanti.
Vi mostriamo due modi per aggiornare gli URL. Potete scegliere quello più adatto a voi.
1. Aggiornare gli URL con il plugin Search & Replace Everything (consigliato)
Il modo più sicuro per correggere questo problema è utilizzare Search & Replace Everything. Si tratta di un potente plugin per WordPress che consente di eseguire facilmente operazioni di aggiornamento di massa sul vostro sito web senza scrivere complesse query al database.
Per prima cosa, è necessario installare e attivare il plugin Search & Replace Everything.
Dopo l’attivazione, andare alla pagina Strumenti ” WP Search & Replace.
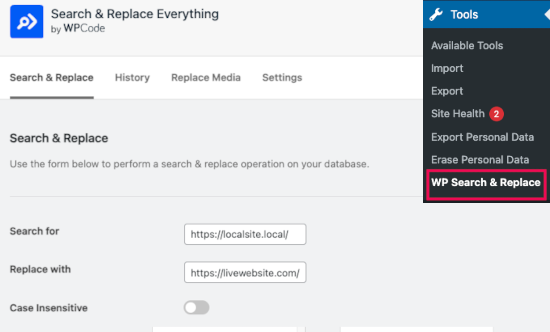
Da qui è necessario inserire l’URL del sito locale nel campo “Cerca” e l’URL del sito live nel campo “Sostituisci con”.
Scorrere un po’ e fare clic su “Seleziona tutto” sotto le tabelle. In questo modo il plugin cercherà il vecchio URL ovunque nel database.
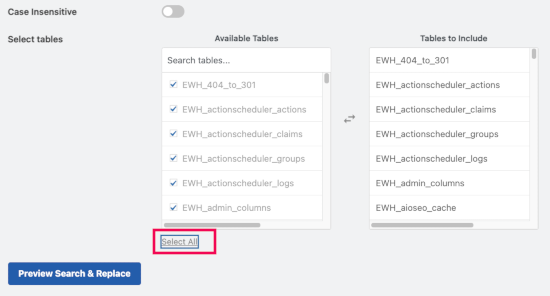
Ora fate clic sul pulsante “Anteprima di ricerca e sostituzione” per continuare.
Il plugin cercherà nel database tutte le istanze del vecchio URL e vedrà l’anteprima dei risultati.
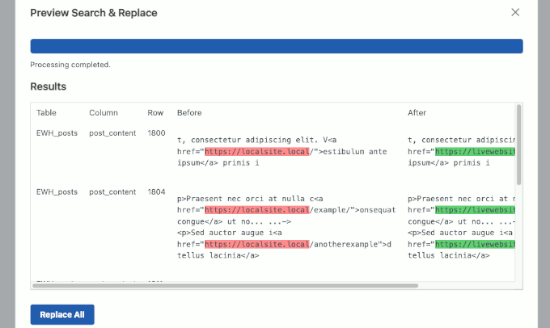
Se tutto sembra a posto, cliccate su “Sostituisci tutto” per salvare le modifiche.
Verrà visualizzata un’attenzione alle modifiche che si stanno apportando. Fare clic su “Sì” per continuare.
Il plugin aggiorna il database e sostituisce gli URL locali con l’URL attuale del sito web.
2. Aggiornare manualmente gli URL (avanzato)
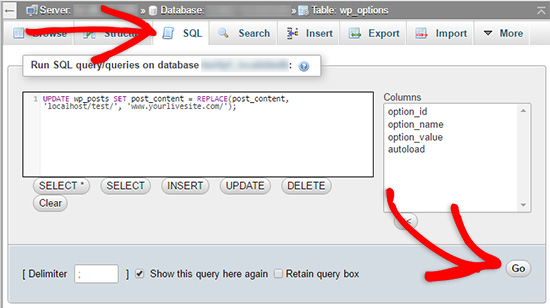
Un altro modo per aggiornare gli URL è utilizzare la seguente query SQL:
1 | UPDATE wp_posts SET post_content = REPLACE(post_content, 'localhost/test/', 'www.yourlivesite.com/'); |
Basta andare su phpMyAdmin, fare clic sul database, quindi cliccare su “SQL” dal menu in alto e aggiungere la query di cui sopra.
Assicurarsi di modificare gli URL del sito locale e del sito live e fare clic sul pulsante “Vai”.
Ecco fatto. Ora avete migrato con successo WordPress dal vostro server locale a un sito live.
Speriamo che il vostro sito web sia attivo e funzionante senza problemi. Se notate degli errori, potete selezionare la nostra guida agli errori comuni di WordPress per aiutarvi nella risoluzione dei problemi.
Speriamo che questo articolo vi abbia aiutato a spostare WordPress da un server locale a un sito live. Potreste anche consultare la nostra guida sullo spostamento di un sito live su un server locale o dare un’occhiata alla lista di controllo definitiva per la migrazione di un sito web per i passaggi pratici della migrazione di WordPress.
Se questo articolo vi è piaciuto, iscrivetevi al nostro canale YouTube per le esercitazioni video su WordPress. Potete trovarci anche su Twitter e Facebook.


Thembi
Hi guys tearing my hair out. Original site on local server works well on local server. The live site on the remote server works well on the live server. When I move it to the local host it gives me this php error when installing plugins… i have read all blogs and issue not resolved for me. I tried both the duplicator and manual process but still get this php error
Warning: An unexpected error occurred. Something may be wrong with WordPress.org or this server’s configuration. If you continue to have problems, please try the support forums. (WordPress could not establish a secure connection to WordPress.org. Please contact your server administrator.) in C:\wamp\www\missflairword\wp-includes\update.php on line 457
WPBeginner Support
Seems like your localhost install is unable to connect to the internet. This could happen if Apache is blocked by your network’s firewall. You need to allow apache access to the internet from your windows firewall settings.
Admin
Checo
Wow guys, this Tutorial was excellent, precise and very well detailed!!! Thank you very much, you helped me publish my first locally developed wordpress site right on the deadline without any mistakes. Best regards!
Sam
someone should tell me when you see a better word for Genius, because that is what you guys are. your tutorials has made me a lil’genius.
Thanks guys
Silvia
Your tut is the best! I tried several times before and never was able to do it until now! genius! thanks!
Angela
What a LIFESAVER! I tried several other peoples suggestions and different plug-ins that are supposed to make it easy… Nothing worked until this! Thank you!
gaurav Royal
thankx a lot .. its working
Ken
I’ve followed all the steps given. When I access the live site I get everything I can without changing the media URLs.
I can’t do that yet because I can’t login to the admin area. i get the following errors on the screen above the login box and valid logins are not accepted (checked with myPHP):
Warning: session_start(): Cannot send session cookie – headers already sent by (output started at /home/cgbookss/public_html/wp-includes/functions.php:1) in /home/cgbookss/public_html/wp-content/plugins/event-commerce-wp-event-calendar/evntgen-scbooking.php on line 519
Warning: session_start(): Cannot send session cache limiter – headers already sent (output started at /home/cgbookss/public_html/wp-includes/functions.php:1) in /home/cgbookss/public_html/wp-content/plugins/event-commerce-wp-event-calendar/evntgen-scbooking.php on line 519
Warning: Cannot modify header information – headers already sent by (output started at /home/cgbookss/public_html/wp-includes/functions.php:1) in /home/cgbookss/public_html/wp-login.php on line 424
Warning: Cannot modify header information – headers already sent by (output started at /home/cgbookss/public_html/wp-includes/functions.php:1) in /home/cgbookss/public_html/wp-login.php on line 437
Have you any suggestions?
WPBeginner Support
Try deactivating all your plugins.
Admin
geoff
can’t seem to get the phpmyadmin to work locally. you seem to haven’t put that in, and the link you have provided to “explain” how to use the phpmyadmin, refers to that running on c panel not locally.
it would be good if you could explain, running phpmyadmin locally, through webmatrix for explain.
rodrigo
Was a great help, this tutorial. I had some 500 server errors fixed after editing the htaccess.php file. But I still have no access to the wp-admin dashboard? Anyone got the same emptiness on the backend link? what could be the fix?
Charlie
I have the same exact issue. Trying to find a solution for this but it seems like one isn’t mentioned here on this page, or in the comments.
hokka
I have troubles with my new site address. Everything else seems to work just fine.
In phpmyadmin if I change the siteurl to direct the site to the correct subfolder, the website content disappears when the “home” option value is correct. Then again if I also change my home-value into the same address as the files are in, meaning the same address as siteurl, then I see the content but the address is not what I wanted it to be. I’ve also tried to use Velvet Blues -plugin but nothing happened.
In my case the WordPress url is different from website url, so basically the changes won’t affect in admin panel Settings.
Thanks for this great tutorial.
JulioC
Not sure if was very lucky but in my case I followed all steps and everything worked perfect!!!
Thanks a lot!
WPBeginner Staff
The other part of making backups is restoring your sites from backups. cPanel does not make that part easy. Configurations may differ from one site to another. Sometimes user may even want to move to a web host that does not offer cPanel. For more advanced users who can troubleshoot these issues, cPanel backups can be a good option. But for most beginners it can be difficult. There are other backup options as well, take a look at our pick of 7 Best WordPress Backup plugins.
Joey
BackupBuddy seems to be a bit of an overpriced option when you can simply back up a WP site via Cpanel … are there any other benefits for using BackupBuddy when backing up via Cpanel is easy and free?
jeroen
Hi, I’m still struggling withe the migration of my local hosted WP multisite to a webserver. Replaced all the urls’s as far as I can tell but still the navigation doens’t work. Ik can enter the root which shows the homepage correctle but clicking a navigation link I get this error.
“Not Found
The requested URL /index.php was not found on this server.”
Although the paths of the menu links(shown on hover) look fine. Any Idea where to go look to solve this? Thanks in advance.
Tim
After importing the database, I tried to do step 5. However, when I click on wp_options, i do not have an edit spot. It says “current selection does not contain a unique column. Grid edit, checkbox, edit, copy and delete features are not available.”
Why is this happening?
Thank you
nirali
hello can anyone help me.. there is a image path error in hosting.. how to solve it?
WPBeginner Staff
You can find out your live site’s database information by vising phpMyAdmin through cpanel. Notice the database name, mysql host, mysql username, and password and then fill in that information in your live site’s wp-config.php file.
On your local site go to localhost/phpmyadmin/ to find out the correct database name.
allison ranieri
I completed all the steps and now my live site just says Error Establishing database connection and I cannot access my localhost at all – it is just a white screen. When in Step 6 it said to change your config.php file I accidentally changed the info in my local config file instead of the one updated through MySql but I figured that one out and changed the info back in my local file to what I thought it was before, but now when I go to localhost/wordpress (where I had previously gone before) it just shows a white screen. And my live site says Error Establishing Database Connection. So confused. Any help would be lovely.
WPBeginner Staff
Yes, you will be able to see the edit link after signing into your live site.
Prabhjot kaur
I want to ask something as if i upload my site as a live site then edit link will appear or not ?that are already shown in localserver.
Enoch Ramal
Almost there but I get this…
Parse error: syntax error, unexpected ‘define’ (T_STRING) in /home/klbensonsk/public_html/wp-config.php on line 31
vanyoattila
Hi, I have uploaded my first page with the help of this post and it has been working perfect since than. Now I have a problem with an other site. I went through all the critical points again and again but I have always the same issue. The site is working (with broken links) but I can’t log in to the admin site. I changed the database at phpmyadmin and the wp-config.php file also. They have the same username and same password so they have the same datas and yet I have the problem. How does it possible?
Sybrin
Hi there, my WordPress website has just moved to a new ip address, and I followed the steps at the bottom to fix broken links. It said that it fixed them but my website is still not displaying properly. Some images are displaying as broken images and some image sliders are not showing up at all. The website also seems a hell of a lot slower. How do I fix this all?
vinamr
Do i have to install WordPress through my cpanel? or do i straight away upload the files through ftp?
WPBeginner Staff
Contents of WordPress folder.
up
I have had a hard time finding an answer to a simple question: Do you upload the wordpress folder or the contents of the wordpress folder to public_html
Krizia Bianca
Thank you so much, this tutorial works fine for me! I uploaded my wordpress to a live site. And it run smoothly!
GSR
Hi. I’ve followed all the steps (I think so) and now I no longer have the error message about not having a database connection – instead I now just have a blank white screen. Can you tell me where I’ve gone wrong?
Malik Talib Hussain
Thanks a lot for such a descriptive guide,I have uploaded my site successfully using this guide.
John
Thanks for sharing this. It worked for me at a go.
Daniel
Is it normal that in the step 6, after I updated the wp-config.php file, instead of appearing the homepage of the site (as I viewed in localhost) it appears the installation process?
PD: I have completed all the previous steps.
duke
Very easy, some tips to remember, i have to wait a while to transfer local wordpress site to public_html because of the number of themes i am using.
I forget to grant access to the db user, so i did it and it worked.
All steps is important, the sql command works great.
I rename .htaccess to .htaccess_old and it works
then just update and save permalinks.
Very easy fix for everything.
BJH
Thanks for the tutorial.
Unfortunately it doesn’t work for me. I think that there are so many variables with something like this. Your steps work for you, with your scenario, but for someone else it can be very easy to end up with something else which stops the process working. Migrating wordpress is a real chore in my experience.
Lloyd
I have 30+ years of IT experience including design of large 1000+ user infrastructure, plus extensive hands on program coding.
I have used WordPress to create one site and I am really happy with the result.
However, I would have to say that for anything other than simply creating a single production site, WordPress is unbelievably complicated to use for anyone contemplating creating multiple sites, or creating a dev to prod environment. Absolute unmitigated nightmare.
Is there is anything that the WordPress developers could do to make the actual architecture easier to understand and use that would be great.
Matthew
Hi,
Great tutorial, thanks a bunch. I’m doing my first wp redesign for a client who already has a well established blog with posts images etc. I’ve exported all of her data into the local site, designed a new theme with new pages etc. While importing her posts locally and selecting the option to download attachments, the posts have appeared but none of the images and I’m about ready to upload everything to her server.
Do I just upload the theme files and in doing so will my modifications be present? Or do I need to upload everything as this tutorial suggests. She has over 2000 posts, an image for each, and I’ve got new images, pages, and layout.
If you can either make a tutorial for moving/importing a redesigned or newly designed blog into an existing blog with posts pages etc. Or point me in the right direction, That would be great.
The client won’t give me access to the server itself and insists on doing the ftp himself because he saw on the news that he could get his identity stolen or some such nonsense. I explained that he could set access restrictions on a separate login but he insists he do it.
And the don’t want me working directly on the site because they’re worried about downtime while I update and build it.
You can’t always be picky when it come to clients and I don’t really have a choice I’m just about done.
Emilio
Thank you for the tutorial!
But now that I’ve imported all my site, the logo isn’t showing and my Dashboard doesn’t show the theme functions, I run Divi from Elegant Themes.
Martin
I’ve imported my database and wordpress install, but none of my pages are showing when I login to the admin panel? I’ve activated the theme, but no pages? Please help!
WPBeginner Staff
Please go to the admin area -> Settings and make sure that you are using the correct Site Address and WordPress Address.
Christine
Good day.
Thanks for this easy to follow tutorial.
I managed all the steps and my site seems to be connected, except that my theme is missing. All the files are in place with their stylesheets, but the site seems to be displaying plain html.Has anyone else experienced this?
Not sure how to go about fixing it.
tawanda masvanhise
thanks for the great tutorial! l have a problem after doing all the steps; my website is displaying
Error establishing a database connection
how can i solve this problem?
Claudio Henrique Amorim
Thank you so much.
I’m definitely a wp beginner and this post was just of an wonderful help. Everything went on flawless.
I’m really enjoying working as a web designer and wp developer. And I hope I’ll get more and more of these kind of jobs, and more challenging ones. I learned so much while doing this very first one.
Thank you again.
WPBeginner Staff
Seems like your domain is not yet ready or you have uploaded WordPress in the wrong directory on your web server. Please contact your web hosting provider for support.
Elliot Lee
HELP!!
I have completed step 1 to step 6, but my site still displays:
Future home of something quite cool.
If you’re the site owner, log in to launch this site
If you are a visitor, check back soon.
Why is this happening???
Elliot Lee
I have completed step 1 to step 6, but my website still displays:
Future home of something quite cool.
If you’re the site owner, log in to launch this site
If you are a visitor, check back soon.
What could be the problem???
Elliot Lee
HELP!!! Why am I receiving this error in step 4?
SQL query:
—
— Database: `wordpress`
—
— ——————————————————–
—
— Table structure for table `wp_commentmeta`
—
CREATE TABLE `wp_commentmeta` (
`meta_id` bigint( 20 ) unsigned NOT NULL AUTO_INCREMENT ,
`comment_id` bigint( 20 ) unsigned NOT NULL DEFAULT ‘0’,
`meta_key` varchar( 255 ) DEFAULT NULL ,
`meta_value` longtext,
PRIMARY KEY ( `meta_id` ) ,
KEY `comment_id` ( `comment_id` ) ,
KEY `meta_key` ( `meta_key` ) ) ENGINE = InnoDB DEFAULT CHARSET = utf8 AUTO_INCREMENT =1;
MySQL said:
#1046 – No database selected
WPBeginner Staff
Before you can run this query you need to select the database you want to run it on. If you are using phpMyAdmin then select the database and then click on the SQL to run the query.
Elliot Lee
ok thanks
Thinh
Hi, thanks for a easy guide.
But I wonder how I can export to live when WordPress is already installed live? I redesigned the website from scratch, only thing is that I used the same theme. What would be the best way to get this live?
Thanks, keep up the good work!
PixelstoLife
Great tutorial, thanks for the help.
Like some others, the up_user updates don’t work and the links on my site are still calling the localhost. I’ve also been booted out as the admin user and cannot login to update permalinks etc.
I’ve found a tutorial to re-instate an admin user via phpmyadmin so I’ll give that a go and see if I can get back in!
Cheers
Ben
Great guide, but having a little bit of trouble and wondering if you can help.
I’ve done everything above, but when I try to go on to the …/wp-admin page I get this: ‘Warning: require(/home/username/public_html/wp-includes/pomo/mo.php): failed to open stream: No such file or directory in /home/username/public_html/wp-settings.php on line 76’
Any ideas?
lokesh
I m facing a prlessphp fatal error: load error: failed to find /home1/eminenta/public_html/server/Suman_Creations/wp-content/themes/theme49413/bootstrap/less/bootstrap.lesslessphp fatal error: load error: failed to find /home1/eminenta/public_html/server/Suman_Creations/wp-content/themes/theme49413/style.less oblem when i move my website from local server to live server