Molti utenti di WordPress preferiscono lavorare sui propri siti web utilizzando un server locale sul proprio computer. In questo modo è possibile lavorare sul sito web in modo privato prima di rendere disponibili le modifiche on line.
Alla fine, dovrete spostarlo su un server live per renderlo accessibile ai visitatori online. Questa transizione è fondamentale per garantire il corretto funzionamento del sito web on line.
Abbiamo lavorato su molti siti web locali, quindi abbiamo dovuto imparare il modo più semplice per trasferire i contenuti a siti web in carne e ossa.
In questo articolo forniremo istruzioni passo passo su come spostare WordPress da un server locale a un sito live.
Perché spostare WordPress da un server locale a un sito live?
Creare il vostro blog WordPress su un server locale è un modo sicuro per testare le modifiche apportate al vostro sito web senza influenzare i visitatori.
Una volta perfezionato il sito web, il passo successivo consiste nel passare dal server locale a un sito live.
Vi mostriamo due modi per spostare il vostro sito da un server locale a un sito live.
Il primo metodo utilizza un plugin di migrazione di WordPress ed è consigliato ai principianti.
Nel secondo metodo, vi mostreremo come spostare manualmente WordPress da un server locale a un sito live.
Potete scegliere il metodo più adatto a voi:
Prima di migrare il sito WordPress
Per migrare WordPress da un server locale a un server live è necessario disporre di alcuni elementi.
Innanzitutto, supponiamo che abbiate un sito WordPress in esecuzione su un server locale (chiamato anche localhost) sul vostro computer e che abbiate pieno accesso ad esso.
Successivamente, è necessario disporre di un nome di dominio e di un hosting web.
Abbiamo sentito innumerevoli storie di principianti che hanno iniziato con fornitori di hosting web scadenti o gratuiti e se ne sono pentiti. Secondo la nostra esperienza, la scelta del giusto fornitore di hosting è fondamentale per il successo di qualsiasi sito web.
Per facilitare la vostra decisione, vi consigliamo di utilizzare Bluehost. Si tratta di una società di hosting WordPress ufficialmente raccomandata, che offre agli utenti di WPBeginner uno sconto esclusivo + dominio e SSL gratuiti.
In pratica, potete iniziare a lavorare con soli 1,99 dollari al mese.
Se volete un’ottima alternativa a Bluehost, potete dare un’occhiata a Hostinger. Offre anche uno sconto esclusivo agli utenti di WPBeginner con un nome di dominio gratuito.
Se potete permettervi di pagare un po’ di più, allora date un’occhiata a SiteGround. Hanno anche un’offerta speciale per i lettori di WPBeginner.
Se avete bisogno di aiuto per creare il vostro sito web, seguite la nostra guida passo passo su come creare un sito web.
Infine, è necessario disporre di un programma FTP e sapere come usare l’FTP per caricare il sito del server locale sul sito live.
Siete pronti? Iniziamo la migrazione del vostro sito WordPress.
Video tutorial
Se preferite le istruzioni scritte, continuate a leggere.
Metodo 1: Trasferire WordPress dal server locale al sito live utilizzando un plugin di migrazione (consigliato)
Questo metodo è più semplice e consigliato ai principianti. Utilizzeremo un plugin di migrazione di WordPress per spostare WordPress da localhost a un sito live.
Passo 1: Installare e configurare il plugin Duplicator
Per prima cosa, è necessario installare e attivare il plugin Duplicator sul sito locale. Per maggiori dettagli, consultate la nostra guida passo-passo su come installare un plugin di WordPress.
Suggerimento professionale: Esiste anche una versione pro di Duplicator che offre backup sicuri, archiviazione su cloud, ripristino semplice del sito e altro ancora.
Dopo l’attivazione, è necessario andare alla pagina Duplicator ” Backups e fare clic sul pulsante ‘Create New’.
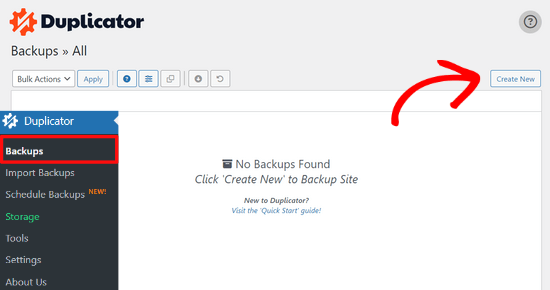
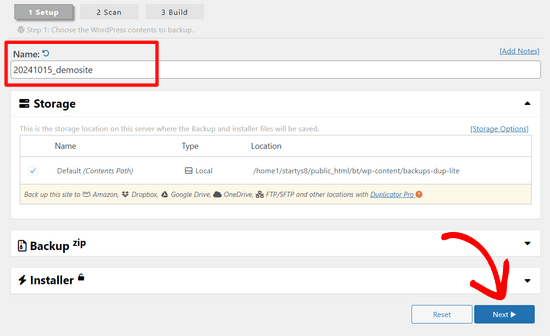
Si accede così a una schermata in cui è possibile assegnare un nome al backup.
Quindi, fare clic sul pulsante “Avanti”.
Duplicator eseguirà ora alcuni test per verificare che tutto sia in ordine.
Se tutti gli elementi sono contrassegnati da “Buono”, cliccate sul pulsante “Costruisci”.
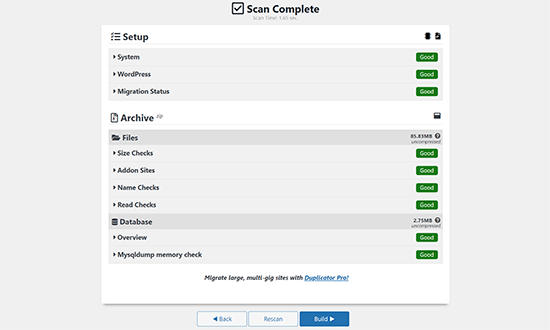
Questo processo può richiedere alcuni minuti, a seconda delle dimensioni del sito web. È necessario lasciare aperta questa scheda fino al completamento.
Una volta terminato, verranno visualizzate le opzioni di download per i pacchetti “Installatore” e “Archivio”. È necessario fare clic sul pulsante “Scarica entrambi i file” per scaricare entrambi i file sul computer.
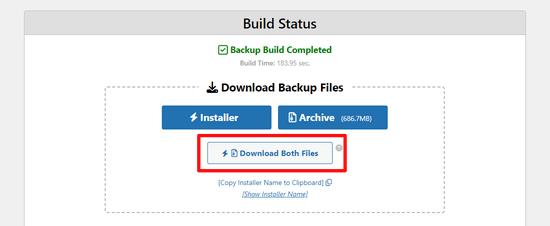
Il file “Archivio” è una copia completa del vostro sito WordPress. Include tutti i file principali di WordPress, nonché le immagini, i caricamenti, i temi, i plugin e un backup del database di WordPress.
Il file “Installer” è uno script che automatizza l’intero processo di migrazione scompattando il file di archivio contenente il vostro sito web.
Fase 2: Creare un database per il vostro sito web WordPress dal vivo
Prima di eseguire il programma di installazione o di caricare il sito web WordPress da localhost al vostro server di hosting, dovete creare un database MySQL per il vostro nuovo sito web live.
Se avete già creato un database MySQL, potete saltare questo passaggio.
Per creare un database, è necessario visitare la dashboard del cPanel del proprio account di hosting. Quindi, individuate la sezione “Database” e fate clic sull’icona “MySQL Database Wizard”.
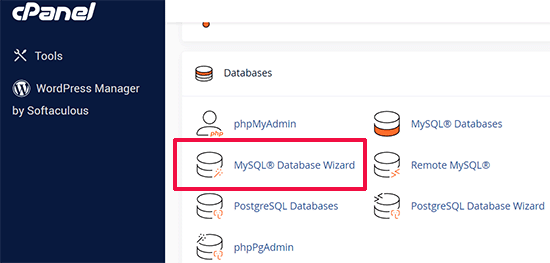
Nella schermata successiva, c’è un campo per creare un nuovo database.
È sufficiente indicare un nome per il database e fare clic sul pulsante “Crea database”.

cPanel creerà ora un nuovo database per voi.
A questo punto, è necessario inserire un nome utente e una password per il nuovo utente e fare clic sul pulsante “Crea utente”.
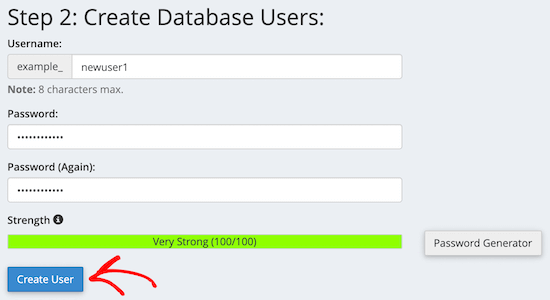
Successivamente, è necessario aggiungere l’utente appena creato al database.
Innanzitutto, fare clic sulla casella di controllo “Tutti i privilegi”.
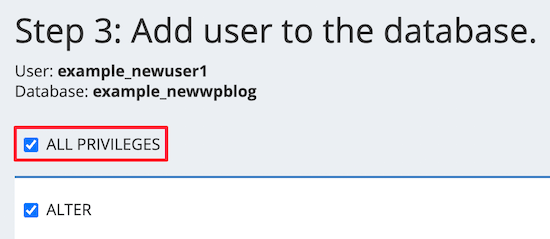
Quindi, scorrere verso il basso e fare clic sul pulsante “Applica modifiche” per salvare le modifiche.
Il database è ora pronto per essere utilizzato con il vostro sito WordPress. Assicuratevi di annotare il nome del database, il nome utente e la password. Queste informazioni vi serviranno nella fase successiva.
Fase 3: caricare i file dal server locale al sito web WordPress dal vivo
Ora è necessario caricare i file dell’archivio e del programma di installazione dal sito locale all’account di hosting.
Per prima cosa, collegatevi al vostro sito live utilizzando un client FTP. Una volta collegati, assicuratevi che la directory principale del vostro sito sia completamente vuota.
Normalmente, la directory principale è la cartella /home/public_html/.
Alcune società di hosting WordPress installano automaticamente WordPress al momento dell’iscrizione. Se sono presenti file di WordPress, è necessario eliminarli.
Successivamente, è possibile caricare i file archive.zip e installer.php da Duplicator nella cartella principale vuota.

Passo 4: esecuzione dello script di migrazione
Dopo aver caricato i file di migrazione, è necessario visitare il seguente URL nel browser:
http://example.com/installer.php
Non dimenticate di sostituire “example.com” con il vostro nome di dominio.
In questo modo si avvia la migrazione guidata di Duplicator.
Il programma di installazione eseguirà alcuni test e inizializzerà lo script.
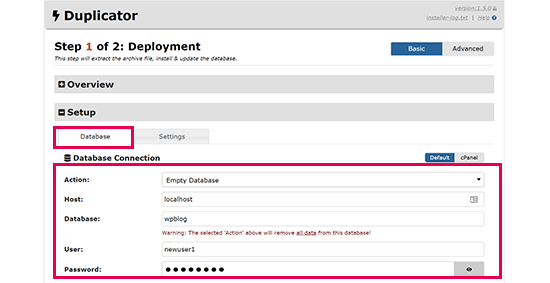
Nella sezione Setup, vi verrà chiesto di inserire l’host MySQL, il nome del database, il nome utente e la password.
L’host sarà probabilmente un host locale. Successivamente, si inseriranno i dettagli del database creato nel passo precedente.
Quindi, fare clic sul pulsante “Convalida” per verificare che i dati inseriti siano corretti.
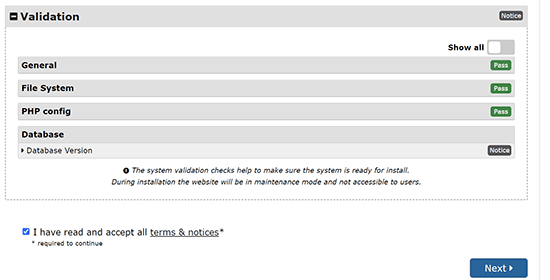
Dopodiché, fare clic sul pulsante “Avanti” per continuare.
Duplicator importerà ora il backup del database di WordPress dall’archivio al nuovo database.
Inoltre, aggiorna gli URL che puntano al sito locale e al nuovo sito live.
A questo punto è possibile fare clic sul pulsante “Admin Login” per accedere all’area di amministrazione di WordPress del sito live.

Una volta effettuato l’accesso al sito live, Duplicator pulirà automaticamente i file di installazione.
È tutto. Avete spostato con successo WordPress dal server locale al vostro sito live.
Metodo 2: Trasferire manualmente WordPress dal server locale al sito live
In questo metodo, vi mostreremo come spostare manualmente WordPress dal server locale al vostro sito live. Sarà utile se il primo metodo non funziona o se preferite farlo manualmente.
Passo 1: Esportare il database locale di WordPress
La prima cosa da fare è esportare il database locale di WordPress. Per farlo, utilizzeremo phpMyAdmin.
Se non lo conoscete, potete dare un’occhiata alla nostra guida alla gestione del database di WordPress con phpMyAdmin.
Basta andare su http://localhost/phpmyadmin/ e cliccare sul database di WordPress. Quindi, fare clic sul pulsante “Esporta” nella barra dei menu in alto.

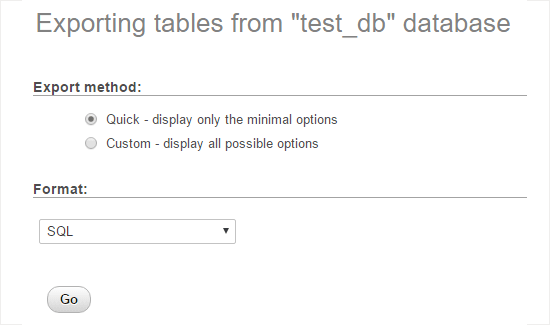
Nell’opzione “Metodo di esportazione:” si può scegliere “Rapido” o “Personalizzato”. Personalizzato vi fornirà più opzioni per esportare il vostro database.
Tuttavia, si consiglia di scegliere “Rapido” e di fare clic sul pulsante “Vai” per scaricare il database.
Passo 2: caricare i file di WordPress sul sito live
Ora è necessario spostare tutti i file del sito web sul sito live.
Per iniziare, aprite il vostro client FTP e collegatevi al vostro account di hosting web.
Una volta collegati al sito live, assicuratevi di caricare i file nella directory giusta. Ad esempio, se si vuole che il sito sia ospitato su “yoursite.com”, si dovranno caricare tutti i file nella directory public_html.
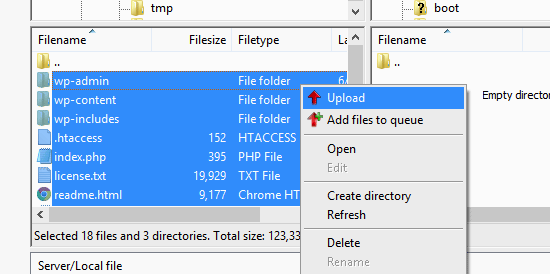
Ora selezionate i file locali di WordPress e caricateli sul vostro server live.
Passo 3: Creare un database MySQL sul sito live
Mentre il client FTP carica i file di WordPress, potete iniziare a importare il database sul server live.
La maggior parte dei fornitori di hosting WordPress offre cPanel per gestire il vostro account, quindi vi mostreremo come creare un database utilizzando cPanel.
Per prima cosa, è necessario accedere alla dashboard di cPanel e fare clic sull’icona “MySQL Database Wizard”, che si trova nella sezione “Database”.

Nella schermata successiva è possibile creare un nuovo database.
È necessario indicare un nome per il database, quindi fare clic su “Crea database”.

cPanel creerà automaticamente un nuovo database.
Successivamente, è necessario inserire un nome utente e una password per il nuovo utente e fare clic su “Crea utente”.
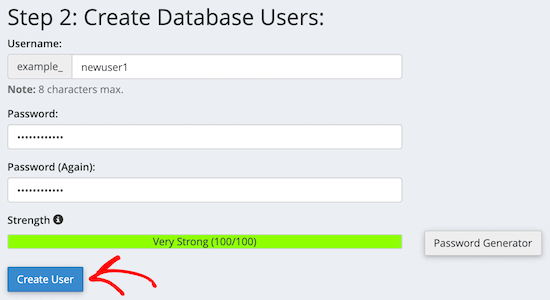
Successivamente, è necessario aggiungere l’utente appena creato al database.
Innanzitutto, selezionare la casella di controllo “Tutti i privilegi”.
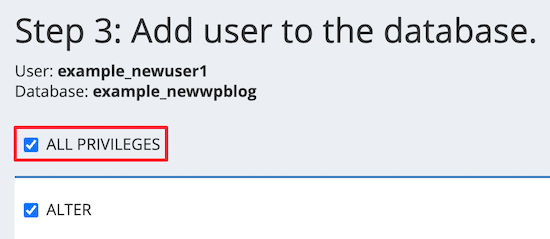
Quindi, scorrere verso il basso e fare clic su “Applica modifiche” per salvare le modifiche.
Avete creato con successo un nuovo database per il vostro sito WordPress live.
Passo 4: Importare il database di WordPress nel sito live
La fase successiva del processo consiste nell’importare il database di WordPress.
Andate nella vostra Bacheca cPanel, scorrete giù fino alla sezione “Database” e fate clic su “phpMyAdmin”.
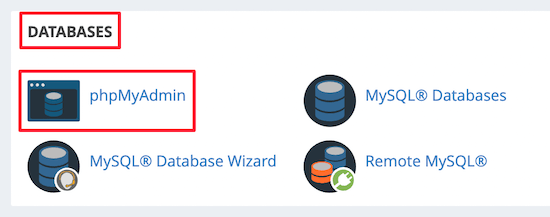
Si accede così a phpMyAdmin, dove si deve fare clic sul database appena creato. phpMyAdmin mostrerà il nuovo database senza tabelle.
Quindi, fare clic sulla scheda “Importa” nel menu superiore. Nella pagina di importazione, fare clic sul pulsante “Scegli file” e selezionare il file del database dal sito locale salvato nel primo passaggio.
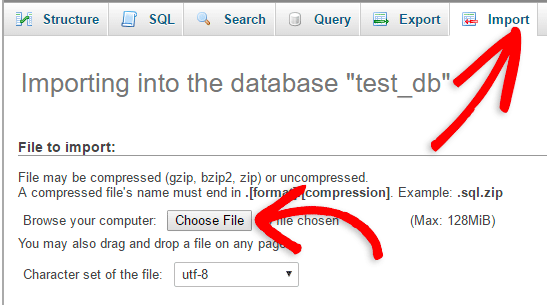
Dopodiché, fare clic sul pulsante “Vai” in fondo alla pagina. Il database verrà importato automaticamente in phpMyadmin.
Passo 5: modificare l’URL del sito
A questo punto, è necessario modificare l’URL del sito nel database in modo che si connetta con il sito WordPress attivo.
In phpMyAdmin, cercate la tabella wp_options nel database che avete appena importato.
Se si è cambiato il prefisso del database, invece di wp_options, potrebbe essere {nuovo_prefisso}_options.
Quindi, fare clic sul pulsante “Sfoglia” accanto a wp_options. Oppure, fate clic sul link nella barra laterale per aprire la pagina con l’elenco dei campi della tabella wp_options.
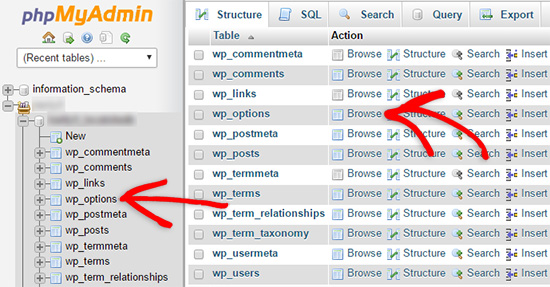
Quindi, nella colonna options_name, occorre cercare l’opzione siteurl.
Quindi, fare clic sull’icona “Modifica”.

Si apre una finestra in cui è possibile modificare il campo.
Nell’input boxed option_value, verrà visualizzato l’URL dell’installazione locale, che sarà qualcosa come http://localhost/test.
In questo campo è necessario inserire l’URL del nuovo sito, ad esempio: https://www.wpbeginner.com.
Quindi, è possibile salvare il campo facendo clic sul pulsante “Vai”.
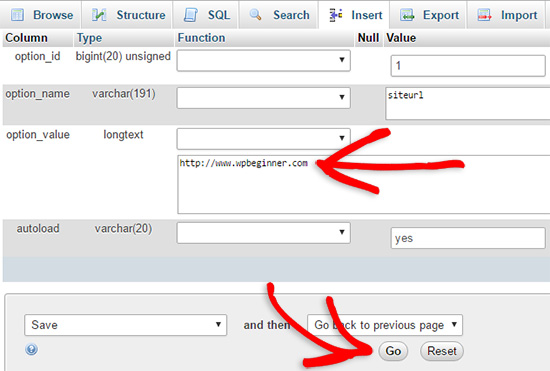
Successivamente, è necessario seguire la stessa procedura descritta sopra per il nome dell’opzione home. Il menu wp_options può essere lungo alcune pagine. Di solito, l’opzione home si trova nella seconda pagina.
Quindi, aggiornare l’URL della home, in modo che sia uguale a quello del sito live.
Passo 6: Configurare il sito live
Ora che avete importato il database e caricato i contenuti, è il momento di configurare WordPress.
A questo punto, il sito dovrebbe mostrare l’errore“Errore nello stabilire una connessione al database“.
Per risolvere il problema, collegarsi al sito web con un client FTP e aprire il file wp-config.php.
Dovrete cercare le seguenti righe di codice:
1 2 3 4 5 6 7 8 9 | // ** MySQL settings - You can get this info from your web host ** ///** The name of the database for WordPress */define( 'DB_NAME', 'database_name_here' );/** MySQL database username */define( 'DB_USER', 'username_here' );/** MySQL database password */define( 'DB_PASSWORD', 'password_here' );/** MySQL hostname */define( 'DB_HOST', 'localhost' ); |
È necessario fornire il nome del database, il nome utente e la password creati in precedenza.
Quindi, salvate il file wp-config.php e caricatelo sul vostro server di hosting WordPress.
Ora, quando si visita il sito web, questo dovrebbe essere attivo.
Dopodiché, è necessario accedere al pannello di amministrazione di WordPress e andare in Impostazioni ” Generale”. Quindi, senza modificare nulla, scorrere fino in fondo e fare clic sul pulsante “Salva modifiche”.
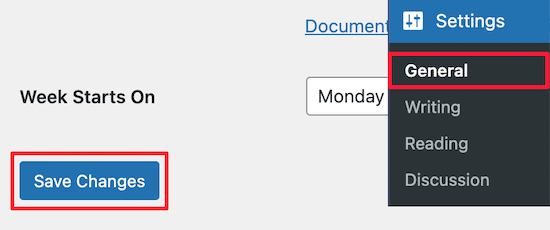
In questo modo ci si assicurerà che l’URL del sito sia corretto ovunque sia necessario.
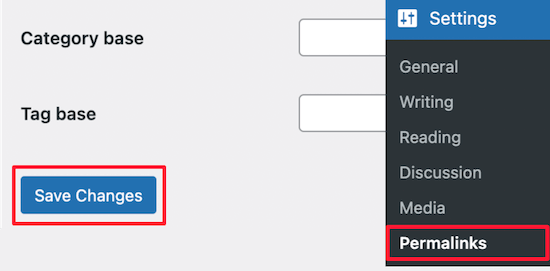
Una volta fatto, andare su Impostazioni ” Permalinks, quindi scorrere verso il basso e fare clic su “Salva modifiche” per assicurarsi che tutti i link ai post funzionino correttamente.
Passo 7: Correggere le immagini e i link rotti aggiornando i percorsi
Ogni volta che spostate un sito WordPress da un dominio a un altro o da un server locale a un sito live, vi troverete di fronte a collegamenti interrotti e immagini mancanti.
Vi mostriamo due modi per aggiornare gli URL. Potete scegliere quello più adatto a voi.
1. Aggiornare gli URL con il plugin Search & Replace Everything (consigliato)
Il modo più sicuro per correggere questo problema è utilizzare Search & Replace Everything. Si tratta di un potente plugin per WordPress che consente di eseguire facilmente operazioni di aggiornamento di massa sul vostro sito web senza scrivere complesse query al database.
Per prima cosa, è necessario installare e attivare il plugin Search & Replace Everything.
Dopo l’attivazione, andare alla pagina Strumenti ” WP Search & Replace.
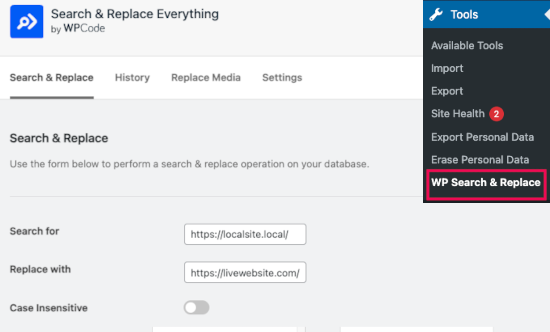
Da qui è necessario inserire l’URL del sito locale nel campo “Cerca” e l’URL del sito live nel campo “Sostituisci con”.
Scorrere un po’ e fare clic su “Seleziona tutto” sotto le tabelle. In questo modo il plugin cercherà il vecchio URL ovunque nel database.
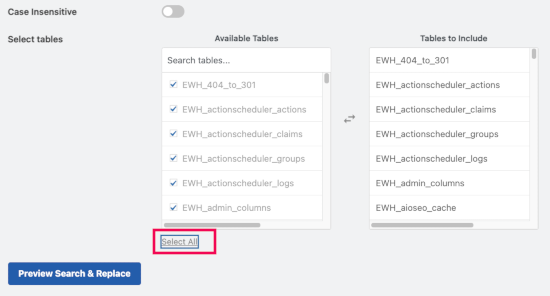
Ora fate clic sul pulsante “Anteprima di ricerca e sostituzione” per continuare.
Il plugin cercherà nel database tutte le istanze del vecchio URL e vedrà l’anteprima dei risultati.
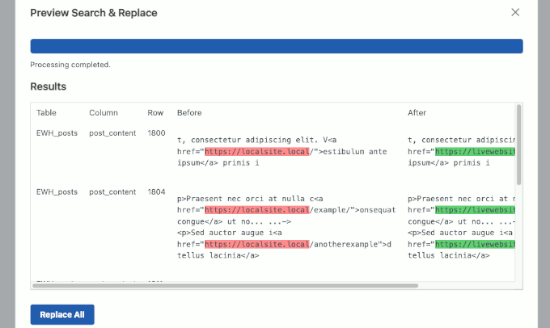
Se tutto sembra a posto, cliccate su “Sostituisci tutto” per salvare le modifiche.
Verrà visualizzata un’attenzione alle modifiche che si stanno apportando. Fare clic su “Sì” per continuare.
Il plugin aggiorna il database e sostituisce gli URL locali con l’URL attuale del sito web.
2. Aggiornare manualmente gli URL (avanzato)
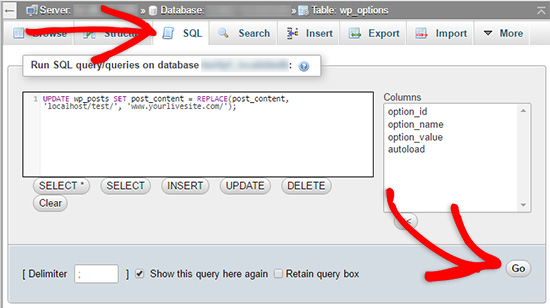
Un altro modo per aggiornare gli URL è utilizzare la seguente query SQL:
1 | UPDATE wp_posts SET post_content = REPLACE(post_content, 'localhost/test/', 'www.yourlivesite.com/'); |
Basta andare su phpMyAdmin, fare clic sul database, quindi cliccare su “SQL” dal menu in alto e aggiungere la query di cui sopra.
Assicurarsi di modificare gli URL del sito locale e del sito live e fare clic sul pulsante “Vai”.
Ecco fatto. Ora avete migrato con successo WordPress dal vostro server locale a un sito live.
Speriamo che il vostro sito web sia attivo e funzionante senza problemi. Se notate degli errori, potete selezionare la nostra guida agli errori comuni di WordPress per aiutarvi nella risoluzione dei problemi.
Speriamo che questo articolo vi abbia aiutato a spostare WordPress da un server locale a un sito live. Potreste anche consultare la nostra guida sullo spostamento di un sito live su un server locale o dare un’occhiata alla lista di controllo definitiva per la migrazione di un sito web per i passaggi pratici della migrazione di WordPress.
Se questo articolo vi è piaciuto, iscrivetevi al nostro canale YouTube per le esercitazioni video su WordPress. Potete trovarci anche su Twitter e Facebook.


Jiří Vaněk
Thanks for the SQL command. You really saved me a lot of time. My current procedure was to open the backup in a text editor and use the function to replace the overwrite URL. Only then could I upload the database dump where it belongs. This command to change the original URL to the new one is new to me and really saves me a lot of time.
WPBeginner Support
Glad to hear it was helpful
Admin
mohadese esmaeeli
Hello.Thank you for your comprehensive explanation.
I have completed all the mentioned steps. However, instead of displaying the content of my site, a page opens with the following message at the top: “Index of /my db name,” and below it, all the folders and files inside the database are listed.
WPBeginner Support
You would want to check to ensure you have an index.php file and that your tool to have the site running locally is active.
Admin
Md Tanvir Hossain
Thanks. As a New user. it is very helpful
WPBeginner Support
You’re welcome, glad to hear our guide was helpful!
Admin
MARYKATHLEEN GIARROCCO
Can I move my WordPress local host to another local host?
WPBeginner Support
If you wanted to you certainly could!
Admin
Olajesu
This is a lifesaver. I thanks you for your easy and understandable content.
WPBeginner Support
Glad you found our content helpful!
Admin
Afridi Mohamed
This guide was very straightforward and really helped me.
WPBeginner Support
Glad our guide helped!
Admin
Ana-Maria
This was a life saver! Very clear instructions for uploading WP manually. Thank you so much!
WPBeginner Support
Glad our guide was helpful!
Admin
Khoa
Thank you so much, it’s very clear.
WPBeginner Support
Glad our guide was helpful!
Admin
Tamara
Great, detailed guide, thank you. My site looks great from the front end but backend doesn’t really function like it does on my local server.
Do you also need to update the guid column of the wp_posts table?
WPBeginner Support
No, you don’t need to update that column.
Admin
Yueshuya Yingjun
It helps me a lot. Thank you very much!
WPBeginner Support
You’re welcome, glad our guide was helpful
Admin
Paavanan Vellan
Thanks a lot for this guidance! Really simplified my migration process. <3
WPBeginner Support
Glad our guide was helpful
Admin
Sharad Gaur
Once I transfer my local website to live environment, then after using live site for at least 1 month and created lot’s of post and comments, I made design changes and added new pages and categories in my local site. Now, how I can transfer my this new design to live where earlier design and live website already exist?
WPBeginner Support
You can import your content from the live site using Tools>Export if it is only posts, pages, and comments on the live site. This would be duplicating that content and not removing it from your live site.
Admin
Kevin
In buying a domain and web host to move my wp local site to a live serve, do I need to purchase a WordPress hosting or an ordinary web hosting???
I’m confused because some web hosting services have WordPress hosting and web hosting as two different options.
WPBeginner Support
It would depend on the hosting provider, some you can place it on either and one is optimized for WordPress while other hosts only allow WordPress on their WordPress hosting.
Admin
Bob Cline
Step 4. Runing The Migration Script
After you have uploaded the migration files, you need to visit the following URL in your browser:
example.com/installer.php
Don’t forget to replace example.com with your own domain name.
I do this, but the Duplicator Migration Wizard never starts. Any ideas?
WPBeginner Support
You would want to ensure you placed the files in the correct folder on your hosting for the most common reason for that issue.
Admin
Ameer Hamza
Hi! i want to move my local wordpress site to another local wordpress site using xampp so method will work for me or not?
WPBeginner Support
You should be able to use this method for transferring to a different localhost as well.
Admin
Armel
Hi dear team,
Thanks for this helpful article.
Please, if my domain has already an existing website and i wanted to update with my new website developed in localhost, how can i update my new website ?
Thanks for all
WPBeginner Support
You would want to create a backup of the current live site, remove the live site, then follow the instructions in this guide.
Admin
Armel
Thanks for your reply
JC
I followed your steps for the manual process. Everything worked until i tried to update the posts in the PHPmyadmin. The urls doesn’t seem to update when i run the query.
WPBeginner Support
You would want to ensure you replace the localhost/test and the yourlivesite.com with the correct addresses.
Admin
Montu
I am setting up my site using manual method (method #2) and have followed till step no. 4 without any error.
However, after added my DB login details in wp-config.php file, now the site (WP set up page) is not appearing and the site keeps loading with a blank screen eternally.
I don’t know if something is missing or went wrong. I see no error message, just a blank, loading screen.
WPBeginner Support
You may want to go through our recommendations in our article below:
https://www.wpbeginner.com/wp-tutorials/how-to-fix-the-wordpress-white-screen-of-death/
The most common reasons would be if you didn’t add the correct database name.
Admin
Montu
Thank you!!
It worked like a charm! It was the incorrect settings in wp-config file.
You are a champ!
Thanks again!
WPBeginner Support
Glad we could help
Susan R.
Thank you, thank you, thank you!! I am a novice, but your tutorials gave me the confidence to build a WP site on Localhost and then upload it to my new host. All went smoothly. I really appreciate all that you provide.
WPBeginner Support
Glad our guides could help you
Admin
Paa
I used the manual method and have issues.
Homepage of the site shows on the live server however other pages when I click redirect me to localhost pages and I cannot seem to find out to solve this.
WPBeginner Support
The most common reason for that specific issue would be if you skipped the Velvet Blues step in this guide to update your URLs
Admin
Marek
Can I change my test site to live site in-place ? I mean I need to convert test site into live site on the same localhost.
WPBeginner Support
If you mean on the same hosting provider, then that would be more of a staging site in which case you would want to take a look at our guide below:
https://www.wpbeginner.com/wp-tutorials/how-to-create-staging-environment-for-a-wordpress-site/
Admin
Zion
Pls what do you mean by
“To fix this, connect to your website using an FTP client and edit wp-config.php file?”
WPBeginner Support
We link to it earlier in the article but we have a guide on how to use FTP:
https://www.wpbeginner.com/beginners-guide/how-to-use-ftp-to-upload-files-to-wordpress-for-beginners/
Admin
Ken
When I am editing the staging site, there would be orders happening on my live site. How do I make sure that when I upload my staging site into my live site that the new orders would also be captured?
Thanks
WPBeginner Support
You would want to pause receiving orders during that update process to prevent issues
Admin
Jana Boswell
WOW, this is perfect! I could NOT migrate my site or get any of this to work before. Working with my hosting company didn’t help – they only gave me bits of information that didn’t make any sense to me. I followed your step-by-step instructions and my site is up and running! I can’t thank you enough!
WPBeginner Support
Glad our guide was helpful
Admin
MarkT.
Where can I find my login info? I didn’t see the login details from the steps, now I cannot login in to my wordpress dashboard.
WPBeginner Support
You would use the same login information from your local installation to log into your site.
Admin
Deb Marvin
Is there a way to migrate part of a development site and not the whole site?
I would like to migrate certain updated pages and content that is ready to go live without also migrating functionality or content that is still under development.
WPBeginner Support
You could manually do what it sounds like you’re wanting to do by using the built-in exporter under Tools>Export and selecting the specific pages
Admin
Edidiomg
If in the place of using an FTP, I decide to compress and upload to my cpanel then extract there, will it make any difference?
WPBeginner Support
As long as your hosting provider allows you to do that it should be fine.
Admin
Angela Grace Vaculik
Hello,
I have tried to upload my wordpress site created on my localhost, and used Method 1. All went well until I got to the Duplicator portion – Step 2. There is no “port” field as shown on your screenshot, so I just enter “localhost”. When I click “test database” I get a fail warning to “verify host connection” which says “unable to connect user to host”. I tried some of the troubleshoot steps to resolve but none of these work. One of the troubleshoot points states “On some servers, the default name ‘localhost’ will not work. Be sure to contact your hosting provider”. Could this be the problem?
WPBeginner Support
More than likely, you would want to reach out to the support for your hosting provider and they should be able to assist.
Admin
Hawareyaw Petros
Is it possible to transfer a single post from local to live word press site?
WPBeginner Support
You would go under Tools>Export and select the single post using the options available there
Admin
Oladipupo Ajisegiri
This post is a life saver!!!
WPBeginner Support
Glad our guide was helpful
Admin
david kule
thank you guys!!
i followed the steps it’s working for me
your save my life
WPBeginner Support
You’re welcome
Admin
Sunita
Really Thanks:)…It’s a great tutorial and it’s very helpful to me..
one thing i asked you..can you tell me how to open wp dashboard after this??
WPBeginner Support
You would want to add /wp-admin to the end of your domain and that should bring you to the login page where you would use the same login information as on your local install.
Admin
Sunita
Really Thanks:)…It’s a great tutorial and it’s very helpful to me..
WPBeginner Support
You’re welcome
Admin
gerardo
HI! i have a live site fully operational but on localhost i make a new site, mostly design. If i migrate it using some pluguin like duplicator, the info from the old site would be deleted?
WPBeginner Support
It would not remove your local site but if you’re trying to install it where a site is already installed then you would run into overwriting issues.
Admin
Grace Lee
After moving my website to a live site, will I still be able to edit and make changes to it? Thanks!
WPBeginner Support
Yes, you would be able to
Admin
Ifeanyi
Easy to follow guide. Even easier than some videos i have watched on youtube.
WPBeginner Support
Glad you’ve found our content helpful
Admin
Temidayo Marvel
Great solution to my Problem.
Thanks
is it safe and easy to use premium themes and plugins on the wampsever while testing and setting up the WordPress site locally, or do I need to deploy my themes and plugins after importing the site to a livehost.
WPBeginner Support
You would want to check with the support for the theme and plugins you’re wanting to use for if they work on local sites or not.
Admin
Israel
Thanks for the guide, it really helped!
WPBeginner Support
You’re welcome
Admin
Jason Bar
I got lost on the part “connect to your live site using an FTP client.”
That is completely different tutorial where there is no hyperlink to see it.
WPBeginner Support
We will be sure to work on improving clarity of this in the future, we linked to our guide on FTP at the start of our article, you can find the FTP guide below:
https://www.wpbeginner.com/beginners-guide/how-to-use-ftp-to-upload-files-to-wordpress-for-beginners/
Admin
Jason Bar
Thank you, I missed it.
Janith
Method 1 worked fine afrter few refreshes in the step 2. Thanks
WPBeginner Support
Glad our guide was able to help
Admin
Ashley Davies
Thanks for the article, I have run into a problem doing method 1. In step 4, when I visit the url at mysite/installer.php, I get an error from duplicator as follows:
‘Archive not found! The ‘Required File’ below should be present in the ‘Extraction Path’. The archive file name must be the exact name of the archive file placed in the extraction path character for character.’
Any help with this would be greatly appreciated
WPBeginner Support
You would want to check with your hosting provider that the file is located in the correct location in your files.
Admin
STEPHEN OFORI
Wow… I can believe my eyes. It worked perfectly with the first option. God bless you.
WPBeginner Support
Glad our guide was helpful
Admin
Temitope Durotoye
Thank you so much for this… Really helped me a lot.
WPBeginner Support
You’re welcome, glad our guide was helpful
Admin
Elías Sánchez
I suffer with this kind of stuff, in fact today i spent a lot of hours doing this migration from local to a server.
Reading and following this helped a lot.
Thanks for sharing!
WPBeginner Support
You’re welcome, glad our guide could help with this process
Admin
Yusuf Omotoso
The post is really helpful just like many other posts. Thank you
WPBeginner Support
You’re welcome
Admin
Luz Manalo-Cruz
Hi. I’ve successfully migrated from localhost to livesite! Yay! What now do I do with the localhost?
WPBeginner Support
That would be a personal preference question whether you would like to keep it or remove it.
Admin
Luz Manalo-Cruz
Hi! Using Method 1, all went well until Step 4 – the migration wizard doesn’t launch when I type in example.com/installer.php (I changed example.com to my domain). Instead I get a Page Not Found. I’ve tried this twice now and I get the same Page Not Found screen on Step 4. Am I missing a step?
WPBeginner Support
You may want to ensure you placed the file inside the correct folder, you can check with your hosting provider and they should be able to assist.
Admin
Habibul Islam
Thanks. I have done migration by 1st method.
WPBeginner Support
Glad our guide could assist
Admin
Milutin
If someone has problems on Method 1 Step 4 with cPanel host name (error text: No such file or directory), instead of localhost, try mysql. This step always bugs me off nad frustrates me.
Thanks for the great tutorial! Used it multiple times!
WPBeginner Support
Thanks for sharing what worked for you
Admin
Purushothaman Gempuraj
Thanks. The first Duplicator based method worked for AWS based AMI Linux server 2 which had external database connection as well.
WPBeginner Support
Glad our recommendation worked for you
Admin