Volete uno spazio sicuro per sperimentare con il vostro sito WordPress senza il timore di rompere qualcosa sul vostro sito live?
Spostare il vostro sito WordPress su un server locale sul vostro computer è la soluzione perfetta, a nostro avviso, soprattutto per gli sviluppatori, i designer o i principianti di WordPress.
L’installazione di WordPress sul vostro computer (server locale) vi permette di imparare facilmente WordPress e di fare delle prove. Quando spostate un sito WordPress live su un server locale, potete sperimentare con gli stessi dati del vostro sito live.
In questo articolo vi mostreremo come spostare facilmente un sito WordPress live su un server locale.
Perché e chi vorrebbe spostare un sito WordPress live su un server locale?
Se gestite un sito web WordPress da qualche tempo, potreste voler provare nuovi temi o plugin. Tuttavia, farlo su un sito web in funzione può comportare una scarsa esperienza d’uso per i vostri utenti.
Per evitare questo problema, molti utenti creano una copia del proprio sito WordPress su un server locale per testare nuovi temi, plugin o per effettuare test di sviluppo.
Questo vi permette di impostare il tema con tutti i vostri contenuti e di testare tutte le funzionalità senza preoccuparvi di rompere il vostro sito. Molti utenti copiano il proprio sito su un server locale per esercitarsi con WordPress e con le proprie capacità di codifica con i dati reali del sito.
Anche se potete fare tutti i test con contenuti fittizi in WordPress, i dati del sito reale vi danno una migliore rappresentazione visiva di come queste modifiche appariranno sul vostro sito reale.
Preparazione allo spostamento di un sito locale su un server locale
Innanzitutto, dovete assicurarvi di eseguire sempre il backup del vostro sito web WordPress. Esistono diversi ottimi plugin di backup per WordPress che potete utilizzare.
In secondo luogo, è necessario installare un ambiente server locale sul computer. È possibile utilizzare WAMP per Windows e MAMP per Mac. Una volta configurato l’ambiente, è necessario creare un nuovo database utilizzando phpMyAdmin.
È sufficiente visitare il seguente URL nel browser per avviare phpMyAdmin.
http://localhost/phpmyadmin/
http://localhost:8080/phpmyadmin/
Da qui è necessario fare clic sulla scheda “Database” e creare un nuovo database. Questo database vi servirà in seguito per scompattare i dati del vostro sito live.

Ora siete pronti a spostare il vostro sito WordPress live sul server locale.
Metodo 1. Spostare un sito WordPress live su un server locale utilizzando un plugin
Questo metodo è più semplice e consigliato a tutti gli utenti.
La prima cosa da fare è installare e attivare il plugin Duplicator. Per maggiori dettagli, consultate la nostra guida passo passo su come installare un plugin di WordPress.
Duplicator consente di creare facilmente un pacchetto di duplicati dell’intero sito web. Può essere utilizzato per spostare il sito WordPress in una nuova posizione e come plugin di backup.
Nota: Duplicator è disponibile in versione gratuita. Tuttavia, Duplicator Pro offre backup illimitati e funzioni più avanzate.
Dopo l’attivazione, andare su Duplicator Pro ” Backup dalla barra laterale dell’amministrazione di WordPress. Per creare un nuovo pacchetto, è necessario fare clic sul pulsante “Aggiungi nuovo”.
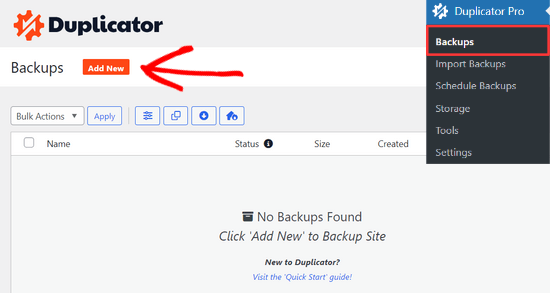
Duplicator avvierà quindi la procedura guidata di backup.
Innanzitutto, è necessario inserire un nome per il pacchetto di backup. È anche possibile utilizzare i tag dinamici per creare automaticamente un nome formato come la data e il titolo del sito.

Quindi, espandere la sezione “Archiviazione” e scegliere una posizione di archiviazione.
Per questa esercitazione, utilizzeremo la posizione predefinita. Se si desidera, è possibile fare clic sul link “Aggiungi archivio” per aggiungere una nuova posizione, come Dropbox o Google Drive.
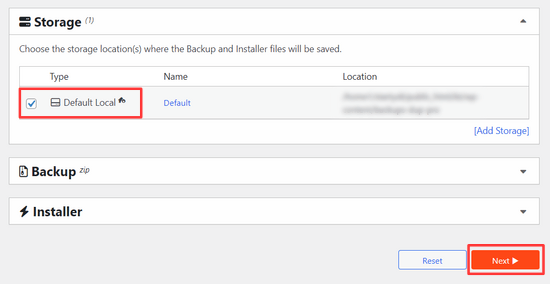
Fare clic sul pulsante “Avanti” per continuare.
Il plugin esegue una scansione del sito web ed esegue alcune verifiche di base. Mostrerà poi un riepilogo di tali verifiche.
Se tutto sembra a posto, fare clic sul pulsante“Crea backup” per continuare.
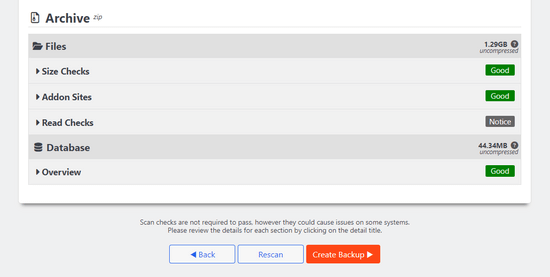
Duplicator creerà ora il vostro pacchetto di siti web.
Al termine, verrà visualizzato un file zip di archivio contenente tutti i dati del sito web e un file di installazione. È necessario scaricare entrambi i file sul computer.
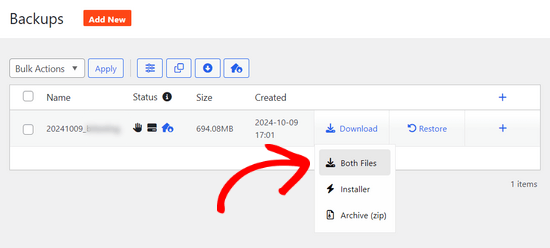
Ora siete pronti a decomprimere e installare questi file sul vostro server locale.
Innanzitutto, è necessario creare una nuova cartella nella cartella principale del server locale. Si tratta della cartella in cui il server locale memorizza tutti i siti web.
Ad esempio, se si utilizza MAMP, sarà la cartella /Applications/MAMP/htdocs/. In alternativa, se si utilizza WAMP, la cartella sarà C:\wamp\www\.
All’interno di questa cartella, è possibile creare nuove cartelle per ogni nuovo sito web che si desidera importare o creare sul server locale.
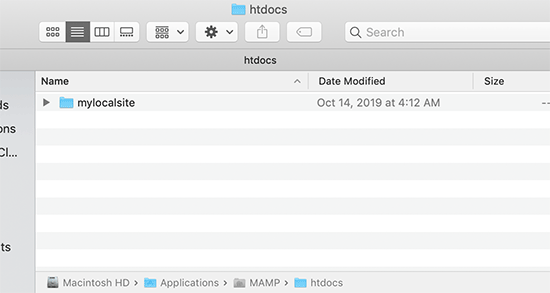
Successivamente, è necessario aprire la cartella creata per il sito web locale e copiare e incollare sia il file zip dell’archivio sia lo script di installazione scaricato in precedenza.
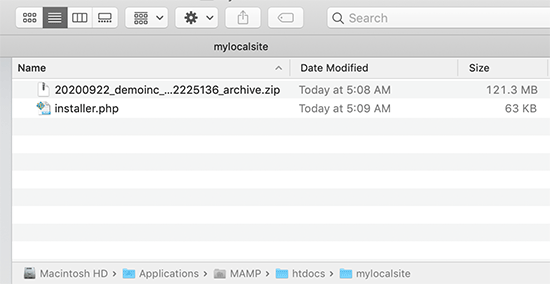
Per eseguire l’installazione, è necessario aprire lo script installer.php nel browser web.
Ad esempio, se si sono incollati entrambi i file nella cartella /mylocalsite/, si accederà ad essi nel browser visitando il sito http://localhost/mylocalsite/installer.php.
A questo punto si vedrà lo script di installazione di Duplicator come questo:
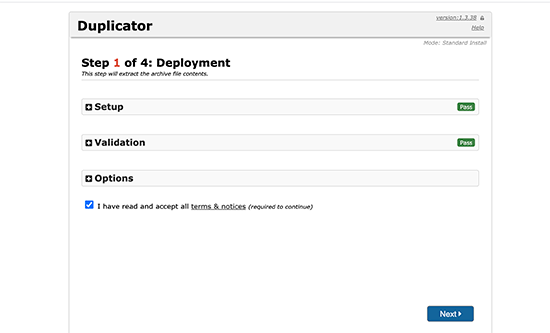
Fare clic sul pulsante “Avanti” per continuare.
Duplicator decomprimerà il file zip dell’archivio e chiederà di inserire le informazioni sul database del sito locale. Si tratta del database creato in precedenza.
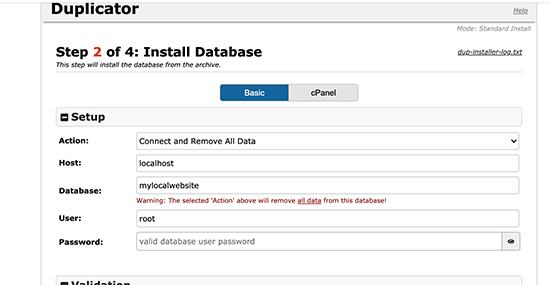
Il nome del server è quasi sempre localhost e il nome utente è root. Nella maggior parte dei casi, l’installazione del server locale non prevede una password per root, quindi si può lasciare vuota.
In fondo alla pagina è presente il pulsante “Prova database”, che può essere utilizzato per verificare che le informazioni del database siano corrette.
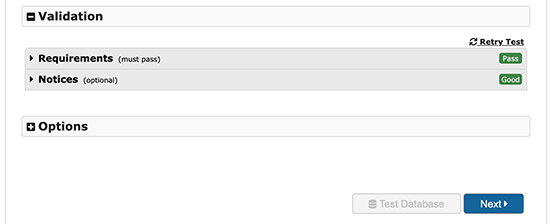
Se tutto sembra a posto, fare clic sul pulsante “Avanti” per continuare.
Duplicator importerà ora il database di WordPress. Dopodiché, vi chiederà di ricontrollare le informazioni del nuovo sito web che ha rilevato automaticamente.
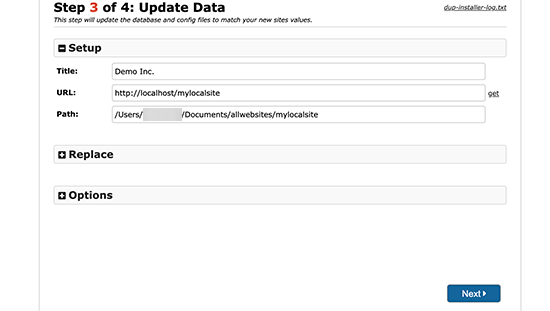
Fare clic sul pulsante “Avanti” per continuare.
Duplicator terminerà la configurazione e mostrerà un pulsante per accedere al sito locale. Utilizzerete lo stesso nome utente e la stessa password di WordPress che utilizzate sul vostro sito live.
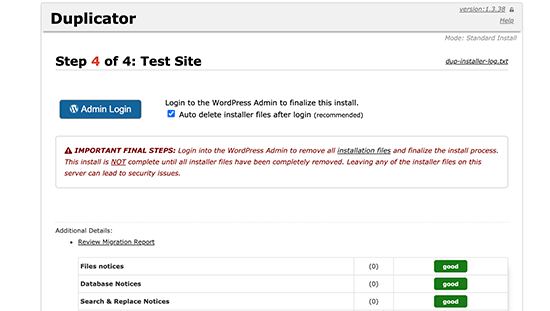
Questo è tutto, avete spostato con successo il vostro sito live sul server locale.
Metodo 2. Spostare manualmente un sito WordPress live sul server locale
Se il plugin non dovesse funzionare, potete sempre spostare manualmente il vostro sito live su un server locale. La prima cosa da fare è eseguire il backup manuale del vostro sito web dal vostro account di hosting WordPress.
Passo 1. Esportare il database di WordPress del sito live
Per esportare il database di WordPress del vostro sito live, dovete accedere alla vostra dashboard cPanel e cliccare su phpMyAdmin.
Nota: mostriamo le schermate della dashboard di Bluehost.
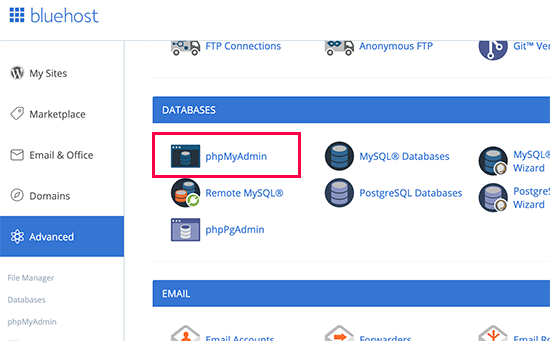
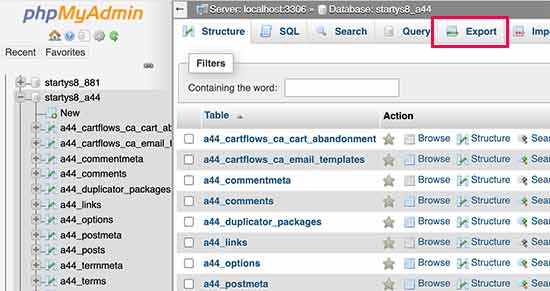
All’interno di phpMyAdmin, è necessario selezionare il database che si desidera esportare e poi fare clic sulla scheda Esportazione in alto.
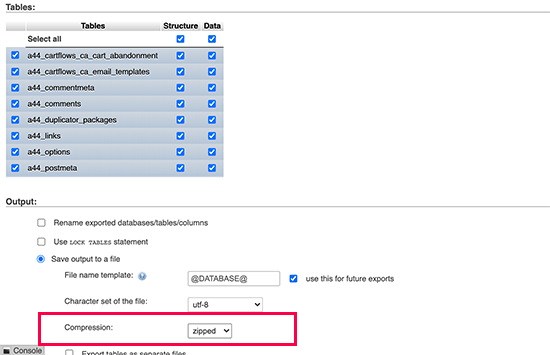
phpMyAdmin chiederà ora di scegliere il metodo di esportazione rapido o personalizzato. Si consiglia di utilizzare il metodo personalizzato e di scegliere zip come metodo di compressione.
A volte i plugin di WordPress possono creare le proprie tabelle all’interno del database di WordPress. Se non si utilizza più quel plugin, il metodo personalizzato consente di escludere quelle tabelle.
Lasciare invariate le altre opzioni e fare clic sul pulsante “Vai” per scaricare il backup del database in formato zip.
phpMyAdmin scaricherà ora il file del database. Per maggiori dettagli, consultate il nostro tutorial su come eseguire il backup manuale del database di WordPress.
Passo 2. Scaricare tutti i file di WordPress
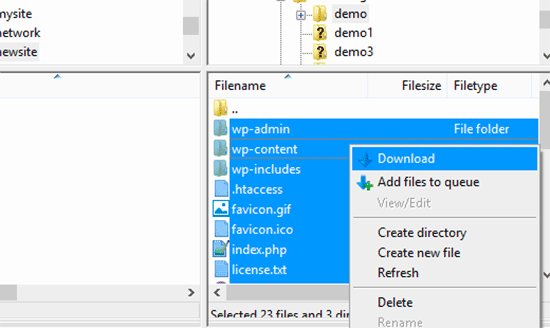
Il passo successivo è scaricare i file di WordPress. Per farlo, dovete collegarvi al vostro sito WordPress utilizzando un client FTP.
Una volta collegati, selezionate tutti i file di WordPress e scaricateli sul vostro computer.
Passo 3. Importare i file e il database di WordPress sul server locale
Dopo aver scaricato i file di WordPress, è necessario creare una cartella sul server locale in cui importare il sito locale.
Se si utilizza WAMP, è necessario creare una cartella all’interno della cartella C:\wamp\www\ per il sito locale. Gli utenti di MAMP devono creare una cartella nella cartella /Applications/MAMP/htdocs/.
Dopodiché, è sufficiente copiare e incollare i file di WordPress nella nuova cartella.
Successivamente, è necessario importare il database di WordPress. Aprite semplicemente phpMyAdmin sul vostro server locale visitando il seguente URL:
http://localhost/phpmyadmin/
Poiché il database è già stato creato in precedenza, è necessario selezionarlo e fare clic sulla scheda “Importa” in alto.
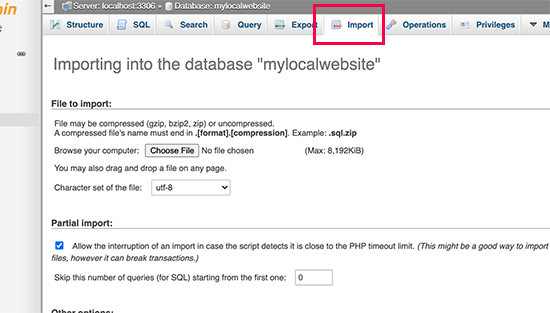
Fare clic sul pulsante “Scegli file” per selezionare e caricare il file di esportazione del database scaricato nel primo passaggio. Quindi, fare clic sul pulsante “Vai” in fondo alla pagina.
phpMyAdmin ora decomprimerà e importerà il database di WordPress.
Ora che il database è stato configurato, è necessario aggiornare gli URL all’interno del database di WordPress che fanno riferimento al sito live.
È possibile farlo eseguendo una query SQL in phpMyAdmin. Assicurarsi di aver selezionato il database del sito locale e poi fare clic su SQL.
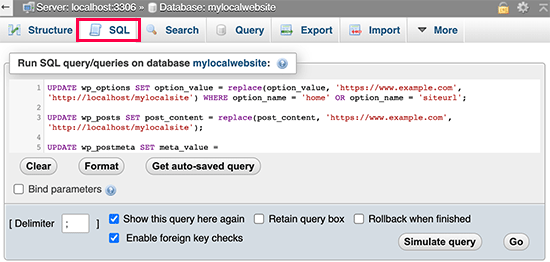
Nella schermata SQL di phpMyAdmin copiate e incollate questo codice, assicurandovi di sostituire example.com con l’URL del vostro sito live e http://localhost/mylocalsite con l’URL del server locale del vostro sito.
UPDATE wp_options SET option_value = replace(option_value,'https://www.example.com','http://localhost/mylocalsite') WHERE option_name ='home'OR option_name ='siteurl';UPDATE wp_posts SET post_content = replace(post_content,'https://www.example.com','http://localhost/mylocalsite');UPDATE wp_postmeta SET meta_value = replace(meta_value,'https://www.example.com','http://localhost/mylocalsite');
Questa query sostituirà i riferimenti all’URL del sito live dal database e lo sostituirà con l’URL del localhost.
Passo 4. Aggiornare il file wp-config.php
Il passo finale consiste nell’aggiornare il file wp-config.php del sito locale. Questo file contiene le impostazioni di WordPress, compresa la modalità di connessione al database di WordPress.
Basta andare nella cartella in cui è stato installato WordPress sul server locale e aprire il file wp-config.php in un editor di testo come Notepad.
Sostituire il nome del database con quello creato in phpMyAdmin su localhost.
Quindi, sostituite il nome utente del database con il vostro nome utente MySQL locale, di solito è root. Se avete impostato una password per l’utente root di MySQL sul vostro host locale, inseritela. Altrimenti, lasciatela vuota e salvate le modifiche.
/** The name of the database for WordPress */define('DB_NAME','database_name_here');/** MySQL database username */define('DB_USER','username_here');/** MySQL database password */define('DB_PASSWORD','password_here');
Ora è possibile visitare il sito locale in una finestra del browser inserendo l’URL in questo modo:
http://localhost/mylocalsite/
Sostituite “mylocalsite” con il nome della cartella in cui avete copiato i file di WordPress.
Questo è tutto, il vostro sito WordPress live è ora copiato sul vostro server locale.
Speriamo che questo articolo vi abbia aiutato a capire come spostare facilmente un sito WordPress live su un server locale. Potreste anche voler consultare la nostra guida su come creare facilmente un sito di staging per WordPress a scopo di test, o su come spostare un sito WordPress dal server locale al sito live.
Se questo articolo vi è piaciuto, iscrivetevi al nostro canale YouTube per le esercitazioni video su WordPress. Potete trovarci anche su Twitter e Facebook.


Aamir Khan
I have created a backup of my website manually and setup on local machine and run the above quires, but my website is redirecting to online version.
WPBeginner Support
It seems like you may have not updated the URL, you can do so using step 3 of the manual method of this article.
Admin
George
Thank you so much for this clear and useful article. I was able to follow it and migrate my WP site in less than 20 minutes – and I’m no expert. You’ve saved me a lot of pain – thank you.
WPBeginner Support
Glad our guide was helpful
Admin
Barry
Doesn’t work for me. I create the package, but it installs the basic WordPress files. So when I navigate to the folder it asks me to setup wordpress
WPBeginner Support
For the most common reason, you would want to ensure you are properly connected to the database, if you are not then it would show the option for creating a new site instead of showing the correct site.
Admin
Daniel
Nooo, its not working for me. pefrectly written tutorial and easy to follow (apart from it says hhttpps in the 3rd query)
i get this in my browser:
This site can’t be reachedlocalhost refused to connect.
Try:
Checking the connection
Checking the proxy and the firewall
ERR_CONNECTION_REFUSED
WPBeginner Support
Thanks for pointing out that typo, it should be fixed. For that error, you would want to ensure you updated your URL in step 3 correctly for the most common reason for that issue.
Admin
McKenzie
Thanks for your tutorial.
The front page is partially working but every other page is not working at all. Furthermore, it seems that front page is loading All the pages. What could be wrong?
WPBeginner Support
We would recommend starting by going through our troubleshooting guide below:
https://www.wpbeginner.com/beginners-guide/beginners-guide-to-troubleshooting-wordpress-errors-step-by-step/
Admin
Collins
Hi, Thank you for this super useful article.
I don’t know why mine doesn’t just work, I have done the exact same thing and gotten all the correct feedback. Whenever I try to open the home page localhost/site/ I get a page that doesn’t exist with the headers and footers and the rest of the pages still point to the live site.
WPBeginner Support
It sounds like you may have not set the URLs correctly. You would likely want to go to method 2 and try the SQL changes to update your URLs.
Admin
Murat
For those who are getting “wp_options doesn’t exist” error, you may have changed your table_prefix before. Just open the wp_config.php file and check $table_prefix = ‘wp_’
if the value isn’t “wp_” you get that error so when pasting the code edit it accordingly, for instance:
UPDATE xx_options SET option_value………..
WPBeginner Support
Thanks for sharing this should someone be running into that error
Admin
Chinwe
Thank you so much for this. It worked.
WPBeginner Support
Glad our guide was helpful
Admin
Ivana Spasic
When I copy and paste the code you provided to phpMyAdmin’s SQL screen, I am getting message: #1146 – Table ‘xyz.wp_options’ doesn’t exist.
How can this be fixed?
WPBeginner Support
You would want to ensure you have the correct database selected for the most common reason for that issue.
Admin
Jill
I used the Duplicator plugin to set up a copy of a website for a non-profit that I inherited. After reloading it so that all plugins are disabled I finally came to the conclusion that my site is attempting to use https:// to log in to the dashboard. To further confuse me, an empty site that I created on localhost does NOT use https:// for log in to the dashboard. I understand the value of https:// on the live site, but it appears there may be a way to disable it on localhost?
WPBeginner Support
For changing your local site’s URL you can follow our guide below and remove the s:
https://www.wpbeginner.com/wp-tutorials/how-to-change-your-wordpress-site-urls-step-by-step
Admin
Hazel beaver
Is there a plugin that allows you to download a zip file from the live site then upload into a fresh install of wordpress on the local host in a simpler way?
WPBeginner Support
For what it sounds like you’re wanting, the closest would be method 2 of this guide that you would want to take a look at.
Admin
Daniel
I successfully uploaded to localhost but when i try to use localhost/mysite_location/wp-admin, it redirects to the live site. Not the one on the localhost.
Need help
WPBeginner Support
You would want to go into your site’s database, go to the options table, and change your site url and address to localhost there. For how to modify your database you would want to take a look at our article here: https://www.wpbeginner.com/beginners-guide/beginners-guide-to-wordpress-database-management-with-phpmyadmin/
Admin
Bine
Great tutorial. It’s straight forward. Unfortunately I still get redirected to the dashboard as soon as I try to enter my URL. I followed all the steps but something must be missing. Does anyone has an idea what the problem might be? Cheers
WPBeginner Support
You may want to check your options table in your database to be sure that you didn’t set the site’s url to your wp-admin area
Admin
Niaz Muhammad
Great tutorial thanks for sharing your knowledge
WPBeginner Support
Glad you liked our article
Admin
alvaro hernandez
it works great!!! i love you!
WPBeginner Support
Glad our guide was helpful
Admin
T_WA
Hi, thanks for the tutorial, it’s was super helpful!!
However, after following all your steps, I have problems “establishing secure connection” (I guess because of the SSL) and thus it doesn’t work . I even tried and changed a line ‘DB_HOST’ to ‘localhost/localhost:8888’ in the wp-config.php that wasn’t mentioned in the video but didn’t help.
Also, when changing links I tried many variations nothing worked. Has someone faced a similar issue and found a solutions to it?
WPBeginner Support
Did you attempt to clear all of your caching after updating the URLs and is there the option to continue anyway under advanced on that error page?
Admin
Said
First of all thank you for theses clear explanations that I followed to the letter. The result is that i can access to to my site homepage locally, but links in this homepage do not seem to work because when I click on a link, for example :
localhost.mysite.com/subject.html
it is the following page that is displayed fir all links :
localhost/dashboard
Can you help me to resolve this problem
Thanks in advance
WPBeginner Support
It is likely due to your localhost not accepting pretty permalinks: https://www.wpbeginner.com/wp-tutorials/how-to-enable-custom-permalinks-in-wordpress-wamp-installation/
Admin
Ifthikar Hussain
Great Working, am facing a new problem which is i can access the only home page of my word press side. how can i able to access other pages??
WPBeginner Support
It would depend on what error you are running into. To get started you could take a look at the troubleshooting steps in: https://www.wpbeginner.com/beginners-guide/beginners-guide-to-troubleshooting-wordpress-errors-step-by-step/
Admin
Hannah
Hi there,
this is really easy to follow and helpful so thank you for that.
I do have a very straightforward question though.
When updating the URLs, you say to replace http:// example.com with your live site, but what if my live site uses https?
WPBeginner Support
If you’re moving your site to a local server we recommend http to avoid local installation issues with not having an SSL, you would change to https if you’re moving the content back to a live site that is using SSL.
Admin
Philip
Thanks. You wrote this article over 5 years ago, and it’s still good. I managed to set everything up nicely without too much trouble by following your manual instructions. Thanks in particular for the SQL queries.
Philip
WPBeginner Support
Glad our guide could be helpful and still works
Admin
Basem
After finishing the installation I click Admin Login button. the browser open new window to the installation of wordpress again? and the login page is not there
I checked the folders. all files are copied.
Patrick
Somebody find a fix for the localhost site copy (from live https) administration wanting to use https ?
dowlass
I found your instructions for the manual move of my site (from live server to localhost) worked pretty well. I had to do the permalinks thing – just click on ‘save’ without changing anything – to make links work properly. But otherwise it’s mostly good.
However, I’ve encountered a problem when trying to use new themes. If I add a new theme, then sure the theme installs ok and shows up on the theme page. However, if I try to preview or activate the new theme I just get a totally blank page – even the admin goes blank. The only recourse is to use the browser back button to get back to the admin view where I can delete the theme.
Adding new themes and trying to use them just makes the whole thing fall over!
Any ideas?
(p.s. I’m using a very old version of WordPress – 2.9.2…!! Which is the reason for wanting to play with it on localhost and work out the best way to upgrade.)
Michael
Tutorial worked pretty good but I had “internal Server Error”. I was downloading an entire network installation. I recopied the wp-config.php file because it had become compressed, all spacing removed. Then replaced the .htaccess with a fresh network version and that “RewriteBase /sitename/” was to the folder of the installation, instead of “RewriteBase /”
Emma
The instructions are clear and straightfoward but unfortunately I am having a total nightmare getting my site to work on the local server. After much trial and I’ve managed to get connect to the database and get some of the site content displayed but links aren’t working (they’re not found, apparently). I’m using MAMP Pro for Windows. Maybe I’ll try XAMMP – or using a Mac – instead. I think alot of the problem is to do with permissions but don’t really know where to start there seem to be so many fixes needed!
WPBeginner Support
Hi Emma,
If you can access the WordPress admin area, then try visiting Settings » Permalinks and then click on the save changes button without changing anything.
Admin
andy
I solve my problem. If you manually moved wordpress to localhost, and you install w3 total cache in your wordpress, you have to clear the browser cache after change database and wp-config. Or just open your localhost site with different browser.
andy
I have changed wp-config and all database url to localhost, but localhost still redirect me to live site. Why? I cannot install any plugin like duplicator anymore because the site already deleted
Suhana
Hi Andy
Have u tried changing the settings from wp dashboard?
Settings-> General->WordPress Address (URL),Site Address (URL)
Even if it shows the localhost address just save it and check. Hope it helps.
Patrick Pogi
Hi wpbeginner,
Thank you for the tutorial, it helps me a lot. I tried the manual install and but in the end it keeps redirecting me into wordpress installation page. Pls help me, i think i’m almost done. Im using xampp.
Thank you
Jason
Hi,
Im having issues while moving my site, it says LOCALHOST REFUSED TO CONNECT.
But my other local sites are okay.
Im moving it to local because something gone terribly wrong and my page woun’t load on the server’s.
Please any suggestion or advise is appriciated
John
In MAMP Preferences set your Ports to – Apache 80, Nginx 443 and MySQL 3306 and see if that fixes it
Steve
Thanks for this article, I found it very useful but would like to add to it if I may.
I used the manual method successfully with one exception, I could not navigate to any of the pages or posts from my sites menu. I would get a page not found error. I tried everything here, saving the premalinks, but nothing worked. I finally found a post elsewhere that gave me the solution. I had to modify a line in Apache’s httpd.conf file. Open the file and search for ‘AllowOverride’. If it looks like this: ‘AllowOverride None’, change it to ‘AllowOverride All’. I could not get to every page and post and see all the content!. FYI, there are several ‘AllowOverride’ options but the one you are looking for resides on a line by itself. I know this is a WordPress and not an Apache config forum but others may be experiencing the same issue. Hope this helps.
Braun Philippe
Hello Guys,
I’m running into a serious problem. When I click on my local site forler with servers ON on MAMP, it redirects to live site I’ve done everything this tutorial says, do you know where is the problem ?
Thanks for your help
Sara
Hi
I am also having blank screen like IDRIS D…any suggestion
Idris D
Unfortuntely when I follow this guide, all the links in my local site redirect to the live site.
Any suggestions?
Adrian Stangell
Hi,
after following the instructions for the manual migration I end up with a blank screen when I try to access my website on the localhost. Any ideas?
Joel M
After running the SQL Query to replace links I receive a 1064 error – it seems there is a problem with the code syntax. I’m guessing it’s the (:) in my localhost url : ‘http://localhost:888/localwebsite’ – any ideas how I can work around this? I am using MAMP to run the local server.
Aaron L
try four ‘8’s instead of 3…. localhost:8888/localwebsite
Natalie Bell
Hi there!
I’ve had a successful migration to local site except for my Media Library, every picture is there (lots of files), url’s are correct, but when they don’t show up in the actual blog. When I go to media library it just shows the grid of the pics – all blank, but in description, url etc everything is correct.
Any idea what to do next?
Grant
Try going to your wordpress dashboard, click on the settings menu near the bottom of the sidebar on the left. Then click on the reading menu in the settings submenu, scroll down to the site visibility options and select the ‘allow search engines to index’ option and click save changes at the bottom of the page. See if that works, if not you may have to go to your terminal and manually pull media files from your old site recursively – I had to go this route and can walk you through it if you have any questions. Hope this helps
Carolina
Hi there, Thanks for the post, it’s a huge success for me.
So far, I’ve been able to get to the wp-login page.
and I’m sorry if this is a very silly question. but I’m really newbie with wp
my problem is I can’t login :$
I’ve tried the same logins as the live details = don’t work
as I haven’t set up the dashboard and it’s a local. no email will work.
what should I do?
btw, it’s on a mac.
Many thanks in advanced. Help is appreciated!!
WPBeginner Support
Hi Carolina,
You can change password using PHPMyAdmin.
Admin
DavidA
Hi again,
My sincere apologies! Posted a comment yesterday (July 24) re difficulty running the Duplicator program from my browser. Went back to check today and realised that I had made a mistake with the placement of the “test-site” folder which contained the installer.php and the zip archive database.
Once I truly placed this folder in the htdocs folder then everything worked fine and I was able to install the website data locally as per your instructions.
Thank you again for all your help!
DavidA
Hi — thank you again for another great article! All very helpful!
I am at the step of opening the Duplicator installer on my local computer. However when I put “http://localhost/test-site/installer.php” into my browser I get a “404 error message” saying “object not found”.
Interestingly if I use “localhost” alone or “localhost/phpmyadmin” they both work. I have moved the “test-site” folder to the “htdocs” folder but still does not work.
Any suggestions??
Thank you
Shun
Thanks for this guide, but what if you’re migrating from a live site with an SSL cert down to a dev site without SSL (https to http?)
I got the front-end working fine, however, HTTPS is still added to my wp-login URL, preventing me from accessing the login page into the admin.
Any additional steps required to eliminating https on a local/dev site’s WP login page?
simone
I am having a similar issue. I migrated a live site to MAMP using WP Migrate DB plug in and FTP. I get the following error – due to the live sites SSL Certificate. It has something to do with the database prefixes not matching. But – I cannot change the prefix on the live site, I called Go Daddy to see if I edited the live site prefix to match my local install database prefix if it would break the site, they said no guarantees, I tried it and it broke the site.
error message I get when entering localhost:8888 url.
An error occurred during a connection to localhost:8888. The client has encountered bad data from the server. Error code: SSL_ERROR_BAD_SERVER
The page you are trying to view cannot be shown because the authenticity of the received data could not be verified.
Please contact the website owners to inform them of this problem.
Thank you in advance for any help!
xasmatic
Well, i used SSL certificate and that is what I did:
At the step where you have to update the URLs inside your WordPress database referencing to your live site, you write the SQL query 4 times to change every URL that may exist.
First time write code like above “http://www.example.com”, then “http://example.com”, after that “https://www.example.com” and finally “https://example.com”.
Make sure: 1) that you write all four times the URL
http://localhost/test-sitewhich will replace those URLs2) change wp_options, wp_posts and wp_postmeta to your right ones (mine for example were cagwp_options etc.)
And a last reminder: Finally (if you’re moving on localhost), on the last step you have also to change the host name to localhost (wp_config.php file)
/** MySQL hostname */
define(‘DB_HOST’, ‘localhost’);
Veer Abheek Singh Manhas
I am tried using this article but I am not sure at which point of time i am supposed to install wordpress. Can anyone help me here?
Thanks
AIAI
you don’t have to reinstall wordpress again. all files from the source wp installation is already backed up.
Alex
I have used these instruction before and they worked fine, however i now have an updated version of mamp and wordpress and i continually get errors. betwen playing around i get the white blank screen or the index.php file. as text.
Both similar problems to users below.
it might be time to update this.
I gave up on moving my site to local and decided to just have a dev url too however, when i run the sql query above i always end up with a token missmatch, despite making all the necessary changes.
Andi
Thank’S a lot for your work.
But it doesn’t work. If I run local installer.php I see blank screen.
Best regards
Andi
mc
hey
I did everything as it is described and when I get to the last phase and put the url: localhost/mysite it automatically downloads a file that has this information:
<?php
/**
* Front to the WordPress application. This file doesn't do anything, but loads
* wp-blog-header.php which does and tells WordPress to load the theme.
*
* @package WordPress
*/
/**
* Tells WordPress to load the WordPress theme and output it.
*
* @var bool
*/
define('WP_USE_THEMES', true);
/** Loads the WordPress Environment and Template */
require( dirname( __FILE__ ) . '/wp-blog-header.php' );
is it something wrong that i did in the process?
Albert Smit
I wasn’t successful with the Duplicator plugin but managed to get my site sort of working the manual way.
I now have another problem. My site opens up correctly but I am unable to do anything. I keep getting 404 Page not Found errors. This happens with my menu items, search bar, login button etc. I can go nowhere on my site. What do I do?
Albert
Matthew
404 means the page is not found, sounds like you haven’t updated your database urls, be sure to follow that step. all your anchors are pointing to links that arn’t available on your server.
Albert Smit
I have done the entire process from the zip file and install.php. In step 3, when I click on Save Permalinks, it takes me to the WP login screen. No matter what I type in, the result is always the same: Invalid Username. I have run this Duplicator twice now, still no luck. Please help.
Albert
Richard
Just wanted to say thanks for such a great and straightfoward description.
I’d tried this a couple of times before using the info on wordpress.org but it never worked.
Followed your article step by step (manual method, non-plugin) and it worked perfectly!!
Thanks
WPBeginner Support
Hey Richard,
Glad you found it useful Don’t forget to join us on Twitter for more WordPress tips and tutorials.
Admin
LS
Thank you very much for this tutorial!
I did the manual install, although it didn’t quite do the trick at first. I got a Database Connection Error. Maybe most of you already know this, but i only saw it upon later glance:
In my wp-config.php file, underneath the DB_NAME, DB_USER and DB_PASSWORD there was this line:
/** MySQL hostname */
define(‘DB_HOST’, ‘host.example.de’);
I had to replace ‘host.example.de’ with ‘localhost’ to fix the issue. Now it works like a charm.
Thank you again and i hope you have a fantastic day!
Regards LS
Abraham Quilca
Yes, same here. That should definitely be updated in the article to save future viewers some time.
RF
This website has saved my hide several times now. Keep it up!
Olivia
Thank you!!!