
Volete uno spazio sicuro per sperimentare con il vostro sito WordPress senza il timore di rompere qualcosa sul vostro sito live?
Spostare il vostro sito WordPress su un server locale sul vostro computer è la soluzione perfetta, a nostro avviso, soprattutto per gli sviluppatori, i designer o i principianti di WordPress.
L’installazione di WordPress sul vostro computer (server locale) vi permette di imparare facilmente WordPress e di fare delle prove. Quando spostate un sito WordPress live su un server locale, potete sperimentare con gli stessi dati del vostro sito live.
In questo articolo vi mostreremo come spostare facilmente un sito WordPress live su un server locale.

Perché e chi vorrebbe spostare un sito WordPress live su un server locale?
Se gestite un sito web WordPress da qualche tempo, potreste voler provare nuovi temi o plugin. Tuttavia, farlo su un sito web in funzione può comportare una scarsa esperienza d’uso per i vostri utenti.
Per evitare questo problema, molti utenti creano una copia del proprio sito WordPress su un server locale per testare nuovi temi, plugin o per effettuare test di sviluppo.
Questo vi permette di impostare il tema con tutti i vostri contenuti e di testare tutte le funzionalità senza preoccuparvi di rompere il vostro sito. Molti utenti copiano il proprio sito su un server locale per esercitarsi con WordPress e con le proprie capacità di codifica con i dati reali del sito.
Anche se potete fare tutti i test con contenuti fittizi in WordPress, i dati del sito reale vi danno una migliore rappresentazione visiva di come queste modifiche appariranno sul vostro sito reale.
Preparazione allo spostamento di un sito locale su un server locale
Innanzitutto, dovete assicurarvi di eseguire sempre il backup del vostro sito web WordPress. Esistono diversi ottimi plugin di backup per WordPress che potete utilizzare.
In secondo luogo, è necessario installare un ambiente server locale sul computer. È possibile utilizzare WAMP per Windows e MAMP per Mac. Una volta configurato l’ambiente, è necessario creare un nuovo database utilizzando phpMyAdmin.
È sufficiente visitare il seguente URL nel browser per avviare phpMyAdmin.
http://localhost/phpmyadmin/
http://localhost:8080/phpmyadmin/
Da qui è necessario fare clic sulla scheda “Database” e creare un nuovo database. Questo database vi servirà in seguito per scompattare i dati del vostro sito live.

Ora siete pronti a spostare il vostro sito WordPress live sul server locale.
Metodo 1. Spostare un sito WordPress live su un server locale utilizzando un plugin
Questo metodo è più semplice e consigliato a tutti gli utenti.
La prima cosa da fare è installare e attivare il plugin Duplicator. Per maggiori dettagli, consultate la nostra guida passo passo su come installare un plugin di WordPress.
Duplicator consente di creare facilmente un pacchetto di duplicati dell’intero sito web. Può essere utilizzato per spostare il sito WordPress in una nuova posizione e come plugin di backup.
Nota: Duplicator è disponibile in versione gratuita. Tuttavia, Duplicator Pro offre backup illimitati e funzioni più avanzate.
Dopo l’attivazione, andare su Duplicator Pro ” Backup dalla barra laterale dell’amministrazione di WordPress. Per creare un nuovo pacchetto, è necessario fare clic sul pulsante “Aggiungi nuovo”.

Duplicator avvierà quindi la procedura guidata di backup.
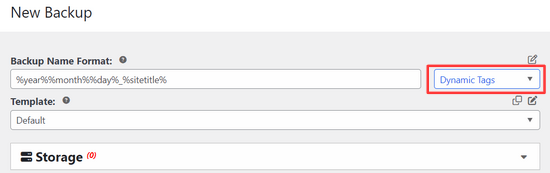
Innanzitutto, è necessario inserire un nome per il pacchetto di backup. È anche possibile utilizzare i tag dinamici per creare automaticamente un nome formato come la data e il titolo del sito.
Quindi, espandere la sezione “Archiviazione” e scegliere una posizione di archiviazione.
Per questa esercitazione, utilizzeremo la posizione predefinita. Se si desidera, è possibile fare clic sul link “Aggiungi archivio” per aggiungere una nuova posizione, come Dropbox o Google Drive.
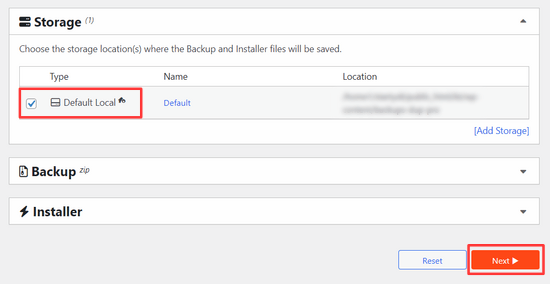
Fare clic sul pulsante “Avanti” per continuare.
Il plugin esegue una scansione del sito web ed esegue alcune verifiche di base. Mostrerà poi un riepilogo di tali verifiche.
Se tutto sembra a posto, fare clic sul pulsante“Crea backup” per continuare.

Duplicator creerà ora il vostro pacchetto di siti web.
Al termine, verrà visualizzato un file zip di archivio contenente tutti i dati del sito web e un file di installazione. È necessario scaricare entrambi i file sul computer.

Ora siete pronti a decomprimere e installare questi file sul vostro server locale.
Innanzitutto, è necessario creare una nuova cartella nella cartella principale del server locale. Si tratta della cartella in cui il server locale memorizza tutti i siti web.
Ad esempio, se si utilizza MAMP, sarà la cartella /Applications/MAMP/htdocs/. In alternativa, se si utilizza WAMP, la cartella sarà C:\wamp\www\.
All’interno di questa cartella, è possibile creare nuove cartelle per ogni nuovo sito web che si desidera importare o creare sul server locale.

Successivamente, è necessario aprire la cartella creata per il sito web locale e copiare e incollare sia il file zip dell’archivio sia lo script di installazione scaricato in precedenza.

Per eseguire l’installazione, è necessario aprire lo script installer.php nel browser web.
Ad esempio, se si sono incollati entrambi i file nella cartella /mylocalsite/, si accederà ad essi nel browser visitando il sito http://localhost/mylocalsite/installer.php.
A questo punto si vedrà lo script di installazione di Duplicator come questo:

Fare clic sul pulsante “Avanti” per continuare.
Duplicator decomprimerà il file zip dell’archivio e chiederà di inserire le informazioni sul database del sito locale. Si tratta del database creato in precedenza.

Il nome del server è quasi sempre localhost e il nome utente è root. Nella maggior parte dei casi, l’installazione del server locale non prevede una password per root, quindi si può lasciare vuota.
In fondo alla pagina è presente il pulsante “Prova database”, che può essere utilizzato per verificare che le informazioni del database siano corrette.

Se tutto sembra a posto, fare clic sul pulsante “Avanti” per continuare.
Duplicator importerà ora il database di WordPress. Dopodiché, vi chiederà di ricontrollare le informazioni del nuovo sito web che ha rilevato automaticamente.

Fare clic sul pulsante “Avanti” per continuare.
Duplicator terminerà la configurazione e mostrerà un pulsante per accedere al sito locale. Utilizzerete lo stesso nome utente e la stessa password di WordPress che utilizzate sul vostro sito live.

Questo è tutto, avete spostato con successo il vostro sito live sul server locale.
Metodo 2. Spostare manualmente un sito WordPress live sul server locale
Se il plugin non dovesse funzionare, potete sempre spostare manualmente il vostro sito live su un server locale. La prima cosa da fare è eseguire il backup manuale del vostro sito web dal vostro account di hosting WordPress.
Passo 1. Esportare il database di WordPress del sito live
Per esportare il database di WordPress del vostro sito live, dovete accedere alla vostra dashboard cPanel e cliccare su phpMyAdmin.
Nota: mostriamo le schermate della dashboard di Bluehost.

All’interno di phpMyAdmin, è necessario selezionare il database che si desidera esportare e poi fare clic sulla scheda Esportazione in alto.

phpMyAdmin chiederà ora di scegliere il metodo di esportazione rapido o personalizzato. Si consiglia di utilizzare il metodo personalizzato e di scegliere zip come metodo di compressione.
A volte i plugin di WordPress possono creare le proprie tabelle all’interno del database di WordPress. Se non si utilizza più quel plugin, il metodo personalizzato consente di escludere quelle tabelle.
Lasciare invariate le altre opzioni e fare clic sul pulsante “Vai” per scaricare il backup del database in formato zip.

phpMyAdmin scaricherà ora il file del database. Per maggiori dettagli, consultate il nostro tutorial su come eseguire il backup manuale del database di WordPress.
Passo 2. Scaricare tutti i file di WordPress
Il passo successivo è scaricare i file di WordPress. Per farlo, dovete collegarvi al vostro sito WordPress utilizzando un client FTP.
Una volta collegati, selezionate tutti i file di WordPress e scaricateli sul vostro computer.

Passo 3. Importare i file e il database di WordPress sul server locale
Dopo aver scaricato i file di WordPress, è necessario creare una cartella sul server locale in cui importare il sito locale.
Se si utilizza WAMP, è necessario creare una cartella all’interno della cartella C:\wamp\www\ per il sito locale. Gli utenti di MAMP devono creare una cartella nella cartella /Applications/MAMP/htdocs/.
Dopodiché, è sufficiente copiare e incollare i file di WordPress nella nuova cartella.
Successivamente, è necessario importare il database di WordPress. Aprite semplicemente phpMyAdmin sul vostro server locale visitando il seguente URL:
http://localhost/phpmyadmin/
Poiché il database è già stato creato in precedenza, è necessario selezionarlo e fare clic sulla scheda “Importa” in alto.

Fare clic sul pulsante “Scegli file” per selezionare e caricare il file di esportazione del database scaricato nel primo passaggio. Quindi, fare clic sul pulsante “Vai” in fondo alla pagina.
phpMyAdmin ora decomprimerà e importerà il database di WordPress.
Ora che il database è stato configurato, è necessario aggiornare gli URL all’interno del database di WordPress che fanno riferimento al sito live.
È possibile farlo eseguendo una query SQL in phpMyAdmin. Assicurarsi di aver selezionato il database del sito locale e poi fare clic su SQL.

Nella schermata SQL di phpMyAdmin copiate e incollate questo codice, assicurandovi di sostituire example.com con l’URL del vostro sito live e http://localhost/mylocalsite con l’URL del server locale del vostro sito.
UPDATE wp_options SET option_value = replace(option_value,'https://www.example.com','http://localhost/mylocalsite') WHERE option_name ='home'OR option_name ='siteurl';UPDATE wp_posts SET post_content = replace(post_content,'https://www.example.com','http://localhost/mylocalsite');UPDATE wp_postmeta SET meta_value = replace(meta_value,'https://www.example.com','http://localhost/mylocalsite');
Questa query sostituirà i riferimenti all’URL del sito live dal database e lo sostituirà con l’URL del localhost.
Passo 4. Aggiornare il file wp-config.php
Il passo finale consiste nell’aggiornare il file wp-config.php del sito locale. Questo file contiene le impostazioni di WordPress, compresa la modalità di connessione al database di WordPress.
Basta andare nella cartella in cui è stato installato WordPress sul server locale e aprire il file wp-config.php in un editor di testo come Notepad.
Sostituire il nome del database con quello creato in phpMyAdmin su localhost.
Quindi, sostituite il nome utente del database con il vostro nome utente MySQL locale, di solito è root. Se avete impostato una password per l’utente root di MySQL sul vostro host locale, inseritela. Altrimenti, lasciatela vuota e salvate le modifiche.
/** The name of the database for WordPress */define('DB_NAME','database_name_here');/** MySQL database username */define('DB_USER','username_here');/** MySQL database password */define('DB_PASSWORD','password_here');
Ora è possibile visitare il sito locale in una finestra del browser inserendo l’URL in questo modo:
http://localhost/mylocalsite/
Sostituite “mylocalsite” con il nome della cartella in cui avete copiato i file di WordPress.
Questo è tutto, il vostro sito WordPress live è ora copiato sul vostro server locale.
Speriamo che questo articolo vi abbia aiutato a capire come spostare facilmente un sito WordPress live su un server locale. Potreste anche voler consultare la nostra guida su come creare facilmente un sito di staging per WordPress a scopo di test, o su come spostare un sito WordPress dal server locale al sito live.
Se questo articolo vi è piaciuto, iscrivetevi al nostro canale YouTube per le esercitazioni video su WordPress. Potete trovarci anche su Twitter e Facebook.

")


Reese
Hello,
I am receiving an error when reaching this step:
“Now that your database is all set up, you need to update the URLs inside your WordPress database referencing to your live site. You can do this by running an SQL query in phpMyAdmin. Make sure you have selected your local site’s database and then click on SQL. In phpMyAdmin’s SQL screen copy and paste this code, make sure that you replace example.com with your live site’s URL and localhost/test-site with the local server URL of your site. ”
The error is:
#1146 – Table ‘rpd.wp_options’ doesn’t exist
Please advise, thank you!
Martin
Thanks for all of your hard work. I’m a beginning web developer and your site is incredibly helpful.
I have looked at both of your articles about migrating from local to live and vice versa. I built a WordPress site locally and used it to replace an existing HTML site. I then made changes to the live site, and I’m not quite sure how to go about “syncing” them again. What would you suggest?
WPBeginner Support
Hi Martin,
Please take a look at our guide on setting up a staging environment.
Admin
James
Thank you for the article, however i have still been having problems.
One thing i don’t understand, is that you start of by recommending using backupbuddy (which i have been using to backup my sites) but then suddenly say to use this duplicator plugin.
I have my full backup (with db) zip of my wordpress site which i created with backupbuddy and have unzipped it into its own folder in the “www” folder in wamp.
I successfully create a new DB in PhpMyAdmin and then successfully imported my website db into it. I have also changed the config.php db name and password.
However on the next step, trying to change the urls it comes back with:
#1146 – Table ‘zexico.wp_options’ doesn’t exist
#1146 – Table ‘zexico.wp_posts’ doesn’t exist
#1146 – Table ‘zexico.wp_postmeta’ doesn’t exist
What have i done wrong?
thank you
Ozi Diptongo
Hi. I’m getting the same error. Were you able to fix it ? Than you !
Nina Chang
Following on from my earlier comment – I fixed the problem! For some reason the duplicator plugin wasn’t copying across all of my database tables, which was causing the first round of issues – I sorted that by switching to the manual method. Then when I was running the queries in mysql I didn’t realise at first that I had to amend the names of the database tables as well (i.e. was just pasting wp_options when I needed to adapt that) – I’m not sure if this is normal as your lines of code only highlight the urls as needing to be corrected? THEN I had to deal with my strange wp-config.php file that had all the ‘database’, ‘host’, ‘username’ fields already filled in – after trying both options it only worked when I deleted the data that wordpress had already filled in and replaced it with the localhost data as directed. I don’t understand why my wp-config file had its fields already populated but then I’m a complete newbie to all this so I’m bound to have missed/misunderstood lots. Anyway – thanks again for the tutorial as it did FINALLY get me there!
Nina Chang
Hi there,
Thanks for the tutorial. I’ve attempted to migrate my site with duplicator and it seems to work except I then can’t log-in to my locally hosted site – it doesn’t recognise my username at all. After the duplicator installed my files I had two config.php files – one config-sample.php and one config.php, and also two htaccess files – one .htaccess and one ORIG – could these doubled-up files have something to do with my login issues? I’ve tried every variation of deleting one of each pair, and I’ve also tried replacing my wp-login file and deleting plugins as I read elsewhere this might help, but nothing has worked. I redid the entire process from packaging and still no luck! I’ve also tried manually but got stuck at the mysql query updates. Do you have any idea where I’ve gone wrong??
Many thanks!
Nina
Susan Taunton
I can’t tell you how grateful I am for this info. I have put an unbelievable amount of time into trying to get a live site onto my local server to no avail — and then I found your post today. Used the Duplicator and it WORKED!
THANK YOU!!!!!!!!! :-))
Editorial Staff
You’re very welcome Susan
Admin
Dilip Pradhan
I have copied website from hosting domain to local host. everything is fine but all links of menu and all are redirected to
how to solve it
Byron Allen
hi ,
I had the same problem and just found the solution. I’m sure you’ve solved it by now but this might help others down the track.
in WordPress admin area go to settings-> permalinks. Choose Post name.
Your problems should be solved.
John Payne
Thanks for all the excellent advice you give- it’s a wonderful service to the WordPress community.
I’ve begun using the All-in-1 WP Migration plugin to easily backup my site , and later migrate it if necessary.
It would also be good to be able to make changes to the sites on my own computer, checking them out before uploading updated files.
I’, installing XAMPP on my computer. Is there an easy way I can use my All-in-1 WP Migration backup files with this?
Any advice will be much appreciated.
WPBeginner Support
Hi John,
Sorry but we haven’t tested this plugin. Please try contacting the plugin developers.
Admin
Andres
Great tutorial. Its important to mention that you need to delete the HTACCESS File in order to this to work.
Thanks
James orr
From local site?
Siddhartha
Yes from the local site folder. I did that, and my site started working. However there are many other problems that I am facing even now. Like my category links are not working at all.
lohith
cool super clean tutorial, got mine to work without any issues.
Gokiko
Hi WPbeginner,
I have followed all the instructions for manual moving. But I’m getting a “Oops! That page can’t be found.” error on the mainpage, none of the content can be viewed. And all the links in my localhost site direct to my online website.
It seems only the the main structure of my site(theme, menus etc.) has been moved but all the rest is lost.
WPBeginner Support
Is this error shown with your WordPress theme or on a blank white page? If it is shown on a blank white page, then this probably means that your WordPress site is not installed on the URL you are trying.
Admin
Gokiko
It shows on my WordPress theme. It also shows all my menus and content categories. But all the links take to the original websites address. Here is a screenshot if it’s gonna help:
WPBeginner Support
Try refreshing your site’s permalink structure. Go to Settings » Permalinks page and click on the save changes button without making any changes.
Juan
I have the exact same issue, but I can not log-in into my localhost using wp-admin or wp-login as it takes me to the live-site domain.
Is there another way to login to my localhost/dev-site area to make this change? thanks in advance!
Jason Hess
Dear WPBeginner,
First of all, Thank you for all you do in the WP community, my question is hopefully a pretty simple one. (Famous last words huh?) Currently I use CLEF to log in to my “Live Site”. When I move my Live site to my Local server, will this create any issues when attempting to log in to the local site once the move has been completed? Or do I need to create a new log in PW for my site via the Dashboard in my Live site before making the move to a Local environment or will CLEF still continue to work on my “Local Server”?
Also, do you all have any thoughts on using CLEF to log in? I’ve been using WP on and off for about 2 years and just want to get your opinion on CLEF.
Thank you very much in advance! You guys rock! After I get my site up and running you can bet I’ll promote your site to everyone I know. I’ve learned so much already from your site and I’ve only been a member for 2 almost 3 months now.
Have a great Day,
Jason Hess
WPBeginner Support
You can disable Clef at anytime once you have transferred your site to local server.
Admin
Mohd Amir
I forgot the password of filezilla, so I couldn’t download all the file of live site. I have backup of live site wp_content only. What can I do now for local server.
maarja
Hi,
Thank You for Your helpful directions.After a long while, I finally got the live page to my localhost with the plugin BUT for some reason, the content pages are not found on the server-all the information, texts etc is there in the back-office but aren’t shown in the front office except for the front page.
Do You have any idea where/why the problem might occur?
Thank You in advance,
Maarja
WPBeginner Support
Try following the steps in our beginner’s guide to troubleshooting WordPress errors.
Admin
Yellow Canary
Thank you very much I have done it manually… from a live server to localhost. With your instructions I have managed this for the first time. And I even know now how to do a SQL query in phpMyAdmin. I feel like a real pro!
amna
Hi,
i followed all the steps but i am getting internal server error .
I am confused in one step , after downloading the live site through filezill from godaddy host. i replace the wordpress folder with my live site folder i.e.
C:/users/amna/wamp/www/wordpress/old folders
with C:/users/amna/wamp/www/wordpress/mywebsite new folders
please help i am a beginner
Debenkumar Naorem
Hi WEBBIGINNER SUPPORT, I followed the instruction for manual, it works very fine. Thanks for such intructions, I’ve been looking for this. Thanks again.
WPBeginner Support
Hey Debenkumar, you are welcome. Don’t forget to join us Facebook for more WordPress tips and tutorials.
Admin
Manish
Hey! Thanks for the post.
I followed manual instruction and replaced my site URL with localhost/name of blog . The problem I am facing is, no images are being loaded in my blog. All the uploaded images are there in upload folder. The text is absolutely fine. The images url have changed to localhost but they are not showing up.
Could you please help me out in this?
deepthi
hi, i followed the manual procedure to check my wordpress website in localhost using xampp, i hav changed the site URL, home and the wp-posts and wp-postmeta. the problem is my home page loading fine in localhost. but when i go the pages in the menu the following error is coming.
Object not found!
The requested URL was not found on this server. The link on the referring page seems to be wrong or outdated. Please inform the author of that page about the error.
If you think this is a server error, please contact the webmaster.
Error 404
localhost
Apache/2.4.10 (Win32) OpenSSL/1.0.1i PHP/5.5.15
i logged into dashboard and can see all of the page content in the editing section, but from there also, when i try to view the page its reporting the same error.
the url path it is taking is my updatedURL only,
please reply with the solution
WPBeginner Support
Go to Settings » Permalinks page and click on the ‘Save Changes’ button to update your permalinks.
Admin
Joshua S.
Can I hug you? Can I love you forever?
I was having the same issue. I did everything correct, except the homepage would load , but all the other page links seemed to be broken (it just displayed an unstyled layout of my localhost information).
But going into Settings>Permalinks>Save Changes reset my links and now I can access my different pages, even the new pages that I create since moving my site to the local host.
LIKE!
WPBeginner Support
Thanks Joshua, we are glad you found it helpful. You may also want to subscribe to our YouTube Channel for WordPress video tutorials.
Peter
After following the instructions to manually move the site, the home page displayed fine on localhost but none of the links worked. The page below said to “Go to settings/permalinks in the wordpress dashboard and update permalinks by clicking twice on save changes.” That fixed it.
Mohd Hasan
I followed your steps , but only home page works fine and none of the links are working . Give The requested URL /akhdir3/category/health/ was not found on this server.
Anes P A
Dear Author,
I tried your step. But problem is when loading a page the localhost refer online site and the Menu links point to the online web site. How it can solve ?
Please advise.
Thanks
Anes
Bhavana
I have manually done all the above mentioned steps . But I am not getting the actual site which I want.There comes all uninstalled plugins in admin panel and the theme is also uncustomized. Where I am going wrong?
Justin
I’m trying to follow your instructions for a manual move.
When trying to find/replace the live site’s address with my local host, SQL tells me there’s a syntax error.
#1064 – You have an error in your SQL syntax; check the manual that corresponds to your MariaDB server version for the right syntax to use near ‘)’ at line 1
Are you sure the code is correct?
Justin
Fixed my own problem….sort of.
For some reason all my tables begin with wplm instead of just wp (wp_options = wplm_options for example). So updating the code to look for the correct table name allowed the script to run without errors.
But….SQL reports “# MySQL returned an empty result set (i.e. zero rows)” and the values in the table didn’t get updated. I had to go in and update the links by hand. In my case this was only 2 values in wplm_options, but I could imagine some people will have a lot more links to check.
Still, I do have my site imported now, and dealing with local hosting is a notoriously confusing process.
Thanks for the clear and simple instructions!
Lloyd
The instructions for Duplicaor Installer begin with this line:
“Your local server site will need a new database, so you need to create a database on your local server using phpMyAdmin.”
Is creating a new database something simple like clicking a menu option, or is it so complex that it would require an extensive tutorial to explain?
When I explore phpMyAdmin on Xampp, the only thing I see that looks like a possibility is under the Databases tab where it says:
“Create database:
(X) No Privileges”
Is there an authorization problem, and if so where do I go to change that parameter?
I have two web sites on this local host that seem to function properly, so I have assumed that the local host is set up correctly.
Thanks for any help or suggestions,
Lloyd
Ashvani Kumar
I am following the Manual option but when i go to Import Database page in phpMyAdmin then the max size for database upload is (Max: 2,048KiB) but my database backup size is 710MB. How do i increase this limit so that i can upload the database?
Thanks
WPBeginner Support
You need to increase the file upload limit in PHP. See our guide on how to increase the maximum file upload size. and follow the php.ini method
Admin
Abdul Aleem Mohammed
Hi Ashvani,
you can change the max_upload_size in php.ini file in apache.
by default it will be 2 Mb, you can change it according to your convinience.
Thanks
Judy Williams
I am trying this using Duplicator. I have downloaded my site and the installer. I have created a database using phpMyAdmin and have got to the bit ‘you need to copy and paste the package and install file to an empty folder in your local server’s web directory’. I have no idea how to do this! I have Filezilla and XAMPP installed on my laptop. Is there a tutorial on how to create an empty folder in my local server’s web directory? I am stuck now. Thanks
WPBeginner Support
You can just go to the htdocs folder on your computer.
Admin
german
I’ve copied the files and database, when i try to access my localhost/test-site i get redirected to the dashboard. Any ideas why this could be happening?
miguel
thank you for the clear tutorial.
although i’ve done the opposite (from localhost to public server) i thought the reverse would be equally simple.
however, when it comes to connecting the database, i’m stumped. i’ve gone over the settings over and over without being able to connect.
i even got into some trouble and got locked out of the database but fortunately got that resolved.
in my config.php file i’ve changed the user to “root”, then set it to empty, used the user name from the public server and the same with the password. i have set the db name correctly to the localhost name.
i can’t guess what i need to do.
if you could give me a direction to look next, i’ll appreciate it greatly.
thank you for you labor of love. it’s great to see so many people with the knowledge helping us those who look for answers.
Daniel
Hi
I want to do this as well. Is this post written a few years back , still the approach to use or are the other plugins or post I should be looking at .
Daniel
Beatrix K.
Hi everyone,
Just wondering (please bare with me as I am new at this) – if I need to have have my local site to work with on two different devices, say my desktop and my laptop, is there a way for the changes I make on one device to be updated on the other device? I just want to know if it is possible to work from two different devices on the same project and not have to redo all of my changes. Thanks in advance for any insight
B
Muniba
I am confused in step related to Filezeila ,,, how i will download my wordpress site using Filezeila..??
german
download filezilla, establish a connection to your current host, productions site using filezilla. Once you have a connection you will be able to download the files to a local directory on your computer
Dee
So with CPanel, for instance, we’d use the IP associated, our CPanel user and pass, along with “21” as the port value? After establishing a connection with Cpanel host, how can I transfer the files to my localhost while keeping the live site as well? Essentially, how do I create a duplicate with having the same site at both hosts (one to experiment with and one that remains live)?
Dee
After successfully transferring files from remote to local, what is an easy way to bulk copy&paste (instead of manually one-by-one) the files to the local server where we want to install WordPress? I tried selecting all files to copy, but there is no copy function available. Please Help
assal0le
I want to copy my live wordpress site to my local wamp server, note moving it. My question is this will remove my live wordpress site if I follow this tutorial using duplicator plugin?
Thx
Diane Laidlaw
No it only copies it.
Ognatius Chironga
I thank you so much!
I found this article helpful.
I almost restarted creating my site.
Quy P
I have tested and tried a number of time. It does not work untill i delete the .htaccess file on local. Thank you.
Andres
Thanks very much.
Tobias
If you are running a network of sites you should also update the column domain URL’s in the table wp_blogs.
lorenzo
Thank for this useful tutorial. I have to move manually my wp site, but if I type in the browser “http://localhost/phpmyadmin/” it doesn’t appear myphpadmin. Maybe I have to install it? How?
Thank you very much…
Dave
In the wp-config.php file I also have to change the /**MySQL hostname */
/** MySQL hostname */
define(‘DB_HOST’, ‘localhost’);
set if for localhost
nicola
Hi,
i follow your step but the admin login is not visible…. error 404 not found. all the site is good in my local installation. how can i solve my problem?
abdelouahad
i did all the steps but i have always the error page i don’t know why some one can help me please
Paul Denver Sy
Thank you so much for this. It saved my almost a week of agony on running it on my local.
Shilling
Double checked all the steps and it all seems good, but I’m getting this error message when I go to the site on my local URL:
Google Chrome’s connection attempt to localhost was rejected. The website may be down, or your network may not be properly configured.
I don’t think the site is down. My local URL is auto flipping to http://localhost/wordpress-folder-name
when I think it should go to http://localhost:888/wordpress-folder-name
I’m hoping this is an obvious clue. I’m new at this and just have no idea.
Any insight would be much appreciated.
Ebert
This was the clearest tutorial I found which helped me to copy a site I started with iPage to my laptop under localhost. The database was not imported but created a new local copy of the server database. I copied the data tables into my new database and modified the sql commands to match the table names and everything ran smoothly.
I had to reuse the password I used on the live site with the local wordpress copy and I can now access and modify what I need to.
Thanks and you just got another new subscriber to this great site.
Also the post about BackWPup was very helpful as well. I tried to use Duplicator and it kept giving me error messages about permissions to create a backup folder on my machine. I used BackWPup and everything ran without a hitch. Thanks again!!
Eduardo Weidman Barijan
The manual process worked like a charm. Thank you.
Alessio
Hi guys,
I’m trying to config the localhost on my computer with linux mint.
i’ve already set up a new database, transferred the files with FTP to my local wordpress folder.
Now I imported the db, but when I give the query to change the webaddress with a local address, it will give me a message “# MySQL returned an empty result set (i.e. zero rows)”.
Now, if I type in the browser “localhost”, it will lead me to the online website…
what should I do?
thank you!
idriss
Hey Allesio,
Did you manage to solve this?
I have the same issue. How did you manage to solve it?
Thanks
Justin
Same problem here.
SQL is having trouble replacing the live site URL with the local host address.
Without the updates to the database, WP tries to connect to the live site instead of the local site.
Did either of you have any luck fixing this?
Sam
Go to your localhost phpmyadmin and the database you are using for the site. Click wp_options and edit the siteurl and home. Replace the live url with the: localhost/ your-folder-name-goes-here
That should do it.
Sam
Mike
The first step worked with me.
But how can I enter to localhost/test-site/wp-admin? It gives me an error message:
Internal Server Error
Wenke Adam
Updating the local site’s wp-config.php file might not be the last step in this procedure. I followed your instructions and after some trials the public site was working (first I had a typo in the SQL queries and nothing happened) but still I couldn’t access wp-admin.
The solution was to edit the wp_options table in the database. The first row had the wrong URL. I fixed this and finally everything was working fine, even the permalinks.
Thanks for all these very nice and clear tutorials!
Tim
I am reposting this because it seems to have disappeared (at least on my end). So I am sorry if it is a double post.
I am getting an error message when uploading the database. Any ideas?
Thanks
Tim
When I try to upload the database I get a Red Error Screen. I can send a screenshot of the error if you would like.
Thanks
WPBeginner Support
Sure, you can upload the screenshot to a cloud hosting service like dropbox and paste the link as a reply to this comment. We will then take a look and will try to help.
Admin
Ian Hyndman
All day I have been trying to do this change with no effect !
I even had to install word press again on my testing server. Was about to give up then I came across this. My other option was to manually copy and paste and install all the same plugins active on my host server to my testing server.
When i read your post i finished in 5 minutes :):)
Thank you for your tutorial, its just what I needed. !
Well Done
Alexandros
Two days i am trying to do this change alone with no effect !
When i read your post i finished in 5 minutes :):)
Thank you for everything !
Keep up the great work