Vuoi uno spazio sicuro per sperimentare con il tuo sito WordPress senza il timore di rompere qualcosa sul tuo sito live?
Trasferire il tuo sito WordPress su un server locale sul tuo computer è la soluzione perfetta, secondo noi, specialmente per sviluppatori, designer o principianti di WordPress.
Installare WordPress sul tuo computer (server locale) ti permette di imparare WordPress e testare cose facilmente. Quando sposti un sito WordPress live su un server locale, ti consente di sperimentare con gli stessi dati del tuo sito live.
In questo articolo, ti mostreremo come spostare facilmente un sito WordPress live su un server locale.
Perché e chi vorrebbe spostare un sito WordPress live su un server locale?
Se gestisci un sito web WordPress da un po' di tempo, potresti voler provare nuovi temi o un plugin. Tuttavia, farlo su un sito web live potrebbe comportare una scarsa esperienza utente per i tuoi visitatori.
Per evitare ciò, molti utenti creano una copia del loro sito web WordPress su un server locale per testare nuovi temi, plugin o fare test di sviluppo.
Questo ti permette di configurare il tuo tema con tutti i tuoi contenuti e testare tutte le funzionalità senza preoccuparti di rompere il tuo sito. Molti utenti copiano il loro sito su un server locale per esercitare le loro competenze di WordPress e di codifica con dati reali del sito.
Anche se puoi fare tutti i test con contenuti fittizi in WordPress, i dati reali del sito ti offrono una migliore rappresentazione visiva di come queste modifiche appariranno sul tuo sito live.
Prepararsi a spostare un sito locale su un server locale
Innanzitutto, devi assicurarti di eseguire sempre il backup del tuo sito WordPress. Esistono diversi ottimi plugin di backup per WordPress che puoi utilizzare.
In secondo luogo, devi installare un ambiente server locale sul tuo computer. Puoi usare WAMP per Windows e MAMP per Mac. Una volta configurato l'ambiente, devi creare un nuovo database usando phpMyAdmin.
Visita semplicemente il seguente URL nel tuo browser per avviare phpMyAdmin.
http://localhost/phpmyadmin/
http://localhost:8080/phpmyadmin/
Da qui devi fare clic sulla scheda 'Database' e creare un nuovo database. Avrai bisogno di questo database in seguito per decomprimere i dati del tuo sito live.

Ora sei pronto per spostare il tuo sito WordPress live su un server locale.
Metodo 1. Spostare un sito WordPress live su un server locale utilizzando un plugin
Questo metodo è più semplice ed è consigliato a tutti gli utenti.
La prima cosa da fare è installare e attivare il plugin Duplicator. Per maggiori dettagli, consulta la nostra guida passo passo su come installare un plugin di WordPress.
Duplicator ti permette di creare facilmente un pacchetto duplicato del tuo intero sito web. Può essere utilizzato per spostare il tuo sito WordPress in una nuova posizione e può anche essere utilizzato come plugin di backup.
Nota: Esiste una versione gratuita di Duplicator con cui puoi iniziare. Tuttavia, Duplicator Pro offre backup illimitati e funzionalità più avanzate.
Dopo l'attivazione, vai su Duplicator Pro » Backups dalla barra laterale di amministrazione di WordPress. Per creare un nuovo pacchetto, devi fare clic sul pulsante 'Add New'.
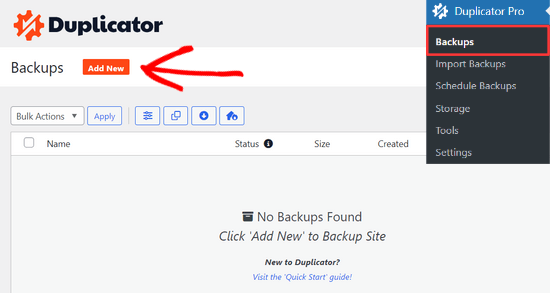
Duplicator avvierà quindi la procedura guidata di backup.
Innanzitutto, devi inserire un nome per il tuo pacchetto di backup. Puoi anche utilizzare i tag dinamici per creare automaticamente un formato di nome come la data e il titolo del tuo sito.

Quindi, espandi la sezione ‘Storage’ e scegli una posizione di archiviazione.
Per questo tutorial, utilizzeremo la posizione predefinita. Puoi fare clic sul link ‘Add Storage’ per aggiungere una nuova posizione, come Dropbox o Google Drive, se lo desideri.
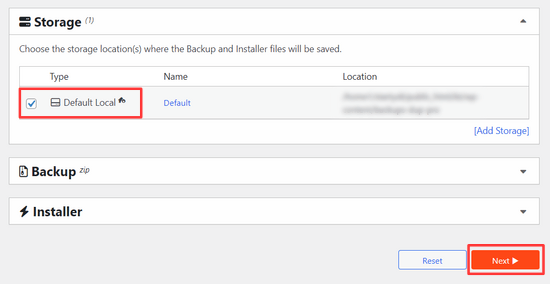
Fai clic sul pulsante 'Avanti' per continuare.
Il plugin analizzerà quindi il tuo sito web ed eseguirà alcuni controlli in background. Ti mostrerà quindi un riepilogo di tali controlli.
Se tutto sembra a posto, fai clic sul pulsante ‘Create Backup‘ per continuare.
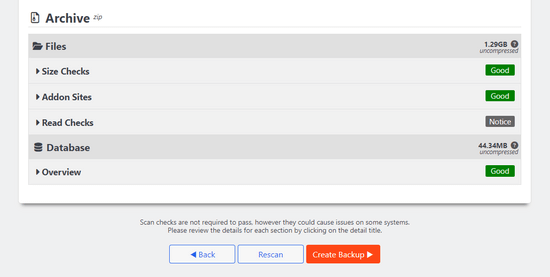
Duplicator creerà ora il pacchetto del tuo sito web.
Una volta terminato, vedrai un file zip di archivio che contiene tutti i dati del tuo sito web e un file di installazione. Devi scaricare entrambi i file sul tuo computer.
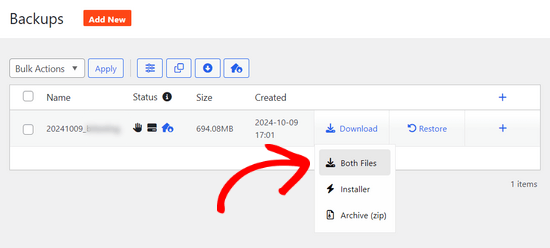
Ora sei pronto per decomprimere e installare questi file sul tuo server locale.
Innanzitutto, devi creare una nuova cartella nella cartella principale del tuo server locale. Questa è la cartella in cui il tuo server locale memorizza tutti i siti web.
Ad esempio, se stai utilizzando MAMP, sarà la cartella /Applications/MAMP/htdocs/. In alternativa, se stai utilizzando WAMP, sarà la cartella C:\wamp\www\.
All'interno di questa cartella, puoi creare nuove cartelle per ogni nuovo sito web che desideri importare o creare sul tuo server locale.
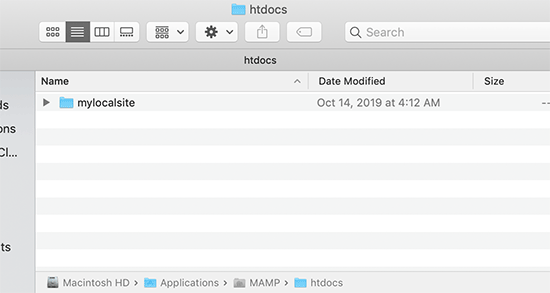
Successivamente, devi aprire la cartella che hai creato per il tuo sito web locale e quindi copiare e incollare sia il file zip di archivio sia lo script di installazione che hai scaricato in precedenza.
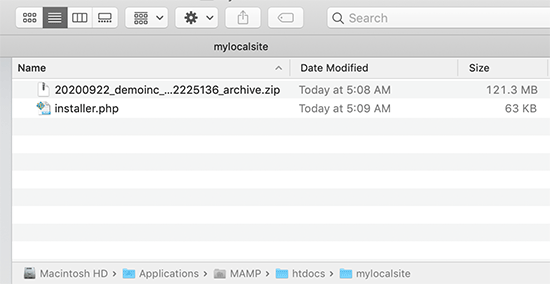
Per eseguire l'installazione, è necessario aprire lo script installer.php nel browser web.
Ad esempio, se hai incollato entrambi i file nella cartella /mylocalsite/, li accederai nel browser visitando http://localhost/mylocalsite/installer.php.
Ora vedrai lo script di installazione di Duplicator in questo modo:
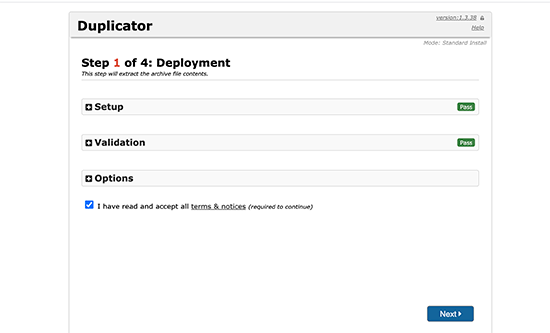
Fai clic sul pulsante 'Avanti' per continuare.
Duplicator decomprimerà ora il file zip dell'archivio e ti chiederà di inserire le informazioni del database del tuo sito locale. Questo è il database che hai creato in precedenza.
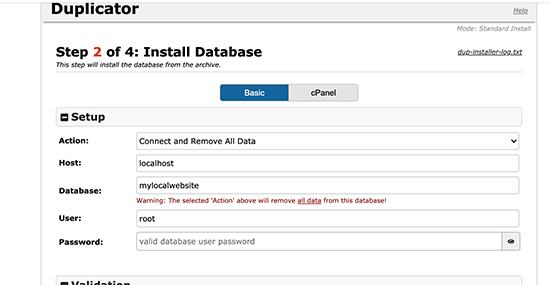
Il nome del server è quasi sempre localhost e il nome utente è root. Nella maggior parte dei casi, la tua installazione del server locale non ha una password impostata per root, quindi puoi lasciare vuoto.
In fondo alla pagina, vedrai un pulsante 'Test Database' che puoi usare per assicurarti che le informazioni del tuo database siano corrette.
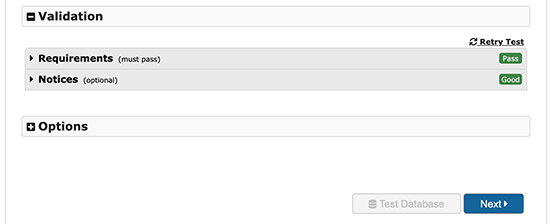
Se tutto sembra a posto, fai clic sul pulsante 'Avanti' per continuare.
Duplicator importerà ora il tuo database di WordPress. Successivamente, ti chiederà di ricontrollare le informazioni del nuovo sito web che ha rilevato automaticamente.
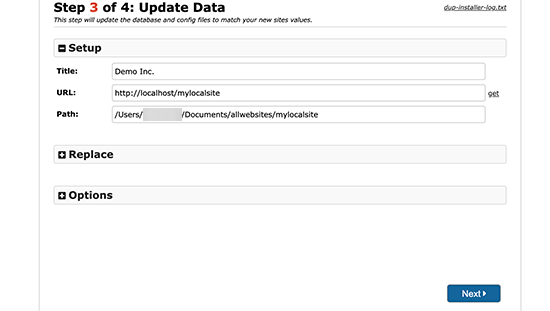
Fai clic sul pulsante 'Avanti' per continuare.
Duplicator completerà ora la configurazione e ti mostrerà un pulsante per accedere al tuo sito locale. Utilizzerai lo stesso nome utente WordPress e password che usi sul tuo sito live.
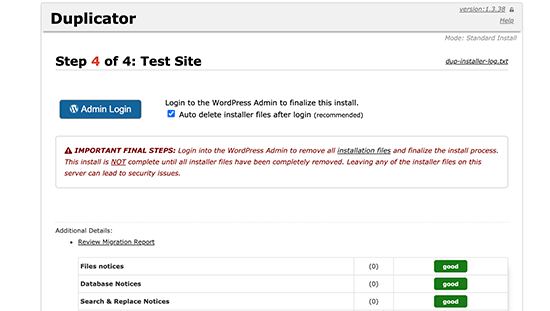
Tutto qui, hai spostato con successo il tuo sito live sul server locale.
Metodo 2. Spostare manualmente un sito WordPress live su un server locale
Nel caso in cui il plugin non funzioni per te, puoi sempre spostare manualmente il tuo sito live su un server locale. La prima cosa di cui avresti bisogno è eseguire manualmente il backup del tuo sito web dal tuo account di hosting WordPress.
Passaggio 1. Esporta il database di WordPress del tuo sito live
Per esportare il database di WordPress del tuo sito live, devi accedere alla tua dashboard di cPanel e fare clic su phpMyAdmin.
Nota: Stiamo mostrando screenshot dalla dashboard di Bluehost.
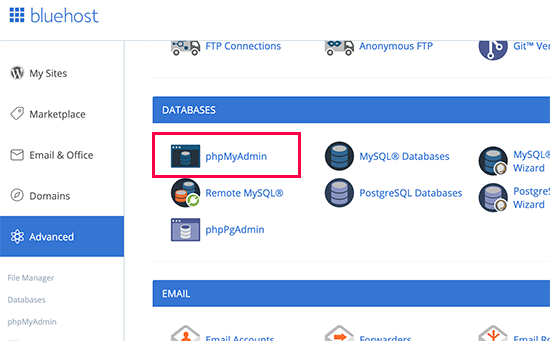
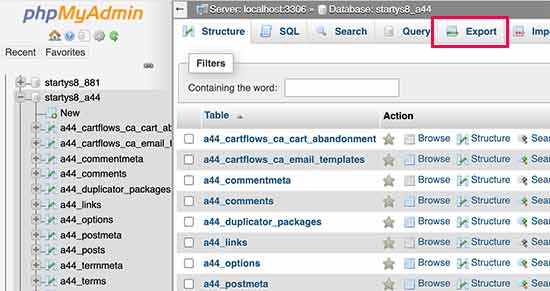
All'interno di phpMyAdmin, devi selezionare il database che desideri esportare e quindi fare clic sulla scheda di esportazione in alto.
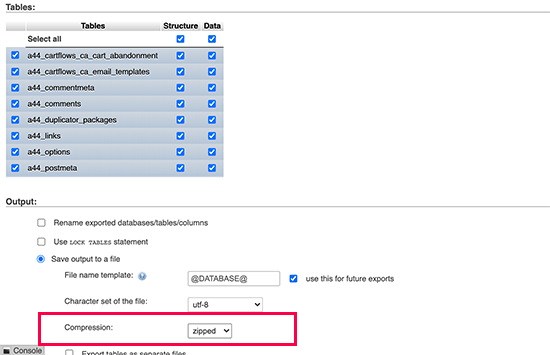
phpMyAdmin ti chiederà ora di scegliere il metodo di esportazione rapido o personalizzato. Si consiglia di utilizzare il metodo personalizzato e di scegliere zip come metodo di compressione.
A volte i plugin di WordPress possono creare le proprie tabelle all'interno del tuo database WordPress. Se non stai più utilizzando quel plugin, il metodo personalizzato ti consente di escludere tali tabelle.
Lascia le altre opzioni così come sono e fai clic sul pulsante ‘Vai’ per scaricare il backup del tuo database in formato zip.
phpMyAdmin scaricherà ora il tuo file di database. Per maggiori dettagli, consulta il nostro tutorial su come eseguire manualmente il backup del tuo database di WordPress.
Passaggio 2. Scarica tutti i tuoi file di WordPress
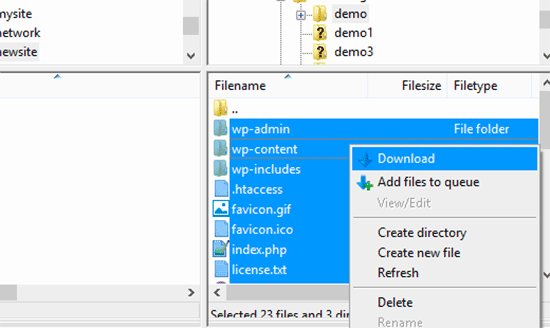
Il passaggio successivo è scaricare i tuoi file di WordPress. Per farlo, devi connetterti al tuo sito WordPress utilizzando un client FTP.
Una volta connesso, seleziona tutti i tuoi file di WordPress e scaricali sul tuo computer.
Passaggio 3. Importa i tuoi file e il tuo database di WordPress sul server locale
Dopo aver scaricato i tuoi file di WordPress, devi creare una cartella sul tuo server locale dove desideri importare il sito locale.
Se stai usando WAMP, vorrai creare una cartella all'interno della cartella C:\wamp\www\ per il tuo sito locale. Gli utenti MAMP dovranno creare una cartella nella cartella /Applications/MAMP/htdocs/.
Dopodiché, copia e incolla semplicemente i tuoi file di WordPress nella nuova cartella.
Successivamente, devi importare il tuo database di WordPress. Apri semplicemente phpMyAdmin sul tuo server locale visitando il seguente URL:
http://localhost/phpmyadmin/
Poiché hai già creato il database in precedenza, ora devi selezionarlo e quindi fare clic sulla scheda ‘Importa’ in alto.
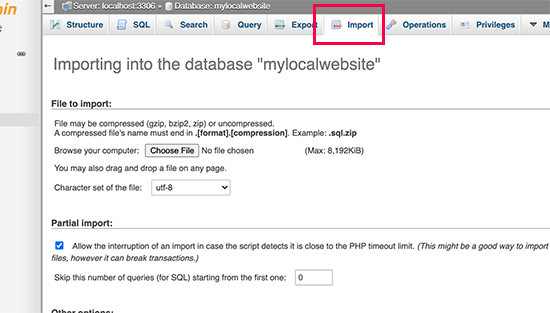
Fai clic sul pulsante ‘Scegli file’ per selezionare e caricare il file di esportazione del database che hai scaricato nel primo passaggio. Dopodiché, fai clic sul pulsante ‘Vai’ in fondo alla pagina.
phpMyAdmin ora decomprimerà e importerà il tuo database di WordPress.
Ora che il tuo database è configurato, devi aggiornare gli URL nel tuo database di WordPress che fanno riferimento al tuo sito live.
Puoi farlo eseguendo una query SQL in phpMyAdmin. Assicurati di aver selezionato il database del tuo sito locale e quindi fai clic su SQL.
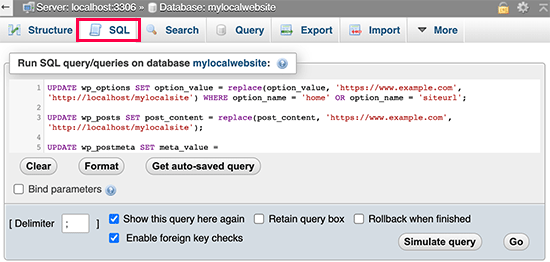
Nella schermata SQL di phpMyAdmin, copia e incolla questo codice, assicurandoti di sostituire example.com con l'URL del tuo sito live e http://localhost/mylocalsite con l'URL del server locale del tuo sito.
UPDATE wp_options SET option_value = replace(option_value, 'https://www.example.com', 'http://localhost/mylocalsite') WHERE option_name = 'home' OR option_name = 'siteurl'; UPDATE wp_posts SET post_content = replace(post_content, 'https://www.example.com', 'http://localhost/mylocalsite'); UPDATE wp_postmeta SET meta_value = replace(meta_value,'https://www.example.com','http://localhost/mylocalsite');
Questa query sostituirà i riferimenti all'URL del tuo sito live nel database con l'URL di localhost.
Passaggio 4. Aggiorna il file wp-config.php
Il passaggio finale consiste nell'aggiornare il file wp-config.php del tuo sito locale. Questo file contiene le impostazioni di WordPress, inclusa la modalità di connessione al tuo database di WordPress.
Vai semplicemente nella cartella in cui hai installato WordPress sul tuo server locale e quindi apri il file wp-config.php in un editor di testo come Blocco note.
Sostituisci il nome del database con quello che hai creato in phpMyAdmin sul tuo localhost.
Successivamente, sostituisci il nome utente del database con il tuo nome utente MySQL locale, di solito è root. Se hai impostato una password per l'utente MySQL root sul tuo localhost, inserisci quella password. Altrimenti, lasciala vuota e salva le modifiche.
/** The name of the database for WordPress */
define('DB_NAME', 'database_name_here');
/** MySQL database username */
define('DB_USER', 'username_here');
/** MySQL database password */
define('DB_PASSWORD', 'password_here');
Ora puoi visitare il tuo sito locale in una finestra del browser inserendo l'URL in questo modo:
http://localhost/mylocalsite/
Sostituisci 'mylocalsite' con il nome della cartella in cui hai copiato i tuoi file di WordPress.
Tutto qui, il tuo sito WordPress live è ora copiato sul tuo server locale.
Speriamo che questo articolo ti abbia aiutato a imparare come spostare facilmente un sito WordPress live su un server locale. Potresti anche voler consultare la nostra guida su come creare facilmente un sito di staging per WordPress per i test, o su come spostare un sito WordPress da un server locale a un sito live.
Se ti è piaciuto questo articolo, iscriviti al nostro canale YouTube per tutorial video su WordPress. Puoi anche trovarci su Twitter e Facebook.


Joseph
Ciao, ho appena trovato questo tutorial oggi, ho scoperto alcuni dei passaggi da altri tutorial, ma il mio problema riguarda la query SQL. Ricevo l'errore # MySQL ha restituito un set di risultati vuoto (cioè zero righe). Ho seguito tutti i tuoi passaggi per cambiare i nomi dei siti ecc. ma non riesco a risolvere questo e quindi ovviamente non posso connettermi al sito locale. Ho usato Duplicator prima su un altro sito ma non funziona così bene su questo a causa di tutte le immagini sul mio sito fotografico, ovvero problemi di timeout. Sto girando in tondo qui, quindi un aiuto sarebbe gradito.
Grazie,
Joseph
Yarina
Joseph, controlla che il prefisso delle tabelle SQL con cui stai lavorando sia lo stesso. Ho avuto questo problema prima quando non mi ero reso conto che il tema da cui stavo copiando aveva un prefisso non tipico (wp_extra-text invece di solo wp_). Quando crei il nuovo db su phpMyAdmin, assicurati che il prefisso corrisponda a quello del vecchio db. Spero che questo aiuti!
Alan OldStudent
Ho provato a usare Duplicator, e ha funzionato con un piccolo intoppo. Poi ho eliminato il database e ho provato il metodo manuale. Tutti i passaggi sono andati bene fino al momento dell'importazione. Ho ricreato il database e sono andato a importare. Successivamente, ho ricevuto questo messaggio di errore: “#1064 – You have an error in your SQL syntax; check the manual that corresponds to your MySQL server version for the right syntax to use near ‘default’, ‘This is the default profile, used when no profile is specified.’, ‘a:’ at line 7”
Per me sembra un pasticcio. Hai qualche idea di cosa sia andato storto e come posso fare l'importazione manualmente?
Saluti,
Alan
Supporto WPBeginner
Questo potrebbe essere un errore di sintassi o un conflitto causato dall'uso di diverse versioni di MySQL. Per risolvere questo problema, quando esporti il tuo database scegli la stessa versione di MySQL della tua installazione locale. Assicurati anche che stai usando lo stesso set di caratteri per entrambe le tabelle del database.
Amministratore
Em Cloney
Solo una cosa veloce che ho notato: il file Duplicator è chiamato “installer.php” invece di “install.php”.
Ben
Ho notato la stessa cosa. Ottimo articolo, però. Sono così felice di aver sentito parlare di questo plugin da voi.
wpva
Ciao, ho deciso di farlo manualmente
Ho creato un database per il mio sito Wordpress sul mio server locale e ho provato a importare il database che avevo scaricato prima sul mio computer, ma sto ricevendo questo messaggio di errore:
Query SQL:
—
— Database: `aguilar_jmln1`
—
— ——————————————————–
—
— Struttura della tabella per la tabella `gm_AnythingPopup`
—
CREATE TABLE IF NOT EXISTS `gm_AnythingPopup` (
`pop_id` int(11) NOT NULL,
`pop_width` int(11) NOT NULL DEFAULT ‘380’,
`pop_height` int(11) NOT NULL DEFAULT ‘260’,
`pop_headercolor` varchar(10) NOT NULL DEFAULT ‘#4D4D4D’,
`pop_bordercolor` varchar(10) NOT NULL DEFAULT ‘#4D4D4D’,
`pop_header_fontcolor` varchar(10) NOT NULL DEFAULT ‘#FFFFFF’,
`pop_title` varchar(1024) NOT NULL DEFAULT ‘Anything Popup’,
`pop_content` text CHARACTER SET utf8 COLLATE utf8_bin NOT NULL,
`pop_caption` varchar(2024) NOT NULL DEFAULT ‘Click to open popup’
) ENGINE=MyISAM AUTO_INCREMENT=2 DEFAULT CHARSET=utf8;
MySQL ha detto:
#1046 – Aucune base n’a été sélectionnée
Kin
Dice che nessun database è stato selezionato.
Sì, l'ho capito anche io.
Devi assicurarti di aver cliccato su un database prima di premere 'import', altrimenti lo strumento di amministrazione tenterà di importare il file .sql su nulla!!
TMo
Meraviglioso tutorial su come procedere manualmente. Grazie per le chiare indicazioni e le foto!
Shane Levine
Ciao, Duplicator è un metodo accettabile per mantenere un backup del sito web? Ho usato BackWPup ma sembra che Duplicator ti permetta anche di creare un backup…
Dennis Crayon
Ciao, non sono sicuro se sono stato fortunato, ma sono riuscito a scaricare e configurare la versione locale rapidamente. L'unico problema che ho è che devo impostare i permalink su predefinito, il che va bene localmente, potrò reimpostarli su nome del post più tardi quando metterò online l'intera cosa? Grazie, arrivare fin qui è già fantastico
Staff di WPBeginner
Sì, puoi cambiare i permalink dopo aver messo online il tuo sito.
Felix
Dennis, sono nuovo di WordPress ma finora ho imparato le questioni chiave di configurazione. Potresti aiutarmi a cambiare i permalink da predefinito a nome del post?
Iftikhar Raja
Solo un'osservazione da condividere.
If you choose custom structure as permalink, it might not work. The work around is to chose default permalink and save the changes. It worked for me after several hours of head scratching
Spero sia d'aiuto
Mario
Se stai usando WAMP, devi attivare mod_rewrite per abilitare i permalink personalizzati.
Clicca Wamp -> Apache -> Moduli Apache -> rewrite_module
Staff di WPBeginner
Di solito è abilitato per impostazione predefinita.
isboleas
Perfetto! L'ho fatto manualmente, solo in wp-config.php devo cambiare la riga
/** MySQL hostname */
define(‘DB_HOST’, ‘127.0.0.1 ‘);
Con l'IP che appare in phpmyadmin nell'angolo in alto a sinistra.
Anindyo Yudhistiro
Ho seguito tutti i passaggi, ma ancora non vedo il mio database nel mio wp locale. Ho ancora solo il post Hello World.
L'ho importato, ho cambiato tutti gli URL e molte righe sono già state modificate.
Keith Davis
Ho usato il metodo manuale ma la query SQL non ha funzionato per me.
Ho dovuto entrare in wp-options e cambiare l'URL nelle tabelle siteurl e home e poi tutto è andato bene.
Keith Davis
Ciao ragazzi
Il metodo Duplicator sembra buono.
Sapete quanto spazio libero su disco serve per creare i pacchetti?
Nana
Qualche idea sul perché mi dia la schermata "Benvenuti nella famosa installazione in cinque minuti"?
Staff di WPBeginner
È possibile che il tuo URL di WordPress e l'URL del sito siano impostati su localhost/xammp. Se riesci ad accedere all'area admin, vai su impostazioni e impostalo sulla tua directory di installazione di WordPress.
Je
Ho controllato e non è sicuramente impostato così. È così strano!
Je
Ho risolto. Era la cache W3 nel file htaccess a causare problemi. Grazie per il tuo aiuto e per questo fantastico tutorial!
Jen
Ottimo tutorial, ho fatto tutto esattamente come hai detto... Pensavo funzionasse finché non ho provato a cambiare tema e non si è cambiato. Poi ho iniziato a provare a navigare verso altre pagine e mi portava a localhost/xammp. Ogni volta. Qualche idea?
dion
Ciao. Ho fatto tutto questo (usando l'opzione manuale), ma quando clicco su qualsiasi opzione, ad esempio login o una delle opzioni del menu, ricevo "l'URL richiesto ... non è stato trovato su questo server".
wagster
Se copi la query SQL direttamente dallo schermo sopra, otterrai anche i numeri di riga, il che causerà un errore come quello sopra. Clicca su 'Visualizza sorgente' e copia il codice pulito da lì.
MrDev
Grazie per questo articolo. Ho provato il percorso manuale per spostare un sito WordPress su localhost, tuttavia i miei fogli di stile non vengono caricati. Per qualche motivo l''href' non viene impostato su tutti i miei fogli di stile. Hai idea di cosa potrebbe succedere?
Staff di WPBeginner
Ci sentiremmo più sicuri nel raccomandare BackupBuddy per i backup.
NikkiC4lyf
Consiglieresti di usare il plugin Duplicator anche per fare backup e spostare siti?
Kin Tatsu
Ottimo tutorial! Il problema che sto riscontrando è che quando accedo a wp-admin con lo stesso nome utente e password che ho usato per il mio sito live, ricevo "ERRORE: Nome utente non valido. Password dimenticata?". Il nome utente e la password sono corretti per il sito live ma errati per il sito localhost. Ho provato a recuperare la password con il mio indirizzo email ma dice che il mio indirizzo email non è registrato. Qualche idea?
pbr
Ho solo una parola per questi passaggi… FANTASTICO!!!!
StefsterNYC
Hai controllato i tuoi prefissi?
pels
ho ottenuto lo stesso errore
StefsterNYC
Potresti aver saltato una tabella o qualcosa del genere. Cerca il vecchio prefisso. Assicurati anche di utilizzare un WP-CONFIG nuovo di zecca. Trovo che a volte questo crei problemi.
StefsterNYC
Scusa per il ritardo Mark. Non sono sicuro di capire la tua domanda. Spero di poterti rispondere qualcosa qui.
Se hai iniziato con un file di configurazione e originariamente iniziava con wp_ e non hai usato uno personalizzato, andrà tutto bene. Ricorda solo che la configurazione deve corrispondere al DB. Se hai lavorato in locale e stai migrando tutto su un sito live e usi lo stesso DB e la stessa Config con cui hai lavorato in locale, tutto dovrebbe andare bene. Ricorda solo di cambiare Nome utente, Password e Hostname.
La chiave da ricordare qui sono i prefissi. Molte persone ti insegnano come fare questo e quello, ma perdono l'unica cosa che può mandare tutto all'aria. Ed è il prefisso.
E i Ruoli utente, se trascurati, possono causare un bel mal di testa quando si aggiungono amministratori manualmente. Quindi fai attenzione quando cambi e lavori con i prefissi. Sono assolutamente un ottimo modo per rafforzare i siti WP. Consiglio vivamente di utilizzare sempre un prefisso personalizzato. dbh_234_ qualcosa del genere è un ottimo modo per proteggere il tuo sito/i.
Staff di WPBeginner
Se l'host mysql del tuo sito live non è localhost, allora devi cambiarlo in localhost. Potrebbe anche essere necessario cambiare il nome del database con il database sul tuo computer locale. Lo stesso vale per il nome utente del DB che di solito è root sui server locali, e la password del DB che di solito è vuota.
Mark
Ciao, giusto per essere chiari, la password nel file config.php dovrebbe essere la stessa di quella che usi per myphpadmin? perché a me sembra funzionare?
StefsterNYC
Ottimo tutorial. Credo che sia stata omessa una cosa. Il prefisso. Per coloro che usano un prefisso nella configurazione, assicurati che quando interroghi il db, cambi wp per la query con il tuo prefisso. Altrimenti la tua query non reimposterà correttamente gli URL.
Mark
Se ho un'installazione locale e sposto il database online, il prefisso rimarrà lo stesso, corretto? Devo fare qualcosa?
Cypherinfo
Errore 404: Oggetto non trovato: L'URL richiesto non è stato trovato su questo server. Il link nella pagina di riferimento sembra essere errato o obsoleto. Si prega di informare l'autore di quella pagina dell'errore.
Se si ritiene che si tratti di un errore del server, si prega di contattare il webmaster.
” Ho seguito tutti i passaggi che hai scritto.
Sophie
Queste istruzioni sono esattamente ciò di cui avevo bisogno. Grazie!!!
Tuttavia, sembra che abbia riscontrato un problema…
Quando aggiorno gli URL nel mio database per quelli del server locale, restituisce un #1064 – errore nella sintassi SQL vicino alla riga 3. Potresti suggerire una soluzione?
Dovrei includere il numero di porta quando aggiorno la parte http://localhost/ del codice?
Aiuto per favore!!
Vtin
Un altro problema da principiante qui! Mi scuso per l'inconveniente.
Certo, penso di aver fatto tutto correttamente (probabilmente no). Quando provo ad accedere al sito tramite localhost, sullo schermo appare il file index.php riga per riga, invece di caricarlo.
Qualche idea?
W
Questo è stato fantastico. Super veloce e ha funzionato esattamente come previsto.
Paul Sahota
Puoi per favore mostrare come spostare un sito WordPress live in locale usando BackupBuddy su Mac usando MAMP. Ci ho provato più volte ma non funziona per me. Posso facilmente fare il contrario.
grazie
Jeremy
Dopo aver trasferito il sito live sul mio server locale (wamp), navigo nella destinazione nel browser e ottengo un errore WordPress "Non trovato". La navigazione del sito si carica, ma quando clicco mi porta al sito live. Mi manca qualcosa di elementare?
Kin
Sto riscontrando la stessa cosa. Ho seguito tutti i passaggi. Poi sono tornato a controllare di nuovo, ma l'errore persiste. Vedo che un paio di persone sopra hanno avuto lo stesso problema. Qualcuno ha idea del perché stia succedendo?
Sinuhe
Thank you!!! I just finished moving my site and a subdomain to a new hosting service and it worked like a charm. I am no techie, actually I am philosopher I really appreciate you taking the time to explain this info in detail.
Sam
Ehi, ho fatto tutto come hai detto nel metodo manuale.
dopo la configurazione,
vedo la homepage del mio sito web sul server locale.
Ma quando provo a navigare verso un'altra pagina, ricevo il seguente errore:
"Non trovato: l'URL richiesto /test/logistics non è stato trovato su questo server."
Aiuto per favore
Bill
Mi è appena capitato lo stesso problema. Sono andato su site/wp-admin. Poi sono andato su Impostazioni > Permalink e ho semplicemente cliccato Salva modifiche. Ha aggiornato qualcosa e tutti i miei link funzionano.
Guarda un po'! Il mio primo contributo alla community.
Isabela Santos
grazie! Ma ho dovuto disabilitarlo perché funzionasse...
Mark
Brillante!
John
Fantastico. Ha funzionato benissimo! Grazie per aver pubblicato questo.
Natalia
Ciao,
I followed your tutorial on doing it manually to the T, but I still get an error message. I am pulling my hair, here…
I’m pretty new to WP and I still have to figure out how to actually enter the new content and modify the files… but I can’t even get it to work locally
Questo è il messaggio che ricevo:
“Errore di connessione al database”
Cosa che non capisco, perché ho fatto tutto come hai detto nel tuo tutorial.
Aiuto, per favore!!
Natalia
Tried it all over again a second time and still same error message… I’m going crazy
Natalia
Ho persino provato su un server remoto e ho ottenuto lo stesso messaggio di errore. Non so cosa sto sbagliando... ci deve essere un percorso da qualche parte che mi sto dimenticando e non sta leggendo il db giusto...
Qualcuno, per favore, mi aiuti!!
Supporto WPBeginner
Natalia, la causa più comune di questo errore sono le informazioni errate sul database. Sul tuo sito live, devi modificare il file wp-config.php. Assicurati che le informazioni sul database in questo file corrispondano al database che hai creato per il tuo sito live.
Amministratore
Kathi Kostiuk
Grazie, il tuo sito è di grande aiuto. Sono nuovo di WP, ho ereditato un sito, l'ho messo in locale in modo da poter imparare/testare. Quando provo a 'caricare' un'immagine, ottengo questo: C:/wamp/www/testsite/wp-content/uploads. La sua directory padre è scrivibile dal server? Nessun errore mostrato in phpMyAdmin, i permessi sulle cartelle, gli utenti sembrano corretti. Potresti per caso indirizzarmi verso una soluzione? Ho cercato ovunque mi venga in mente. Grazie.
Supporto WPBeginner
Quando hai spostato il sito in locale, hai modificato le opzioni siteurl e homeurl? Se non l'hai fatto, devi aggiungere queste due righe al tuo file
wp-config.phpdefine('WP_HOME','http://localhost/yoursite'); define('WP_SITEURL','http://localhost/yoursite');1-click Use in WordPress
Amministratore
Kathi Kostiuk
Grazie, lo farò.
Julie Rondeau
Ciao,
Ottimi tutorial! Grazie, tuttavia continuo a ricevere un errore "Sconosciuto" codice 0 dal plugin Duplicator quando tento di creare i pacchetti. C'è qualche altro modo che potresti consigliare? Qualsiasi aiuto sarebbe davvero apprezzato.
Grazie mille,
Saluti da Parigi.
J.
Supporto WPBeginner
Puoi anche fare un backup manuale del tuo sito in locale e ripristinarlo sul server live.
Amministratore
Rehan
Best tutorial ever!!
Ashley
Ciao! Grazie mille per i tuoi ottimi tutorial! Tutto ha funzionato alla grande, ma quando avrei dovuto "risalvare i permalink" non mi faceva accedere. Ho risolto e ora sono loggato, ma dove vado per risalvarli ora che non ho quel pop-up? Presumo sia questo il motivo per cui quando provo a cliccare sui post mi appare una pagina "non trovata"? Grazie in anticipo!
Supporto WPBeginner
Puoi salvare i permalink da Impostazioni » Permalink.
Amministratore
Jesse
Posso chiedere come hai risolto il problema di accesso? Sto riscontrando lo stesso problema.
Yarina
Ciao! Tutto ha funzionato alla grande finché non ho dovuto accedere alla dashboard di wp, il mio accesso non ha funzionato e anche dopo averlo modificato manualmente nella tabella degli utenti, non sono riuscito ad accedere, qualche idea...?
Angela
Grazie! Ci sto provando da un po' di tempo. Ho guardato diversi video su YouTube ma non sono riuscito a farlo funzionare correttamente. Questo è stato così facile... la cosa migliore di sempre. Grazie ancora!
Ivan
Ciao,
Ho seguito le tue istruzioni alla lettera (e cantando lol), ma non ho avuto successo. Penso che abbia a che fare con l'installazione di WP. Non l'ho installato, l'ho solo copiato.
Brett Golding
Non ha funzionato per me, ho solo finito con una homepage bianca e vuota dopo aver eseguito il programma. Ho riprovato 3 volte.
Supporto WPBeginner
Dai un'occhiata a come risolvere il problema della schermata bianca della morte.
Amministratore
Jason Moore
Grazie! È stato troppo facile!
ron
Ciao, sto cercando di fare esattamente questo, ma ottengo un errore 500 Internal Server Error subito dopo aver inserito i dettagli del database e premuto il pulsante Run Deployment. Vedo l'animazione di avanzamento e dopo circa 10 o 15 secondi ottengo l'errore.
Stavo guardando i log degli errori situati in C:\wamp\logs e ho trovato solo questa riga che sembrava un po' pertinente: "Invalid command 'RewriteOptions', perhaps misspelled or defined by a module not included in the server configuration".
Ho usato duplicator con successo in passato, ma passando da un webserver a un altro.
Qualche idea?
Supporto WPBeginner
Ti preghiamo di consultare la nostra guida su come risolvere l'errore 500 Internal Server Error in WordPress.
Amministratore
Usama Noman
Thanks, seems like this is a tutorial posted upon my request Thanks guys you are doing good.
Supporto WPBeginner
Sì, è così Usama. Grazie per avercelo suggerito.
Amministratore
Jamie Mannion
Ottima guida, ma penso che tu abbia saltato la parte in cui aggiorni wp-config.php con i nuovi dettagli del database – name è il nuovo nome, username è 'root' e la password è vuota.
Ci ho provato manualmente e sembra tutto a posto, ma i link mi portano alla pagina di configurazione del server WAMP, anche se gli URL sono aggiornati – non riesco a capirlo. Riesco ad accedere alla home page e all'area admin, ma nient'altro. Saluti!
Supporto WPBeginner
Grazie per aver segnalato l'aggiornamento di wp-config.php. Abbiamo aggiornato l'articolo.
Per quanto riguarda il tuo problema di reindirizzamento. Prova a eliminare il file .htaccess dall'installazione di WordPress sul tuo server locale.
Amministratore
Jamie Mannion
Fantastico, grazie! Ho rimosso il .htaccess, poi ho visitato la pagina delle opzioni dei permalink e ho salvato e ora va tutto bene! Devo ammettere che l'unica ragione per cui sapevo delle impostazioni di wp-config.php è perché ho letto i tuoi articoli precedenti. Continua così!
Kin
Ho posto una domanda prima oggi, ma questo ha funzionato benissimo per me.
Grazie.
Shahraar Khan
Faccio questo manualmente. Comprimo semplicemente i file dal server e li scarico… esporto il database e sostituisco tutti i collegamenti nel mio editor di testo. un lavoro di soli 5 minuti.. Ma comunque il tuo tutorial è anche un'ottima alternativa.