
Dopo anni di costruzione di siti web WordPress, abbiamo imparato quanto sia importante avere una configurazione locale di WordPress sul proprio computer.
Avere WordPress sul vostro computer personale vi permette di sperimentare nuove funzionalità senza rischiare il vostro sito live, di immergervi in profondità nello sviluppo di WordPress e persino di costruire interi siti web prima che diventino operativi. È come avere una sandbox privata per tutti i vostri progetti WordPress.
Se siete utenti Windows, esistono numerosi modi per configurare WordPress in locale. Ma abbiamo ristretto il campo ai due metodi più semplici. In questa guida vi mostreremo come installare facilmente WordPress su un computer Windows, indipendentemente dalla versione in uso.

Perché installare WordPress su Windows?
Se siete utenti di Windows, l’installazione di WordPress in locale sul vostro computer offre diversi vantaggi.
Un’installazione locale di WordPress crea un ambiente di prova che non influisce sul vostro sito web reale. Questa configurazione, spesso chiamata server locale o localhost, è il vostro parco giochi personale per WordPress.
Gli sviluppatori di WordPress utilizzano regolarmente installazioni locali per il loro lavoro. Ad esempio, possono usarle per sperimentare nuovi plugin o temi o per testare il sito prima di aggiornare l’editor di blocchi Gutenberg.
Ma non è solo per i professionisti. Se siete alle prime armi con WordPress, una configurazione locale è perfetta per imparare. Potete esplorare le funzionalità, testare temi e plugin e sperimentare liberamente senza preoccuparvi di rompere un sito live.
È importante notare che quando installate WordPress in locale su Windows, solo voi potete vedere il sito. Se volete creare un sito web pubblico, avrete bisogno di un nome di dominio e di un hosting web.
Ora, tecnicamente, è possibile installare WordPress su Windows utilizzando XAMPP, e abbiamo già scritto un tutorial al riguardo.
Detto questo, abbiamo trovato due metodi ancora più semplici di XAMPP per configurare un ambiente WordPress locale, ideali per i principianti o per gli utenti che hanno bisogno di creare rapidamente un sito locale. Potete fare clic sul link qui sotto per passare al metodo che vi interessa:
Metodo 1: Installare WordPress su Windows utilizzando Studio (semplice e veloce)
Per il primo metodo, utilizzeremo Studio. Si tratta di un software locale per WordPress realizzato da Automattic, la società che gestisce e amministra WordPress.com, che è un costruttore di siti web basato sul software WordPress.
Parleremo prima di questo metodo perché è molto più rapido e semplice da seguire, perfetto per i principianti.
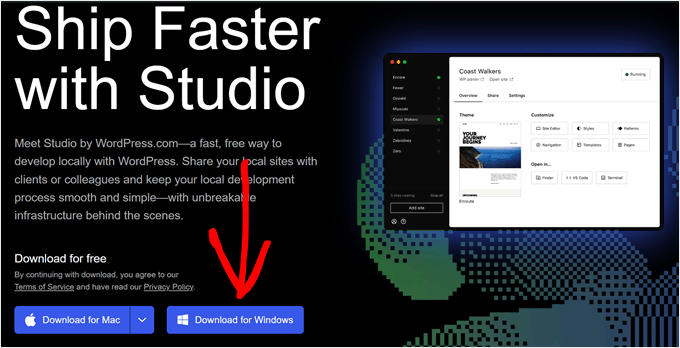
Innanzitutto, è necessario aprire il sito web di Studio by WordPress.com. Quindi, fate clic sul pulsante “Download per Windows”.
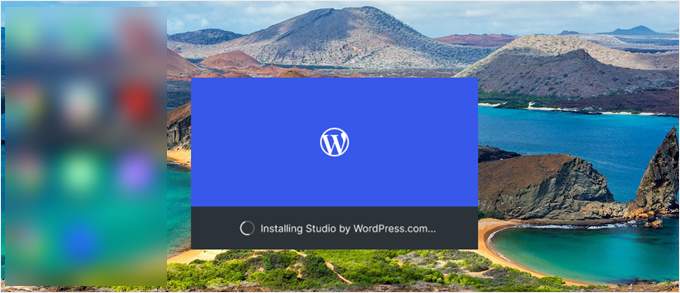
Una volta fatto ciò, basta aprire il file scaricato per avviare l’installazione.
A questo punto apparirà una finestra popup che indica che l’applicazione è in fase di installazione.
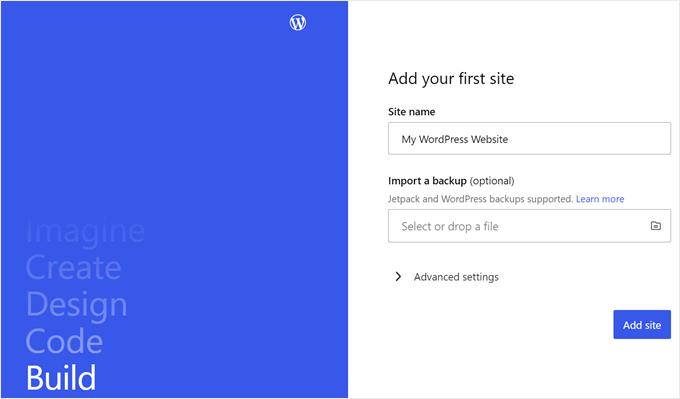
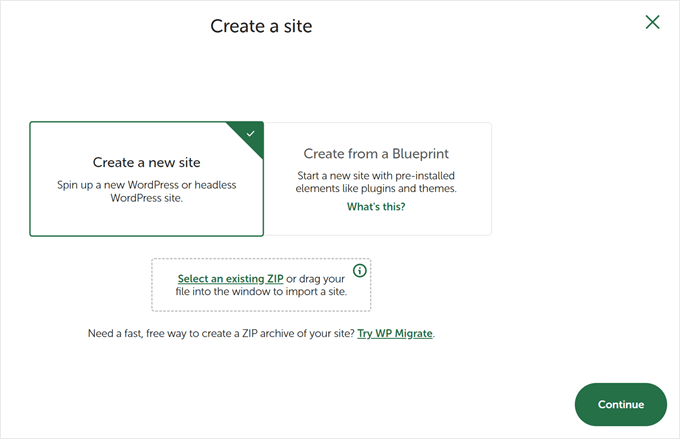
Fatto questo, si può aggiungere il primo sito.
Per farlo, basta inserire il nome del nuovo sito WordPress locale e fare clic su “Aggiungi sito”. Potete dare al sito il nome che preferite, purché vi aiuti a identificarlo facilmente.
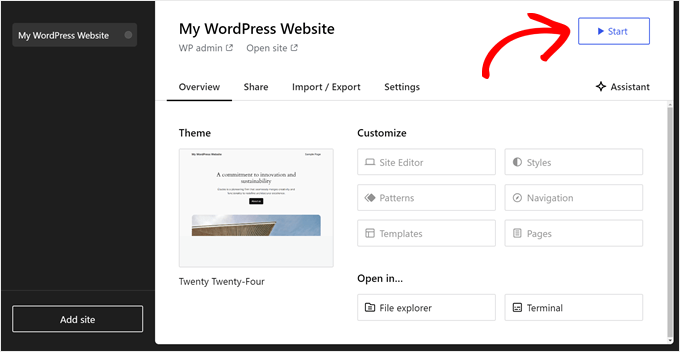
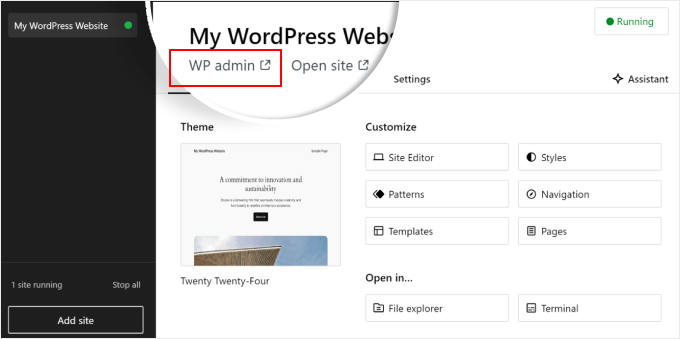
Ora dovreste vedere la dashboard del vostro sito WordPress locale.
Per accedere alla dashboard di WordPress e modificare il sito web, è sufficiente fare clic sul pulsante “Start” nell’angolo in alto a destra. In questo modo il vostro sito web locale sarà accessibile sul vostro computer.
Una volta modificato il pulsante “Avvio” in “In esecuzione”, si può fare clic sul link “WP Admin” in alto a sinistra della pagina.
In questo modo si accede alla pagina di amministrazione locale di WordPress.
E questo è praticamente tutto per la configurazione. Esaminiamo le altre impostazioni che possono essere necessarie per la creazione del vostro sito web locale.
Come si può vedere nella scheda “Panoramica”, è possibile accedere immediatamente al menu dell’editor completo di WordPress direttamente dalla dashboard di Studio. Potete anche fare clic su “Esplora file” per aprire le cartelle e i file del vostro sito WordPress e fare clic su “Terminale” per gestire il vostro sito web utilizzando WP-CLI.
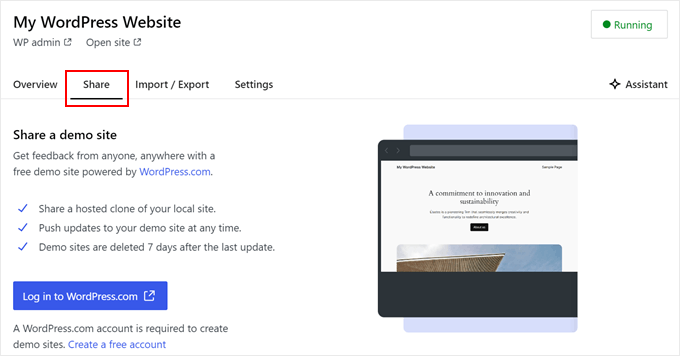
Se passate alla scheda “Condividi”, potete accedere al vostro account WordPress.com, clonare il vostro sito web locale e caricarlo sui server di WordPress.com. In questo modo il sito clonato sarà temporaneamente online, il che è utile per condividere siti demo con i vostri clienti o membri del team.
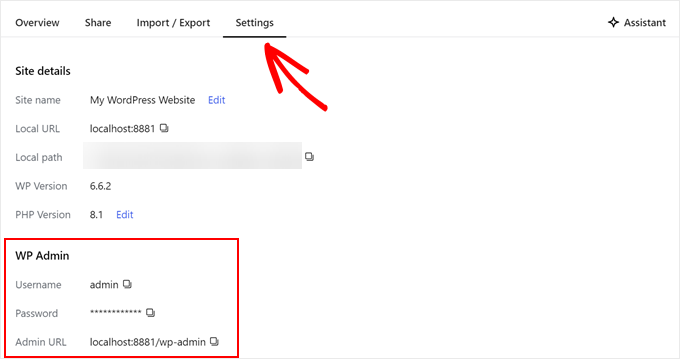
A volte si può desiderare di accedere al proprio sito web locale direttamente tramite il browser, invece di utilizzare Studio. In questo caso, è necessario conoscere le credenziali di wp-admin.
Per trovarli, potete passare alla scheda “Impostazioni” e trovare il nome utente, la password e l’URL di accesso dell’amministratore di WordPress.
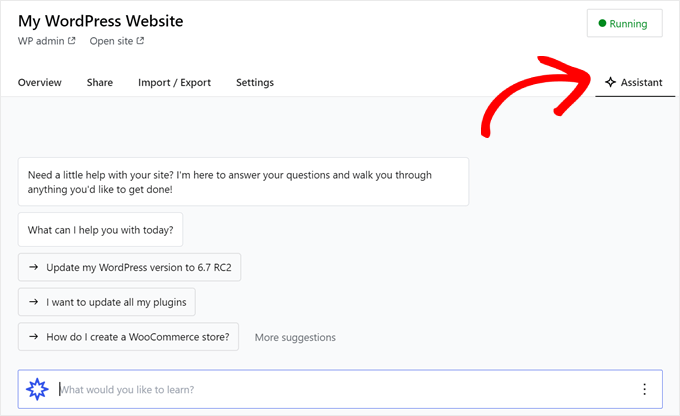
Un’altra caratteristica interessante di Studio è il chatbot AI integrato, con il quale è possibile comunicare facendo clic sul pulsante “Assistente”.
Qui è possibile chiedere aiuto a Studio per compiti come l’aggiornamento di tutti i plugin in una sola volta, l’aggiornamento della versione principale di WordPress o la creazione di codice per un blocco personalizzato.
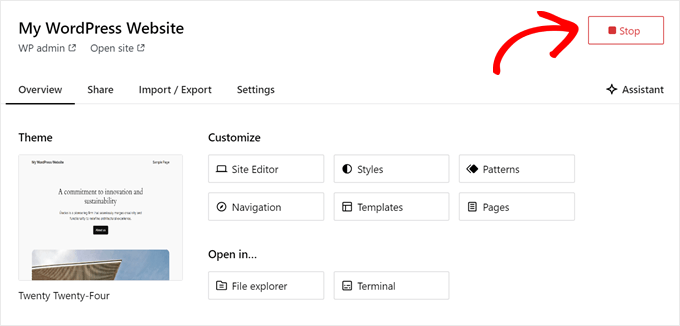
Quando avete finito di lavorare sul vostro sito locale, passate sopra il pulsante “In esecuzione” nell’angolo in alto a destra fino a quando non appare la scritta “Stop”.
Quindi, fare clic sul pulsante per interrompere il sito web.
Un aspetto negativo di Studio è che non è possibile configurare l’ambiente WordPress a proprio piacimento. Ciò significa che dovete utilizzare la versione di PHP, il server web e il database che sono stati preselezionati per voi.
Questo può essere uno svantaggio se avete bisogno di testare il vostro sito web o plugin con configurazioni specifiche del server.
Se avete bisogno di un maggiore controllo sull’ambiente WordPress locale o di far coincidere la vostra configurazione locale con una specifica configurazione del server live, potete verificare il metodo successivo che prevede l’uso di WP locale.
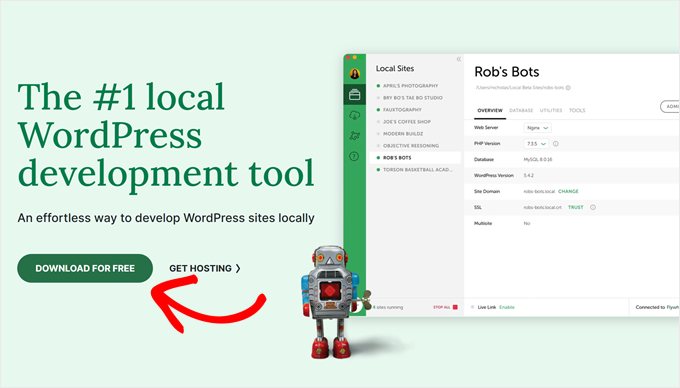
Metodo 2: Installare WordPress su Windows utilizzando WP locale (più personalizzabile)
Innanzitutto, è necessario scaricare e installare il software Local WP sul proprio computer Windows. Basta andare sul sito web di Local WP e fare clic sul pulsante “Download for Free”.
Successivamente, apparirà una finestra popup in cui dovrete selezionare la vostra piattaforma. Scegliete “Windows” dal menu a discesa.
Successivamente, è possibile inserire i propri dati, come nome e cognome, indirizzo e-mail di lavoro e numero di telefono, per scaricare il software.
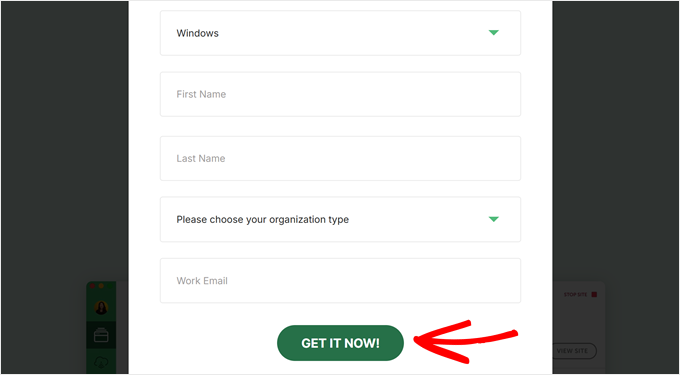
Dopo aver inserito i dati, è sufficiente fare clic sul pulsante “Ottieni ora”.
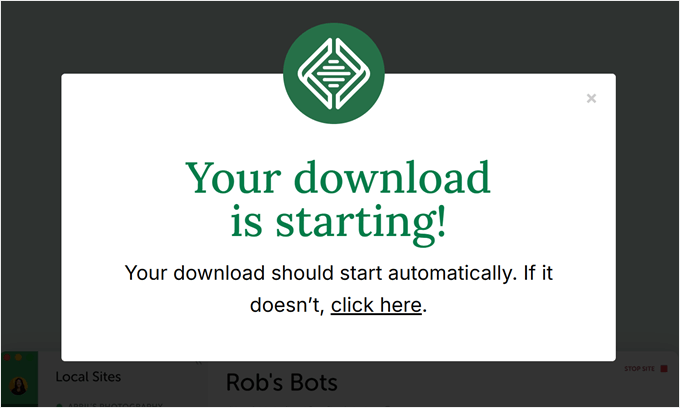
Successivamente, il software verrà scaricato automaticamente nel computer. Altrimenti, è possibile fare clic sul link “clicca qui” per avviare il download.
Una volta scaricato il file, avviate la procedura guidata di installazione.
A questo punto, dovrete selezionare se volete installare il software per tutti gli utenti o solo per voi.
Una volta selezionata un’opzione, fare clic sul pulsante “Avanti”.

Nel passaggio successivo, è possibile selezionare la “cartella di destinazione” in cui verrà installato il software.
È sufficiente fare clic sul pulsante “Sfoglia” per impostare il percorso e quindi fare clic sul pulsante “Installa”.

Il software Local WP viene ora installato sul computer Windows.
Una volta terminato, è possibile selezionare la casella di controllo “Esegui in locale” e fare clic sul pulsante “Fine” nella procedura guidata di installazione.

A questo punto il software si avvia sul dispositivo Windows.
Il passo successivo consiste nell’aggiungere un nuovo sito web locale. Per farlo, è sufficiente fare clic sul pulsante “+” in basso.

Successivamente, è possibile creare un sito nel software Local.
Selezionare l’opzione “Crea un nuovo sito” e fare clic sul pulsante “Continua”. È possibile creare il sito partendo da un blueprint o da un file di sito esistente, ma a scopo dimostrativo sceglieremo la prima opzione.
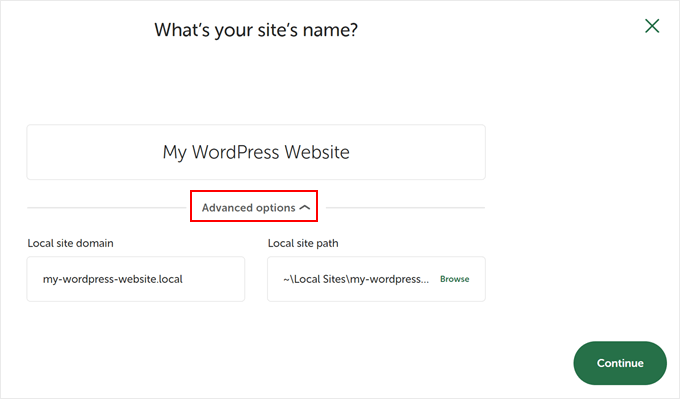
Successivamente, è possibile inserire un nome per il sito web locale, ad esempio “Il mio sito WordPress”.
Sono disponibili anche opzioni avanzate in cui è possibile inserire il dominio del sito locale e il percorso del sito locale. Per impostazione predefinita, il dominio utilizzerà il titolo del sito web, ma separato da trattini.
Una volta terminato, è sufficiente fare clic sul pulsante “Continua”.
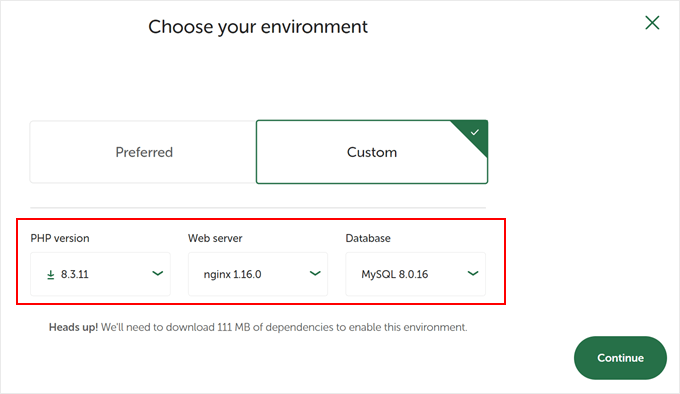
Successivamente, è necessario scegliere un ambiente per il sito web locale.
È possibile utilizzare l’ambiente “Preferito”, in cui il software selezionerà automaticamente la versione di PHP, il server web e la versione di MySQL. D’altra parte, si può anche selezionare “Personalizzato” e inserire i dettagli dell’ambiente.
Local WP offre le ultime versioni di PHP. Per quanto riguarda il server web, è possibile scegliere tra Nginx e Apache. È inoltre possibile scegliere tra MySQL o MariaDB per i database.
Si noti che alcune versioni di PHP, server web e database richiedono il download di alcune dipendenze per funzionare correttamente.
Successivamente, è possibile inserire un nome utente e una password di WordPress per il sito web locale. Inoltre, è possibile scegliere un indirizzo e-mail di WordPress per ricevere tutte le notifiche via e-mail.
Oltre a questo, c’è un’opzione avanzata in cui il software vi chiederà se avete una rete WordPress multisito. In caso contrario, basta fare clic su “No”.
Dopo aver inserito questi dati, è sufficiente fare clic sul pulsante “Aggiungi sito”.

Il software installerà ora WordPress e configurerà il vostro sito web.
Per avviare il sito web locale, fare clic sul pulsante “Avvia sito” nell’angolo in alto a destra.
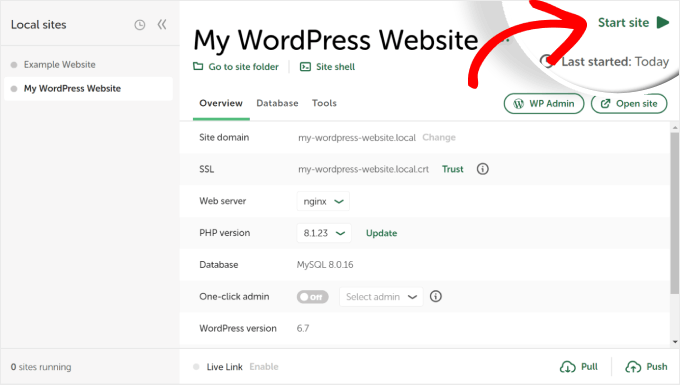
Quindi, fate clic sul pulsante “WP Admin” e vedrete la pagina di accesso all’amministrazione di WordPress.
È sufficiente inserire il nome utente e la password immessi in precedenza durante la configurazione del sito web locale, quindi fare clic sul pulsante “Accedi”.

Ora è possibile modificare il sito web locale sul computer Windows.
Una volta terminato, non dimenticate di fermare il sito web dal software Local WP facendo clic sul pulsante “Stop site”.

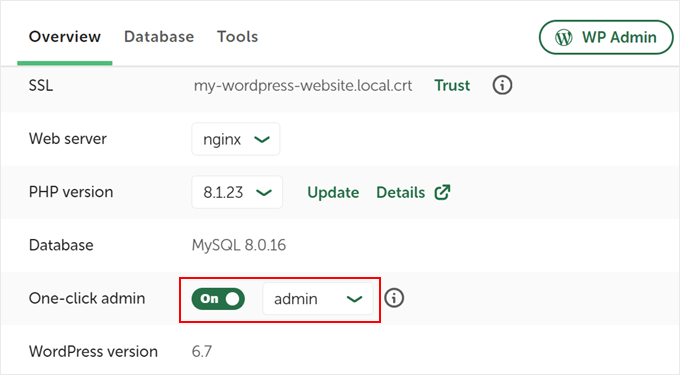
Suggerimento: se si desidera saltare il processo di login, è possibile abilitare il login dell’amministratore con un solo clic in Local WP.
Per farlo, basta tornare alla dashboard di WP locale e attivare il pulsante “Amministratore con un solo clic” fino a quando non appare la dicitura “On”. Quindi, nel menu a discesa, selezionare l’utente amministratore che può utilizzare questa funzione di accesso con un solo clic.
Alternativa: Usare WordPress Playground per testare temi, plugin e altro ancora
WordPress Playground è uno strumento innovativo che consente di sperimentare WordPress direttamente nel browser web. Si tratta di una sandbox virtuale in cui è possibile provare nuovi temi, plugin e funzionalità di WordPress senza influire su alcun sito web reale.
WordPress Playground si differenzia da un ambiente WordPress locale per diversi aspetti fondamentali.
Innanzitutto, non richiede l’installazione sul computer e si ripristina dopo ogni utilizzo, a differenza delle installazioni locali permanenti. È possibile accedervi da qualsiasi dispositivo dotato di browser, mentre le installazioni locali sono legate a un solo computer.
Mentre WordPress Playground è ideale per test e apprendimento rapidi, un ambiente WordPress locale sul vostro computer Windows offre maggiore flessibilità per progetti di sviluppo a lungo termine.
Per una guida dettagliata, consultate la nostra guida su come utilizzare WordPress Playground nel browser.
Ho installato WordPress sul mio computer Windows, e ora?
Ora che avete WordPress sul vostro computer, ecco alcune cose che potete fare:
- Imparate i suggerimenti e i trucchi di base di WordPress per utilizzare meglio il vostro sito.
- Provate diversi temi di WordPress per vedere come può apparire il vostro sito.
- Installate e testate i plugin WordPress indispensabili per aggiungere nuove funzionalità al vostro sito.
- Imparate a risolvere gli errori più comuni di WordPress da soli.
- Provate diversi page builder drag-and-drop per dare al vostro sito un aspetto gradevole.
- Imparate a reimpostare la password di amministrazione di WordPress su localhost per recuperare l’accesso al vostro sito.
- Impostate flussi di lavoro automatizzati per semplificare la gestione del sito.
- Imparate a conoscere la sicurezza di WordPress per mantenere il vostro sito al sicuro dagli hacker.
- Spostate il vostro sito WordPress locale su un server live quando siete pronti a condividerlo con tutti.
Speriamo che questo articolo vi abbia aiutato a capire come installare WordPress in locale su un computer Windows. Potreste anche consultare il nostro articolo su come installare WordPress in locale su un computer Mac e la nostra guida definitiva alla creazione di un sito di staging per WordPress.
Se questo articolo vi è piaciuto, iscrivetevi al nostro canale YouTube per le esercitazioni video su WordPress. Potete trovarci anche su Twitter e Facebook.


")
Francesco
Hi,
Can I use this system to test a previous back up I did via the server control panel?
I have a zip file which is a mirror of my directory on the server, including database and WP-admin file.
I would line to test if the backup I have works fine and possible run it on a precioys version of the WP
WPBeginner Support
You would want to check with the tool you are using for the specifics but it should allow you to do what you’re wanting.
Admin
Melissa T
Installed WAMP and WordPress – thanks for the wonderfully detailed instructions! So now it’s time to create the web site — is there a guide on wpbeginner for that?
thank you!
WPBeginner Support
There are many different types of sites so there is no complete guide but for a starting point you may want to take a look at our article below. Step 3 and beyond in the guide should help.
https://www.wpbeginner.com/guides/
Admin
kwestyon
First, thank you so much for the guide! It’s working. Second, is there a way wherein after you create the website, would there a way to view the site after you clicked the published button. Sorry for the dumb question.
WPBeginner Support
If you are logged in, in the top right you should be able to open the dropdown that has your site title, and there you should find a link to view your site.
Admin
Yomi
Hello,
If I install WordPress on a localhost based on the content of this blog, will I be able to use plugins like woocommerce, elementor, astra & kadence?
Thank you.
WPBeginner Support
Yes, installing locally you would be able to use plugins and page builders like those on your site
Admin
Lisa
Hi,
I am at the point where I would put localhost/mysite/ in the browser. I am getting the “404 not found error”.
I named the copy of wordpress to wamp the same and have double checked the address to see if it’s typed in correctly. This still happens, what am I doing wrong?
Thanks!
WPBeginner Support
You would want to ensure you’re not running into the Skype error where it is trying to use port 80 while WAMP is.
Admin
WPBeginner Support
Currently, the WAMP website is down which is why we’ve added a different link and included a note above and are working on updating this article as quickly as we are able
Admin
mark
WAMP link redirects to a different site.
Faten
Hi team,
I followed the guide but when I go to local host/my site/ I have this error: your don’t have permission to access my site on this server.
Can you please help?
My folders are in this order: c/wamp/www folder/mysite, is that correct?
WPBeginner Support
That is the correct location, you would want to ensure WAMP is running when you see that specific error message.
Admin
Sam
Our published website was created using an older versions of WP, themes, and plugins. I would like to test against the latest versions of WP, themes, and plugins on a local PC installation.
If I backup the website data from the live online WP account using UpdraftPLus, can I restore the files on the local installation to test against the latest versions of WP, themes, and plugins?
If not, what is the most effective method to do so?
Thank you so much!
WPBeginner Support
You can do that or you could create a staging environment here:
https://www.wpbeginner.com/wp-tutorials/how-to-create-staging-environment-for-a-wordpress-site/
Admin
Jerelyn
Hi, the WampServer link (website) has not been working the past few days. Is there an alternative place to get it? Thanks.
WPBeginner Support
Not that we would recommend at the moment, hopefully, the issues on the site at the moment are resolved and the site starts working again soon.
Admin
Harry
I am trying to do the localhost/mysite/ part but every time I search this it says url not found how do I put the WordPress folder with the WAMP folder
WPBeginner Support
You would go to where you installed WAMP on your computer, and place the mysite folder inside the www folder
Admin
Jyoti
I installed WAMP and able to see a GREEN icon in system tray.
But i am not able to see anything when i click on that icon.No PHP database nothing at all.I uninstalled and reinstalled but didn’t work.
Would you please help?
thank you so much.
WPBeginner Support
You would normally want to enter localhost in your browser while the green W is in your icon tray to find that
Admin
Pete
I installed WampServer, but it wouldn’t run. All I saw was a couple of windows with command prompts briefly appear and then disappear.
WPBeginner Support
You should see the WAMP icon if you expand your icon tray in the bottom right
Admin
HSM
it happened with me, and solved it like that:
when entering the database name, and user name,
you may forgot and left the default password as written “Password”
(as happened with me)
without change it to a private password or at least remove the word “Password” and keep the field of password blank,
WPBeginner Support
Thanks for sharing the issue you ran into should others have this issue
Admin
Tracy De
Thanks for this. I was having trouble at this point. Have reinstalled everything and couldn’t work out what I was doing wrong.
Bain Dom
Can I install WordPress plugins in this WordPress on Windows 10 environment?
WPBeginner Support
Unless the plugin specifies otherwise(mainly plugins that connect to 3rd party services), you would be able to use plugins on a local installation
Admin
Chloe
Hi, I followed this guide a few weeks ago and set up the very beginnings of a test site. I now can’t remember or work out how to get back to editing the site! It’s maddening as I can launch WAMP, go to localhost/testsite/ and view the site I made but please can someone let me know how to enter editing mode!! Many thanks
WPBeginner Support
You would want to add /wp-admin to be able to log into your local installation of WordPress to be able to start editing it again
Admin
Kathleen
Thank you!!! Exactly what I needed to develop before making a site live
WPBeginner Support
You’re welcome, glad our guide could be helpful
Admin
Kathleen
Installed Wamp with no trouble thanks to your concise directions. However, after creating my database and starting the WP install I get this message:
“We were able to connect to the database server (which means your username and password is okay) but not able to select the ericajlester database.” I have been over and over checking everything to make sure the information is correct, but WP will not connect to the database. Any suggestions would be appreciated.
Thank you for such great information and support!
WPBeginner Support
The most common reason for this would be a typo in your database name, you would want to ensure the database information and prefix are both correct compared to what you have set
Admin
Alexis
Thank you so much!
WPBeginner Support
You’re welcome
Admin
Linda
Good job is done by Wpbeginner team!!!
Have a great day!
WPBeginner Support
Thank you, hope you have a great day as well
Admin
Daniel
Developing WP plugin for a client. Wanted to create a dev environment without paying for hosting space to do it. Thanks for the quick and dirty path to get there.
WPBeginner Support
Glad our article could help
Admin
Vic Iyke
This is a real life saver, thank you for the detailed instructions, it saved my time.
WPBeginner Support
Glad our guide was helpful
Admin
Erica
Thank you for the guidance..
WPBeginner Support
You’re welcome
Admin
Harish Nemade
After doing work on WordPress from WAMP, should we click on ‘Stop all services’?
WPBeginner Support
only if you wish to turn of WAMP and your local installation
Admin
Harish Nemade
The Website of WAMP which you had mentioned is not working anymore. The download is not responding from Sourceforge.net,
WPBeginner Support
From testing, the link is page is still working on our end, you may want to ensure this isn’t due to a browser or browser addon preventing your download.
Admin
Harish Nemade
Hey, I installed WAMP in the Internet Explorer folder, but once when I checked to search for my same localhost running on Explorer appeared in Chrome. But can I also Use the same Localhost from Chrome?
WPBeginner Support
If you installed your site in the wamp folder then you should be able to visit the site at localhost on any browser on that computer
kamodh singh
localhost/phpmyadmin not opening with any browser. when trying to open there are showing an error ( This site can’t be reached – ERR_CONNECTION_RESET )
How can i fix this error plz tell me .
thanks…
WPBeginner Support
If you’ve shut down your computer since the last time you used WAMP you would want to ensure it is running before visiting localhost.
Admin
Divyanshu Garg
Thank you very much for your guidance step by step.
WPBeginner Support
You’re welcome
Admin
Nena Rahin
The code execution cannot proceed because MSVCR120.dil was not found. Reinstalling the program may fix the problem.
The code excicution cannot proceed because VCRUNTIME140.dil was not found.
Reinstalling the program may fix the problem.
I get this error even after reinstalling many times.
Please help
WPBeginner Support
You would want to download the C++ redistributable we link to in the article and that should get you past these errors.
Admin
Dean
Hi, Thank you so very much for being here! All your information etc. is truly a gift, and it’s appreciated very much!
I’ve successfully installed WAMP and WordPress on my local computer and have played around somewhat. I’d like to refresh WordPress to start fresh again. Can you point me in the direction of doing this?
Thanks much!
Dean
WPBeginner Support
You could either delete the WordPress folder and install a new WordPress site or you could reset your database using the method in our article here: https://wordpress.org/plugins/wordpress-database-reset/
Admin
Dean
Thanks so much!
WPBeginner Support
Glad we could help
Elizabeth
Great tutorial. I’ve been building sites for a long time in Dreamweaver, switched to WordPress in 2015 and am now using Divi by Elegant Themes to build my sites. I need to rebuild an existing website for a yoga studio I did in 2015 without bringing down the current site and this is just the answer! Fabulous job in explaining step-by-step how to do it. Thank you so much! I am so excited to get working on this!!!
WPBeginner Support
Glad our tutorial could help
Admin
Marama
I’ve been thinking about the blogging thing and didn’t want to go straight into a Live site. This tutorial is awesome Thank you. I have installed WordPress to a localhost and now I can put everything in my test site. So Stoked!!
WPBeginner Support
Awesome, glad our article could help you get a localhost site set up for you to test
Admin
Mike
Quick question, Which ports rely on this, so i can create firewall rules in our firewall as well as have our Server Team create them in windows? Thanks for any info.
WPBeginner Support
Sadly, there are too many programs that may or may not use the ports for us to give a list at the moment.
Admin
Thelynx
Thank you for this excellent tutorial. I have been a WP webmaster for about a year at work and finally decided to set up my own page about flight simulation. I followed the instructions to the letter and now have WP setup on my home PC ready to build the next earth shattering website. I am by no means a noobie to the net, but never dug into all this. Without your help, I’d be floundering. Thank you again. The WPverse is truly a grand community.
WPBeginner Support
You’re welcome, glad our guide could help you
Admin
Anupama
I am having an issue with my login setup it says. (see it below) even though I login in PHP server with new data still says that. what am I gonna do.?
Error establishing a database connection
This either means that the username and password information in your wp-config.php file is incorrect or we can’t contact the database server at localhost. This could mean your host’s database server is down.
Are you sure you have the correct username and password?
Are you sure that you have typed the correct hostname?
Are you sure that the database server is running?
If you’re unsure what these terms mean you should probably contact your host. If you still need help you can always visit the WordPress Support Forums.
WPBeginner Support
You would want to edit your wp-config file in a text editor and ensure your information in this file is correct. We have an article on how to edit it here: https://www.wpbeginner.com/beginners-guide/how-to-edit-wp-config-php-file-in-wordpress/
Specifically, the database name is normally where problems can happen
Admin
Mike
Thank you very much for this awesome solution. I was searching for something like that and I have seen that you have provided an additional tutorial of how to deploy the offline WP website to a web hoster. Great work THX again.
WPBeginner Support
You’re welcome, glad our guides can be helpful
Admin
Emm Man
For all who faced the issue ‘404’ when tried ‘localhost/{yourSiteName}’, one possible solution (for me at least) is to add also the port of wamp server e.g. localhost:8080/{yourSiteName}
WPBeginner Support
Thanks for sharing a possible solution
Admin
Su
I am building a website for a friend. She already has an old site which is live. I plan to build the new one locally using WAMP.
However, while working on it how do I share my progress with her? So that she can revert for any changes.
WPBeginner Support
There isn’t a simple method for allowing someone to view your local installation, you may want to check with the hosting provider to see if there is the option of a staging environment for an easier method of what you’re wanting.
Admin
Caragh
Thanks for the great step by step guide.
Just wondered if I could screen share say through skype or Zoom?
WPBeginner Support
That is one possibility it just means that the user can’t directly interact with the site.
JAcob
Hi I would like to install/ run my sample wordpress site off of an external harddrive on various machines of my choosing. Is there any special instructions for this or do I simply install WAMP as described except onto the external drive?
WPBeginner Support
It is an older article, but for what you’re wanting you would use XAMPP: https://www.wpbeginner.com/wp-tutorials/how-to-install-wordpress-on-a-usb-stick-using-xampp/
Admin
Adam Bermingham
Hi, you missed an entire step, and it’s a complicated one. All the MS C++ applications. I don’t know what to download or where to save them. Very confusing. There must be an easier way to host a demo WordPress site than this??
WPBeginner Support
Thanks for letting us know, we will certainly look to include that information when we update this article. For the time being, you should be able to go to the WAMP forums and the specific files should be linked and you would only need to install them where they automatically set their installations
Admin
Duncan McCormack
You don’t need all of them, just the ones shown in the WAMPserver page when you click either download (it’s the second “warning” – yes, it’s in French) – just get the 64/32bit versisons of those.
Richard
hi, first of all thanks for the amazing tutorials!
i have a question – I want to create my first website with wordpress. i thought about using wamp to save the money of the domain use and hosting and then move the website to the domain after it is done.
do you think that’s a good idea? will it be a problem to move the website from the local server to the live site as described it this tutorial? –
https://www.wpbeginner.com/wp-tutorials/how-to-move-wordpress-from-local-server-to-live-site/
WPBeginner Support
You could certainly create your site locally and then follow the steps in that article to move your site and you shouldn’t run into any problems.
Admin
Sakil Ahmed
I uninstalled Skype and installed visual C++ but after installing WAMP Server app, clicking the wamp icon in the system tray doesn’t effects and the pop-up to create a database from myphpadmin doesn’t open.
WPBeginner Support
You may want to check the Skype conflict we mention in the article and should that not be the issue, reach out to WAMP’s support to see if there is a possible known issue.
Admin
Deepti
Hi
I am planning to make a website of my own . Its basically a food blog. I ahve a good knowledge of programming. However, I have a gap of around 7 yrs and really dont know the new stuff in programming like bootstrap, etc..I am still in learning phase for these concepts.
Would u suggest me to make a website using wordpress.org or wordpress.com?
WPBeginner Support
We would normally recommend a WordPress.org site, you can see our comparison here: https://www.wpbeginner.com/beginners-guide/self-hosted-wordpress-org-vs-free-wordpress-com-infograph/
Admin
Jem
Hi there,
I am building wordpress.com site as the client didn’t want to manage hosting separately. I have only ever used wordpress.org. Can you still design the site on a local server and upload in when completed onto a wordpress.com site? I am a little unsure of the limitations of the .com version.
Thanks so much
WPBeginner Support
You would not be able to upload a new site on WordPress.com, you would normally need to build the site from the beginning on WordPress.com due to their restrictions.
Admin
Seema
Hi,
This is a great tutorial.
I am stuck with “Error establishing a database connection” error since a day. For me WAMP works fine, I created a DB then unzip the WP. After localhost/mysite it goes till language selection page get the DB details and when i submit it gives above mentioned error. Tried putting DB details in wp-config-samle.php, same error. Deleted DB created again, deleted mysite folder created again but still same error. Can somebody please help?
WPBeginner Support
For that error on localhost you may want to ensure you have all of your database information set properly. The database information is normally root with a blank password or you could add a space if it is preventing you from leaving it blank unless you changed that login information.
Admin
Onur SANIR
Hey I found the solution.
Left Click Wamp Icon > Mysql x.x.x > Use port other than 3xxx > Press Ok
Bobby
Any way to take a copy of my live hosted site from iPage and put a copy on the WAMP for testing with plugins, etc?
If so how would I do that?
WPBeginner Support
You would want to take a look at our guide on how to do that here: https://www.wpbeginner.com/wp-tutorials/how-to-move-live-wordpress-site-to-local-server/
Admin
Hang
Thank you so much <3
WPBeginner Support
You’re welcome
Admin
Jason
Worked awesome. Thank you.
WPBeginner Support
Glad our guide helped
Admin
Barbara
Wow! So straightforward! Thank you!
WPBeginner Support
Glad our article was helpful
Admin
Henrik
Hi, first of all thanks for a very helpful post. Secondly, a question: will having multiple wordpress installations in a single database affect the migration to a live environment when the time comes? Or should I just deploy a new database to be on the safe side? cheers
WPBeginner Support
You would want to use a database for each site to make transferring environments easier.
Admin
Joe
Thanks so much. Very well written installation guide. Installed without a single glitch.
WPBeginner Support
Glad our guide could help you
Admin