
Dopo anni di costruzione di siti web WordPress, abbiamo imparato quanto sia importante avere una configurazione locale di WordPress sul proprio computer.
Avere WordPress sul vostro computer personale vi permette di sperimentare nuove funzionalità senza rischiare il vostro sito live, di immergervi in profondità nello sviluppo di WordPress e persino di costruire interi siti web prima che diventino operativi. È come avere una sandbox privata per tutti i vostri progetti WordPress.
Se siete utenti Windows, esistono numerosi modi per configurare WordPress in locale. Ma abbiamo ristretto il campo ai due metodi più semplici. In questa guida vi mostreremo come installare facilmente WordPress su un computer Windows, indipendentemente dalla versione in uso.

Perché installare WordPress su Windows?
Se siete utenti di Windows, l’installazione di WordPress in locale sul vostro computer offre diversi vantaggi.
Un’installazione locale di WordPress crea un ambiente di prova che non influisce sul vostro sito web reale. Questa configurazione, spesso chiamata server locale o localhost, è il vostro parco giochi personale per WordPress.
Gli sviluppatori di WordPress utilizzano regolarmente installazioni locali per il loro lavoro. Ad esempio, possono usarle per sperimentare nuovi plugin o temi o per testare il sito prima di aggiornare l’editor di blocchi Gutenberg.
Ma non è solo per i professionisti. Se siete alle prime armi con WordPress, una configurazione locale è perfetta per imparare. Potete esplorare le funzionalità, testare temi e plugin e sperimentare liberamente senza preoccuparvi di rompere un sito live.
È importante notare che quando installate WordPress in locale su Windows, solo voi potete vedere il sito. Se volete creare un sito web pubblico, avrete bisogno di un nome di dominio e di un hosting web.
Ora, tecnicamente, è possibile installare WordPress su Windows utilizzando XAMPP, e abbiamo già scritto un tutorial al riguardo.
Detto questo, abbiamo trovato due metodi ancora più semplici di XAMPP per configurare un ambiente WordPress locale, ideali per i principianti o per gli utenti che hanno bisogno di creare rapidamente un sito locale. Potete fare clic sul link qui sotto per passare al metodo che vi interessa:
Metodo 1: Installare WordPress su Windows utilizzando Studio (semplice e veloce)
Per il primo metodo, utilizzeremo Studio. Si tratta di un software locale per WordPress realizzato da Automattic, la società che gestisce e amministra WordPress.com, che è un costruttore di siti web basato sul software WordPress.
Parleremo prima di questo metodo perché è molto più rapido e semplice da seguire, perfetto per i principianti.
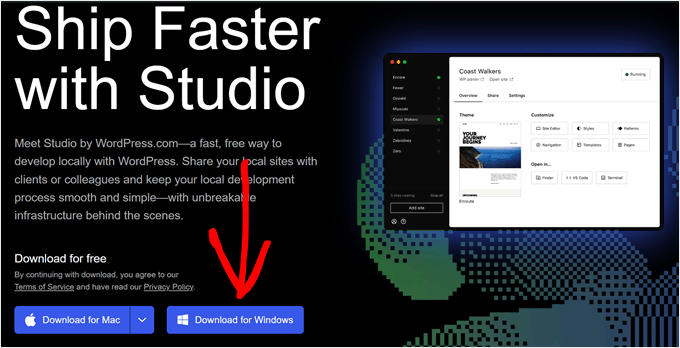
Innanzitutto, è necessario aprire il sito web di Studio by WordPress.com. Quindi, fate clic sul pulsante “Download per Windows”.
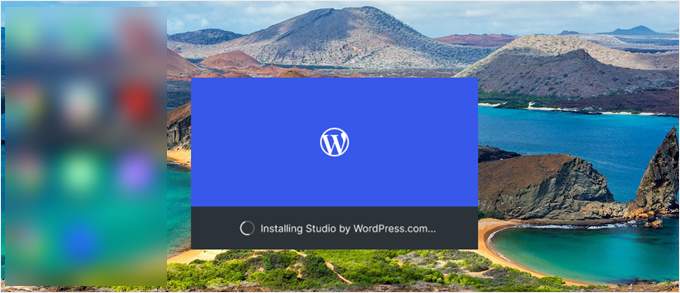
Una volta fatto ciò, basta aprire il file scaricato per avviare l’installazione.
A questo punto apparirà una finestra popup che indica che l’applicazione è in fase di installazione.
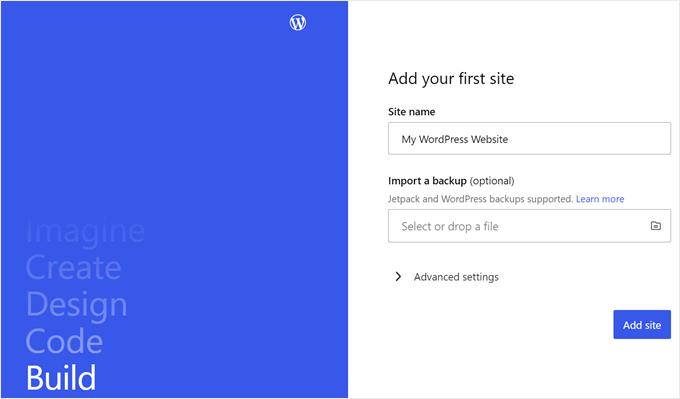
Fatto questo, si può aggiungere il primo sito.
Per farlo, basta inserire il nome del nuovo sito WordPress locale e fare clic su “Aggiungi sito”. Potete dare al sito il nome che preferite, purché vi aiuti a identificarlo facilmente.
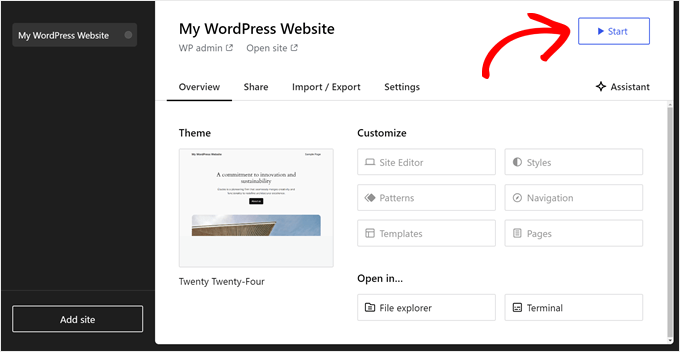
Ora dovreste vedere la dashboard del vostro sito WordPress locale.
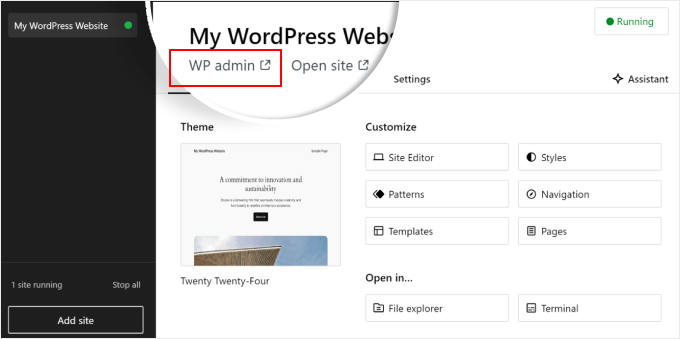
Per accedere alla dashboard di WordPress e modificare il sito web, è sufficiente fare clic sul pulsante “Start” nell’angolo in alto a destra. In questo modo il vostro sito web locale sarà accessibile sul vostro computer.
Una volta modificato il pulsante “Avvio” in “In esecuzione”, si può fare clic sul link “WP Admin” in alto a sinistra della pagina.
In questo modo si accede alla pagina di amministrazione locale di WordPress.
E questo è praticamente tutto per la configurazione. Esaminiamo le altre impostazioni che possono essere necessarie per la creazione del vostro sito web locale.
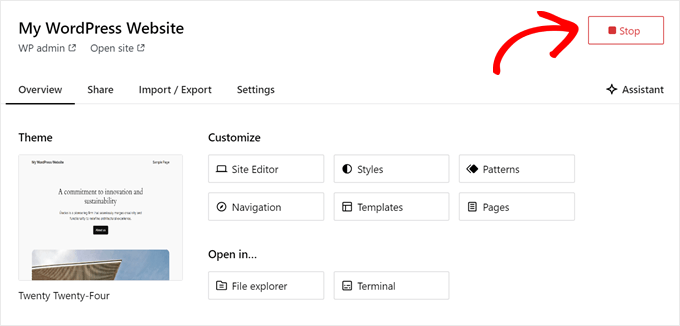
Come si può vedere nella scheda “Panoramica”, è possibile accedere immediatamente al menu dell’editor completo di WordPress direttamente dalla dashboard di Studio. Potete anche fare clic su “Esplora file” per aprire le cartelle e i file del vostro sito WordPress e fare clic su “Terminale” per gestire il vostro sito web utilizzando WP-CLI.
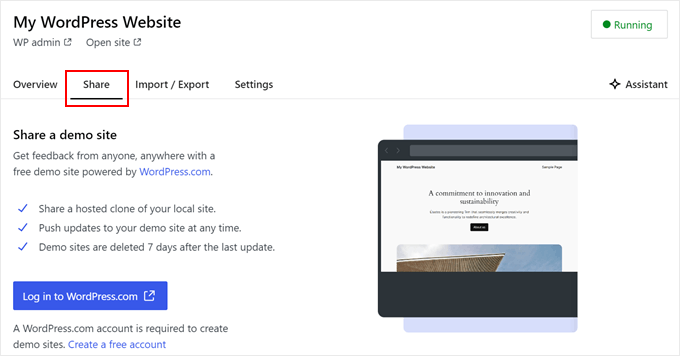
Se passate alla scheda “Condividi”, potete accedere al vostro account WordPress.com, clonare il vostro sito web locale e caricarlo sui server di WordPress.com. In questo modo il sito clonato sarà temporaneamente online, il che è utile per condividere siti demo con i vostri clienti o membri del team.
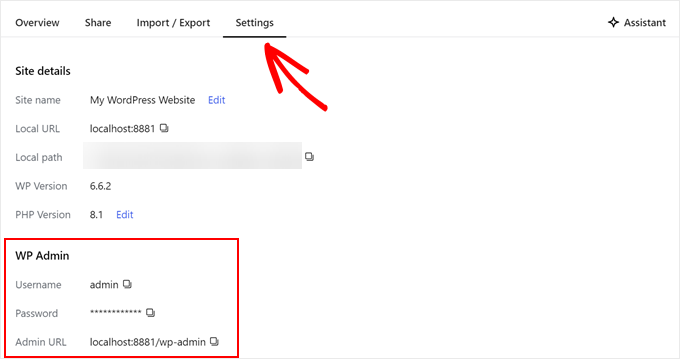
A volte si può desiderare di accedere al proprio sito web locale direttamente tramite il browser, invece di utilizzare Studio. In questo caso, è necessario conoscere le credenziali di wp-admin.
Per trovarli, potete passare alla scheda “Impostazioni” e trovare il nome utente, la password e l’URL di accesso dell’amministratore di WordPress.
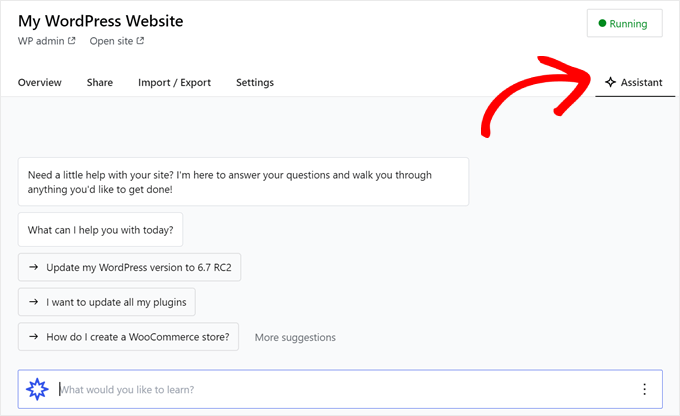
Un’altra caratteristica interessante di Studio è il chatbot AI integrato, con il quale è possibile comunicare facendo clic sul pulsante “Assistente”.
Qui è possibile chiedere aiuto a Studio per compiti come l’aggiornamento di tutti i plugin in una sola volta, l’aggiornamento della versione principale di WordPress o la creazione di codice per un blocco personalizzato.
Quando avete finito di lavorare sul vostro sito locale, passate sopra il pulsante “In esecuzione” nell’angolo in alto a destra fino a quando non appare la scritta “Stop”.
Quindi, fare clic sul pulsante per interrompere il sito web.
Un aspetto negativo di Studio è che non è possibile configurare l’ambiente WordPress a proprio piacimento. Ciò significa che dovete utilizzare la versione di PHP, il server web e il database che sono stati preselezionati per voi.
Questo può essere uno svantaggio se avete bisogno di testare il vostro sito web o plugin con configurazioni specifiche del server.
Se avete bisogno di un maggiore controllo sull’ambiente WordPress locale o di far coincidere la vostra configurazione locale con una specifica configurazione del server live, potete verificare il metodo successivo che prevede l’uso di WP locale.
Metodo 2: Installare WordPress su Windows utilizzando WP locale (più personalizzabile)
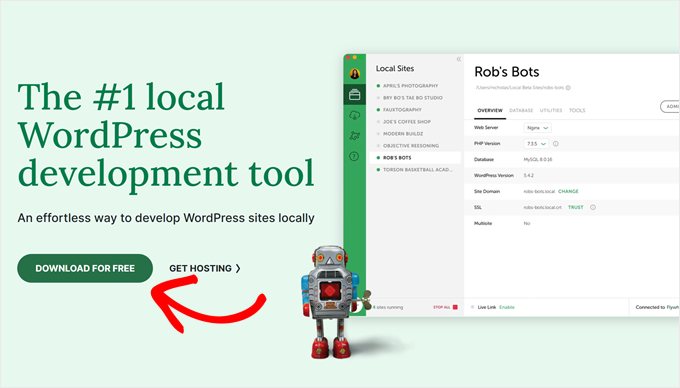
Innanzitutto, è necessario scaricare e installare il software Local WP sul proprio computer Windows. Basta andare sul sito web di Local WP e fare clic sul pulsante “Download for Free”.
Successivamente, apparirà una finestra popup in cui dovrete selezionare la vostra piattaforma. Scegliete “Windows” dal menu a discesa.
Successivamente, è possibile inserire i propri dati, come nome e cognome, indirizzo e-mail di lavoro e numero di telefono, per scaricare il software.
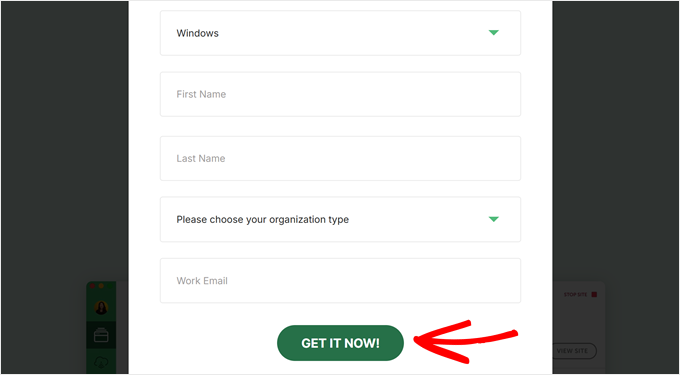
Dopo aver inserito i dati, è sufficiente fare clic sul pulsante “Ottieni ora”.
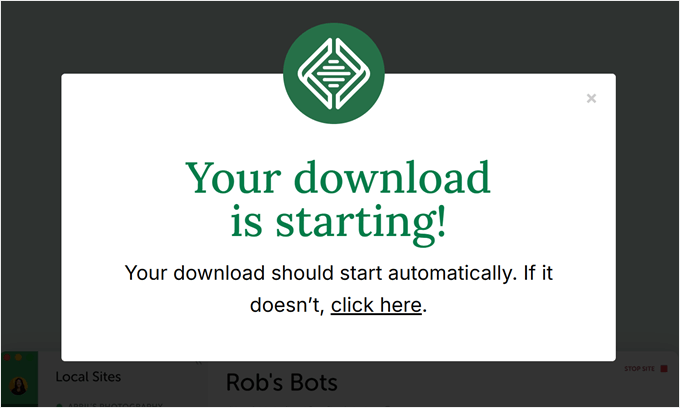
Successivamente, il software verrà scaricato automaticamente nel computer. Altrimenti, è possibile fare clic sul link “clicca qui” per avviare il download.
Una volta scaricato il file, avviate la procedura guidata di installazione.
A questo punto, dovrete selezionare se volete installare il software per tutti gli utenti o solo per voi.
Una volta selezionata un’opzione, fare clic sul pulsante “Avanti”.

Nel passaggio successivo, è possibile selezionare la “cartella di destinazione” in cui verrà installato il software.
È sufficiente fare clic sul pulsante “Sfoglia” per impostare il percorso e quindi fare clic sul pulsante “Installa”.

Il software Local WP viene ora installato sul computer Windows.
Una volta terminato, è possibile selezionare la casella di controllo “Esegui in locale” e fare clic sul pulsante “Fine” nella procedura guidata di installazione.

A questo punto il software si avvia sul dispositivo Windows.
Il passo successivo consiste nell’aggiungere un nuovo sito web locale. Per farlo, è sufficiente fare clic sul pulsante “+” in basso.

Successivamente, è possibile creare un sito nel software Local.
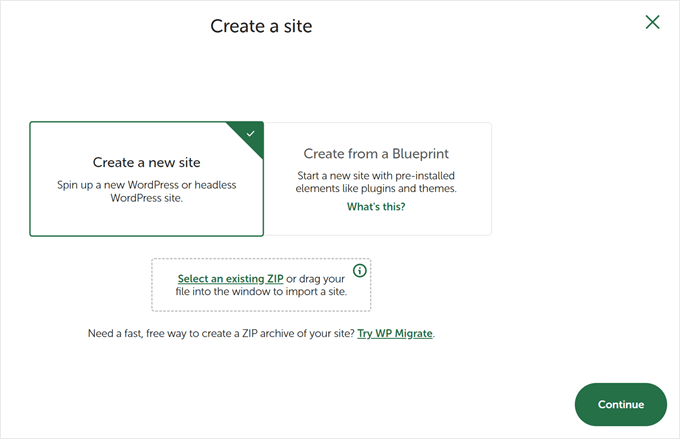
Selezionare l’opzione “Crea un nuovo sito” e fare clic sul pulsante “Continua”. È possibile creare il sito partendo da un blueprint o da un file di sito esistente, ma a scopo dimostrativo sceglieremo la prima opzione.
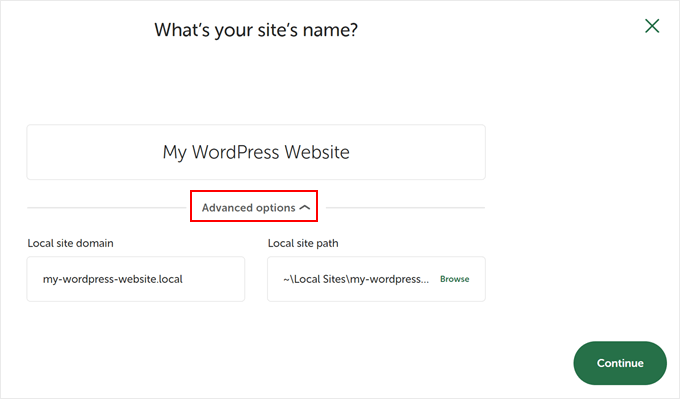
Successivamente, è possibile inserire un nome per il sito web locale, ad esempio “Il mio sito WordPress”.
Sono disponibili anche opzioni avanzate in cui è possibile inserire il dominio del sito locale e il percorso del sito locale. Per impostazione predefinita, il dominio utilizzerà il titolo del sito web, ma separato da trattini.
Una volta terminato, è sufficiente fare clic sul pulsante “Continua”.
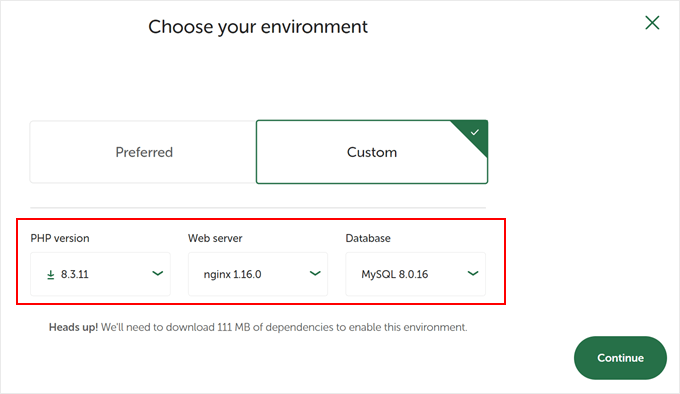
Successivamente, è necessario scegliere un ambiente per il sito web locale.
È possibile utilizzare l’ambiente “Preferito”, in cui il software selezionerà automaticamente la versione di PHP, il server web e la versione di MySQL. D’altra parte, si può anche selezionare “Personalizzato” e inserire i dettagli dell’ambiente.
Local WP offre le ultime versioni di PHP. Per quanto riguarda il server web, è possibile scegliere tra Nginx e Apache. È inoltre possibile scegliere tra MySQL o MariaDB per i database.
Si noti che alcune versioni di PHP, server web e database richiedono il download di alcune dipendenze per funzionare correttamente.
Successivamente, è possibile inserire un nome utente e una password di WordPress per il sito web locale. Inoltre, è possibile scegliere un indirizzo e-mail di WordPress per ricevere tutte le notifiche via e-mail.
Oltre a questo, c’è un’opzione avanzata in cui il software vi chiederà se avete una rete WordPress multisito. In caso contrario, basta fare clic su “No”.
Dopo aver inserito questi dati, è sufficiente fare clic sul pulsante “Aggiungi sito”.

Il software installerà ora WordPress e configurerà il vostro sito web.
Per avviare il sito web locale, fare clic sul pulsante “Avvia sito” nell’angolo in alto a destra.
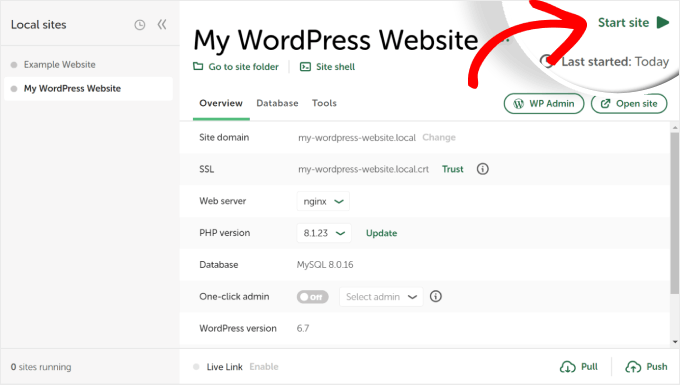
Quindi, fate clic sul pulsante “WP Admin” e vedrete la pagina di accesso all’amministrazione di WordPress.
È sufficiente inserire il nome utente e la password immessi in precedenza durante la configurazione del sito web locale, quindi fare clic sul pulsante “Accedi”.

Ora è possibile modificare il sito web locale sul computer Windows.
Una volta terminato, non dimenticate di fermare il sito web dal software Local WP facendo clic sul pulsante “Stop site”.

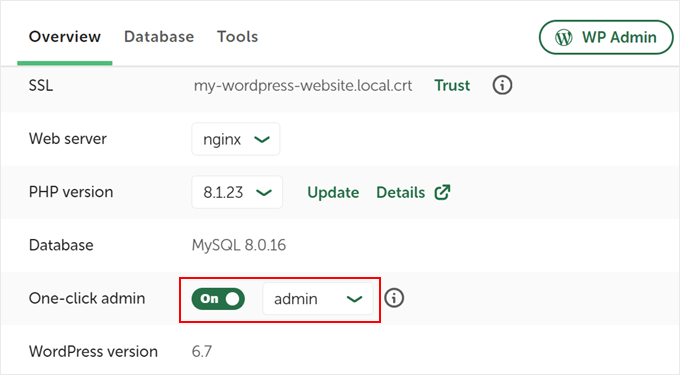
Suggerimento: se si desidera saltare il processo di login, è possibile abilitare il login dell’amministratore con un solo clic in Local WP.
Per farlo, basta tornare alla dashboard di WP locale e attivare il pulsante “Amministratore con un solo clic” fino a quando non appare la dicitura “On”. Quindi, nel menu a discesa, selezionare l’utente amministratore che può utilizzare questa funzione di accesso con un solo clic.
Alternativa: Usare WordPress Playground per testare temi, plugin e altro ancora
WordPress Playground è uno strumento innovativo che consente di sperimentare WordPress direttamente nel browser web. Si tratta di una sandbox virtuale in cui è possibile provare nuovi temi, plugin e funzionalità di WordPress senza influire su alcun sito web reale.
WordPress Playground si differenzia da un ambiente WordPress locale per diversi aspetti fondamentali.
Innanzitutto, non richiede l’installazione sul computer e si ripristina dopo ogni utilizzo, a differenza delle installazioni locali permanenti. È possibile accedervi da qualsiasi dispositivo dotato di browser, mentre le installazioni locali sono legate a un solo computer.
Mentre WordPress Playground è ideale per test e apprendimento rapidi, un ambiente WordPress locale sul vostro computer Windows offre maggiore flessibilità per progetti di sviluppo a lungo termine.
Per una guida dettagliata, consultate la nostra guida su come utilizzare WordPress Playground nel browser.
Ho installato WordPress sul mio computer Windows, e ora?
Ora che avete WordPress sul vostro computer, ecco alcune cose che potete fare:
- Imparate i suggerimenti e i trucchi di base di WordPress per utilizzare meglio il vostro sito.
- Provate diversi temi di WordPress per vedere come può apparire il vostro sito.
- Installate e testate i plugin WordPress indispensabili per aggiungere nuove funzionalità al vostro sito.
- Imparate a risolvere gli errori più comuni di WordPress da soli.
- Provate diversi page builder drag-and-drop per dare al vostro sito un aspetto gradevole.
- Imparate a reimpostare la password di amministrazione di WordPress su localhost per recuperare l’accesso al vostro sito.
- Impostate flussi di lavoro automatizzati per semplificare la gestione del sito.
- Imparate a conoscere la sicurezza di WordPress per mantenere il vostro sito al sicuro dagli hacker.
- Spostate il vostro sito WordPress locale su un server live quando siete pronti a condividerlo con tutti.
Speriamo che questo articolo vi abbia aiutato a capire come installare WordPress in locale su un computer Windows. Potreste anche consultare il nostro articolo su come installare WordPress in locale su un computer Mac e la nostra guida definitiva alla creazione di un sito di staging per WordPress.
Se questo articolo vi è piaciuto, iscrivetevi al nostro canale YouTube per le esercitazioni video su WordPress. Potete trovarci anche su Twitter e Facebook.


 in 2024")
")
Ruchira
Excellent article. I could install successfully wordpress following this article.
Thank you.
Lindsay
I’m trying to set up a local copy of an existing site. I have a full backup of the site, I have a copy of the database, but when I create a new database in WAMP and try to import the database copy I have, it tells me the database already exists. If anyone can help me figure out what I’m doing wrong I would be very grateful.
Enric
It works perfect!
Christie
ok, got it to work, but trying to install a theme and it gives me error message: The uploaded file exceeds the upload_max_filesize directive in php.ini.
WPBeginner Support
Hi Christie,
Please see how to increase maximum upload size limit in WordPress.
Admin
Christie
I did everything step by step, when opening my local host, it gives me this error message “Error establishing a database connection”. What did I do incorrectly? Thanks!
Sammy P
Excellent tutorial! I am a developer, and totally new to WordPress. And with this tutorial, I was able to set up a complete WordPress test environment on my PC. Thank you!
Nicole
I can’t thank you enough for this help. It worked and walked me through the steps perfectly. Bravo! Cheers to your success in life.
Jacy Lucier
After installing WAMP, a short-cut icon appears on the desktop. It’s not green, and it doesn’t do anything. The real icon used to open WAMP is in the notification area on the task bar – usually at the far right and sometimes, depending on your setup, you must click the up ^ arrow to access it.
Tony
Very helpful article. I installed it and it is running perfect but I am facing an error whenever I Go to Theme/Plugins and click on Add New “An unexpected error occurred. Something may be wrong with WordPress.org or this server’s configuration. If you continue to have problems, please try the support forums.”
or when I go to Setting—>General I see this message on the page “Warning: An unexpected error occurred. Something may be wrong with WordPress.org or this server’s configuration. If you continue to have problems, please try the support forums. (WordPress could not establish a secure connection to WordPress.org. Please contact your server administrator.) in C:\wamp64\www\Ain-Ebel\wp-admin\includes\translation-install.php on line 66”
Can you please assist.
Thanks
Himani Bhardwaj
The only solution I’ve found is to get a better internet connection. Because This Error is so common when an internet speed is slow.
Kiki
Hello,
I get this error after selection a language:
“This program can only be installed on Versions of windows designed for the following processor architectures 64x”
But I tried the 32 en 64 bit version… Can you help?
Aniruddha Chaudhari
I am getting this error:
“The program can’t start because api-ms-win-crt-runtime-|1-1-0.dll is missing from your computer. Try reinstalling the program to fix this problem.”
Any suggestion?
nabil
try installing wamp server version 2.5.
Version 3.0 does not support in some older OS
Saradha
Such a good explanation. Great Work. Thanks!
ian
great info..what my question is…if I decide to make the website with my computer then upload to local site…will the DB still work the same or is code different now..cause I’m on their data base
WPBeginner Support
Hi Ian,
Once you are done with developing your site on your computer, you can move it to a live website.
Admin
Goki
Thank you,such precise explanation
Frank
Went through all of this and it worked fine. Had WAMP running and localhost site running. Was looking at themes. Closed everything down and restarted and now the MYSQL service won’t start. Apache starts and MariaDB starts but mysql won’t start. I’ve searched with google and tried a few solutions but can’t get the issue resolved. I’ve looked in MYSQL log and it’s blank. I’ve tried reinstalling the service and that doesn’t help.
Richard Grove
After renaming wordpress folder and pasting it to the wamp64 folder I get a file 404 error when trying to open browser/ Did I miss a step somewhere? Thanks
Cedric
Hi
Don’t paste the wordpress folder in the general ‘wamp64 folder’
BUT
paste it in the ‘www’ folder inside the ‘wamp64’ folder.
Shabana Anjum Khan
Simple and Easy , thank you
Kim
Great guide, worked like a charm!
vandana
Its really helpful for a novice like me . thanks a lot
ahmad sabry
many thanks it was easy and usefull
Solomon
What else can I say…? This is so informative, and timely. Last week I was struggling to get WordPress installed on my local machine; now it’s done. Good job guys!
Marilyn Mutsune
I really appreciate WP beginner. However, am not tech savvy thus a bit slow on grasping what is probably fundamental for most people.
Now, I got as far as installing Wampserver 64 but when I try http: localhost/my site I get Error 404.
What is the problem? I have done all I possibly can but the error message keeps coming on.
Please help.
Thanks in advance.
Timilz
Ensure there’s no spacing in between local host/mysite
Yogesh Malik
Thanks it is really help full and install the WordPress successfully from above steps.
Tom Martin-Wells
Thanks a bunch for this post, I had been struggling for a while to set up a local server so I could safely test and develop my site, but all the other guides I found never worked. Yours has finally got this sorted for me! Big love.
Marilyn Mutsune
Help! I have been successful to this point but now I can’t rename the folder. The prompt keeps reading, “a file or folder is open in another location.”
Further, I tried pasting http;//localhost/wamp64 in my browser, it gives the error 404. Also, I want to build my website locally before I go live. Please assist me.
Lastly, have mercy this web building stuff is super scary, I just want to write but I need to show case my portfolio. Thus, I have to do this.
Sunday akinola
Great job. Please can we have pdf version of these guides for downloads. Thanks ….
Jeff Collins
After I gave the database a name; it asks me to name a table. I’m not seeing anything like what is on this page after setting a database name.
Nathan Wakefield
Hi guys, I use tutorials all the time, but never felt the need to comment.
Great job! Simple, concise, no need to investigate further on other sites.
Love your work.
Nasredeen
thank you !
Really Helpful…..
Jim Felland
Thank you for the accurate tutorial, this was dead on and walked us right through. Thank you Thank you Thank you
David
Hi,
After coping the wordpress folder to the wamp www folder, I renamed the folder to mysite. When I try to open the url in the browser I get the error message Object not found.
Please advise.
Thanks
David
Carmelo
Please help me what to do after installing wampserver, I opened the phpMyAdmin but its a blank space. It’s not the “Welcome to phpMyAdmin as shown above where I can log in. What do I do. Please. Thanks
PW
Hi,
I want to know if I can share my locally developed site to a friend before pushing it live without having hosting.
amar
thanks for steps. it is really helpful me for installation.
ern
Just wanted to thank you a zillion times for this excellent tutorial, so detailed, i followed it and it went so smoothly!
Leo
I hit a roadblock. I loaded WP in the WAMP folder. Then when it comes to “Now open your web browser and go to localhost/mysite/” Here I copy this address and put it in the address box at the top of the Wamp program (there are two of them side by side…I put it in the right one). Result: Can’t find page. I am stuck…can anyone tell me what I am doing wrong or not doing. Thank you in advance!
Bikash
inside Wamp folder there will be a folder named as www .you need to paste the wordpress folder there and then try it on the browser
Brian
I have downloaded WAMP with the intention of installing WordPress as a local server setup on my Pc. I have a 64 bit CPU on windows 10 and after the installation of the WAMP software, when I click on the desktop icon to launch WAMP, the CMD.exe window briefly appears for a few seconds and then nothing. I have tried both 32bit and 64 bit versions ( installing and then uninstalling) with no success. In the download instructions, it says that for a 64 bit cpu, both 32 bit and 64 bit versions should be downloaded and I have installed both at the same time and i still can’t launch WAMP and I still get the sudden appearance of the CMD screen. Would very much appreciate your help.
Regards,
Brian
Pawan koul
Localhost/mysite is giving a 404 error stating that apache/2.4.23(win 64) PHP/5.6.25 server at localhost port 80.
.help me out.
Amit
i think you have done the same mistake what i have done. actually, we do not have to change www folder name you can change wordpress folder name as you want and keep that inside www folder. it will work. if you still facing same error then i am sorry
Lukasz
Amazing tutorial! Was looking for something like this for ages. Istalled it locally without any troubles and in no time.
I will keep browsing through website as I do my child-theme.
Thank you for your work.
Aly Kouyate
Hello guys I’m a beginner in designing so I try to install wordpress on my windows computer in wamp server the step is:
wamp/www/folther then I chose language the next step I fill form:
Database Name = database
Username = root
Password =
Database Host = localhost
Table Prefix = wp_
When I submit it gave me this error “Can’t select database”
What can I do to remove this error?
Ashutosh Singh
This error show you because you are not make a database with name “database” in phpMyAdmin. So first make a Database in phpMyAdmin of your wamp server. Then Install WordPress and Happy to go with WordPress.
Bikash
Give the database name whichever you have created and try again
Muhammad Adil
Hello Sir !!!
Thank you for sharing such a very useful tip.
I have a question….
I am working with one website locally in my machine. Now I want to start a new project with a new data base name (I can work with several sites with one login but my question is not about that).
For this I create a new data base in my XAMMP server.After that I was unable to login in my WP dashboard again .When I login in WP it takes me to my previous site.
It is necessary to config-php file again ???
please answer
Claire
Please, I tried installing WordPress locally copied the page to the www folder in wamp64 but when I try accessing it through the browser it gives an http 404 error and I haven’t even started the WordPress installation please I need your help on this.
hamork
To have multiple websites on wamp. Do I need to install wordpress in www folder or there’s a specific way to achieve that.
Eugen M
How can I install two/ multiple websites on my PC?
They are not related.
Thank you for your great instructions.
WPBeginner Support
Hi Eugene,
Yes, you can install multiple websites on your PC. Make sure each website has its own folder inside www folder
Admin
Roy Mellick
Problem sorted. I stupidly copied only one of the folders downloaded for WordPress. Sorry to have bothered you. Excellent tutorial, well done.
Roy Mellick
localhost/mysite opens with ‘Index of /mysite’ and not WordPress. Using Wamp64, set up php and database as per your instructions, downloaded WordPress.org v. 4.7.5 from WordPress. Renamed wordpress folder to ‘mysite’.
Any thoughts please.
ajay
I forgot my password, how can I get it back. when I use “lost password” option, it says mail function not enabled. plz help
WPBeginner Support
Hi Ajay,
Please see our guide on How to reset WordPress admin password on localhost.
Admin
John A. Mozzer
I’ve installed Wampserver 3.0.6 on my brand new Microsoft Surface Book with Windows 10. During the installation process, it defaulted to Internet Explorer instead of Edge, and I am not sure what happened with that. I’ve tried launching the program and get a system error message saying it can’t launch because MSVCR110.dll is missing. I hope that I don’t have to uninstall Wampserver and start over. Also, I am new to Windows 10 and can’t tell whether I am looking at the .exe file or the app because extensions don’t show.
Mike
You need to uninstall and read the install notes, you have not installed all the .net Pre recs in the notes follow links.
Margaret
What about Mac users? How to instal WAMP on Apple machine?
WPBeginner Support
Hi Margaret,
Please see our guide on how to install WordPress on Mac using MAMP.
Admin
radhika
Thank you very much. I installed wordpress. Its very helpful
ajay
The wordpress has all themes layout just like blogs. I wanted a standard website layout ? how can I get it
WPBeginner Support
Hey Ajay,
Check out our list of corporate or business themes.
Admin
ajay
Many Thanx buddy. NOw I got few very good themes that I can work upon.