Installare WordPress sul tuo Mac ti consente di esplorare le sue funzionalità senza bisogno di un web host.
Imparerai come funziona WordPress e vedrai se è adatto al tuo progetto. È anche perfetto per testare temi e plugin prima di rendere live il tuo sito. Inoltre, sperimentare localmente ti dà la libertà di commettere errori e imparare.
Abbiamo sperimentato molto con i siti locali, sia su computer Mac che Windows. E in questo tutorial, condivideremo 2 semplici metodi per configurare WordPress sul tuo Mac.
Nota: Non usi Mac? Abbiamo anche un tutorial su come installare WordPress localmente su Windows.
Perché installare WordPress localmente su Mac?
Normalmente, hai bisogno di un account di web hosting e di un nome di dominio per creare un sito web WordPress.
Tuttavia, il software WordPress principale è gratuito da scaricare e può essere eseguito localmente sul tuo computer. Questo sito WordPress locale generalmente non sarà disponibile su Internet e potrà essere visualizzato solo sul tuo computer.
Il vantaggio di questo approccio è che puoi esercitarti privatamente con WordPress, provarlo e vedere che tipo di siti web puoi creare.
Puoi anche utilizzare questa installazione locale per testare diversi temi e plugin di WordPress prima di installarli sul tuo sito web live.
Di cosa hai bisogno per installare WordPress localmente su Mac?
WordPress è scritto principalmente in PHP, un linguaggio di programmazione lato server. Per eseguire PHP, avrai bisogno di un software server web e di un sistema di gestione di database MySQL installati.
Ora, installare tutti questi software in modo indipendente e farli funzionare insieme sembra un compito arduo.
Fortunatamente, esistono strumenti di sviluppo gratuiti che rendono semplicissimo installarli come un unico pacchetto, anche per gli utenti meno esperti di tecnologia. Tenendo conto di ciò, ecco 2 metodi per installare facilmente WordPress localmente su un Mac senza alcuna competenza speciale di amministrazione server:
- Metodo 1. Installa WordPress localmente su Mac usando Local WP (Consigliato)
- Metodo 2. Installa WordPress localmente su Mac usando MAMP
- Spostare la tua installazione WordPress locale su un sito web live
Pronto? Mettiamo WordPress in esecuzione sul tuo computer.
1. Installa WordPress localmente su Mac usando Local WP (Consigliato)
Local WP è uno strumento di sviluppo WordPress che ti consente di configurare facilmente un server locale sul tuo computer Mac. Puoi anche usare Local su Windows e Linux per configurare WordPress.
Innanzitutto, dovrai visitare il sito web di Local e fare clic sul pulsante 'Download' nell'angolo in alto a destra dello schermo.
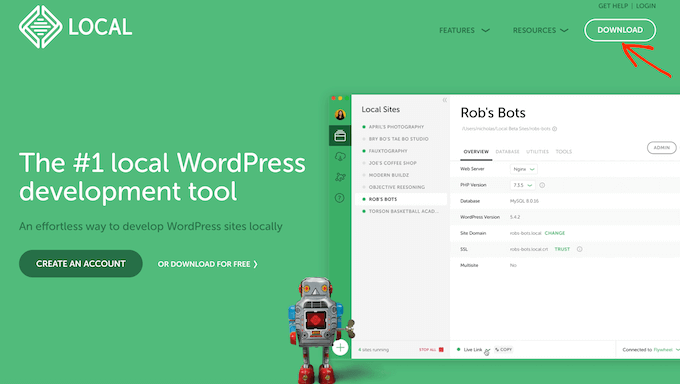
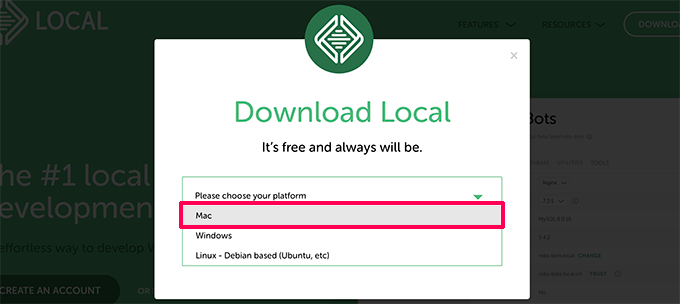
Questo aprirà una finestra popup di Download Local.
Qui, scegliamo Mac come piattaforma.
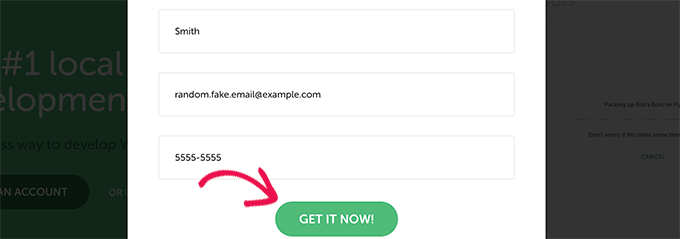
Local ti chiederà quindi di completare un breve modulo.
Dopo aver inserito il tuo nome, indirizzo email e numero di telefono, puoi procedere e fare clic sul pulsante 'Get it Now'.
Questo scaricherà il file di installazione di Local sul tuo computer. Puoi fare doppio clic per aprire il file scaricato non appena il download è terminato.
Vedrai quindi una procedura guidata di configurazione, che ti guiderà attraverso il processo di installazione di Local sul tuo computer.
Gli utenti Mac devono semplicemente trascinare l'app Local nella loro cartella ‘Applicazioni’.
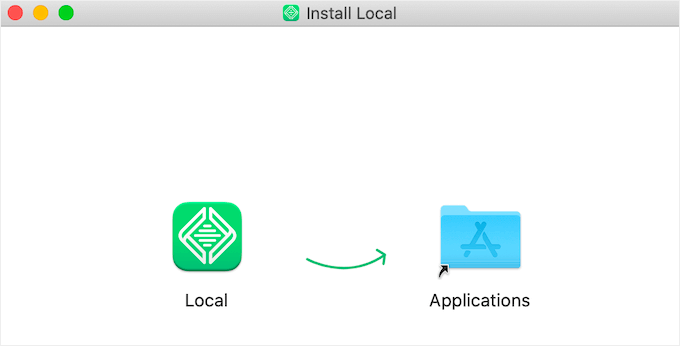
Una volta terminata l'installazione, potrai avviare l'app Local dalla cartella Applicazioni.
Al primo avvio, potrebbero esserti poste alcune domande e ti verrà chiesto di creare un account Local gratuito. Questi passaggi sono facoltativi e puoi saltarli se lo desideri.
Creare un sito web WordPress in Local
Local rende molto facile creare un sito web locale e installare WordPress rapidamente.
Per iniziare, fai semplicemente clic sul pulsante ‘Crea un nuovo sito’ per continuare.
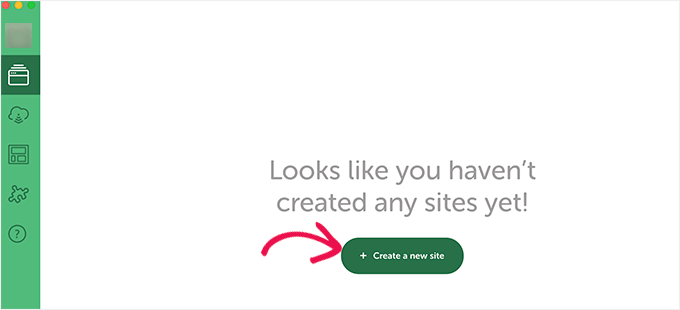
Nella schermata successiva, dovrai inserire il nome del tuo sito.
Dopodiché, procedi e fai clic sul pulsante ‘Continua’.

Successivamente, ti verrà chiesto di scegliere la tua piattaforma.
Local ti permette di scegliere quale versione di PHP, Apache e MySQL desideri utilizzare.
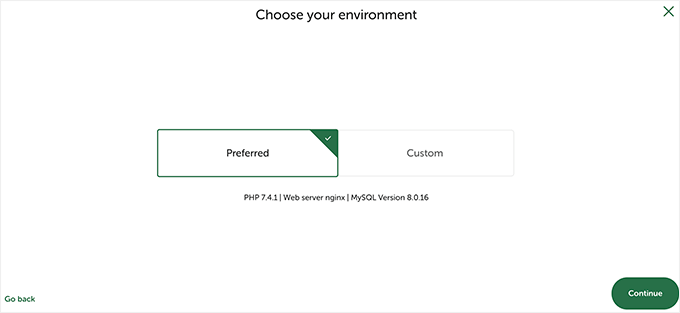
Se non sei sicuro, scegli le impostazioni ‘Preferite’ e fai clic sul pulsante ‘Continua’.
Infine, dovrai inserire un nome utente WordPress e una password. Quindi, puoi fare clic sul pulsante ‘Aggiungi sito’.
Local scaricherà e installerà ora WordPress per creare il tuo sito web. Potrebbe esserti richiesto di inserire il nome utente e la password del tuo Mac per apportare modifiche.
Una volta terminato, vedrai le informazioni sul tuo sito web appena creato con pulsanti per visitare l'area di amministrazione di WordPress o visualizzare il tuo sito locale.
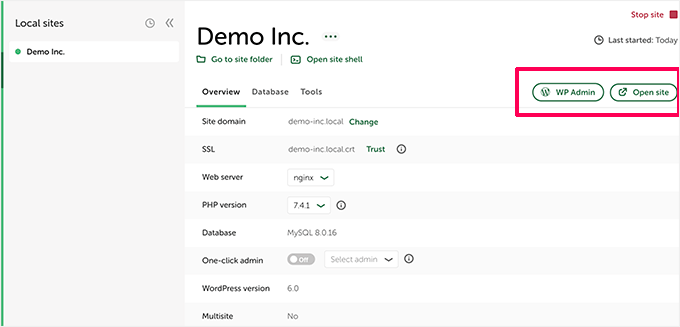
Ora puoi visitare il tuo sito web o accedere all'area di amministrazione di WordPress.
Da qui, puoi utilizzare il tuo sito WordPress ospitato localmente proprio come gestiresti un sito web live.
Puoi installare plugin e temi e progettare il tuo sito web come ritieni opportuno.
2. Installa WordPress localmente su Mac usando MAMP
MAMP è un programma popolare che ti permette di eseguire WordPress sul tuo computer Mac.
Per prima cosa, visitiamo il sito web di MAMP. Qui dovresti vedere l'ultima versione di MAMP & MAMP Pro.
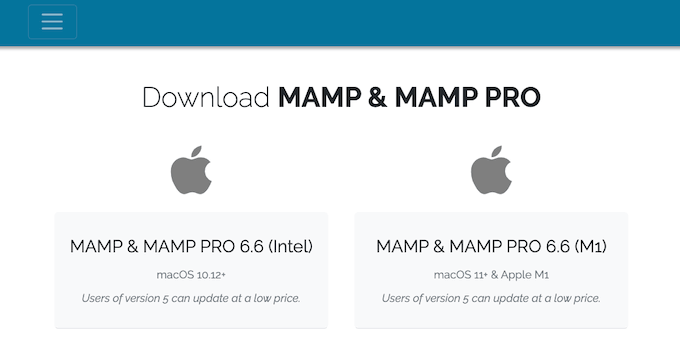
MAMP ha download separati per diverse versioni del sistema operativo macOS.
Non sei sicuro di quale versione di macOS sia installata sul tuo computer? Per scoprirlo, fai semplicemente clic sull'icona Apple nella barra degli strumenti del tuo computer.
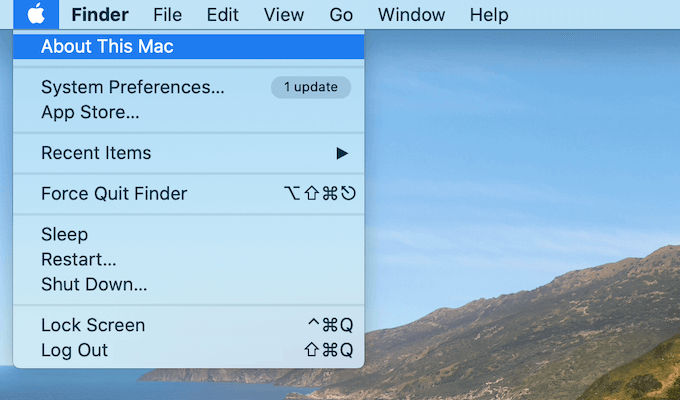
Puoi quindi fare clic sull'opzione 'Informazioni su questo Mac'.
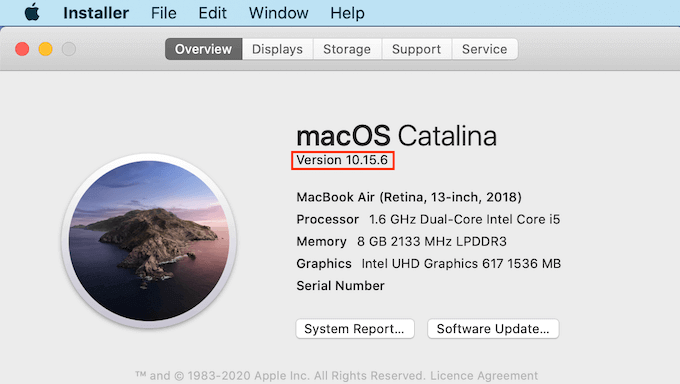
Si aprirà una finestra popup che mostrerà molte informazioni sul tuo computer, inclusa la tua versione di macOS.
Ora puoi scaricare la versione corretta di MAMP per il tuo sistema operativo.
Una volta terminato il download, fai doppio clic sul file .pkg di MAMP. Questo avvierà l'installer di MAMP.

Ora, segui semplicemente le istruzioni sullo schermo per installare MAMP.
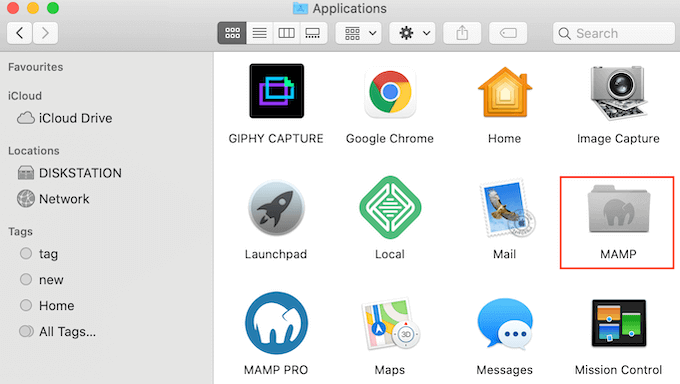
Dopo aver installato questo programma, procedi e avvia MAMP aprendo la cartella 'Applicazioni' del tuo computer.
Qui troverai 2 versioni di MAMP. MAMP Pro è la versione a pagamento, quindi assicurati di selezionare la versione gratuita.
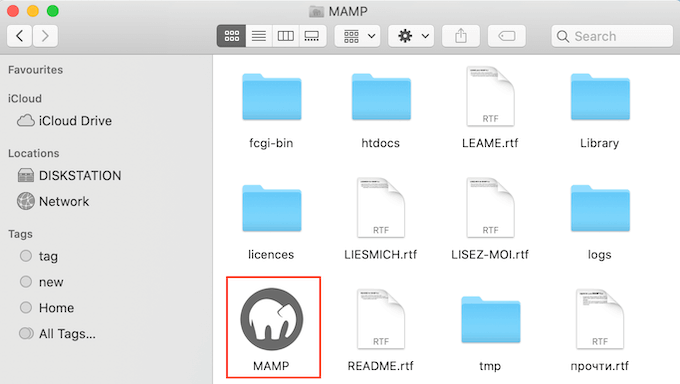
All'interno di questa cartella MAMP, troverai vari file, oltre a un'applicazione MAMP.
Fai semplicemente doppio clic per avviare l'app MAMP.
Prima di iniziare, ti consigliamo di configurare alcune impostazioni per migliorare la tua esperienza con MAMP.
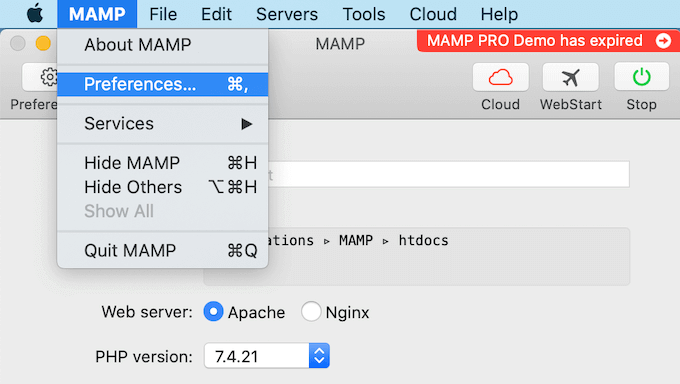
Per apportare queste modifiche, fai clic su 'MAMP' nella barra degli strumenti e quindi seleziona 'Preferenze...'.
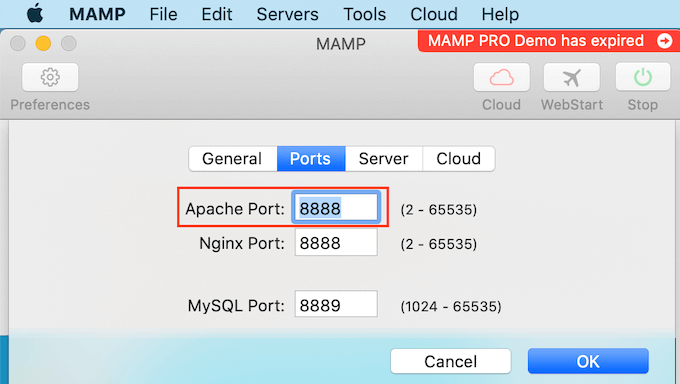
Nella finestra popup, dovrai passare alla scheda 'Porte'.
Ora puoi verificare quale porta Apache sta utilizzando MAMP. Si consiglia di passare alla porta Apache 8888 se MAMP non sta già utilizzando questa porta.
Il prossimo passo è configurare la cartella della tua root del documento. Qui creerai e memorizzerai tutti i tuoi siti WordPress locali.
Per impostazione predefinita, MAMP utilizza la cartella /Applications/MAMP/htdocs/, ma puoi cambiarla in qualsiasi altra posizione.
Nella finestra di dialogo ‘Preferenze…’, facciamo clic sulla scheda ‘Server’. La tua root del documento dovrebbe ora essere visibile.
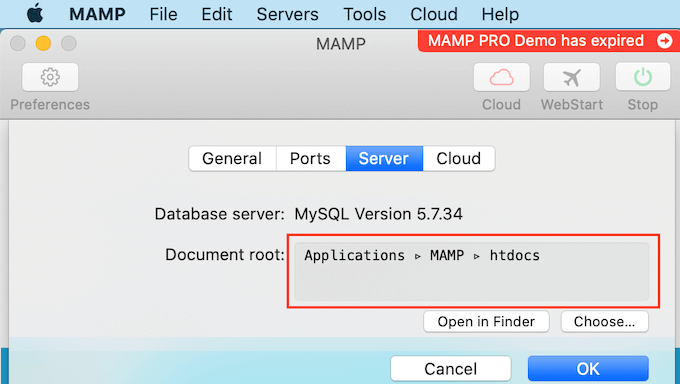
Per memorizzare i tuoi siti in qualsiasi altra cartella, fai clic sul pulsante ‘Scegli…’.
Si aprirà una finestra popup dove potrai scegliere una nuova posizione. Potresti anche voler creare una nuova cartella per memorizzare tutti i tuoi siti WordPress.
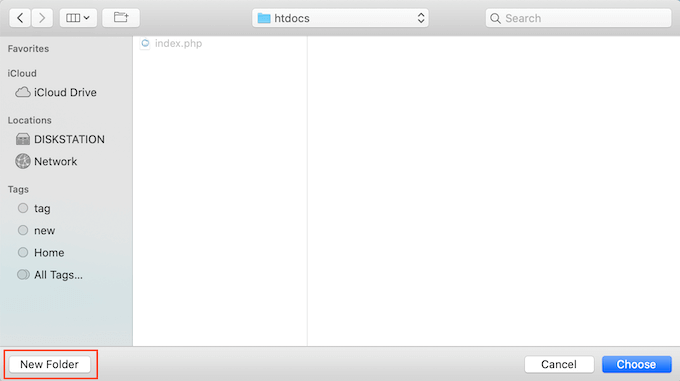
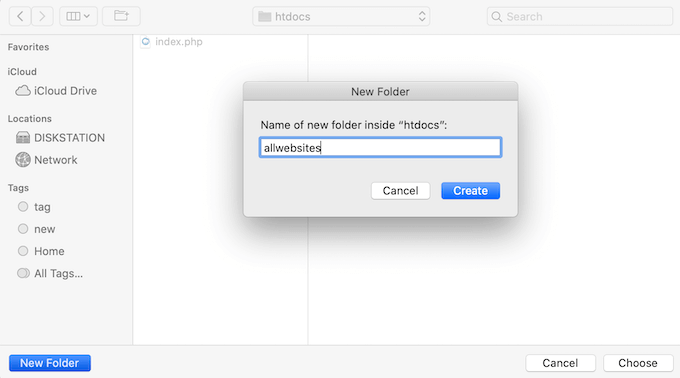
Puoi nominare questa cartella come preferisci.
Per questo articolo, memorizzeremo i nostri siti in una cartella chiamata ‘allwebsites’.
Installare WordPress su MAMP
Ora che hai configurato MAMP, è il momento di installare WordPress sul tuo computer Mac.
Innanzitutto, dovrai visitare il sito web WordPress.org e scaricare l'ultima versione di WordPress Core.
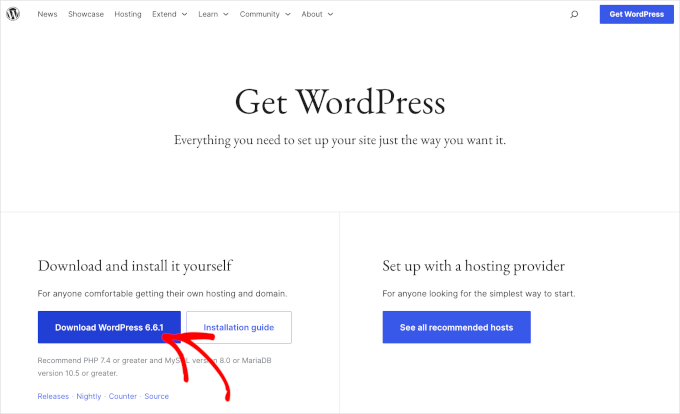
NOTA: Esistono due versioni di WordPress. Per maggiori dettagli, consulta il nostro articolo di confronto su WordPress.com vs. WordPress.org.
Dopo aver scaricato il file da WordPress.org, devi semplicemente decomprimerlo. Questo creerà una cartella ‘wordpress’ non compressa.
Ora, copia semplicemente questa cartella nella tua cartella della root del documento MAMP.
Poiché abbiamo modificato la cartella della root del documento, dobbiamo copiare ‘wordpress’ in applications/MAMP/htdocs/allwebsites.
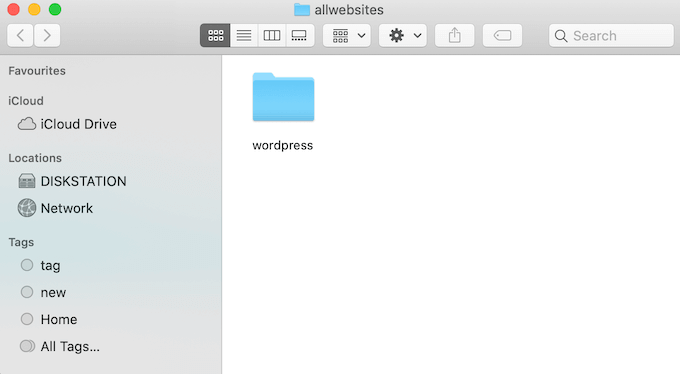
WordPress ha bisogno di un database per memorizzare tutti i suoi contenuti e dati. Dovrai creare questo database prima di poter creare un sito web locale.
Non preoccuparti, non è difficile come sembra.
Nella finestra ‘Preferenze…’ di MAMP, fai semplicemente clic sul pulsante ‘OK’. Questo dovrebbe avviare l'applicazione MAMP in una nuova scheda del browser.
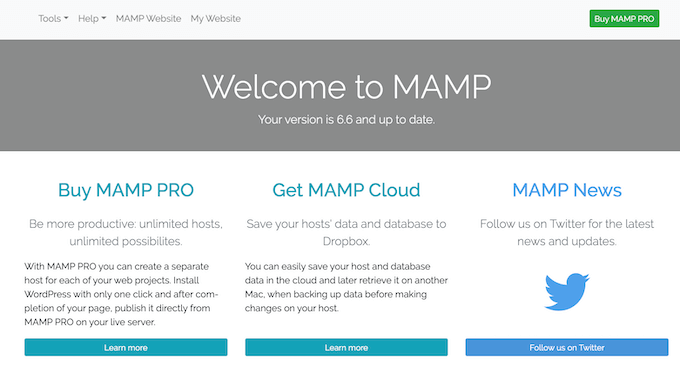
Il tuo prossimo compito è avviare phpMyAdmin. Questa è un'applicazione basata sul web per la gestione del database MySQL del tuo sito web.
Nella barra degli strumenti, naviga su Strumenti » phpMyAdmin.
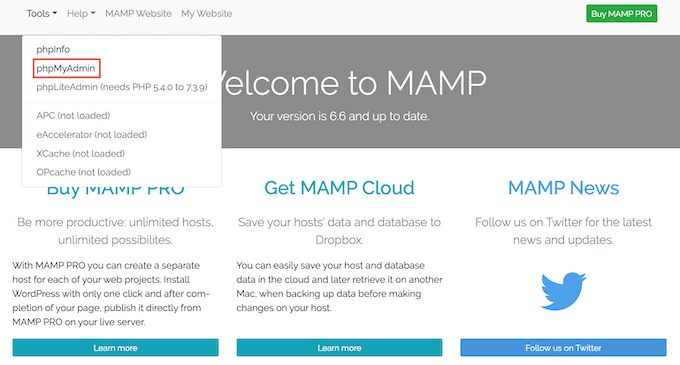
Questo aprirà phpMyAdmin in una nuova scheda.
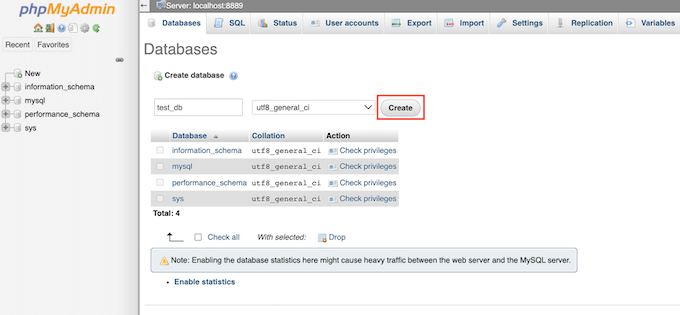
Nella dashboard di phpMyAdmin, dovrai andare alla scheda ‘Database’.
Ora puoi digitare un nome per il tuo database nel campo ‘Nome database’ con quello che preferisci. Assicurati solo di ricordare il nome, poiché lo utilizzeremo nel passaggio successivo.
Per questo tutorial, chiameremo il nostro database ‘test_db’.
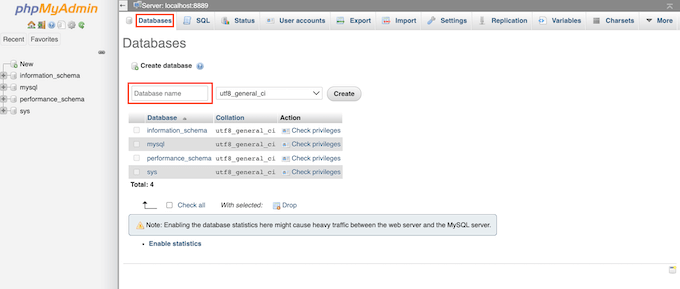
Dopo aver digitato il nome del tuo database, puoi fare clic sul pulsante ‘Crea’.
PhpMyAdmin creerà quindi il tuo database.
Ora è il momento di installare WordPress.
In una nuova scheda del browser, vai semplicemente su http://localhost:8888/. Se stai utilizzando una porta diversa dalla 8888, modifica semplicemente questo URL per menzionare la tua porta.
Ora dovresti vedere un link alla cartella ‘wordpress’ che hai copiato nella tua cartella dei documenti principali. Fai clic su questo link. Questo aprirà la procedura guidata di installazione di WordPress.
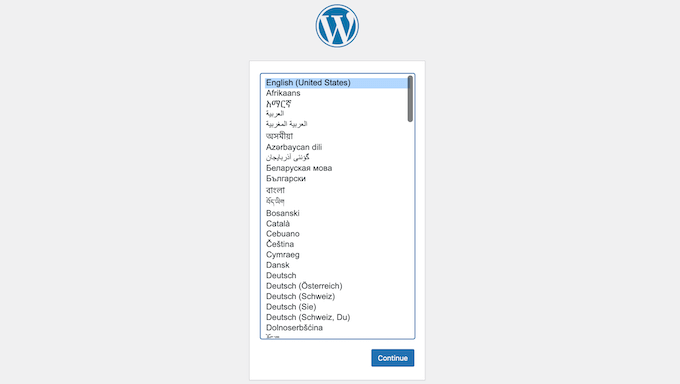
La procedura guidata di installazione di WordPress inizia chiedendoti di scegliere una lingua. Dopo aver fatto la tua scelta, puoi fare clic sul pulsante ‘Continua’.
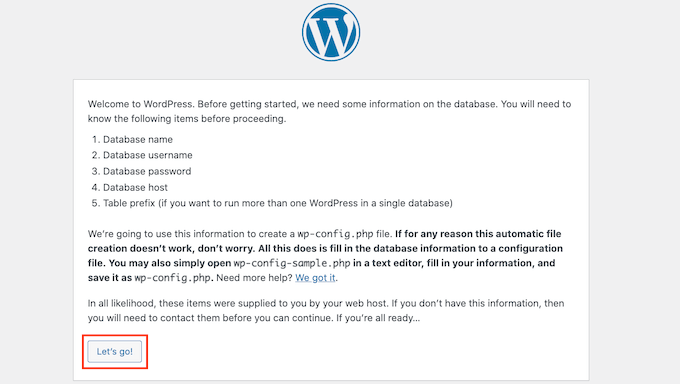
Nella schermata successiva, WordPress ti mostrerà l'elenco di tutte le informazioni necessarie per completare l'installazione.
Dopo aver letto questa schermata, fai clic sul pulsante ‘Iniziamo’ per procedere.
La procedura guidata di configurazione ti chiederà ora le informazioni sul tuo database WordPress. Per il nome del database, digita semplicemente il nome che hai creato nel passaggio precedente.
Per ‘Nome utente’ e ‘Password’, digita semplicemente ‘root’.
Puoi quindi digitare ‘localhost’ nel campo ‘Host database’. Localhost significa che il database e il sito web sono ospitati sullo stesso server, che, in questo caso, è il tuo computer Mac.
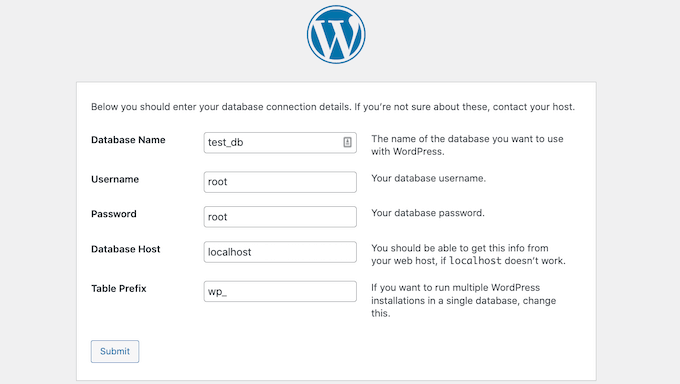
Dopo aver digitato tutte queste informazioni, fai semplicemente clic sul pulsante ‘Invia’.
WordPress si connetterà ora al tuo database e creerà un file di configurazione per te. Una volta terminato, vedrai un messaggio di successo.
Per passare al passaggio successivo, puoi fare clic sul pulsante ‘Esegui l’installazione’.
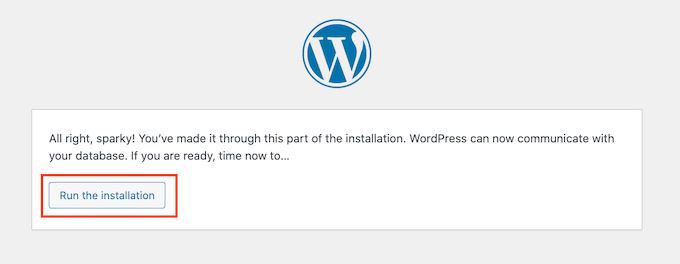
Nella schermata successiva, WordPress ti chiederà di aggiungere un titolo del sito. Ad esempio, potresti usare il nome della tua attività. La maggior parte dei temi WordPress mostra questo titolo nella parte superiore del tuo sito web.
Se non sei sicuro del titolo del tuo sito, non c’è bisogno di farsi prendere dal panico. Puoi cambiare il titolo nella tua bacheca di WordPress in qualsiasi momento.
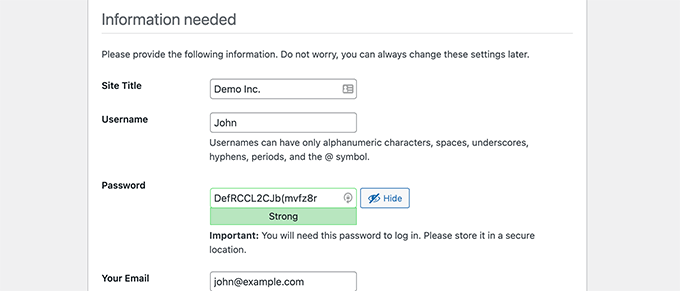
Dovrai quindi creare un nome utente e una password. Queste sono le informazioni di accesso che utilizzerai per accedere alla tua bacheca di WordPress.
Puoi anche digitare il tuo indirizzo email nel campo ‘La tua email’. Questo è l’indirizzo a cui WordPress invierà tutte le sue email amministrative.
Dopo aver completato questo modulo, fai clic sul pulsante ‘Installa WordPress’.

WordPress eseguirà ora l'installazione.
Dopo qualche istante, dovresti vedere un messaggio 'Successo!'.

Per accedere direttamente alla tua schermata di accesso di WordPress, fai clic sul pulsante 'Accedi'.
Puoi anche accedere al tuo sito WordPress locale utilizzando il seguente URL: http://localhost:8888/wordpress/wp-login.php
Nota: Se stai utilizzando una porta Apache diversa, dovrai modificare la parte '8888' di questo URL.
Ora puoi procedere e accedere al tuo sito WordPress inserendo il nome utente e la password che hai creato nel passaggio precedente.
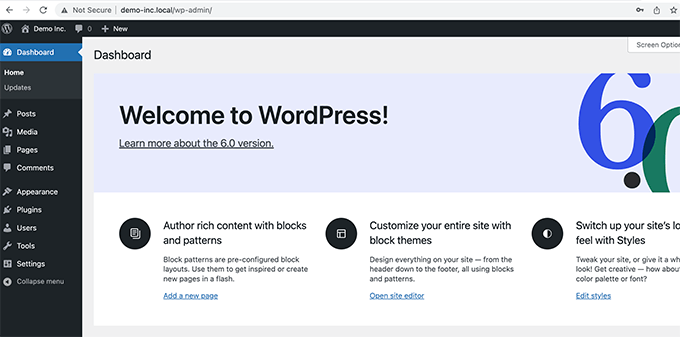
Questo ti porterà alla dashboard di WordPress.
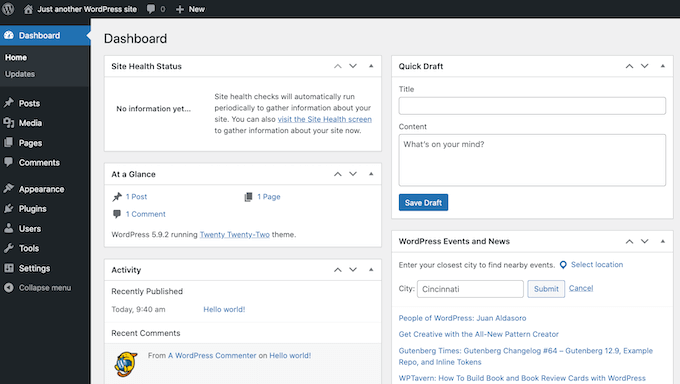
Provare WordPress in locale su Mac
Un'installazione locale è perfetta per testare WordPress o sviluppare siti web sul tuo computer. Ora che WordPress è in esecuzione in locale sul tuo Mac, ecco alcune cose che potresti voler provare:
- Sperimenta con i migliori temi WordPress.
- Prova a trovare il tuo tema WordPress perfetto.
- Prova plugin WordPress essenziali in locale.
- Impara la programmazione WordPress creando i tuoi plugin e temi personalizzati.
Spostare la tua installazione WordPress locale su un sito web live
Una volta che hai giocato con WordPress in locale, potresti voler spostare la tua installazione di WordPress su un sito web live. Questo è l'unico modo in cui gli altri potranno vedere il tuo sito web.
Per fare ciò, dovrai acquistare un nome di dominio e web hosting.
Un nome di dominio è l'indirizzo del tuo sito web su Internet, e il web hosting è dove vengono archiviati i file del tuo sito web. Puoi pensare al web hosting come alla casa del tuo sito web su Internet.
Per il web hosting, consigliamo Bluehost. Sono una delle più grandi aziende di hosting al mondo e sono anche ufficialmente raccomandati da WordPress.org.
Fortunatamente, Bluehost offre agli utenti WPBeginner uno sconto sull'hosting, un certificato SSL gratuito e un nome di dominio gratuito. In sostanza, puoi trasformare la tua installazione WordPress locale in un sito web live per $2,99 al mese.
Una volta acquistato l'hosting, potresti voler consultare il nostro articolo su come spostare WordPress da un server locale a un sito web live.
Speriamo che questo articolo ti abbia aiutato a imparare come installare WordPress localmente su Mac. Successivamente, potresti anche voler consultare la nostra guida su come creare un sito web con WordPress o vedere il nostro confronto delle migliori società di hosting WordPress gestito.
Se ti è piaciuto questo articolo, iscriviti al nostro canale YouTube per tutorial video su WordPress. Puoi anche trovarci su Twitter e Facebook.


Staff di WPBeginner
Dato che non sappiamo cosa è andato storto quando hai eliminato il sito in precedenza. Ti consigliamo di creare un nuovo sito. Ripeti fondamentalmente l'intero processo da capo. Tranne che questa volta crea una nuova directory nella tua cartella document root. Fai lo stesso con il DB MySQL. Quindi installa WordPress nella nuova directory usando il tuo nuovo DB MySQL.
Steve
Ottime istruzioni! Sono riuscito a configurare un sito, ma ho dovuto eliminarlo e ricominciare da capo. Ho eliminato il database SQL e la precedente cartella del sito. Ma quando WordPress tenta di installarsi ora, ricevo un enorme registro di errori nel browser che dice che un sacco di file, informazioni "esistono già". Devo eliminare altri file precedentemente installati e, in tal caso, quali?
Minyan
Quando digito http://localhost/wordpress (ho chiamato la cartella wordpress sotto la cartella root di MAMP wordpress), viene visualizzato "404 non trovato. L'URL richiesto /wordpress non è stato trovato su questo server". Qualcuno può dirmi cosa ho sbagliato?
Schalk
Minyan,
Hai avuto fortuna con il tuo problema "404 non trovato"??
ej
ho lo stesso problema. per favore aiutami!
Ish
Instead of typing in ‘http://localhost/wordpress’,
just type in ‘localhost’ instead and it should bring you to the wordpress page.
Ha funzionato per me, spero che funzioni anche per te!
Grazie
Michelle Hamilton
Queste istruzioni sono le migliori e più facili da seguire in circolazione. Le ho effettivamente usate per aiutare il mio istruttore a configurare Wordpress sul suo nuovo mac e le ho usate per configurarlo sul mac che uso nel mio stage. Grazie mille!!!
Michelle Hamilton
Queste sono le migliori e più facili da seguire istruzioni in circolazione. Le ho effettivamente usate per aiutare il mio istruttore a installare MAMP sul suo mac. Le avevo già usate per farlo per il mio stage a cui sto partecipando. Ottimo lavoro!!!
Julie Valin
Grazie mille per questo tutorial passo-passo! Molto utile per questo utente MAMP alle prime armi, quando all'inizio mi sentivo sopraffatto. Ora mi sento informato e felice, e mi piace sempre commentare quei post/tutorial che mi hanno davvero aiutato. Complimenti!
Staff di WPBeginner
Puoi configurare un ambiente di staging per su un server live. Dai un'occhiata alla nostra guida su come creare un ambiente di staging per un sito WordPress
Haley
Grazie per questo tutorial – una domanda veloce per te: sto progettando un sito per un cliente che dovrò costruire offline usando MAMP, tuttavia vedo la nota sulla possibilità di visualizzarlo solo sul mio computer. C'è un modo per cui il mio cliente (situato in un altro stato) possa rivedere i progressi senza renderlo live sul suo sito?
Hannah
Oh dio, grazie mille al team di wpbeginner. È la prima volta che uso MAMP e niente sembrava dire 'Ehi, per tutti voi stupidi, ecco come installare WordPress' - dava per scontato che lo sapessimo. *per sempre grato*
Frank
Troppo facile ragazzi, grazie mille!
Alex Koch
Apprezzo molto il vostro aiuto. MAMP 3.0.3 viene fornito con un'interfaccia leggermente diversa e una configurazione diversa – devi reindirizzare Apache a /bin/phpMyAdmin/ per configurare il tuo database mysql per wordpress e POI reindirizzare Apache alla tua directory principale effettiva localhost/mysitewahtever/ dove hai messo wordpress.
Wordpress può accedere al db comunque.
Rich
Grazie per questa guida facile da seguire! Ho finalmente trovato la motivazione per proseguire con un progetto che ho quasi completato e questa guida mi ha davvero aiutato. Grazie ancora!
megan Dickson
This was AWESOME. SO EASY.
Thank you!
Tim Aldiss
Molto utile, grazie
Tom Nguyen
È possibile ricevere email da WordPress installato su un server locale? Chiedo solo perché avevo installato WordPress e dimenticato la mia password di amministratore. Ho cliccato sul link Hai dimenticato la password? per avviare il processo di reimpostazione della password, ma non ho mai ricevuto un'email.
Ho finito per andare all'interfaccia phpMyAdmin locale e reimpostare la password in quel modo.
Kate
Ho fatto un'ipotesi durante l'installazione di mamp/wordpress con il nome del mio sito web. Il "nome del sito web" che ho usato per configurarlo usando il tuo tutorial non è il nome del mio sito web che la mia attività possiede attualmente e che sto rifacendo. Pensavo che se avessi usato quello, avrebbe creato problemi al sito attuale. Quindi... devo tornare indietro e inserire il mio "vero" nome del sito web nei file di installazione o posso semplicemente cambiarlo con il mio attuale nome di dominio quando avrò finito con il nuovo sito wordpress? Grazie!
Leigh
hey
seguito i passaggi... fino all'impostazione della parte di... nuovo database – usato test_db come da esempio
apertura di http://localhost/mysite nel browser e ottenimento di un errore 404 che mi espelle.
dovrebbe dire …
WordPress ti avviserà che non è riuscito a trovare il file wp-config.php. !!!
…directory impostata bene , a mysite
///usando le porte predefinite di mamp
grazie in anticipo per l'aiuto, amico!
smiles
Kate
Suppongo che il problema fosse che ho chiamato la mia cartella wp che contiene tutti i miei file wp nella cartella hpdocs all'interno di MAMP usando 2 parole. Pertanto, ho messo uno spazio in mezzo e quando sono andato a inserire l'indirizzo localhost/nomiodominio/wp-admin/ per trovare la mia dashboard, apparentemente ho dovuto aggiungere un %20 a causa dello spazio. Sembra funzionare ora, quindi penso di aver fatto bene! Grazie ancora per la guida del tuo sito e per il tuo rapido aiuto. Lo apprezzo molto e ho aggiunto il tuo sito ai miei preferiti e mi sono iscritto!
Kate
Well apparently it was so simple I was missing the part that I needed to put the _db after my new database I created Solved!
Kate
Sto passando a WordPress da Drupal e apprezzo e valorizzo le tue fantastiche risorse e i passaggi dettagliati che provengono da un principiante senza esperienza e conoscenze tecniche!! Sto avendo lo stesso problema che ha avuto Jen sopra (12/12/2013). Sto usando un Macbook Pro e sono arrivato a cercare di capire se il database che ho impostato nel mio file wp-config esiste. Ho seguito i passaggi che hai raccomandato (dice che tutti i privilegi sono concessi nel mio utente root), ma forse lo sto facendo nel modo sbagliato perché ricevo ancora lo stesso messaggio di errore come lei? Forse ho bisogno di un altro modo per spiegare i passaggi? Ho chiuso Skype e mi sono assicurato che la condivisione web non fosse attiva, ma ciò non ha cambiato nulla. Completamente bloccato!!
Supporto WPBeginner
Kate, una volta avviato MAMP, devi andare su http://localhost/phpmyadmin per creare un nuovo database. Apri il tuo file wp-config.php e inserisci il nome del database nella riga:
define('DB_NAME', 'IlTuoNomeDatabaseQui');Facci sapere se questo ha risolto il tuo problema.
Amministratore
Daniel
Grazie per la guida.
Ora ho installato WordPress sul mio Mac e ho creato un sito web. Come posso procedere per avviare un nuovo sito web?
Grazie Dan
Supporto WPBeginner
Ripeti il processo installando WordPress in una nuova directory (cartella) e creando un nuovo database.
Amministratore
Syed
Sto vivendo un incubo. Grazie alle tue istruzioni, tutto stava funzionando bene fino ad oggi, quando ho cliccato su aggiorna alla nuova versione di MAMP e ho proceduto all'installazione, pensando che sarebbe avvenuta in background.
Sembra che l'aggiornamento abbia cancellato i miei dati o li abbia messi da parte. Tra l'altro, avevo una copia completa del disco principale su un altro disco (l'intera cartella MAMP). Vedo le cartelle e i file in entrambi i posti, ma quando provo ad avviare MAMP dall'altro disco dove si trovano le vecchie cartelle di MAMP, si avvia comunque con la nuova versione e non riesco ad avviare il mio sito.
Non ho modo di sapere veramente cosa fare dopo. Ti prego di aiutarmi. Grazie
netyx
Grazie per la guida!
Ho però un problema. Ho creato un database e poi il server MySQL è crashato. Non funziona più. Qualcuno potrebbe aiutarmi per favore?
arzu
very helpful, thank you
Art
Sì amico, questo è stato molto utile, grazie mille!
Derek
Ottimo tutorial. Grazie. Tutto ha funzionato bene per me fino alla fine. Dopo aver installato con successo WordPress, ho cliccato su “Visualizza sito” e ho ottenuto una schermata bianca che diceva “Il tuo sito web” seguita da istruzioni su come renderlo “live”. Non voglio andare live. Voglio solo lavorare alla creazione di un tema localmente. Ma per qualche motivo, non riesco a visualizzare il sito.
Aiuto!
Grazie.
Ian
Guida perfetta, molto apprezzata
Brandon
Un gioco da ragazzi. Molte grazie!
GH
Grazie mille. Spiegazione molto utile.
Jen
Ho appena installato MAMP e i miei server non si avviano. Ti è mai capitato questo problema prima? Ho provato a riavviare e a rileggere i passaggi, grazie!
Supporto WPBeginner
controlla i log degli errori nella directory in cui hai installato MAMP
Amministratore
Jen
AIUTO PER FAVORE! NON TROVO UNA SOLUZIONE E HO UNA SCADENZA!
Quindi tutto funzionava finché non ho cliccato sul pulsante 'apri pagina di avvio'. Originariamente si apriva solo un browser web che diceva solo:
Funziona
Poi, dopo aver aggiornato, mi ha mandato direttamente alla schermata di creazione della configurazione per WordPress, saltando la sezione di avvio del database. Quando ho inviato le informazioni incluse nel tuo tutorial, dice:
"Siamo stati in grado di connetterci al server del database (il che significa che il tuo nome utente e password sono corretti) ma non siamo riusciti a selezionare il database (nome del mio database)."
Cosa devo fare per risolvere questo problema?? Ho letto online e dice che ci sono alcuni problemi con Mac Mountain Lion, quindi ho disattivato la condivisione web, che è stata la soluzione per questo problema su tutti gli altri siti. Per favore, per favore, aiutami!!
– Jen
Supporto WPBeginner
Jen, apri il tuo file wp-config.php che si trova nella directory principale dell'installazione di WordPress. Guarda le sezioni Database, nome utente del database e password. Vai su phpmyadmin digitando
http://localhost/phpmyadminnel browser. Assicurati che il nome del database nel tuo file wp-config esista. Controlla anche che l'utente utilizzato nel file wp-config abbia tutti i privilegi cliccando sulla scheda Utenti in phpmyadmin.Amministratore
brad
revoco la mia precedente vittoria, quando ho finito di lavorare sul mio sito, ho fermato i server e chiuso MAMP. Quando ho riavviato MAMP per lavorare su un nuovo progetto qualche ora dopo, non riesco ad accedere a nessun file in htdocs senza un errore 404. I forum di supporto di MAMAP hanno quasi nessuna risposta a questo problema, qualcuno qui ha questo problema? Qualsiasi aiuto possibile? Non sono una persona tecnica, solo un designer, quindi questo è per lo più greco per me.
Brad
Grazie per un tutorial semplice e ben spiegato! L'ho configurato e funzionante in meno di 15 minuti!
Daniele
Grazie ragazzi! Davvero utile per un giovane utente Mac come me!
jeroen faber
Great guide!
One thing: the following line in the guide:
“Apri una nuova finestra del browser e digita http://localhost/mysite.”
non mi ha portato alla schermata di installazione di WordPress, è bastato digitare "localhost" nel browser.
Ho commesso qualche errore nella configurazione o...?
Supporto WPBeginner
Sembra che tu abbia installato WordPress nella tua directory principale www, htdocs o web sotto la tua installazione Apache.
Amministratore
Dee
Grazie per questo, è stato davvero facile da seguire e non ho avuto alcun problema!
Ton in 't Veld
Ho già realizzato molti siti con Dreamweaver. Ora voglio configurare un blog WordPress per mia moglie. Ho installato MAMP. Fin qui tutto bene. Nelle preferenze ho provato ad avviare i server. Il server MySQL ha funzionato immediatamente, ma il server Apache non diventa verde. Ho già spento Skype (come consigliato in precedenza).
Molte grazie per aver esaminato il mio problema.
Supporto WPBeginner
A volte Skype è in esecuzione in background, controlla nel monitoraggio attività per assicurarti che Skype non sia in esecuzione in background.
Amministratore
George
Tutto stava andando bene finché non sono arrivato a http://localhost:8888/wordpress. Per qualche motivo il server Apache non si avviava con la porta 80. Per favore, dimmi cosa non sto facendo o cosa sto facendo di sbagliato.
Thank you,
George
Staff editoriale
Questo accade se Skype è in esecuzione. Devi cambiare la porta in Skype o chiudere Skype mentre usi Mamp.
Amministratore
Justin
Era esattamente quello di cui avevo bisogno. Un intoppo che ho avuto è stato che "Condivisione Web" era attivata nelle "Preferenze di Sistema" del mio Mac OSX. Stava causando l'esecuzione di un server Apache duplicato, che impediva il funzionamento di phpmyadmin o della "Pagina di avvio".
Staff editoriale
Thanks for sharing that with us Justin. Hopefully it will help others who read the comments
Amministratore
Jonas
Hi,
Followed your instructions an successfully installed WP. Many thanks
JaY Srivastava
Thanks for saving me real time, i knew how to do that on windows, but since i use my mac as my main work laptop it was getting difficult for me to test websites.
I have been always fan of wpbeginner but now i guess it has grown more.
Grazie Ancora!
RW
Uso la mia prima installazione di MAMP da quando ho letto questo tutorial. L'unica cosa con cui sto lottando è portarla su un sito di produzione live. Presumo di dover esportare il mio DB e poi importarlo usando phpmyadmin, ma ovviamente alcune cose dovranno cambiare. Devo anche caricare manualmente tutte le cartelle di upload.
Qualcuno ha idee sul flusso di lavoro consigliato?
Grazie,
Bob
Staff editoriale
Se hai BackupBuddy, puoi facilmente creare un file di backup completo e importarlo. Per farlo manualmente:
1. Install WordPress on new site and copy/paste the /wp-content/ directory from the old site.
2. Import all content using phpMyAdmin
3. Change the site_url and home_url options in wp_options to reflect the new site.
4. Login to the new site and go to Settings > General and click on the save button.
5. Go to Settings > Permalinks and click on the save button.
Amministratore
RW
perfetto! grazie! non ho mai amato backupbuddy perché non ha funzionato in modo affidabile per me. l'approccio manuale sembra semplice! grazie mille!
Bob
RW
Sto usando MAMP da una settimana e lo adoro. Rende i test molto più veloci!
Grazie,
Bob
Gautam Doddamani
i have been using XAMPP from a long time and its serving me well…it has the same functionality as MAMP and perfectly runs on a mac
Raihan
questo post mi è molto utile. per questo ho salvato questa pagina
Gunstra
Ottimo tutorial, grazie.
Debbie
Finalmente, istruzioni concise e passo-passo su come impostare Wordpress. Ho seguito altre istruzioni e mi sono ancora perso su cosa fare. Grazie mille!!
Christopher Anderton
Sto usando MAMP anch'io, tuttavia, c'è un modo ancora più semplice per essere operativi in pochissimo tempo usando MAMP Stack (http://bitnami.com/stack/mamp) e il modulo WordPress (vedi la sezione moduli nella pagina).
Luke
Processo decisamente utile! Vorrei aver avuto questo articolo la prima volta che ho provato a configurarlo. Sarebbe stato di grande aiuto!
Qual è la tua opinione sulla modifica del file hosts per consentire l'uso di un nome DNS per il sito locale (esempio.com invece di localhost)? Buona pratica? Cattiva pratica?
Personalmente l'ho trovato utile quando trasferisco un sito che ho sviluppato localmente su un server live.
RW
È così utile. Ho letto di come fare e penso che farà risparmiare molto tempo lavorando localmente sui siti. Immagino che debba essere configurato (o riconfigurato) per siti diversi?
Grazie,
Bob