Hai mai provato a caricare un file sul tuo sito WordPress e ti sei scontrato con un muro? È super frustrante quando non riesci a caricare quell'immagine, plugin o tema di cui hai bisogno. I nostri lettori ci chiedono spesso aiuto con i problemi di caricamento dei file perché possono rallentare il tuo flusso di lavoro.
A volte, questi limiti di caricamento dei file possono impedirti inaspettatamente di aggiungere contenuti alla tua libreria multimediale o di installare quei plugin e temi più grandi di cui hai bisogno. È come essere bloccati con le mani legate. Ed è ancora più fastidioso quando non sai come risolverlo!
Ma non preoccuparti, siamo qui per aiutarti. Amiamo che WordPress sia una piattaforma così configurabile e ci sono spesso più modi per risolvere lo stesso problema.
In questa guida, ti mostreremo i modi più semplici per aumentare la dimensione massima di caricamento dei file in WordPress. Ti aiuteremo a superare queste limitazioni in modo che tu possa tornare a fare ciò che ami: gestire il tuo sito web!
Perché aumentare la dimensione massima di caricamento dei file in WordPress?
Il tuo provider di hosting WordPress imposterà una dimensione massima predefinita di caricamento dei file quando ti iscrivi e installerai WordPress. Il tuo provider di hosting definisce questo limite, e di solito varia da 2 MB a 500 MB.
Per la maggior parte dei proprietari di siti web WordPress, questo limite sarà più che sufficiente.
Tuttavia, ci sono momenti in cui dovrai aumentare questo limite per evitare errori di caricamento.
Ad esempio:
- Gestisci un sito web di fotografia e devi caricare immagini di grandi dimensioni.
- Il tuo portfolio di design o fotografia contiene immagini di grandi dimensioni.
- Vuoi installare un tema o un plugin WordPress più grande.
- Vuoi vendere prodotti digitali come eBook, foto, video e altro.
- Aggiorni regolarmente i contenuti e aggiungi audio, foto e altro che vanno oltre il limite attuale.
Detto questo, ti mostreremo come aumentare la dimensione massima di caricamento dei file sul tuo sito WordPress.
Nota: Tieni presente che la visualizzazione di molti file di grandi dimensioni sul tuo sito web può rallentarne seriamente la velocità e le prestazioni. Ecco perché in genere consigliamo di non caricare mai video su WordPress.
Poiché la maggior parte degli utenti ha configurazioni di hosting WordPress diverse, copriremo quanto segue:
- Come controllare il limite massimo di dimensione di caricamento dei file in WordPress
- Metodo 1: Contatta il tuo provider di hosting WordPress
- Metodo 2: Crea o modifica un file php.ini esistente
- Metodo 3: Aggiungi codice al file functions.php del tuo tema WordPress
- Metodo 4: Aggiungi codice al tuo file .htaccess
- Method 5: Use a WordPress Plugin to Increase File Upload Size
Come controllare il limite massimo di dimensione di caricamento dei file in WordPress
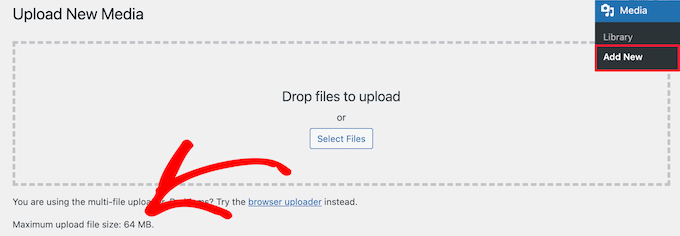
WordPress mostrerà automaticamente il limite massimo di dimensione di caricamento dei file quando carichi immagini o altri media.
Per verificarlo, vai semplicemente su Media » Aggiungi nuovo nel tuo pannello di amministrazione di WordPress e vedrai il limite massimo di dimensione del file caricabile per il tuo sito WordPress.
Ora che sai come trovare il limite di dimensione, ti mostreremo come aumentare la dimensione massima di caricamento in WordPress.
Metodo 1: Contatta il tuo provider di hosting WordPress
Uno dei modi più semplici per aumentare la dimensione massima di caricamento dei file in WordPress è contattare il tuo provider di hosting WordPress.
Questo è un compito relativamente semplice per il loro team di assistenza clienti e può essere fatto in un paio di minuti.
Per i principianti, questo può essere molto più facile che aggiungere codice a WordPress e modificare i file del server.
Vai semplicemente sul sito web del tuo provider di hosting, come Bluehost, ed effettua l'accesso.
Quindi, fai clic sull'icona ‘Chat’ in fondo allo schermo. Puoi quindi chiedere al personale di supporto di aumentare la dimensione del caricamento dei file sul tuo sito WordPress.
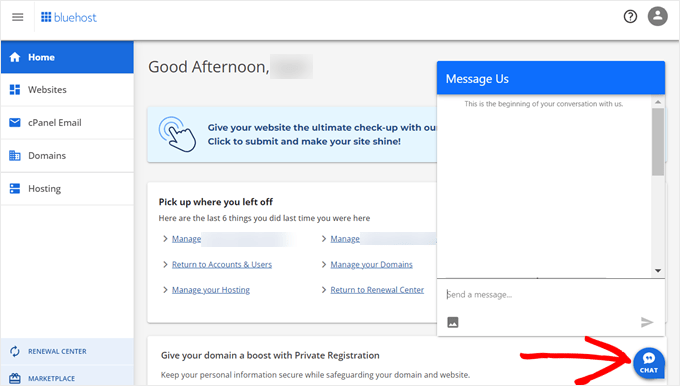
Puoi anche contattare il supporto dalla dashboard del tuo account di hosting.
Metodo 2: Crea o modifica un file php.ini esistente
Un altro modo per aumentare la dimensione massima di caricamento dei file è creare o modificare un file chiamato php.ini. Questo file controlla molte impostazioni per il tuo ambiente di hosting WordPress.
La maggior parte dei provider di hosting WordPress come Bluehost dispone di un cPanel intuitivo per aiutarti a gestire il tuo sito web.
Se il tuo web host dispone di una dashboard cPanel, puoi aumentare la dimensione di caricamento dei file tramite gli strumenti integrati.
Nota: Quanto segue è tratto dal cPanel di Bluehost. Tuttavia, la maggior parte dei provider di hosting condiviso avrà passaggi simili.
Troverai un pulsante cPanel in fondo alla scheda Hosting in Bluehost.
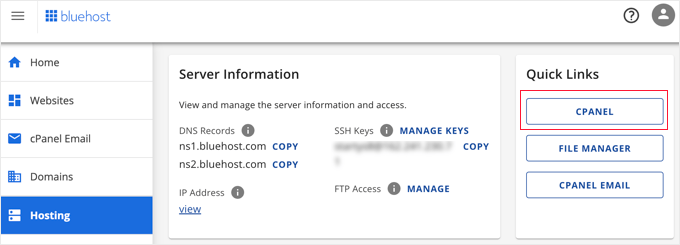
Facendo clic su questo pulsante si aprirà la tua dashboard cPanel.
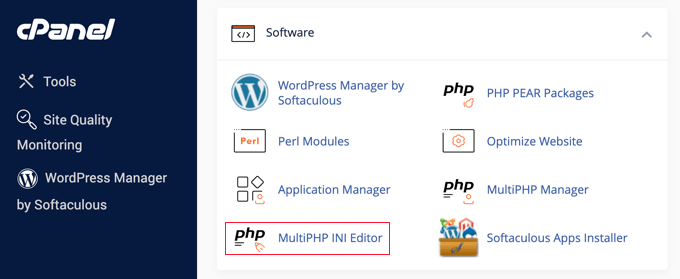
Ora devi scorrere verso il basso fino alla sezione Software e fare clic su ‘MultiPHP INI Editor’.
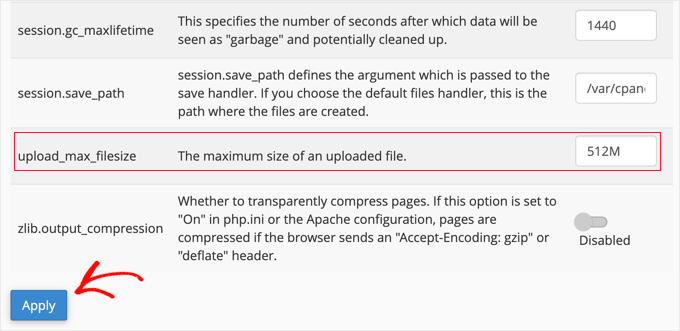
Successivamente, scorri verso il basso fino alla sezione etichettata ‘upload_max_filesize’ e inserisci una nuova dimensione massima del file nella casella.
Quindi, fai clic sul pulsante ‘Applica’.
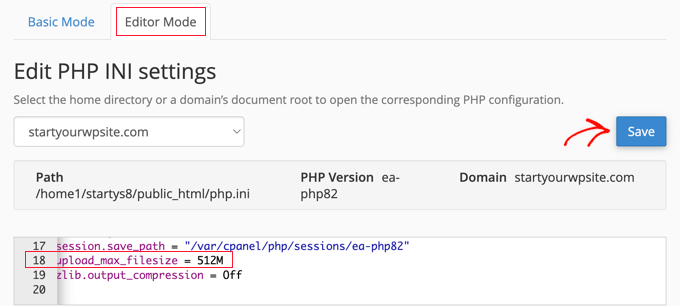
In alternativa, puoi fare clic sulla scheda del menu ‘Modalità Editor’, e quindi puoi modificare direttamente la dimensione massima di caricamento dei file nell'editor.
Devi modificare la sezione ‘upload_max_filesize’ per aumentare la dimensione di caricamento dei tuoi file.
Una volta terminato, fai semplicemente clic sul pulsante ‘Salva’.
Modifica php.ini aggiungendo codice
Se il tuo attuale provider di hosting non offre l'opzione cPanel, dovrai modificare questo file manualmente.
Per fare ciò, puoi utilizzare un client FTP o l'opzione del file manager nel pannello di controllo del tuo hosting WordPress.
Se stai utilizzando l'hosting condiviso, potresti non vedere il file php.ini nella tua directory di hosting. Se non ne vedi uno, crea semplicemente un file chiamato php.ini e caricalo nella tua cartella principale.
Quindi, aggiungi il seguente snippet di codice al file:
upload_max_filesize = 256M
post_max_size = 256M
max_execution_time = 300
Puoi modificare il limite di '256M' con la dimensione del file di cui hai bisogno per il tuo blog WordPress.
Metodo 3: Aggiungi codice al file functions.php del tuo tema WordPress
Questo metodo prevede l'aggiunta di codice al tuo file functions.php nel tuo tema WordPress.
Invece di modificare direttamente il file, ti consigliamo di utilizzare WPCode. È il miglior plugin per snippet di codice che ti consente di aggiungere codice al tuo sito web senza romperlo.
Se non l'hai mai fatto prima, consulta la nostra guida per principianti su come aggiungere codice personalizzato in WordPress.
Per prima cosa, devi installare il plugin gratuito WPCode. Per maggiori dettagli, consulta la nostra guida passo passo su come installare un plugin di WordPress.
Dopo l'attivazione, dovresti navigare su Snippet di codice » + Aggiungi snippet.
Dovrai passare il mouse sull'opzione ‘Aggiungi il tuo codice personalizzato (Nuovo snippet)’ e quindi fare clic sul pulsante ‘+ Aggiungi snippet personalizzato’.

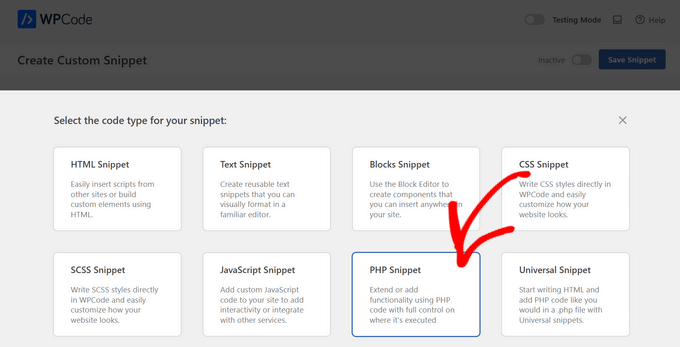
Successivamente, devi scegliere ‘Snippet PHP’ come tipo di codice dall'elenco delle opzioni che appaiono.
Nella schermata seguente, inserisci un nome per il tuo nuovo snippet, che può essere qualsiasi cosa per aiutarti a ricordare a cosa serve il codice.
Quindi, puoi copiare e incollare il seguente snippet di codice sotto ‘Anteprima codice’. Assicurati di cambiare ‘256M’ con la dimensione massima del file di cui hai bisogno:
@ini_set( 'upload_max_size' , '256M' );
@ini_set( 'post_max_size', '256M');
@ini_set( 'max_execution_time', '300' );
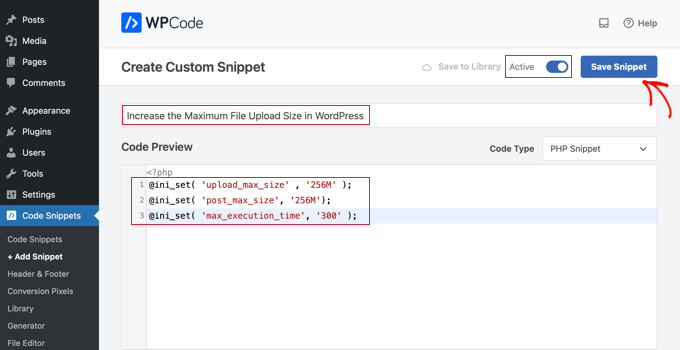
Infine, sposta l'interruttore in alto su ‘Attivo’ e quindi fai clic sul pulsante ‘Salva snippet’. Il codice verrà ora eseguito sul tuo sito web.
Metodo 4: Aggiungi codice al tuo file .htaccess
Un altro modo per aumentare la dimensione massima del file è modificando il file .htaccess. Questo file controlla le impostazioni di configurazione di alto livello per il tuo sito web.
Per fare ciò, devi accedere al server del tuo sito web tramite FTP. Se non l'hai mai fatto prima, consulta la nostra guida su come usare FTP per caricare file su WordPress per principianti.
Dopodiché, devi individuare il tuo file .htaccess nella cartella principale del tuo sito web.

Se non riesci a trovare il tuo file .htaccess, potrebbe essere nascosto dal tuo file manager o client FTP. Per saperne di più, consulta la nostra guida su perché non riesci a trovare il file .htaccess sul tuo sito WordPress.
Successivamente, devi aggiungere il seguente snippet di codice al tuo file .htaccess:
php_value upload_max_filesize 256M
php_value post_max_size 256M
php_value max_execution_time 300
php_value max_input_time 300
Per aumentare ulteriormente la dimensione massima di caricamento dei file, cambia semplicemente '64M' con la dimensione che desideri.
Metodo 5: Usa un plugin WordPress per aumentare la dimensione di caricamento dei file
Un altro modo per aumentare il limite massimo di caricamento dei file è utilizzare il plugin WP Increase Upload Filesize. Se non ti senti a tuo agio nell'aggiungere codice a WordPress, questa potrebbe essere una buona opzione per te.
La prima cosa da fare è installare e attivare il plugin. Per maggiori dettagli, consulta la nostra guida su come installare un plugin di WordPress.
Dopo l'attivazione, naviga su Media » Aumenta Limite Caricamento nel tuo pannello di amministrazione di WordPress.
Questo ti porterà a una schermata in cui puoi selezionare una nuova dimensione di caricamento file nel menu a discesa 'Scegli Dimensione Massima Caricamento File'.
Quindi, fai clic sul pulsante 'Salva Modifiche'.

Nota: La dimensione massima di caricamento dei file sarà impostata dal tuo provider di hosting. Se hai bisogno di un limite di dimensione file superiore a quello elencato nel menu a discesa, devi contattare il tuo provider di hosting e chiedere di aumentare il limite.
Tutorial video
Se non ti piace seguire istruzioni scritte, puoi guardare il nostro tutorial video invece:
Speriamo che questo articolo ti abbia aiutato ad aumentare la dimensione massima di caricamento dei file in WordPress. Potresti anche voler consultare la nostra guida su come aggiungere tipi di file aggiuntivi da caricare in WordPress e le nostre scelte di esperti di plugin e suggerimenti per migliorare l'area di amministrazione di WordPress.
Se ti è piaciuto questo articolo, iscriviti al nostro canale YouTube per tutorial video su WordPress. Puoi anche trovarci su Twitter e Facebook.


Abduaziz
Grazie mille!!! Il Metodo 3 ha funzionato per me
Supporto WPBeginner
Glad our recommendation could help
Amministratore
Alexander Gartley
Grazie, questo mi ha aiutato a risolvere un problema con il limite di upload. Sto usando un'installazione di rete multisito di Wordpress, quindi alla fine era un'impostazione nelle Impostazioni di Amministrazione di Rete.
All'inizio ero confuso, perché le mie impostazioni php consentivano upload più grandi, ma era limitato nelle Impostazioni di Rete.
Supporto WPBeginner
Thanks for sharing what solved the problem for you
Amministratore
Ernesto
Sarebbe stato fantastico se avessi incluso il metodo .user.ini.
.user.ini caricato nella cartella principale con lo stesso valore/testo nel tuo php.ini modificato
La maggior parte delle volte, solo questo metodo funziona per l'hosting condiviso.
ErnestPH
Supporto WPBeginner
The php.ini file should work the same as the user.ini file unless your specific host ignores the php.ini but thank you for sharing your recommendation
Amministratore
Mark
Questa è l'unica soluzione che funziona sul mio server di hosting condiviso. Grazie Ernesto!
Tamir Davidoff
Non funziona per me.
Ho seguito questa guida e ricontrollato il file php.ini per assicurarmi che le modifiche siano effettivamente salvate. Ho modificato il file htaccess per aumentare i limiti. e ho anche provato a modificare i file httpd-app.conf e php-settings.conf di phpMyAdmin. Tutti questi file riflettono un caricamento massimo superiore a 40m e il mio sito WP non riflette nessuna di queste modifiche. Sono davvero frustrato qui.
Per favore, aiutami, grazie!
Supporto WPBeginner
If you haven’t already, you would want to reach out to your hosting provider to ensure there is not a setting on their end that is overriding what you are setting
Amministratore
rajesh
Ho provato tutti e 3 i metodi, nessuno ha funzionato. Sto cercando di caricare il tema newspaper sul mio sito wordpress. ma ogni volta mostra che il file php.ini ha una dimensione massima di caricamento del file.
Per favore aiutami
Supporto WPBeginner
Dovresti contattare il tuo provider di hosting per assicurarti che non abbiano un'impostazione che stia sovrascrivendo le modifiche che hai apportato.
Amministratore
Adam Walsworth
Attenzione ai file php.ini nascosti. Nella mia configurazione ne ho trovati 2. Quello che ho trovato e che ha effettivamente risolto il problema si trovava sotto
./etc/php/7.0/apache2/php.ini
modificare questo file ha risolto il mio problema.
Supporto WPBeginner
Grazie per aver condiviso la tua soluzione, con dove si trova quel file, raccomanderemmo alla maggior parte degli utenti di contattare il proprio provider di hosting prima di cercare in posizioni come quella.
Amministratore
Rafiq khan
Grazie amico, ho risolto il mio problema adottando il metodo 2 modificando il mio file php.ini
Grazie mille, stai lavorando alla grande
Supporto WPBeginner
Glad our article could help
Amministratore
Carla
Nessuno dei metodi sopra ha funzionato per me. Anzi, modificare il file htaccess ha rotto il mio sito anche dopo aver cancellato il codice sopra. Sovrascrivere con un nuovo file ha risolto il problema.
Ho un server dedicato su Bluehost. Quello che ha funzionato per me è stato andare nella root di WHM, non cpanel né accesso FTP. Cerca MultiPHP INI Editor. Dagli almeno 5 minuti per caricarsi se vedi solo il titolo e l'icona. Puoi impostare il tempo di caricamento, la dimensione del post, ecc. lì. Funziona istantaneamente, anche se il tuo sito utilizza Cloudflare, senza metterlo in modalità sviluppo o cancellare la cache. Spero questo aiuti qualcuno.
Supporto WPBeginner
Thank you for sharing what worked for you, should other users be on a dedicated server, if they reach out and let BlueHost know the need to increase the upload size then BlueHost can normally edit that for them
Amministratore
Pezza
Ottimo materiale! .htaccess ha funzionato per me!
Supporto WPBeginner
Thank you, glad our guide could help
Amministratore
ReineR
Il metodo htaccess ha funzionato per me, grazie!
Supporto WPBeginner
Glad our article could help
Amministratore
Ahmed
Funziona per me
3. Metodo .htaccess
devi cliccare (mostra file nascosti per visualizzare e modificare questo file).
Supporto WPBeginner
Glad our article could help
Amministratore
rahul
quando ho provato questo
Impossibile comunicare nuovamente con il sito per verificare errori fatali, quindi la modifica PHP è stata annullata. Sarà necessario caricare la modifica del file PHP in altro modo, ad esempio utilizzando SFTP.
questo mi è successo
qual è la soluzione a questo
Supporto WPBeginner
Dovresti usare FTP piuttosto che WordPress stesso per aggiungere il codice: https://www.wpbeginner.com/beginners-guide/how-to-use-ftp-to-upload-files-to-wordpress-for-beginners/
Amministratore
Efrem
Stavo provando il metodo php.ini ma non funziona mai, per favore come lo imposto..
Oppure dovreste per favore dirmi dove incollare in function.php
Supporto WPBeginner
Normalmente useresti un editor di testo per impostare il contenuto nel file php.ini. Per il tuo functions.php dovrebbe andare alla fine normalmente in modo che possa essere rimosso in seguito secondo necessità. Potresti anche voler verificare con il tuo provider di hosting se stai riscontrando problemi con questi metodi, se possono assisterti nell'aumentare la dimensione del file per te.
Amministratore
Ivos G.
Nessuno ha funzionato per me. Ma questo l'ha risolto: aggiungi al tuo .htaccess questa riga:
LimitRequestBody 104857600
Supporto WPBeginner
Thanks for sharing your solution for this issue
Amministratore
Achilleas
Sto usando Nginx e avevo già impostato correttamente i valori per php nel php.ini, ma ciò che l'ha risolto è stato mettere lo stesso valore nel blocco server con la variabile client_max_body_size xxxM;
Scrivo questo sperando che possa aiutare qualcuno.
Staff editoriale
Thank you for sharing this with us
Amministratore
RAHUL
Ha funzionato per me, grazie
Supporto WPBeginner
Glad our tutorial could help
Amministratore
Adriana Sabo
Nessuna delle opzioni ha funzionato per me. Non è successo nulla quando ho provato le prime due, e l'ultima ha generato un errore 500. Puoi aiutarmi in qualche modo?
Carl
Molto utile, grazie!
Md. Rana
The third option is worked for me.
Supporto WPBeginner
Ciao Rana,
Felice che abbia funzionato per te. Non dimenticare di seguirci su Facebook per altri consigli e tutorial su WordPress.
Amministratore
Tom Allen
La spiegazione di cui sopra va bene per i siti ospitati, ma per noi che usiamo il localhost? Non riesco ancora a capire l'errore “upload_max_filesize” quando scarico Updfaftplus da WP Plugins o da un file zip di download. Sono un principiante e ho bisogno di essere guidato passo dopo passo in questo processo. L'aiuto è apprezzato.
crystal
l'accesso hta ha funzionato.
voi ragazzi dovete mettere il codice prima di #END Wordpress
se lo mettete dopo #end wordpress allora il sito va in errore interno del server 500 nella mia esperienza con l'hosting godaddy
Luis Felipe Lino
Grazie.
Jaime Lopes
Sulla maggior parte dei siti cPanel condivisi che ho configurato:
-cambiare .htaccess manda giù l'intero sito (errore interno 500)
-aggiungere file php.ini o php5.ini non fa nulla
-non c'è opzione per scegliere 'Software del sito' in cPanel...
Joseph
Grazie mille. Il file .htaccess ha funzionato per me
John S
Grazie mille. Il file .htaccess ha funzionato per me!
Karina
Thanks you so much!!! The .htaccess version worked for me
Megan
Grazie! Questo è stato di grande aiuto! Non riuscivo nemmeno a caricare i plugin perché il mio limite era preimpostato a 2MB... Ora l'ho portato a 64MB e sono in grado di lavorare.
Grazie!
Okimi Solomon
Grazie mille. La seconda opzione ha funzionato per me. Dio ti benedica
Benj
La modifica del file .htaccess ha funzionato per me. Grazie mille..
Martin Croker
Su vidahost (ora TSOhost).
Aggiungere il seguente php.ini ha funzionato per me... tuttavia (e sono ancora un po' confuso sul perché), metterlo semplicemente nella root http non ha funzionato – ho dovuto duplicare il file php.ini all'interno delle directory wp-admin e wp-include all'interno di wordpress.
Kabelo
Molto utile. Grazie mille.
Dwayne S
Sono su HostGator e attualmente ho problemi con il tempo massimo di esecuzione. È successo qualche settimana fa e il supporto di HostGator ha risolto il problema. Ora è riapparso e il supporto mi dice che non possono risolverlo perché sono su un server condiviso. L'agente ha persino bloccato il mio sito modificando manualmente il file htaccess e non ha verificato se funzionasse o meno. Ha però raccomandato un plugin che avrebbe modificato il file htaccess con codice per aumentare il limite, ma non funziona. Immagino che HostGator lo blocchi
Jessany
Ho aggiunto il codice nella cartella delle funzioni .php, e ora Wordpress non si carica. Come risolvo questo problema??
Supporto WPBeginner
Ciao Jessany,
Puoi eliminare il codice che hai aggiunto accedendo al tuo sito web tramite FTP o File Manager in cPanel.
Amministratore
bala
carica il codice fornito sopra nel file .htaccess, funziona
Caleb
Ho l'hosting GoDaddy e li ho contattati per aiutarmi ad aumentare la dimensione del mio file caricato. È stato un gioco da ragazzi: non ho dovuto creare alcun file, aggiungere codice al mio tema o cose del genere. Quindi, per quelli di voi che hanno GoDaddy o controlli di tipo cPanel, dimenticate gli hack e usate semplicemente le impostazioni dell'amministratore.
Ecco cosa mi ha fatto fare il supporto:
1. Vai al tuo cPanel Admin (un pannello di hosting simile potrebbe funzionare in modo simile)
2. Scorri fino a 'Software' e fai clic su 'Seleziona versione PHP'
3. Fai clic su 'Passa alle opzioni PHP' in alto a destra E TADA! Ci sono tutte le tue opzioni PHP!
4. Scorri semplicemente e cambia 'post_max_filesize' e 'upload_max_filesize' a tuo piacimento, applica e salva le modifiche, e ora sei un proprietario di sito web sicuro e felice senza dover scrivere codice.
Buona fortuna!
ZafB
Grazie, ha funzionato perfettamente
Alissa
Grazie per aver pubblicato questo! Ha funzionato benissimo!
Alejandra
Grazie mille! Ha funzionato davvero!!
Paul Palmer
Soluzione brillante: ha funzionato perfettamente e facilmente! Molte grazie.
Rich Perozich
Questo ha funzionato per me, ma per trovare questi file ho dovuto chiamare GoDaddy, dove mi hanno guidato attraverso questi passaggi o non sarei mai stato in grado di navigare nel cPanel Admin senza il loro aiuto.
1. Accedi a GoDaddy
2. Fai clic su 'I miei prodotti' in alto a sinistra
3. Sotto 'Web hosting', fai clic su 'Gestisci tutto'
4. Fai clic su 'Web hosting con C panel'
5. Fai clic sull'icona 'C panel Admin'
6. Scorri fino a 'Software' e fai clic su 'Seleziona versione PHP'
7. Fai clic su 'Passa alle opzioni PHP'
8. In fondo alla pagina, fai clic sul numero 'upload_max_filesize' e seleziona il numero desiderato come dimensione massima del file.
9. Fai clic su 'Applica'. Funziona. Ora le dimensioni dei file possono essere caricate alla dimensione massima selezionata.
Chris Sandford
Utenti Multisito:
Se sei un cretino come me, potresti aver provato di tutto senza successo.
Non dimenticare che se stai usando Wordpress Multi-site, di cambiare le impostazioni di caricamento per i singoli siti.
Amministratore di Rete > Impostazioni > Dimensione massima file caricabile
Potresti comunque dover usare i suggerimenti di questo articolo, ma senza cambiare le impostazioni di caricamento per il multisito, non saprai se sta funzionando.
Stef Thoen
Sei il mio eroe. Ho cercato questo problema per troppo tempo finché non ho finalmente visto il tuo post. Grazie mille.
Ron
Grazie mille! Questo dovrebbe essere nel corpo di questo articolo!
Hitesh L.
HA FUNZIONATO! complimenti a te!!!!!!!
Emanuel Pietri
Metodo 3 – con .htaccess – funziona bene per me con il tema
Stefanos Kargas
Grazie!! Ho modificato il file .htaccess e ha funzionato.
haadi
ciao. grazie mille. il terzo ha funzionato per me
Jim R
L'opzione 2 ha funzionato bene. Grazie per le informazioni.
Tor Helge
Ha funzionato quando ho fatto l'ultima con .htaccess
mara
Qualcuno qui è riuscito a farlo funzionare con Godaddy? Sono molto inutili. So che devo creare il file php.ini (e l'ho fatto), ma nessuna delle soluzioni che hai pubblicato ha funzionato. Qualsiasi aiuto è apprezzato.
WangTuanJie
dopo il metodo 3, non ho visto successo.
Mahadi
Grazie amico!! .htacces ha funzionato per me!
Lynn
Wish you wouldn’t assume everyone looking for this solution knows what you mean by our “Theme Functions File” – do you mean functions.php? I’m not an expert, and I’m really good at following precise directions, and don’t want to even put a toe in the water of editing files if I don’t know EXACTLY what file you’re talking about! No clues were provided, like what other code I might look for in the file to know I’m in the right place, etc. So…this didn’t help me at all
Supporto WPBeginner
Ciao Lynn,
Sì, devi aggiungerlo al file functions.php del tuo tema.
Amministratore
Justin
Sì, ma dove va nel file functions.php. In cima, in fondo, in mezzo? All'interno delle ""
Supporto WPBeginner
Ciao Justin,
Alla fine.
jack
grazie, tutti questi passaggi mi hanno aiutato
Alex
Grazie, il metodo 3 ha funzionato davvero per me
php_value upload_max_filesize 64M
php_value post_max_size 64M
php_value max_execution_time 300
php_value max_input_time 300
vikram
Ciao
Usi l'hosting condiviso?
shahrin
Fantastico! Il metodo htaccess ha funzionato per me. Sono così sollevato, ragazzi! Grazie in anticipo
Samba Siva
.htaccess method worked for me
nelson
htaccess ha funzionato per me, grazie
Sagar
php.ini ha funzionato per me.
Saluti.
Grazie mille!!
Mituka
Questo ha funzionato per me.
Apri il tuo file .htacess con il blocco note.
Salta tutto quello che vedi e vai in fondo.
Incolla quanto segue e salva.
php_value upload_max_filesize 64M
php_value post_max_size 64M
php_value max_execution_time 300
php_value max_input_time 300
Thomas
Dove esattamente l'hai incollato?
# BEGIN WordPress
RewriteEngine On
RewriteBase /
RewriteRule ^index\.php$ – [L]
RewriteCond %{REQUEST_FILENAME} !-f
RewriteCond %{REQUEST_FILENAME} !-d
RewriteRule . /index.php [L]
# END WordPress
php_value upload_max_filesize 64M
php_value post_max_size 64M
php_value max_execution_time 300
php_value max_input_time 300
È prima dell'istruzione #END WordPress? (Ottengo un errore quando lo faccio)
O dovrebbe essere dopo l'istruzione #END WordPress?
Supporto WPBeginner
Ciao Thomas,
Devi incollarlo alla fine del tuo file .htaccess dopo la riga #END WordPress.
Amministratore