Hai mai provato a caricare un file sul tuo sito WordPress e ti sei scontrato con un muro? È super frustrante quando non riesci a caricare quell'immagine, plugin o tema di cui hai bisogno. I nostri lettori ci chiedono spesso aiuto con i problemi di caricamento dei file perché possono rallentare il tuo flusso di lavoro.
A volte, questi limiti di caricamento dei file possono impedirti inaspettatamente di aggiungere contenuti alla tua libreria multimediale o di installare quei plugin e temi più grandi di cui hai bisogno. È come essere bloccati con le mani legate. Ed è ancora più fastidioso quando non sai come risolverlo!
Ma non preoccuparti, siamo qui per aiutarti. Amiamo che WordPress sia una piattaforma così configurabile e ci sono spesso più modi per risolvere lo stesso problema.
In questa guida, ti mostreremo i modi più semplici per aumentare la dimensione massima di caricamento dei file in WordPress. Ti aiuteremo a superare queste limitazioni in modo che tu possa tornare a fare ciò che ami: gestire il tuo sito web!
Perché aumentare la dimensione massima di caricamento dei file in WordPress?
Il tuo provider di hosting WordPress imposterà una dimensione massima predefinita di caricamento dei file quando ti iscrivi e installerai WordPress. Il tuo provider di hosting definisce questo limite, e di solito varia da 2 MB a 500 MB.
Per la maggior parte dei proprietari di siti web WordPress, questo limite sarà più che sufficiente.
Tuttavia, ci sono momenti in cui dovrai aumentare questo limite per evitare errori di caricamento.
Ad esempio:
- Gestisci un sito web di fotografia e devi caricare immagini di grandi dimensioni.
- Il tuo portfolio di design o fotografia contiene immagini di grandi dimensioni.
- Vuoi installare un tema o un plugin WordPress più grande.
- Vuoi vendere prodotti digitali come eBook, foto, video e altro.
- Aggiorni regolarmente i contenuti e aggiungi audio, foto e altro che vanno oltre il limite attuale.
Detto questo, ti mostreremo come aumentare la dimensione massima di caricamento dei file sul tuo sito WordPress.
Nota: Tieni presente che la visualizzazione di molti file di grandi dimensioni sul tuo sito web può rallentarne seriamente la velocità e le prestazioni. Ecco perché in genere consigliamo di non caricare mai video su WordPress.
Poiché la maggior parte degli utenti ha configurazioni di hosting WordPress diverse, copriremo quanto segue:
- Come controllare il limite massimo di dimensione di caricamento dei file in WordPress
- Metodo 1: Contatta il tuo provider di hosting WordPress
- Metodo 2: Crea o modifica un file php.ini esistente
- Metodo 3: Aggiungi codice al file functions.php del tuo tema WordPress
- Metodo 4: Aggiungi codice al tuo file .htaccess
- Method 5: Use a WordPress Plugin to Increase File Upload Size
Come controllare il limite massimo di dimensione di caricamento dei file in WordPress
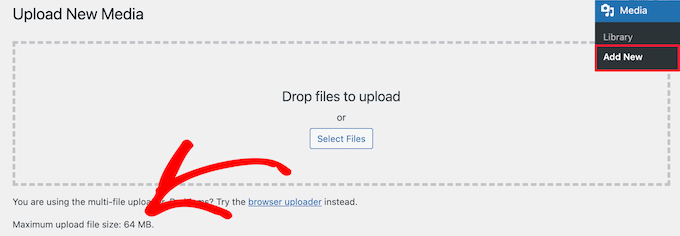
WordPress mostrerà automaticamente il limite massimo di dimensione di caricamento dei file quando carichi immagini o altri media.
Per verificarlo, vai semplicemente su Media » Aggiungi nuovo nel tuo pannello di amministrazione di WordPress e vedrai il limite massimo di dimensione del file caricabile per il tuo sito WordPress.
Ora che sai come trovare il limite di dimensione, ti mostreremo come aumentare la dimensione massima di caricamento in WordPress.
Metodo 1: Contatta il tuo provider di hosting WordPress
Uno dei modi più semplici per aumentare la dimensione massima di caricamento dei file in WordPress è contattare il tuo provider di hosting WordPress.
Questo è un compito relativamente semplice per il loro team di assistenza clienti e può essere fatto in un paio di minuti.
Per i principianti, questo può essere molto più facile che aggiungere codice a WordPress e modificare i file del server.
Vai semplicemente sul sito web del tuo provider di hosting, come Bluehost, ed effettua l'accesso.
Quindi, fai clic sull'icona ‘Chat’ in fondo allo schermo. Puoi quindi chiedere al personale di supporto di aumentare la dimensione del caricamento dei file sul tuo sito WordPress.
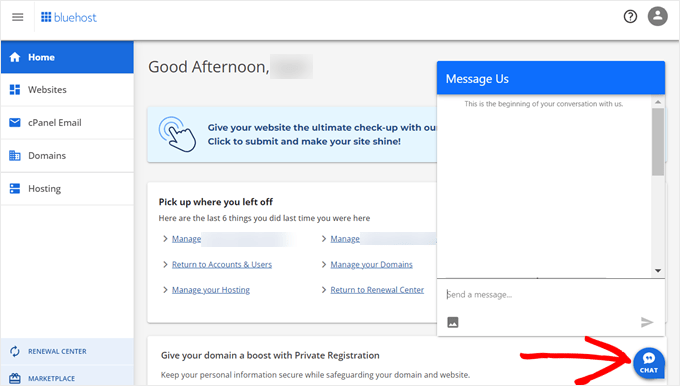
Puoi anche contattare il supporto dalla dashboard del tuo account di hosting.
Metodo 2: Crea o modifica un file php.ini esistente
Un altro modo per aumentare la dimensione massima di caricamento dei file è creare o modificare un file chiamato php.ini. Questo file controlla molte impostazioni per il tuo ambiente di hosting WordPress.
La maggior parte dei provider di hosting WordPress come Bluehost dispone di un cPanel intuitivo per aiutarti a gestire il tuo sito web.
Se il tuo web host dispone di una dashboard cPanel, puoi aumentare la dimensione di caricamento dei file tramite gli strumenti integrati.
Nota: Quanto segue è tratto dal cPanel di Bluehost. Tuttavia, la maggior parte dei provider di hosting condiviso avrà passaggi simili.
Troverai un pulsante cPanel in fondo alla scheda Hosting in Bluehost.
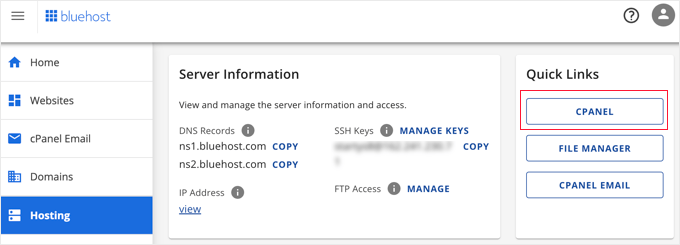
Facendo clic su questo pulsante si aprirà la tua dashboard cPanel.
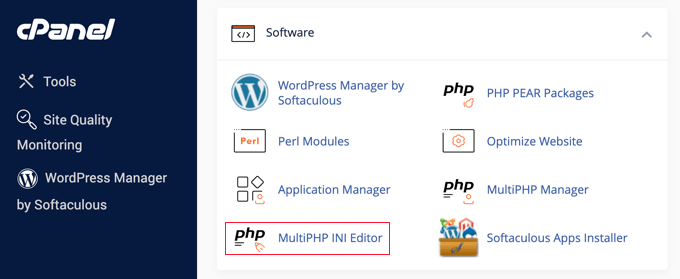
Ora devi scorrere verso il basso fino alla sezione Software e fare clic su ‘MultiPHP INI Editor’.
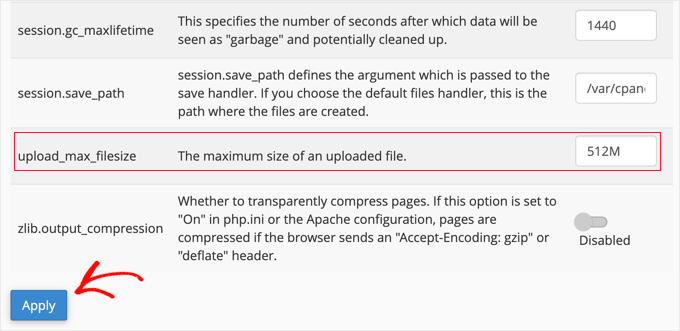
Successivamente, scorri verso il basso fino alla sezione etichettata ‘upload_max_filesize’ e inserisci una nuova dimensione massima del file nella casella.
Quindi, fai clic sul pulsante ‘Applica’.
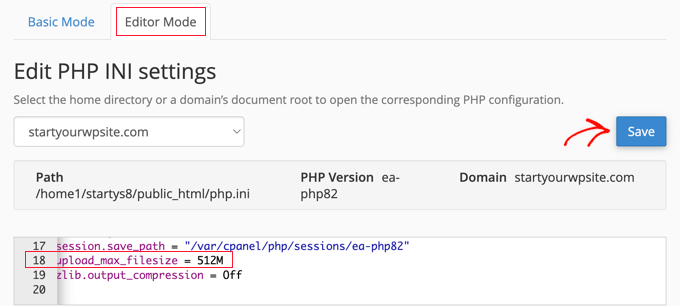
In alternativa, puoi fare clic sulla scheda del menu ‘Modalità Editor’, e quindi puoi modificare direttamente la dimensione massima di caricamento dei file nell'editor.
Devi modificare la sezione ‘upload_max_filesize’ per aumentare la dimensione di caricamento dei tuoi file.
Una volta terminato, fai semplicemente clic sul pulsante ‘Salva’.
Modifica php.ini aggiungendo codice
Se il tuo attuale provider di hosting non offre l'opzione cPanel, dovrai modificare questo file manualmente.
Per fare ciò, puoi utilizzare un client FTP o l'opzione del file manager nel pannello di controllo del tuo hosting WordPress.
Se stai utilizzando l'hosting condiviso, potresti non vedere il file php.ini nella tua directory di hosting. Se non ne vedi uno, crea semplicemente un file chiamato php.ini e caricalo nella tua cartella principale.
Quindi, aggiungi il seguente snippet di codice al file:
upload_max_filesize = 256M
post_max_size = 256M
max_execution_time = 300
Puoi modificare il limite di '256M' con la dimensione del file di cui hai bisogno per il tuo blog WordPress.
Metodo 3: Aggiungi codice al file functions.php del tuo tema WordPress
Questo metodo prevede l'aggiunta di codice al tuo file functions.php nel tuo tema WordPress.
Invece di modificare direttamente il file, ti consigliamo di utilizzare WPCode. È il miglior plugin per snippet di codice che ti consente di aggiungere codice al tuo sito web senza romperlo.
Se non l'hai mai fatto prima, consulta la nostra guida per principianti su come aggiungere codice personalizzato in WordPress.
Per prima cosa, devi installare il plugin gratuito WPCode. Per maggiori dettagli, consulta la nostra guida passo passo su come installare un plugin di WordPress.
Dopo l'attivazione, dovresti navigare su Snippet di codice » + Aggiungi snippet.
Dovrai passare il mouse sull'opzione ‘Aggiungi il tuo codice personalizzato (Nuovo snippet)’ e quindi fare clic sul pulsante ‘+ Aggiungi snippet personalizzato’.

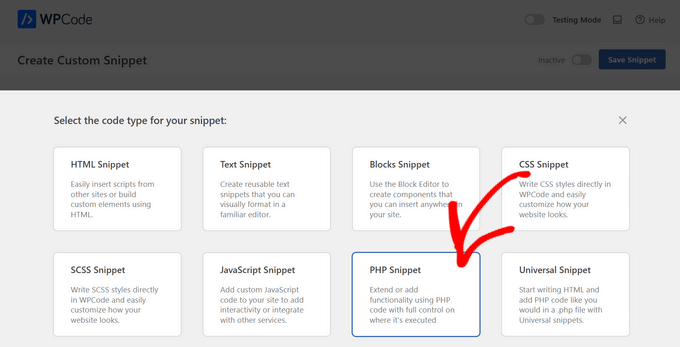
Successivamente, devi scegliere ‘Snippet PHP’ come tipo di codice dall'elenco delle opzioni che appaiono.
Nella schermata seguente, inserisci un nome per il tuo nuovo snippet, che può essere qualsiasi cosa per aiutarti a ricordare a cosa serve il codice.
Quindi, puoi copiare e incollare il seguente snippet di codice sotto ‘Anteprima codice’. Assicurati di cambiare ‘256M’ con la dimensione massima del file di cui hai bisogno:
@ini_set( 'upload_max_size' , '256M' );
@ini_set( 'post_max_size', '256M');
@ini_set( 'max_execution_time', '300' );
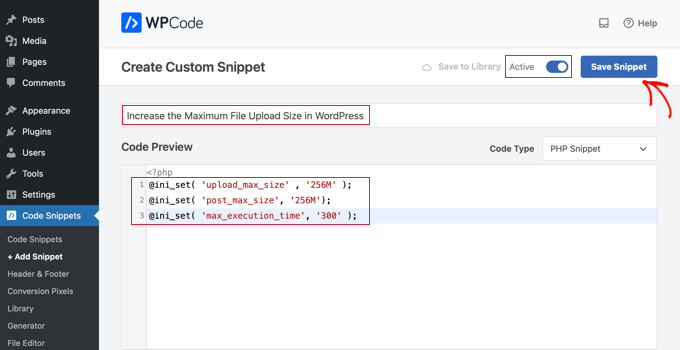
Infine, sposta l'interruttore in alto su ‘Attivo’ e quindi fai clic sul pulsante ‘Salva snippet’. Il codice verrà ora eseguito sul tuo sito web.
Metodo 4: Aggiungi codice al tuo file .htaccess
Un altro modo per aumentare la dimensione massima del file è modificando il file .htaccess. Questo file controlla le impostazioni di configurazione di alto livello per il tuo sito web.
Per fare ciò, devi accedere al server del tuo sito web tramite FTP. Se non l'hai mai fatto prima, consulta la nostra guida su come usare FTP per caricare file su WordPress per principianti.
Dopodiché, devi individuare il tuo file .htaccess nella cartella principale del tuo sito web.

Se non riesci a trovare il tuo file .htaccess, potrebbe essere nascosto dal tuo file manager o client FTP. Per saperne di più, consulta la nostra guida su perché non riesci a trovare il file .htaccess sul tuo sito WordPress.
Successivamente, devi aggiungere il seguente snippet di codice al tuo file .htaccess:
php_value upload_max_filesize 256M
php_value post_max_size 256M
php_value max_execution_time 300
php_value max_input_time 300
Per aumentare ulteriormente la dimensione massima di caricamento dei file, cambia semplicemente '64M' con la dimensione che desideri.
Metodo 5: Usa un plugin WordPress per aumentare la dimensione di caricamento dei file
Un altro modo per aumentare il limite massimo di caricamento dei file è utilizzare il plugin WP Increase Upload Filesize. Se non ti senti a tuo agio nell'aggiungere codice a WordPress, questa potrebbe essere una buona opzione per te.
La prima cosa da fare è installare e attivare il plugin. Per maggiori dettagli, consulta la nostra guida su come installare un plugin di WordPress.
Dopo l'attivazione, naviga su Media » Aumenta Limite Caricamento nel tuo pannello di amministrazione di WordPress.
Questo ti porterà a una schermata in cui puoi selezionare una nuova dimensione di caricamento file nel menu a discesa 'Scegli Dimensione Massima Caricamento File'.
Quindi, fai clic sul pulsante 'Salva Modifiche'.

Nota: La dimensione massima di caricamento dei file sarà impostata dal tuo provider di hosting. Se hai bisogno di un limite di dimensione file superiore a quello elencato nel menu a discesa, devi contattare il tuo provider di hosting e chiedere di aumentare il limite.
Tutorial video
Se non ti piace seguire istruzioni scritte, puoi guardare il nostro tutorial video invece:
Speriamo che questo articolo ti abbia aiutato ad aumentare la dimensione massima di caricamento dei file in WordPress. Potresti anche voler consultare la nostra guida su come aggiungere tipi di file aggiuntivi da caricare in WordPress e le nostre scelte di esperti di plugin e suggerimenti per migliorare l'area di amministrazione di WordPress.
Se ti è piaciuto questo articolo, iscriviti al nostro canale YouTube per tutorial video su WordPress. Puoi anche trovarci su Twitter e Facebook.


Manish
Non riesco a importare il mio file xml esportato da Blogger su WordPress.
La dimensione del mio file xml importato da Blogger è di 24 MB.
Si prega di risolvere questo problema, vi sarò grato.
Hashim
3. Il metodo .htaccess ha funzionato per me.
Grazie
John
Qualcuno ti ha mai detto che copiare e incollare IL TUO codice in tutto il tuo sito ha sempre:
1: codice
2: codice
3: codice
Quindi è un po' una modifica per farlo funzionare correttamente quando un semplice copia/incolla sarebbe senza stress per i tuoi lettori! Dico solo...
John Delaney
Crea un file php.ini e posizionalo nella cartella wp-admin, non nella root. Risolve ogni volta.
Michael Kelley
Grazie! Questa è l'unica cosa che ha funzionato per me. Vale la pena notare che avevo già un file php5.ini lì con lo stesso codice, non ha fatto nulla. Un po' confuso.
Mudassar
htaccess worked
Robert
Dopo 2 ore di frustrazione, il metodo .htaccess menzionato qui ha funzionato per il mio ambiente locale.
Thank you very much.
Robin
Ho modificato il mio .htaccess e ho inserito
php_value memory_limit 2G
php_value upload_max_filesize 2G
php_value post_max_size 2G
php_value max_execution_time 99999
php_value max_input_time 99999
quando vado a caricare un file, mostra 2GB ma quando carico un file più grande di 128MB mostra un errore HTTP. Ho bisogno di aiuto per favore.
Grazie
Zain Zaheer
Imposta il limite massimo a 128M invece di 2G
Robin
Ho aggiunto sul mio .htaccess
php_value memory_limit 2G
php_value upload_max_filesize 2G
php_value post_max_size 2G
php_value max_execution_time 99999
php_value max_input_time 99999
e mostra 2GB ma quando carico un file più grande di 128M, mi dà un errore HTTP. Qualcuno può aiutarmi per favore.
Grazie
Elisabeth Parker
I DO NOT recommend putting that code in the Theme Functions file. I tried it and it completely blew up my site. And if you don’t know how to use FTP or the File manager to change the Functions file BACK, you’ll be very unhappy. I haven’t tried the other options but if I find something that works I’ll let you know
kennedy Odhiambo
Ciao Elisabeth, ci ho provato e ha anche fatto saltare il mio sito, non riesco ad accedervi... posso per favore sapere come l'hai risolto?
Caki
Ho appena contattato GoDaddy. Sto usando l'hosting cPanel tramite loro. Ha aggiunto un file .user.ini nel file public/html con quanto segue:
memory_limit = 128M
max_execution_time = 300
post_max_size = 128M
upload_max_filesize = 256M
razib ahmed
grazie mille! ha funzionato per me
Tino
Sono con Axxess e anche questo ha funzionato per me!
Mukhiiii
Mi hai rallegrato la giornata!
Grazie
Paul Vijay
Grazie mille, ha funzionato per me. Anch'io uso l'hosting GoDaddy, ma il template continua a non caricarsi dal database online, puoi aiutarmi?
Bob
lo chiami .user.ini o user.ini??
Jesse
Questo metodo ha funzionato per me! Grazie mille per aver condiviso!!!
Craig
nella soluzione .htaccess, dove nel file inserisci il codice, l'ho messo alla fine e ho ottenuto un errore 500?
Cornelius
Ho sentito dire che in alternativa si potrebbe caricare direttamente tramite ftp cPanel, ma quando lo faccio il PDF non compare nella mia dashboard media di WP?
Supporto WPBeginner
Ciao Cornelius,
Puoi caricare un file PDF ma sì, hai ragione, non sarà visibile nella libreria media sul tuo sito WordPress. Per vedere un file nella libreria media e poterlo aggiungere facilmente, dovresti caricarlo utilizzando l'uploader media integrato.
Amministratore
Christopher Eller
Puoi caricare qualsiasi cosa tramite FTP/SFTP e poi aggiungerla al database usando un plugin come Add From Server.
Nitus
Questo ha funzionato per me (dato che nient'altro lo faceva):
– Apri wp-config.php
– In fondo aggiungi questa riga:
define(‘WP_MEMORY_LIMIT’, ‘128M’);
– Salva (e carica il tuo file)
Maja
Quindi non sono uno sviluppatore, quindi non mi sento di pasticciare con il PHP e alcune cose funzionali.
Ho trovato da un post sopra le impostazioni PHP e tutto è impostato correttamente, la dimensione massima del file è 30 MB, quindi sono confuso sul perché non riesco ancora a caricare media più grandi di 5 MB.
C'è qualcosa in WordPress che mi sfugge?
Non ho trovato da nessuna parte un posto dove cambiarlo.
Niall Flynn
Se stai usando cPanel, la maggior parte delle volte modifichi tramite le impostazioni della versione PHP, puoi verificare se sei su 5.6 o 7.0 e modificare tutte le impostazioni tramite cpanel. Per me questo è l'unico modo in cui il mio host ha bloccato tutto il resto, ma è molto comodo e ci sono modi semplici per abilitare i moduli PHP e modificare qualsiasi impostazione.
yaser
Grazie.
Questo è ciò che alla fine ha funzionato per me:
In wp-config, prima di wp-settings:
define( ‘WP_MEMORY_LIMIT’, ‘256M’ );
define( ‘WP_MAX_MEMORY_LIMIT’, ‘256M’ );
ini_set( ‘memory_limit’, ‘256M’ );
In .htaccess:
php_value memory_limit 256M
php_value upload_max_filesize 64M
php_value post_max_size 64M
php_value max_execution_time 300
php_value max_input_time 300
mohammad
grazie amico mi hai reso la giornata ha funzionato
Evan Olsen
Questo ha funzionato per me! Grazie!
Rudrax
Grazie amico ha funzionato!
Yna Capumpue
Come si accede a wp-config? Voglio dire, dove si inserisce il codice stesso? Grazie.
maneesh naithani
mi hai reso la giornata. grazie amico.
Rahadian
Grazie per questo post prezioso, il metodo .htaccess ha funzionato per me
Abhishek
Thanx a lot php.ini option works thanx a lot
Sean
Ciao
Sto costruendo un negozio WooCommerce per la vendita di file audio. Alcuni dei miei file sono superiori a 100 MB, quindi il caricamento diretto da WordPress non funzionerà. Quello che sto cercando di fare è caricare il file su cPanel e poi inserire quel link nel prodotto scaricabile su WP. Ma non so come fare. Visualizzo il file in cPanel e copio quel link, ma questo porta solo la persona al login di cPanel. Non so come ottenere il link del mio file in cPanel in modo che altri possano scaricarlo quando acquistano un prodotto?
Hai un tutorial su questo?
o puoi aiutare?
Grazie
Ian
Dovresti approfondire questo aspetto perché avresti bisogno di sicurezza per quell'URL del file, in genere l'URL del file è accessibile a tutti e quindi può essere scaricato senza effettuare un acquisto.
Larry Scott
Il secondo suggerimento di creare un file php.ini funziona a meraviglia.
john
Assolutamente NON provare a inserire quel codice nel file delle Funzioni del Tema!!!!! Ora ricevo messaggi di errore e non riesco ad accedere alla dashboard del mio sito. Non oserò provare nessun altro dei loro suggerimenti.
Supporto WPBeginner
Ciao John,
Puoi facilmente modificare il tuo file functions.php usando un client FTP per annullare le modifiche apportate.
Amministratore
Fred Preston
Grazie. la versione .htaccess ha funzionato per me. Ho solo dovuto ricordarmi di mostrare i file nascosti nel mio file manager di cPanel.
John
Just wanted to say thanks. I’ve been able to solve three wordpress related issues in one day, all with help from this website. Kudos on the good work.
Supporto WPBeginner
Thanks John Don’t forget to join us on Twitter for more WordPress tips and tutorials.
Amministratore
Shameer
Molto utile
David
Grazie.
Le modifiche a php.ini hanno aiutato. Ho dovuto assicurarmi di aumentare anche la dimensione di post_max. Ho dimenticato di modificare questo al primo aggiornamento e non è cambiato nulla. Modifica tutti i parametri e il gioco è fatto. Grazie ancora!
Alyse
C'è un posto specifico dove aggiungerlo nel file delle funzioni del tema? L'inizio? La fine?
Shambo
La modifica del file .htaccess ha funzionato per me. Grazie mille..
Celal Erdogdu
Funziona, grazie.
Supporto WPBeginner
You are welcome
Amministratore
Bentham
Grazie mille, l'opzione uno mi ha dato un suggerimento
Mohsin
Il metodo .htaccess ha funzionato per me. Grazie per questo articolo.
Aswani Somarajan
It was great. Very helpful! Had to upload a theme, used the second method. added a ner php.ini file and the theme is installed. Thanks a lot
John
Grazie per l'aiuto
apportare le modifiche nel metodo .htaccess ha fatto crashare il sito web
tuttavia, modificare il file php.ini ha funzionato per me.
Don
o prova un altro metodo come il mio,
su cpanel > fai clic su "seleziona versione php" > quindi fai clic su "passa alle opzioni php" > trova "upload_max_filesize" quindi cambialo in quello che vuoi.
Aoun
Grazie…… È molto utile e funziona perfettamente
Jose
Grazie amico, mi hai salvato il lavoro
Md Robiul Islam
Grazie mille… per il tuo commento ho risolto il mio problema dopo averci provato a lungo.. grazie mille…..
Miaka
I metodi nell'articolo non hanno funzionato per me, ma questo sì! Grazie mille, Don! Autore dell'articolo, spero tu possa modificare questo metodo come una delle soluzioni nel tuo articolo!
DAVID
@DON Grazie!
Rudi
Grazie mille, ho usato il metodo htaccess e ha funzionato per me.
bob hildegard
'upload_max_size' non è un nome di variabile di php.ini. è 'upload_max_filesize'. è scritto male nella soluzione 1
Eric
La prima cosa che ho provato è stata modificare il file .htaccess. Ha funzionato per me!
sumit
grazie mille, mi hai salvato
Reza
l'opzione htaccess restituisce un errore 500 Internal Server quando ricarico il mio sito web e wp admin
kashyapkumbhani
signore ho provato tutto ma il mio file Xml non viene importato per favore aiutami :) grazie
Trevor
Ho provato il tuo primo suggerimento e apparentemente ho inserito del codice errato nel file functions.php e ora ho perso l'accesso alla dashboard del mio sito web, il sito web effettivo non è accessibile da nessuno e il problema ovviamente non è stato risolto.
Supporto WPBeginner
Si prega di consultare la nostra guida su cosa fare quando si è bloccati nell'area di amministrazione.
Amministratore
Aakarshit
Nessuno di questi ha funzionato ; (
Ho anche contattato il provider di hosting, nessuna risposta da parte loro ; (
frizzy lee
grazie .. anche il metodo htacess ha funzionato per me .. pollice in su bro
Okie Wardoyo
Ciao, dove dovrei mettere quel codice nel mio file .htaccess.
Ho provato a mettere questo codice nel mio file htaccess ma ottengo sempre un errore interno del server 500 quando apro il mio sito live.
# BEGIN WordPress
RewriteEngine On
RewriteBase /
RewriteRule ^index\.php$ – [L]
RewriteCond %{REQUEST_FILENAME} !-f
RewriteCond %{REQUEST_FILENAME} !-d
RewriteRule . /index.php [L]
php_value max_input_vars 5000
php_value max_execution_time 300
php_value post_max_size 50M
# END WordPress
John Jones
Prova questo:
php_value upload_max_filesize 50M
php_value post_max_size 50M
php_value max_execution_time 300
php_value max_input_time 300
Jitender Singh
.htaccess funziona bene.
subodeep ray
thanks .htaccess works smoothly
Bukunmi
Dove esattamente devo inserire questi codici nella funzione del mio tema? perché sono un po' perso
Galuh Prasetyawan
in Aspetto -> editor, trova function.php
Eóin Kilroy
Giusto, ma esattamente dove nel file functions?
Manas Mitra
Ciao,
Ho usato il primo metodo di aggiungere codice al file functions.php del tema child, ma non ha l'effetto desiderato. In locale, il limite è 3 MB e sul server condiviso, il limite è 32 MB. Qualche idea sul perché sta succedendo?
Grazie.
Bouguezzi
the .htaccess modification methode worked with me thx a lot
Supporto WPBeginner
Lieto che tu l'abbia trovato utile. Assicurati di seguirci su Facebook per ricevere altri consigli su WordPress.
Amministratore
cathy belyea
ho seguito questo, ho persino contattato il mio host aumentando i miei upload a 64 MB, tuttavia in WordPress ne consente ancora solo 8 MB.
altri suggerimenti, per favore aiutatemi.
Guillermo
Stesso problema per la versione wordpress 3.9 / 4 e guardando la console di Chrome o Firefox ho visto un errore 413 di NGINX durante il caricamento
Maybe this thread can help to nginx users