Hai mai provato a caricare un file sul tuo sito WordPress e ti sei scontrato con un muro? È super frustrante quando non riesci a caricare quell'immagine, plugin o tema di cui hai bisogno. I nostri lettori ci chiedono spesso aiuto con i problemi di caricamento dei file perché possono rallentare il tuo flusso di lavoro.
A volte, questi limiti di caricamento dei file possono impedirti inaspettatamente di aggiungere contenuti alla tua libreria multimediale o di installare quei plugin e temi più grandi di cui hai bisogno. È come essere bloccati con le mani legate. Ed è ancora più fastidioso quando non sai come risolverlo!
Ma non preoccuparti, siamo qui per aiutarti. Amiamo che WordPress sia una piattaforma così configurabile e ci sono spesso più modi per risolvere lo stesso problema.
In questa guida, ti mostreremo i modi più semplici per aumentare la dimensione massima di caricamento dei file in WordPress. Ti aiuteremo a superare queste limitazioni in modo che tu possa tornare a fare ciò che ami: gestire il tuo sito web!
Perché aumentare la dimensione massima di caricamento dei file in WordPress?
Il tuo provider di hosting WordPress imposterà una dimensione massima predefinita di caricamento dei file quando ti iscrivi e installerai WordPress. Il tuo provider di hosting definisce questo limite, e di solito varia da 2 MB a 500 MB.
Per la maggior parte dei proprietari di siti web WordPress, questo limite sarà più che sufficiente.
Tuttavia, ci sono momenti in cui dovrai aumentare questo limite per evitare errori di caricamento.
Ad esempio:
- Gestisci un sito web di fotografia e devi caricare immagini di grandi dimensioni.
- Il tuo portfolio di design o fotografia contiene immagini di grandi dimensioni.
- Vuoi installare un tema o un plugin WordPress più grande.
- Vuoi vendere prodotti digitali come eBook, foto, video e altro.
- Aggiorni regolarmente i contenuti e aggiungi audio, foto e altro che vanno oltre il limite attuale.
Detto questo, ti mostreremo come aumentare la dimensione massima di caricamento dei file sul tuo sito WordPress.
Nota: Tieni presente che la visualizzazione di molti file di grandi dimensioni sul tuo sito web può rallentarne seriamente la velocità e le prestazioni. Ecco perché in genere consigliamo di non caricare mai video su WordPress.
Poiché la maggior parte degli utenti ha configurazioni di hosting WordPress diverse, copriremo quanto segue:
- Come controllare il limite massimo di dimensione di caricamento dei file in WordPress
- Metodo 1: Contatta il tuo provider di hosting WordPress
- Metodo 2: Crea o modifica un file php.ini esistente
- Metodo 3: Aggiungi codice al file functions.php del tuo tema WordPress
- Metodo 4: Aggiungi codice al tuo file .htaccess
- Method 5: Use a WordPress Plugin to Increase File Upload Size
Come controllare il limite massimo di dimensione di caricamento dei file in WordPress
WordPress mostrerà automaticamente il limite massimo di dimensione di caricamento dei file quando carichi immagini o altri media.
Per verificarlo, vai semplicemente su Media » Aggiungi nuovo nel tuo pannello di amministrazione di WordPress e vedrai il limite massimo di dimensione del file caricabile per il tuo sito WordPress.
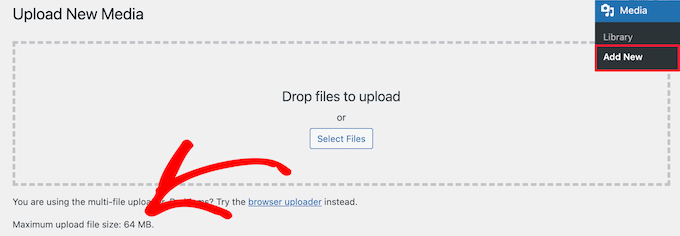
Ora che sai come trovare il limite di dimensione, ti mostreremo come aumentare la dimensione massima di caricamento in WordPress.
Metodo 1: Contatta il tuo provider di hosting WordPress
Uno dei modi più semplici per aumentare la dimensione massima di caricamento dei file in WordPress è contattare il tuo provider di hosting WordPress.
Questo è un compito relativamente semplice per il loro team di assistenza clienti e può essere fatto in un paio di minuti.
Per i principianti, questo può essere molto più facile che aggiungere codice a WordPress e modificare i file del server.
Vai semplicemente sul sito web del tuo provider di hosting, come Bluehost, ed effettua l'accesso.
Quindi, fai clic sull'icona ‘Chat’ in fondo allo schermo. Puoi quindi chiedere al personale di supporto di aumentare la dimensione del caricamento dei file sul tuo sito WordPress.
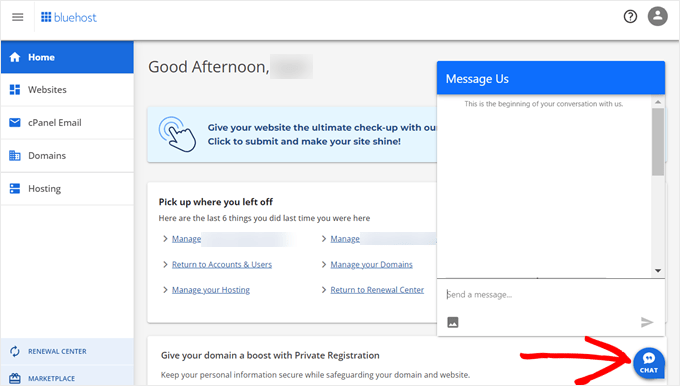
Puoi anche contattare il supporto dalla dashboard del tuo account di hosting.
Metodo 2: Crea o modifica un file php.ini esistente
Un altro modo per aumentare la dimensione massima di caricamento dei file è creare o modificare un file chiamato php.ini. Questo file controlla molte impostazioni per il tuo ambiente di hosting WordPress.
La maggior parte dei provider di hosting WordPress come Bluehost dispone di un cPanel intuitivo per aiutarti a gestire il tuo sito web.
Se il tuo web host dispone di una dashboard cPanel, puoi aumentare la dimensione di caricamento dei file tramite gli strumenti integrati.
Nota: Quanto segue è tratto dal cPanel di Bluehost. Tuttavia, la maggior parte dei provider di hosting condiviso avrà passaggi simili.
Troverai un pulsante cPanel in fondo alla scheda Hosting in Bluehost.
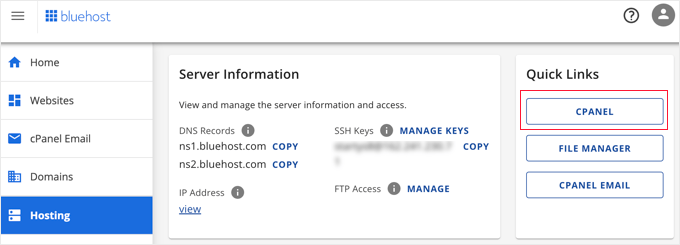
Facendo clic su questo pulsante si aprirà la tua dashboard cPanel.
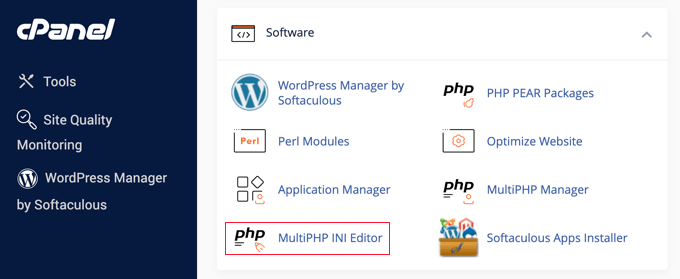
Ora devi scorrere verso il basso fino alla sezione Software e fare clic su ‘MultiPHP INI Editor’.
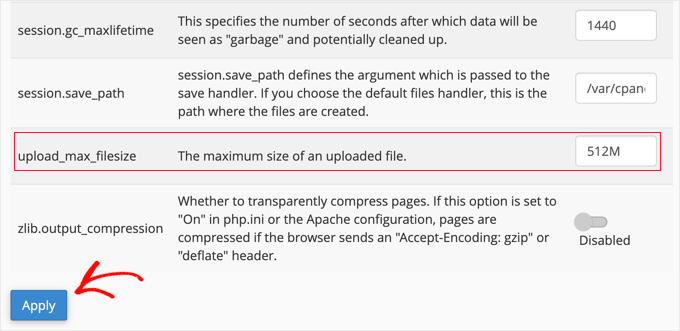
Successivamente, scorri verso il basso fino alla sezione etichettata ‘upload_max_filesize’ e inserisci una nuova dimensione massima del file nella casella.
Quindi, fai clic sul pulsante ‘Applica’.
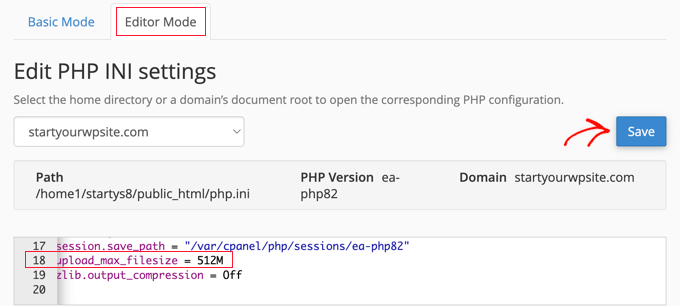
In alternativa, puoi fare clic sulla scheda del menu ‘Modalità Editor’, e quindi puoi modificare direttamente la dimensione massima di caricamento dei file nell'editor.
Devi modificare la sezione ‘upload_max_filesize’ per aumentare la dimensione di caricamento dei tuoi file.
Una volta terminato, fai semplicemente clic sul pulsante ‘Salva’.
Modifica php.ini aggiungendo codice
Se il tuo attuale provider di hosting non offre l'opzione cPanel, dovrai modificare questo file manualmente.
Per fare ciò, puoi utilizzare un client FTP o l'opzione del file manager nel pannello di controllo del tuo hosting WordPress.
Se stai utilizzando l'hosting condiviso, potresti non vedere il file php.ini nella tua directory di hosting. Se non ne vedi uno, crea semplicemente un file chiamato php.ini e caricalo nella tua cartella principale.
Quindi, aggiungi il seguente snippet di codice al file:
upload_max_filesize = 256M
post_max_size = 256M
max_execution_time = 300
Puoi modificare il limite di '256M' con la dimensione del file di cui hai bisogno per il tuo blog WordPress.
Metodo 3: Aggiungi codice al file functions.php del tuo tema WordPress
Questo metodo prevede l'aggiunta di codice al tuo file functions.php nel tuo tema WordPress.
Invece di modificare direttamente il file, ti consigliamo di utilizzare WPCode. È il miglior plugin per snippet di codice che ti consente di aggiungere codice al tuo sito web senza romperlo.
Se non l'hai mai fatto prima, consulta la nostra guida per principianti su come aggiungere codice personalizzato in WordPress.
Per prima cosa, devi installare il plugin gratuito WPCode. Per maggiori dettagli, consulta la nostra guida passo passo su come installare un plugin di WordPress.
Dopo l'attivazione, dovresti navigare su Snippet di codice » + Aggiungi snippet.
Dovrai passare il mouse sull'opzione ‘Aggiungi il tuo codice personalizzato (Nuovo snippet)’ e quindi fare clic sul pulsante ‘+ Aggiungi snippet personalizzato’.

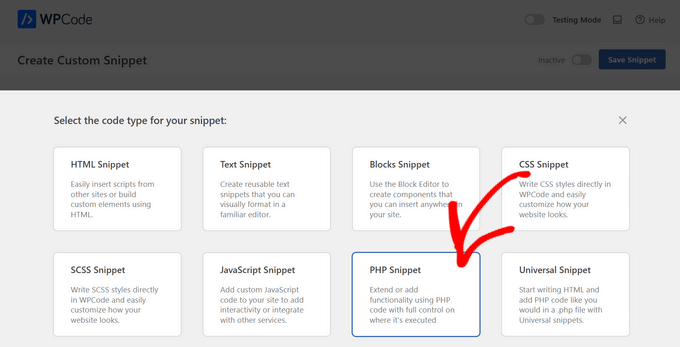
Successivamente, devi scegliere ‘Snippet PHP’ come tipo di codice dall'elenco delle opzioni che appaiono.
Nella schermata seguente, inserisci un nome per il tuo nuovo snippet, che può essere qualsiasi cosa per aiutarti a ricordare a cosa serve il codice.
Quindi, puoi copiare e incollare il seguente snippet di codice sotto ‘Anteprima codice’. Assicurati di cambiare ‘256M’ con la dimensione massima del file di cui hai bisogno:
@ini_set( 'upload_max_size' , '256M' );
@ini_set( 'post_max_size', '256M');
@ini_set( 'max_execution_time', '300' );
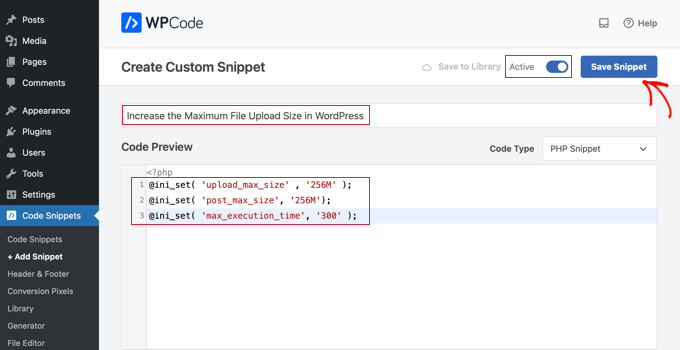
Infine, sposta l'interruttore in alto su ‘Attivo’ e quindi fai clic sul pulsante ‘Salva snippet’. Il codice verrà ora eseguito sul tuo sito web.
Metodo 4: Aggiungi codice al tuo file .htaccess
Un altro modo per aumentare la dimensione massima del file è modificando il file .htaccess. Questo file controlla le impostazioni di configurazione di alto livello per il tuo sito web.
Per fare ciò, devi accedere al server del tuo sito web tramite FTP. Se non l'hai mai fatto prima, consulta la nostra guida su come usare FTP per caricare file su WordPress per principianti.
Dopodiché, devi individuare il tuo file .htaccess nella cartella principale del tuo sito web.

Se non riesci a trovare il tuo file .htaccess, potrebbe essere nascosto dal tuo file manager o client FTP. Per saperne di più, consulta la nostra guida su perché non riesci a trovare il file .htaccess sul tuo sito WordPress.
Successivamente, devi aggiungere il seguente snippet di codice al tuo file .htaccess:
php_value upload_max_filesize 256M
php_value post_max_size 256M
php_value max_execution_time 300
php_value max_input_time 300
Per aumentare ulteriormente la dimensione massima di caricamento dei file, cambia semplicemente '64M' con la dimensione che desideri.
Metodo 5: Usa un plugin WordPress per aumentare la dimensione di caricamento dei file
Un altro modo per aumentare il limite massimo di caricamento dei file è utilizzare il plugin WP Increase Upload Filesize. Se non ti senti a tuo agio nell'aggiungere codice a WordPress, questa potrebbe essere una buona opzione per te.
La prima cosa da fare è installare e attivare il plugin. Per maggiori dettagli, consulta la nostra guida su come installare un plugin di WordPress.
Dopo l'attivazione, naviga su Media » Aumenta Limite Caricamento nel tuo pannello di amministrazione di WordPress.
Questo ti porterà a una schermata in cui puoi selezionare una nuova dimensione di caricamento file nel menu a discesa 'Scegli Dimensione Massima Caricamento File'.
Quindi, fai clic sul pulsante 'Salva Modifiche'.

Nota: La dimensione massima di caricamento dei file sarà impostata dal tuo provider di hosting. Se hai bisogno di un limite di dimensione file superiore a quello elencato nel menu a discesa, devi contattare il tuo provider di hosting e chiedere di aumentare il limite.
Tutorial video
Se non ti piace seguire istruzioni scritte, puoi guardare il nostro tutorial video invece:
Speriamo che questo articolo ti abbia aiutato ad aumentare la dimensione massima di caricamento dei file in WordPress. Potresti anche voler consultare la nostra guida su come aggiungere tipi di file aggiuntivi da caricare in WordPress e le nostre scelte di esperti di plugin e suggerimenti per migliorare l'area di amministrazione di WordPress.
Se ti è piaciuto questo articolo, iscriviti al nostro canale YouTube per tutorial video su WordPress. Puoi anche trovarci su Twitter e Facebook.


Essere Furtivi
L'aggiunta del file php.ini nella cartella wp-admin ha funzionato per me. Yahoooo grazie.
Mouad Chafai
Grazie, il metodo php.ini ha funzionato perfettamente.
i’ve created the php.ini
wp-adminphp.ini
add lines:
upload_max_filesize = 64M
post_max_size = 64M
max_execution_time = 300
grazie per l'articolo.
Saleh Shaukat
Grazie, .htaccess ha funzionato perfettamente per me!!.
Dan Rosenberg
Il metodo PHP.INI ha funzionato perfettamente. Grazie!
Ben Peacock
Mi dispiace, trova questo invece Accedi alla macchina root digitando il seguente comando nano /usr/lib/php.ini
trova ; Dimensione massima dei dati POST che PHP accetterà.
post_max_size = 2M cambia questo in 64
Save and exit and then you should be able to upload what you need hope this helps
QuangPham
Grazie per le istruzioni su come risolvere.
Voicu Ioan Virgil
Grazie, ottimo tutorial!
Maria McCarthy
Aggiungere il file php.ini alla mia cartella wp-admin SPECIFICAMENTE ha funzionato anche per me! Grazie a tutti! Mi ci sono volute quasi 4 ore per trovare una pagina che avesse le informazioni che avrebbero funzionato per me – salvavita!
pete
trovato il php.ini funzionante in wp-admin network php.ini
Tabassum Javaid
il metodo htaccess funziona bene per me. grazie
Mike
con alcuni host (godaddy) ad esempio, potrebbero esserci dei passaggi aggiuntivi.
E a quale php stai eseguendo. Per godaddy con php5, rinomina php.ini in php5.ini e ricorda che se hai delle accuratezze in esecuzione, dovrai terminarle temporaneamente prima che il file venga preso in carico, o attendere un po'.
Processi di sistema / Termina tutto
jaymz
Molte grazie per l'articolo. Per l'auto-ospitato c'è un altro modo poiché i metodi 2 e 3 non hanno funzionato per me poiché la modifica di .htaccess non ha avuto effetto e nemmeno l'aggiunta di un file php.ini in /wp-admin. Si trattava semplicemente di trovare il file php.ini esistente per Apache. Su Ubuntu ho eseguito;
sudo find / -name php.ini
Questo ha trovato il mio file ini in /etc/php5/apache2/
Tutto ciò che era necessario era individuare i parametri e aggiornare i valori per;
upload_max_filesize
post_max_size
max_execution_time
Grazie per avermi portato lì!
D Winzell
Grazie per aver scritto questo. Il file php.ini deve essere nella directory wp-admin per funzionare correttamente. Ho appena controllato il mio host (Vaurent) e consentono caricamenti di file fino a 105M, quindi troverò qualcosa di quella dimensione e vedrò se arriva al mio blog.
Matt
Voglio solo aggiungere che, usando GoDaddy, non puoi usare il metodo .htaccess, altrimenti otterrai un errore interno del servizio 500.
Devi usare il metodo php.ini. L'unica differenza è che dovrai avere un file php.ini e un file php5.ini e le righe devono essere aggiunte a entrambi. I file devono trovarsi nella directory principale di dove è installato WordPress, non nella cartella wp-admin, ma al di fuori di essa.
Inoltre, se hai più installazioni di WordPress, questo deve essere fatto e inserito in ogni directory in cui si trova ciascuna installazione di WordPress.
GSJha
Ottimo post.
sandeep
php_value upload_max_filesize 64M
php_value post_max_size 64M
php_value max_execution_time 1500
php_value max_input_time 1500
uso questi valori in .htaccess e funziona!
grazie
Thyme
Quindi ho fatto tutto questo e ho cambiato il file php.ini nella cartella /etc (il mio sito è sul grid-service di MediaTemple) e niente funzionava, ma poi mi sono ricordato vagamente che c'era qualcosa che dovevo cambiare nelle impostazioni di rete se la mia installazione era multisito e lì c'era. Uff.
Quindi sì, se hai una rete WordPress, vai nelle impostazioni di rete e cambia la dimensione massima di caricamento dei file vicino al fondo della pagina.
Alex
Questa è l'unica cosa che ha funzionato per me, ho provato tutte le opzioni, sono su 1&1
memory_limit = 32M
upload_max_filesize = 32M
post_max_size = 32M
file_uploads = On
** La dimensione può essere qualsiasi
La chiave era la riga "file_uploads"
Posiziona questo nella cartella /wp-admin/.
Kristina
Ha funzionato per me! Sono su Bluehost.
Thanks for your post
Brandon
questo ha funzionato per me dopo che tutto il resto non aveva funzionato. Sono così sollevato!
Sono anche su 1&1. Una volta aggiunta la riga "file_uploads = On" al mio file php.ini ha funzionato a meraviglia!!
grazie!
Hafeez Ansari
Thank you Alex, This works for me in /wp-admin/ folder. Problem solved.
Jordan Miller
Grazie mille
Mike
Fantastico! grazie Alex. Ero limitato a 2mb…molto utile.
Sam
Alex, sei il migliore! La tua soluzione ha funzionato per me! Molte grazie!
Johnny T
Genius! This worked for me! Just to clarify. Create a php.ini file in the wp-admin folder and only add the lines of code in Alex’s post. FTP this to your server and you’re good to go. Thanks Alex. You are a genius!
Luan
Grazie Johnny e Alex! È stato davvero utile.
vanniee
qual è il nome del file?
Togi Tan
Ma, non funziona sull'hosting gratuito. Tutti i metodi che ho provato. Penso che dipenda dal server.
Duncan
Wow wow wow wow! Grazie per quel commento chiaro che mi ha aiutato a farlo funzionare. Sei una stella.
Nomo
Alex – Il tuo post continua ad essere utile. Molto apprezzato!
Noor
Ha funzionato con il metodo .htaccess. Saluti.
Bogdan
Ottimo consiglio. Il mio limite di upload era 8MB e ho provato solo il trucco htaccess e ha funzionato, è aumentato a 64MB. L'ho testato e funziona benissimo! Grazie mille per il tuo ottimo consiglio!
VoidnessMD
Cosa importante da notare: l'utilizzo del metodo php.ini richiede che il file si trovi nella cartella wp-admin, non nella root della tua installazione WP.
DJ
THANKS!! This sorted it out for me on my end
David Connolly
Superbo… chiaro e la soluzione finale ha funzionato.
un grande grazie
Bongo
Questo sito è il più bello per imparare WP! Continuate così ragazzi…ancora per favore…ancora! lol
Staff editoriale
Thanks for the kind words
Amministratore
Ido Schacham
Finalmente, un post che spiega chiaramente come cambiare il limite di memoria in WP. Grazie!
mostafa
ciao.
l'ho fatto con successo con il terzo metodo. la mia dimensione di upload era 8 M, ma ora è 64 M. per me è più che sufficiente.
Grazie mille.
a proposito, vengo dall'Iran.
Rowan Evenstar
Creare un file php.ini e metterlo nella directory principale ha risolto subito il problema!
Saluti, molto apprezzato!
assassinateur
grazie, ma sono su un hosting condiviso quindi niente funziona, ho messo php.ini in wp-admin e nella cartella del blog e nella cartella principale e non ha funzionato neanche .htaccess ho cambiato tema e non ha funzionato
Arvind Kukreti
Aggiungere codice nel file .htaccess potrebbe causare un errore interno 500… il modo migliore è creare un file php.ini e caricarlo nella cartella wp-admin
Stephen Afije
Waooo è stato brillante, tutto quello che ho fatto è stato creare php.ini e caricarlo nella cartella wp-admin ha funzionato come nient'altro grazie
leo
il metodo htaccess funziona bene per me. grazie
Andrew Lilly
Ciao,
Ho fatto tutto quanto sopra e ancora non mi permette di importare un file xml da 11 MB. Ne ho bisogno perché contiene 1500 prodotti da importare.
Ho parlato con il mio provider di server virtuale 1and1 e mi hanno detto che tutto ciò che devo fare è aggiungere il codice al file .htaccess ma non sembra funzionare
Per favore, qualcuno aiuti
Staff editoriale
Se nessuno dei precedenti funziona, allora l'unica persona che può aiutarti è il tuo host.
Amministratore
Ali Amer
Potrebbe essere correlato al tipo MIME. In tal caso, risolvilo da cpanel
Dominique
Nessuna di queste soluzioni ha funzionato per me. Le ho provate tutte. Sto usando WPEngine per l'hosting.
Qualche suggerimento?
Staff editoriale
Chiedi a WPEngine di aumentare il limite per te.
Amministratore
Thad
Il metodo htaccess ha funzionato per me. Grazie per il post. Buone informazioni, ben presentate.
Richard
L'opzione php.ini ha funzionato per me ma sul file php.ini nella directory /wp-admin
Mike
perfetto – ha funzionato benissimo – impostato a 200MB e funziona bene.
Matheus M.
In localhost funziona il .htaccess. Ma sull'host solo php.ini. Grazie per l'aiuto.
dan
Sì, php.in funziona in /wp-admin. grazie
marin
Grazie, htaccess ha funzionato per me, lo apprezzo.
Makarand Mane
Ho l'hosting su mediatemple. I primi due metodi non hanno funzionato per me. Solo il metodo htaccess ha funzionato per me.
Grazie.
Gavin
Ho scoperto che php.ini era nascosto nella cartella cgi-bin che alcuni server condivisi hanno nelle loro directory root. L'ho modificato come sopra (E ho aggiunto un php5.ini per sicurezza) ma finché non l'ho modificato, nient'altro ha funzionato. Grazie per il thread MOLTO utile!
Cath
Grazie Gavin, nessuno degli altri metodi ha funzionato per me, poi ho visto il tuo commento, c'erano file php.ini e php4.ini nella cartella cgi-bin. Ho trovato il codice pertinente in entrambi i file – post_max_size = , e upload_max_filesize = , li ho modificati e ora tutto funziona bene.
Jarod Billingslea
Grazie mille per questo articolo!
Void lon iXaarii
grazie mille! ho provato tante soluzioni e il tuo .htaccess ha finalmente funzionato
Anthony
L'unica cosa che ha funzionato per me è stata creare/modificare un file php.ini e aggiungere quanto segue:
memory_limit = 100M upload_max_filesize = 100M post_max_size = 100M file_uploads = On
e caricarlo nella cartella wp-admin.
Alan
L'opzione 2 ha funzionato perfettamente, anche se ho dovuto posizionare il file php.ini nella cartella wp-admin invece che nella directory principale.
phpinfo stava rilevando il file php.ini nella root, ma non WordPress.
Attualmente ho installato WP 3.2...
RPaterson
Grazie per quel consiglio extra, è quello che alla fine ha funzionato per il mio caso
arun
grazie anthony, il tuo metodo mi ha salvato molto.
Quest The Wordsmith
Questo è esattamente ciò che ha funzionato anche per me.
RamiAlloush
Thx
Snowboard
grazie per questo post, ma qual è il limite predefinito?
almb1111
64 MB
kat1111
Era 8MB, ma l'ho portato a 192 MB @almb1111
kat1111
Grazie per aver risposto, finalmente ho ricevuto aiuto, dovevo cambiare PHP in PHP-5.
kat1111
Sono evidentemente più nuovo della maggior parte qui, non capisco quale sia la directory "root", è Editor sotto la scheda Aspetto? Inoltre, non capisco come accedere a hcaccess. Qualsiasi aiuto è apprezzato.
jameserie
il metodo htaccess funziona per me. – saluti!
nycxs
Se stai usando PHP5, il file dovrebbe chiamarsi php5.ini e trovarsi nella root delle cartelle condivise.
MyDreamDinZ
Qual è il limite più alto per l'upload
posso impostarlo a 1024M?
alexlee.cs
Il metodo .htaccess funziona per me. Grazie.
rajkanuri
Grazie per il codice.. è davvero utile per me..
pranjalgupta2009
Sì! mettere php.ini anche in wp-admin funziona per me. grazie
Snipsley
Grazie, ma nessuno dei due ha funzionato per me.
Ma ho trovato la soluzione!
Ho dovuto mettere quel php.ini in /public_html E in /public_html/wp-admin e funziona!
Biju Subhash
già..la stessa cosa funziona anche per me..
Grazie Snisley
Trond
Great! This worked for me as well I run Wordpress on an MS Server 2008 with IIS 7.5 from my host provider, btw
kenseneff
Ha funzionato anche per me. Grazie!
Kiran
Grazie amico. Funziona per me.
Rollie Osayan
Sì. Funziona anche qui. grazie
Kaushik Biswas
Alla fine di un post, voglio visualizzare i post recenti di quella specifica categoria sotto quel post – come posso fare?