Avete mai provato a caricare un file sul vostro sito WordPress e vi siete scontrati con un muro di mattoni? È molto frustrante quando non si riesce a caricare l’immagine, il plugin o il tema di cui si ha bisogno. I nostri lettori ci chiedono spesso aiuto per i problemi di uploader dei file, perché possono portare il vostro flusso di lavoro a uno stallo.
A volte, questi limiti di uploader possono inaspettatamente impedirvi di aggiungere contenuti alla vostra libreria dei media o di installare i plugin e i temi più grandi di cui avete bisogno. È come essere bloccati con le mani legate. Ed è ancora più fastidioso quando non si sa come correggerlo!
Ma non preoccupatevi, siamo qui per aiutarvi. Ci piace che WordPress sia una piattaforma così configurabile e spesso ci sono più modi per risolvere lo stesso problema.
In questa guida vi mostreremo i modi più semplici per aumentare la dimensione massima dei file caricati in WordPress. Vi faremo superare queste limitazioni in modo che possiate tornare a fare ciò che amate: gestire il vostro sito web!
Perché aumentare la dimensione massima di uploader dei file in WordPress?
Il vostro fornitore di hosting WordPress imposterà una dimensione massima predefinita per l’uploader dei file al momento dell’iscrizione e dell’installazione di WordPress. Il fornitore di hosting definisce questo limite, che di solito varia da 2 MB a 500 MB.
Per la maggior parte dei proprietari di siti web WordPress, questo limite sarà più che sufficiente.
Tuttavia, a volte è necessario aumentare questo limite per evitare errori di uploader.
Ad esempio:
- Gestite un sito web di fotografia e avete bisogno di caricare immagini di grandi dimensioni.
- Il vostro portfolio di design o di fotografia contiene immagini di grandi dimensioni.
- Si vuole installare un tema o un plugin per WordPress più grande.
- Volete vendere prodotti digitali come eBook, foto, video e altro ancora.
- È normale aggiornare i contenuti e aggiungere audio, foto e altro ancora oltre il limite attuale.
Detto questo, vi mostriamo come potete aumentare la dimensione massima di uploader dei file sul vostro sito WordPress.
Nota: tenete presente che la visualizzazione di molti file di grandi dimensioni sul vostro sito web può seriamente ridurne la velocità e le prestazioni. Per questo motivo, in genere raccomandiamo di non caricare mai video su WordPress.
Poiché la maggior parte degli utenti ospita configurazioni diverse di WordPress, copriremo quanto segue:
- How to Check Your Maximum File Upload Size Limit in WordPress
- Method 1: Contact Your WordPress Hosting Provider
- Method 2: Create or Edit an Existing php.ini file
- Method 3: Add Code to Your WordPress Theme functions.php File
- Method 4: Add Code to Your .htaccess File
- Method 5: Use a WordPress Plugin to Increase File Upload Size
Come controllare il limite massimo di uploader dei file in WordPress
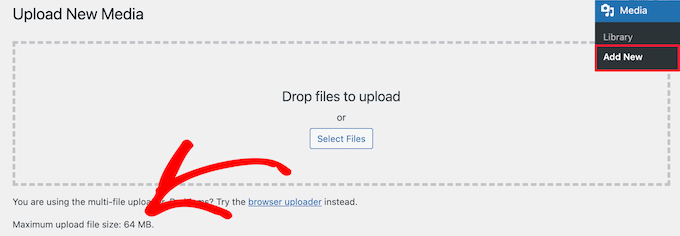
WordPress mostra automaticamente il limite massimo di dimensione dei file da caricare quando si caricano immagini o altri media.
Per verificarlo, basta andare su Media ” Aggiungi nuovo nel pannello di amministrazione di WordPress e si vedrà il limite massimo di uploader dei file per il sito WordPress.
Ora che sapete come trovare il limite di dimensione, vi mostriamo come aumentare la dimensione massima di uploader in WordPress.
Metodo 1: Contattare il fornitore di hosting WordPress
Uno dei modi più semplici per aumentare la dimensione massima di uploader dei file in WordPress è quello di contattare il fornitore di hosting di WordPress.
Si tratta di un’operazione relativamente semplice per il team del servizio clienti, che può essere eseguita in un paio di minuti.
Per i principianti, questo può essere molto più facile che aggiungere codice a WordPress e modificare i file del server.
È sufficiente collegarsi al sito web del proprio fornitore di hosting, come Bluehost, e accedervi.
Quindi, fare clic sull’icona “Chat” nella parte inferiore della schermata. Potete quindi chiedere al personale di supporto di aumentare la dimensione dei file caricati sul vostro sito WordPress.
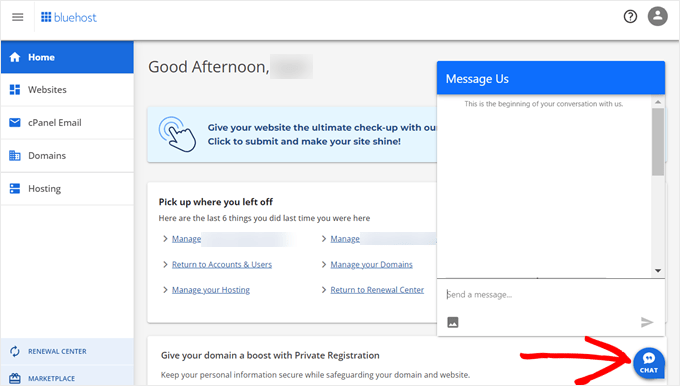
È possibile contattare l’assistenza anche dalla Bacheca del proprio account di hosting.
Metodo 2: Creare o modificare un file php.ini esistente
Un altro modo per aumentare la dimensione massima dei file da caricare è creare o modificare un file chiamato php.ini. Questo file controlla molte impostazioni dell’ambiente che ospita WordPress.
La maggior parte dei fornitori di hosting WordPress, come Bluehost, dispone di un cPanel facile da usare per i principianti che aiuta a gestire il sito web.
Se il vostro host web ospita una Bacheca cPanel, potete aumentare la dimensione dell’uploader dei file attraverso gli strumenti integrati.
Nota: quanto segue è tratto dal cPanel di Bluehost. Tuttavia, la maggior parte dei fornitori di hosting condivisi prevede passaggi simili.
Il pulsante cPanel si trova in fondo alla scheda Hosting di Bluehost.
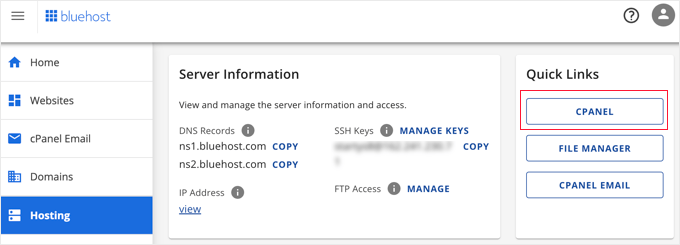
Facendo clic su questo pulsante si apre la Bacheca di cPanel.
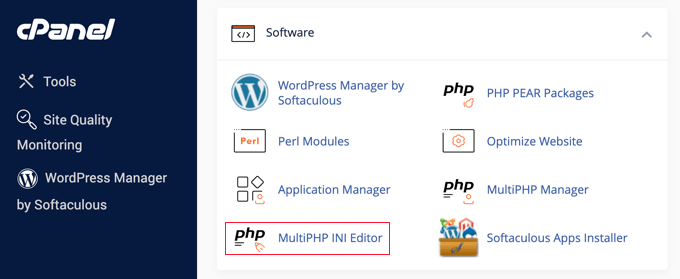
Ora è necessario scendere nella sezione Software e fare clic su ‘MultiPHP INI Editor’.
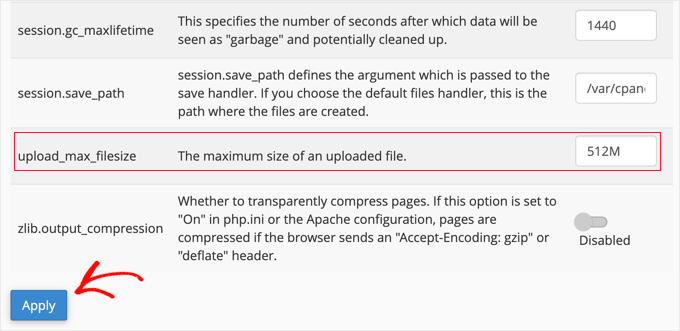
Quindi, scorrere giù fino alla sezione etichettata “upload_max_filesize” e inserire una nuova dimensione massima dei file nel boxed.
Quindi, fare clic sul pulsante “Applica”.
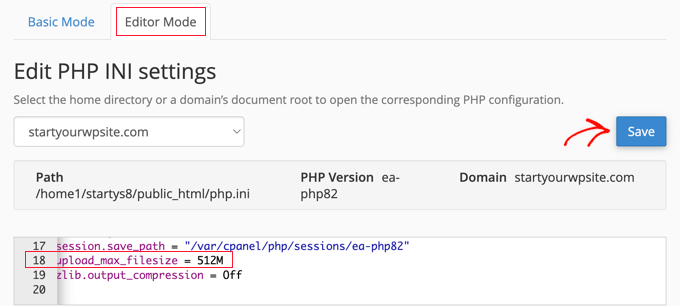
In alternativa, fate clic sulla scheda di menu “Modalità editore” e potrete modificare la dimensione massima dei file da caricare direttamente nell’editor.
È necessario modificare la sezione ‘upload_max_filesize’ per aumentare le dimensioni dei file da caricare.
Una volta terminato, fate clic sul pulsante “Salva”.
Modificare php.ini aggiungendo codice
Se il vostro attuale fornitore di hosting non offre l’opzione cPanel, dovrete modificare questo file manualmente.
Per farlo, potete utilizzare un client FTP o l’opzione di gestione dei file nel pannello di controllo del vostro hosting WordPress.
Se si utilizza un hosting condiviso, è possibile che non si veda il file php.ini nella directory dell’hosting. Se non lo si vede, è sufficiente creare un file chiamato php.ini e caricarlo nella cartella principale.
Quindi, aggiungere al file il seguente frammento di codice:
1 2 3 | upload_max_filesize = 256Mpost_max_size = 256Mmax_execution_time = 300 |
È possibile modificare il limite di ‘256M’ in base alla dimensione dei file necessaria per il proprio blog WordPress.
Metodo 3: Aggiungere il codice al file functions.php del tema WordPress
Questo metodo prevede l’aggiunta di codice al file functions.php del tema WordPress.
Invece di modificare direttamente il file, si consiglia di utilizzare WPCode. È il miglior plugin per gli snippet di codice che permette di aggiungere codice al sito web senza romperlo.
Se non l’avete mai fatto prima, consultate la nostra guida per principianti su come add-on il codice personalizzato in WordPress.
Per prima cosa, è necessario installare il plugin gratuito WPCode. Per maggiori dettagli, consultate la nostra guida passo-passo su come installare un plugin di WordPress.
Dopo l’attivazione, si deve navigare in Code Snippets ” + Add Snippet.
Si dovrà passare il mouse sull’opzione “Aggiungi codice personalizzato (nuovo snippet)” e cliccare sul pulsante “+ Aggiungi snippet personalizzato”.

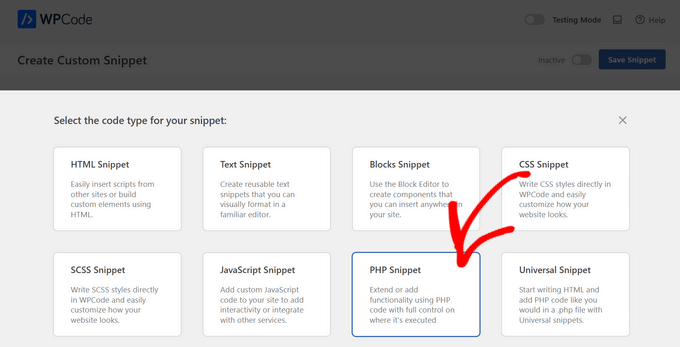
Successivamente, è necessario scegliere “PHP Snippet” come tipo di codice dall’elenco di opzioni che appare.
Nella schermata successiva, inserire un nome per il nuovo snippet, che può essere qualsiasi cosa che aiuti a ricordare a cosa serve il codice.
Quindi, è possibile copiare e incollare il seguente frammento di codice sotto “Anteprima codice”. Assicurarsi di modificare ‘256M’ con la dimensione massima del file desiderata:
1 2 3 | @ini_set( 'upload_max_size' , '256M' );@ini_set( 'post_max_size', '256M');@ini_set( 'max_execution_time', '300' ); |
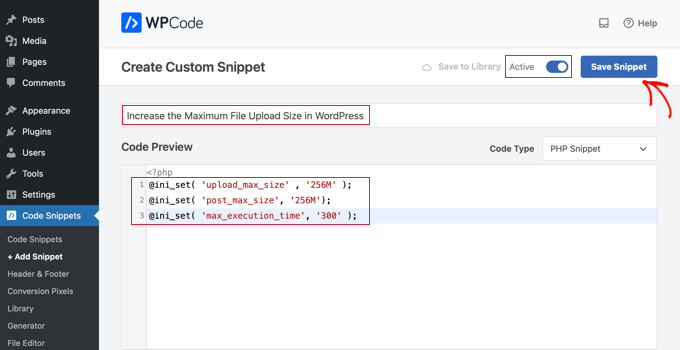
Infine, spostare l’interruttore in alto su “Attivo” e fare clic sul pulsante “Salva snippet”. Il codice verrà ora eseguito sul sito web.
Metodo 4: Aggiungere codice al file .htaccess
Un altro modo per aumentare la dimensione massima dei file è modificare il file .htaccess. Questo file controlla le impostazioni di configurazione di alto livello del sito web.
Per farlo, è necessario effettuare l’accesso al server del sito web tramite FTP. Se non l’avete mai fatto prima, consultate la nostra guida su come usare l’FTP per l’uploader dei file su WordPress per i principianti.
Successivamente, è necessario individuare il file .htaccess nella cartella principale del sito web.

Se non riuscite a trovare il vostro file .htaccess, potrebbe essere nascosto dal vostro file manager o client FTP. Per saperne di più, consultate la nostra guida sul perché non riuscite a trovare il file .htaccess sul vostro sito WordPress.
Successivamente, è necessario aggiungere il seguente frammento di codice al file .htaccess:
1 2 3 4 | php_value upload_max_filesize 256Mphp_value post_max_size 256Mphp_value max_execution_time 300php_value max_input_time 300 |
Per aumentare ulteriormente la dimensione massima dei file da caricare, è sufficiente modificare il valore ’64M’ con la dimensione desiderata.
Metodo 5: utilizzare un plugin di WordPress per aumentare le dimensioni dell’uploader dei file
Un altro modo per aumentare il limite massimo di upload dei file è utilizzare il plugin WP Increase Upload Filesize. Se non vi sentite a vostro agio nell’aggiungere codice a WordPress, questa potrebbe essere una buona opzione per voi.
La prima cosa da fare è installare e attivare il plugin. Per maggiori dettagli, consultate la nostra guida su come installare un plugin di WordPress.
Dopo l’attivazione, andare su Media ” Aumenta limite di uploader nel pannello di amministrazione di WordPress.
Si accede così a uno schermo in cui è possibile selezionare una nuova dimensione per l’uploader dei file nel menu a discesa “Scegli la dimensione massima del file caricato”.
Quindi, fare clic sul pulsante “Salva modifiche”.

Nota: la dimensione massima dei file da caricare è stabilita dal fornitore di hosting. Se avete bisogno di un limite di dimensioni dei file superiore a quello elencato nel menu a discesa, dovete contattare il vostro fornitore di hosting e chiedere di aumentare il limite.
Video tutorial
Se non vi piace seguire le istruzioni scritte, potete consultare il nostro video tutorial:
Speriamo che questo articolo vi abbia aiutato ad aumentare la dimensione massima dei file caricati in WordPress. Potreste anche consultare la nostra guida su come add-on per caricare altri tipi di file in WordPress e la nostra selezione di plugin e suggerimenti per migliorare l’area di amministrazione di WordPress.
Se questo articolo vi è piaciuto, iscrivetevi al nostro canale YouTube per le esercitazioni video su WordPress. Potete trovarci anche su Twitter e Facebook.


Lisha Van Nieuwenhove
This help was BRILLIANT. THANK YOU!
WPBeginner Support
You’re welcome!
Admin
Ray Konopka
Thanks for the tips. My site is hosted in BlueHost so I first tried Method 2. However, after changing the upload_max_filesize value, the Add New media page for my site still showed 64 MB. I went back into the MultiPHP INI Editor and looked at the other values. One other value stood out:
post_max_size
Sets max size of post data allowed. This setting also affects file upload. To upload large files, this value must be larger than upload_max_filesize. Generally speaking, memory_limit should be larger than post_max_size.
After I increased the post_max_size value as well, then the Add New media upload page showed the new limit. Perhaps you can update the post to include this tip.
WPBeginner Support
Thank you for sharing this, we’ll be sure to look into it and possibly add it to the article in the future
Admin
Mark
All my limits were increased as suggested, but I started getting ‘files are too big’ after a plugin update. After double checking everything server and email side, the solution was changing from 5M to 5120kb in Contact Form 7 settings. The plugin suddenly stopped recognizing M when trying to override the default 1024kb setting.
WPBeginner Support
Thanks for sharing this should someone else run into this issue!
Admin
devshah
Function.php method is not Working.
WPBeginner Support
It would depend on your host and what else is set up on your server for what will work. If nothing else works you can always reach out to your host for assistance.
Admin
Halil AHMAD
The .htaccess worked for me. Thank you
Muzoora Barnabas
The .htaccess worked for me. Thank you
WPBeginner Support
Glad our recommendation was able to assist
Admin
Muhammad Farooqi
You comments and thanks secion is almost 10 times longer..than the content of this page is guarantee of your amazing tips
WPBeginner Support
We’re happy we can help so many WordPress users
Admin
Jacob Alas
The only method that worked for me was: htaccess Method
Thank you.
WPBeginner Support
Glad one of our methods was able to work for you
Admin
Daniyar Nauryz
htaccess Method has worked for me.
WPBeginner Support
Glad our recommendation worked for you
Admin
furqan
its not working.
WPBeginner Support
If the recommendations are not working for you, we would recommend reaching out to your hosting provider and they should be able to assist if this is something they’ve set on their end.
Admin
Abdullah Ashraf
Thank you so much. I tried all the methods and the last method was helpful for me.
I would like to know should I undo the second last step that was php.ini?
WPBeginner Support
It is not required to remove that file but you can remove it if it is not working for your server.
Admin
Bradley
None work.
WPBeginner Support
If none of our recommendations work, we would recommend reaching out to your hosting provider to see if it is a restriction that they have set on their servers.
Admin
Ben
If you have access to the FTP, can I just upload the file in the wp-content/uploads/[year]/[month] folder?
WPBeginner Support
If you do that you would need a plugin to find the images, we have a guide on how to do that below:
https://www.wpbeginner.com/plugins/how-to-bulk-upload-wordpress-media-files-using-ftp/
Admin
naved ahmed
Thanks a lot
.htaccess method worked for me.
You saved my lot of time.
Thanks again.
WPBeginner Support
Glad our guide was able to help you
Admin
Adio Usman
Does this method works for restoring backup that is up to 3.5gb manually?
WPBeginner Support
It would depend on the method you are using but it could help with restoring a backup that large.
Admin
viren
method 3 is perfectly worked for me.keep inspiring us.great work man.thnks
WPBeginner Support
Glad our recommendation was helpful
Admin
ayman
.htaccess methode worked with me
WPBeginner Support
Glad our recommendation was helpful
Admin
Sanchit Setia
Does this work on free hosting?
WPBeginner Support
You would want to check with your hosting provider if you are concerned
Admin
bara
It works for me
WPBeginner Support
Glad our recommendation helped you
Admin
abc
nothing is working for lms
WPBeginner Support
If none of the recommendations worked we would recommend reaching out to your hosting provider for assistance.
Admin
Ahmad
I tried this but the size did not change… status is same please help what should I do know I am using localhost
WPBeginner Support
You would want to try restarting your localhost service just in case, otherwise, you would want to ensure you added/editied the php.ini correctly for the most common reason.
Admin
Vittorio
I think
@ini_set( ‘upload_max_size’ , ’64M’ );
should be
@ini_set( ‘upload_max_filesize’ , ’64M’ );
WPBeginner Support
upload_max_size currently increases that value as well as a few other things which is why we don’t use upload_max_filesize
Admin
MFoale
Thank you. The 3rd method worked for me. Very useful post and video.
WPBeginner Support
You’re welcome, glad we were able to help
Admin
Masud Rana
Wow !its work. Thanks
WPBeginner Support
Glad our guide could help you
Admin
Oliver
IT WORKS!!! THANKS
I made a file ini.php then uploaded it, then renamed it from ini.php.txt to ini.php and it worked.
thanks
WPBeginner Support
You’re welcome, glad our guide was able to help
Admin
Brad
None of these works
WPBeginner Support
If our recommendations do not work you would want to reach out to your hosting provider to ensure they do not have it as part of their settings.
Admin
Arivazhagan
Method 2 worked for me thanks a lot ive been struggling with this for two days …
WPBeginner Support
You’re welcome, glad our recommended solution was able to help you
Admin
Sujan Chakraborty
you are great.I fix my problem by reading you post.Tnx
WPBeginner Support
Glad our article could be helpful
Admin
Krakawid
Method 3 worked
WPBeginner Support
Glad our recommendation worked for you
Admin
Tung
Method 1 worked wonders for me. Thanks a bunch!
WPBeginner Support
You’re welcome, glad our recommendation worked for you
Admin
Trasadu
Thanks Method 3 really worked for me.
WPBeginner Support
Glad our recommendation was helpful
Admin
Asad
How can i increase the upload limit while i have the wordpress hosting also functions.php isn’t updating
WPBeginner Support
If the file will not update, you would want to reach out to your hosting provider and they should be able to assist
Admin
Chris
I want to increase the limit to 250mb but i dont know if this exposes my site to security treats, though am only using gravity form and I have also set to disable php execution on my upload folder. And have allowed only jpg, and mp3 files.
Please do you think this may affect my site load times as huge upload is coming from several users?
WPBeginner Support
If multiple users attempt uploads at the same time it can have an effect on your site’s load time but it shouldn’t open you to security threats
Admin
Vinod
Thanks a lot!!! Method 3 worked for me
WPBeginner Support
Glad our recommendation worked for you
Admin
Janice
Nice article, but I tried adding your 3 lines of code to the functions.php file, but got an “unknown @ rule” error. What’s that all about?
WPBeginner Support
It would depend on the entire error but it could have been a hiccup with how the code was inserted, you may want to take a look at our guide here: https://www.wpbeginner.com/beginners-guide/beginners-guide-to-pasting-snippets-from-the-web-into-wordpress/
Admin
Abduaziz
Thanks a lot!!! Method 3 worked for me
WPBeginner Support
Glad our recommendation could help
Admin
Alexander Gartley
Thanks, this helped me troubleshoot an upload limit. I’m on a WordPress multisite network install, so it ended up being a setting in the Network Admin Settings.
I was confused at first, because my php settings were allowing larger uploads, but it was restricted in the Network Settings.
WPBeginner Support
Thanks for sharing what solved the problem for you
Admin
Ernesto
Would have been great if you have included the .user.ini method.
.user.ini uploaded in the root folder with the same value/text in your edited php.ini
Most of the time, only this method works for shared hosting.
ErnestPH
WPBeginner Support
The php.ini file should work the same as the user.ini file unless your specific host ignores the php.ini but thank you for sharing your recommendation
Admin
Mark
This is the only solution that works on my shared hosting server. Thanks Ernesto!
Tamir Davidoff
Not working for me.
I have followed this guide and double checked the php.ini file to make sure that the changed are in fact saved. changed htaccess file to increase limits. and also tried modifying the phpMyAdmin httpd-app.conf and php-settings.conf file. All of these files reflect max upload higher than 40m and my WP site does not reflect Any of these changes. Really frustrated here.
Please help me, thanks !
WPBeginner Support
If you haven’t already, you would want to reach out to your hosting provider to ensure there is not a setting on their end that is overriding what you are setting
Admin
rajesh
i have tried all 3 method none of them worked. i am trying to upload newspaper theme in my in my wordpress site. but every time it show that php.ini file upload max file size.
plz help me
WPBeginner Support
You would want to reach out to your hosting provider to ensure they don’t have a setting that is overriding the changes you made.
Admin
Adam Walsworth
Watchout for hidden php.ini files. In my setup I found 2 of them. The one which I found actually resolved the issue was found under
./etc/php/7.0/apache2/php.ini
modifying this file fixed my issue.
WPBeginner Support
Thanks for sharing your solution, with where that file is located we would recommend most users reach out to their hosting provider before looking in locations like that.
Admin
Rafiq khan
Thanks buddy i have solved my problem by adopting method 2 by editing my php.ini file
Thanks alot you are working great
WPBeginner Support
Glad our article could help
Admin
Carla
None of the above worked for me. A matter of fact, editing the htaccess file broke my site even after deleting the above code. Overwriting with a new file fixed the problem though.
I have a dedicated server on Bluehost. What worked for me was going in the WHM root, not cpanel nor FTP access. Search for MultiPHP INI Editor. Give it at least 5 minutes to load if you only see the title and icon. You can set you upload time, post size, etc. there. Works instantly, even if your site is using Cloudflare, without placing it in development mode or clearing the cache. I hope this helps someone.
WPBeginner Support
Thank you for sharing what worked for you, should other users be on a dedicated server, if they reach out and let BlueHost know the need to increase the upload size then BlueHost can normally edit that for them
Admin
Pezza
Great Stuff! .htaccess worked for me!
WPBeginner Support
Thank you, glad our guide could help
Admin
ReineR
htaccess metod worked for me, thanks!
WPBeginner Support
Glad our article could help
Admin
Ahmed
Work for me
3. htaccess Method
you need to click (show hidden files to view and edit this file).
WPBeginner Support
Glad our article could help
Admin
rahul
when i tried this
Unable to communicate back with site to check for fatal errors, so the PHP change was reverted. You will need to upload your PHP file change by some other means, such as by using SFTP.
this happened to me
whats the solution of this
WPBeginner Support
You would need to use FTP rather than WordPress itself to add the code: https://www.wpbeginner.com/beginners-guide/how-to-use-ftp-to-upload-files-to-wordpress-for-beginners/
Admin
Ephraim
I had been trying php.ini method but it never works please how will I set it..
Or you should please tell me the were to paste at function.php
WPBeginner Support
You would normally use a text editor to set the content in the php.ini file. For your functions.php it should go at the end normally so it can be removed later as needed. You may also want to check with your hosting provider if you are having trouble with these methods for if they can assist in increasing the file size for you.
Admin
Ivos G.
None worked for me. But this one fixed it – add to your .htaccess this line:
LimitRequestBody 104857600
WPBeginner Support
Thanks for sharing your solution for this issue
Admin
Achilleas
I am using Nginx and i had already setup properly the values for php in the php.ini but what fixed it was puting the same value in the server block with the variable client_max_body_size xxxM;
I am writing this hoping it will help someone.
Editorial Staff
Thank you for sharing this with us
Admin