Vi ritrovate a passare costantemente da WordPress a un editor di foto solo per mettere in scala di grigi le immagini prima di caricarle? È un processo noioso e inefficiente modificare singolarmente ogni foto prima di caricarla.
Fortunatamente, grazie ad anni di sperimentazione su WordPress, abbiamo scoperto un modo semplice per rendere automaticamente le immagini in scala di grigi durante la carica, salvando tempo prezioso.
In questo articolo vi mostreremo, passo dopo passo, come scalare le immagini in grigio in WordPress mentre le caricate sul vostro sito.

Quando utilizzare immagini in scala di grigi in WordPress?
Le immagini in scala di grigi contengono solo informazioni sulla quantità di luce presente nell’immagine. I colori delle immagini mostrano diverse tonalità di grigio, che variano tra il nero e il bianco.
In determinate situazioni, l’uso di immagini in scala di grigi può essere vantaggioso per il vostro sito web WordPress. Ad esempio, è possibile utilizzarle per migliorare la leggibilità degli oggetti mostrati nell’immagine.
D’altra parte, le immagini in scala di grigi sono comunemente utilizzate per l’elaborazione delle immagini grazie alle loro dimensioni ridotte. Ciò consente agli sviluppatori di eseguire operazioni complesse in tempi più brevi.
Detto questo, vediamo come trasformare le immagini in scala di grigi in WordPress al momento dell’uploader.
Immagini in scala di grigi in fase di uploader in WordPress
Quando si tratta di aggiungere immagini in WordPress, è necessario modificarle prima dell’uploader utilizzando un software di editing fotografico come Photoshop e convertendo le immagini colorate in scala di grigi.
Se si hanno centinaia o migliaia di immagini da uploader, può essere necessario molto tempo per modificare manualmente ogni immagine.
Tuttavia, è possibile trasformarle automaticamente in immagini in scala di grigi al momento dell’uploader. Per iniziare, basta aggiungere il seguente codice al file functions.php del tema:
1 2 3 4 5 6 7 8 9 10 11 12 13 14 15 16 17 18 19 20 21 22 23 24 25 26 27 28 29 30 31 32 33 34 | add_filter('wp_generate_attachment_metadata','rb_bw_filter'); function rb_bw_filter($meta) { $path = wp_upload_dir(); // get upload directory $file = $path['basedir'].'/'.$meta['file']; // Get full size image $files[] = $file; // Set up an array of image size urls foreach ($meta['sizes'] as $size) { $files[] = $path['path'].'/'.$size['file']; } foreach ($files as $file) { // iterate through each image size // Convert image to grayscale credit to http://ottopress.com/2011/customizing-wordpress-images/ list($orig_w, $orig_h, $orig_type) = @getimagesize($file); $image = wp_load_image($file); imagefilter($image, IMG_FILTER_GRAYSCALE); switch ($orig_type) { case IMAGETYPE_GIF: imagegif( $image, $file ); break; case IMAGETYPE_PNG: imagepng( $image, $file ); break; case IMAGETYPE_JPEG: imagejpeg( $image, $file ); break; } } return $meta;} |
Un modo semplice per aggiungere codice ai file del tema è utilizzare il plugin WPCode per WordPress.
È il miglior plugin per gli snippet di codice che consente di eseguire gli snippet di codice senza dover modificare manualmente il file function.php del tema. In questo modo, non dovrete preoccuparvi di rompere il vostro sito.

Per prima cosa, dovrete scaricare e installare il plugin gratuito WPCode sul vostro sito. Se avete bisogno di aiuto, seguite la nostra guida su come installare un plugin di WordPress.
Nota: la versione gratuita di WPCode offre tutto ciò che serve per aggiungere facilmente codice personalizzato in WordPress. Per caratteristiche più avanzate, come una libreria di snippet in cloud privata, snippet programmati, sgranati di conversione e altro ancora, potete passare a WPCode Pro.
Dopo l’attivazione, potete andare su Code Snippets ” + Aggiungi nuovo dalla vostra dashboard di WordPress.
Quindi, passare all’opzione “Aggiungi codice personalizzato (nuovo snippet)” e fare clic sul pulsante “Usa snippet”.

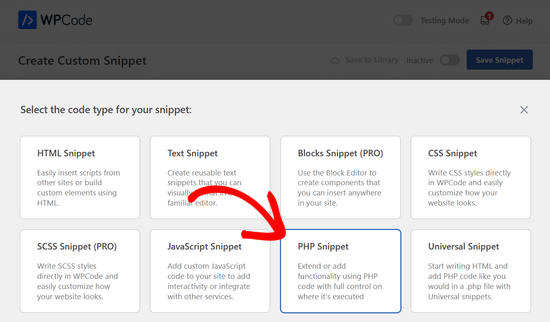
Successivamente, è necessario selezionare “PHP Snippet” come tipo di codice dalle opzioni che appaiono.

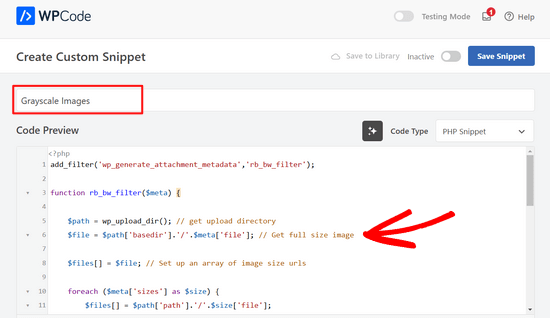
A questo punto, nella pagina Crea snippet personalizzato, inserire un nome per il proprio snippet. Può essere qualsiasi cosa che aiuti a ricordare a cosa serve il codice.
Quindi, incollare il codice sopra riportato nell’area “Anteprima codice”.

Dopo aver inserito il codice, è possibile scorrere giù fino alla sezione “Inserimento”.
Qui si può lasciare selezionata l’opzione “Inserisci automaticamente”. In questo modo il codice verrà inserito ed eseguito automaticamente.

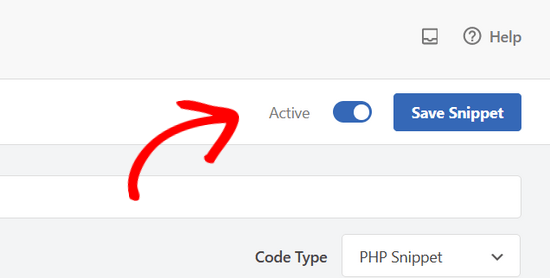
Infine, tornate in alto nello schermo, spostate l’interruttore da ‘Inattivo’ ad ‘Attivo’ e fate clic sul pulsante ‘Salva snippet’.

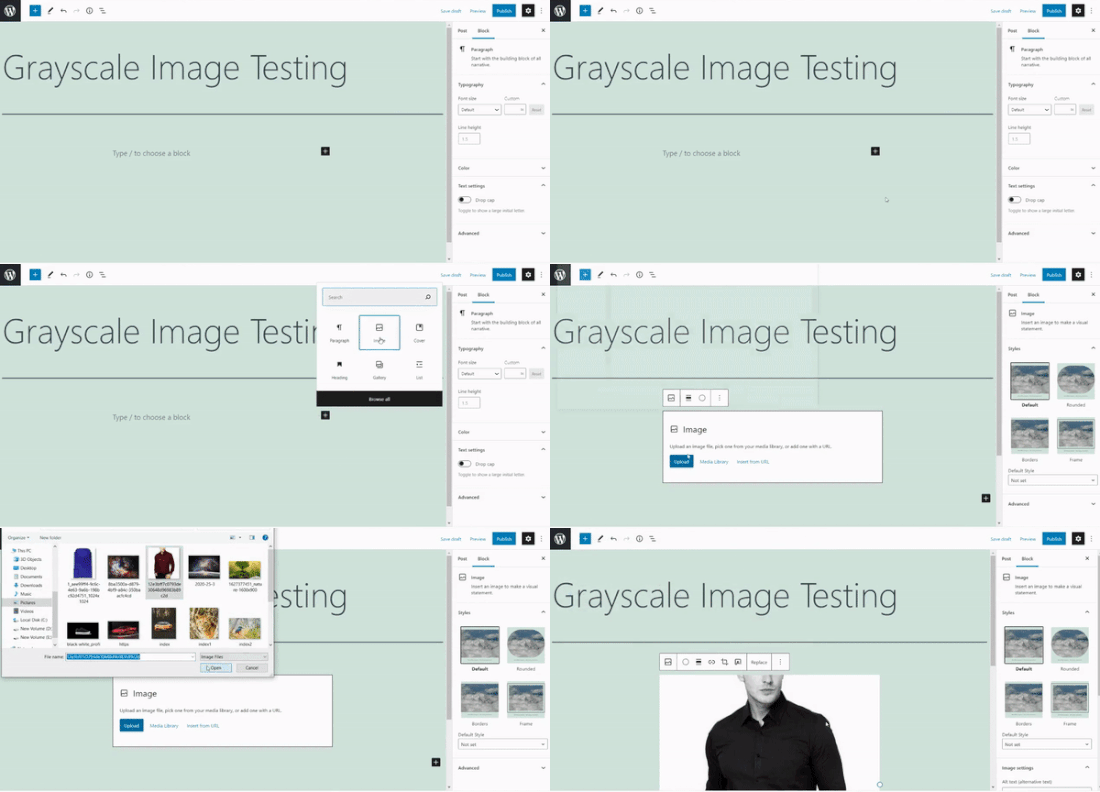
Quindi, si può testare il codice modificando o aggiungendo una nuova pagina. Nell’editor di WordPress, fare clic sul pulsante ‘+’ e aggiungere un blocco immagine.
Ora potete caricare qualsiasi immagine sul vostro blog WordPress e la convertirà automaticamente in un’immagine in scala di grigi.

Ci auguriamo che questo articolo vi abbia aiutato a imparare come scalare i grigi delle immagini in WordPress. Potete anche selezionare la nostra guida su come add-on la modalità scura al vostro sito WordPress e le nostre verifiche sui migliori software di web design.
Se questo articolo vi è piaciuto, iscrivetevi al nostro canale YouTube per le esercitazioni video su WordPress. Potete trovarci anche su Twitter e Facebook.


Tomas Kapler
Great tip, i would just like to mention, that for many usages it might be better to simply do this via CSS filter, e.g.
img.bw {
filter: grayscale(1);
}
you can even e.g. show b/w by default and color on hover, or you can do animation from greyscale to full color and back, e.g.
img.bw {
filter: grayscale(0);
}
img.bw.grey {
filter: grayscale(1);
transition-property: filter;
transition-duration: 1s;
}
i also do not think, that wp_generate_attachment_metadata filter is the proper one, that should be used because of its calling in meta creation not only image creation and making second image manipulation, but the proper solution would be much longer, so i understand why it is done this way
rok
It works nice but when uploading, WP 4.3 throws error in media library.
i think have applied all fixes written in comments, but still error.
my code looks like this:
add_filter(‘wp_generate_attachment_metadata’,’themename_bw_filter’);
function themename_bw_filter($meta) {
$time = substr( $meta[‘file’], 0, 7); // <- get the correct time of the upload
$file = wp_upload_dir( $time ); // <- locates the correct upload directory
$file = trailingslashit($file[‘path’]).$meta['sizes']['slide-pic']['file'];
if( $file ) {
list($orig_w, $orig_h, $orig_type) = @getimagesize($file);
}
$image = wp_load_image($file);
imagefilter($image, IMG_FILTER_GRAYSCALE);
switch ($orig_type) {
case IMAGETYPE_GIF:
imagegif( $image, $file );
break;
case IMAGETYPE_PNG:
imagepng( $image, $file );
break;
case IMAGETYPE_JPEG:
imagejpeg( $image, $file );
break;
}
return $meta;
}
Kim
Will this change all pictures in word press to grayscale or only newly updates ones?
Tomaž Zaman
I know I’m a bit late to the discussion, but I just had the same problem with an error (that others report):
imagefilter() expects parameter 1 to be resource, string givenThis happens when you try to upload image through media modal while editing a post, older than the current month which apparently confuses WordPress which directory the original image is in and which directory it should save the grayscaled image in.
This is the solution:
<?php

add_filter('wp_generate_attachment_metadata','themename_bw_filter');

function themename_bw_filter($meta) {

  $time = substr( $meta['file'], 0, 7); // <- get the correct time of the upload

  $file = wp_upload_dir( $time ); // <- locates the correct upload directory

  $file = trailingslashit($file['path']).$meta['sizes']['themename-bw-image']['file'];

  list($orig_w, $orig_h, $orig_type) = @getimagesize($file);

  $image = wp_load_image($file);

  imagefilter($image, IMG_FILTER_GRAYSCALE);

  switch ($orig_type) {

    case IMAGETYPE_GIF:

      imagegif( $image, $file );

      break;

    case IMAGETYPE_PNG:

      imagepng( $image, $file );

      break;

    case IMAGETYPE_JPEG:

      imagejpeg( $image, $file );

      break;

  }

  return $meta;

}
endul
how to change, result filter image to specific folder/directory
geertvdheide
One addition: I’ve added a few lines to get around the issue of having two images with the same file name, caused by having two add_image_size calls with the same size. The additional code was found here:
http://bavotasan.com/2011/create-black-white-thumbnail-wordpress/
mklemme
@geertvdheide
If you wanted to add multiple size support, try what I use:
if ( function_exists( ‘add_theme_support’ ) ){
add_theme_support( ‘post-thumbnails’ );
set_post_thumbnail_size( 50, 50, true );
add_image_size( ‘medium-thumb’, 660, ”, true );
add_image_size( ‘large-thumb’, 960, ”, true );
add_image_size( ‘small-thumb’, 100, ”, true );
}
(The height is not defined, only the width.)
you would have to add the different names to make the function apply to them all:
[‘medium-thumb’ , ‘large-thumb’ , ‘small-thumb’] in the filter code.
Calling the thumbnail in your theme is the same listed in the article:
Mike Logan
Excellent idea, almost 10 years later this is still handy.
geertvdheide
Thanks for sharing this code! Except I’m running into a weird issue when trying to implement it. It’s related to the uploaded image’s size (pixel size, meaning its dimensions). Copied the code literally to my theme’s functions.php, and it works a charm with images larger than the size specified in the add_image_size call. But when using an image smaller than or equal to the size specified, the uploader in WordPress gives me errors and doesn’t process the image size (either from the media section of the admin environment, or from a specific post or page). The error:
Warning: imagefilter() expects parameter 1 to be resource, string given.
Ssome other stuff in the error as well, but this seems to be the main cause. The image data given to the imagefilter function must not be valid or doesn’t exist?
Any idea what’s causing this? The only real difference between my situation and a clean install is that I’ve also added a few other add_image_size calls for other purposes in my site. I’m also adding the same size twice (one black/white, one regular), but that doesn’t seem to be a problem with the larger images.
Ed Nailor
@GEERTVDHEIDE
and for others that need this:
When the script is converting the image to greyscale and the file uploaded does not fit the file size, this causes the script to break. To prevent this, simply add a quick if() conditional to make sure you have the $file.
$file = trailingslashit($file[‘path’]).$meta[‘sizes’][‘themename-bw-image’][‘file’];
if( $file ) {
list($orig_w, $orig_h, $orig_type) = @getimagesize($file);
——– remainder of code until ——–
return $meta;
}
This will check to make sure the file size you have requested exists before it tries to convert it.
Hope that helps!
frankiegershwin
@Otto42 Thanks for offering. I will.
Otto42
@frankiegershwin bummer! Feel free to email me directly for code help. otto@wordpress.org
frankiegershwin
@Otto42 thank you! I had a bit of a hard time, actually and had to undoe it will pick it up tomorrow. It’s a good way to mix it up onsite
Otto42
@frankiegershwin Lemme know if you need help. I added a way to do sepia tones too in my comments on the original post: http://t.co/avDNNEX
rodhk
@rodriguezhernan vaya idiotez de truco…. madremua tocar el codigo para eso
wpbeginner
@Otto Thanks for the comment Otto. Updated the post as well
Otto
Note that people should change “themename” to be the name of their theme instead.