If you’ve noticed that your website’s navigation menu appears underneath the WordPress admin bar, then you’re not alone. This is a common issue, and we have seen it on many websites.
This issue can be frustrating, especially when it hides parts of your menu or makes it difficult for logged-in users to click.
We have noticed that it usually occurs due to theme or CSS conflicts. But the good news is that it can be fixed quickly.
In this article, we will show you what to do when the WordPress navbar is under the admin bar, starting with a simple, non-technical solution that doesn’t require any coding.
Why Is the WordPress Admin Bar Overlapping the Navigation Menu?
If your WordPress navigation menu seems to be hidden or overlapping with the admin bar, you might be dealing with a common display issue.
We have seen this problem occur when a theme’s CSS doesn’t properly account for the height of the admin bar. The CSS then obscures parts of your site’s header, including the navigation menu.
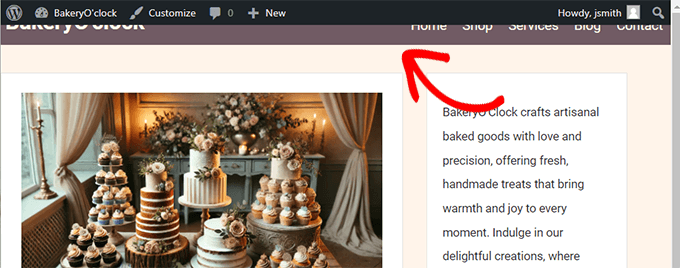
You might notice that some menu items are difficult to click or that the entire menu is partially covered when viewing your site. This can be frustrating, especially when it affects the usability of your website.
There are a few common reasons why this might happen:
- Theme Conflicts: Sometimes, the CSS in your theme doesn’t account for the admin bar, causing the menu to be positioned incorrectly.
- Plugin Conflicts: A plugin that modifies the front-end design could unintentionally cause the menu to overlap with the admin bar. This may include plugins that add mega menus or header banners.
- Custom CSS: If you’ve added custom CSS to your site, it might be interfering with the proper display of your menu.
This issue can affect the usability of your site, making it harder for users to navigate. Fortunately, there are several ways to fix this problem, starting with a simple solution that doesn’t require any coding.
Here is an overview of the solutions we will show. You can jump to the one that looks easier to you:
Solution 1: Hide the Admin Bar via User Profile Settings
This solution is ideal for users who want a quick and easy fix without having to deal with any code. It’s perfect for beginners or anyone who might be worried about accidentally breaking their site’s layout.
Additionally, if you don’t have permission to edit your site’s CSS or theme files, this method provides a simple way to avoid the problem without making permanent changes.
Note: This solution applies at the user level, which means other users on your site will need to log in to their accounts and repeat the following steps.
First, you need to log in to your WordPress dashboard. Then navigate to the Users » Profile page in the left-hand menu.
Scroll down to the Toolbar section and then uncheck the box next to the ‘Show Toolbar when viewing site’ option.
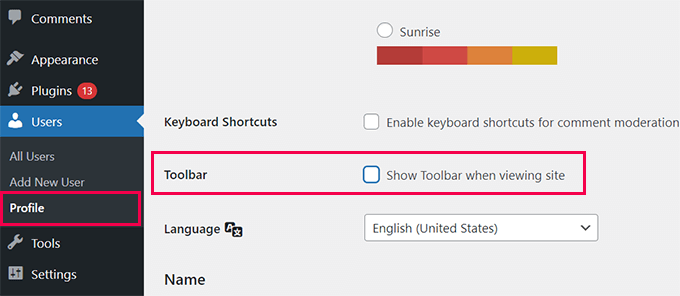
After that, don’t forget to click the ‘Update Profile’ to save your changes.
Why This Works
Hiding the admin bar prevents it from interfering with the navigation menu on the front end of your site. Since the admin bar is not displayed, the overlapping issue is temporarily resolved, making your menu fully accessible to both you and your visitors.
Solution 2: Manually Adjusting the Theme’s CSS
If you’re comfortable working with HTML and CSS or want a more permanent solution to the overlapping menu issue, you should adjust your theme’s CSS.
This solution is ideal for users who have the necessary user permissions to edit their site’s appearance and want to fix the problem at its source.
1. Inspect the Issue:
First, you need to use the Inspect tool in your browser to determine where to add the custom CSS. We have a detailed guide for DIY beginners on using the Inspect tool.
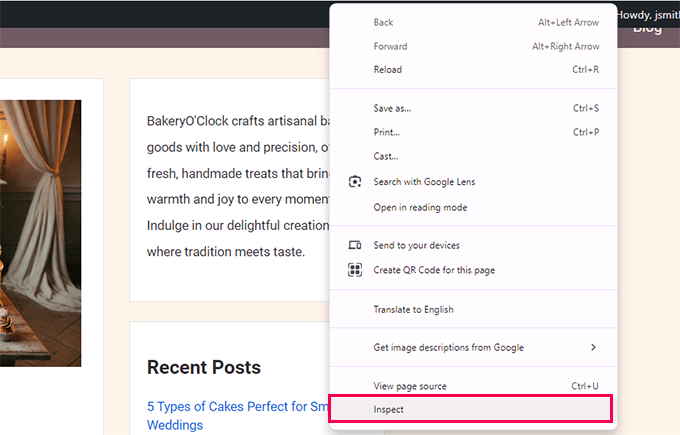
First, right-click on your navigation menu and select ‘Inspect’ (in Chrome) or ‘Inspect Element’ (in Firefox).
This will open the developer tools, which will show the HTML and CSS for the element.
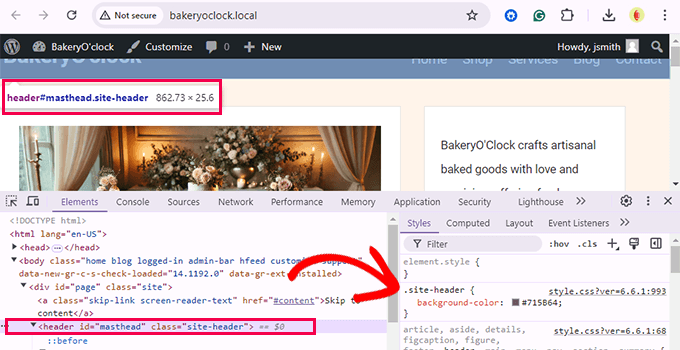
In the code, you need to locate CSS classes or IDs used by your theme to display the header or navigation menu areas. For instance, in the above screenshot, our demo site uses the .site-header class for the affected area.
Tip: Move your mouse over HTML, and your browser will highlight the area in the preview window. Right-click on HTML and then look under ‘Styles’ to find the CSS properties.
Add Custom CSS Using WPCode
Next, you will need to install and activate the WPCode plugin. It is the best WordPress custom code plugin, making adding custom CSS to your website very easy regardless of your theme.
Another reason to use WPCode is its conditional logic rules. Since this issue only affects logged-in users, we will need these rules to add our code for logged-in users only.
Go ahead and install and activate the WPCode plugin. For more details, see our tutorial on how to install a WordPress plugin.
Note: A free version of WPCode is also available and would work for this tutorial. However, we recommend upgrading to a paid plan because it gives you access to more features.
Once activated, navigate to the Code Snippets » + Add Snippet page in your WordPress dashboard.
On the next page, the plugin will show you a bunch of ready-to-use code snippets. However, we will be writing custom CSS code.
To do that, move your mouse to the ‘Add Your Custom Code (New Snippet)’ box and click the ‘+ Add Custom Snippet’ button.
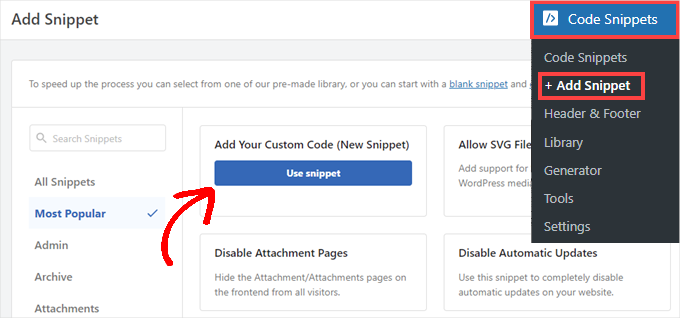
This will take you to the code editor page.
Here, enter a name for your code snippet and then select CSS Snippet from the ‘Code Type’ drop-down.
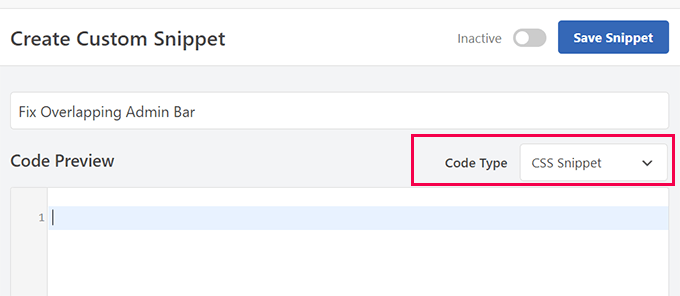
After that, add the following code into the ‘Code Preview’ box:
1 2 3 4 5 6 | #your-menu-id .your-menu-class { margin-top: 40px; /* Adjust this value based on your theme */ z-index: 10001; position: relative; padding-top:40px} |
In this code snippet, you will need to replace #your-menu-id and .your-menu-class with the values you want to target in the HTML.
Here is how we added it to our test site and adjusted it to target the affected area.
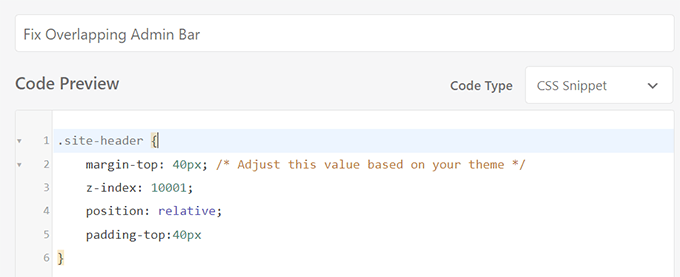
The CSS contains four rules.
First are the margin-top and padding-top rules. Since the admin bar has a fixed height of 32 pixels, you will use that to compensate for conflicting CSS.
Next, the admin bar also has a z-index value set to 9999. This rule pushes it to the front of the display. By using a z-index rule with a higher value, you move your header or navigation area to the front.
The position rule is set to relative so that you can use the z-index rule.
After adding your custom CSS rules, you need to tell WPCode to only use this CSS code when a logged-in user is viewing the site.
Scroll down to the Smart Conditional Logic section and toggle the switch next to the ‘Enable Logic’ option.
After that, simply set the condition option to ‘Show’ and then click ‘+Add new group’.
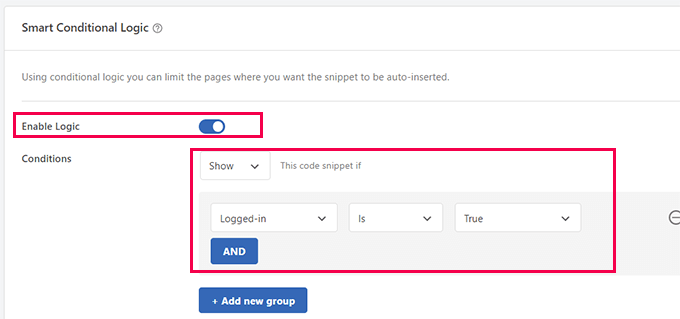
Under the logic rules, you need to select ‘Logged-in’ > ‘Is’ > ‘True.’
Finally, at the top-right corner of the screen, just click ‘Save Snippet’ and switch it from Inactive to Active.
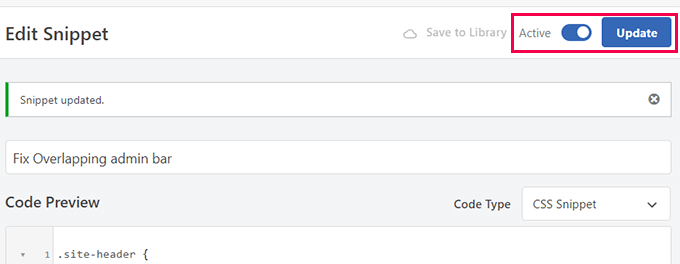
You now need to visit your site and check if the navigation menu and header area now appear correctly above the admin bar.
If you don’t get it right the first time, then try adjusting the margin-top value or targeting different ID or CSS classes.
Why This Works
The problem often occurs because the theme’s CSS doesn’t properly account for the admin bar, causing the navigation menu to be displayed underneath it. By adding a small snippet of custom CSS, you can adjust the positioning of the navigation menu, ensuring it appears correctly above the admin bar.
Bonus Tip 💡 : Are you having trouble with CSS issues? You can hire our WordPress Emergency Support. For a small fee, our WordPress developers will fix the issue for you in no time, and you can get back to growing your business.
Solution 3: Checking for Plugin Conflicts
If you’ve tried the previous solutions and the issue is still there, then it might be caused by a plugin conflict.
Plugins can sometimes introduce CSS or JavaScript that interferes with your theme’s layout. This interference can cause issues like the navigation menu appearing under the admin bar.
Identifying the conflicting plugin can resolve the issue without changing your theme’s code.
1. Deactivate All Plugins:
First, go to your WordPress dashboard and navigate to Plugins » Installed Plugins.
Select all plugins by checking the box next to Plugin at the top of the list.
You need to choose ‘Deactivate’ from the bulk actions dropdown and click ‘Apply’.
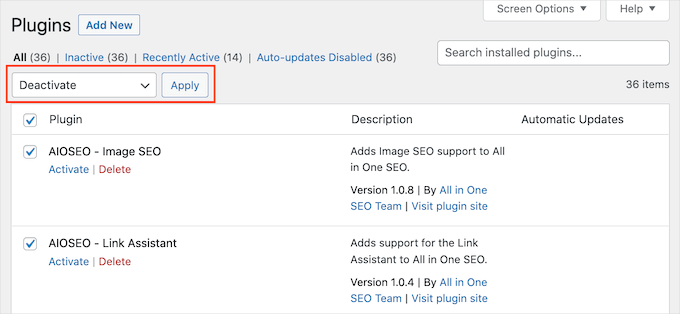
Now, simply visit your site to see if the issue has been resolved. If the navigation menu is now displaying correctly, one of the plugins likely caused the problem.
2. Identify The Conflicting Plugin
To figure out which plugin was causing the issue, go back to the Installed Plugins page.
You will have to reactivate each plugin one at a time, checking your site after each activation. Repeat until the problem appears after activating a specific plugin.
Once the problem reappears, you have successfully identified the plugin causing the conflict.
What to Do Next
If you identify a conflicting plugin, consider reaching out to the plugin’s developer for support. They may offer a fix or update to resolve the issue. Alternatively, you can look for a different plugin that provides similar functionality without causing conflicts.
Additional Resources for WordPress Admin
Here are a few more resources that you may find helpful:
- How to Disable WordPress Admin Bar for All Users Except Administrators
- How to Fix Missing Admin Bar Issue in WordPress (3 Ways)
- How to Add Custom Shortcut Links to Your WordPress Admin Toolbar
- Beginner’s Guide to Troubleshooting WordPress Errors (Step by Step)
Hopefully, the solutions we shared will resolve the admin bar causing the navigation menu or header display issue on your website.
You may also want to see our handbook on fixing the most common WordPress errors or take a look at our tips on customizing the WordPress admin area to your requirements.
Se questo articolo vi è piaciuto, iscrivetevi al nostro canale YouTube per le esercitazioni video su WordPress. Potete trovarci anche su Twitter e Facebook.


Have a question or suggestion? Please leave a comment to start the discussion.