A volte, i commenti potrebbero scomparire dai tuoi tipi di post personalizzati dopo essere passato a Disqus.
Abbiamo usato Disqus in passato, quindi abbiamo molta familiarità con le stranezze dello strumento e abbiamo scoperto che questo può accadere se i tuoi commenti non vengono migrati correttamente.
Fortunatamente, esiste una soluzione rapida e semplice.
In questo articolo, ti mostreremo come disabilitare il sistema di commenti Disqus sui tipi di post personalizzati in WordPress. Seguendo alcuni semplici passaggi, puoi risolvere questo problema e far tornare i tuoi commenti al loro posto.
Perché abbiamo abbandonato Disqus
In passato, abbiamo sperimentato l'uso del sistema di commenti Disqus su WPBeginner. Tuttavia, siamo rapidamente tornati ai commenti predefiniti di WordPress.
Ci sono state diverse ragioni per cui abbiamo abbandonato Disqus, ma all'inizio, abbiamo notato che alcuni commenti non apparivano sui nostri tipi di post personalizzati dopo essere passati a Disqus.
Se stai ancora usando Disqus per gestire e moderare i commenti in WordPress, allora una soluzione è importare manualmente questi commenti. Tuttavia, questo può richiedere molto tempo e sforzo, in particolare se i tuoi post personalizzati hanno molti commenti.
Fortunatamente, esiste una soluzione alternativa più veloce per gli utenti Disqus. Tenendo presente questo, vediamo come puoi disabilitare rapidamente e facilmente Disqus per i tipi di post personalizzati.
Disabilitare Disqus sui tipi di post personalizzati in WordPress
Prima di iniziare, è necessario assicurarsi di aver abilitato la sincronizzazione tra Disqus e il tuo sito web WordPress.
Nel menu a sinistra, seleziona Disqus e quindi fai clic sulla scheda 'Syncing'. Puoi quindi fare clic su 'Enable Auto Syncing' se non è già attivo.
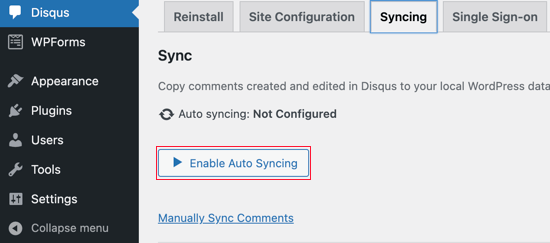
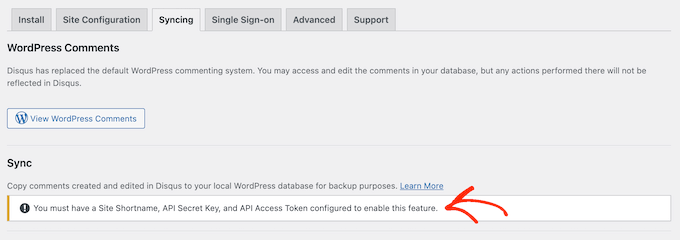
Nota: A questo punto, potresti visualizzare il seguente errore: "È necessario disporre di un nome breve del sito, una chiave API segreta e un token di accesso API configurati per abilitare questa funzionalità."
Se ciò accade, ti mostreremo come risolvere l'errore alla fine del post.
Dopodiché, devi aggiungere del codice al tuo sito WordPress.
Spesso, i tutorial ti chiederanno di modificare direttamente i file functions.php del tuo tema, ma non raccomandiamo questo approccio, poiché un piccolo errore potrebbe causare una serie di errori comuni di WordPress o addirittura danneggiare completamente il tuo sito.
Detto questo, raccomandiamo invece di utilizzare il plugin gratuito WPCode. È il modo più semplice e sicuro per aggiungere codice personalizzato in WordPress.
Abbiamo testato a fondo lo strumento e lo abbiamo trovato estremamente affidabile. Per saperne di più, consulta la nostra recensione di WPCode.
Note: You can also switch to WPCode’s pro plan to unlock the cloud library of code snippets, custom block creation, smart conditional logic, and more.
Upon activation, visit the Code Snippets » + Add Snippet page in your WordPress dashboard.
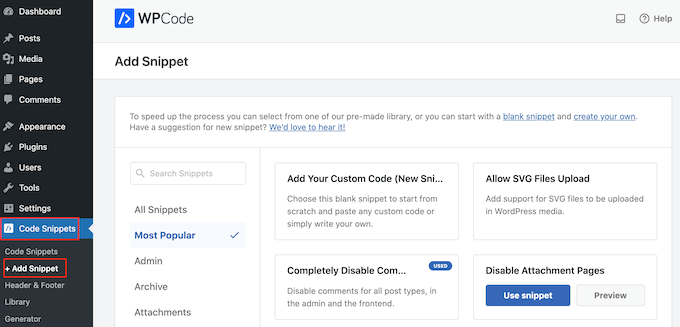
Here, you will see all the different ready-made snippets that you can add to your site. These include snippets that allow you to disable widget blocks in WordPress and remove the WordPress version number.
To add your own snippet, hover over ‘Add Your Custom Code’ and then click ‘Use snippet.’
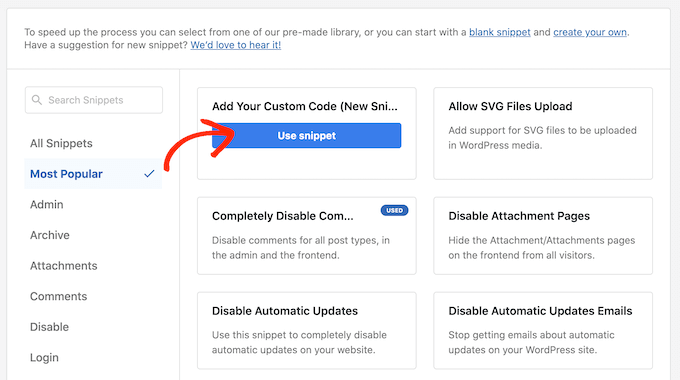
In questa schermata, digita un titolo per lo snippet di codice personalizzato. Può essere qualsiasi cosa che ti aiuti a identificare lo snippet PHP.
Successivamente, apri semplicemente il menu a discesa 'Tipo di codice' e seleziona 'Snippet PHP'.
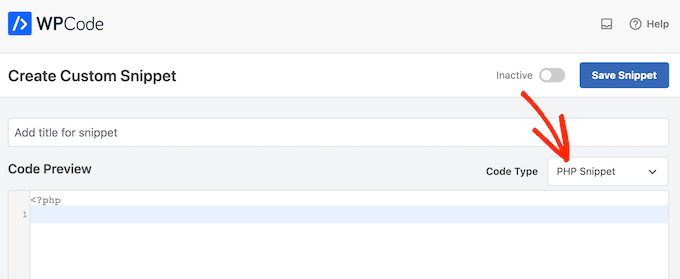
Dopodiché, incolla semplicemente il seguente snippet di codice nell'editor:
function filter_dsq_can_load( $script_name ) {
if ( is_singular( 'custom_post_type_name' ) ) {
if ( 'count' === $script_name ) {
return false;
} elseif  ( 'embed' === $script_name ) {
return false;
} else {
return true;
}
}
}
add_filter( 'dsq_can_load', 'filter_dsq_can_load' );
Questo codice crea un filtro che controlla un tipo di post personalizzato specifico e quindi disabilita il template dei commenti di Disqus.
Tenendo presente ciò, assicurati di sostituire custom_post_type_name con il nome del tipo di post personalizzato in cui desideri disabilitare Disqus.
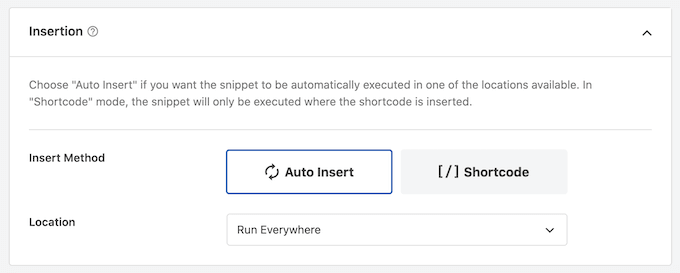
Sotto la casella del codice, vedrai le opzioni di inserimento. Se non è già selezionato, fai clic sul metodo 'Inserimento automatico' in modo che lo snippet venga inserito ed eseguito automaticamente su tutto il tuo blog WordPress.
Dopodiché, apri il menu a discesa 'Posizione' e fai clic su 'Esegui ovunque'.
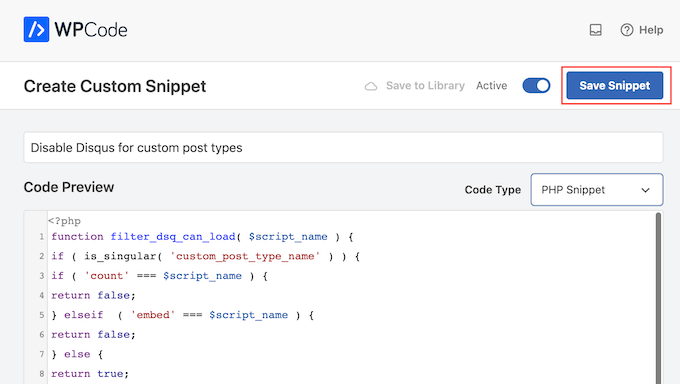
Quindi, scorri fino in cima alla schermata e fai clic sull'interruttore 'Inattivo' in modo che cambi in 'Attivo'.
Infine, procedi e fai clic su 'Salva' per rendere attivo lo snippet di Disqus.
Troubleshooting: Devi avere un nome breve del sito, una chiave segreta API e un token di accesso API
Quando provi ad abilitare la sincronizzazione automatica di Disqus, potresti ricevere un errore: "Devi avere un nome breve del sito, una chiave segreta API e un token di accesso API configurati per abilitare questa funzionalità."
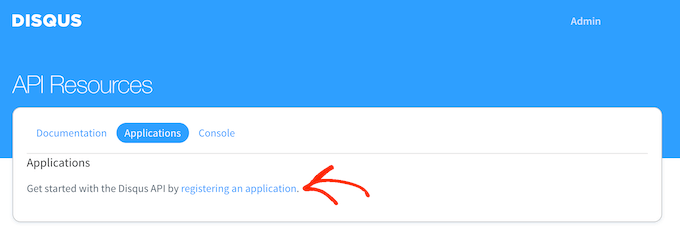
Se ciò accade, dovrai creare un'applicazione Disqus recandoti sul sito web di Disqus. Se non l'hai già fatto, puoi creare un account gratuito utilizzando il tuo indirizzo email o accedere utilizzando un altro account, come il tuo account Facebook o Twitter.
Fatto ciò, fai clic sul link 'Registrazione di un'applicazione'.
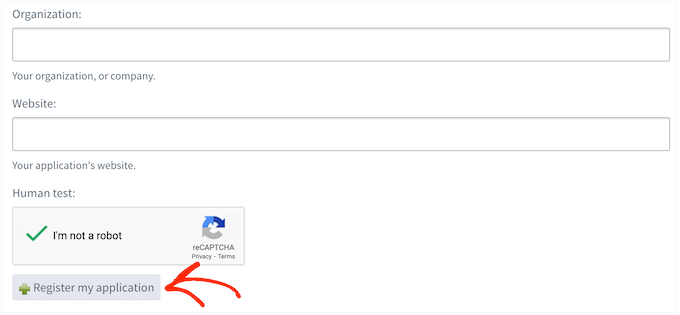
In questa schermata, puoi inserire alcune informazioni sulla tua applicazione, come il suo nome, la tua organizzazione e il sito web dove prevedi di utilizzare Disqus.
Quando sei soddisfatto delle informazioni che hai inserito, fai clic su ‘Registra la mia applicazione.’
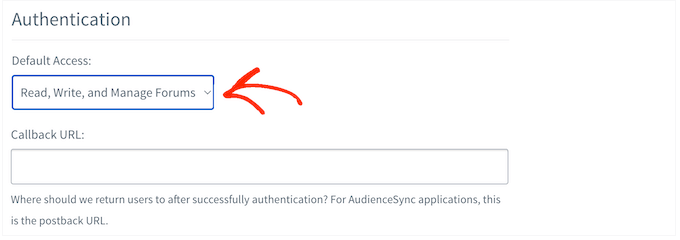
Fatto ciò, scorri fino alla sezione ‘Accesso predefinito’.
Ora puoi scegliere ‘Leggi, scrivi e gestisci forum’ dal menu a discesa.
Dopodiché, scorri fino in fondo alla schermata e fai clic su 'Salva modifiche'.
Ora puoi fare clic sulla scheda ‘Dettagli’.
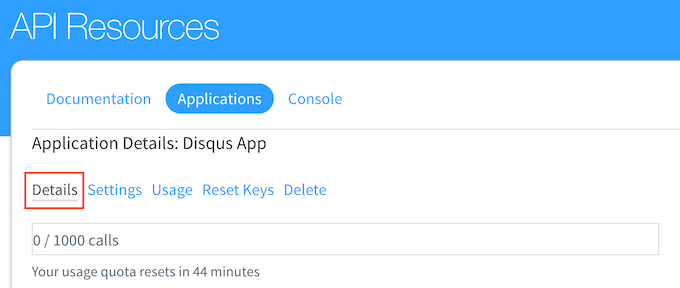
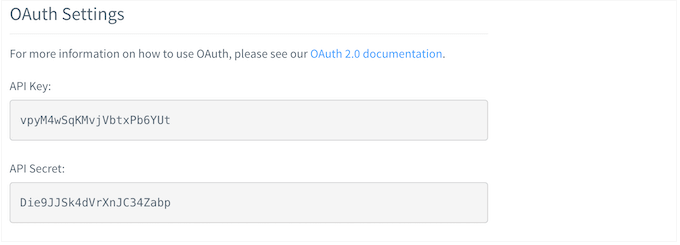
Dopodiché, scorri fino alla sezione ‘Impostazioni OAuth’.
Qui troverai la chiave API, il segreto API e il token di accesso. Dovrai aggiungere queste informazioni alle impostazioni del plugin Disqus.
Nella dashboard di WordPress, seleziona Disqus dal menu a sinistra.
Quindi, fai clic sulla scheda ‘Configurazione sito’.
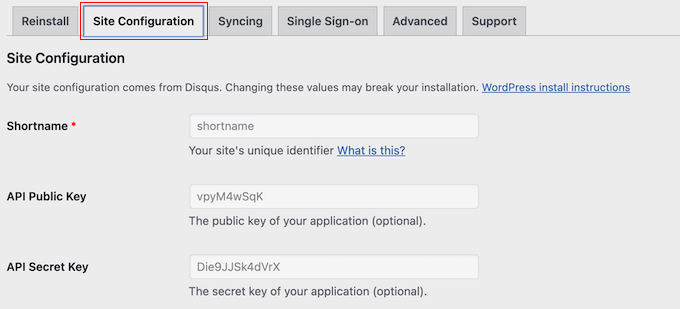
In questa schermata, devi selezionare il link ‘Fai clic per apportare modifiche’.
Ora puoi aggiungere la chiave API, il segreto API e il token di accesso nei diversi campi. Dovrai anche aggiungere il nome breve del tuo sito se non l'hai già fatto.
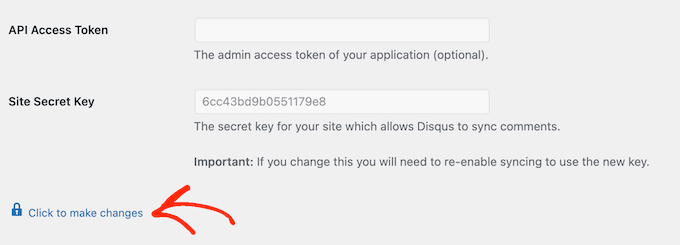
Fatto ciò, fai clic sul pulsante ‘Salva’.
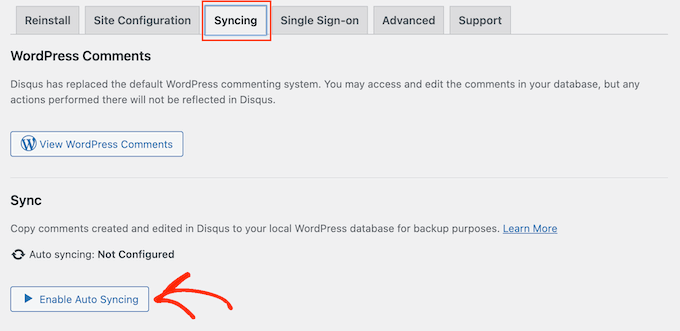
Ora, se selezioni la scheda ‘Sincronizzazione’, dovresti vedere un nuovo pulsante ‘Abilita sincronizzazione automatica’ invece di un errore.
Speriamo che questo tutorial ti abbia aiutato a imparare come disabilitare Disqus sui tipi di post personalizzati in WordPress. Potresti anche voler imparare come eliminare facilmente tutti i commenti di WordPress in blocco e consultare la nostra guida per principianti su come moderare i commenti di WordPress.
Se ti è piaciuto questo articolo, iscriviti al nostro canale YouTube per tutorial video su WordPress. Puoi anche trovarci su Twitter e Facebook.


Ludy Amano
Il nuovo plugin Disqus (2018) richiede alcune modifiche a questo codice per funzionare correttamente:
function filter_dsq_can_load( $script_name ) { // $script_name è o ‘count’ o ’embed’. if ( ‘count’ === $script_name ) { return false; }
return true; } add_filter( 'dsq_can_load', 'filter_dsq_can_load' );
Priyanka
Dobbiamo aggiungere questo codice insieme a quanto menzionato in questo blog?
Arta
Disgustoso….
Hemang Rindani
WordPress è un eccellente servizio di gestione di contenuti web aziendali che consente a un'azienda di controllare i siti web senza sforzo. Con strumenti integrati illimitati e la loro flessibilità e scalabilità, uno sviluppatore può progettare siti web per qualsiasi esigenza aziendale. È consigliabile mantenere il sito interessante, dove l'aggiunta di una casella di commenti giocherà un ruolo cruciale. Disqus è uno dei modi più semplici per aggiungere una casella di commenti su qualsiasi pagina, tuttavia a volte è essenziale disabilitarla su alcune sezioni in cui non si richiedono input dai lettori. Il metodo descritto nell'articolo è perfetto poiché l'ho implementato prontamente. Grazie per aver condiviso. Ritengo che Jetpack sia una buona alternativa. Consente ai tuoi lettori di connettersi al tuo sito web e lasciare un commento in diversi modi. Utilizza l'opzione di commento predefinita di WordPress, può connettersi a WordPress.com o consente agli utenti di accedere tramite Facebook, G+ e Twitter. Ci sono molte altre funzionalità che rendono Jetpack uno strumento eccellente.
Raunak Hajela
Ci hai mostrato come disabilitare disqus nei tipi di post personalizzati, ma per quanto riguarda l'abilitazione? Recentemente ho aggiunto disqus al mio tipo di post personalizzato per le interviste, ma non funziona. Perché? Ho creato due tipi di post personalizzati, ovvero Interviste e Blog. Funziona nel tipo di post del blog ma non nel tipo di post delle interviste. Dimmi come dovrei risolvere il problema.
Questo è il mio codice per entrambi i tipi di post personalizzati. Sto usando il template genesis qui –
//* Registra il tipo di post Interviste (Modifiche di NSS) add_action( 'init', 'create_interview_post_type' );
function create_interview_post_type() {
$labels = array( 'name' => __( 'Interviste' ), 'singular_name' => __( 'Interviste' ), 'all_items' => __( 'Tutte le Interviste' ), 'add_new' => _x( 'Aggiungi nuovo', 'Interviste' ), 'add_new_item' => __( 'Aggiungi nuova intervista' ), 'edit_item' => __( 'Modifica intervista' ), 'new_item' => __( 'Nuova intervista' ), 'view_item' => __( 'Visualizza intervista' ), 'search_items' => __( 'Cerca nelle interviste' ), 'not_found' => __( 'Nessuna intervista trovata' ), 'not_found_in_trash' => __( 'Nessuna intervista trovata nel cestino' ), 'parent_item_colon' => "" );
$args = array( 'labels' => $labels, 'public' => true, 'has_archive' => true, 'rewrite' => array( 'slug' => 'interviste' ), 'taxonomies' => array( 'category', 'post_tag' ), 'supports' => array( 'title', 'editor', 'author', 'thumbnail' , 'custom-fields', 'excerpt', 'comments' ) );
register_post_type( 'interview', $args); }
//* Registra tipo di post Blog (Modifiche da NSS)
add_action( 'init', 'create_nssblog_post_type' );
function create_nssblog_post_type() {
$labels = array( 'name' => __( 'Blog' ), 'singular_name' => __( 'Blog' ), 'all_items' => __( 'Tutti i Post' ), 'add_new' => _x( 'Aggiungi nuovo', 'Blog' ), 'add_new_item' => __( 'Aggiungi nuovo post' ), 'edit_item' => __( 'Modifica post' ), 'new_item' => __( 'Nuovo post' ), 'view_item' => __( 'Visualizza post' ), 'search_items' => __( 'Cerca nei post' ), 'not_found' => __( 'Nessun post trovato' ), 'not_found_in_trash' => __( 'Nessun post trovato nel cestino' ), 'parent_item_colon' => "" );
$args = array( ‘labels’ => $labels, ‘public’ => true, ‘has_archive’ => true, ‘rewrite’ => array(‘slug’ => ‘blog’), ‘taxonomies’ => array( ‘category’, ‘post_tag’ ), ‘supports’ => array( ‘title’, ‘editor’, ‘author’, ‘thumbnail’ , ‘custom-fields’, ‘excerpt’, ‘comments’ ) );
register_post_type( ‘nssblog’, $args); }
Wakil Nikzad
Grazie per questo ottimo post.
Abbiamo installato e configurato il plugin Disqus sul nostro sito web. tutto è quasi perfetto con esso, tranne l'opzione di commento predefinita. Mi chiedo se ci sia un'opzione per scegliere il commento degli ospiti come predefinito.
Tuttavia ci sono molte persone che hanno un account Disqus, ma differisce in diverse società/paesi. Ad esempio: in Afghanistan la maggior parte degli utenti di Internet non conosce Disqus.
Travis Pflanz
Non hai bisogno di un account Disqus per commentare sul sistema Disqus. Hai l'opzione di usare Facebook, Twitter, Google+, Nome/Email o Ospite.
Sono sempre connesso, quindi ho dovuto disconnettermi per assicurarmi che fosse così.
Esci e dai un'occhiata.
danh
Vedo cosa stai facendo e mi piace. Penso di avere un problema di ordine di caricamento. Se modifico il codice del plugin disqus per non aggiungere il filtro quando viene utilizzato il mio tipo di post personalizzato, questo risolve il mio problema:
if ( 'custom_post_type_name' != get_post_type() ){ add_filter( 'comments_template', 'dsq_comments_template' ); }
Se provo il tuo suggerimento di rimuovere il filtro se è stato aggiunto, allora non funziona per me. Presumo che functions.php venga eseguito prima di disqus.php, quindi non c'è alcun filtro da rimuovere al momento dell'esecuzione della rimozione. Non ho ancora trovato una soluzione.
Piku
Ottimo articolo
Erik
Grazie per aver condiviso.
Akash Agarwal
sì, lo è. Lo sto solo cercando. Mi aiuta molto. Grazie per aver condiviso un post così utile e informativo.
Manuel Edburg
Wow. Articolo interessante! L'ho notato e ho pensato che fosse un errore. Non sapevo che fosse possibile.
Eduardinho Teixeira
Ok, capisco... Nel caso disabilitassi Disqus sui tipi di post personalizzati, cosa succede allora? Quel post rimane con i commenti disabilitati? O in quel caso, i commenti di WP tornano sulla pagina?