Quando si tratta di apportare aggiornamenti o modifiche significative al proprio sito WordPress, farlo direttamente può essere rischioso. È qui che entra in gioco un sito di staging.
È un clone perfetto del vostro sito web, dove potete testare in sicurezza le modifiche, risolvere i problemi e perfezionare gli aggiornamenti prima di distribuirli al sito principale.
Noi di WPBeginner usiamo siti di staging per testare gli aggiornamenti del sito web prima di pubblicarli sui nostri siti live. Questo ci salva da potenziali tempi di inattività, caratteristiche non funzionanti e altre complicazioni.
In questa guida passo passo, vi mostreremo come creare facilmente un ambiente di staging per il vostro sito WordPress. Verranno illustrati diversi metodi, la maggior parte dei quali richiede solo pochi clic.
Che cos’è un sito di staging?
Un sito di staging è un clone del vostro sito web live, utilizzato per testare le modifiche prima di renderle effettive. I siti di staging aiutano a individuare gli errori, in modo da non danneggiare il sito web live.
In passato era molto difficile configurare un sito di staging di WordPress, ma ora le cose sono cambiate e anche una persona non tecnica può farlo.
Molti utenti installano WordPress in locale sui loro computer Windows o Mac per testare le modifiche. Una volta terminati gli aggiornamenti, caricano semplicemente le modifiche da localhost al server live.
Il problema più grande di questo approccio è: cosa succede se qualcosa che ha funzionato sul localhost non funziona sul server live?
Spesso i siti locali e i server di hosting WordPress non sono in esecuzione nello stesso ambiente.
Dal momento che il sito di staging vive sul vostro server di web hosting, potete facilmente evitare tutti questi errori perché esegue la stessa configurazione del server del vostro sito live.
Detto questo, vediamo come impostare un sito di staging per WordPress.
Come creare facilmente un sito di staging di WordPress
Esistono diversi modi per creare un sito di staging per WordPress. Il più semplice è quello di utilizzare la funzione di sito di staging integrata del vostro provider di hosting.
Alcune delle migliori società di hosting WordPress offrono già siti di staging con un solo clic. Se il vostro sito web è ospitato presso una di esse, potete creare facilmente un sito di staging senza alcun problema.
Se non disponete di una di queste popolari soluzioni di host, abbiamo anche una soluzione per aiutarvi a creare un sito di staging di WordPress utilizzando un plugin (o anche manualmente).
Per una navigazione più rapida, è possibile utilizzare la navigazione sottostante per passare alla sezione più pertinente:
Creare un sito di prova su Bluehost
Bluehost è una delle migliori società di hosting WordPress. Offre una soluzione rapida di sito di staging in 1 clic con tutti i suoi piani.
Per prima cosa, è necessario accedere al cruscotto di Bluehost e visitare la sezione “I miei siti”.
Quindi, passare alla scheda “Plugin” e attivare l’interruttore accanto all’opzione “Plugin Bluehost”.
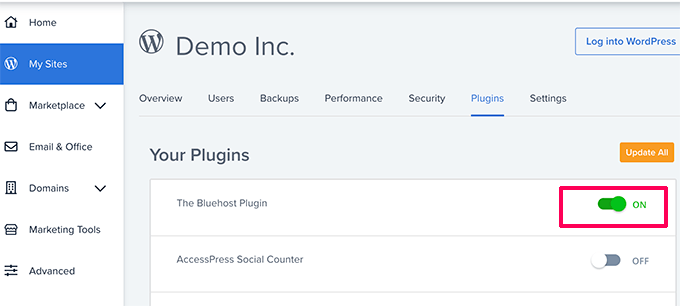
Dopodiché, accedere alla dashboard del sito WordPress e visitare la pagina Bluehost ” Staging”.
A questo punto, fare clic sul pulsante “Create Staging Site”.
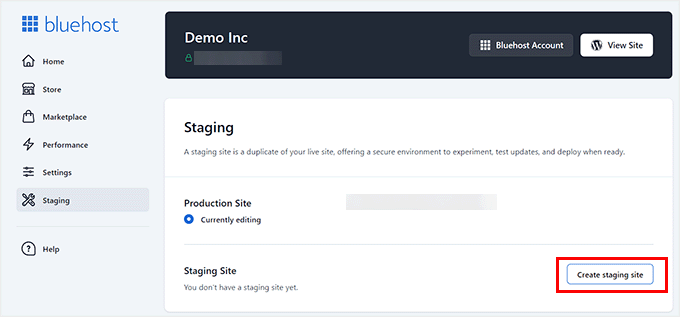
Bluehost preparerà ora l’ambiente di staging per il vostro sito web.
Una volta fatto ciò, verrà visualizzata la sezione “Sito di prova”, dove si dovrà selezionare la casella “Non in fase di modifica”.
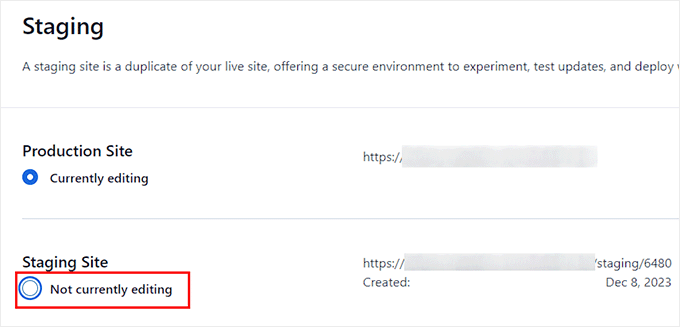
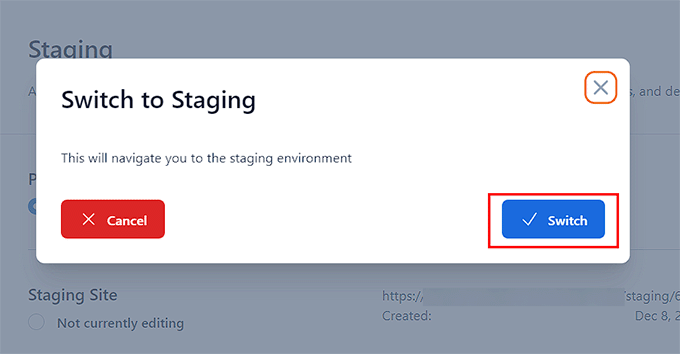
A questo punto si aprirà un prompt che chiede di passare al sito di staging.
Da qui, fare clic sul pulsante “Cambia”.
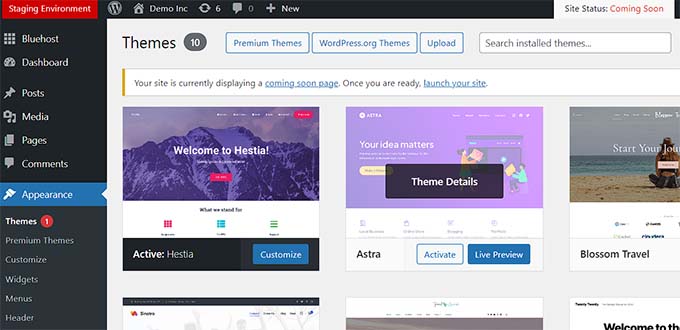
Una volta attivata, sullo schermo apparirà un pulsante che indica che si sta lavorando sul sito web di staging.
Potete continuare a lavorare sul vostro sito web senza preoccuparvi che ciò influisca sul vostro sito live.
Distribuire le modifiche da un sito in fase di allestimento a un sito live su Bluehost
Una volta pronti a trasferire le modifiche dallo staging al sito live, basta andare alla pagina Bluehost ” Staging dalla barra laterale dell’amministrazione di WordPress.
Da qui, si vedrà il menu a discesa delle opzioni di distribuzione accanto al sito web di staging. È possibile distribuire solo i file, solo il database o tutte le modifiche.
Se non si è sicuri, fare clic sul pulsante “Distribuisci tutte le modifiche” per continuare.
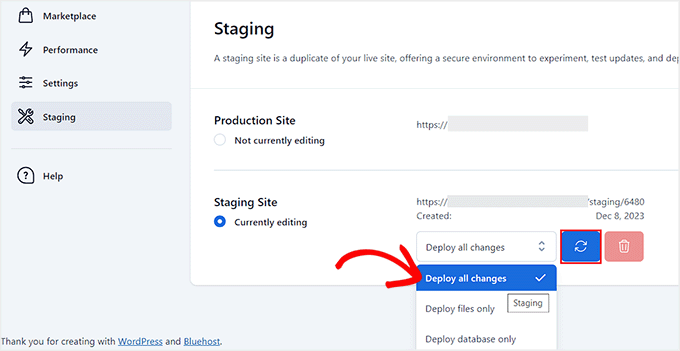
Successivamente, fare clic sul pulsante “Deploy Site” accanto al menu a discesa.
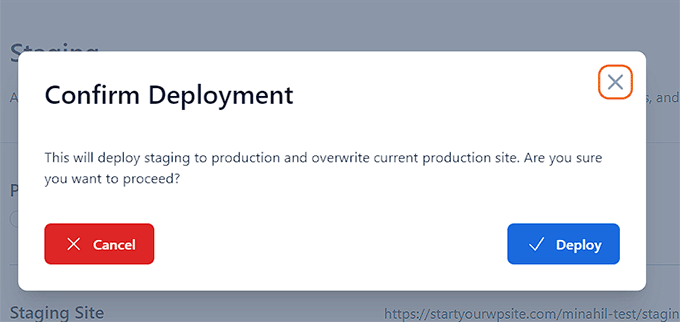
Si aprirà un popup in cui si chiederà di confermare che si vuole distribuire il sito di staging al sito di produzione. Fare clic sul pulsante “Distribuisci” per continuare.
Bluehost inizierà ora a distribuire il sito di staging al sito live. A seconda delle dimensioni del sito, questa operazione potrebbe richiedere un po’ di tempo.
Ora è possibile tornare al sito web live per vedere le modifiche in azione, facendo clic sul pulsante Radio sotto l’opzione Sito di produzione.
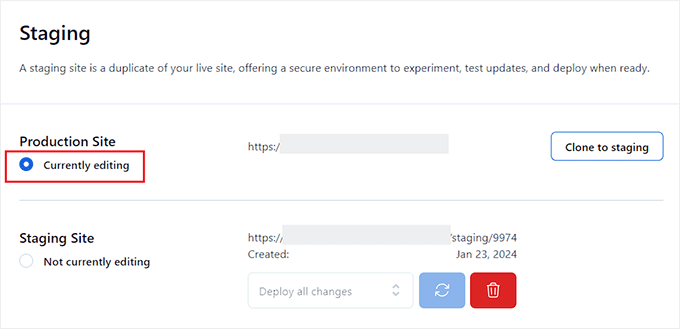
Clonazione del sito di produzione in quello di staging
Ora, quando si torna al sito di produzione, le modifiche apportate non vengono sincronizzate automaticamente con il sito di staging.
In futuro, se si desidera testare più cose sul sito di staging, sarà necessario duplicare il sito.
Per farlo, è necessario visitare la pagina Bluehost ” Staging e cliccare sul pulsante “Clona in staging”.
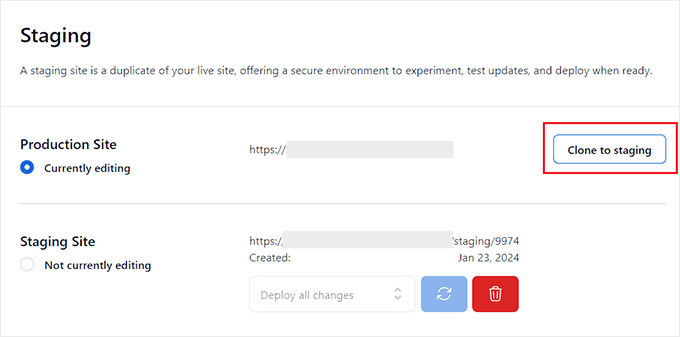
Bluehost clonerà quindi le ultime modifiche apportate al sito web live sul sito web di staging. Dopodiché, è possibile passare al sito web di staging per i test e lo sviluppo.
Creazione di un sito di prova su SiteGround
SiteGround è un’altra delle migliori società di hosting WordPress che offre una funzione di staging in un clic con i suoi piani GrowBig e GoGeek.
Abbiamo ospitato questo host su WPBeginner e abbiamo avuto un’ottima esperienza. È stato affidabile, veloce e facile da gestire, il che lo rende una scelta solida per il nostro sito web.
Per saperne di più, consultate la nostra recensione di SiteGround.
Se il vostro sito web è ospitato da SiteGround, allora è così che si configura un sito web di staging.
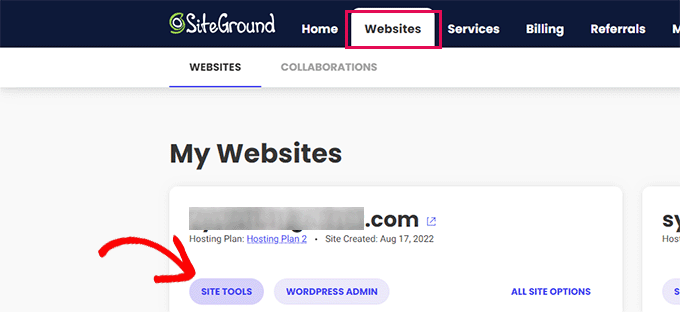
Per prima cosa, è necessario accedere alla dashboard di SiteGround e passare alla scheda Siti web. Da qui è necessario scegliere gli Strumenti del sito sotto il proprio sito web.
Nella schermata successiva, dovete fare clic sul menu WordPress ” Staging dalla colonna di sinistra.
Da qui, selezionate il vostro sito web e fornite un nome per la vostra copia di staging.
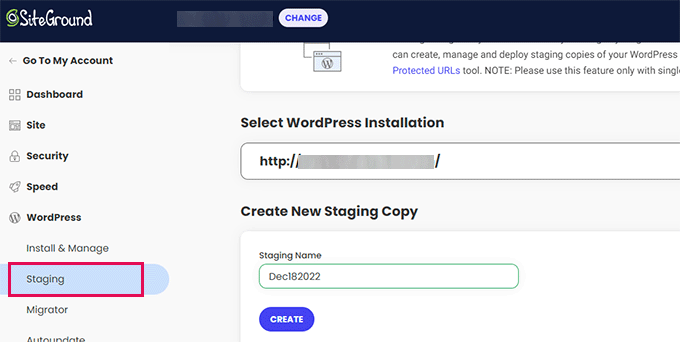
Fare clic sul pulsante “Crea” per continuare e Siteground creerà una copia di staging del sito web.
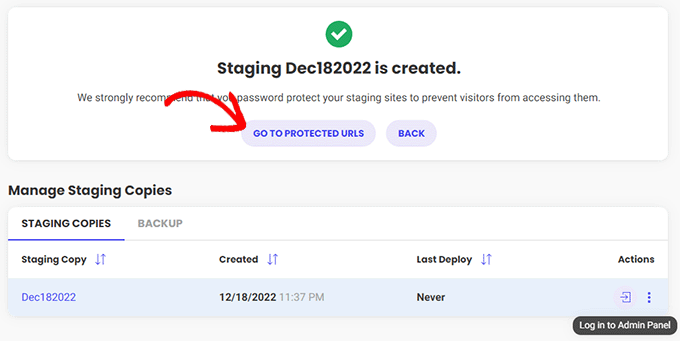
Successivamente, è necessario fare clic sul pulsante “Vai agli URL protetti” per proteggere con una password il sito di staging e mantenerlo privato.
Nella schermata successiva, Siteground inserirà automaticamente l’URL e il percorso del sito di staging.
È necessario inserire il nome utente e la password che si desidera utilizzare per proteggere il sito di staging.
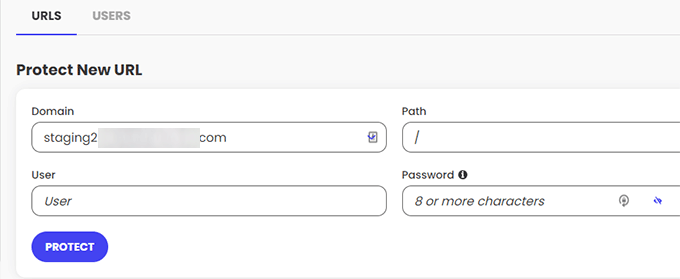
Fare clic sul pulsante “Proteggi” per salvare le impostazioni.
Ora potete tornare alla pagina WordPress ” Staging e fare clic sul pulsante “Accedi al pannello di amministrazione” accanto al vostro sito web di staging.

SiteGround aprirà ora l’area di amministrazione di WordPress del sito web di staging. È possibile testare le modifiche su questo sito web di staging.
Distribuzione delle modifiche al sito web live
Una volta provate le modifiche sul sito web di staging, è possibile unirle al sito web live.
SiteGround rende facile anche questo.
È sufficiente fare clic sul menu WordPress ” Staging dalla colonna di sinistra. Quindi fate clic sul menu a tre puntini accanto al vostro sito di staging nella sezione “Gestisci copie di staging”.

Il menu mostra due opzioni di distribuzione. È possibile scegliere l’opzione “Distribuzione completa” o “Distribuzione personalizzata”.
L’opzione “Distribuzione completa” unisce tutto dal sito web di staging al sito web live. L’opzione “Distribuzione personalizzata” consente di selezionare i file o i dati che si desidera unire.
Se non siete sicuri, scegliete l’opzione “Distribuzione completa”.
SiteGround copierà quindi il sito di staging sul vostro sito web live.
Unire il Live al vostro sito web di staging
Le modifiche apportate al sito web live non vengono copiate automaticamente sul sito web di staging.
Ogni volta che si deve lavorare sul sito web di staging, ripetere la procedura sopra descritta per creare un nuovo sito web di staging.
Creazione di un sito di prova su WP Engine
WP Engine è la migliore società di hosting gestito per WordPress al mondo. L’hosting WordPress gestito è un servizio di portineria per il vostro sito WordPress in cui il provider di hosting si occupa di aggiornamenti, backup, sicurezza e prestazioni.
WP Engine offre una soluzione di staging con un solo clic con tutti i suoi piani. Se utilizzate WP Engine per ospitare il vostro sito web, ecco come impostare un ambiente di staging per il vostro sito.
Per prima cosa, è necessario accedere al cruscotto di WP Engine. Quindi, andate alla pagina “Siti” e selezionate il vostro sito web facendo clic su di esso.
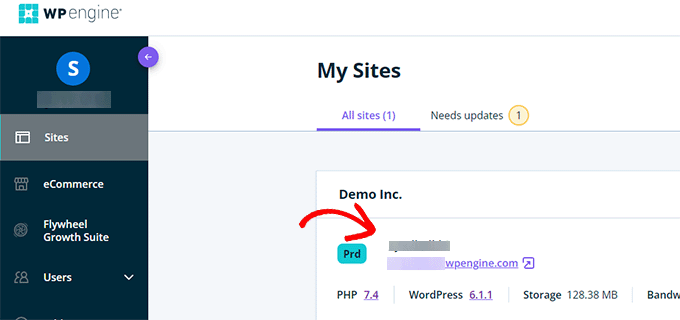
In questo modo si accede alla dashboard del sito web.
A questo punto, è necessario fare clic sul link “Add Staging” nella colonna di sinistra o selezionarlo sotto il nome del sito in alto.
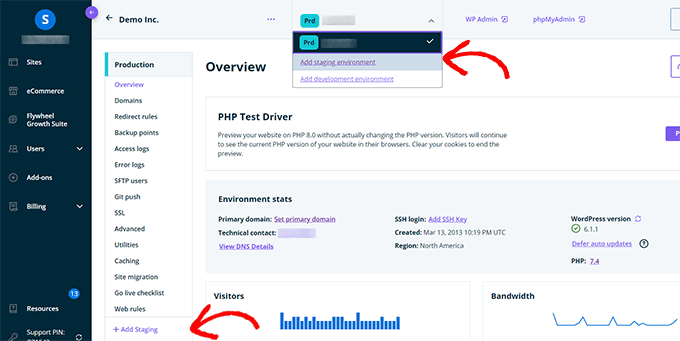
Si accede così alla schermata “Aggiungi ambiente”.
Vi verrà chiesto di scegliere come procedere con l’ambiente di staging.
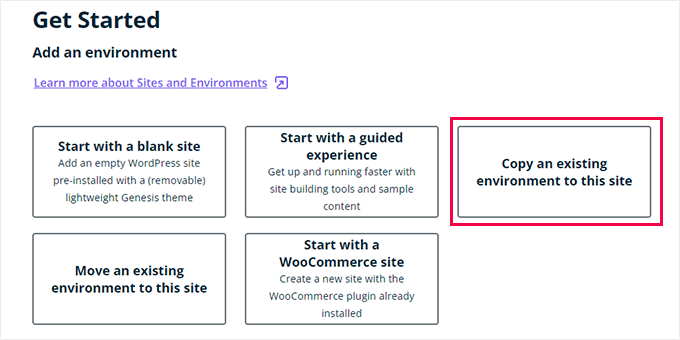
Ecco cosa fa ciascuna di queste opzioni:
- Inizia con un nuovo sito vuoto” crea un nuovo sito vuoto.
- Inizia con un’esperienza guidata” crea un nuovo sito con un’esperienza guidata e contenuti dimostrativi.
- Copia un ambiente esistente in questo sito” copia l’ambiente di produzione o di sviluppo in questo sito (ad esempio, copia il sito live in questo ambiente).
- Sposta un ambiente esistente” sposta un ambiente in questo sito (ad esempio, sposta l’ambiente di sviluppo nello Staging).
- Inizia con un sito WooCommerce” crea un nuovo sito WordPress con WooCommerce preinstallato.
Poiché si vuole creare una copia di staging del nostro sito web live, è necessario fare clic sull’opzione “Copia un ambiente esistente in questo sito”.
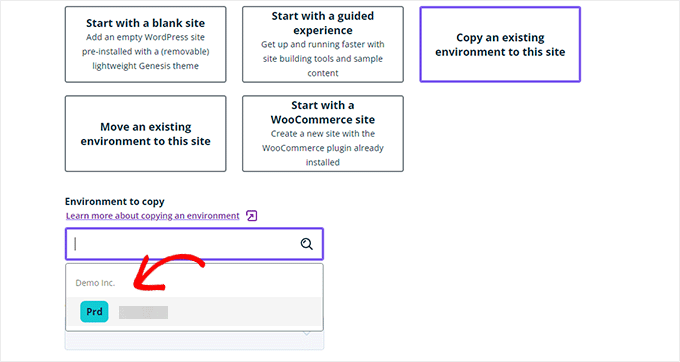
Dopo aver scelto un ambiente, selezionare l’ultimo backup da cui si desidera copiare e fare clic sul pulsante “Avanti” per continuare.
Ora è necessario fornire un nome per il sito di staging. Questo nome sarà usato nell’URL del sito di staging. Successivamente, scegliere STG (staging) come tipo di ambiente.
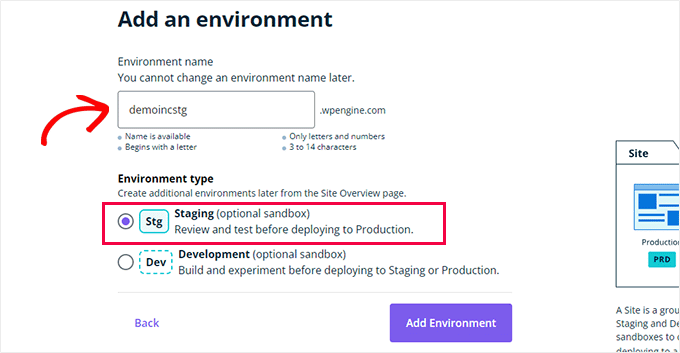
Fare clic sul pulsante “Crea ambiente” per continuare.
WP Engine creerà un sito di staging per voi. Successivamente, sarete reindirizzati alla dashboard del vostro ambiente di staging.
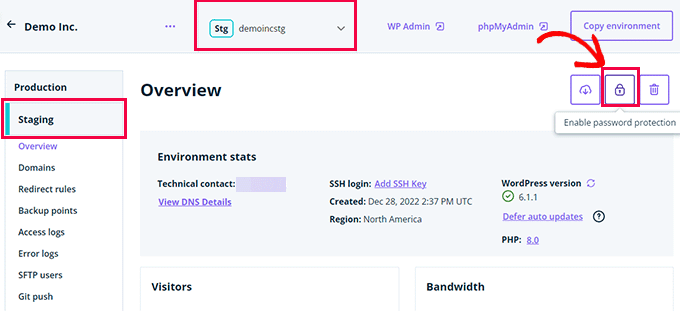
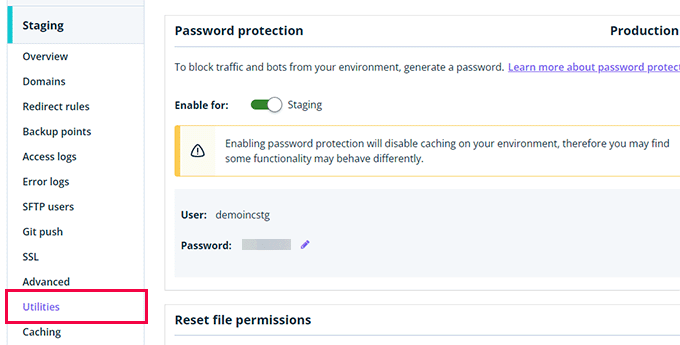
Successivamente, è necessario fare clic sul pulsante Lucchetto per attivare la protezione con password per il sito di staging.
Successivamente, è necessario passare alla scheda ‘Utilità’ per copiare il nome utente e la password del sito di staging.
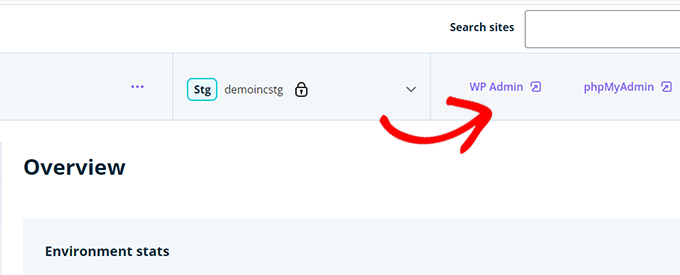
Ora è possibile fare clic sul pulsante “WP Admin” in alto per accedere al sito di staging.
Sentitevi liberi di apportare modifiche e provare le funzionalità sul sito di staging, proprio come fareste con un tipico sito WordPress che installate altrove.
Distribuire le modifiche da un sito web in fase di allestimento a un sito web live su WP Engine
Volete unire le modifiche apportate al sito web di staging al vostro sito web live?
È sufficiente fare clic sul pulsante “Copia ambiente” per iniziare la distribuzione.
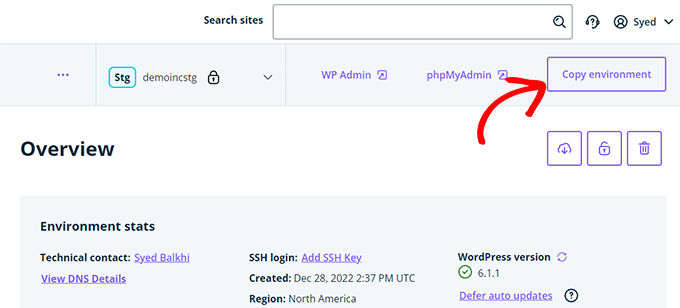
Si accede così alla pagina delle opzioni. Da qui è necessario scegliere gli ambienti di origine e di destinazione per la copia.
Qui si selezionerà il sito web di staging come ambiente di origine e il sito web di produzione o live come ambiente di destinazione.
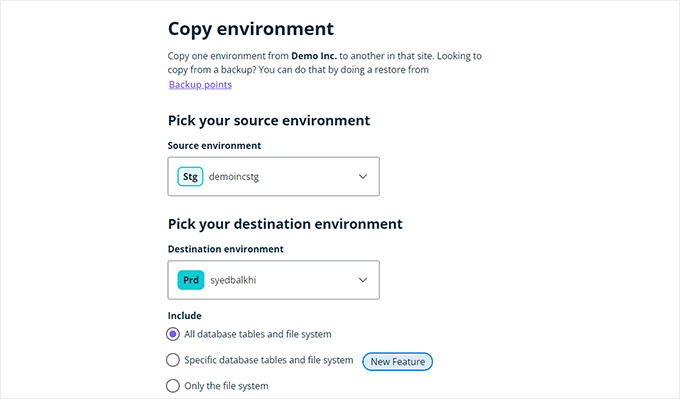
È possibile scegliere ciò che si desidera copiare. Ad esempio, è possibile copiare tutte le tabelle e i file del database, file e tabelle del database specifici o solo il file system.
Nota: se si copia tutto, si perderanno i dati memorizzati sul sito web live dopo averlo utilizzato per creare l’ambiente di staging. Ciò può includere dati importanti come nuovi post, pagine, clienti e ordini. È quindi consigliabile eseguire un backup del sito live prima di distribuirlo dall’ambiente di staging.
Quindi, fare clic sul pulsante “Rivedi e conferma” per iniziare la distribuzione. Ci vorrà un po’ di tempo per copiare tutto sul vostro sito web live.
Riceverete una notifica via e-mail quando il processo sarà completato.
Creazione di un sito di staging con il plugin di WordPress
Se la vostra società di hosting WordPress non fornisce una funzione di sito di staging, potete comunque creare un sito di staging utilizzando un plugin di WordPress.
Questo metodo presenta alcuni svantaggi.
Innanzitutto, un plugin ha un controllo limitato sul vostro server di hosting. Per questo motivo potrebbe non dare sempre i risultati migliori.
In secondo luogo, il plugin che utilizzeremo memorizzerà il vostro sito di staging sui propri server. Se siete preoccupati per la privacy e la protezione dei dati, questo potrebbe non essere l’ideale per voi.
Infine, il plugin presenta diverse incompatibilità note. Controllare la pagina delle incompatibilità per assicurarsi che il proprio sito web sia compatibile.
Detto questo, vediamo come creare un sito WordPress di staging utilizzando un plugin WordPress.
La prima cosa da fare è installare e attivare il plugin WP Stagecoach. Per maggiori dettagli, consultate la nostra guida passo passo su come installare un plugin di WordPress.
Dopo l’attivazione, il plugin aggiunge alla barra di amministrazione una nuova voce di menu denominata WP Stagecoach. Facendo clic su di essa si accede alla pagina delle impostazioni del plugin.
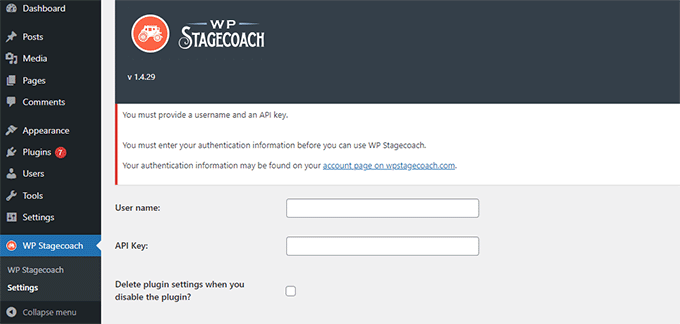
Dovrete inserire il vostro nome utente WP Stagecoach e la chiave API, che potete trovare nel vostro account sul sito web del plugin.
Successivamente, è necessario visitare la pagina WP Stagecoach ” WP Stagecoach e scegliere un nome per il sito di staging. Questo nome sarà utilizzato anche come sottodominio del vostro sito WordPress di staging.
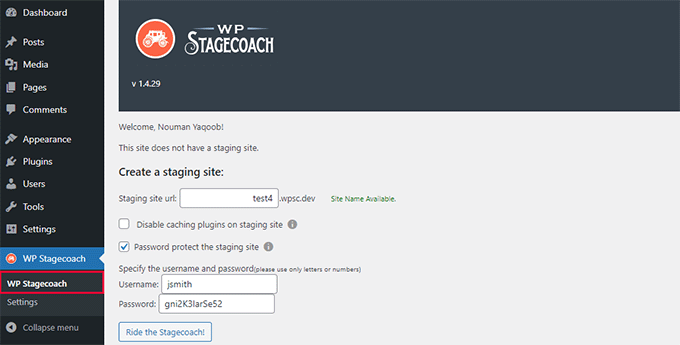
Non dimenticate di selezionare la casella accanto all’opzione “Proteggi con password il sito di staging”. Questo proteggerà il vostro sito di staging dalla vista pubblica e dai motori di ricerca.
Cliccate sul pulsante “Ride the Stagecoach” per continuare.
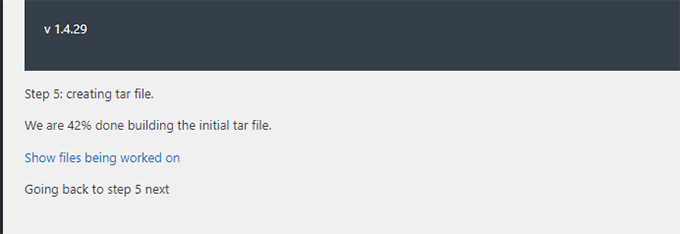
Il plugin creerà ora un backup dei file e del database di WordPress per esportarli nel sito di staging.
Potrebbe essere necessario un po’ di tempo, a seconda delle dimensioni del vostro sito WordPress.
Una volta terminato, verrà visualizzato il link al sito di staging e alla sua area di amministrazione.
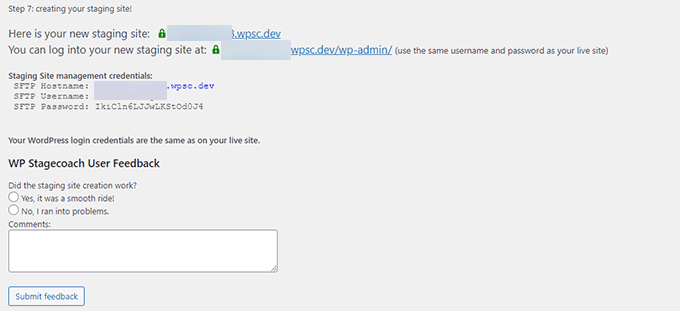
È possibile fare clic sul link per visitare il sito di staging e iniziare a lavorarci.
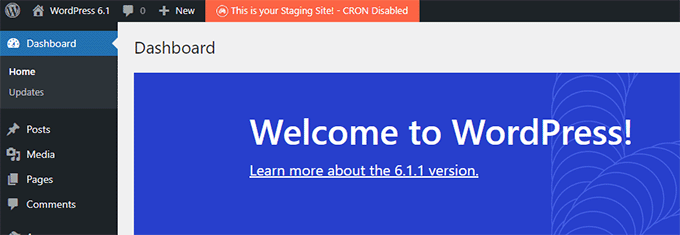
Si noterà un messaggio arancione nella barra di amministrazione in alto che indica che si sta lavorando sul sito di staging.
Distribuire il sito di staging al sito live usando WP Stagecoach
Una volta pronti a importare le modifiche nel sito live, andate alla pagina WP Stagecoach ” Importa modifiche e cliccate sul pulsante Controlla modifiche.
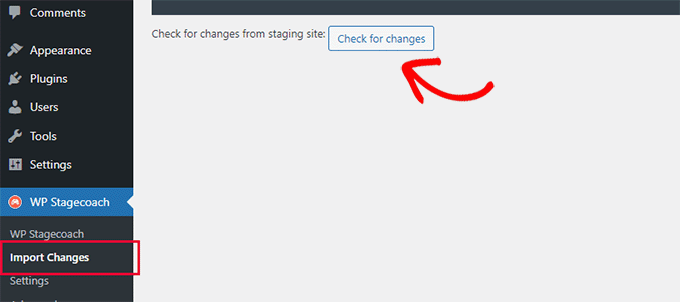
Il plugin controllerà ora le modifiche sul sito di staging e mostrerà le opzioni per importarle.
È possibile scegliere tra tutte le modifiche, le modifiche ai file o le modifiche al database.
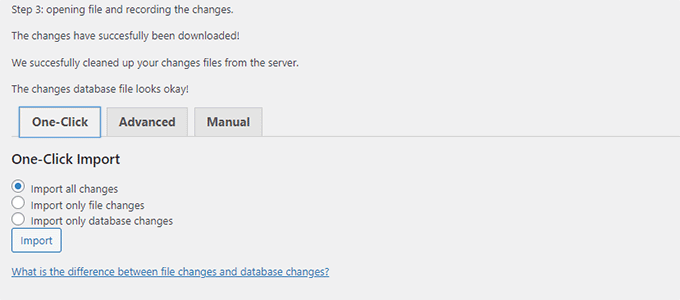
Il plugin mostra l’avanzamento dell’importazione e notifica il completamento della stessa.
Ora è possibile testare il sito live per verificare se tutte le modifiche sono state importate con successo.
Creare manualmente un sito di staging per WordPress
Questo metodo vi insegnerà a creare manualmente un sito di staging per la vostra installazione di WordPress. È destinato agli utenti avanzati e richiede più lavoro rispetto agli altri metodi descritti in precedenza.
Un altro svantaggio di questo metodo è che il sito web sarà temporaneamente indisponibile quando le modifiche vengono riportate dallo staging al server live.
Detto questo, vediamo come creare manualmente un ambiente di staging per il vostro sito WordPress.
Per prima cosa, è necessario creare un sottodominio per il sito di staging. Se utilizzate Bluehost, andate nella dashboard del vostro account di hosting e passate alla scheda “Avanzate”.
Quindi, fare clic sul pulsante “Gestisci” accanto all’opzione “cPanel”.
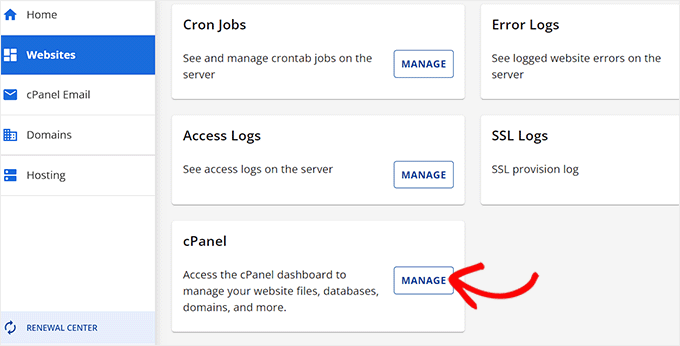
In questo modo si aprirà il cPanel in una nuova scheda, dove si dovrà scorrere fino alla sezione “Dominio”.
Da qui, fare clic sull’opzione “Domini”.
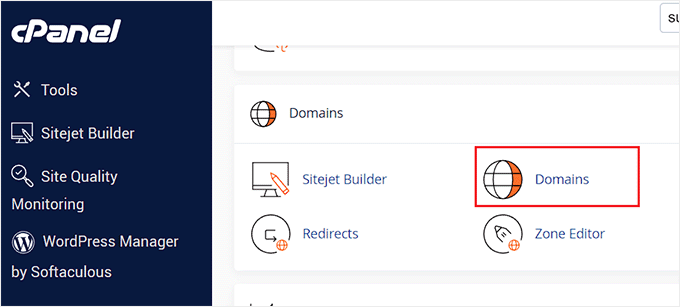
Si aprirà un elenco di tutti i domini presenti sul vostro account di hosting. Qui è necessario fare clic sul pulsante “Crea un nuovo dominio”.
Una volta fatto ciò, si aprirà una nuova pagina nella quale dovrete scrivere il vostro sottodominio seguito dal nome del dominio nel campo “Dominio”, come in questo caso:
sottodominio.example.com
A questo punto, è sufficiente fare clic sul pulsante “Invia” per memorizzare le impostazioni.
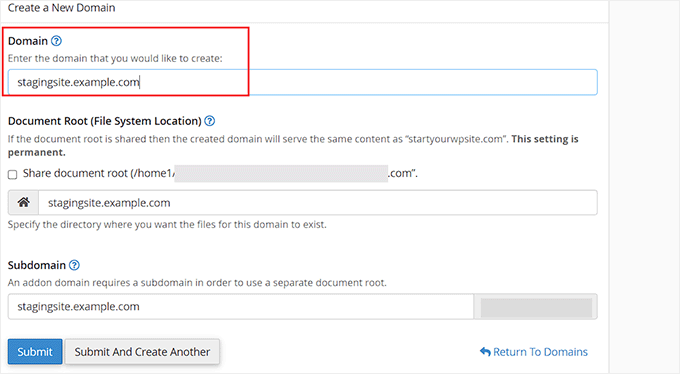
Nota: nelle nostre schermate di esempio stiamo usando Bluehost, quindi la vostra schermata potrebbe apparire diversa.
Il pannello di controllo del vostro hosting aggiungerà ora il vostro sottodominio, che potrete utilizzare per importare il vostro sito WordPress dal vivo.
Successivamente, è necessario installare e attivare il plugin gratuito Duplicator sul sito live. Se avete bisogno di funzioni complete, potete acquistare la versione premium di Duplicator qui.
Anche molti dei nostri brand partner hanno utilizzato questo strumento per creare backup e hanno ottenuto ottimi risultati. Per saperne di più, consultate la nostra recensione di Duplicator.
Dopo l’attivazione, è necessario fare clic sul menu Duplicator nella barra laterale dell’amministrazione di WordPress e fare clic sul pulsante “Crea nuovo” sotto Backup.
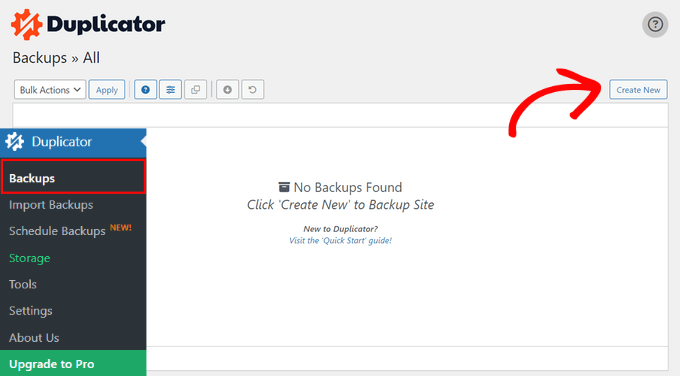
Successivamente, è possibile inserire un nome per il backup e fare clic sul pulsante “Avanti” per continuare.
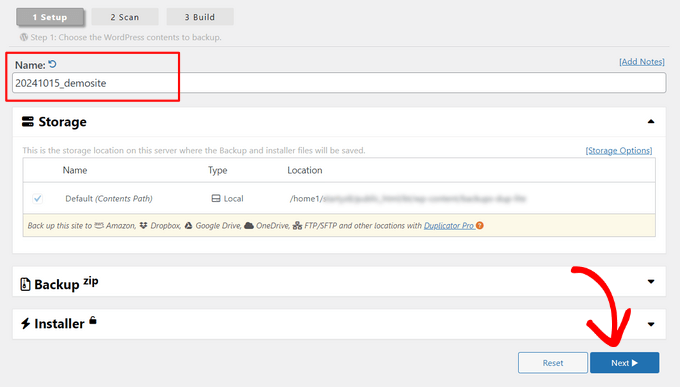
Duplicator eseguirà quindi la procedura guidata per la duplicazione del sito web.
Innanzitutto, vengono eseguiti alcuni test per verificare se tutto è in ordine. Se tutti gli elementi sono contrassegnati come “buoni”, fare clic sul pulsante “Costruisci”.
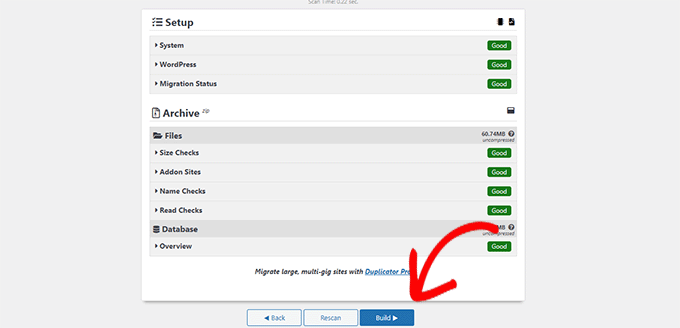
Il plugin inizierà a creare un pacchetto di backup Duplicator per il vostro sito WordPress. Questo processo potrebbe richiedere alcuni minuti, a seconda delle dimensioni del sito.
Una volta terminato, verranno visualizzate le opzioni di download per il programma di installazione e per l’archivio. È necessario fare clic sul pulsante “Scarica entrambi i file” per scaricare entrambi i file sul computer.
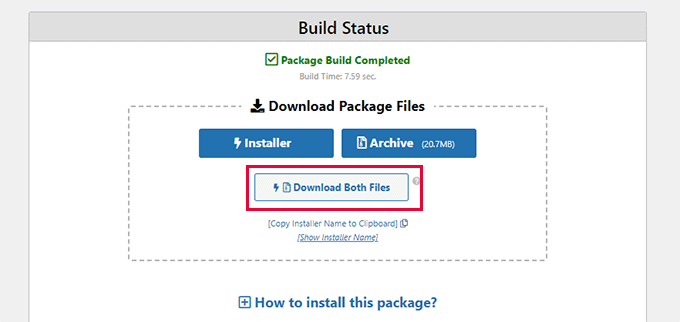
Dovrete caricare entrambi i file nella directory dei file del sottodominio appena creato. Per maggiori dettagli, consultate la nostra guida su come usare l’FTP per caricare i file sul vostro sito WordPress.
Successivamente, il nuovo sito WordPress di staging avrà bisogno di un nuovo database. Creiamone uno.
Accedete al pannello di controllo del vostro account di hosting WordPress e passate alla scheda “Avanzate”.
Successivamente, scorrere fino alla sezione “Database” e fare clic sul pulsante “Gestisci” accanto ad essa.
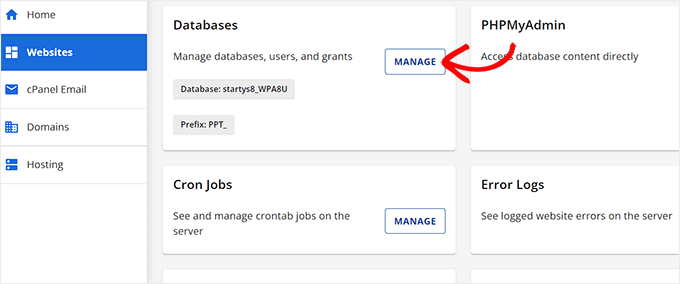
Se non utilizzate Bluehost, il vostro ambiente di hosting WordPress potrebbe apparire un po’ diverso. Non preoccupatevi e cercate la sezione Database.
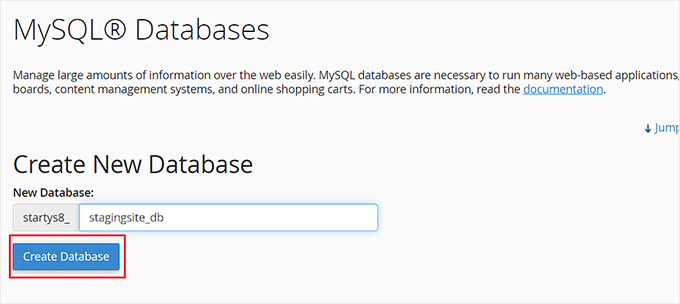
Si accede così alla pagina “Database MySQL”, dove è possibile iniziare a fornire un nome per il database.
Quindi, fare clic sul pulsante “Crea database”.
Successivamente, è necessario creare un utente MySQL per il database.
Scorrete fino alla sezione Utenti MySQL e fornite un nome utente e una password per il nuovo utente del database.
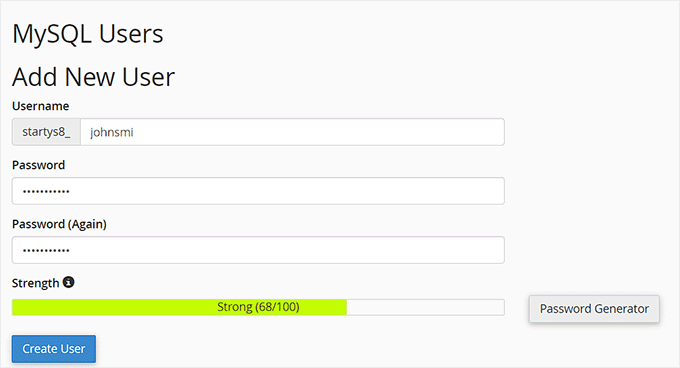
Ora bisogna dare a questo utente il permesso di accedere e modificare il database creato in precedenza.
Basta scorrere la sezione “Aggiungi utente al database” e selezionare il database e l’utente appena creato.
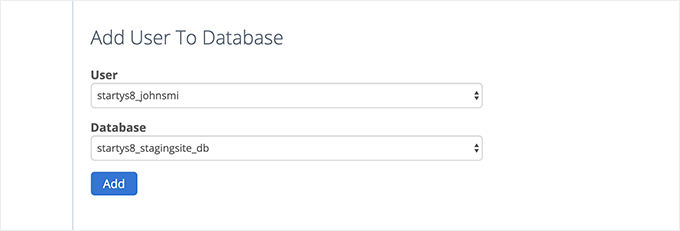
Quindi, fare clic sul pulsante “Aggiungi” per continuare.
Verrà chiesto di selezionare i privilegi per l’utente. Selezionare la casella di controllo “Tutti i privilegi” e fare clic sul pulsante “Apporta modifiche”.
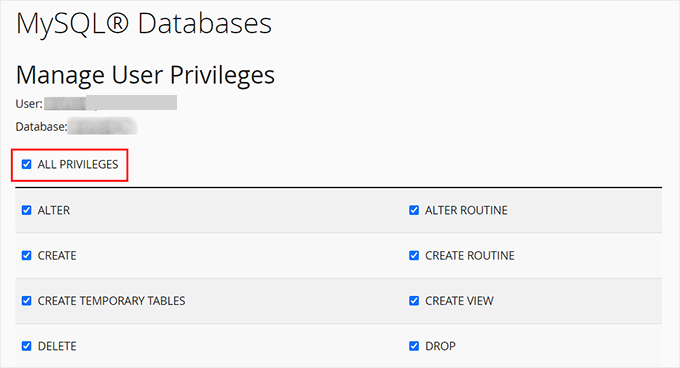
Ora il database è pronto per essere utilizzato per il sito web di staging.
Successivamente, è necessario aprire una nuova scheda del browser e inserire il sottodominio del sito di staging in questo modo:
https://yoursubdomain.example.com/installer.php
Non dimenticate di sostituire yoursubdomain con il sottodominio effettivo e example.com con il vostro nome di dominio.
In questo modo si avvia l’installazione guidata di Duplicator.
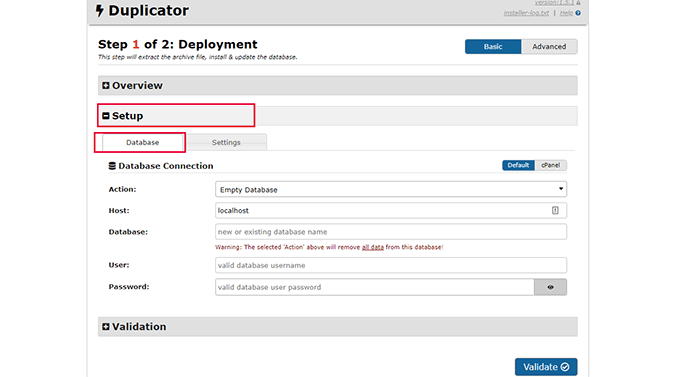
Nella sezione “Impostazione”, il programma di installazione vi chiederà di inserire le informazioni sul database di WordPress.
Il vostro host sarà probabilmente localhost. Dopodiché, si inseriranno i dettagli del database creato per il nuovo nome di dominio nel passaggio precedente.
Fare clic sul pulsante “Convalida” per assicurarsi che Duplicator possa connettersi al database.
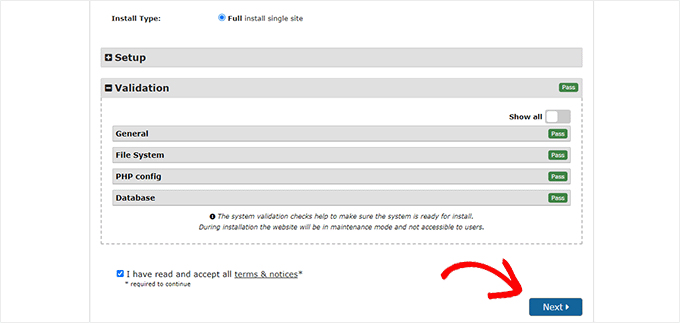
Una volta fatto, fare clic sul pulsante “Avanti” per continuare.
Duplicator scompatta il database e i file di WordPress e li importa nel sito di staging.
Al termine, verrà visualizzato un messaggio di successo.
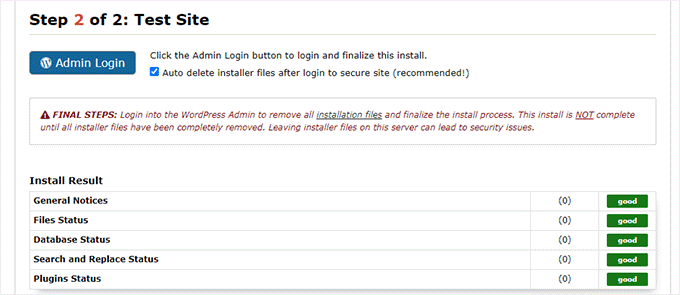
È possibile fare clic sul pulsante “Admin Login” per accedere all’area di amministrazione di WordPress del proprio sito web sul nuovo sito di staging.
Ora il sito di staging è stato configurato. È possibile proteggerlo aggiungendo una password di protezione al sottodominio.
Accedere alla dashboard del proprio account di hosting e passare alla scheda “Avanzate”.
Dopodiché, scorrere fino alla sezione “cPanel” e fare clic sul pulsante “Gestisci” accanto.
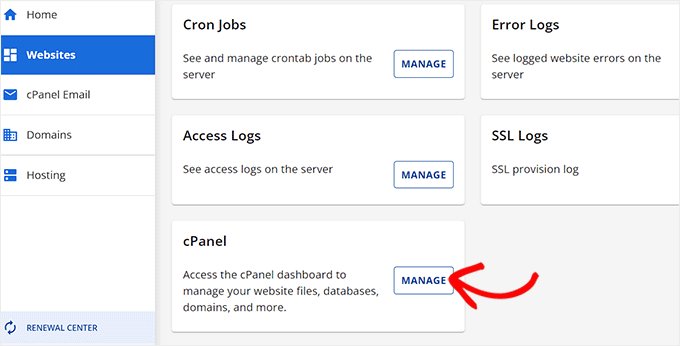
In questo modo si aprirà il cPanel in una nuova finestra, dove si dovrà scorrere fino alla sezione “File”.
Da qui, fare clic sull’icona “Directory Privacy”.
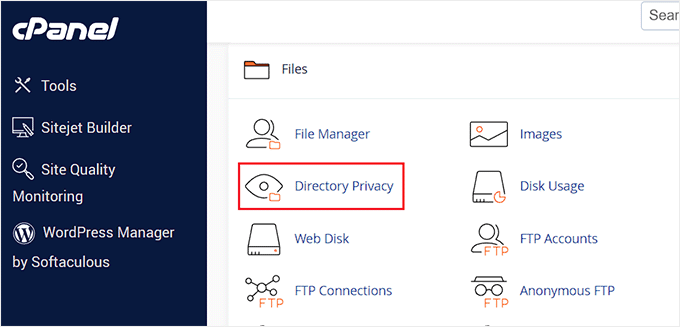
Successivamente, è necessario selezionare la cartella del sottodominio e poi selezionare l’opzione “Protezione con password di questa directory”.
Verrà richiesto di assegnare un nome a questa impostazione e di fare clic sul pulsante “Salva”.
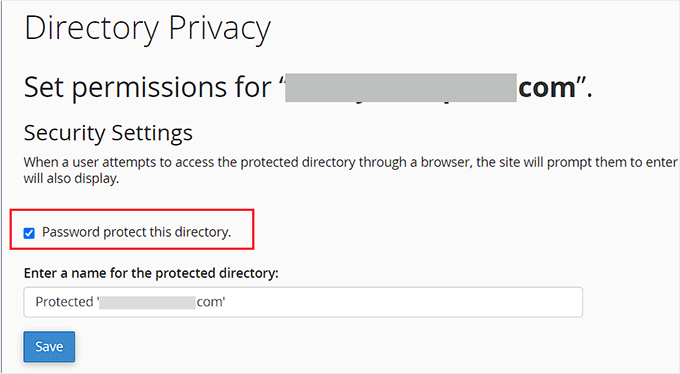
Il vostro sito di staging sarà ora nascosto dietro una password di protezione, in modo da tenerlo lontano dalle mani dei motori di ricerca e dagli occhi del pubblico.
Ora è possibile lavorare sul sito di staging e apportare qualsiasi modifica.
Distribuire manualmente il sito di staging al sito live
Una volta pronti a distribuire le modifiche dal sito di staging al server live, si seguirà la stessa procedura descritta sopra.
È sufficiente creare un nuovo pacchetto Duplicator sul sito di staging e scaricare i file dell’installatore e dell’archivio sul computer (vedere le istruzioni sopra).
Successivamente, è necessario andare sul proprio sito live e creare un backup completo di WordPress (è possibile utilizzare anche Duplicator per creare un backup completo).
Una volta terminato, dovrete eliminare tutti i file e le cartelle di WordPress dal vostro sito web live. Ciò significa che il vostro sito WordPress sarà inattivo per un po’ di tempo.
Infine, seguire le istruzioni precedenti per eseguire l’installazione guidata di Duplicator per importare il sito di staging sul server live.
Come si può notare, l’ultimo metodo non è affatto il migliore. Durante il processo ci sono molte cose che possono danneggiare il vostro sito.
Suggeriamo di evitare assolutamente questo metodo, a meno che non abbiate altra scelta. Si consiglia di utilizzare un provider di hosting affidabile come Bluehost, SiteGround o WP Engine con funzioni di sito di staging integrate.
Speriamo che questo articolo vi abbia aiutato a capire come creare facilmente un ambiente di staging per il vostro sito WordPress. Se riscontrate qualche problema, selezionate la nostra guida su come testare il vostro sito per aggiornare a Gutenberg. Potreste anche voler imparare a utilizzare WordPress Playground nel browser per i test.
Se questo articolo vi è piaciuto, iscrivetevi al nostro canale YouTube per le esercitazioni video su WordPress. Potete trovarci anche su Twitter e Facebook.


Lynda Joy
Hi,
I just did the first five or so steps of this, and then got lost at “upload your WordPress content to. So now I have completely messed up my site and I would like to know how to undo what I have done.
Thanks.
– Lynda
Rachel
Thanks so much for this – I am very much a beginner but trying to figure out how to do these things myself so I can launch a new design by first using a test site in order to get it right. I have managed to follow your instructions perfectly until this part:
“After copying your database, you need to copy your WordPress files, plugins, themes, and uploads. First download a fresh copy of WordPress from WordPress.org. Upload the contents of WordPress to your staging site. Note, do not run the WordPress install yet”
Can you please advise as to how this is done or direct me to another instruction article? I can’t seem to find out how to do it otherwise. Many many thanks in advance
Sanket D.
So I’ve managed to create my staging environment successfully — I’ve all my media, themes, plugins, everything else properly transferred. However, I’d made some changes to my theme (not through any codes, but through the theme’s inbuilt settings — basic stuff like a custom logo (which I can see in my media library), theme color, homepage layout, etc. These changes are the only thing that for some reason are missing from my staging site. Anybody knows why this might be?
byberkan
I’m hoping you can find the solution. Same problem exists for me.
Joe
It seems we have to do the steps in here after we have our theme, plugin etc.
Mark Park
Great article! Just one thing that isn’t clear to me.
If I have the current non-wordpress website on a domain name example.com and I want to build a new website using WordPress and develop it on a staging environment on a sub-domain dev.example.com – is this possible?
Can I make a sub-domain dev.example.com and install WP on the same server used by the current non-WP website?
Later when the website is finished I want to connect my WP developed site with the domain name example.com.
Thank you for your help.
WPBeginner Support
Yes this is possible. Make sure you block search engines on your development subdomain.
Admin
Maria
Thanks for a Very helpful article! I am in a similar situation as Mark, however my current website is a WordPress site. Can I still develop the redesigned website on a staging site within a sub domain? And if so do I have to create a new database?
byberkan
You really didn’t read the article, do you?
Benito
Hello, great article, but what if I don’t want to use XAMPP, and I just want to use a subdomain as a staging site and then push changes to live? What would be the best way to deploy the changes?
Raj
Will this process create a Database User and add it to the database we created while copying giving it all privileges by itself? or do we need to create a database user at some point?
Raj
Okay I tried it.. both ways.
Once I created the database user before installing wordpress on the staging site and it worked. The other time around, I didn’t and got the issue “We were able to connect to the database server (which means your username and password is okay) but not able to select the a*******_ata_d2db database.”
That to me means that one has to create a user manually, only copying database won’t do. Right?
Sanny
Raj, I see the same error (“Can’t select database”). How did you fix it ?
Scott
Hopefully you guys figured this out, but just to leave this here for others to find, you do indeed need to create a database user (which is not clear in this article). While using Bluehost, I had to do about three steps. First step is to use the MySQL Database cPanel to get access to the list of MySQL databases. Once there, I could see that the new staging database that I had copied using phpMyAdmin per the article, did not have a privileged user assigned to it. So, I created a user, but then discovered that the user I created had too many characters (16 is the max). Once I got that straightened out, I then had to Add this user to a database using the same MySQL page. As part of this assignment step, I was able to select “ALL PRIVILEGES” to make this user a privileged user for this new staging database. Once that was all setup, I was able to configure WordPress to connect up to the staging database.
Gayle
Terrific resource! Reached a WP staging breaking point and then found this. Lifesaver! Thank you! Only things I’d add would be some meta information for newbies like me. : )
LizP
Yikes, too hard for me!
Deborah
Thanks for the tutorial. I seem to be stuck on one of the very first steps. When clicking go after changing the URL’s in SQL, I get a message of ‘# MySQL returned an empty result set (i.e. zero rows)’
This is how I’ve entered the data:
UPDATE wp_options SET option_value = REPLACE(option_value, ‘http://www.example.co.za/wp’, ‘http://staging.example.co.za’);
UPDATE wp_postmeta SET meta_value = REPLACE(meta_value, ‘http://www.example.co.za/wp’, ‘http://staging.example.co.za’);
UPDATE wp_posts SET guid = REPLACE(guid, ‘http://www.example.co.za/wp’, ‘http://staging.example.co.za’);
UPDATE wp_posts SET post_content = REPLACE(post_content, ‘http://www.example.co.za/wp’, ‘http://staging.example.co.za’);
Can anyone please help me with this?
Thanks
Andreas Kofoed
Hi,
First of all thanks for an amazing tut on this.
I’ve encountered one problem so far and that is when I try to enter my subdomain through
www.staging.example.com. I get this message: err_connection_timed_out ???Andreas Kofoed
Hi,
I figured this out as I was due to some table prefix.
Now my staging.mysite.com is up and running, but the styling and layout is totally different.
How do I do, so my files in my child theme applies to the current theme???
It seems like it is missing a lot of pictures, css and some basic settings?…
Patrick
Thanks for this great tutorial!
I’m finding that after setting everything up, comments on the live blog are now going to the sub-domain staging blog. I can’t find anything in the settings that explains this behavior. Do subdomains perhaps take precedence for some reason?
Any ideas?
Jennifer Filgate
Perhaps when you ran the operation to update the URLs in your database you performed it on your live site’s database instead of the new staging site’s database? You have to select the staging site’s database after you create it before you run the operation. Maybe you missed that selecting step.
Arjun Singhal
I got errors regarding SSL certificates. I am a newbie when it comes to using Git and the command prompt on my Mac. So I couldn’t get to syncing everything like I wanted.
Also, how it appears is that the steps are good to sync the local disks files to the server – changes in the theme folder etc.
However, there is no syncing mechanism highlighted for the MySQL server changes in the case of WordPress.
Evan
I don’t know. This just seems really confusing.
So, a Git Bucket is like an intermediary between your local computer and the hosted dev server? For example, if I have website.com then I create dev.website.com then I create an account and empty repository in Git Bucket then I create an empty folder on my local computer, and I edit files locally and sync them to the Git Bucket repository and then how do I commit to the live site? Is there any connection and control to the live site? It seems like from here, you sync your Git Bucket repository to the dev.website.com
Then what? I wish this article had a diagram to understand how this all works. It might make sense to you guys because you do it all day, but for the first time, this is a dizzying experience. Especially since multiple points in this setup failed and I had to go about custom fixing each one. At this point, I have created dev.website.com, copied all files from the live site to it, copied the database, connected it in, logged into the dev.website.com wordpress site, made sure all is cool, but now … I am lost as to what I do next.
In your article, you ask us to INIT a local directory on our computer. Well, I’m trying out Git Bucket’s SOURCE TREE, which by the way looks great. But now what? Any help on what is the procedure from here? What’s the logic to all this?
I create a folder on my local drive, it syncs to a Git Bucket Repository so that people can develop collaboratively. But who uploads the changes to the dev.website.com server? Don’t users need to be able to do that to see live changes on the server? So how does that all connect?
And how do you update the final changes to the live website once you’re ready? Man I’m confused. I spent 3 days getting this setup and I can’t figure out this next step, because I don’t understand how that all works.
Any help?
Oscar
Hi Evan, although I am sure you figured it out by now as its months later, I figured it may help others with the same question. After you have committed your code to version control, you would move your changes over to the server of your choice (dev/staging/production) using the deploy feature. This is described in the section above titled, “Deploying Changes From BitBucket to Staging Site”. Hope this helps clarify!
vjohnson
I am truly a beginner at this, and I have read the article a couple of times. I think my environment is almost set up, the piece that appears to be missing is in the install step. The directions say copy the files but do not install “yet”, when in this process do I run an install of wp? I am unsure if some of the issues that i ran into are due to my host which is hostgator or something that I’ve done wrong. Any input would be great.
What is happening at this point is no errors but nothing is rendered on at the url for my staging area.
Martin
Nice article. Although, the whole way, you’re talking about setting up a development site on the server as a subdomain. But at the end your using a local Xammp server.
How would you setup a test environment on the server where the doomain is hosted? Do you use bitbucket for it as well?
Thanks, cheers.
Alberto Serrano
Hello , I made a staging site successfully but my live site already had a little problem with a plug in , I contacted the developer and he asked for my admin credentials , following your advice on other article I gave him log in credentials to my staging site and he fixed the issue , to make the changes on the live site he told me to import the database from the staging site to the live site , my concern is the sql changes I made to the staging database , if I copy the database isn’t my live site going to redirect to the staging site now ? I can’t find the SQL queries to delete them
Thanks
WPBeginner Support
See our tutorial on how to update URLS when moving WordPress site.
Admin
isagani
hey,
nice article, i followed all instructions and gave me a clean view process on using git and staging environment. hope all experienced people do what you did so many can step forward from beginner to advance.
Thanks a lot.
Isagani
Kristof Bernaert
Just a perfect article that helped me to setup the whole thing.
My staging environment is on the same shared linux hosting, just in another directory.
I used this also as the repo for git.
With Coda, I’m working online in that staging. As I save changed files (mainly css), I see instantly the updates.
So I don’t need the local files on my laptop.
But how to checkout those remote files under the staging folder, without fetching a local copy?
Thx!
Kristof
bcall
Thanks for the article!
I have one problem, though: I have two databases and am not sure which one (or maybe both) is connected to my live site. I checked the wp-config.php file and it’s linking to a database with a different name, one that does not appear in my database list (in phpMyAdmin). Is it possible that the database was renamed?
Nick Jubrey
Look in your wp-config.php file that’s where wp is directed to that particular database, the db your using will be listed there.
Tiffany Johnson
I’m having some issues with the dev site recognizing my theme and content. I copied over the following files prior to running my installation of wordpress, however the pages and content are still not being recognized. I checked the files and my media is in the uploads file, my themes are present, as are my plugins, but none of them are recognized in the actual wordpress site.
/wp-content/uploads
/wp-content/themes
/wp-content/plugins
Any suggestions on what else I can try? Thanks!
Nicole
I’m having this same problem. Any suggestions of what to try? I followed the instructions to copy those files from one folder to the other, and it is in the right place.
Brad Scott
@WPBeginner,
For my case.
Create subdomain: staging.example.com
Create Document Root: public_html/staging
Need to run the following SQL queries:
The NEW_URL should be http://example.com/staging not http://staging.example.com
Login: http://example.com/staging/wp-login.php
Cheers & Thanks
byberkan
Brad, so that means you are not using the subdomain. You are just using it as a subdirectory which you didn’t have to create a subdomain to use that..
Paula Lay
Thank you so much for this tutorial! The step-by-step instructions are perfect for someone who hasn’t done this before. I encountered a snag where I was getting an error message after creating a subdomain (something like a problem configuring the DNS). For anyone that encounters this problem – clear your browser cache and cookies, and then you will see the correct screen. Took me days to figure this out (I gave it a few days because I thought it would take 24hrs or so for the domain to propogate).
Random Dev
Whoa. Wouldn’t it be simpler, cutting down on quite a few steps and reducing the technical nature of this process, to just use a backup plugin with a migrator (search/replace the database) function… instead of copying the databases manually, *and* instead of using Git/Bitbucket? Or am I not understanding something?
Cannonpult
For smaller sites, maybe. But plugins like Duplicator start to fail or have significant diminishing returns on larger sites. For example, if you were working on a site with a lot of media, Duplicator will never be able to transfer everything. You will get warning messages and have to leave media behind in the transfer.
Yes, this tutorial would be overkill for a small blog. But it’s absolutely the way you should go for say, a woocommerce site with 3,000 products (including images and custom data).
The other big consideration is frequency of changes. Some sites are fairly hands-off after they go live. Maybe you just update core + plugins and perform a few minor changes per year. Other sites might require weekly or even more frequent changes. If this were the case, it would become a pain to wait for backups and then drop a backup on the new site (crossing your fingers that it works each time). By using the method described in the tutorial, you can commit smaller changes at a time right after testing them.
mgiulio
Excellent article.I was looking for info about best practices for wordpress staging sites. The additional section on the git-bitbucket workflow is very much appreciated.
nwesource
Fantastic tutorial, thank you! I know WPEngine.com has a staging site built into their hosting options which seems fantastic although I haven’t tried it just yet. Are there any other easier options you know of to setup and operate a staging site, with more of a plugin functionality like WPEngine? They literally have a clone to staging button and a clone to live button that makes this seem like a process from the 80’s LOL…
Amazing tutorial, thank you for enterprise level content!
WPBeginner Staff
No you first need to extract the zip folder and then upload the contents of wordpress directory to your staging site.
Tony Leary
Can someone elaborate on this one step:
“First download a fresh copy of WordPress from WordPress.org. Upload the contents of WordPress to your staging site. Note, do not run the WordPress install yet.”
I read that as “1) download WordPress zip file from WordPress.org and 2) upload .zip file to /staging folder via File Manager.” However, I don’t think that’s correct.
bcall
You can upload the .zip file and then extract the contents within file manager.
WPBeginner Staff
Most probably your subdomain is not configured correctly.
Julius
I actually found out the problem..and it’s been resolved…however, I am unable to add images to my library….anyone else experienced this challenge.
Hans Lindgren
Is the wordpress install running on Windows?
(If so, you need to grant Modify NTFS permissions to IUSR on C:WindowsTemp)
Julius
Awesome tutorial…however, after I attempt to log into the staging site I am taking to the “Opps! Google Chrome could not find http”. What am I doing wrong?
Julius
This is really a great tutorial and something I been wanting to do for quite sometime. My problem is that when I visit the WP login screen it appears that the styling from my theme isn’t applied. Is this normal? Also, when I enter my credentials from the live site into the fields for the staging site, it doesn’t log me in. It’s taking me to the “Oops! Google Chrome could not find http”. Am I doing something wrong?
Sloan Stewart
Very helpful article. Only issue I have is that when it begins discussing version control, it switches from focusing on the alternate wordpress installation on the server to a local installation on one’s machine.
I am assuming one would build your site locally (I am using WAMP) and then use Git/Bitbucket & Ftploy to update your dev/staging wordpress install? That would mean one would have three versions of the wordpress site at all times [Production, Dev/Staging, Local].
How does one ensure your local wordpress install remains compatible with the database and other configuration on the server? Or is there a way to utilize Git/Bitbucket/Ftploy on the server without having to involve a local copy of your wordpress site.
Karlis
Do you need to create user for your freshly created phpmyadmin database?
WPBeginner Staff
No this tutorial is not written for WordPress multisite.
Aathi
Hi,
Will the above process works for wordpress multisite ?
Cheryl S.
Because I typically develop in a staging area on my server and then move it to the clients server to go live, rolling back to previous versions is nearly impossible. This article has made me seriously consider implementing version control with Git and Bitbucket. Thank you so much for this tutorial.
WPBeginner Staff
Yes this would be a better approach.
Mimi Bondi
Thank you. Is it safe to simply copy all the files from the ”test” site and paste them over the current ”live” files via FTP? Or is there more to it?
Mimi Bondi
Would this be the best way to duplicate a website, set it up with a new theme/content then copy it over to the current live website?
I want to change theme but it’s quite a big job so instead of activating it then frantically trying to fix things for days, I’m looking for a way to copy my current site, change it all ”in the background” then make the new one live. Please let me know if it’s even possible?
Mimi Bondi
Once i have my site exacty how i want it in the staging environment,
is there a safeway to copy those files to the real live site?
My goal is to change themes but because this would involve quite a bit of
setting up, i am looking for a way to do this safely and only replace my
current content with the new content when it’s ready (without changing
permalinks and SEO hopefully). Is that possible?
Larry
Excellent article….I was able to follow the instructions step-by-step and complete the creation of development site on my hosting server. Kudos to the writter.
Mike
I’m having some issues when I try to run the SQL queries to change the references to the staging site. I am receiving the following error:
”
#1064 – You have an error in your SQL syntax; check the manual that corresponds to your MySQL server version for the right syntax to use near ‘1
UPDATE wp_options SET option_value = REPLACE(option_value, ‘http://example’ at line 1
”
My SQL query is as follows:
”
1
UPDATE wp_options SET option_value = REPLACE(option_value, ‘http://example.com’, ‘http://dev.example.com’);
2
UPDATE wp_postmeta SET meta_value = REPLACE(meta_value, ‘http://example.com’, ‘http://dev.example.com’);
3
UPDATE wp_posts SET guid = REPLACE(guid, ‘http://example.com’, ‘http://dev.example.com’);
4
UPDATE wp_posts SET post_content = REPLACE(post_content, ‘http://example.com’, ‘http://dev.example.com’);
”
As I missing a step or do I have something incorrect in query? Thanks for your help.
Mike
Never mind, I figured out my issue. Feel free to delete this comment.
djramc
i have the same problem. could i ask how did you solve this issue?
thanks by advance
#1064 – You have an error in your SQL syntax; check the manual that corresponds to your MySQL server version for the right syntax to use near ‘)’ at line 1
WPBeginner Support
You need to remove numbers from lines, replace example.com with your live site url and dev.example.com with your development or staging site URL.
Admin
Bevis Larsen
This article is most useful for the user who want to make advance wordpress application
Brad E
I followed the directions and am able to get the staging site to work. However, every link, page and even login revert to the live site not the staging site. How do I fix this?
WPBeginner Support
you need to change site address and wordpress address. To do that you need to run this SQL query in phpmyadmin for the database of your staging site:
UPDATE wp_options SET option_value = REPLACE(option_value, ‘ORIGINAL_URL’, ‘NEW_URL’);
UPDATE wp_postmeta SET meta_value = REPLACE(meta_value, ‘ORIGINAL_URL’, ‘NEW_URL’);
UPDATE wp_posts SET guid = REPLACE(guid, ‘ORIGINAL_URL’, ‘NEW_URL’);
UPDATE wp_posts SET post_content = REPLACE(post_content, ‘ORIGINAL_URL’, ‘NEW_URL’);
Don’t forget to replace the original url with the url of your live site and new url with the URL of your staging site.
Admin
Brad E
OK – it works now. I had to run the query several times, but got it to work. The problem I am having now, is that all of the theme settings are missing. The header, widgets, background, etc. are set to the theme’s defaults. I am not sure how to update the settings to what the live site has. I copied the 3 files from the wp-content directory. Thanks for the outstanding article and support.
ROHIT
Hi,
As usual, just read you well written article on staging. I’ve got only question in mind right now and is that if there is any changes made in database while working on any project then do I need to upload it seperately on server from local environment whereas files would automatically get deployed via ftploy.
Cheers and Thanks.
Keep your good work up.
Clive
If I make changes on my local WP project, I understand files in my theme are changed, and those are uploaded to staging via BitBucket/Ftploy. What about the database/tables from my local project? I don’t understand why those aren’t also included? Or would the database/tables in staging be updated based on theme changes that are uploaded? Thanks!!
WPBeginner Support
Clive, in your BitBucket repository you can only store your WordPress files. FTPloy simply syncs those files to your staging site.
Admin
Paul Sweany
What do you recommend for when database changes are made? Let’s say I create a new page; should I just re-import the database on the dev server after I make changes to it on my local copy? Also, moving it from dev to live, any recommendations other than manually importing it and running a search and replace to fix the URL?
Glen Clay
As usual, great article and right when I need it. Keep up the great work! On another note, I am on my iPhone and that annoying floating black ‘Trending’ bar keeps getting in the way of me commenting. This article benefited me so much that I went through the several tries it took for me to comment.
WPBeginner Support
Glen, thanks for your feedback. We will look into it.
Admin
Eben
I wasn’t really mentioned on what to do with the staging database and how to transfer the changes to the live database, especially if your client has been making changes to the live site while you’ve been making changes to the staging site and there are changes in both databases.
This is one area of staging environments with wordpress that I haven’t been able to get my head around.
WPBeginner Support
Staging is basically for development, when working on themes or plugins. We imported the database only so that we have actual data to test with. It is not supposed to be a synchronized mirror of your live site.
Admin
Juliana Maggioli
I don’t know if is the same as Eben’s question, but everything is going fine till…: upload/transfer the staging content to the live site. supposing everything is perfect in the staging, how do i make all this perfect structure/content be the live site, without risks?
Damien Carbery
I have started using WP Migrate DB (http://wordpress.org/plugins/wp-migrate-db/) to convert urls and paths in the DB. It will also convert urls and paths that are in serialised data.
So I copy the files to the staging server and create a database and then export the live db via WP Migrate DB and import it to the new database via phpMyAdmin.
The biggest issue is when the live site is updated before I bring the staging server db back.
Zimbrul
If you have Softaculous is even easier to deploy a staging site to the live site: you can clone the site to a location within the same server.
It’s what I’m doing: I create the staging environment and when done I just go the the list of my WordPress installs in Softaculous control panel and “clone” the site to the live location. The live location must be empty by other files for this to work.
WPBeginner Support
Thats another way to do it.
Admin
Giacomo Ardesi
Hey Zimbrul, can you give some more details about Softaculous and how you used it please?
Giacomo Ardesi
Hey Zimbrul, could you please give some more details on how you use Softaculous to clone your WP staging site? Thank you!
M Asif Rahman
Thanks Syed & The Team, that’s one of the most complete and understandable for normal readers Staging Guide for WP. Nicely done.