Stai avendo difficoltà a organizzare diversi tipi di contenuti sul tuo sito WordPress?
Se stai cercando di usare i normali post del blog per tutto – elenchi di prodotti, testimonianze, elementi del portfolio – avrai probabilmente notato quanto velocemente le cose diventano un pasticcio confuso. 🤦
Comprendiamo perfettamente quanto possa essere frustrante. Fortunatamente, c'è un modo semplice per portare ordine nel caos: i tipi di post personalizzati.
I tipi di post personalizzati ti consentono di creare sezioni dedicate per tutti i tuoi contenuti. Ciò significa che prodotti, testimonianze o portfolio possono avere ciascuno il proprio layout e struttura, completamente separati dai tuoi normali post del blog e pagine.
In questa guida, ti mostreremo due metodi diversi per creare tipi di post personalizzati. In questo modo, puoi scegliere quello che si adatta al tuo livello di comfort e organizzare ordinatamente i tuoi contenuti oggi stesso.

Cos'è un Tipo di Post Personalizzato in WordPress?
Un tipo di post personalizzato è un tipo di contenuto che puoi creare in WordPress ed è diverso dai normali post e pagine. Ti consente di organizzare e visualizzare tipi di contenuti unici, come portfolio, prodotti o recensioni di film, in modo più strutturato.
Pensalo come avere schedari organizzati per diversi tipi di contenuti invece di buttare tutto in un unico cassetto!
Prima di approfondire, WordPress utilizza tipi di post per distinguere i diversi contenuti. Mentre "post" e "pagina" sono i tipi più comuni, WordPress in realtà ne include alcuni altri per impostazione predefinita:
- Post – per le voci del blog
- Pagina – per contenuti statici come una pagina "Chi siamo"
- Allegato – per i file multimediali
- Revisione – per bozze e modifiche di contenuti
- Menu di Navigazione – per le voci di menu
I tipi di post personalizzati ti consentono di creare sezioni dedicate del tuo sito WordPress per specifici tipi di contenuto.
Supponiamo che tu gestisca un sito di recensioni di film. Allora, probabilmente vorresti creare un tipo di post 'recensioni di film'. Su un sito portfolio, potresti creare un tipo di post Progetti. Mentre un sito di eCommerce trarrebbe beneficio da un tipo di post Prodotti.
📝 Nota interna: Noi di WPBeginner utilizziamo effettivamente anche tipi di post personalizzati. Li utilizziamo per le nostre sezioni Offerte e Glossario per mantenerle separate dai nostri articoli del blog.
Quindi, ogni tipo di post personalizzato può avere il proprio layout, campi personalizzati e persino la propria struttura di categorie o tag personalizzati. Questo rende il tuo sito più organizzato e facile da usare!
Inoltre, molti plugin WordPress popolari utilizzano tipi di post personalizzati per archiviare dati sul tuo sito WordPress. Di seguito sono riportati alcuni dei migliori plugin che utilizzano tipi di post personalizzati:
- WooCommerce aggiunge un tipo di post 'prodotto' al tuo negozio online
- WPForms crea un tipo di post 'wpforms' per memorizzare tutti i tuoi moduli
- MemberPress aggiunge un tipo di post personalizzato 'memberpressproduct'
Ho bisogno di creare tipi di post personalizzati?
Prima di iniziare a creare tipi di post personalizzati sul tuo sito WordPress, è importante valutare le tue esigenze. Spesso, puoi ottenere gli stessi risultati con un normale post o pagina.
Se non sei sicuro che il tuo sito necessiti di tipi di post personalizzati, fai riferimento alla nostra guida su quando hai bisogno di un tipo di post o di una tassonomia personalizzata in WordPress.
Tenendo conto di ciò, diamo un'occhiata a come creare facilmente tipi di post personalizzati in WordPress per il tuo uso. Ti mostreremo due metodi e copriremo anche alcuni modi per visualizzare tipi di post personalizzati sul tuo sito WordPress:
- Metodo 1: Creare un tipo di post personalizzato manualmente utilizzando WPCode (più flessibile)
- Metodo 2: Creare un tipo di post personalizzato con un plugin (nessuna codifica richiesta)
- Suggerimento bonus: visualizzare tipi di post personalizzati sul tuo sito
- Domande frequenti (FAQ): Tipi di post personalizzati di WordPress
- Tutorial video – Come creare tipi di post personalizzati in WordPress
- Altre guide sulla gestione di post e pagine di WordPress
Pronto? Iniziamo.
Metodo 1: Creare un tipo di post personalizzato manualmente utilizzando WPCode
La creazione di un tipo di post personalizzato richiede l'aggiunta di codice al file functions.php del tuo tema. Tuttavia, non lo consigliamo a nessuno se non agli utenti avanzati, poiché anche un piccolo errore può compromettere il tuo sito. Inoltre, se aggiorni il tuo tema, il codice verrà cancellato.
Invece, utilizzeremo WPCode, il miglior plugin per aggiungere codice personalizzato al tuo sito WordPress.
Con WPCode, puoi aggiungere snippet personalizzati e attivare molte funzionalità dalla sua libreria di codice integrata e preconfigurata. In altre parole, può sostituire molti plugin dedicati o monouso che potresti aver installato.
Esplora tutte le funzionalità che abbiamo testato nella nostra recensione dettagliata di WPCode.

Innanzitutto, dovrai installare e attivare il plugin gratuito WPCode. Per istruzioni dettagliate, consulta la nostra guida passo passo su come installare un plugin di WordPress.
📝 Nota: La versione gratuita di WPCode funziona bene per questo tutorial. Tuttavia, l'aggiornamento a WPCode Pro sblocca funzionalità avanzate come la pianificazione di codice personalizzato e la cronologia completa delle revisioni.
Una volta attivato, naviga su Snippet di codice » Aggiungi snippet dalla tua bacheca di WordPress.
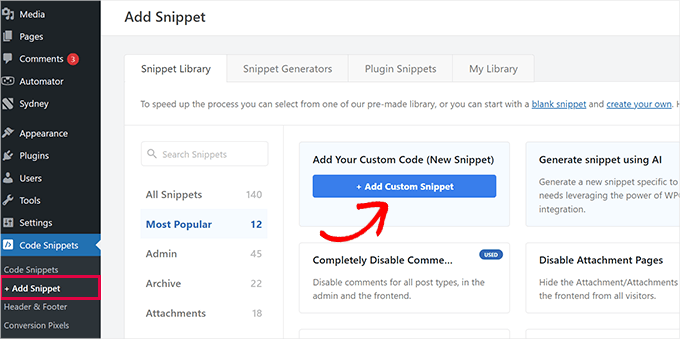
Quindi, dovrai passare il mouse su 'Aggiungi il tuo codice personalizzato (Nuovo snippet)' e quindi fare clic su '+ Aggiungi snippet personalizzato'.
Nel popup che appare, seleziona 'Snippet PHP' come tipo di codice dall'elenco delle opzioni.
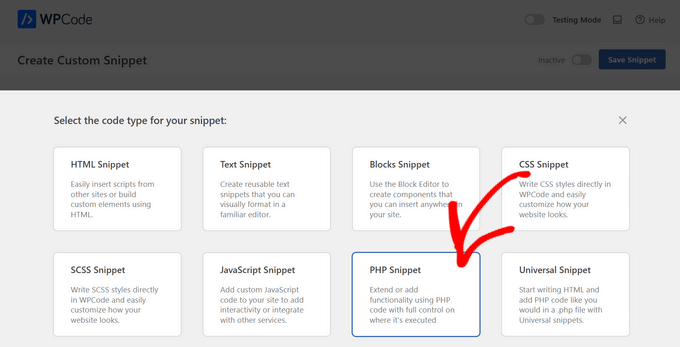
Questo aprirà la pagina 'Crea snippet personalizzato'.
Ora, puoi aggiungere il titolo dello snippet di codice, che può essere qualsiasi cosa per aiutarti a ricordare a cosa serve il codice.
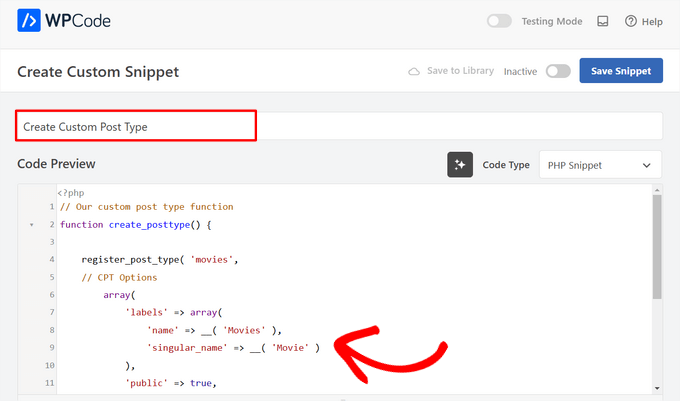
Dopodiché, incolla semplicemente il seguente codice nell'area 'Anteprima codice'.
Questo codice crea un tipo di post personalizzato di base chiamato 'Film' che apparirà nella barra laterale di amministrazione e funzionerà con qualsiasi tema WordPress.
// Our custom post type function
function create_posttype() {

    register_post_type( 'movies',
    // CPT Options
        array(
            'labels' => array(
                'name' => __( 'Movies' ),
                'singular_name' => __( 'Movie' )
            ),
            'public' => true,
            'has_archive' => true,
            'rewrite' => array('slug' => 'movies'),
            'show_in_rest' => true,

        )
    );
}
// Hooking up our function to theme setup
add_action( 'init', 'create_posttype' );
Se desideri solo un tipo di post personalizzato di base, sostituisci semplicemente movies e Movies con il tuo slug e nome CPT e fai clic sul pulsante 'Aggiorna'.
Tuttavia, se desideri ancora più opzioni per il tuo tipo di post personalizzato, dovresti usare il seguente codice invece di quello sopra.
Il codice seguente aggiunge molte più opzioni al tipo di post personalizzato 'Film', come il supporto per revisioni, immagini in evidenza e campi personalizzati, oltre ad associare il tipo di post personalizzato a una tassonomia personalizzata chiamata 'generi'.
☝ Importante: Non combinare questi due snippet, altrimenti WordPress ti darà un errore perché entrambi gli snippet registrano lo stesso tipo di post personalizzato. Si consiglia di creare uno snippet completamente nuovo utilizzando WPCode per ogni tipo di post aggiuntivo che si desidera registrare.
/*
* Creating a function to create our CPT
*/

function custom_post_type() {

// Set UI labels for Custom Post Type
    $labels = array(
        'name'                => _x( 'Movies', 'Post Type General Name', 'twentytwentyone' ),
        'singular_name'       => _x( 'Movie', 'Post Type Singular Name', 'twentytwentyone' ),
        'menu_name'           => __( 'Movies', 'twentytwentyone' ),
        'parent_item_colon'   => __( 'Parent Movie', 'twentytwentyone' ),
        'all_items'           => __( 'All Movies', 'twentytwentyone' ),
        'view_item'           => __( 'View Movie', 'twentytwentyone' ),
        'add_new_item'        => __( 'Add New Movie', 'twentytwentyone' ),
        'add_new'             => __( 'Add New', 'twentytwentyone' ),
        'edit_item'           => __( 'Edit Movie', 'twentytwentyone' ),
        'update_item'         => __( 'Update Movie', 'twentytwentyone' ),
        'search_items'        => __( 'Search Movie', 'twentytwentyone' ),
        'not_found'           => __( 'Not Found', 'twentytwentyone' ),
        'not_found_in_trash'  => __( 'Not found in Trash', 'twentytwentyone' ),
    );

// Set other options for Custom Post Type

    $args = array(
        'label'               => __( 'movies', 'twentytwentyone' ),
        'description'         => __( 'Movie news and reviews', 'twentytwentyone' ),
        'labels'              => $labels,
        // Features this CPT supports in Post Editor
        'supports'            => array( 'title', 'editor', 'excerpt', 'author', 'thumbnail', 'comments', 'revisions', 'custom-fields', ),
        // You can associate this CPT with a taxonomy or custom taxonomy.
        'taxonomies'          => array( 'genres' ),
        /* A hierarchical CPT is like Pages and can have
        * Parent and child items. A non-hierarchical CPT
        * is like Posts.
        */
        'hierarchical'        => false,
        'public'              => true,
        'show_ui'             => true,
        'show_in_menu'        => true,
        'show_in_nav_menus'   => true,
        'show_in_admin_bar'   => true,
        'menu_position'       => 5,
        'can_export'          => true,
        'has_archive'         => true,
        'exclude_from_search' => false,
        'publicly_queryable'  => true,
        'capability_type'     => 'post',
        'show_in_rest' => true,

    );

    // Registering your Custom Post Type
    register_post_type( 'movies', $args );

}

/* Hook into the 'init' action so that the function
* Containing our post type registration is not
* unnecessarily executed.
*/

add_action( 'init', 'custom_post_type', 0 );
Potresti notare la parte in cui abbiamo impostato il valore gerarchico su false. Se desideri che il tuo tipo di post personalizzato si comporti come le pagine anziché come i post, puoi impostare questo valore su true.
Un'altra cosa da notare è l'uso ripetuto della stringa twentytwentyone, questo è chiamato 'Text Domain'. Se il tuo tema è pronto per la traduzione e desideri che i tuoi tipi di post personalizzati vengano tradotti, dovrai menzionare il text domain utilizzato dal tuo tema.
Puoi trovare il text domain del tuo tema all'interno del file style.css nella directory del tuo tema o andando su Aspetto » Editor file tema nel tuo pannello di amministrazione. Il text domain sarà menzionato nell'intestazione del file.
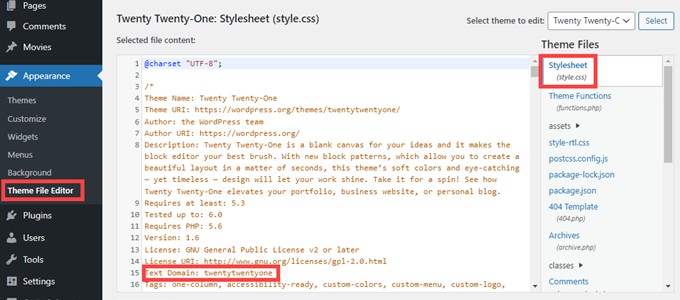
Sostituisci semplicemente twentytwentyone con il 'Text Domain' del tuo tema.
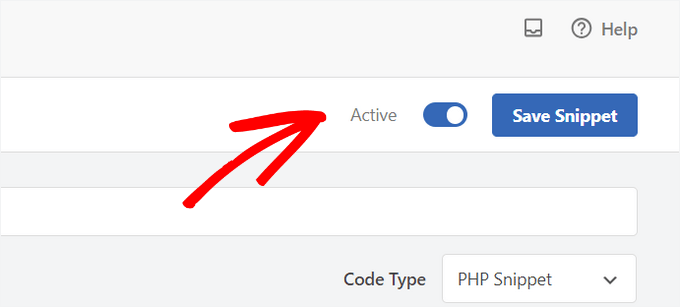
Una volta soddisfatto delle modifiche, semplicemente sposta l'interruttore da 'Inattivo' ad 'Attivo' in cima alla pagina.
Infine, fai clic sul pulsante 'Salva snippet' e WPCode si occuperà del resto.
Metodo 2: Creare un tipo di post personalizzato con un plugin
Un altro modo semplice per creare un tipo di post personalizzato in WordPress è utilizzare un plugin. Questo metodo è consigliato ai principianti perché è sicuro e super facile.
La prima cosa da fare è installare e attivare il plugin Custom Post Type UI. Per maggiori dettagli, consulta la nostra guida passo passo su come installare un plugin WordPress.
Dopo l'attivazione, devi andare su CPT UI » Aggiungi / Modifica tipi di post per creare un nuovo tipo di post personalizzato. Dovresti trovarti nella scheda 'Aggiungi nuovo tipo di post'.
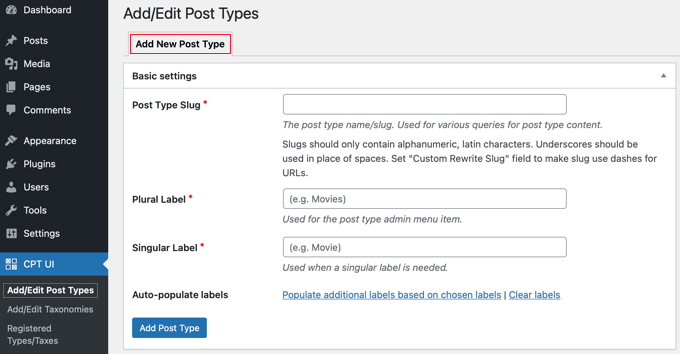
In quest'area, dovrai fornire uno slug per il tuo custom post type, ad esempio 'film'. Questo slug verrà utilizzato nell'URL e nelle query di WordPress, quindi può contenere solo lettere e numeri.
Sotto il campo dello slug, devi fornire i nomi plurale e singolare per il tuo custom post type.
Se lo desideri, puoi fare clic sul link che dice 'Popola etichette aggiuntive in base alle etichette scelte'. Questo compilerà automaticamente i campi delle etichette aggiuntive sottostanti e di solito ti farà risparmiare tempo.
Ora puoi scorrere verso il basso fino alla sezione 'Etichette aggiuntive'. Se non hai fatto clic sul link che abbiamo menzionato, dovrai fornire una descrizione per il tuo post type e modificare le etichette.
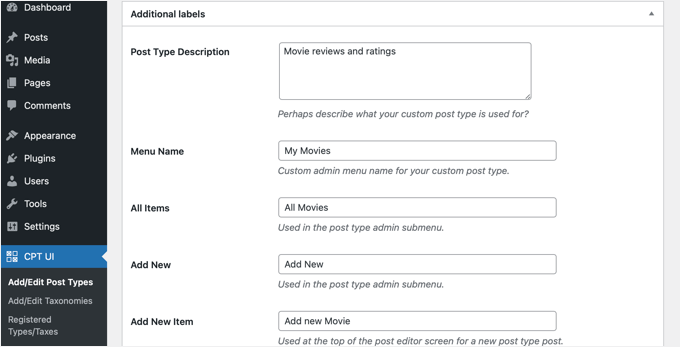
Queste etichette verranno utilizzate nell'interfaccia utente di WordPress quando gestisci contenuti in quel particolare post type.
Successivamente, arrivano le impostazioni del post type.
Da qui, puoi impostare diversi attributi per il tuo post type. Ogni opzione viene fornita con una breve descrizione che spiega cosa fa.
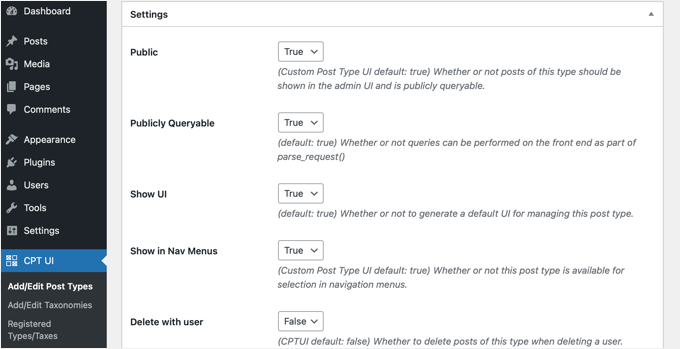
Ad esempio, puoi scegliere di non rendere un post type gerarchico come le pagine o di ordinare i post cronologici in ordine inverso.
Sotto le impostazioni generali, vedrai l'opzione per selezionare quali funzionalità di modifica questo post type supporterebbe. Semplicemente seleziona le opzioni che desideri includere.
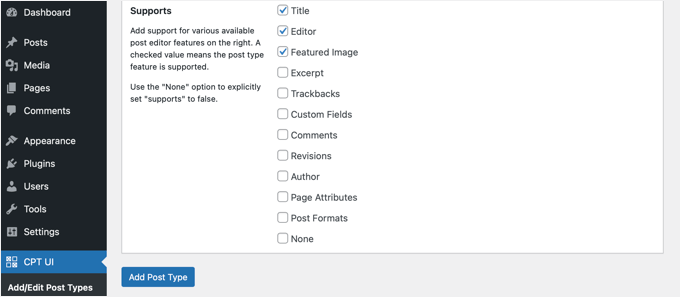
Infine, fai clic sul pulsante 'Aggiungi Post Type' per salvare e creare il tuo custom post type.
Tutto qui, hai creato con successo il tuo custom post type! Ora puoi procedere e iniziare ad aggiungere contenuti.
Suggerimento bonus: visualizzare tipi di post personalizzati sul tuo sito
WordPress offre supporto integrato per la visualizzazione dei tuoi custom post types. Una volta aggiunti alcuni elementi al tuo nuovo custom post type, è ora di visualizzarli sul tuo sito web.
Ci sono alcuni metodi che puoi utilizzare, e ognuno ha i propri vantaggi.
Visualizzazione di Custom Post Types utilizzando il modello di archivio predefinito
Innanzitutto, puoi semplicemente andare su Aspetto » Menu e aggiungere un link personalizzato al tuo menu. Questo link personalizzato è il link al tuo custom post type.
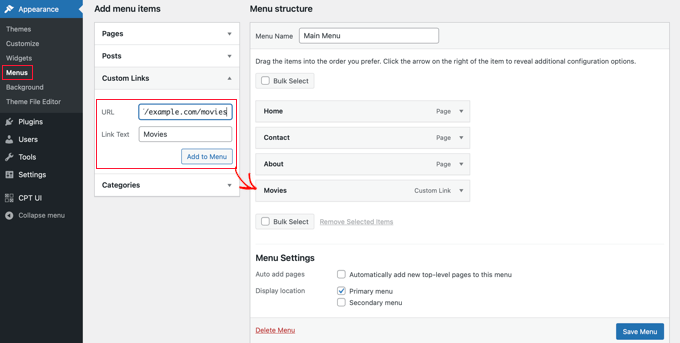
Se stai utilizzando permalink SEO-friendly, allora l'URL del tuo custom post type sarà molto probabilmente simile a questo:
http://example.com/movies
Se non stai utilizzando permalink SEO-friendly, allora l'URL del tuo custom post type sarà simile a questo:
http://example.com/?post_type=movies
Non dimenticare di sostituire 'example.com' con il tuo nome di dominio e 'movies' con il nome del tuo custom post type.
Puoi quindi salvare il tuo menu e visitare il front-end del tuo sito web. Vedrai la nuova voce di menu che hai aggiunto e, quando ci cliccherai sopra, verrà visualizzata la pagina di archivio del tuo custom post type utilizzando il file template archive.php nel tuo tema.

Creazione di template per Custom Post Type
Se non ti piace l'aspetto della pagina di archivio per il tuo custom post type, puoi utilizzare un template dedicato per gli archivi di custom post type.
Tutto quello che devi fare è creare un nuovo file nella directory del tuo tema e nominarlo archive-movies.php. Assicurati di sostituire 'movies' con il nome del tuo custom post type.
Per iniziare, puoi copiare il contenuto del file archive.php del tuo tema nel template archive-movies.php e poi modificarlo per soddisfare le tue esigenze.
Ora, ogni volta che si accede alla pagina di archivio per il tuo custom post type, questo template verrà utilizzato per visualizzarla.
Allo stesso modo, puoi creare un template personalizzato per la visualizzazione singola del tuo post type. Per farlo, devi creare single-movies.php nella directory del tuo tema. Non dimenticare di sostituire 'movies' con il nome del tuo custom post type.
Puoi iniziare copiando il contenuto del template single.php del tuo tema nel template single-movies.php e poi modificandolo per soddisfare le tue esigenze.
Per saperne di più, consulta la nostra guida su come creare template personalizzati per singoli post in WordPress.
Visualizzazione di Custom Post Type nella Pagina Principale
Un vantaggio dell'utilizzo dei tipi di post personalizzati è che mantengono i tuoi tipi di contenuto personalizzati separati dai tuoi post normali. Tuttavia, puoi visualizzare i tipi di post personalizzati nella home page del tuo sito web, se lo desideri.
Aggiungi semplicemente questo codice come nuovo snippet utilizzando il plugin gratuito WPCode.
Si prega di consultare la sezione di questo articolo sull'aggiunta manuale di codice per istruzioni dettagliate.
add_action( 'pre_get_posts', 'add_my_post_types_to_query' );

function add_my_post_types_to_query( $query ) {
    if ( is_home() && $query->is_main_query() )
        $query->set( 'post_type', array( 'post', 'movies' ) );
    return $query;
}
Non dimenticare di sostituire 'movies' con il tuo tipo di post personalizzato.
Interrogare Tipi di Post Personalizzati
Se hai familiarità con la programmazione e desideri eseguire query loop nei tuoi template, ecco come farlo. Interrogando il database, puoi recuperare elementi da un tipo di post personalizzato.
Dovrai copiare il seguente snippet di codice nel template in cui desideri visualizzare il tipo di post personalizzato.
<?php
$args = array( 'post_type' => 'movies', 'posts_per_page' => 10 );
$the_query = new WP_Query( $args );
?>
<?php if ( $the_query->have_posts() ) : ?>
<?php while ( $the_query->have_posts() ) : $the_query->the_post(); ?>
<h2><?php the_title(); ?></h2>
<div class="entry-content">
<?php the_content(); ?>
</div>
<?php endwhile;
wp_reset_postdata(); ?>
<?php else:  ?>
<p><?php _e( 'Sorry, no posts matched your criteria.' ); ?></p>
<?php endif; ?>
Questo codice definisce il tipo di post e il numero di post per pagina negli argomenti della nostra nuova classe WP_Query. Esegue quindi la query, recupera i post e li visualizza all'interno del loop.
Visualizzare Tipi di Post Personalizzati nei Widget
Noterai che WordPress ha un widget predefinito per visualizzare i post recenti, ma non ti permette di scegliere un tipo di post personalizzato.
E se volessi visualizzare le ultime voci dal tuo tipo di post appena creato in un widget? Fortunatamente, c'è un modo semplice per farlo.
La prima cosa da fare è installare e attivare il plugin Custom Post Type Widgets. Per maggiori dettagli, consulta la nostra guida passo passo su come installare un plugin WordPress.
Dopo l'attivazione, vai semplicemente su Aspetto » Widget e trascina il widget 'Articoli recenti (Custom Post Type)' in una barra laterale.
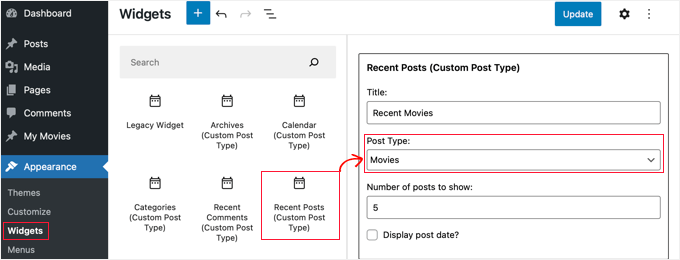
Questo widget ti permette di mostrare gli articoli recenti di qualsiasi tipo di post. Devi selezionare il tuo tipo di post personalizzato dal menu a discesa 'Tipo di post' e scegliere le opzioni desiderate.
Dopodiché, assicurati di fare clic sul pulsante 'Aggiorna' in cima alla schermata e poi visita il tuo sito web per vedere il widget in azione.

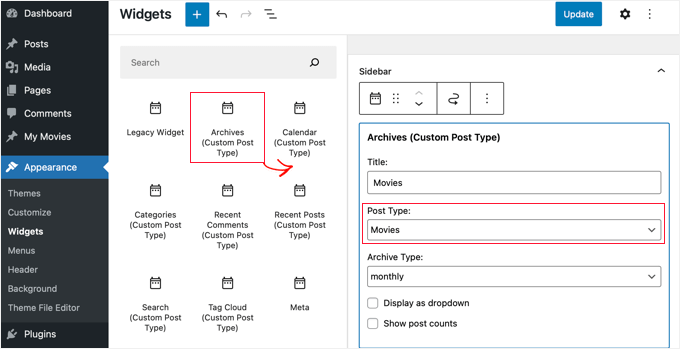
Il plugin fornisce anche widget per tipi di post personalizzati che visualizzano archivi, un calendario, categorie, commenti recenti, ricerca e una nuvola di tag.
Quindi, sentiti libero di esplorare e scegliere quello di cui hai bisogno.
Domande frequenti (FAQ): Tipi di post personalizzati di WordPress
Ecco alcune delle domande più comuni che ci vengono poste sulla creazione di tipi di post personalizzati in WordPress.
Qual è la differenza tra un tipo di post personalizzato e una categoria?
Un tipo di post personalizzato serve a creare un tipo di contenuto completamente nuovo, mentre una categoria serve a raggruppare contenuti esistenti. Ad esempio, 'Recensioni di libri' sarebbe un tipo di post personalizzato. 'Narrativa' e 'Saggistica' sarebbero categorie per organizzare tali recensioni di libri.
L'eliminazione di un tipo di post personalizzato eliminerà anche tutti i suoi contenuti?
No, i contenuti non vengono eliminati dal tuo database, ma diventeranno nascosti e inaccessibili. Per rendere nuovamente visibili i post, dovresti ri-registrare il tipo di post personalizzato con lo stesso identico nome.
Raccomandiamo sempre di effettuare un backup completo di WordPress prima di rimuovere i tipi di post.
Come aggiungo campi personalizzati al mio tipo di post personalizzato?
Puoi facilmente aggiungere campi personalizzati per aggiungere informazioni più strutturate ai tuoi tipi di post, come aggiungere un campo 'Regista' a un tipo di post 'Film'. Puoi farlo con il codice o utilizzare un plugin popolare come Advanced Custom Fields (ACF) per un'interfaccia user-friendly.
Tutorial video – Come creare tipi di post personalizzati in WordPress
Prima di andare, assicurati di controllare il nostro tutorial video su come creare tipi di post personalizzati in WordPress.
Altre guide sulla gestione di post e pagine di WordPress
Speriamo che questo tutorial ti abbia aiutato a imparare come creare tipi di post personalizzati in WordPress. Successivamente, potresti anche voler imparare:
- Come aggiungere stati di post personalizzati per i post del blog in WordPress
- Come includere tipi di post personalizzati nei risultati di ricerca di WordPress
- Come mostrare o nascondere i widget su pagine WordPress specifiche
- Come creare una pagina figlia in WordPress
- Come creare una pagina di archivio personalizzata in WordPress
- Pagine importanti che ogni blog WordPress dovrebbe avere
- Tutorial sui tipi di post personalizzati di WordPress più utili
Se ti è piaciuto questo articolo, iscriviti al nostro canale YouTube per tutorial video su WordPress. Puoi anche trovarci su Twitter e Facebook.


R Davies
Hai un errore di sintassi nel tuo secondo esempio (più dettagliato), il codice non funziona nell'ultima versione di Wordpress 7.4.3
) Warning: call_user_func_array() expects parameter 1 to be a valid callback, function ‘custom_post_type’ not found or invalid function name
C'è la possibilità di un aggiornamento / correzione?
Supporto WPBeginner
Ciao R Davies,
Abbiamo controllato e ha funzionato perfettamente.
Amministratore
Archit
La virgola alla fine dell'array 'supports' (nelle opzioni per il custom post type) è intenzionale?
Robert Stuart
Alla riga 31? Sì, quello è codice PHP normale.
“La virgola dopo l'ultimo elemento dell'array è opzionale e può essere omessa. Questo viene solitamente fatto per gli array su una singola riga, cioè si preferisce array(1, 2) rispetto ad array(1, 2, ). Per gli array su più righe, invece, la virgola finale è comunemente usata, poiché consente una più facile aggiunta di nuovi elementi alla fine.”
saurabh
Come abilitare 'Post Settings' in Custom_Post_type (usando il plugin Custom Post Type UI)?
Arias
Ciao, ho avuto problemi con questo plugin.
Ha disabilitato l'opzione per creare categorie e tag,
ho cercato un esempio per inserirli manualmente ma non ho ancora trovato nulla.
Sto cercando di annullare con questo metodo per risolvere il problema ma apprezzerei molto il tuo aiuto.
stormonster
Nel tuo array $args, all'indice ‘taxonomies’, aggiungi ‘category’ e ‘post_tag’.
Questo dovrebbe risolvere il problema.
John D
Troppo codice. Wordpress deve mantenere le cose più semplici.
Ilija
Questo è il motivo per cui uso il mio CMS dove posso creare nuovi tipi di post in una frazione di secondo direttamente tramite il CMS stesso. Senza alcuna codifica, sfortunatamente le grandi agenzie vogliono sviluppatori Wordpress e devono impararlo, sembra così complicato..
Sarah A
Ciao, sono riuscito a visualizzare un gruppo di CPT con un design specifico in un popup quando si fa clic su un'immagine come la prima. Ma si apre una nuova pagina e quando si fa clic fuori dal popup per uscire, non si torna alla homepage, e io non voglio questo. Voglio tutto sulla homepage.
Ho inserito il codice del CPT da visualizzare come popup in "single-chg_projet.php" e apro e chiudo il popup con javascript. Ho già provato a mettere tutto il codice di single-chg_projet.php nell'index, ma non visualizza nulla. Oppure potrei aver fallito da qualche parte. Per favore, aiutami. Grazie
Ghulam Mustafa
Ciao,
Grazie per il fantastico codice. Solo una piccola correzione al codice. Manca l'istruzione endwhile; prima dell'istruzione else: nella sezione Querying Custom Post Types =)
Tony Peterson
QUESTO! Si prega di aggiornare il codice per riflettere questo errore di sintassi poiché mi ha causato un po' di grattacapi finché non ho trovato il commento di Ghulam. Ora funziona.
Arkanum
Yes! True. It’s miss befire wp_reset_postdate();
The cycle while does not end
Azamat
Errore di battitura: "Quando ho bisogno di un tipo di post personalizzato?"
Supporto WPBeginner
Thanks for notifying us We have updated the article.
Amministratore
Jhon
ehi, puoi guidarmi nel processo di creazione di un glossario personalizzato come quello che hai sul tuo sito?
Supporto WPBeginner
Usiamo campi personalizzati e un modello personalizzato per visualizzare i termini del glossario.
Amministratore
Anil Reddy
Voglio creare un elenco di post nella pagina della categoria per il mio sito web
david ben oren
come faccio a clonare un tipo di post che ha una tabella specifica al suo interno, ho bisogno di creare un tipo di post separato per altre tabelle.
betty
Come aggiungo un campo personalizzato a un tipo di post?
Supporto WPBeginner
Si prega di consultare la nostra guida WordPress Custom Fields 101.
Amministratore
Megan
Ho scaricato il plugin e voglio aggiungere due tipi di post personalizzati. 1. Fanfiction per tutti i miei scritti e 2. Fanart per tutta la mia arte.
Per Fanfiction – voglio la possibilità di collegare capitoli tra loro in una storia e poter caricare capitoli in una storia mentre li scrivo.
Per Fanart – vorrei che l'attenzione fosse su un'immagine (ovviamente) con una descrizione sotto di essa
Questo articolo è quello di cui ho bisogno o è qualcosa di completamente diverso?
Grazie,
Megan
Zubair Abbas
Ciao,
Ho semplicemente copiato il codice nel functions.php del mio sito. Il nuovo tipo di post è visibile nella dashboard ma quando provo a vedere un post dopo averlo pubblicato, appare una pagina bianca. Successivamente ho capito che anche i post predefiniti non si aprono.
Quando rimuovo il codice da functions.php, tutto funziona di nuovo correttamente.
Please help
Grazie,
Zubair Abbas
Jouke Nienhuis
Se vedi una pagina bianca, spesso significa che hai dimenticato un carattere. Il fatto che tu veda i post se elimini il tuo codice personalizzato, conferma che hai un errore di battitura. Controlla i punti e virgola ";" e le parentesi di apertura e chiusura.
Per vedere esattamente dove hai commesso un errore, potresti modificare il file wp-config. Cerca ERROR REPORTING e imposta questo valore su true. Dopo, testa di nuovo e lì otterrai un errore e una riga con l'omissione.
Alex
Ho creato il CPT e sta funzionando benissimo, ma Google non riesce a trovarlo anche dopo aver aggiornato le sitemap, utilizzato plugin SEO o richiesto tramite Google Webmaster Tools. Qualche idea sul perché sta succedendo?
Supporto WPBeginner
Ci vuole tempo a Google per iniziare a mostrare nuovi contenuti nei risultati di ricerca. Per stare tranquillo, controlla le impostazioni del tuo plugin SEO per assicurarti di non bloccare l'indicizzazione dei tuoi CPT o delle pagine di archivio CPT.
Amministratore
Amunet
Creare un Custom Post Type può essere facile, specialmente con un plugin. Il vero trucco è mostrarli sulla pagina. Di solito hai bisogno di uno sviluppo personalizzato piuttosto avanzato o di plugin specifici per il tema come quello per Avada.
Sfortunatamente non esiste un modo universale per visualizzare i CPT in WordPress.
Supporto WPBeginner
In realtà, ci sono modi diretti e standard per visualizzare i CPT in WordPress. Ne abbiamo menzionato uno nell'articolo sopra.
Amministratore
Jouke Nienhuis
Come ha detto l'autore, ma ripeterò la risposta.
In breve, crea un link nel tuo menu di navigazione
Risposta avanzata in breve: crea una pagina archivio e una pagina singola
Chuck
Ottimo articolo. Come si possono modificare le informazioni dei post CPT singoli in base alla tassonomia personalizzata? Ad esempio:
Data | Autore | Serie | Libro | Argomento
Questo è facile da scrivere ma voglio capire come visualizzare informazioni post modificate se manca una delle tassonomie di Serie, come:
Data | Autore | Libro | Argomento
Altrimenti le informazioni post predefinite vengono visualizzate come:
Data | Autore | | Libro | Argomento
borahan
Voglio visualizzare post di categorie specifiche per l'utente corrente in una pagina. Come posso farlo?
Moazam Ali
Caro/a,
Grazie per il post. Voglio creare una libreria di ebook e usare un custom post type e un portfolio per mostrare le miniature dei libri nel frontend. Potresti per favore guidarmi su come posso farlo?
Sharon Wallace
Ciao a tutti,
Questo è un ottimo plugin. Sto cercando di far apparire la tassonomia nella pagina. Ne ho creata una chiamata Presenters. Puoi vederla qui.
Come posso fare in modo che accada?
Grazie
Supporto WPBeginner
Per favore, dai un'occhiata a come creare tassonomie personalizzate in WordPress. Spero che questo risponda alla tua domanda.
Amministratore
Sharon Wallace
Salve,
Grazie per la tua risposta. Non funziona ancora, ma mi hai indicato la giusta direzione. Continuerò a lavorarci.
Ti auguro una splendida giornata.
Dave S.
Ciao,
Ho creato un modulo (usando il plugin ArForms) che vorrei trasformare in un Post-Type. Hai qualche suggerimento su come fare, per favore?
Grazie.
Mark Greenway
Grazie per questo, esattamente quello che dovevo sapere per aiutarmi a capire i tipi di post personalizzati.
Mark.
shashik
Grazie caro..è molto utile..
Graham
Grazie! Proprio quello che stavo cercando. È incredibile quante volte trovo soluzioni alternative per WordPress e poi dimentico come le ho fatte e devo tornare indietro.
Molto apprezzato!
Ram
Molto utile! Grazie....
MELAS
Caro/a,
Non ho molta conoscenza di programmazione. Come posso vedere su una pagina specifica questi tipi di post e tassonomie personalizzati?
Grazie in anticipo!
MELAS
Mike Ritter
C'è un errore? La funzione non dovrebbe essere `create_post_type`?
Supporto WPBeginner
No Mike, non è una funzione core. Puoi definire questa funzione come vuoi.
Amministratore
Vera
Ciao,
Grazie per questo bellissimo tutorial.
Ho fatto tutto come hai detto.
Due cose non capisco:
1.
Hai specificato la tassonomia "genere". Dove viene impostata? Cosa succede se voglio creare i generi effettivi sotto di essa? Come li creo? Dove li vedo?
2.
Vorrei creare i collegamenti del menu a "Film" e sotto - collegamenti secondari a "Generi". Vedo "Film" nella sezione Menu, ogni post, come le pagine. Non mi serve davvero, ma non mi dispiace. Come vedo i "Generi" lì?
Grazie,
Vera
Supporto WPBeginner
Sembra che tu abbia creato con successo il tuo tipo di post personalizzato, ad esempio Film. Il passo successivo è creare una tassonomia personalizzata, Generi. Una tassonomia è un modo per ordinare i contenuti in WordPress. Categorie e tag sono due tassonomie predefinite che vengono fornite con WordPress e sono associate di default ai 'Post'. Si prega di consultare il nostro tutorial su come creare tassonomie personalizzate in WordPress. Segui le istruzioni in quel tutorial per creare la tua tassonomia personalizzata Generi e associarla al tipo di post film. La tua tassonomia personalizzata apparirà sotto il menu Film nell'area di amministrazione di WordPress.
Amministratore
Hamed 3daJoo
Faccio tutto questo ma quando voglio pubblicare un post di questo tipo, i miei tipi di post vengono reindirizzati alla pagina principale (ho appena copiato il tuo codice senza alcuna modifica)
ad esempio, scrivo questo post con il tipo di post Film
per favore aiutami adoro i tipi di post ma non riesco a usarli correttamente
Ciprian
Hai provato a salvare nuovamente la struttura dei permalink?
Saluti!
Aaron
Post eccellente! Grazie per il contenuto.. ha aiutato molto.
antonio
ciao sto cercando di aggiungere lo snippet di codice per il tipo di post film... l'ho copiato in functions.php ma quando aggiorno la pagina non viene mostrato nulla. sto usando il tema twenty fourteen... cosa può essere sbagliato?
ashish shestha
Come visualizzare i tipi di post personalizzati nel front-end??
Fahd
Ciao, i tipi di post personalizzati sul mio sito WordPress hanno funzionato bene negli ultimi 2 anni. Ma quello che è successo è che quando cambio il titolo di un post e clicco su aggiorna, salva anche altre modifiche. Ma se lascio lo stesso titolo del post e apporto modifiche al post, non le salva. Qualche raccomandazione per favore?
Staff di WPBeginner
Si prega di consultare questo tutorial su come mostrare/nascondere testo nei post di WordPress con effetto toggle.
Arup Ghosh
Grazie per le informazioni.
Arup Ghosh
Voglio creare un tipo di post personalizzato per coupon con opzione di rivelazione coupon e il codice si collegherà all'URL del negozio, puoi dirmi come posso farlo. Non ho molta conoscenza di programmazione.
Isaías Subero
Ottimo articolo. Come posso aggiungere icone ai tipi di post personalizzati nel backend di WordPress proprio come mostrato nell'immagine?
Jouke Nienhuis
è uno degli argomenti ($args) quando si definisce il custom post type.
Aggiungi ‘menu-icon’ => ‘dashicons-cart’ all’elenco $args.
WordPress utilizza i dashicons integrati, ma puoi anche usare le tue icone.
Maggiori informazioni su questo link:
Johan
Ciao, l'estratto e i dati dei campi personalizzati non vengono visualizzati nel front-end... hai idea del perché sta succedendo?
Bill Querry
Ho dimenticato di menzionare, preferibilmente tramite codice per il mio file functions.php dato che è lì che sono definiti i CPT curernet.
Bill Querry
Sto cercando un modo per aggiungere categorie ad alcuni tipi di post personalizzati esistenti. Qualcuno può indicarmi la giusta direzione?
Jouke Nienhuis
Puoi aggiungere nuove tassonomie a un tipo di post esistente (personalizzato o meno) semplicemente compilando il tipo di post corretto quando scrivi la funzione per crearlo. La categoria è solo un nome di tassonomia che include tutti i post con una categoria.
Se vuoi creare una nuova categoria, fai clic su categoria nel menu e creane una nuova.
Esempi di categorie sono Barche se il tuo post riguarda le barche o aerei se il tuo post riguarda gli aerei. Sono possibili anche più categorie, selezionale o aggiungile nella colonna laterale destra quando scrivi il tuo nuovo post o ne modifichi uno.
Un tipo di post non è collegato a una categoria specifica, lo è un post.
Robey Lawrence
Ho appena provato a usare lo snippet sotto
Querying Custom Post Types,
e ho capito che ha bisogno di un prima del reset.
YassinZ
Grazie per l'articolo pulito e utile
Voglio solo usare l'editor di testo nel post personalizzato
così posso usare i tag html,
Yassin
grazie per un tutorial così fantastico e chiaro
ma sto riscontrando un problema nella visualizzazione del CPT sto usando permalink SEO friendly quando vado su mio sito/film i CPT sono duplicati
Aris Giavris
Molto utile! Grazie.
Vorrei aggiungere a ogni tag dei miei post uno dei seguenti segni: +, -, +/-. Posso?
Se sì, allora vorrei avere la possibilità di rappresentare i tag con segno come segue: tutti i tag +, tutti i tag -, tutti i tag +/-.
Penso di fare troppe domande.
Placid
Ciao,
Sto avendo difficoltà a implementare correttamente un tipo di post personalizzato. Ho cercato una soluzione per molto tempo ma non ne ho trovata nessuna. Ecco cosa ho fatto:
1. Installazione fresca di WordPress sul mio server wamp locale (abilitando prima rewrite_module di Apache).
2. Utilizzo del tema predefinito (twenty fourteen). Nessun plugin installato.
3. Permalink modificati in "Nome del post"
4. Nella cartella dei plugin, ho creato una cartella chiamata pr_custom_posts e al suo interno, ho creato un file chiamato pr_custom_posts.php. Nel file ho creato un tipo di post personalizzato. Il codice è il seguente:
register_post_type();
//flush_rewrite_rules();
}
public function register_post_type () {
$args = array(
‘labels’ => array (
‘name’ => ‘Film’,
‘singular_name’ => ‘Film’,
‘add_new’ => ‘Aggiungi Nuovo Film’,
‘add_new_item’ => ‘Aggiungi Nuovo Film’,
‘edit_item’ => ‘Modifica Film’,
‘new_item’ => ‘Aggiungi Nuovo Film’,
‘view_item’ => ‘Visualizza Film’,
‘search_items’ => ‘Cerca Film’,
‘not_found’ => ‘Nessun Film Trovato’,
‘not_found_in_trash’ => ‘Nessun Film Trovato nel cestino’
),
‘query_var’ => ‘movies’,
‘rewrite’ => array (
‘slug’ => ‘movies/’,
‘with_front’=> false
),
‘public’ => true,
‘publicly_queryable’ => true,
‘has_archive’ => true,
‘menu_position’ => 10,
‘menu_icon’ => admin_url().’/images/media-button-video.gif’,
‘supports’ => array (
‘title’,
‘thumbnail’,
‘editor’
)
);
register_post_type(‘jw_movie’, $args);
//flush_rewrite_rules();
}
}
add_action(‘init’, function() {
new PR_Movies_Custom_Post();
//flush_rewrite_rules();
});
?>
Il punto positivo: il CPT viene mostrato nel mio pannello di amministrazione e posso aggiungere e visualizzare film lì.
IL PROBLEMA: Non riesco ad anteprima i film nel front-end (cliccando su "visualizza" nel CPT nel pannello di amministrazione). Viene mostrato nel front-end solo quando imposto il permalink su predefinito (http://localhost/wp02/?p=123).
Cosa ho provato:
1. Vai su permalink, mantieni le impostazioni di permalink su "Nome articolo" e Salva modifiche.
2. Ho usato flush_rewrite_rules() in diversi punti (uno alla volta) nel mio codice. Si prega di vedere le parti commentate nel codice sopra.
3. Ho creato una voce di menu come:
URL: http://localhost/wp02/movies
Etichetta di navigazione: Film
Questo crea una voce di menu nel front-end ma mostra "Non trovato" quando si fa clic sul link "Film".
Questo mi sta facendo impazzire. Qualcuno può aiutarmi? Lo apprezzerei molto.
kikilin
Stavo impazzendo anch'io con lo stesso problema "Non trovato", finché non ho provato questo: vai su Impostazioni > Permalink e poi salva nuovamente le tue impostazioni. Avevo cambiato la mia impostazione su Predefinito, e poi l'ho cambiata in Nome articolo (per le esigenze del mio progetto). Dopo di che, i link hanno funzionato come previsto.
Staff di WPBeginner
Sì, certo, cercheremo di realizzare presto un tutorial video. Iscriviti al nostro Canale YouTube per rimanere aggiornato.
rehan
Helpfull tutorials and posts thanks
ceslava
Un altro modo semplice è semplicemente duplicare archive.php e rinominarlo in archive-movies.php e lo stesso per single.php -> single-movies.php
Quindi puoi apportare modifiche ai file php per il tuo tema.
Cordiali saluti
Mladen Gradev
lol il plugin sembra super utile, grazie.
Achilles Khalil
Molto difficile da visualizzare. per favore puoi fare un tutorial video?
Mik
Ciao, leggo e seguo i tuoi post da così tanto tempo, sei fantastico e ti rivolgi a quelle cose mancanti per i principianti... Grazie.
Davide De Maestri
This plugin should be okay, but after every upgrade they’ve got some bug. Due to exporting field, or while migrating from local to remote etc… So It’s better to hand-write the code and put into functions.php