Volete creare una intranet WordPress per la vostra organizzazione? WordPress è una piattaforma potente e ricca di opzioni flessibili che la rendono ideale per essere utilizzata come intranet aziendale. In questo articolo vi mostreremo come creare una intranet WordPress per la vostra organizzazione mantenendola privata e sicura.

Cosa si intende per Intranet o Extranet? Perché utilizzare WordPress come piattaforma Intranet?
Intranet o Extranet è una piattaforma di comunicazione utilizzata da un’organizzazione per comunicare, condividere file, annunci e altre attività organizzative.
WordPress è una piattaforma eccellente per costruire l’intranet o l’extranet della vostra organizzazione. È facile da mantenere, è open source e consente di accedere a migliaia di plugin WordPress per aggiungere nuove funzionalità quando necessario.
Una intranet funziona sulla rete privata di un’organizzazione. In genere, il sistema informatico di un ufficio è collegato tramite cavo o adattatori di rete wireless. Un computer della rete può essere utilizzato come server web e ospitare un sito web WordPress.
Seguite le istruzioni della nostra guida su come installare WordPress su una rete Windows utilizzando WAMP o installare WordPress su un computer Mac utilizzando MAMP per avviare la vostra intranet WordPress.
D’altra parte, una extranet è una piattaforma intranet accessibile a una rete più grande o a Internet pubblica. In parole povere, potrebbe trattarsi di un sito web accessibile pubblicamente ma limitato ai soli utenti autorizzati.
È particolarmente utile se la vostra organizzazione è distribuita in diverse località geografiche.
Per creare la vostra extranet WordPress, avrete bisogno di un account di hosting WordPress e di un nome di dominio. Dopodiché, potrete installare WordPress e impostarlo come intranet della vostra organizzazione.
Una volta installato WordPress come intranet, il passo successivo è quello di convertirlo in un centro di comunicazione per la vostra organizzazione.
Per farlo, dovrete utilizzare diversi plugin di WordPress. Vi mostreremo la configurazione di base che servirà a far crescere la vostra intranet WordPress e a raggiungere gli obiettivi della vostra organizzazione.
Impostazione di BuddyPress come hub della vostra intranet WordPress
BuddyPress è un progetto gemello di WordPress. Converte il vostro sito web WordPress in un social network. Ecco alcune delle cose che una intranet alimentata da BuddyPress può fare:
- Potrete invitare gli utenti a registrarsi sulla intranet aziendale.
- Gli utenti potranno creare profili utente estesi
- I flussi di attività consentono agli utenti di seguire gli ultimi aggiornamenti come su Twitter o Facebook.
- Potrete creare gruppi di utenti per suddividere gli utenti in dipartimenti o team.
- Gli utenti possono seguirsi a vicenda come amici
- Gli utenti possono inviarsi messaggi privati
- È possibile aggiungere nuove funzionalità mediante l’aggiunta di plugin di terze parti
- Avrete a disposizione numerose opzioni di design con i temi WordPress per BuddyPress
Per iniziare, è necessario installare e attivare il plugin BuddyPress. Per maggiori dettagli, consultate la nostra guida passo passo su come installare un plugin di WordPress.
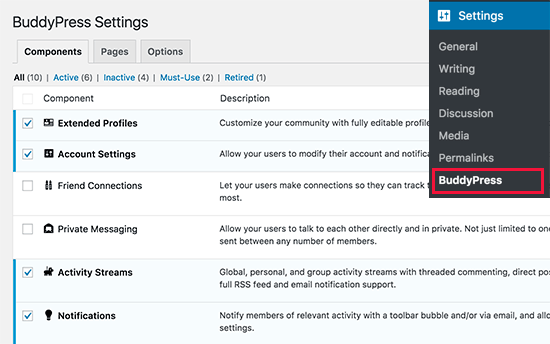
Dopo l’attivazione, andate alla pagina Impostazioni ” BuddyPress per configurare le impostazioni del plugin.

Per istruzioni complete passo dopo passo, consultate la nostra guida su come trasformare WordPress in un social network con BuddyPress.
Proteggete la vostra Intranet WordPress con All-in-One Intranet
Se state gestendo una intranet WordPress su un server locale, potete proteggerla limitando l’accesso agli IP interni nel vostro file .htaccess.
Tuttavia, se gestite una Extranet, i vostri utenti potrebbero accedere alla intranet da reti e indirizzi IP diversi.
Per assicurarsi che solo gli utenti autorizzati possano accedere alla intranet aziendale, è necessario rendere la extranet privata e accessibile solo agli utenti registrati.
A tal fine, è necessario installare e attivare il plugin All-in-One Intranet. Per maggiori dettagli, consultate la nostra guida passo passo su come installare un plugin di WordPress.
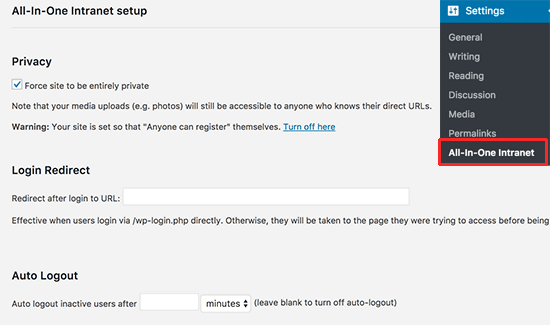
Dopo l’attivazione, andate alla pagina Impostazioni ” All-in-One Intranet per configurare le impostazioni del plugin.

Per prima cosa è necessario selezionare la casella accanto all’opzione “Forza il sito come interamente privato”. In questo modo tutte le pagine del vostro sito WordPress saranno completamente private.
L’unica cosa che questo plugin non renderà privata sono i file nella directory degli upload. Non preoccupatevi, vi mostreremo come proteggerli più avanti in questo articolo.
Successivamente, è necessario fornire un URL al quale si desidera che gli utenti siano reindirizzati una volta effettuato l’accesso. Potrebbe essere una qualsiasi pagina della vostra intranet.
Infine, è possibile disconnettere automaticamente gli utenti inattivi dopo un certo numero di minuti.
Non dimenticate di fare clic sul pulsante Salva modifiche per memorizzare le impostazioni.
Protezione dei caricamenti multimediali nella vostra Intranet WordPress
Il fatto che il vostro sito web sia completamente privato non riguarda i file multimediali. Se qualcuno conosce l’URL esatto di un file, può accedervi senza alcuna restrizione.
Cambiamo questa situazione.
Per una maggiore protezione, reindirizzeremo tutte le richieste effettuate alla cartella uploads a un semplice script PHP.
Questo script PHP verificherà se un utente è connesso. Se lo è, servirà il file. In caso contrario, l’utente sarà reindirizzato alla pagina di login.
Per prima cosa è necessario creare un nuovo file sul computer, utilizzando un editor di testo semplice come Notepad. Successivamente, è necessario copiare e incollare il codice seguente e salvare il file come download-file.php sul desktop.
1 2 3 4 5 6 7 8 9 10 11 12 13 14 15 16 17 18 19 20 21 22 23 24 25 26 27 28 29 30 31 32 33 34 35 36 37 38 39 40 41 42 43 44 45 46 47 48 49 50 51 52 53 54 | <?phprequire_once('wp-load.php');is_user_logged_in() || auth_redirect();list($basedir) = array_values(array_intersect_key(wp_upload_dir(), array('basedir' => 1)))+array(NULL);$file = rtrim($basedir,'/').'/'.str_replace('..', '', isset($_GET[ 'file' ])?$_GET[ 'file' ]:'');if (!$basedir || !is_file($file)) { status_header(404); die('404 — File not found.');}$mime = wp_check_filetype($file);if( false === $mime[ 'type' ] && function_exists( 'mime_content_type' ) ) $mime[ 'type' ] = mime_content_type( $file );if( $mime[ 'type' ] ) $mimetype = $mime[ 'type' ];else $mimetype = 'image/' . substr( $file, strrpos( $file, '.' ) + 1 );header( 'Content-Type: ' . $mimetype ); // always send thisif ( false === strpos( $_SERVER['SERVER_SOFTWARE'], 'Microsoft-IIS' ) ) header( 'Content-Length: ' . filesize( $file ) );$last_modified = gmdate( 'D, d M Y H:i:s', filemtime( $file ) );$etag = '"' . md5( $last_modified ) . '"';header( "Last-Modified: $last_modified GMT" );header( 'ETag: ' . $etag );header( 'Expires: ' . gmdate( 'D, d M Y H:i:s', time() + 100000000 ) . ' GMT' );// Support for Conditional GET$client_etag = isset( $_SERVER['HTTP_IF_NONE_MATCH'] ) ? stripslashes( $_SERVER['HTTP_IF_NONE_MATCH'] ) : false;if( ! isset( $_SERVER['HTTP_IF_MODIFIED_SINCE'] ) ) $_SERVER['HTTP_IF_MODIFIED_SINCE'] = false;$client_last_modified = trim( $_SERVER['HTTP_IF_MODIFIED_SINCE'] );// If string is empty, return 0. If not, attempt to parse into a timestamp$client_modified_timestamp = $client_last_modified ? strtotime( $client_last_modified ) : 0;// Make a timestamp for our most recent modification...$modified_timestamp = strtotime($last_modified);if ( ( $client_last_modified && $client_etag ) ? ( ( $client_modified_timestamp >= $modified_timestamp) && ( $client_etag == $etag ) ) : ( ( $client_modified_timestamp >= $modified_timestamp) || ( $client_etag == $etag ) ) ) { status_header( 304 ); exit;}readfile( $file ); |
Ora collegatevi al vostro sito web utilizzando un client FTP. Una volta connessi, caricare il file appena creato nella cartella /wp-contents/uploads/ del sito.
Successivamente, è necessario modificare il file .htaccess nella cartella principale del sito. Aggiungete il seguente codice in fondo al file .htaccess:
1 2 | RewriteCond %{REQUEST_FILENAME} -sRewriteRule ^wp-content/uploads/(.*)$ download-file.php?file=$1 [QSA,L] |
Non dimenticate di salvare le modifiche e di caricare il file sul vostro sito web.
Ora tutte le richieste degli utenti alla cartella multimediale saranno inviate a uno script proxy per verificare l’autenticazione e reindirizzare gli utenti alla pagina di login.
4. Aggiungere moduli alla vostra Intranet WordPress con WPForms

L’obiettivo principale di una intranet aziendale è la comunicazione. BuddyPress fa un ottimo lavoro con i flussi di attività, i commenti e la messaggistica privata.
Tuttavia, a volte è necessario raccogliere informazioni privatamente con un sondaggio o un’indagine. Inoltre, è necessario ordinare e memorizzare tali informazioni per un uso successivo.
È qui che entra in gioco WPForms. È il miglior costruttore di moduli per WordPress sul mercato.
Non solo vi permette di creare facilmente dei bellissimi moduli, ma salva anche le risposte degli utenti nel database. È possibile esportare le risposte di qualsiasi modulo in un file CSV.
In questo modo è possibile organizzare le risposte dei moduli in fogli di calcolo, stamparli e condividerli con i colleghi.
Estendere la vostra Intranet WordPress
A questo punto dovreste avere una intranet perfettamente funzionante per la vostra organizzazione. Tuttavia, man mano che testate la piattaforma o la aprite agli utenti, potreste voler aggiungere nuove funzionalità o renderla più sicura.
Ci sono molti plugin di WordPress che possono aiutarvi a farlo. Ecco alcuni strumenti che potreste voler aggiungere subito.
- Sucuri – Per migliorare la sicurezza di WordPress proteggendolo da accessi non autorizzati e attacchi DDoS dannosi.
- Envira Gallery – Per creare splendide gallerie fotografiche.
- Google Drive Embedder – Per incorporare facilmente i documenti di Google Drive in qualsiasi punto della vostra intranet WordPress.
Per ora è tutto.
Speriamo che questo articolo vi abbia aiutato a creare una intranet WordPress per la vostra organizzazione. Potreste anche voler consultare il nostro confronto tra i migliori software di payroll per le piccole imprese.
Se vi è piaciuto questo articolo, iscrivetevi al nostro canale YouTube per i video tutorial su WordPress. Potete trovarci anche su Twitter e Facebook.


John Akpama
The article is very helpful. Quick question please, for an intranet, how do other computers on my internal network access the wordpress intranet? If there is a previous article on this please share the link let me go through it. TIA
WPBeginner Support
It would depend on how your intranet is set up as each intranet can have its own tools for customizing what URL goes where. If the tool you are using for your network has documentation we would recommend checking that and there should be the option to set where a specific URL directs to.
Admin
Megan
How would you update WP if you do not have access to the internet? Does it have to be done manually through FTP?
WPBeginner Support
Correct, we cover how to do this as option two in our article here: https://www.wpbeginner.com/beginners-guide/ultimate-guide-to-upgrade-wordpress-for-beginners-infograph/
Admin
AdamGreenberg
I’m a US Peace Corps volunteer in Zambia considering the possibilities of doing this in the rural village where I live. Starting with the two schools who have a few, older computers. There’s no internet here, so this could be fantastic for sharing offline learning like Khan Academy Lite and such. I understand the localhost WordPress component of this, but how do I start by even connecting two computers in a LAN? Is it with cat 5 cables or can it even be done with wireless routers? Thank you. I think an Intranet could be a huge help here.
WPBeginner Support
That question is a bit beyond this article, it would depend on what tools you have available but normally one computer would need to be the web server while the other computers need the ability to connect to that computer
Admin
Hjason
Will my media or my content will be indexed by google or is it 100% safe?
WPBeginner Support
If you are installing it on a local network then Google should be unable to crawl the site. If you’re publishing the site online with hosting then you can make the site private using the method in our article here: https://www.wpbeginner.com/beginners-guide/how-to-make-your-wordpress-blog-completely-private/
Admin
Blair Hewitt
Why are my users not sending comments?
WPBeginner Support
There are multiple possible reasons, you may want to go through the steps in this article to make users want to comment more: https://www.wpbeginner.com/beginners-guide/how-to-increase-your-blog-traffic/
Admin
Ken
I tried to implement the Securing Media Uploads script and configured in .htaccess but when I tried to copy the exact image link and access it in a browser that does not have the intranet session it can still access! Did I missed some PHP modules?
Michael
I have been using the method described in this article to protect my media for a couple of days now when all of a sudden it stopped working – not sure if sue to a change in server configuration or something else. Media wouldn’t show up for registered users, when diretly requesting a file being logged in a 404 error would appear.
Solved it by changing two things:
.htaccess:
RewriteCond %{REQUEST_FILENAME} -s
RewriteRule ^wp-content/uploads/(.*)$ wp-content/uploads/download-file.php?file=$1 [QSA,L]
download-file:
<?php
$parse_uri = explode( 'wp-content', $_SERVER['SCRIPT_FILENAME'] );
require_once( $parse_uri[0] . 'wp-load.php' );
is_user_logged_in() || auth_redirect();
Just in case someone has the same problem…
Stephen
Thanks Michael, was having the same problem, added this and it’s working for me now.
Sean
This post was just what I was looking for, so thank you for posting it!
However, something isn’t right.
I may be brand spanking new to this whole thing but either the adding of the script for securing media files and/or the 2 lines added to the .htaccess file prevents images from being displayed in the Media Library.
I’m thinking it’s a permission issue of some type but I’m not really sure how to proceed.
Sean
Looks like it’s the .htaccess file (2 lines of code) that is causing the images to not load in the Media Library. I put the old one back and the images load. Any advice would be appreciated.
Michael
Sean, I am having the same problem here. I did a small workaround in the .htaccess:
RewriteCond %{REMOTE_ADDR} !123.456.789.000
RewriteCond %{REQUEST_FILENAME} -s
RewriteRule ^wp-content/uploads/(.*)$ download-file.php?file=$1 [QSA,L]
The first line makes an exception for my home IP, I might be adding office IPs too. Seems to work quite well.
Jonathon
Your code for restricting the uploads folder doesn’t seem to be working anymore or I might have a plugin conflict.
WPBeginner Support
Hi Jonathan,
Are you seeing an error message? If not, then you probably missed something. Please follow the instructions again. Let’s us know how it went. Good Luck
Admin
LFreitas
Hi, thanks for the article!
I’m planning to use WP in a extranet and this will be very helpful.
To meet the requirements I also need an unique calendar for the staff.
It should allow schedule meetings with multiple people and these people should receive an email with the invitation; also this email should contain metadata that added the event to outlook calendar, as it is used to remind people of the meeting. (Everyone uses Outlook as email here).
Do you guys know any plugin or method to do this?
I’ve tried several calendar and booking plugins, but none meets this requirement. Specially because it is possible to have multiple meetings at the same time, with different people.
Thanks in advance!
WPBeginner Support
Hey LFreitas,
Have you looked into Google Calendar? It syncs well with outlook and you can Embed the calendar in WordPress.
Admin
Thomas
Well – what if I don*t want to feed Google with my data? Is there any CalDAV/CardDAV integration possible?