Se lavorate con WordPress, probabilmente sapete quanto importi testare le cose prima di apportare modifiche al vostro sito. Noi di WPBeginner creiamo spesso siti web di prova sui nostri computer per testare nuovi temi e plugin. Questo ci permette di esplorare nuove cose senza rompere i nostri siti web.
Uno dei modi migliori per creare un sito web di prova è utilizzare uno strumento gratuito chiamato XAMPP. XAMPP semplifica l’impostazione di WordPress sul proprio computer. Non è necessario un host web o una connessione a Internet per creare un sito di prova sul proprio computer.
In questo articolo vi mostreremo come creare facilmente un sito web WordPress locale utilizzando XAMPP. In questo modo avrete un luogo sicuro per sperimentare con WordPress, provare nuove cose e migliorare le vostre capacità di sviluppo di siti web senza influenzare nessuno dei vostri siti web.

Perché creare un sito WordPress locale?
La creazione di siti WordPress locali è una pratica comune tra gli sviluppatori e i proprietari di siti. Permette di testare WordPress senza creare un vero e proprio sito web su Internet.
I siti web locali sono visibili solo sul vostro computer. Potete provare diversi temi e plugin di WordPress, testarne le funzionalità e imparare le basi di WordPress.
Se avete già un sito web WordPress, potete creare una copia locale del vostro sito web sul computer per provare i nuovi aggiornamenti dei plugin prima di implementarli sul vostro sito web reale.
Importante: un sito web locale sarà visibile solo sul vostro computer. Se si desidera creare un sito web live, è necessario disporre di un nome di dominio e di un hosting WordPress.
Seguite le istruzioni passo-passo della nostra guida su come avviare un blog WordPress quando siete pronti a creare un sito web dal vivo.
Detto questo, vediamo come installare WordPress in locale su Windows, Mac o Linux utilizzando XAMPP.
Che cos’è XAMPP?
XAMPP è un pacchetto software che include tutto ciò che serve per configurare un ambiente server locale sul proprio computer.
Per creare un sito WordPress locale, è necessario configurare un server web (Apache), PHP e MySQL sul proprio computer.
PHP è un linguaggio di programmazione e MySQL è un software di gestione di database. Entrambi sono necessari per far funzionare WordPress.
Installarli separatamente è piuttosto difficile per i principianti. È qui che entra in gioco XAMPP.
XAMPP semplifica la creazione di siti web WordPress in locale. È disponibile per computer basati su Windows, Mac e Linux.
Iniziamo installando XAMPP e configurandolo per gestire il vostro sito WordPress locale.
Installazione di XAMPP sul computer
Per prima cosa, è necessario visitare il sito web di XAMPP e fare clic sul pulsante “Download” per il proprio sistema operativo.
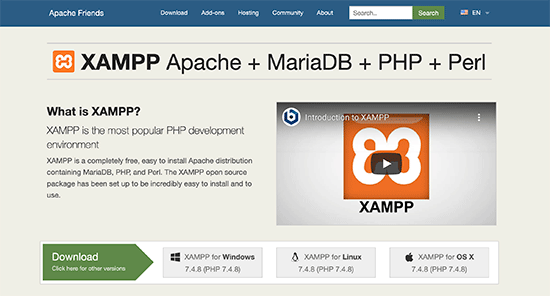
A seconda del sistema operativo, l’installazione guidata e l’interfaccia dell’applicazione potrebbero differire dalle schermate qui riportate. Per il bene di questo articolo, vi mostreremo la versione Windows del software.
Dopo aver scaricato XAMPP, è necessario fare clic ed eseguire il programma di installazione.
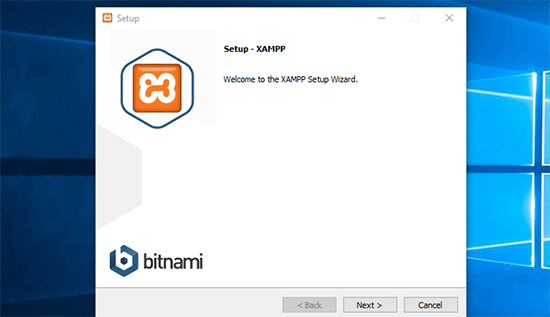
XAMPP chiederà dove installare il software e quali pacchetti si desidera installare. Le impostazioni predefinite andranno bene per la maggior parte degli utenti. Continuate a fare clic sul pulsante “Avanti” per terminare l’installazione guidata.
Al termine della procedura guidata, selezionare l’opzione “Avvia il pannello di controllo ora” e quindi fare clic sul pulsante “Fine”.
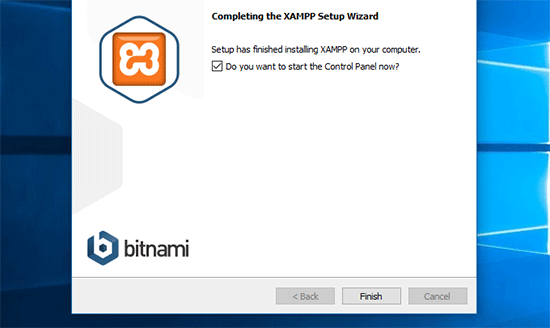
In questo modo si avvia l’applicazione Pannello di controllo XAMPP.
Utilizzando l’applicazione XAMPP, è possibile eseguire il server web Apache come server locale e MySQL come server di database. Cliccate sul pulsante “Avvia” accanto ad Apache e MySQL.
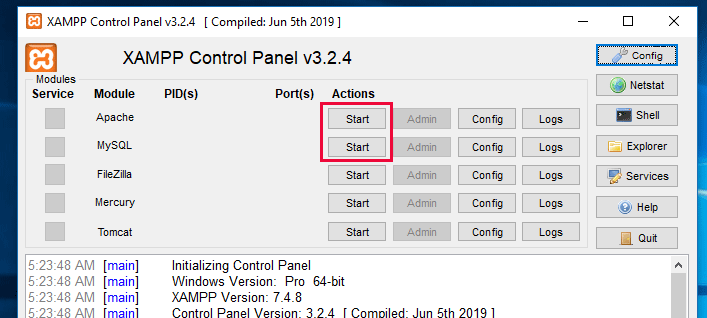
XAMPP avvierà ora Apache e MySQL.
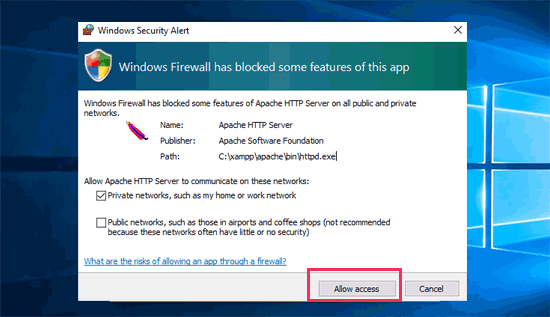
È possibile che venga visualizzata una notifica del firewall di Windows. È importante fare clic sul pulsante “Consenti accesso” affinché entrambe le applicazioni possano essere eseguite sul computer.
Una volta avviate entrambe le applicazioni, i loro nomi saranno evidenziati in verde.
Ora siete pronti a creare un sito web locale e a installare WordPress utilizzando XAMPP.
Creare un sito WordPress locale con XAMPP
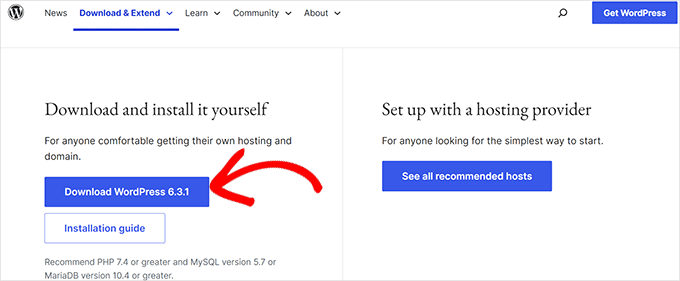
Per prima cosa, è necessario scaricare WordPress. Visitate il sito WordPress.org e fate clic sul pulsante “Scarica WordPress”.
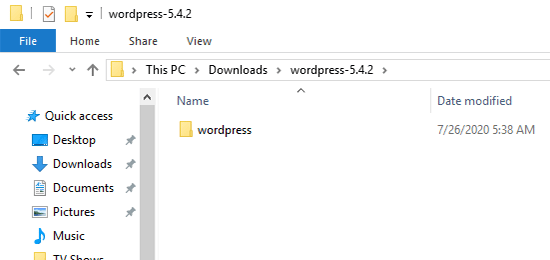
Dopo aver scaricato WordPress, è necessario estrarre il file zip e si vedrà una cartella wordpress.
È necessario copiare questa cartella.
Quindi, andare nella cartella di installazione di XAMPP.
Su Windows, sarà C:/Program Files/XAMPP/htdocs o C:/Xampp/htdocs.
Su Mac, sarà /Applications/XAMPP/htdocs.
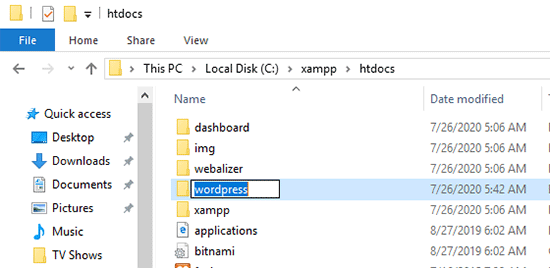
Incollare la cartella wordpress copiata in precedenza all’interno della cartella ‘htdocs’.
Si consiglia di rinominare la cartella ‘wordpress’ in ‘website’ o altro. Questo vi aiuterà a identificare facilmente il vostro sito locale.
Successivamente, è necessario aprire il proprio browser web preferito.
È possibile inserire il seguente URL nella barra degli indirizzi del browser:
https://localhost/website1/
Se avete rinominato la cartella WordPress in un altro modo, assicuratevi di sostituire ‘website1’ con il nome della vostra cartella.
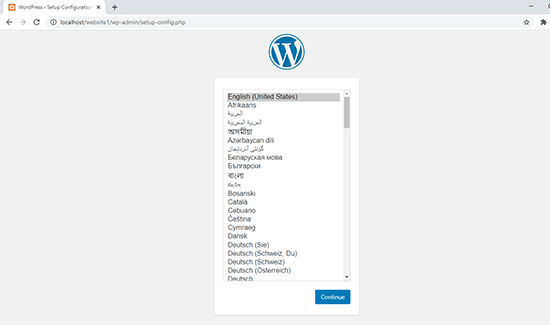
Si aprirà la procedura guidata di installazione di WordPress e vi verrà chiesto di selezionare una lingua. Dopo aver selezionato una lingua, fate clic sul pulsante “Continua”.
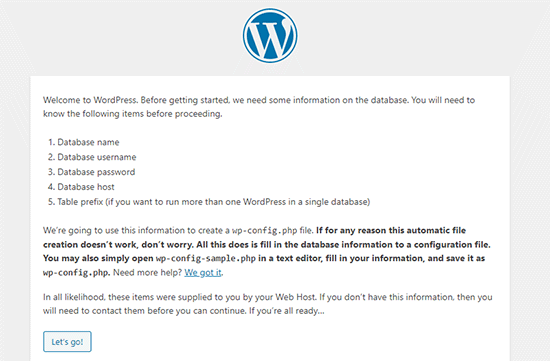
Nella schermata successiva, apparirà la schermata di benvenuto di WordPress.
Include un avviso che indica che WordPress ha bisogno del nome del database, del nome utente del database, della password e delle informazioni sull’host.
Creiamo un database per il vostro sito WordPress.
È necessario aprire una nuova scheda del browser e visitare https://localhost/phpmyadmin/.
In questo modo si avvia l’applicazione phpMyAdmin, preinstallata in XAMPP. Permette di gestire facilmente i database utilizzando un’interfaccia più semplice.
È necessario fare clic su “Database” e indicare un nome per il nuovo database. Quindi, fare clic sul pulsante “Crea” per continuare.
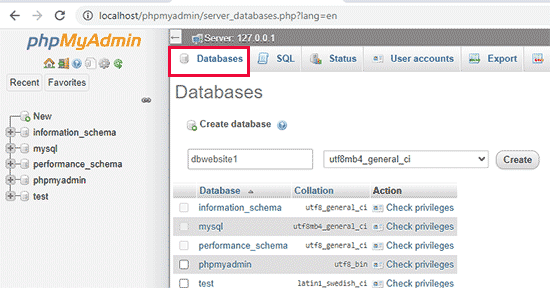
Ora che avete creato un database, potete utilizzarlo per il vostro sito WordPress.
Tornate alla scheda del browser /localhost/website1/ e fate clic sul pulsante “Let’s Go”.
Nella schermata successiva, vi verrà chiesto di fornire le informazioni sul database di WordPress.
Inserire il nome del database creato in precedenza. Il nome utente è “root” e il campo della password va lasciato vuoto. Per il campo host del database, è necessario utilizzare localhost.
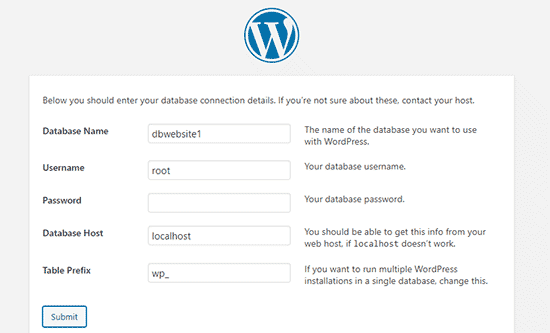
Una volta terminato, fare clic sul pulsante “Invia” per continuare.
Se siete su Windows o Linux, WordPress memorizzerà queste impostazioni nel file di configurazione di WordPress chiamato wp-config.php.
Tuttavia, se siete su un Mac, vi mostrerà il contenuto del file e vi chiederà di crearlo.
È necessario creare questo file nella cartella principale del sito web.
Dopo aver creato il file, incollate al suo interno il testo copiato in precedenza. Successivamente, è necessario salvare il file e tornare al programma di installazione di WordPress per continuare.
Nella fase successiva, WordPress vi chiederà di fornire informazioni sul vostro sito web. Innanzitutto, inserite il titolo che volete utilizzare per questo sito.
Successivamente, è necessario inserire un nome utente, una password e un indirizzo e-mail per l’account amministratore.
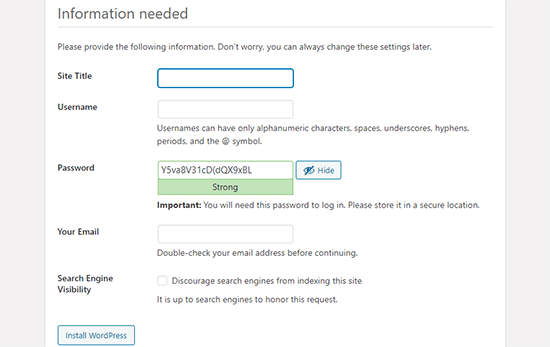
Una volta compilate tutte le informazioni, fate clic sul pulsante “Installa WordPress” per continuare.
A questo punto WordPress eseguirà l’installazione e chiederà di effettuare il login una volta terminata.
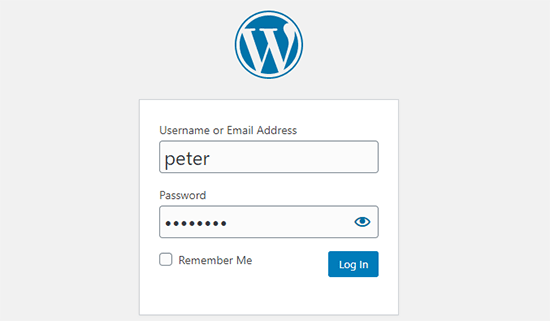
È possibile accedere al proprio sito web andando alla pagina /localhost/website1/wp-admin e utilizzando il nome utente e la password inseriti durante l’installazione.
Cose da provare dopo la creazione di un sito WordPress locale
Ora che avete creato il vostro sito WordPress locale utilizzando XAMPP, potete lavorare su di esso come fareste con un sito WordPress dal vivo.
Andate al menu Aspetto nella barra laterale di amministrazione di WordPress per personalizzare l’aspetto del vostro sito o installare un nuovo tema.
Ecco alcuni fantastici temi gratuiti che potete provare.
La prossima cosa da fare è installare alcuni plugin di WordPress.
I plugin sono come applicazioni per il vostro sito WordPress e vi permettono di aggiungere funzioni interessanti come un modulo di contatto, pulsanti per i social media, un negozio di e-commerce e molto altro.
Avete bisogno di aiuto per installare i plugin? Consultate la nostra guida passo passo su come installare un plugin di WordPress.
Bonus: Spostare un sito WordPress locale su un server live
Dopo aver lavorato sul vostro sito WordPress locale, potreste volerlo spostare su un server live per creare il vostro primo blog o sito web WordPress.
Per farlo, avrete bisogno di un nome di dominio e di un account di web hosting. Normalmente, un nome di dominio costa 14,99 dollari e l’hosting di un sito web parte da 7,99 dollari al mese.
È troppo se si è agli inizi.
Per fortuna, Bluehost offre agli utenti di WPBeginner un nome di dominio gratuito e un generoso sconto sull’hosting. In pratica, potete iniziare a lavorare per 1,99 dollari al mese.
Per ulteriori consigli sull’hosting, date un’occhiata alla nostra guida completa all’hosting WordPress.
Dopo aver sottoscritto l’hosting, potete seguire la nostra guida passo passo su come spostare WordPress da un server locale a un sito live.
Potreste anche voler dare un’occhiata ai modi alternativi per creare siti WordPress locali su Windows usando Wampserver e su Mac usando MAMP.
Guide di esperti sui siti WordPress locali
Speriamo che questo articolo vi abbia aiutato a imparare come creare un sito WordPress locale utilizzando XAMPP. Potreste anche voler consultare altre guide relative alle installazioni locali di WordPress:
- Glossario: Localhost
- Come installare WordPress in locale su Mac (2 modi semplici)
- Come installare WordPress su un computer Windows (2 metodi)
- Come spostare WordPress dal server locale al sito live (2 metodi)
- Come spostare un sito WordPress live su un server locale
- Come ricevere le e-mail di WordPress da localhost con SMTP
- Come resettare la password dell’amministratore di WordPress su localhost
- Come creare facilmente un sito di staging per WordPress (passo dopo passo)
Se questo articolo vi è piaciuto, iscrivetevi al nostro canale YouTube per le esercitazioni video su WordPress. Potete trovarci anche su Twitter e Facebook.


André Bruwer
Hi there WPBEGINNER SUPPORT
Great article thank you
I was wondering… is it better to develop a wp website for a client live or better to build it locally then transfer it to the hosted wp site with duplicator or something similar?
Any advise would be greatly appreciated. Can’t figure this one out.
Thanks
André
WPBeginner Support
Hi André Bruwer,
It depends on developers own preferences. If a site hasn’t been live before then they can work on it using a maintenance mode or coming soon plugin. However, more developers prefer to work locally and then transfer a website to a live server.
Admin
demola
pls i want to move my wordpresite from my laptop to another laptop i use xamp as a local server
Thomas James Keely
I was up and running within minutes. Thank you so much!!!
Chaitra
Hi, I am getting following error when I connect to localhost/website1
You don’t have permission to access /website1/ on this server.
Additionally, a 403 Forbidden error was encountered while trying to use an ErrorDocument to handle the request.
Chaitra
Hi, I get the following error when I access localhost/website1 –
You don’t have permission to access /website1/ on this server.
Additionally, a 403 Forbidden error was encountered while trying to use an ErrorDocument to handle the request.
Jay
your article is very helpful for wp beginner.
rocky
Thanks for the Knowledge but how can i make it live through Xampp. Let us know if theres any tutorial
bala
yes there is a way to put your localhost online, you should redirect your domain name to your computer’s ip address
Jojo
Hi,
I followed your tutorial and created a wordpress site. How can I create another local wordpress site with this setup?
sekar ramu
Thanks. Simple and Straightforward
Eleazar
Hi Guy. Your tutorial is very straightforward. I liked it. Very clear and easy to follow. Tkanks
Jerry
Very straight forward tutorial! Thank you.
krishan pal singh
Very helpful tutorial for me… Thank you so much
paul
hi, i have been able to login to wordpress using xampp, but when i click on the themes area i only see three themes. when i try to install a new theme, im notified that there is an error. please i need your help.
Shamrat Hossain
This article was really helpful for me . Hope You will be doing good works like this for us in future ..
Thanks
Abhijith
Hi Team
I have problem with xampp server once installation itz working fine after shutdown if am going to using again in the xamm server buttons not working
it asking again and again tomcat file….please let me know how to fix it
Suraj Barthwal
you’r article was really helpful. i do have a query for you though, what should i do if i wanted to extract my wordpress live website so i could use it in future.
Mario Bergeron
Hi,
Thanks for your article really helpful. Everything works fine, installation etc., but I try to install a theme on my WP and i got this message ”The uploaded file exceeds the upload_max_filesize in php.ini.” What can I do to install my theme??
Thank you to help me.
Mario Bergeron
WPBeginner Support
Hi Mario,
Please see our guide on how to increase maximum file size upload limit in WordPress.
Admin
JERSon
Hi ALL,
im stuck at localhost/website1 …it will give the error page
This site can’t be reached
localhost refused to connect.
Search Google for localhost website1
ERR_CONNECTION_REFUSED
Please help
Innocent
Make sure your apache and mysql is running. Then try again
Emmanuel
Hello WordPress, I have installed and used Xampp yesterday and it worked very fine but whike trying to open and use it today, its taking back to the installation process and asking for a new storage location. How do I go about this?
ayush singh chauhan
Sir , when i try opening localhost/website1
then something else opens which is not similar to yours.
that is showing index of website ..
what should i do now
WPBeginner Support
Hi Ayush,
Restart XAMPP and then try again.
Admin
Stanley
When I finish with a website and wish to build another different website, how do I go about it? Thanks.
WPBeginner Support
Hi Stanley,
Create a new folder for your website inside htdocs folder and repeat all the steps mentioned under ‘Creating a Local WordPress Site with XAMPP’ section.
Admin
Jonathan Pienaar
Great tutorial, and works 99% for Linux. (I had to create wp-config.php manually for some reason).
Only other issue: trying to use the Elementor Page Builder plugin, but it requires an FTP login/password. Tried starting FTP server, but can’ figure out how to configure it so that I can give Elementor FTP access/download the plugin.
(Hope this makes sense).
Bhagwat Pawar
nice and practically perfect. can i add email functionality here installing gmail smtp or wp smtp plugin
Jane
This was so easy to follow. Thank you very much,
When I want to upload a theme in my new wordpress I get this error: ‘The uploaded file exceeds the upload_max_filesize directive in php.ini.’
Can I do anything about this?
WPBeginner Support
Hi Jane,
Please see our guide on how to increase maximum file upload size in WordPress.
Admin
Kumar
Thank you! Wonderfully detailed step-by-step instructions. Was able to install WordPress on my local machine without a problem. Much appreciated.
Julie
I am having the same problem James had:
Hi! I have successfully installed my xamp server, wordpress and database. My question is, after logging in to wordpress, I cannot see any dashboard panel wherein I can edit my themes and install plugins. Please help! Thanks.
Has anyone found a solution?
Thanks!
Eleonro
Hi, I have issues at login, when I try to log on, wp server says its invalid, what can I do?
James
Hi! I have successfully installed my xamp server, wordpress and database. My question is, after logging in to wordpress, I cannot see any dashboard panel wherein I can edit my themes and install plugins. Please help! Thanks.
Ruma
when I am submitting my data base name,username and password it is saying try again i have written each and every thing right name
Kenny
Leave the password space blank
Dani
To anyone having an issue with the localhost/website1 link not working, how I got it to work (on mac, might work for windows) was heading over to the Network tab in XAMPP and pressing enable. Then I took the port number (in my case it was localhost:8080) and then added that to the url. It looked like localhost:8080/website1.
Good luck!
Maria
Dani, Thanks so much for your post. I was having the same issue. After reading your post, I was able to get to the next step. few!
Hillary
I have set up the WordPress website, but yet i am still having issues upload some plugins that come with the themes i want to use. How do i get to correct this?
Thanks
Maheshwaran
Thanks you so much.. Your step by step contents helps me lot.
Nicholas
Thanks you so much ..
But i have faced one problem, after putting WordPress files into htdocs, i went to my browser and searched for “localhost/WordPress ” and i got ” error 404 Object not found ” how can i please fix that problem?
Thanks
Amokola Stephen
Did you start services in your local server(xamp)? if not please navigate xamp control panel and make sure that you start apache and mysql services
Alexander
I really like your post, thank you for sharing such a great post. Setting up wordpress website on localhost using XAMPP is the best solution you have. It gives you an option to explore themes and plugins as well. When i was researching how to work on localhost i have found two great resources through which anyone can easily learn to launch wordpress using localhost.
https://www.wpbeginner.com/wp-tutorials/how-to-create-a-local-wordpress-site-using-xampp/
Aligo
Thank you very much for this article.. I really followed it and was successful in creating the website
DavidA
Thank you for this article — it is great to be able to work at the website locally before exposing it to the world.
Is it possible to have more than one website locally? I have another site that I need to modify/see locally. How would I add this to the other without getting them mixed?
Thank you
WPBeginner Support
Hi,
You can add more websites by simply adding a new folder under /XAMPP/htdocs/.
Admin
DavidA
Thank you – the WPBeginners site/articles/support team have been a God-send.
Please keep doing what you are doing!(:0)!
Stanley
Thanks at WP team. I added another WordPress folder and it’s not working. I named this second folder WordPress1 since the first site database is WordPress and it didn’t work. Please, do help. Thanks.
WPBeginner Support
Hi Stanley,
Do you see an error when you visit the website in your browser?
Trifina
For Mac users you recommended:
“You will need to create this file in your website’s root folder.”
Can you elaborate? Where can i find this folder?
WPBeginner Support
Hey Triffina,
Normally, your XAMPP website folders are stored in /Applications/XAMPP/xamppfiles/htdocs/ folder.
Admin
Ann
followed all the steps but when i put “localhost/website1”, it shows an error saying “Error establishing a database connection”, also tried restarting my xampp, yet still the same problem exist.
Mike
Get an Object not found message when I put the localhost/website1 in my browser. It reads the following:
Error 404
localhost
Apache/2.4.25 (Win32) OpenSSL/1.0.2j PHP/5.6.30
Any ideas guys?
Thanks
Chris
good afternoon,
thank you for your article. It was easy to follow. I have managed to install WP offline on my pc but I cannot figure out how to login to wp-admin and start working offline.
I know you mentioned that we should login at /localhost/etc…. but where do I enter that? do I open it on my browser?
thank you
WPBeginner Support
Hi Chris,
Yes, you will need to enter that in your browser’s address bar.
Admin
Amy
Hi, thanks for this great tutorial.
I need to update the php.ini as I am getting the error ‘The uploaded file exceeds the upload_max_filesize directive in php.ini.’ how do I find this on localhost ?
Thanks!
Ratnesh Tripathi
Great article sir, but I am not able to login into WordPress admin panel.
Please provide solution
Mike
am not getting the welcome to word press page what’s wrong, it’s got — Index of /website1 —at the top
abdulmuluq
please it showing me database not found when I try to input database name in my wp
sam
Yeah, It happened to me too. You’ve gotta create your database name in the localhost/phpMyAdmin section in your browser before going back to fill the pieces of information and also the username will be root and the password will be empty. You’re good to go
divp
Good one thanks for sharing
Raymart
Which is much faster, XAMPP or WAMP?
Shaedar
Thanks for the detailed guide… i followed the steps as outlined above an it all worked out well until i tried to launch wordpress on my browser by entering “localhost/website1” Instead of launching, its showed “Index/website1”
please what could be the problem?
WPBeginner Support
Hi Shaeder,
Try to restart XAMPP, make sure you copied the WordPress folder and the website1 folder actually contains your WordPress files.
Admin
Shaedar
Thanks so much… working perfectly now.
Rodney Lacambra
Having a local WordPress site is great hence testing functionality, plugins, and themes before making it live.
It’s also much faster compare to live.
Thanks, great article.
Paul Guzman
This worked to perfection. Can’t believe I actually did this. Instructions were “Right On”. This made my day!
Soham Pratap
Much creative way to just design put up the content … experiment and when you are done!! get your site online
Om
What about Wampserver is it the same ?
WPBeginner Support
WAMPserver is also an Apache distribution maintained by different folks. But yes it also allows you to create local WordPress sites on your Windows computer.
Admin