Pubblicare manualmente sui social media può richiedere molto tempo ed energia. Ecco perché da tempo utilizziamo strumenti di automazione dei social media sui nostri siti web aziendali.
L’automazione dei media può salvare molto tempo gestendo le attività ripetitive. Un programma di pubblicazione coerente mantiene il vostro pubblico impegnato e aumenta la vostra portata condividendo i contenuti su più piattaforme.
Fortunatamente, strumenti come IFTTT, Zapier, Uncanny Automator e ClickSocial vi permettono di condividere automaticamente i post del vostro blog WordPress su piattaforme come Facebook, Twitter, LinkedIn, Instagram e altre ancora.
Tuttavia, la navigazione tra questi strumenti può essere scoraggiante. Ed è per questo che siamo qui.
In questo articolo analizzeremo come impostare questi strumenti di automazione per automatizzare il social media marketing e liberare spazio per altre attività.
Perché automatizzare WordPress e i social media?
L’automazione del sito web e degli account dei social media di WordPress elimina la necessità di condividere manualmente i contenuti su queste piattaforme.
È possibile programmare facilmente la pubblicazione di post su varie piattaforme di social media nello stesso momento, senza doversi accedi e condividerli singolarmente.
Ad esempio, se dovete fare un annuncio importante sul vostro sito web, potete automatizzare WordPress e i social media in modo che l’annuncio venga pubblicato su tutte le piattaforme sociali a un orario programmato.
Questo salva tempo e fatica, aumenta la presenza sui media e la visibilità del sito web.
Inoltre, l’automazione di WordPress con i social media può anche migliorare la SEO del sito aumentando i segnali dei social media come i like, le condivisioni e i commenti.
Per questo motivo, vi mostreremo come automatizzare facilmente WordPress con i media utilizzando IFTT, Zapier e Uncanny Automator. Potete utilizzare i link rapidi qui sotto per passare al metodo che desiderate utilizzare:
Pronti? Entriamo subito nel vivo.
Metodo 1: automatizzare WordPress e i social media con IFTTT (gratuito)
IFTTT (If This Then That) è un servizio web gratuito che aiuta gli utenti ad automatizzare le attività basate sul web. Utilizza applet per collegare due o più app e dispositivi.
Ad esempio, è possibile utilizzare un’applet Twitter per collegare il proprio account Twitter al sito web WordPress.
Se state cercando un modo gratuito per automatizzare i media e WordPress, questo metodo fa per voi.
Creare un account IFTTT
Per automatizzare il sito web WordPress e i media, è necessario creare un account su IFTTT.
Per prima cosa, dovete visitare il sito web di IFTTT e fare clic sul pulsante “Get Started” in alto a destra dello schermo.
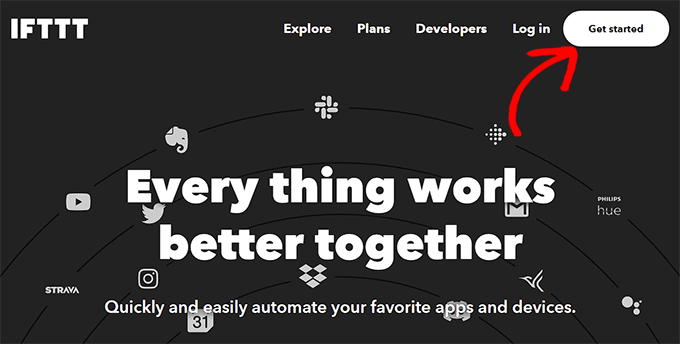
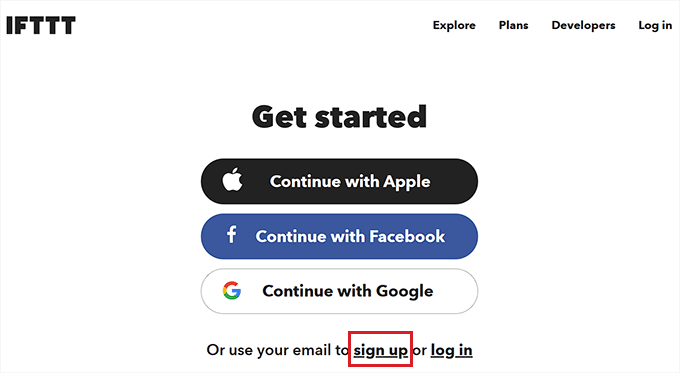
Questo vi indirizzerà a una nuova pagina, dove dovrete fare clic sul collega “Iscriviti”.
Quindi, fornite le vostre credenziali email per creare un account su IFTTT.
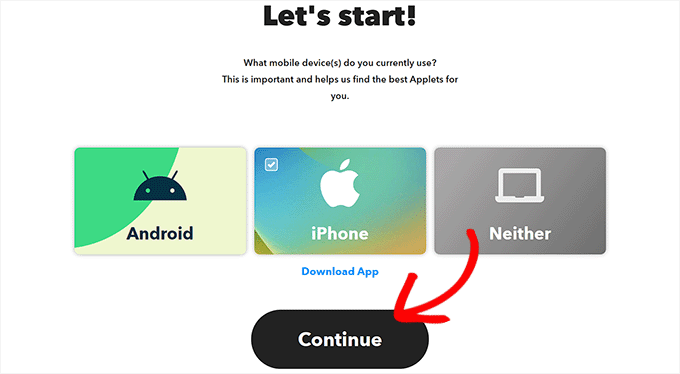
Una volta fatto ciò, verrà visualizzata la pagina “Let’s Start”, in cui è necessario selezionare il tipo di dispositivo mobile attualmente in uso.
È sufficiente scegliere un’opzione e fare clic sul pulsante “Continua”.
Successivamente, è necessario selezionare le piattaforme di social media che si utilizzano di frequente per personalizzare al meglio la pagina “Esplora”.
Una volta terminato, fai clic sul pulsante “Continua” per andare avanti.
Impostazione di un’applet IFTTT
Ora che il vostro account è pronto, verrete portati alla pagina “Esplora”, dove potrete selezionare l’applet che fa per voi.
Per questa esercitazione, automatizzeremo WordPress e Facebook.
Per farlo, fate clic sull’applet “WordPress to FB Page” dall’elenco.
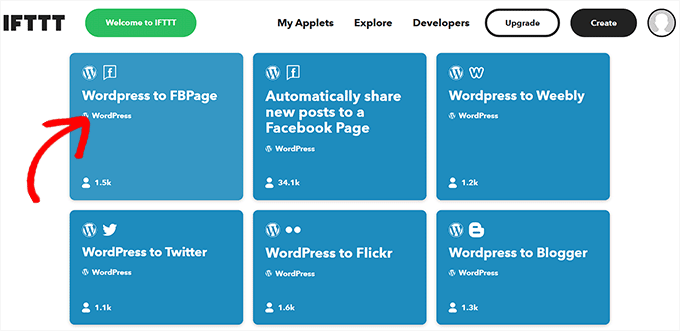
Ora verrete indirizzati allo schermo “WordPress to FB Page”.
Successivamente, è sufficiente attivare/disattivare l’interruttore “Connect”.
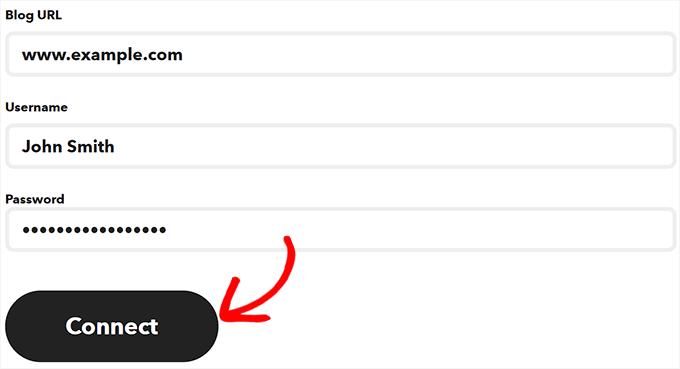
Si aprirà una nuova pagina in cui dovrete fornire l’URL del vostro blog WordPress, il nome utente e la password.
Una volta terminato, fai clic sul pulsante “Connetti” per integrare WordPress con IFTTT.
Dopo che il sito web WordPress è stato collegato, si verrà reindirizzati allo schermo “WordPress to FBPage”.
Qui è sufficiente attivare/disattivare di nuovo l’interruttore “Connect”. Questo vi indirizzerà alla piattaforma di Facebook, dove dovrete dare l’autorizzazione a collegare il vostro account di Facebook con IFTTT.
Se siete sicuri, fate clic sul pulsante “Continua”.
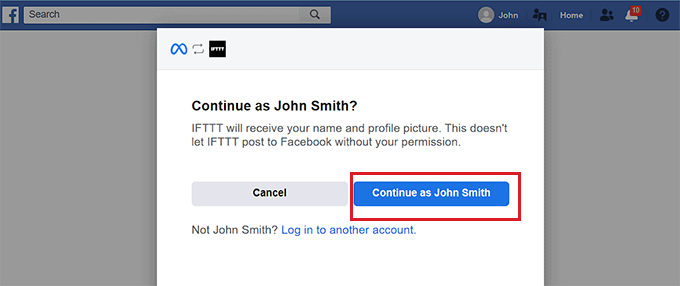
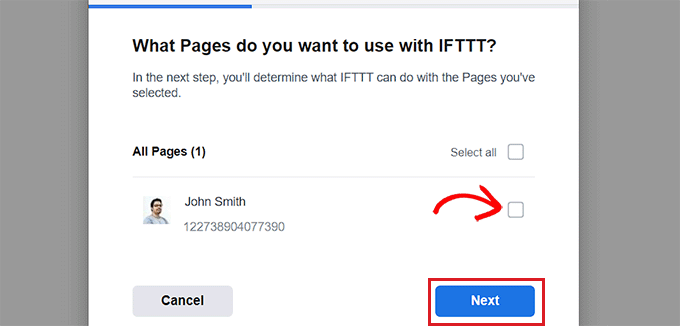
Vi verrà chiesto chi siamo e quali pagine volete collegare a IFTTT. Selezionate la pagina Facebook con la quale condividerete le pubblicazioni del vostro blog WordPress.
Una volta fatto ciò, fate clic sul pulsante “Avanti”.
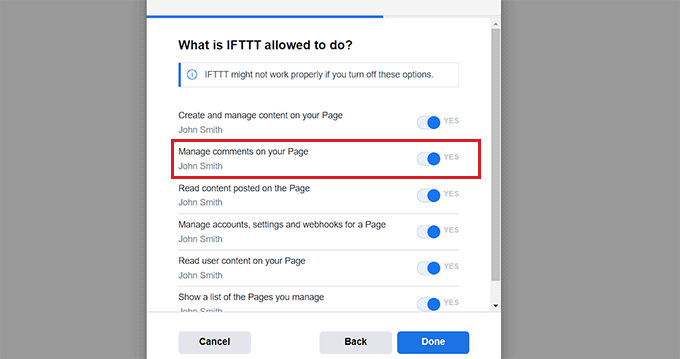
Successivamente, è sufficiente selezionare tutte le azioni che IFTTT può eseguire sulla vostra pagina di Facebook.
Ad esempio, se si desidera che IFTTT gestisca i commenti sulla pagina, attivare/disattivare l’opzione accanto a ‘Sì’. Poi, fate clic su “Fatto”.
A questo punto si aprirà lo schermo “WordPress to FBPage”, dove l’attiva/disattiva mostrerà che il sito web di WordPress e le pagine di Facebook sono collegate.
Da qui è sufficiente fare clic sul pulsante “Impostazioni” in alto.
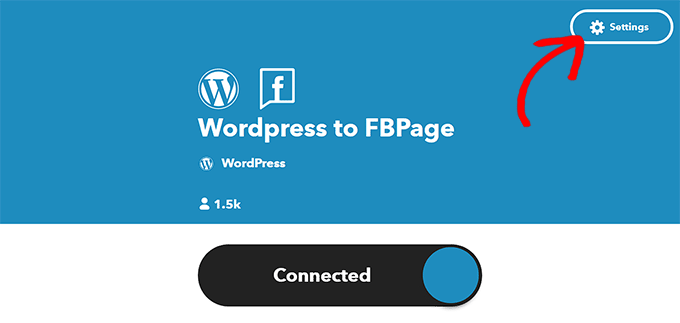
A questo punto si accede alla pagina “Crea”.
Impostazione di “Se questo” e “Allora quello”.
Qui potete configurare le azioni che volete che IFTTT compia sulla vostra pagina Facebook quando succede qualcosa sul vostro sito web WordPress.
Fate clic sul pulsante “Add-on” accanto all’opzione “Se questo”.
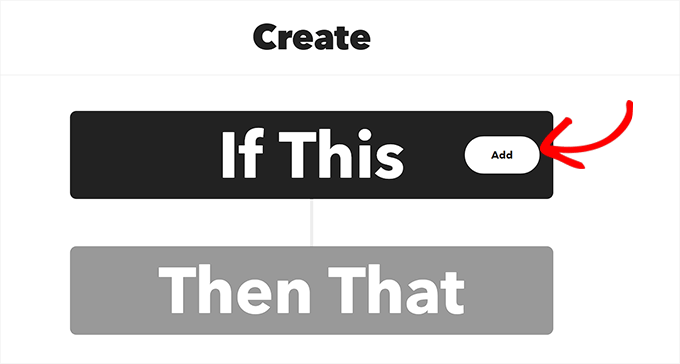
Successivamente, è sufficiente scegliere WordPress come servizio dalla pagina “Scegliere un servizio”.
Si accede così alla pagina “Scegliere un trigger”. Qui è sufficiente selezionare quando si desidera che il trigger si attivi. Questo trigger avviserà IFTTT quando un’azione si svolge sul vostro sito web.
Ad esempio, se si desidera che un trigger si attivi ogni volta che si aggiunge un nuovo articolo, è sufficiente scegliere questa opzione.
È anche possibile creare il proprio trigger. A tal fine, è sufficiente fare clic sul pulsante “Crea trigger”.
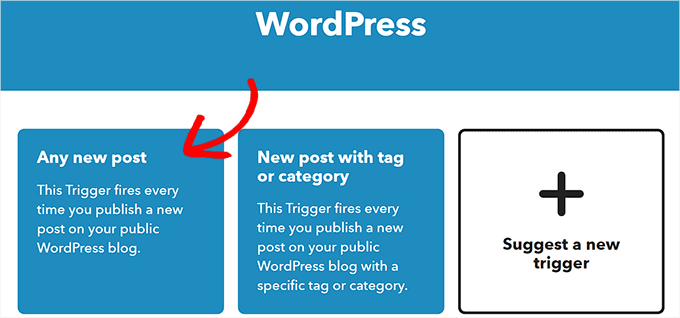
Ora che il trigger è pronto, si verrà reindirizzati alla pagina “Crea”.
Fate clic sul pulsante “Aggiungi” accanto all’opzione “Allora quello”.
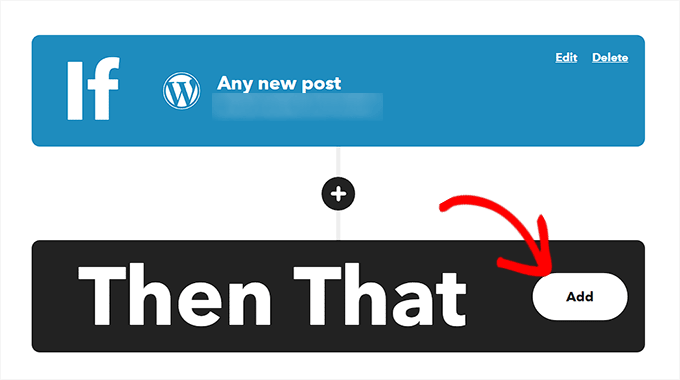
Quindi, scegliete semplicemente “Pagine Facebook” dalla pagina “Scegliere un servizio”.
A questo punto è necessario selezionare un’azione. Si tratta di ciò che IFTTT farà sulla vostra pagina Facebook quando si verifica una particolare azione sul vostro sito web WordPress.
Ad esempio, potete dire a IFTTT di condividere il collega di WordPress sulla vostra pagina Facebook una volta pubblicato un nuovo articolo sul vostro sito web.
Dopodiché, fate clic sul pulsante “Crea azione”.
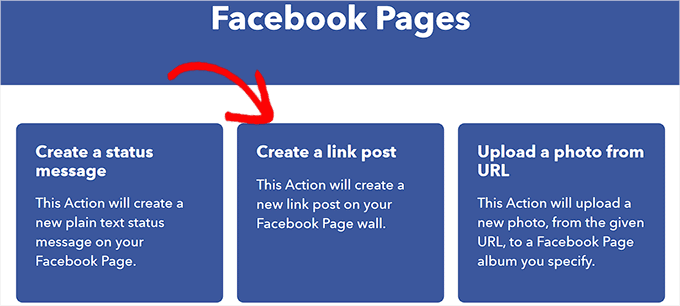
Una volta creata con successo un’azione IFTTT, verrà visualizzata la pagina “Crea”.
Fare clic sul pulsante “Salva” per salvare le impostazioni.
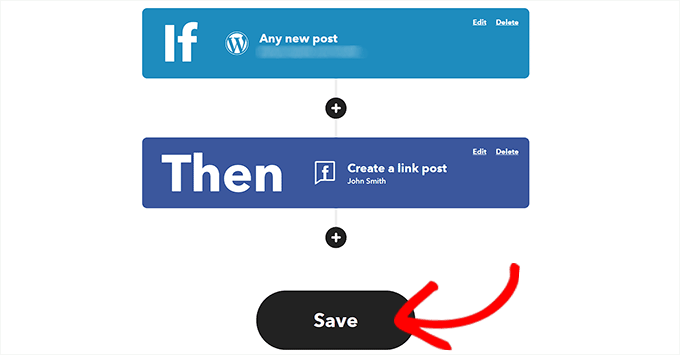
Ora avete automatizzato con successo WordPress e Facebook con IFTTT.
Metodo 2: utilizzare Zapier per automatizzare WordPress e i social media
Se volete automatizzare i media e WordPress utilizzando Zapier, questo metodo fa per voi.
Zapier è uno strumento di automazione basato sul cloud che permette agli utenti di collegare varie applicazioni web, tra cui Gmail, Trello, Slack, Facebook, Twitter e altre ancora.
Offre inoltre una libreria di flussi di lavoro di automazione precostituiti, noti come “Zaps”, che possono essere ulteriormente personalizzati in base alle proprie esigenze.
Impostazione di Zapier
Per automatizzare WordPress e i media, è necessario innanzitutto installare e attivare il plugin Zapier for WordPress sul proprio sito web. Per ulteriori istruzioni, consultate la nostra guida passo passo su come installare un plugin per WordPress.
Dopodiché, è necessario visitare il sito web di Zapier e fare clic sul pulsante “Iscriviti” nell’angolo in alto a destra dello schermo per iniziare a creare un account.
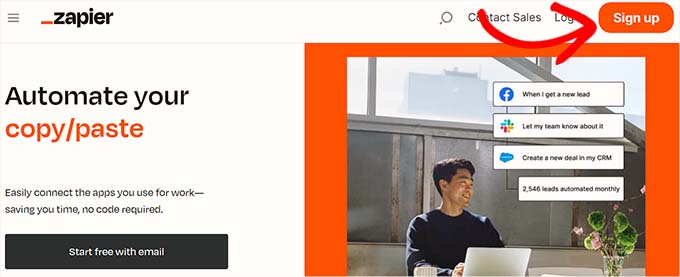
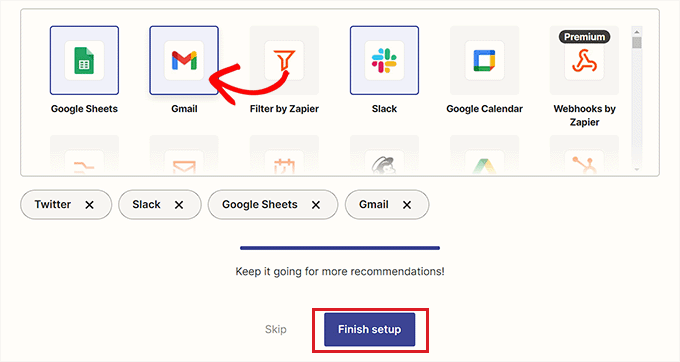
Una volta fornite le credenziali, verrà visualizzata la pagina “Quali app utilizzi?”.
È sufficiente selezionare le applicazioni utilizzate e fare clic sul pulsante “Termina configurazione”. Come minimo, dovrete scegliere WordPress e le piattaforme di social media che volete collegare al vostro sito web.
A questo punto si accede alla Bacheca di Zapier. Qui, è sufficiente cercare e aggiungere WordPress sotto l’opzione “Connect this app…”.
Successivamente, aggiungere la piattaforma di social media che si desidera collegare a WordPress sotto l’opzione “con questo!
Per questa esercitazione, collegheremo WordPress con Twitter.
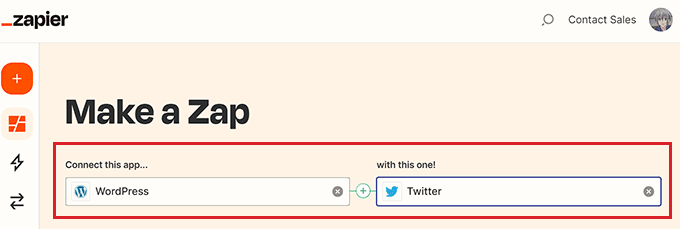
Fare uno Zap
Successivamente, è necessario selezionare un trigger per WordPress dal menu a discesa. Quando si verifica un’azione particolare sul sito web di WordPress, questo trigger dirà a Zapier di eseguire un’azione su Twitter.
Dopo aver fatto questo, scegliete l’azione che volete far eseguire a Zapier dal menu a discesa “Allora fai questo!
Ad esempio, se si desidera creare un tweet ogni volta che si pubblica un nuovo articolo in WordPress, è necessario selezionare queste opzioni.
Una volta terminato, fare clic sul pulsante “Prova” per creare uno Zap.

Collegare il sito WordPress e l’account Twitter a Zapier
Successivamente, verrà visualizzato l’editor di Zapier.
È necessario espandere la scheda “WordPress Trigger” e poi fare clic sul pulsante “Accedi” per collegare WordPress e Zapier.
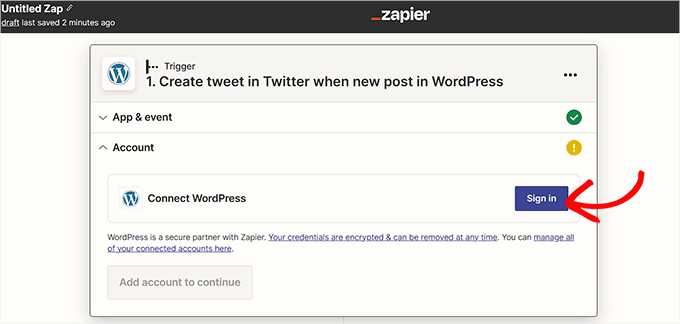
Si aprirà la pagina “Connetti un account” in una nuova finestra.
Procedete fornendo il nome utente, la password e l’URL del vostro sito WordPress. Dopodiché, fate clic sul pulsante “Sì, continua su WordPress” per andare avanti.
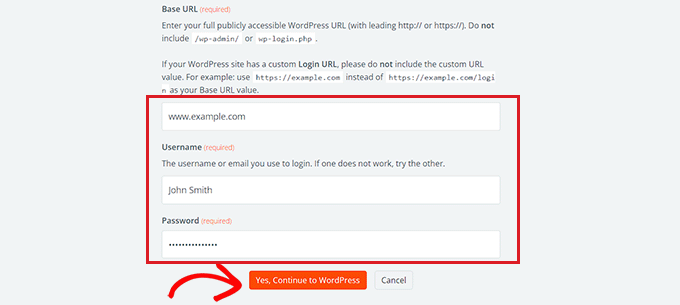
Una volta che il sito web WordPress è collegato, espandere la scheda “Twitter” e fare clic sul pulsante “Accedi”.
Verrà visualizzata nuovamente la pagina “Connetti un account”, in cui è necessario dare a Zapier l’autorizzazione a connettersi al proprio account Twitter.
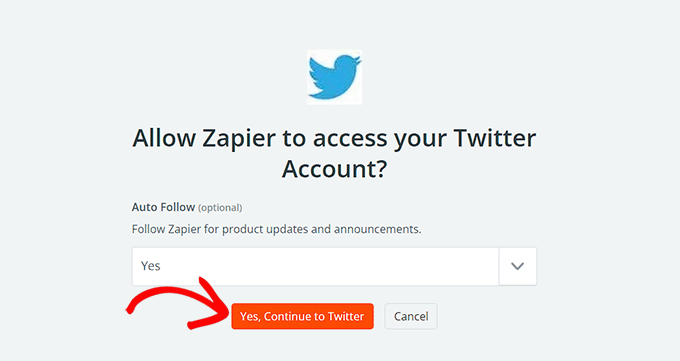
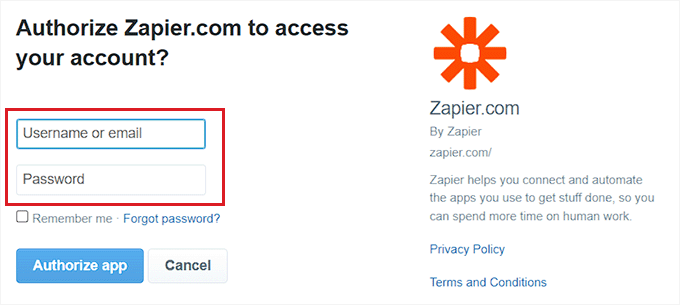
È sufficiente fornire il nome utente e la password del proprio account Twitter e fare clic sul pulsante “Autorizza app”.
Zapier ora collegherà il vostro account Twitter con il vostro sito web WordPress.
Personalizzate il vostro Zap
Successivamente, è possibile utilizzare il menu a discesa “Messaggio” per selezionare il contenuto del tweet che verrà pubblicato ogni volta che si pubblica un nuovo articolo.
Ad esempio, se si desidera aggiungere al tweet il link alla pubblicazione, la data e il nome dell’autore, è sufficiente scegliere queste opzioni dal menu a discesa.
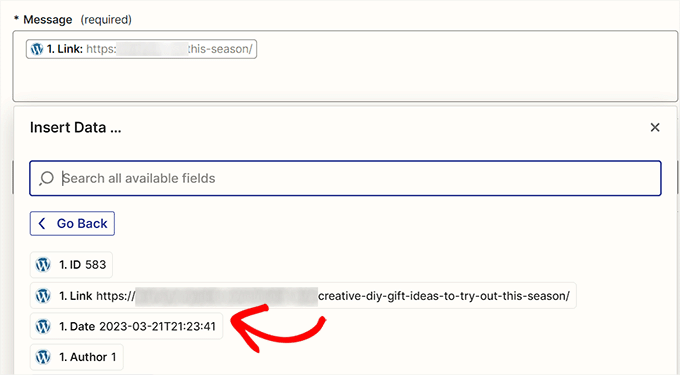
Quindi, fate clic sul pulsante “Continua” per andare avanti.
Quindi, passare alla scheda “Impostazioni” dalla barra laterale a sinistra. Si può iniziare inserendo un nome per lo Zap creato.
Quindi, digitare una descrizione e scegliere un fuso orario per lo Zap.
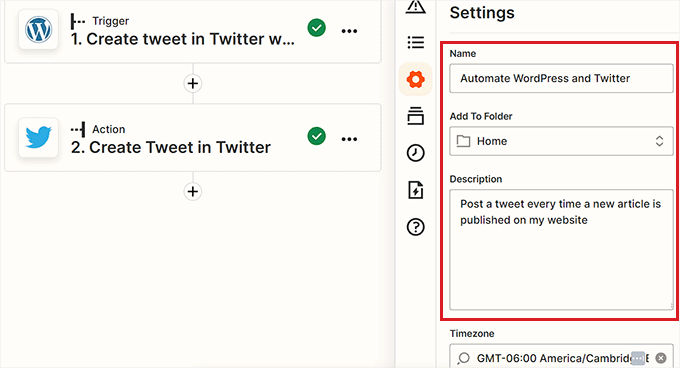
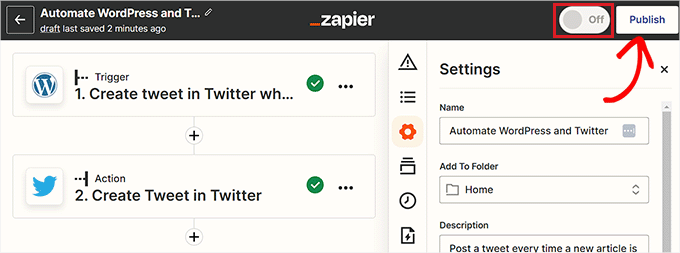
Infine, attivare/disattivare l’interruttore in alto e fare clic sul pulsante “Pubblica” per creare e attivare lo Zap.
Ora avete automatizzato con successo WordPress e Twitter.
Correlato: Consultate il nostro elenco dei migliori plugin Zapier per WordPress.
Metodo 3: automatizzare WordPress e i social media con Uncanny Automator (consigliato)
Impostazione di Uncanny Automator
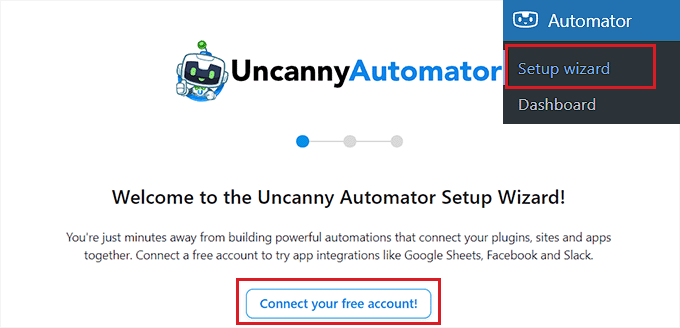
Si aprirà la pagina “Accedi” in una nuova finestra.
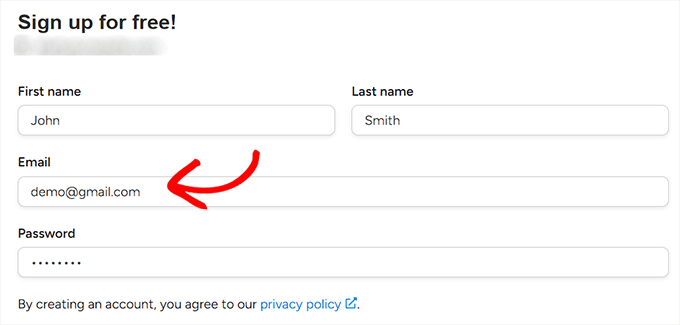
Qui è sufficiente fornire le proprie credenziali per creare un account gratuito di Uncanny Automator e poi fare clic sul pulsante “Iscriviti” in basso.
Scegliere un trigger dell’Automator Uncanny
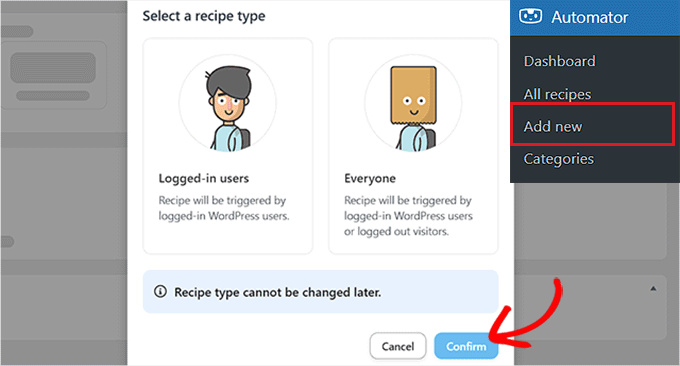
Quindi, visitate la pagina Automator ” Aggiungi nuovo dalla barra laterale dell’amministrazione di WordPress. Automator vi chiederà se la ricetta che volete creare deve essere triggerata solo dagli utenti connessi o da tutti quelli che visitano il vostro sito.
Dopo aver scelto un’opzione, fate clic sul pulsante “Conferma”.
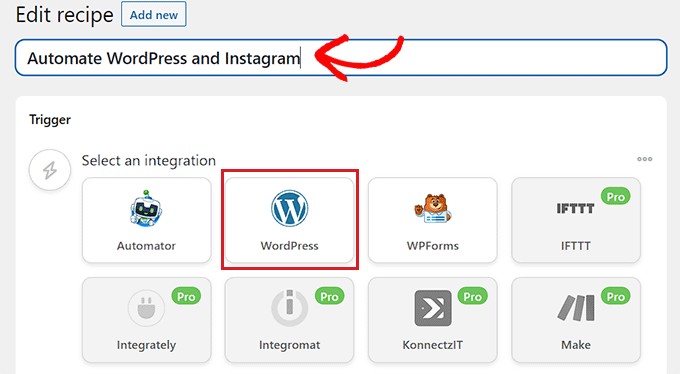
Dopodiché, si può iniziare ad aggiungere un titolo per la ricetta. Ad esempio, se si desidera automatizzare WordPress e Instagram, è possibile utilizzare questo titolo come nome della ricetta.
Successivamente, è sufficiente selezionare l’opzione “WordPress” nella sezione “Trigger”.
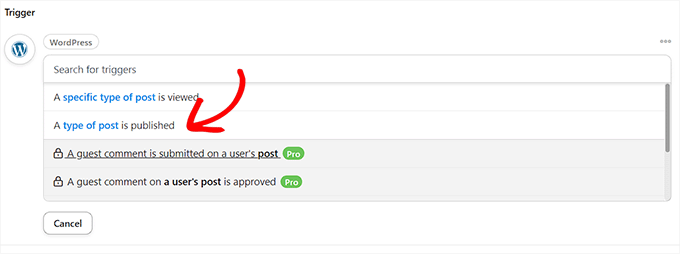
Ora è necessario selezionare un trigger per WordPress.
Ad esempio, se volete che un post di Instagram venga pubblicato ogni volta che pubblicate un nuovo post su WordPress, scegliete l’opzione ‘Viene pubblicato un tipo di post’ dal menu a discesa”.
Collegare Uncanny Automator a Instagram
Dopo aver selezionato un trigger, fate clic sul pulsante “Add action” per aprire l’elenco delle integrazioni.
Per questa esercitazione, automatizzeremo WordPress e Instagram.
Scegliete l’opzione “Instagram” dall’elenco.
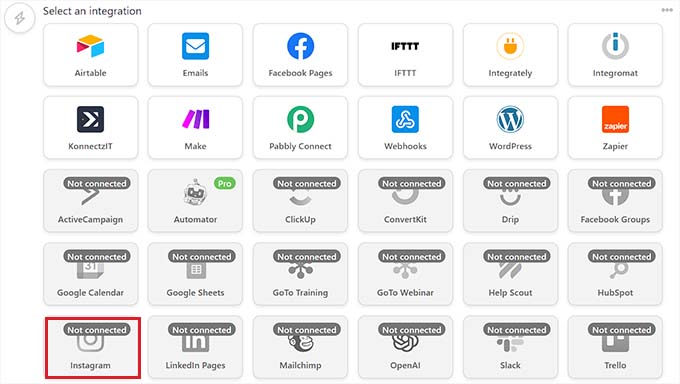
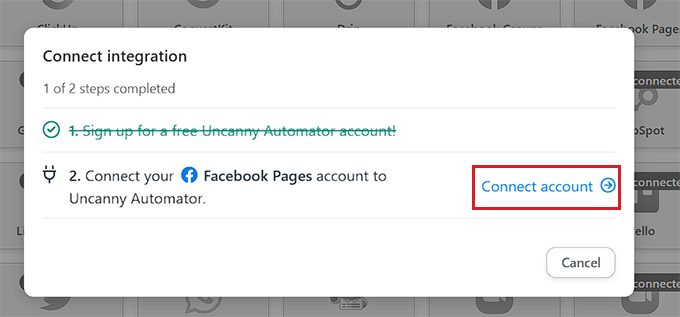
A questo punto viene visualizzato un popup sulla schermata.
Tenete presente che è possibile collegare solo un account aziendale Instagram già collegato a una pagina Facebook. Non sarà possibile collegarsi nemmeno a un account Instagram personale.
Ora, fate clic sul link “Collega account” per integrare Instagram con Uncanny Automator.
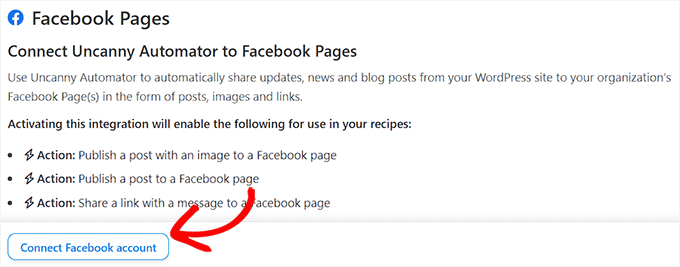
Si aprirà la pagina “Connetti un account” in una nuova finestra.
A questo punto, fai clic sul pulsante “Connetti account Facebook” per andare avanti.
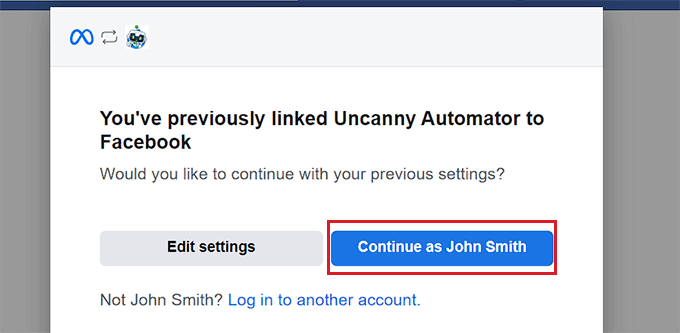
A questo punto verrete indirizzati al sito web di Facebook, dove dovrete fornire le vostre credenziali di accesso. Vi verrà chiesto se volete continuare con lo stesso ID.
Fai clic sul pulsante “Continua” per collegare Facebook a Uncanny Automator.
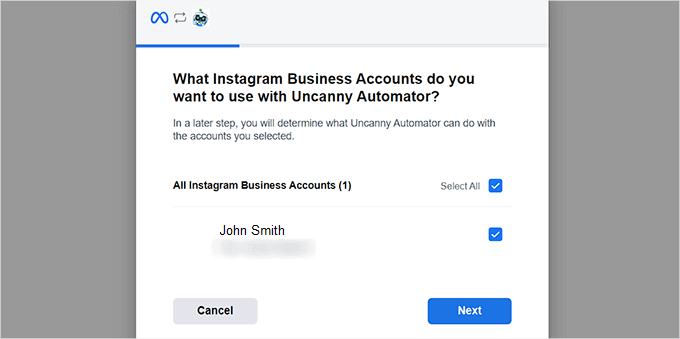
Successivamente, è necessario selezionare l’account Instagram aziendale collegato al proprio account Facebook.
Quindi, fate clic sul pulsante “Avanti” per continuare.
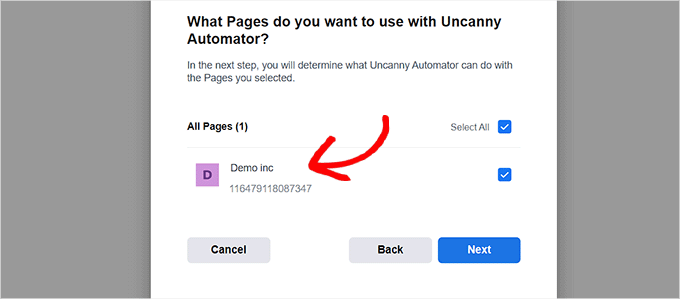
Successivamente, è necessario selezionare una pagina Facebook. Basta sceglierne una e fare clic sul pulsante “Avanti”.
Assicuratevi di scegliere la pagina collegata al vostro account business di Instagram. In caso contrario, il processo non funzionerà.
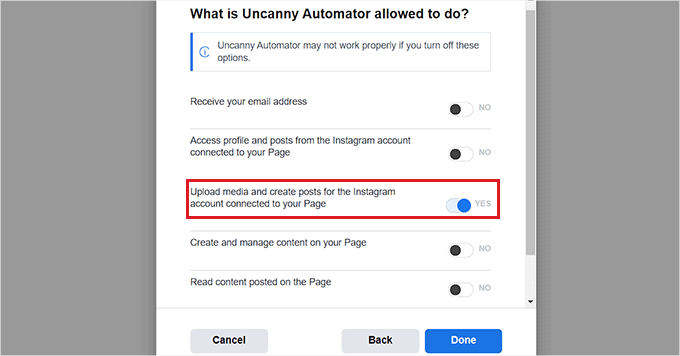
Dovrete quindi scegliere tutte le azioni che Uncanny Automator può eseguire sulla vostra pagina di Instagram.
Ad esempio, se si vuole concedere l’autorizzazione a creare articoli sul proprio account Instagram, è sufficiente attivare/disattivare l’interruttore accanto a tale opzione.
A questo punto, fate clic sul pulsante “Fatto”.
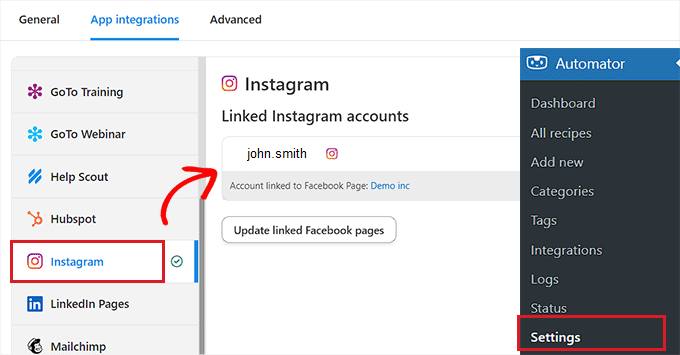
A questo punto verrete reindirizzati alla pagina Automator ” Impostazioni sulla vostra plancia di amministrazione di WordPress. Una volta lì, passate alla scheda “Instagram” nella colonna di sinistra.
Qui vedrete l’account business di Instagram collegato alla vostra pagina Facebook.
Se l’account Instagram non viene visualizzato sulla schermata, significa che qualcosa è andato storto e che è necessario ripetere la procedura.
A questo punto si può uscire da questa finestra e andare alla pagina popup “Integrazione di connessione”, facendo clic di nuovo sul collega “Connetti account”. In questo modo Instagram verrà integrato con Uncanny Automator e il vostro sito web WordPress.
Scegliete un’azione dell’Automator Uncanny
Ora è il momento di scegliere l’azione che volete che Uncanny Automator esegua su Instagram quando accade qualcosa sul vostro sito web WordPress.
Ad esempio, se volete pubblicare una foto su Instagram ogni volta che un articolo viene pubblicato, scegliete l’opzione “Pubblica una foto su un account Instagram Business”.

Quindi, digitate l’URL o l’ID della libreria dei media della foto che volete postare su Instagram.
È possibile modificare l’URL della foto dalla Bacheca di WordPress ogni volta che si pubblica un nuovo articolo di WordPress.
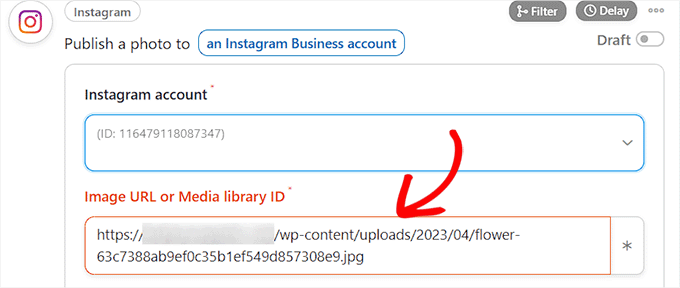
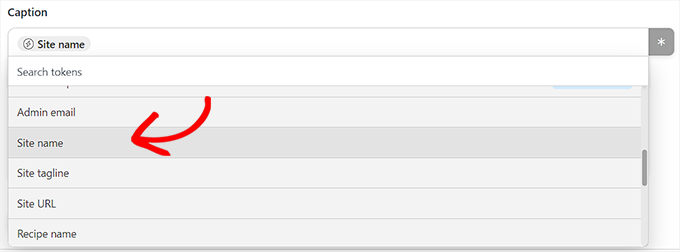
Successivamente, è necessario bozzare la didascalia che verrà pubblicata insieme alle pubblicazioni. È sufficiente scegliere le opzioni desiderate dal menu a discesa.
È possibile aggiungere il nome del sito, l’indirizzo email, l’URL del sito web, la data e altro ancora dall’elenco delle opzioni.
Al termine, fare clic sul pulsante “Salva” per memorizzare le modifiche.
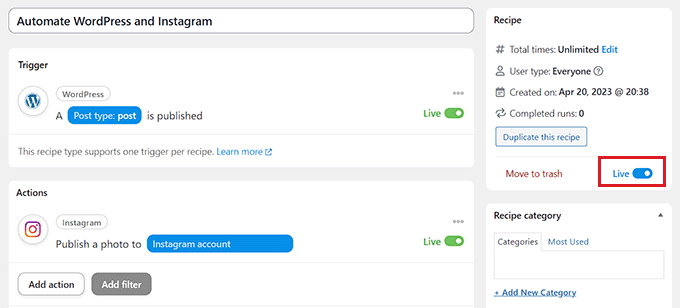
Infine, dirigetevi verso la sezione “Ricetta” nell’angolo destro della schermata e attivate/disattivate l’interruttore su “Live”.
Ora avete automatizzato con successo WordPress e Instagram.
Metodo 4: Utilizzare ClickSocial per automatizzare WordPress e i social media
Se cercate un metodo più semplice per automatizzare WordPress e i social media, potete usare anche ClickSocial.
ClickSocial è uno dei migliori strumenti di pianificazione dei social media. È possibile utilizzarlo per programmare facilmente i post sui social media direttamente dalla dashboard di WordPress. È anche dotato di una funzione per condividere automaticamente i vecchi post di WordPress su base regolare.
Configurare ClickSocial
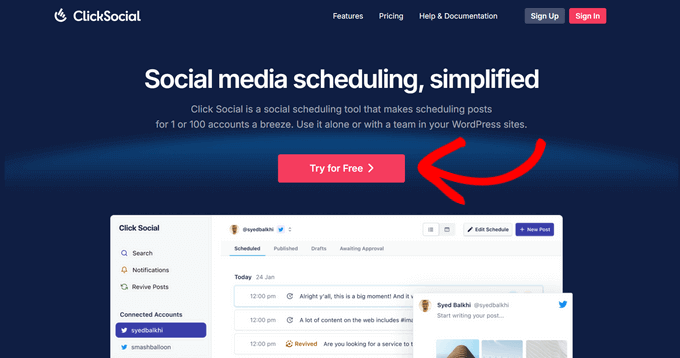
Per prima cosa, è necessario visitare il sito web di ClickSocial e fare clic sul pulsante “Prova gratis” per registrare un account.
Successivamente, è necessario installare e attivare il plugin gratuito ClickSocial sul vostro sito WordPress. Se avete bisogno di aiuto, consultate la nostra guida su come installare un plugin di WordPress.
Una volta attivato il plugin, è necessario tornare al proprio account sul sito web di ClickSocial per generare una chiave API.
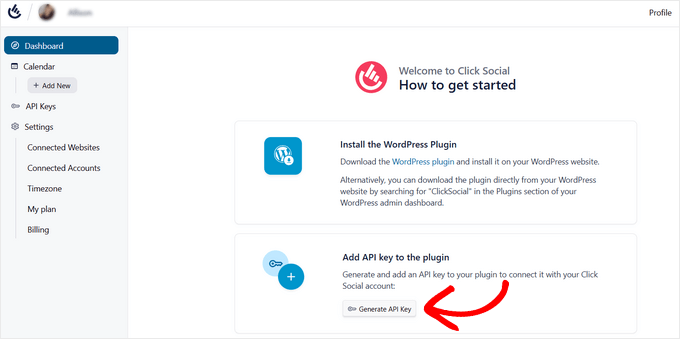
Per farlo, cliccate sul pulsante “Genera chiave API” dalla dashboard di ClickSocial.
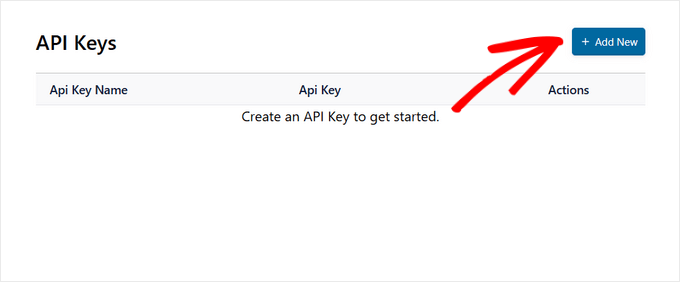
Nella pagina successiva, è necessario fare clic sul pulsante “Aggiungi nuovo”.
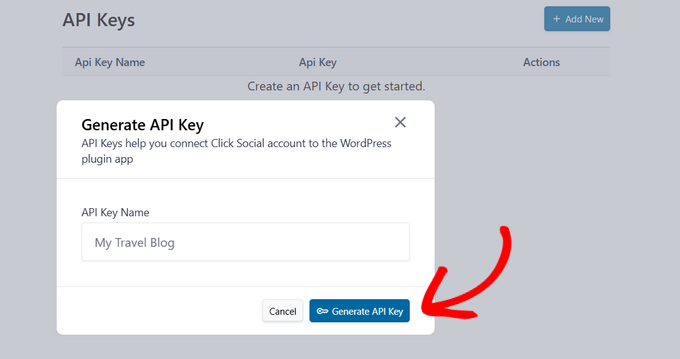
Si aprirà una finestra a comparsa in cui è possibile inserire un nome per la chiave API, ad esempio il nome del proprio sito web.
Successivamente, fare clic sul pulsante “Genera chiave API”.
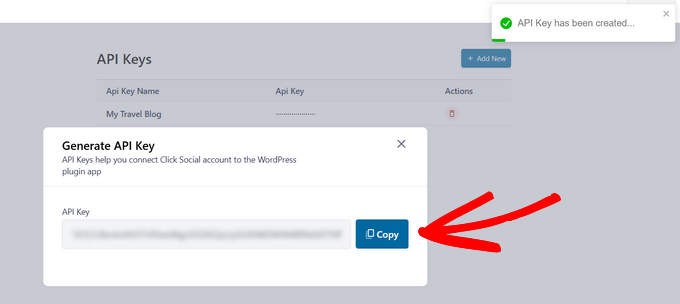
Ora avete creato con successo una chiave API. Ricordate di tenerla al sicuro perché è essenziale per connettere il vostro sito WordPress.
Fare clic sul pulsante “Copia” per copiare la chiave API e tornare al sito WordPress.
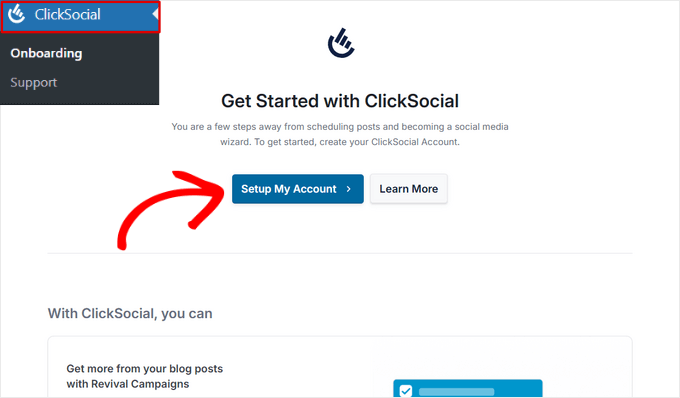
Dalla dashboard di WordPress, fate clic sulla voce di menu ClickSocial e poi sul pulsante “Configura il mio account”.
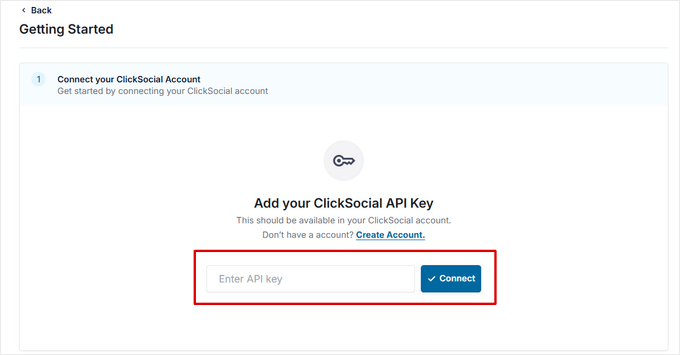
Successivamente, è sufficiente incollare nel campo la chiave API copiata in precedenza e fare clic sul pulsante “Connetti”.
Una volta fatto questo, si può iniziare a collegare gli account dei social media premendo il pulsante “Aggiungi account”.
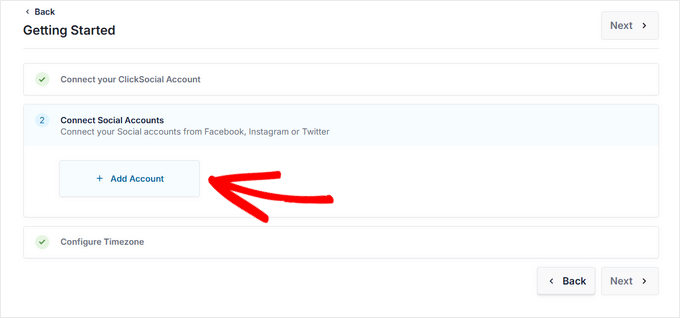
Con ClickSocial, potete collegare il vostro sito web alle reti di social media più popolari, tra cui Facebook, Instagram e Twitter/X.
Per questa esercitazione, selezioneremo l’opzione Twitter per collegarlo.
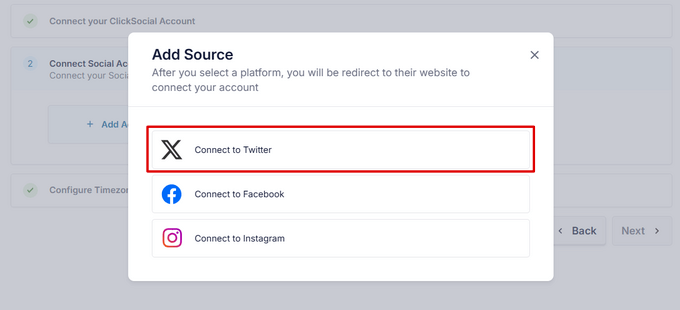
Il plugin vi reindirizzerà quindi al sito web di Twitter dove dovrete accedere al vostro account e fare clic sul pulsante “Authorize App”.
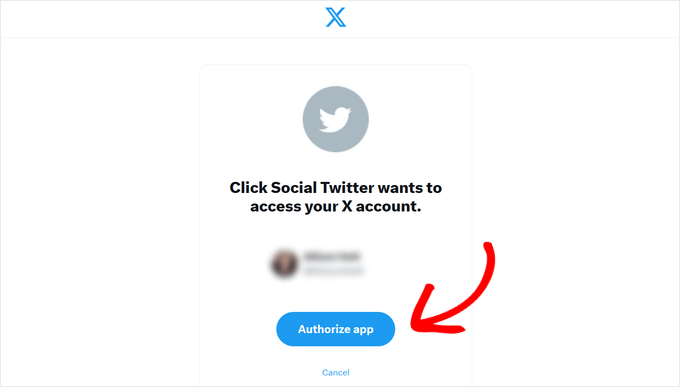
Dopodiché, sarete reindirizzati al vostro sito web. Se volete, potete ripetere la procedura per collegare altri account di social media.
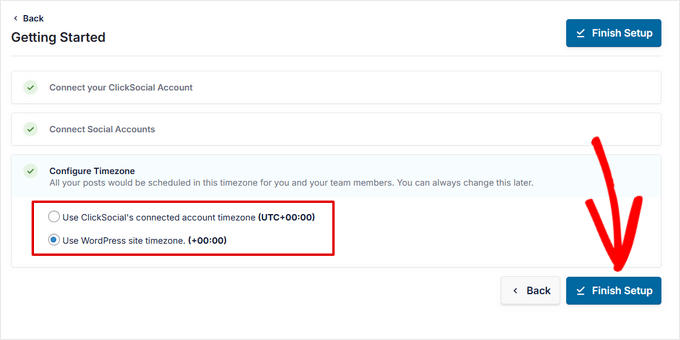
Una volta collegati gli account dei social media, è possibile scegliere il fuso orario in cui programmare i post. Per questa esercitazione, utilizzeremo il fuso orario del nostro sito WordPress.
Quindi, fare clic sul pulsante “Fine dell’installazione”.
Creare una campagna di rilancio in ClickSocial
Ora che ClickSocial è stato configurato, è possibile creare una campagna di rilancio per condividere automaticamente i vecchi post di WordPress.
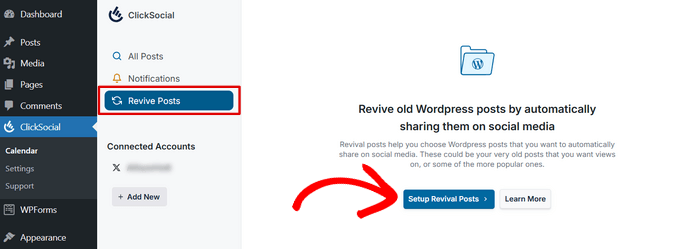
Per farlo, andate alla scheda “Ravviva i messaggi” e fate clic sul pulsante “Imposta messaggi di ripristino”.
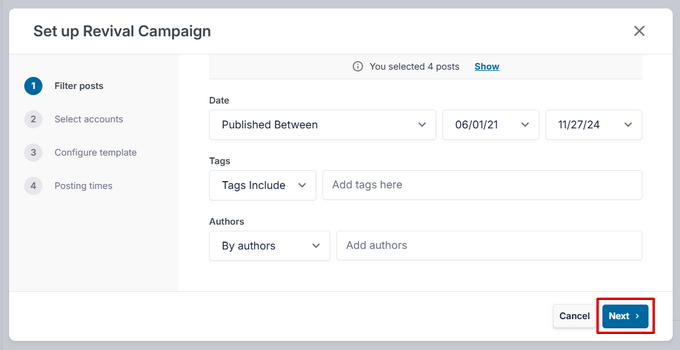
Nella prima fase, è possibile impostare dei filtri per decidere quali post condividere automaticamente sui social media.
È possibile filtrare per data, tag e autori. Quando si è soddisfatti dei filtri, fare clic sul pulsante “Avanti” per continuare.
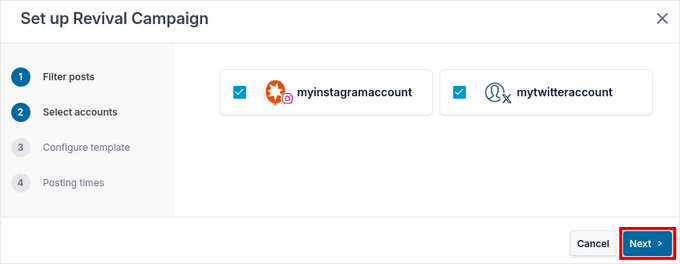
Quindi, selezionare gli account dei social media su cui si desidera pubblicare. Se si desidera, è possibile selezionare più account.
Fare clic sul pulsante “Avanti” per continuare.
Successivamente, è possibile creare un modello di post, ovvero il testo che accompagnerà i post sui social media.
È possibile digitare manualmente il contenuto del post e inserire contenuti dinamici come il titolo del post, l’estratto, il link breve al post e le categorie come hashtag.
Una volta che il modello è pronto, fare clic sul pulsante “Avanti”.
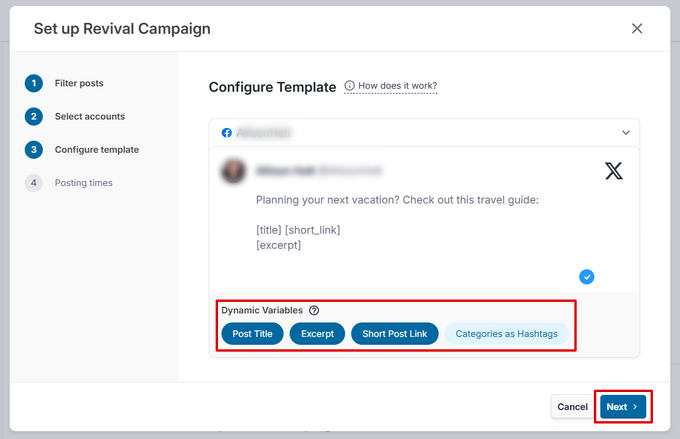
Nota: se sono stati selezionati più account su cui pubblicare, è necessario creare un modello separato per ogni piattaforma. A tale scopo, fare clic sulla freccia rivolta verso il basso accanto al nome dell’account.
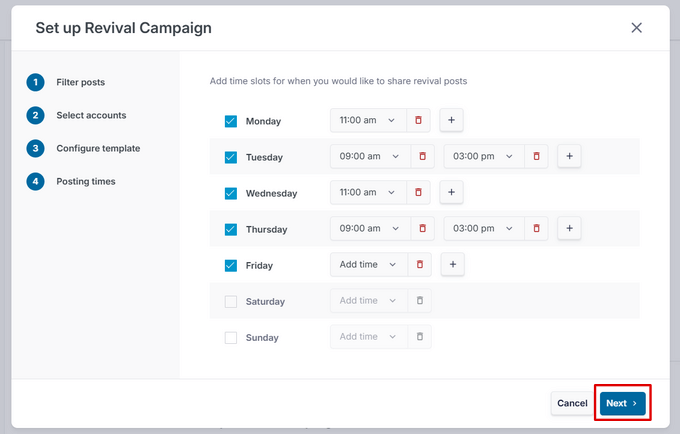
Infine, è possibile selezionare i giorni e gli orari specifici in cui si desidera che i post vengano condivisi. È possibile aggiungere più orari di pubblicazione al giorno facendo clic sull’icona “+ Aggiungi”.
Quando siete soddisfatti del vostro programma di pubblicazione, fate clic sul pulsante “Avanti”.
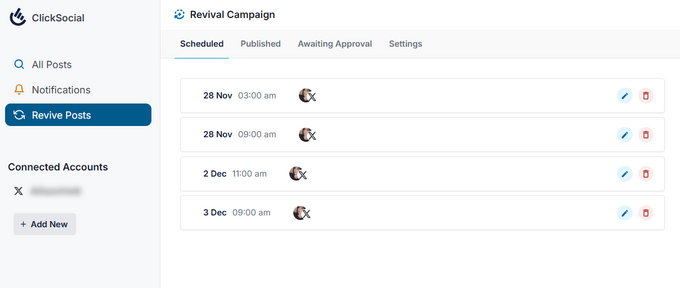
A questo punto, si accede alla scheda “Pianificato”, dove si possono vedere i post che verranno condivisi automaticamente sui social media.
Speriamo che questo articolo vi abbia aiutato a capire come automatizzare WordPress e le piattaforme di social media utilizzando IFTTT, Zapier, Uncanny Automator e ClickSocial. Inoltre, vi consigliamo di consultare il nostro tutorial su come aggiungere i social login al vostro sito WordPress o la nostra selezione dei migliori plugin per i social media per WordPress.
Se questo articolo vi è piaciuto, iscrivetevi al nostro canale YouTube per le esercitazioni video su WordPress. Potete trovarci anche su Twitter e Facebook.


Mrteesurez
Website Automation is worth give an attention. It helps one automation and share website contents to your different social handles, this will save your time and energy.
Can this also work for custom post type ??
WPBeginner Support
It can, you would want to ensure you include the custom post type in an RSS feed for IFTTT to be able to see it.
Admin
THANKGOD JONATHAN
I have been using free Zapier to automate my social media post but today I have get an alternative.
I will need to try IFTTT. Base on this tutorial as I see it will be easier to use than Zapier.
Moinuddin Waheed
This is so powerful and easy to use in yet free. IFTTT is hands down the best social media automator free plugin to use.
Others are paid options and are of course worth having but for beginners who are just starting out and have a tight budget, this ifttt is the best option to go with to automate the social media posts and pages.
Matthew Carney
I have set everything up but I want ifttt to pull posts from a categorie but when i use the link “https://domain.name/local-news/feed/” it doesn’t pull but if i ask it to pull site wide “https://domain.name/feed/” it pulls everything. im so confused i dont know why it wont work
Andrew B.
Ok so just the normal site URL mysitename.com nothing special like the link to the backend for it to log in correct? Im new to all this stuff only had website for just over a month. Thanks again for your time and assistance.
WPBeginner Support
Unless it asks for a specific URL then you would go to your primary site URL
Admin
Andrew B.
Awesome thank you for the help greatly appreciated.
Andrew B.
I have a bluehost wordpress website. I just created my if this then that account. I want to connect my website blog to post on social media.
It said to enter the blog URL. So i used mysitename.com/blog/ and it said it was not a valid blog URL.
What other URL would it be if not my site name/blog?
WPBeginner Support
IFTTT would normally need the URL for your site and not the blog page of your site.
Admin
Emmanuel Ajayi
NIce one. Thank you.
WPBeginner Support
You’re welcome
Admin
Jen
Hi,
Is there a way to set up IFTT with a third party plugin? For instance my calendar plugin. Everytime I Post, I would like for it to post to my socials .Just like it does for my WordPress Posts currently.
Thanks!
WPBeginner Support
You would want to check with that plugin’s support for if it has the ability to work with IFTTT
Admin
Chinecherem Somto
this is great! i have searched for this for a long time, thanks to WPBeginner
WPBeginner Support
You’re welcome, glad our article could help
Admin
Rohit Singh
Hello admin.
I’ve read this article but i wanted to know that i own a website but whenever i am checking the seo stats it’s showing me that social count 0. How to increase the social count. Kindly reply me please.
WPBeginner Support
Your users may not be sharing your content yet, you can add social icons on your site using one of the plugins in: https://www.wpbeginner.com/plugins/best-social-media-plugins-for-wordpress/
if you do not have shares currently.
Admin
Terri Scheffler
I set up IFTTT to post my WordPress blog entries to the FB page. It works great, and was so easy to do!
One problem. The ‘logo’ appearing with each post comes from my WP page. It’s far too big, and gets truncated, and looks stupid. I went into the media library, created a thumbnail on my ‘logo’ graphic, and hoped it would pick that up instead. It didn’t.
Is there any way I can get IFTTT to pick up the thumbnail graphic instead of the larger one that appears at the top of the blog? Please be gentle, I am a newbie. But I have gotten so much good info from this site, appreciate it!
marc
why do the wordpress apps in ifttt not post the featured image from the wordpress post in the social media you chose. I have so many posts that will post to lnkedin or facebook but do not post the image along with it. Am I doing something wrong?
Simran
Thank you for the tips. It took a while for the ifttt to work for my wordpress but Finally it did.
Tom
Does anyone know how to post a bunch of already published wordpress posts on facebook ?
I have a lot of old posts on a blog that I would like to gradually post on FB (with a pace of 2-5 a day).
Daretoeatapeach
Though ITTT has many services the problem is few of them are detailed enough to be useful. For example, there’s no way to tell it which of my Tumblr blogs to post to, nor can I have it send only certain categories to Tumblr, so the Tumblr option is useless, even though I’ve been seeking a solution to send my posts to Tumblr. Every other time I try to use ITTT I find the lack of detailed options for the services they provide doesn’t meet my needs.
Sadiq Ali Baloch
Hello
please tell me
how to connect twitter accounts to my f.b pages?
Benson
Very terrible to connect self hosted WordPress blog with IFTTT. And suggestion will be greatly appreciated. Only WordPress.com is connecting. Ah! My head is heavy.
markwoff
Trying to use IFTTT to push WP posts to tumblr. I get ‘external image/image not found’ message on tumblr. How might I fix this? Thanks in advance…
Ann Murugi
I have a blog,when i try sharing my links on twitter it states’ the site might be automated’
How can i fix this?
Katia
thanks! very helpful!
Tony
Thank you so much for this post. I’ve heard that plugins for auto sharing to social media can slow down a WordPress site pretty badly, so this is way better. IFTTT is brilliant, and the video combined with the instructions were extremely helpful.
WPBeginner Staff
It actually depends on what CMS or software the other website is using to publish content.
poonam
This is really a awesome article but my question is how can I automatically post to some non wordpress sites every time I publish a new blog post in my wordpress site. Is that possible to do. Its really helpful for me if you will write about this. thanks
Marco Miomac
How to post old WordPress posts to twitter using IFTTT?
Fabula
Hej there.
I am using the IFTTT now for some time. Thanks for telling me that this exists! =)
But I have a problem, when it comes to posting images on Facebook or Twitter from my WordPress-Blog. I always have a featured image set for my posts, but if I want to create an image post on the social media, it always tells me there that the image does not exit.. Is there a trick to make it work?
I even tried making my blog post an image post, but that did not work either.
And can I adjust the recipes so that I just type in what he should show, or is that limited to what they give me (For example what I want to post in my posts, like imageURL and so on)
Thanks for the help!
WPBeginner Staff
You will enter your website’s url in IFTTTT
http://www.example.com
IFTTT will still get your blog feed. Make sure you have activated Twitter channel and given IFTTT permission to tweet on your behalf. After that try publishing a post and then come back to IFTTT and manually run the recipe. See if it shows you any error.
darkhorse85
I can’t activate my WordPress BLOG as a channel:
[On IFTTT.com]
When I attempt activate WordPress posts as channel from my blog URL “mywebsite.co.uk/blog” it will not work.
IFTTT.com activate on WordPress posts as channel by typing “mywebsite.co.uk” it does indeed activate (but does not tansfer the posts from my blog page to Twitter).
Please
let me know I know if you have good idea what going wrong here thanks.
WPBeginner Staff
Seems like your site is setup with a static front page and a separate page for blog posts. In cases like this, your blog’s URL is still the root domain not the blog page. Sometimes it may take IFTTT a while to get your new post and tweet it. You can also try running a recipe manually and see if it triggers the action or shows any error.
You will also need to activate the Twitter channel and give IFTTT permission to post on your behalf.
darkhorse85
Yes I do have a mutli-page site where my blog is not the font page. My front page is my Home page should be a static page and page named Blog should be categorised as a blog.
I must admit I don’t fully follow what it is you are saying and am unsure where to go from here.
Q1: What address should enter use activate and use my WP blog?
Q2: How would I run a recipe “manually”
Please kindly advise. Thanks
Adam Kaan
I had a nightmare for weeks trying to resolve this problem in the end I found out to use my feed to set it up. For example mine is put whatever your site url is and then add forward slash feed try and use that address to set it up on ifttt
Sheridan
Hi really cool post !
is it possible for IFTTT to make a bitly link (shotend link) under the sent post, so the readers come back to my site, or does this tool do such a thing – maybe I just have to make the bitly link (shotend link) in my WP POST before letting IFTTT send to the social platforms – somebody know if I am right or wrong?
thanks for answering !
Sheridan
Tim Buttle
I’ve recently created a ‘recipe’ on IFTTT that means whenever I retweet, it comes up on the blog on my WordPress site. However if I click on the link that comes up on WordPress, it doesn’t take me to the original Twitter feed (rather to a sub-page on my WordPress site). How can I get the link to take me from my site back to Twitter?
Might be a stupid question, and many thanks for any help! Tim.
Lav Singh
How to post old WordPress posts to twitter using IFTTT? (Twitter account created after publishing some WordPress posts)
toddbot
I recently set up ifttt to post to wordpress whenever I load a video to youtube. Is there a way to build the short code [publicize off] into the recipe so it will not post to the other sites I have linked to wordpress?
Pundi
I almost pull my hair with my wp plugin.. thank you for this article. I have to join IFTTT
Robin Rico
I just discovered this little gem of a site. Love it! One recipe I used was fb fan page to wordpress. I have a client who prefers to post everything in fb vs. her blog. Problem solved!!
Joanne Marcinek
Great post. Thank you.
I love IFTTT but I am trying to use it with a WordPress.com blog that I have marked as private (using it as a personal journal). However, I would like to access the RSS via IFTTT for backup.
I am getting this error when I try to link to the blog RSS: Not a valid feed url, missing feed title
Do you think this is because the blog is marked private? Or is there something else going wrong? (I tried your suggestion to enable XML-RPC, but I don’t see that option in my settings.
Thank you!
Editorial Staff
Yes it is because your blog is set to private.
Admin
B
Then why does it ask for the WordPress username and password. Privacy settings shouldn’t matter…
darkhorse85
Acutally I think it may just be because you version of WordPress has XML-RPC automatically enabled. Google search this to check: “WordPress (enter the version you use)” followed by “XML-RPC automatically enabled” and see what
comes up!
I use WordPress 4.0 on a wordpress.org site and that solved my
XML-RPC dilema.
Mattia
When I try to connect WordPress to IFTTT it says:
Live channel fields value is not a valid WordPress url
Unable to verify WordPress credentials. Please try again.
Am I missing something? Thanks
Dan Deeble
It doesn’t seem to work with my wordpress.com blog, unless of course I am doing something completely retarded.
Can anyone verify this please?
Thanks
Dan
Editorial Staff
It should work fine. You can also use the RSS method.
Admin
Julien Maury
Thanks a lot for making my blogging life easier !
Zimbrul
This is quite cool. The backup to Dropbox or Google drive is good but my question is: how the backup of any post looks like? I think I should try for myself, shouldn’t I.
The problem (at least until recently) was for the Facebook to work nicely with WordPress and grab the featured image or the image in the post as well as the excerpt. I wonder how this service pulls out the excerpt and the post image?
Editorial Staff
If you have the proper og: tags defined, then Facebook will pull the image. As for per post backup, it stores the post as PDF.
Admin
Tom Hermans
The other way around it’s even more useful, that it fetches yr social media blurbs, and archive them in YOUR own space. WordPress is all about owning and controlling your own content, and that way you can preserve, bundle, and display all yr tweets, fb status updates etc. in one centrally managed hub.
For a personal blog, it doesn’t get any more personal than that.
Editorial Staff
Totally agreed. It pulls from RSS, FB, Twitter, and all sorts of places.
Admin
Charles
I use IFTTT to auto tweet and facebook all my new posts on my blog. It’s good, but my only complaint is that it only activates once every 30 minutes.
Manveet Singh
I already use IFTTT with Google Drive to backup my blog posts, and it works amazingly.
There’s only one thing that I have been trying to find a solution though. When I update an already published post, how to get a backup of that! Still trying to figure out
Shea Bunge
At this time, IFTTT does not support Google+, and therefore your “WordPress to Google+” recipe suggestion is invalid.
Birgit
This is really AWESOME, wow! Thanks for that great tip!
I wonder whether it’s possible to replace the good old feedburner mail subscription with IFTTT?
I’ve only found the possibility, to create a receipe at IFTTT to send my/any feed to my (!) e-mail address. But how to offer the own blog visitors the possibility for a mail subscription to get the newest posts (as in normal RSS)? Isn’t that possible with IFTTT or has anybody another suggestion?
Editorial Staff
No that is not possible with IFTTT. You would have to use a service like MailChimp or Aweber.
Admin
Shea Bunge
While email subscriptions are not possible with IFTTT, you can use the Jetpack Email Subscriptions plugin.
Lawrence
For Twitter, Facebook, LinkedIn, and Tumbler, I’ve found that Jetpack’s Publicize tool has worked very well.
I had been using IFTTT for all of the above and switched over to Jetpack.
Editorial Staff
Yes, there are cool plugins in WordPress that can do the job as well. But if you are only going to use Jetpack for that feature, then you might as well just use IFTTT. Again, Jetpack offers a lot more that everyone might not need/want.
Admin
zimbrul
I heard that Jetpack is quite “heavy” on a WordPress site…
Matt Litherland
I have literally skim read this, and it looks great. I’m hoping when i get time later tonight to read it fully that it fulfils what im after. Posting blog posts to facebook or twitter automatically is something i’ve wanted to build into my themes for a while