Quando si ha un sito web, è probabile che ci siano delle pubblicazioni che importano più di altre. Un modo per assicurarsi che i visitatori vedano per primi queste pubblicazioni è collocarle in alto nella pagina.
La caratteristica dei post in evidenza di WordPress consente di farlo con i post standard. Ma se sul vostro sito web utilizzate dei post type / tipi di contenuto personalizzati, questi post in evidenza non appariranno in alto nella pagina come ci si aspetterebbe.
In questo articolo vi mostreremo come aggiungere la funzionalità di post in evidenza ai vostri tipi di post personalizzati e come visualizzarli sulle pagine di archivio dei tipi di post personalizzati.

Perché rendere gli articoli personalizzati di WordPress in evidenza?
Se create contenuti per il vostro sito web WordPress con un formato diverso da quello di un articolo o di una pagina standard, probabilmente state già utilizzando un tipo di contenuto personalizzato. Ad esempio, se gestite un sito web di recensioni di libri, potreste aver creato un post type Book Reviews.
Si consiglia di collocare i contenuti più importanti in alto nell’archivio dei post type personalizzati. È uno dei modi migliori per caratterizzare contenuti approfonditi e sensibili al tempo, nonché gli articoli personalizzati più popolari.
Ma mentre WordPress offre una caratteristica di post in evidenza, questa non è disponibile per i post type / tipi di contenuto personalizzati.
Vediamo come aggiungere una caratteristica “sticky” alle pagine degli archivi dei post type personalizzati.
Aggiunta di articoli in evidenza in Post Type / Tipo di contenuto personalizzati
Per prima cosa, è necessario installare e attivare il plugin Sticky Posts – Switch. Per maggiori dettagli, consultate la nostra guida passo-passo su come installare un plugin di WordPress.
Nota: sebbene questo plugin non sia stato aggiornato da tempo, nei nostri test funziona ancora bene. Si consiglia di leggere il nostro articolo sull’utilizzo di plugin non testati con la propria versione di WordPress.
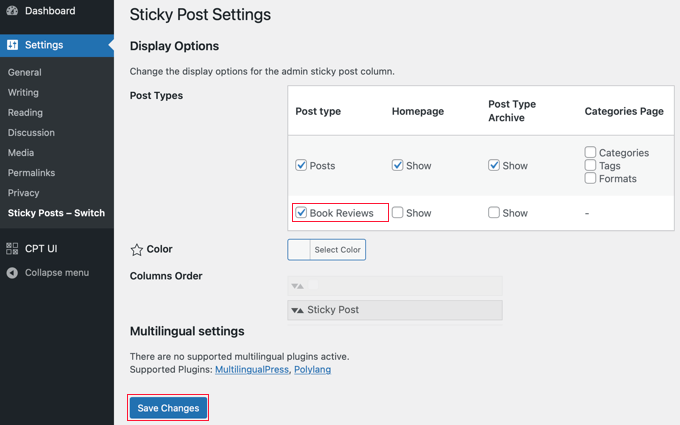
Al momento dell’attivazione, è necessario visitare la pagina Impostazioni ” Articoli in evidenza – Interruttore per configurare il plugin. È sufficiente selezionare la casella accanto ai post type personalizzati che si desidera rendere in evidenza.
Per questa esercitazione, controlleremo il post type “Recensioni di libri”.

Dopodiché, fate clic sul pulsante “Salva modifiche” nella parte inferiore dello schermo.
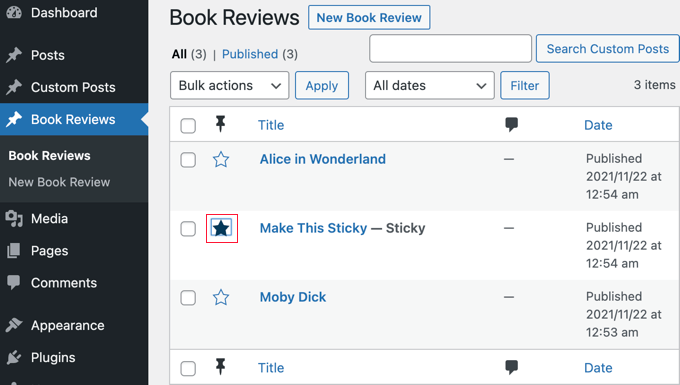
Ora, quando si visita la pagina di amministrazione del post type personalizzato, si noterà una nuova colonna in cui è possibile rendere gli articoli in evidenza. Tutto ciò che dovete fare è cliccare sulla stella accanto agli articoli successivi che desiderate rendere caratteristici.

Ora avete reso l’articolo in evidenza. Il problema è che WordPress mostra gli articoli in evidenza solo sulla pagina iniziale. Nel prossimo articolo vedremo come visualizzare gli articoli in evidenza sulle pagine degli archivi.
Visualizzazione degli articoli in evidenza negli archivi dei post type personalizzati
Per visualizzare gli articoli in evidenza in alto nella pagina dell’archivio personalizzato, è necessario creare un nuovo template.
Per farlo, dovrete utilizzare un client FTP o l’opzione di gestione dei file nel pannello di controllo del vostro hosting WordPress. Se non avete mai usato l’FTP, potete consultare la nostra guida su come usare l’FTP per l’uploader dei file su WordPress.
È necessario accedere al sito utilizzando il client FTP o il file manager e andare alla cartella /wp-content/themes/YOURTHEME/.
Ad esempio, se si utilizza il tema Twenty Twenty-One, occorre navigare in /wp-content/themes/twentytwentyone/.
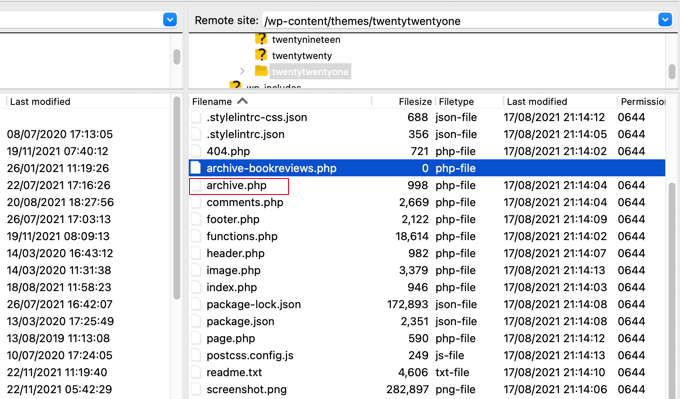
Successivamente, è necessario creare un nuovo file in quella cartella con un nome come archivia-POSTTYPE.php.
Ad esempio, se lo slug del vostro post type personalizzato è “bookreviews”, dovrete creare un nuovo file chiamato archive-bookreviews.php.

Successivamente, è necessario trovare il file archive.php nella stessa cartella. È sufficiente copiare il contenuto di archive.php e incollarlo nel nuovo file creato.
Il passo successivo richiede l’aggiunta di codice ai file del tema. Se avete bisogno di aiuto per aggiungere codice al vostro sito, fate riferimento alla nostra guida su come add-on di codice personalizzato in WordPress.
Quando si è pronti, è necessario aggiungere il seguente codice al file functions.php del tema o a un plugin di snippets di codice come WPCode (consigliato):
1 2 3 4 5 6 7 8 9 10 11 12 13 14 15 16 17 18 19 20 21 22 23 24 25 26 27 28 29 30 31 32 33 34 35 36 37 38 39 40 41 42 43 44 45 46 47 48 49 50 51 52 53 54 55 56 57 58 59 60 61 62 63 | function wpb_cpt_sticky_at_top( $posts ) { // apply it on the archives only if ( is_main_query() && is_post_type_archive() ) { global $wp_query; $sticky_posts = get_option( 'sticky_posts' ); $num_posts = count( $posts ); $sticky_offset = 0; // Find the sticky posts for ($i = 0; $i < $num_posts; $i++) { // Put sticky posts at the top of the posts array if ( in_array( $posts[$i]->ID, $sticky_posts ) ) { $sticky_post = $posts[$i]; // Remove sticky from current position array_splice( $posts, $i, 1 ); // Move to front, after other stickies array_splice( $posts, $sticky_offset, 0, array($sticky_post) ); $sticky_offset++; // Remove post from sticky posts array $offset = array_search($sticky_post->ID, $sticky_posts); unset( $sticky_posts[$offset] ); } } // Look for more sticky posts if needed if ( !empty( $sticky_posts) ) { $stickies = get_posts( array( 'post__in' => $sticky_posts, 'post_type' => $wp_query->query_vars['post_type'], 'post_status' => 'publish', 'nopaging' => true ) ); foreach ( $stickies as $sticky_post ) { array_splice( $posts, $sticky_offset, 0, array( $sticky_post ) ); $sticky_offset++; } } } return $posts;} add_filter( 'the_posts', 'wpb_cpt_sticky_at_top' ); // Add sticky class in article title to style sticky posts differently function cpt_sticky_class($classes) { if ( is_sticky() ) : $classes[] = 'sticky'; return $classes; endif; return $classes; } add_filter('post_class', 'cpt_sticky_class'); |
Questo codice sposta gli articoli in evidenza in alto. Se il tema utilizza la funzione post_class(), aggiunge anche una classe “sticky”, in modo che si possa dare stile agli articoli in evidenza utilizzando i CSS.
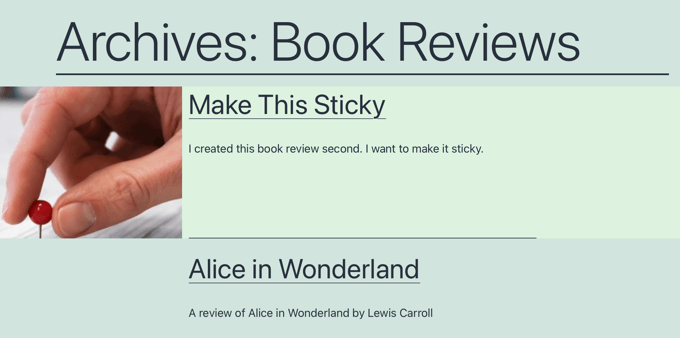
Ecco come appare l’archivio del post type personalizzato Recensioni di libri sul nostro sito demo. Prima di aggiungere il codice, l’articolo in evidenza era il secondo dell’elenco.

È ora possibile creare uno stile per gli articoli in evidenza utilizzando la classe .sticky nel foglio di stile style.css del tema. Ecco un esempio:
1 2 3 4 5 6 | .sticky { background-color:#ededed;background-image:url('http://example.com/wp-content/uploads/featured.png');background-repeat:no-repeat;background-position:right top;} |
Ecco uno screenshot aggiornato del nostro sito web demo.

Guide di esperti sugli articoli in evidenza
Speriamo che questo tutorial vi abbia aiutato a imparare come aggiungere post in evidenza negli archivi di WordPress custom post type. Potreste anche voler vedere altre guide relative alle pubblicazioni in evidenza in WordPress:
- Come creare articoli in evidenza in WordPress (facile e veloce)
- Come aggiungere articoli in evidenza per le categorie in WordPress
- Cose interessanti da fare con gli articoli in evidenza in WordPress
- Come escludere gli articoli in evidenza dal loop in WordPress
- Come riordinare facilmente gli articoli in WordPress (passo dopo passo)
- Come creare un menu di navigazione fluttuante in evidenza in WordPress
- Come creare un widget fluttuante in evidenza nella barra laterale di WordPress
- Come creare una barra flottante a piè di pagina “in evidenza” in WordPress
Se questo articolo vi è piaciuto, iscrivetevi al nostro canale YouTube per le esercitazioni video su WordPress. Potete trovarci anche su Twitter e Facebook.


Clare
I got a custom post type to be “sticky” in an archive in 15 minutes following your example. Super helpful, thank you!
WPBeginner Support
Glad to hear our guide was helpful!
Admin
rom
Hi,
I’m banging my head right now….
I’m using this plugin, it works fine, I can see it in the admin, and on the data base, I can see it update the sticky_posts in wp_options. But, when I try to use ‘post__not_in’ => get_option(‘sticky_posts’), it doesn’t filter any thing.
So I try to var_dump(get_option(‘sticky_posts’)), and all I get is the id of the ‘normal post’, not the full list of id who I can see are in the wp_options/sticky_posts.
Which mean if I try to use is_stiky in my loop, it only work in ‘normal’ post, not in CPT, which is logic, since get_option(‘sticky_posts’) is not working properly…. Any idea how I can fix that ? it’s driving me crazy
Markus Froehlich
You can use this Sticky Post Switch Plugin
It also enables the featuere for custom post types
Pat Ducat
This works good however it makes it sticky on every page of a paginated archive. Is this how the built-in sticky functionality for standard posts work too?
Aaron
How could i set this up to work with a custom taxonomy archive page?
I’ve tried adding ‘is_tax’ and ‘is_category’ instead of the is_post_type_archive() on line 4 of your function but it just breaks the page.
I’m missing something obviously but can’t seem to find it.
Any ideas?
Daniel Dropik
Thanks. Is it possible to adapt this tutorial to display sticky posts onto a specialized page template, rather than on the archives page? If so how might I accomplish this?
WPBeginner Support
Daniel, yes sure it can be done in a separate page template. Simply create a custom template and follow the instructions given above.
Admin
Shawn
How do you do this for Custom Taxonomy.php instead of archives.
WPBeginner Support
if the custom taxonomy is displaying post types with sticky posts support, then you can display it in the same manner. Instead of archive-post-type.php template, make changes in taxonomy-custom-taxonomy.php template.
Admin
Mr.Ultra
Thanks. This is useful.
But if it’s possible not using a plugin to add sticky functionality to custom post types?
Can you share the snippet?
Anir
Very informative, thanks for sharing. It helps a lot.
Daniel
Really nice tut.