Mostrare le competenze dei vostri autori vi aiuta a creare fiducia nel vostro pubblico. Potete visualizzare le informazioni sugli autori nei loro post in un riquadro bio dedicato che presenta il vostro team ai lettori, evidenzia le loro credenziali e fornisce i collegamenti ai social media.
Abbiamo riscontrato che i riquadri delle biografie degli autori possono rafforzare i segnali E-E-A-T (Esperienza, Competenza, Autorevolezza e Affidabilità) del vostro sito web, migliorando in modo significativo la SEO.
Mentre alcuni temi WordPress offrono funzionalità integrate di biografia dell’autore, altri potrebbero non farlo. È possibile aggiungere facilmente box informativi sull’autore al proprio sito WordPress utilizzando un plugin o un codice personalizzato.
In questo articolo vi mostreremo come scrivere una biografia dell’autore che aumenti i segnali E-E-A-T di Google e come aggiungere facilmente un boxed informazioni sull’autore al vostro blog WordPress.

Scrivere una biografia dell’autore che aumenti l’E-E-A-T di Google
Mostrare l’autore che sta dietro ai contenuti di WordPress aiuta a creare credibilità nei confronti dei lettori e può rafforzare l’autorevolezza del sito.
Le linee guida E-E-A-T di Google, infatti, cercano la competenza, l’esperienza, l’autorevolezza e l’affidabilità nella selezione di fonti di informazione affidabili. Quindi classificano questi contenuti in cima ai risultati della ricerca.
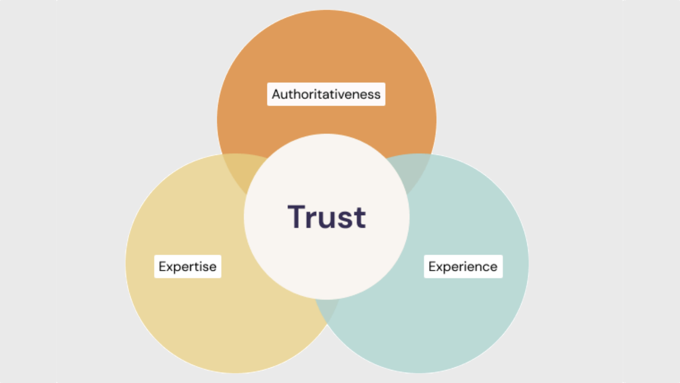
Ecco come scrivere una biografia dell’autore che contribuisca a ciascun fattore E-E-A-T:
Competenza
Una biografia consente di dimostrare la profonda conoscenza dell’autore dell’argomento, compresa la sua formazione e le sue qualifiche nel settore.
Assicuratevi di elencare i titoli di studio, le certificazioni o le affiliazioni professionali che dimostrino le loro conoscenze e qualifiche nel loro campo.
Dovreste anche menzionare brevemente eventuali premi e riconoscimenti che dimostrano o verificano la competenza dell’autore.
Esperienza
La biografia consente di riassumere l’esperienza diretta dell’autore sugli argomenti di cui scrive abitualmente, compresi i risultati e i ruoli più significativi. L’obiettivo è quello di dipingere un quadro di come la loro esperienza li abbia equipaggiati per scrivere contenuti autorevoli sull’argomento scelto:
- Utilizzate un numero specifico di anni per mostrare l’esperienza dell’autore.
- Invece di limitarsi a citare il loro settore, elencate le aree specifiche di esperienza all’interno di quel campo in cui hanno migliorato le loro competenze.
- Menzionare brevemente le esperienze lavorative, i progetti o le attività di volontariato pertinenti che dimostrino come hanno acquisito le loro competenze.
Autorevolezza
La biografia consente di evidenziare il riconoscimento dell’autore da parte di esperti del settore, come i premi ricevuti e le pubblicazioni in cui è stato caratterizzato.
Menzionate le pubblicazioni a cui hanno contribuito, i guest post che hanno scritto per siti web rinomati o gli engagement a cui hanno partecipato. Questo dimostra la loro posizione all’interno della loro nicchia.
Si dovrà anche accennare brevemente al loro coinvolgimento in organizzazioni o Community del settore. Questo indica che sono attivi nel settore.
Affidabilità
Una bio permette di essere trasparenti su chi siamo a scrivere i contenuti. Ecco alcuni suggerimenti:
- Mantenere uno stile di scrittura professionale e informativo nelle biografie degli autori.
- Spiegate brevemente in che modo il contenuto, le intuizioni e la prospettiva dell’autore sono utili ai lettori.
- Considerate la possibilità di inserire dei link ai loro profili sui mezzi di comunicazione sociale, dove si impegnano con il pubblico, in modo da farli apparire come persone reali.
In alto i consigli: La biografia deve essere informativa ma concisa, idealmente di 3-5 frasi. Assicuratevi di scrivere in terza persona per ottenere un tono più professionale. Infine, includete una foto professionale della testa per aggiungere un tocco personale e rendere la biografia visivamente accattivante.
Notate come abbiamo ottimizzato la biografia di questo autore di WPBeginner per Google E-E-A-T:
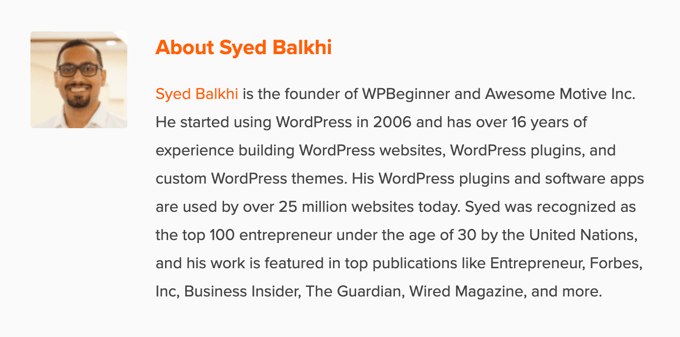
Ecco un template per la biografia degli autori che potete adattare al vostro sito web:
[Name] is a [Job Title/Area of Expertise] with over [Number] years of experience in [Industry]. [He/She/They] has a strong background in [specific areas of experience] gained through [relevant work experience, projects, or volunteer work]. [He/She/They] holds a [Degree] in [Field of Study] from [University Name] and is a certified [Certification] professional. [He/She/They] has [briefly mention achievements or publications]. [Name] is passionate about [area of interest] and enjoys helping readers by [explain how your content benefits them]. |
Ora che avete scritto la biografia dell’autore, dovete visualizzarla sul vostro sito web WordPress.
Visualizzazione della biografia dell’autore in WordPress
Per impostazione predefinita, la maggior parte dei temi di WordPress visualizza il nome dell’autore su una pubblicazione del blog, ma non altre informazioni su chi siamo.
Anche se potete presentare i vostri autori sulla pagina “Chi siamo” del vostro sito, non tutti i lettori la visiteranno.
Si consiglia di visualizzare un boxed informazioni sull’autore su ogni blog che l’autore ha scritto. In questo modo i lettori potranno sapere di più su chi c’è dietro ogni pubblicazione su un sito WordPress con più autori.
È anche un ottimo modo per attirare nuovi scrittori e incoraggiarli a inviare contenuti al vostro sito.
Vediamo una serie di metodi che potete utilizzare per aggiungere una biografia o un box di informazioni sugli autori in WordPress. Utilizzate i link rapidi qui sotto per passare direttamente al metodo che desiderate utilizzare:
- Adding Author Info Box Using Your WordPress Theme Settings
- Adding Author Info Box in WordPress Using a Free WordPress Plugin
- Display Author Info Box in WordPress Sidebar Widget Area
- Adding Author Info Box by Adding Code to WordPress
- Adding Author Info Box in WordPress With AIOSEO's Author SEO (Recommended)
- Displaying Author Info Box With a WordPress Page Builder
1. Aggiungere un boxed informazioni sull’autore utilizzando le impostazioni del tema di WordPress
Alcuni dei migliori temi WordPress sono dotati di un boxed informazioni sull’autore che si visualizza automaticamente sotto ogni articolo.
Per prima cosa, occorre verificare se il tema attuale supporta un riquadro informativo sull’autore.
Per farlo, basta andare su Utenti ” Tutti gli utenti nel pannello di amministrazione di WordPress.
Quindi, passare il mouse sul profilo utente che si desidera modificare e fare clic sul link “Modifica”.
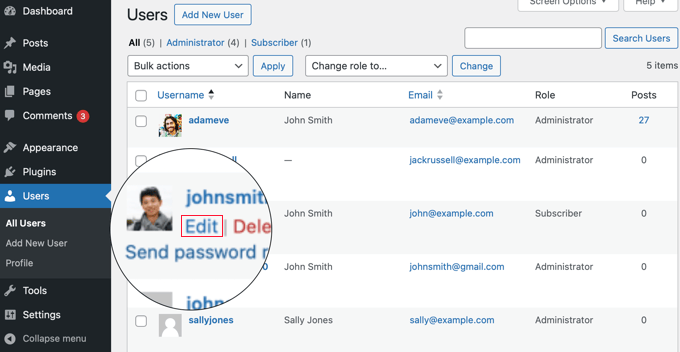
Si accede così alla schermata di modifica del profilo.
Scorrere la pagina fino alla sezione “Informazioni biografiche” per aggiungere la biografia dell’autore. È anche possibile utilizzare l’HTML in questo campo per aggiungere manualmente i link ai profili dei social media dell’autore.
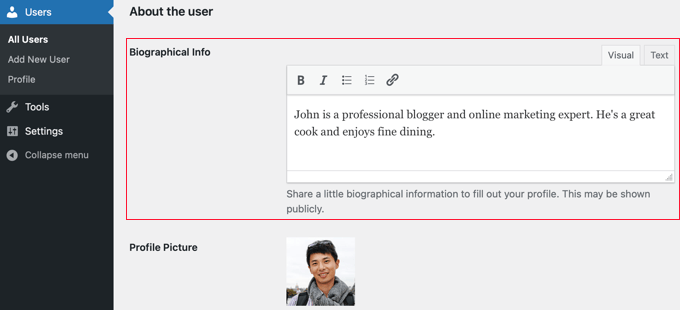
La foto del profilo dell’autore viene recuperata automaticamente dal servizio Gravatar. Se l’autore ha già creato un account, questa viene visualizzata automaticamente.
Una volta terminato, assicuratevi di cliccare sul pulsante “Aggiorna profilo” in fondo alla pagina per salvare le modifiche.
A questo punto, è possibile visualizzare qualsiasi articolo sul proprio sito web scritto da quell’autore e il box bioed è attivo.

2. Aggiunta di boxed informazioni sull’autore in WordPress utilizzando un plugin gratuito per WordPress
Se il vostro tema non ha l’opzione di mostrare il riquadro della biografia dell’autore o se volete personalizzarne l’aspetto, questo metodo fa al caso vostro.
Per farlo, utilizzeremo il plugin Simple Author Boxed. Si tratta di uno dei migliori plugin per WordPress che consente di aggiungere in modo semplice al proprio sito un riquadro personalizzabile per la biografia dell’autore.
Nota: esiste anche una versione pro che offre caratteristiche aggiuntive come la visualizzazione di un boxed autore prima o dopo il contenuto, l’aggiunta di link a siti web, l’inclusione di ospiti e coautori, ulteriori stili di icone sociali e altro ancora.
La prima cosa da fare è installare e attivare il plugin. Per maggiori dettagli, consultate la nostra guida per principianti su come installare un plugin di WordPress.
Dopo l’attivazione, è necessario visitare Aspetto ” Simple Author Boxed per configurare le impostazioni del plugin.
Qui è possibile scegliere la visibilità, i colori, la tipografia, lo stile gravatar per la foto dell’autore e altro ancora.
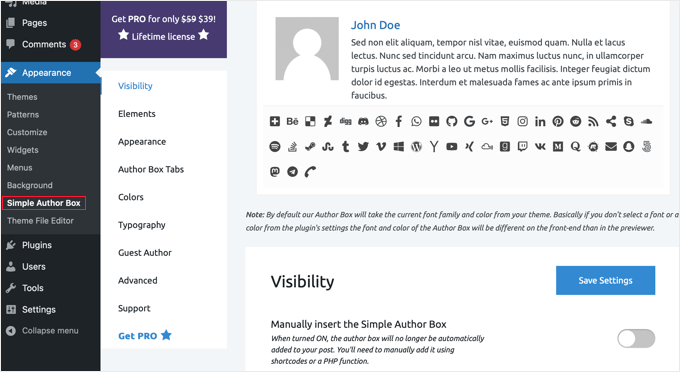
Al termine, fare clic sul pulsante “Salva impostazioni” per memorizzare le modifiche.
Successivamente, è necessario visitare Utenti ” Tutti gli utenti e fare clic sul link ‘Modifica’ sotto l’utente per il quale si desidera aggiungere una biografia.

Ora è possibile aggiungere la biografia dell’utente al suo profilo.
Basta scendere alla sezione “Chi siamo” e incollare la biografia nel campo “Informazioni biografiche”.

È anche possibile utilizzare l’HTML in questo campo per aggiungere manualmente i link o utilizzare le opzioni di formattazione HTML di base.
Quindi, cercate la sezione “Social Media Link (Simple Author Box)” in fondo alla pagina.
Qui è possibile aggiungere i link ai social media per i profili dei vostri autori. Il plugin mostrerà solo le icone dei social network in cui è stato inserito un URL.
È necessario selezionare il profilo del social media che si desidera aggiungere dal menu a discesa e poi aggiungere l’URL corretto.
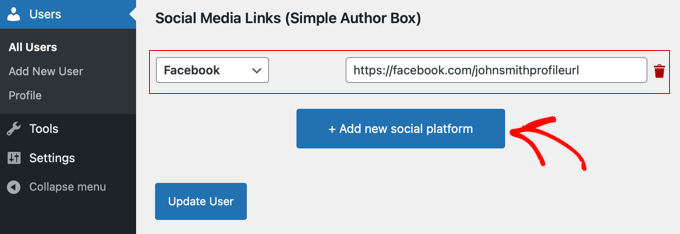
È possibile aggiungere altri link sociali facendo clic sul pulsante “+ Aggiungi una nuova piattaforma sociale”.
Al termine, fare clic sul pulsante “Aggiorna profilo” per salvare le modifiche al profilo utente.
È ora possibile visitare qualsiasi articolo scritto da quell’utente per vedere la casella informativa sull’autore in azione.

3. Visualizzare il boxed informazioni sull’autore nell’area widget della barra laterale di WordPress
Volete mostrare le informazioni sull’autore nella barra laterale o nell’area widget invece che sotto l’articolo? Se sì, questo metodo fa al caso vostro, perché consente di mostrare le informazioni sull’autore in un widget della barra laterale.
Per questo metodo, è necessario installare e attivare il plugin Simple Author Boxed, utilizzato nel metodo precedente. Per maggiori dettagli, consultate la nostra guida passo-passo su come installare un plugin di WordPress.
Suggerimento: il plugin Simple Author Box fornisce un widget per i temi classici e un blocco per i temi a blocchi nell’editor a blocchi di WordPress e nell’editor completo del sito.
In questo tutorial vi mostreremo come aggiungere rapidamente il widget Simple Author Block all’area widget di un tema classico.
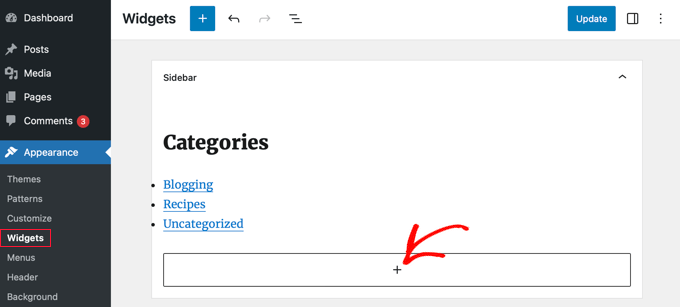
Dopo l’attivazione, è necessario visitare Aspetto ” Widget nel cruscotto di WordPress.
Quindi, fare clic sull’icona “+” per aggiungere un blocco nell’area del widget “Barra laterale”.
Nota: se non si vede l’opzione del menu Widget, il sito web utilizza un tema a blocchi. Per maggiori dettagli, potete consultare il nostro tutorial su come utilizzare l’editor completo del sito di WordPress.

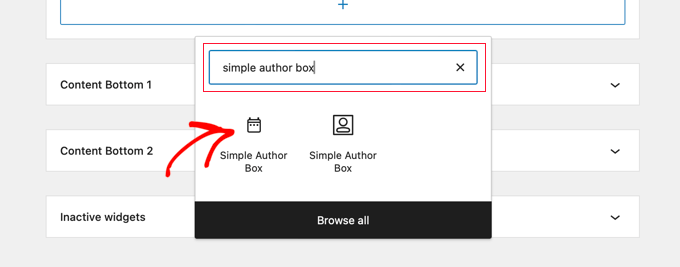
Successivamente, è necessario cercare “Simple Author Boxed”. Si vedranno due icone: il widget Simple Author Box e il blocco.
Quindi, fare clic sulla prima icona per selezionare il widget Simple Author Block.
Il widget è dotato di una serie di opzioni per personalizzare la sua visualizzazione.
È importante assicurarsi che l’opzione “Rilevamento automatico” sia selezionata dal menu a discesa “Scegli autore/utente”. Questa è l’opzione predefinita e garantisce la visualizzazione automatica della biografia dell’autore della pubblicazione.
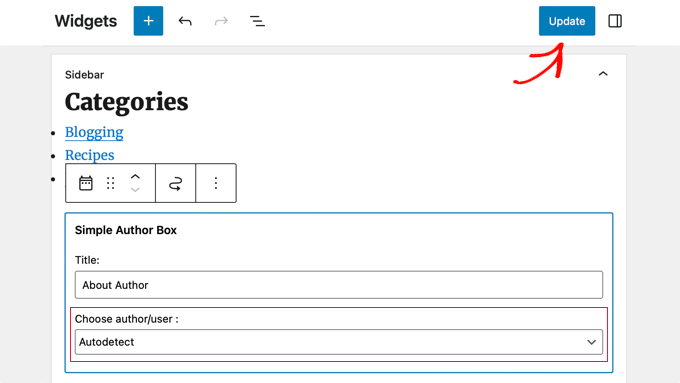
Quindi, fare clic sul pulsante “Aggiorna” in alto nella schermata per memorizzare le impostazioni del widget.
Ora potete visitare il vostro sito web per vedere il widget della biografia dell’autore in azione.

Questo plugin recupera le informazioni sugli utenti dal loro profilo WordPress. Voi o i vostri autori dovete inserire le informazioni bio modificando i loro profili, come abbiamo mostrato sopra.
Per saperne di più sulla modifica dei profili utente, consultate la nostra guida su come aggiungere nuovi utenti e autori al vostro blog WordPress.
4. Aggiunta di un boxed informazioni sull’autore tramite l’aggiunta di codice a WordPress
Un altro modo per aggiungere informazioni sul boxed autore in WordPress è aggiungere del codice al file functions.php del tema.
Tuttavia, non consigliamo di modificare il file functions.php a meno che non siate utenti esperti, perché anche il più piccolo errore può danneggiare il vostro sito.
È invece possibile utilizzare WPCode, il miglior plugin per gli snippet di codice per WordPress. Rende sicura e facile l’aggiunta di codice personalizzato in WordPress senza modificare il file functions.php del tema.
WPCode è inoltre dotato di oltre 393 snippet di codice preconfezionati che potete aggiungere al vostro sito facendo solo un paio di clic, compreso lo snippet “Bio dell’autore dopo la pubblicazione”.
Per iniziare, è necessario installare e attivare il plugin gratuito WPCode. Se avete bisogno di aiuto, consultate questo tutorial su come installare un plugin di WordPress.
Nota: la versione gratuita di WPCode ha tutto ciò che serve per aggiungere codice in WordPress. Ma se desiderate caratteristiche più avanzate come la generazione di snippet AI, snippet programmati, revisioni del codice e altro ancora, potete passare a WPCode Pro.
Dopo l’attivazione, accedere alla pagina Code Snippets ” Library dalla propria Bacheca di WordPress.
Da qui si possono vedere tutti i diversi snippet che si possono aggiungere al sito web.
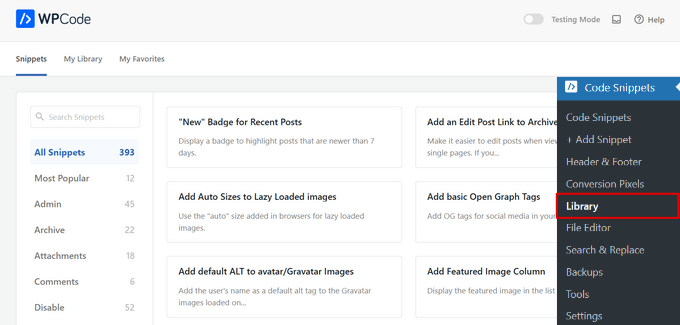
Quindi, cercare lo snippet “Bio dell’autore dopo la pubblicazione”.
Una volta trovato lo snippet, passarci sopra e fare clic sul pulsante “Usa snippet”.
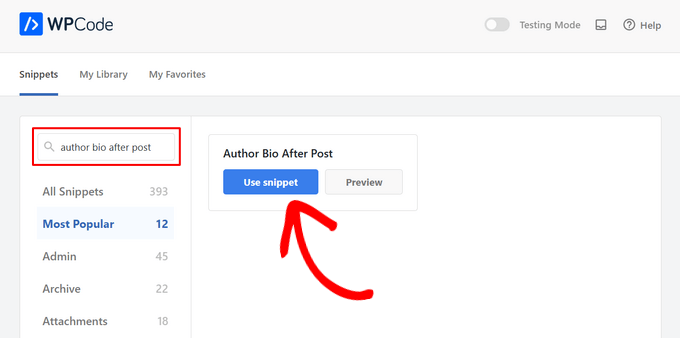
Successivamente, WPCode aggiungerà automaticamente il codice e selezionerà il metodo di inserimento corretto.
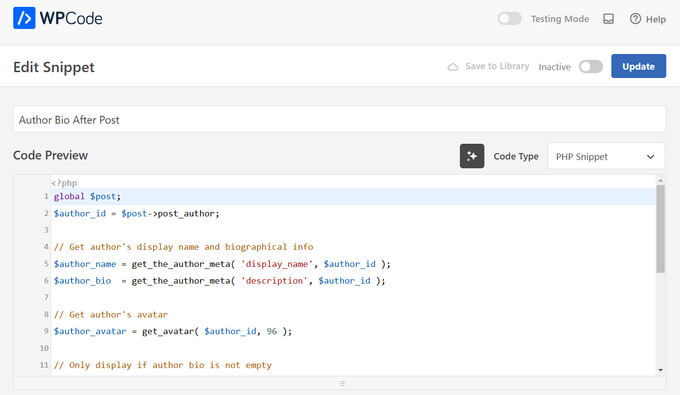
A questo punto, non resta che attivare/disattivare l’interruttore da “Inattivo” a “Attivo” e quindi premere il pulsante “Aggiorna”.

Ecco fatto. Ora, quando visiterete il vostro sito web, vedrete il vostro nuovo boxed info autore visualizzato alla fine dei vostri blog WordPress.
Ecco come appariva sul nostro sito di prova:

Metodo del codice avanzato
Se siete utenti avanzati, potete comunque copiare e incollare questo codice nel vostro file functions.php.
1 2 3 4 5 6 7 8 9 10 11 12 13 14 15 16 17 18 19 20 21 22 23 24 25 26 27 28 29 30 31 32 33 34 35 36 37 38 39 40 41 42 43 44 45 46 47 48 49 50 51 52 53 54 55 56 | function wpb_author_info_box( $content ) { global $post; // Detect if it is a single post with a post authorif ( is_single() && isset( $post->post_author ) ) { // Get author's display name$display_name = get_the_author_meta( 'display_name', $post->post_author ); // If display name is not available then use nickname as display nameif ( empty( $display_name ) )$display_name = get_the_author_meta( 'nickname', $post->post_author ); // Get author's biographical information or description$user_description = get_the_author_meta( 'user_description', $post->post_author ); // Get author's website URL$user_website = get_the_author_meta('url', $post->post_author); // Get link to the author archive page$user_posts = get_author_posts_url( get_the_author_meta( 'ID' , $post->post_author)); if ( ! empty( $display_name ) ) $author_details = '<p class="author_name">About ' . $display_name . '</p>'; if ( ! empty( $user_description ) )// Author avatar and bio $author_details .= '<p class="author_details">' . get_avatar( get_the_author_meta('user_email') , 90 ) . nl2br( $user_description ). '</p>'; $author_details .= '<p class="author_links"><a href="'. $user_posts .'">View all posts by ' . $display_name . '</a>'; // Check if author has a website in their profileif ( ! empty( $user_website ) ) { // Display author website link$author_details .= ' | <a href="' . $user_website .'" target="_blank" rel="nofollow">Website</a></p>'; } else {// if there is no author website then just close the paragraph$author_details .= '</p>';} // Pass all this info to post content$content = $content . '<footer class="author_bio_section" >' . $author_details . '</footer>';}return $content;} // Add our function to the post content filteradd_action( 'the_content', 'wpb_author_info_box' ); // Allow HTML in author bio sectionremove_filter('pre_user_description', 'wp_filter_kses'); |
Questo codice recupera semplicemente le informazioni sull’autore e le visualizza sotto le pubblicazioni di WordPress.
Dovrete quindi creare uno stile per questo boxed info sull’autore, in modo che abbia un aspetto gradevole e sia in corrispondenza con il vostro tema WordPress. Se non conoscete i CSS, consultate la nostra guida su come add-onare facilmente i CSS personalizzati al vostro sito WordPress.
Per prima cosa, spostarsi su Aspetto ” Personalizza nel pannello di amministrazione di WordPress.
Si apre il pannello di personalizzazione del tema WordPress. È necessario fare clic sulla scheda “CSS aggiuntivi”.
Se non riuscite a trovare il personalizzatore del tema, consultate il nostro tutorial su come correggere il personalizzatore del tema mancante in WordPress.
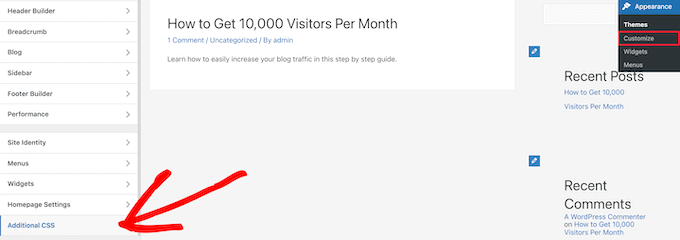
Consente di aggiungere codice CSS personalizzato direttamente al tema WordPress e di vedere le modifiche in tempo reale.
Ecco alcuni esempi di codice CSS per aiutarvi a iniziare:
1 2 3 4 5 6 7 8 9 10 11 12 13 14 15 16 17 | .author_bio_section{background-color: #F5F5F5;padding: 15px;border: 1px solid #ccc;} .author_name{font-size:16px;font-weight: bold;} .author_details img {border: 1px solid #D8D8D8;border-radius: 50%;float: left;margin: 0 10px 10px 0;} |
Quindi, aggiungere il codice direttamente nella casella “CSS aggiuntivo”.
Quindi, fare clic sul pulsante “Pubblica” per rendere effettive le modifiche.
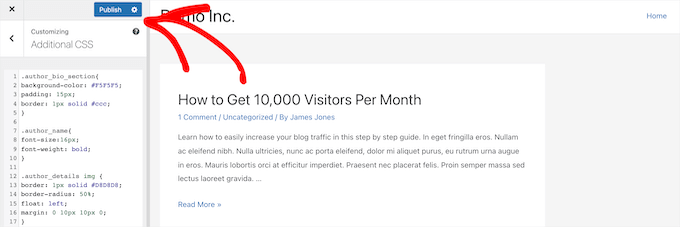
Ecco come appariva la biografia dell’autore nel nostro tema:

5. Aggiunta di boxed informazioni sugli autori in WordPress con l’addon SEO per autori di AIOSEO
All in One SEO (AIOSEO) è il miglior plugin SEO per WordPress sul mercato, con oltre 3 milioni di utenti. È possibile utilizzarlo anche per aggiungere box di informazioni dettagliate sull’autore in qualsiasi post o pagina di WordPress.
Questo metodo utilizza il potente add-on Author SEO di AIOSEO e può migliorare la SEO più degli altri metodi.
Per iniziare, è necessario installare e attivare il plugin All in One SEO. Se avete bisogno di aiuto, consultate il nostro tutorial su come installare un plugin di WordPress.
Nota: è possibile utilizzare una versione gratuita di All in One SEO. Tuttavia, per accedere alle funzioni SEO per gli autori, è necessario il piano AIOSEO Pro.
Una volta attivato e configurato il plugin, andare su Utenti ” Tutti gli utenti dalla dashboard di WordPress.
Quindi, fare clic sul nome dell’autore o sul link “Modifica” sotto di esso.
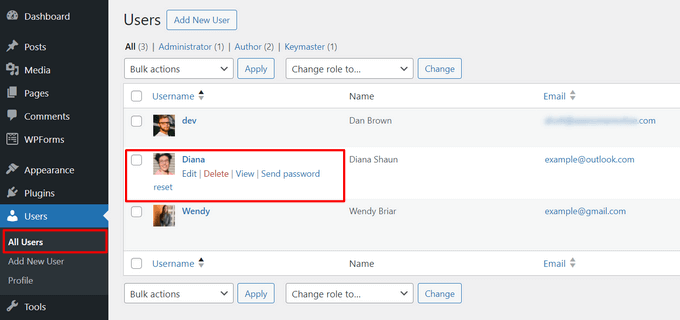
Si aprirà la pagina “Modifica utente” per quell’autore.
In questa pagina è necessario fare clic sulla scheda “SEO per autori”.
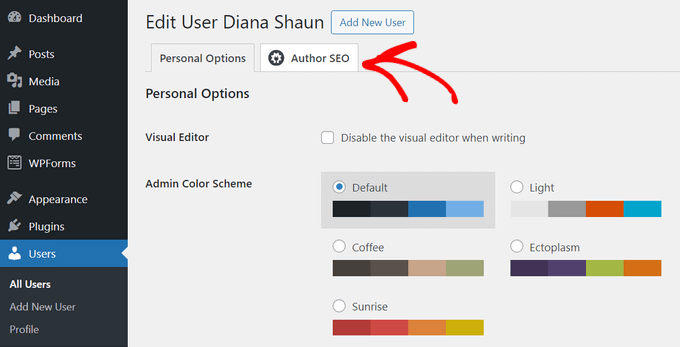
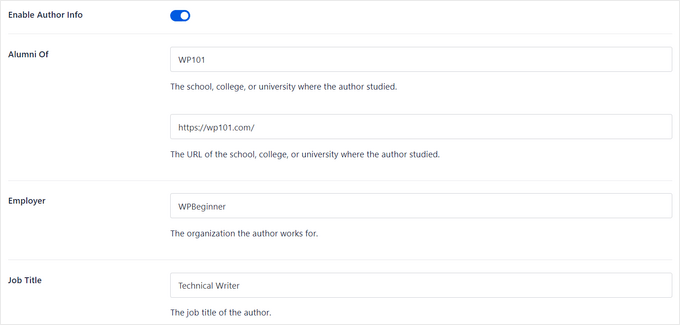
Nella sezione SEO dell’autore, è possibile aggiungere informazioni come l’istruzione, il datore di lavoro e il titolo di lavoro.
Queste informazioni vi aiuteranno a validare i vostri segnali E-E-A-T.
È anche possibile aggiungere categorie di argomenti.
Queste aree di competenza dell’autore vengono presentate ai motori di ricerca e ai lettori.

Nota: queste categorie di argomenti devono essere inserite prima nel pannello di impostazioni Aspetto di ricerca “ Avanzate “ Argomenti dell’esperienza dell’autore in All in One SEO.
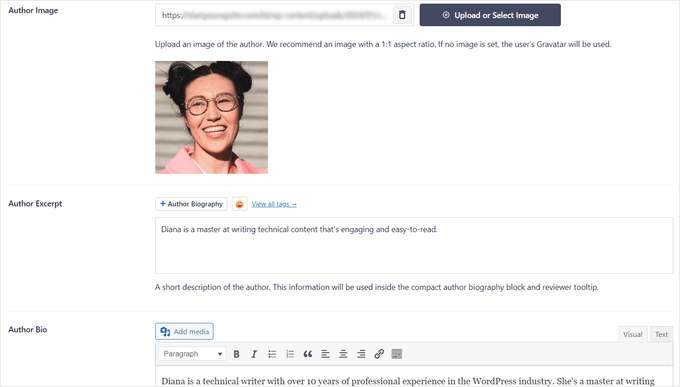
Poi si può scendere per aggiungere un’immagine dell’autore, un riassunto dell’autore e una biografia completa dell’autore.
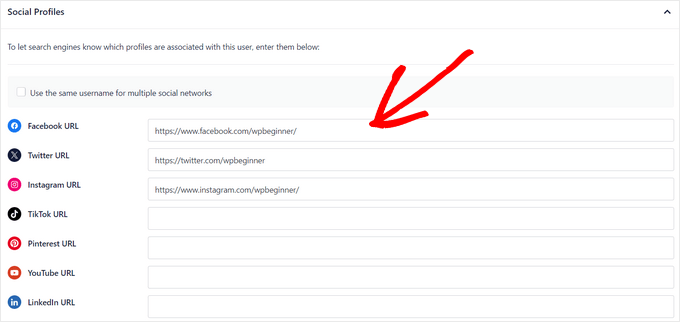
È inoltre possibile visualizzare i profili sociali nel boxed informazioni sull’autore.
È sufficiente inserire gli URL dei profili di Facebook, Instagram, Twitter, YouTube e altro ancora.
C’è anche un’impostazione “Aggiungi bio dell’autore ai post” che si può attivare o disattivare.
Se questa impostazione è attivata, All in One SEO visualizzerà automaticamente una biografia compatta dell’autore in fondo ai vostri post.

È possibile disattivare l’impostazione se si desidera aggiungere manualmente le biografie compatte o complete dell’autore in fondo ai post utilizzando i blocchi bio dell’autore di AIOSEO. Per maggiori dettagli, consultare questa guida sull’aggiunta di blocchi autore nei post.
Per questa esercitazione, lasceremo l’impostazione abilitata per allegare automaticamente le biografie degli autori alle pubblicazioni.
Una volta terminata la compilazione delle informazioni sull’autore, non dimenticate di fare clic sul pulsante “Aggiorna utente” per memorizzare le modifiche.
Ora, potete visitare uno dei vostri post di WordPress per vedere il vostro nuovo riquadro informativo sull’autore in azione.

Bonus: Visualizzare il boxed informazioni sull’autore con il builder di pagina di WordPress
Se si desidera creare un tema WordPress completamente personalizzato e visualizzare facilmente un boxed info sugli autori in qualsiasi punto del sito, si consiglia di utilizzare SeedProd.
SeedProd è il miglior builder di pagine trascina e rilascia per WordPress. Consente di creare facilmente temi e layout di pagina personalizzati per WordPress, senza bisogno di codifica.
È dotato di oltre 320 template di temi e pagine che si possono importare facendo clic. I template dei temi includono ogni parte di un sito web, tra cui homepage, pagina singola, singola pubblicazione, archivio del blog, pagina dei contatti e altro ancora.
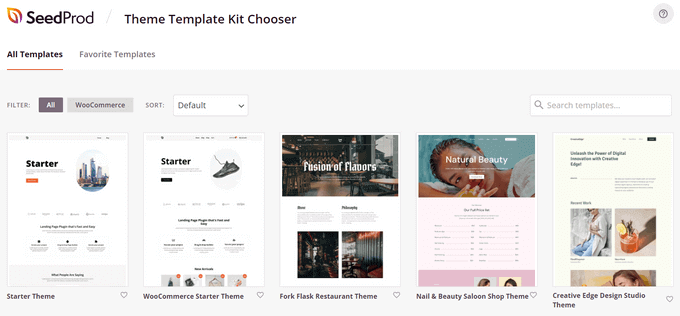
È possibile personalizzare il tema in qualsiasi modo utilizzando il builder visuale del tema.
SeedProd semplifica le cose offrendo oltre 90 blocchi già pronti, tra cui un blocco “Boxed autore”, che si possono trascina e rilascia su qualsiasi pagina.

Dopo aver aggiunto il blocco Author Box alla pagina, è sufficiente fare clic su di esso per modificarne i dettagli.
È possibile modificare la tipografia, la dimensione del font, l’allineamento, il colore di sfondo e il bordo, abilitare o disabilitare l’immagine del profilo e altro ancora.
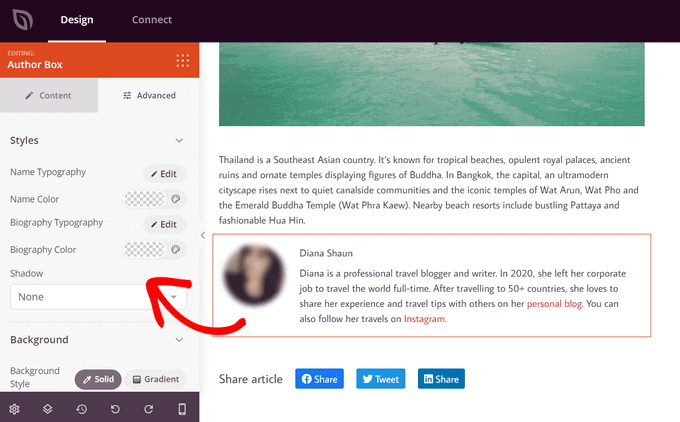
Una volta terminata la personalizzazione, è sufficiente attivare il nuovo tema SeedProd.
A tal fine, spostare l’interruttore “Attiva/disattiva il tema SeedProd” in alto nella pagina in posizione On.

Congratulazioni, avete aggiunto il boxed informazioni sull’autore al vostro tema.
Ora è possibile visitare il proprio sito WordPress e vedere il boxed informazioni personalizzato sull’autore.

Per maggiori dettagli, consultate il nostro tutorial su come creare un tema WordPress personalizzato con SeedProd.
FAQ: Domande frequenti su Google E-E-A-T
Ora che abbiamo coperto come scrivere una biografia dell’autore e aggiungerla al vostro sito web WordPress, rispondiamo ad alcune domande frequenti sull’E-E-A-T di Google.
Che cos’è Google E-E-A-T?
E-E-A-T sta per Esperienza, Competenza, Autorevolezza e Affidabilità. Si tratta di una struttura che Google utilizza per valutare la qualità e la credibilità dei contenuti web.
Più E-E-A-T dimostra una pagina, più è probabile che venga considerata una fonte affidabile e che si posizioni più in alto nei risultati della ricerca.
Il fattore “esperienza” in E-E-A-T è stato introdotto nel 2022. Prima di allora, il quadro era conosciuto come E-A-T.
Perché Google sta enfatizzando l’esperienza ora?
L’aggiornamento mette in evidenza l’importanza della conoscenza e dell’esperienza diretta per i contenuti specifici. Google vuole davvero assicurarsi che gli utenti trovino informazioni scritte da persone con esperienza pratica sull’argomento.
Di quanta esperienza ho bisogno per avere un buon E-E-A-T?
Non è necessario avere necessariamente anni di esperienza. In caso contrario, concentratevi sugli altri aspetti della competenza, dell’autorevolezza e dell’affidabilità.
E se il mio sito web è nuovo?
Costruire l’E-E-A-T richiede tempo. È necessario che possiate ricevere il focus sulla creazione di contenuti di valore, sulla valorizzazione dell’esperienza degli autori e sull’affermazione del vostro sito come fonte affidabile di informazioni. Nel corso del tempo, si creerà un rapporto di fiducia con Google e con il pubblico.
Esiste un modo garantito per migliorare il mio punteggio E-E-A-T?
No, non esiste una formula magica. L’E-E-A-T varia a seconda del contenuto e dello scopo del sito.
Tuttavia, la creazione di contenuti informativi, la dimostrazione di esperienza e la costruzione di un rapporto di fiducia con il pubblico vi manterranno in carreggiata.
Speriamo che questo articolo vi abbia aiutato a capire come aggiungere un boxed informazioni sull’autore ai post di WordPress. Potreste anche voler consultare la nostra guida dettagliata che spiega l’E-E-A-T di Google e la nostra scelta dei migliori plugin per gestire in modo efficiente i blog multi-autore su WordPress.
Se questo articolo vi è piaciuto, iscrivetevi al nostro canale YouTube per le esercitazioni video su WordPress. Potete trovarci anche su Twitter e Facebook.


Dennis Muthomi
thank you for this incredibly helpful guide!!!
my WordPress theme had a basic author bio box, but it doesn’t allow me to include links to the author’s social media profiles.
I was about to hire a developer to add that feature but I have tried out Author Info Box as you have highlighted and it has fixed this issue.
You saved me some bucks there…haha!
WPBeginner Support
Glad we could help!
Admin
Michael
Simple and perfect, thank yo!
WPBeginner Support
You’re welcome
Admin
Jiří Vaněk
Thanks for providing the complete php code. In Elementor, I solve it with a widget, but outside of Elementor, I would very much like to use a ready-made solution from you.
Gleni
This only works for posts. I usually post everything from pages, not posts. How can I get this sorted?
WPBeginner Support
We don’t have a specific method we would recommend for pages at the moment but we will look into the possibilities in the future.
Admin
Bojan
Please, replace this code with this if you want to show only on blog posts:
// Detect if it is a single post with a post author
if ( is_single() && isset( $post->post_author ) ) {
with:
// Detect if it is a single post with a post author
if ( is_singular(‘post’) && isset( $post->post_author ) ) {
WPBeginner Support
Thanks for sharing this for those looking for that customization
Admin
Mark Beese
I would like to add something like the option of related stories to the author box, but show a random selection of others posts/stories from that author. Is that possible?
WPBeginner Support
For something like that, we would recommend taking a look at our guide below for showing related posts by the same author:
https://www.wpbeginner.com/wp-tutorials/how-to-display-related-posts-by-same-author-in-wordpress/
Admin
Ramon
This is excellent, works out of the box.
Keep in mind that you might want to add a “title” attribute to a href links ..
WPBeginner Support
Thanks for sharing your recommendation.
Admin
Kelly
I came here for your opinion because my SEO teacher (paid class) says that even though my website/URL is my name, Google needs to know who wrote the posts. I write them (with the exception of guest writers from time to time). You said, “For a single-author WordPress blog, you can just add an about me page.” Do you mean just have an about me page on your blog? Or link to the about me page within the author box at the end of posts?
WPBeginner Support
That would be a personal preference decision but having an about page publicly visible was what we recommended. It is not required in every article.
Admin
Rozard
I added the code in Theme function.php. It’s working better than a plugin. I just need little bit help if that is possible. My website is not in English, which is right to left. I added a css code that start paragraph from right to left, now the problem is that most of the author bios are in English, is there way to modify the alignment of bios to make left to right?
I really appreciate your help. Thank you
WPBeginner Support
You would need to add in the CSS for the author box:
direction: ltr;
Admin
Jerry
I have an author info box that shows at the end of every blog post. I want it to be shown on my About me static page as well apart from the blog post. How can I enable this?
WPBeginner Support
It would depend on what is adding the author box, if your theme is adding it you would want to reach out to your theme’s support for having it appear on a page.
Admin
usef
Hi. I used the method 4. It worked like a charm. Thank you for sharing this.
WPBeginner Support
You’re welcome, glad you found our guide helpful
Admin
Lauren Colquhoun
Hello
Could you please tell me how to only display the author bio box for certain categories? Thank you
WPBeginner Support
If you are using the widget method you can conditionally display the widget using the method from our guide here: https://www.wpbeginner.com/plugins/how-to-show-or-hide-widgets-on-specific-wordpress-pages/
Admin
Gustavo Razzetti
Hi I used the plugin and now it’s showing two bios–the one generated by the plugin and the one created by WordPress (which looks uglier and I don’t want to use). How I avoid having two bios?.
WPBeginner Support
If your theme included its own author bio, you would need to reach out to the theme’s support for how to remove it
Admin
Prajyot Kumbharjuvekar
Looks like the Guerrilla’s Author Box plugin is no longer available… Do you can you suggest any alternatives? thank you
WPBeginner Support
While we don’t have a recommended plugin at the moment, we will certainly look to update this article with an alternative
Admin
Louis Chaussé
Hi,
I have a problem with method #3
I added the php code to the functions.php file and the css to additonal css section in WP
Everything is working except that the bio is displaying twice on the page…
Once at the proper place at the bottom of the post, and it is also displaying at the top of the page (before header)
Any thoughts?
Warwick Levey
Is there anyway to disable to author box for profiles which don’t have any info in the author bio?
We use a custom field to add authorship to guest posts, and we don’t have a bio for most of our guests, and the blank box at the bottom of the page is z bit of an eyesore for these posts.
Thanks in advance for any help
Elizabeth Thompson
Does this mean I have to give them user access????
This doesn’t make sense for me? THey’re random people?
Thanks
re: Each author on your site will need to add their biographical information and links to their user profiles. They can do this by logging in to their WordPress account on your website and then click on the Profile link from the WordPress admin menu.
WPBeginner Support
Hi Elizabeth,
Random people should not have access to your WordPress site. Please see our beginner’s guide about WordPress user roles and permissions.
Admin
Morteza
Hi to all!
How to add EDD vendor name in EDD receipt?
I add this to my downloads page by adding:
echo get_the_author_meta( ‘name_of_store’, $post->post_author );
and
echo get_the_author_meta( ‘display_name’, $post->post_author );
,
It seems in this case I need to hook this, BUT HOW?
thanks
Mick
Thanks for this which is what I was looking for. Although now I see it with the bio in 2 places, what I would like is that the bio at the end of each post different to the bio down the side.
Is this possible or do I have to remove Meks and replace it with some other plugin?
Thanks
Wilson Lee
Hey,
This was just what I was looking for. I think I will stick with installing a plug-in though.
Coding makes my head hurt.
Thanks for the great wordpress content!
Wilson
Matt Stephens
hahaha! I thought exactly the same thing while reading through the post. Why go through the stress of coding, when there’s a plugin to get the job done?
Manjit Kumar
It’s great and so much helpful…
ingresos pasivos
Hi, I was wondering how I can add a margin higher than my box using the code that you left us.
My box shows very close to the letters of my post, I hope your answer.
A big greeting.
Vishal Rana
very helpful thanks a lot
Hina Ilyas
I have added the Guerrilla’s author box, but author details still don’t show on my posts. I can only see these three lines:
Author: Hina Ilyas
Filed Under: Weekly Rundown
Tags:
i don’t understand what is the issue!
Magnus
If I use method 3, it only shows the author info box when viewing a post.
The post itself doesn´t show at all.
Any suggestions?
Thank you in advance.
Kingsford
Please how can I add the author box to specific categories only?
Pls help.
Andy W.
You may have found the answer for this already (it’s kind of disappointing someone makes this posts and doesn’t respond to the questions), but I used this to display the box on only certain categories.
If you want to display the author box only on single posts that are assigned to any category, change:
// Detect if it is a single post with a post author
if ( is_single() && isset( $post->post_author ) ) {
to
// Detect if it is a single post with a post author
if ( is_single() && isset( $post->post_author ) && has_category() ) {
If you want to display the box ONLY in a certain category, then change the above to:
// Detect if it is a single post with a post author
if ( is_single() && isset( $post->post_author ) && in_category(‘X’) ) {
Change “X” to the category ID.
To include more than one category, simply replay “X” with an array() of category IDs:
// Detect if it is a single post with a post author
if ( is_single() && isset( $post->post_author ) && in_category( array(‘X’, ‘X’) ) ) {
Joseph
Hi andy can you help me, i-followed the method #3, how can i hide it to my wocommerce product page description here’s the site
Joseph
i just solved it, i used this code of yours:
// Detect if it is a single post with a post author
if ( is_single() && isset( $post->post_author ) && has_category() ) {
thanks for this
Shraddha Kapoor
Hi. I am facing a problem while adding hyperlink in the author bio. I tried add hyper link using anchor text at edumovlive.com but failed. Can anyone help me to get hyperlink in author bio.
Gabrielle
Hi, i added custom admin column: thumbnail to all users table
, how can i print each user gravatar, by user id, inside this column?
I added sucessfully featured image column inside all post table,
that links each image to each post via edit link, is there a way to add gravatar column in all users that links to edit user?
Anis Chity
How can I add links to my posts within the author box?
Nishat
Thanks for the post, great help. Is it possible to make the author box interactive? Like the bottom of this page?
I would like something similar to the ‘as well as’ feature but I know nothing about CSS.
Agus Tamanuri
Nice Post ..
Thanks for Your Article,
gagan
I added author box using method 3 but it showing author box above sharing icons how to move this down near comment section??
Annie
Do I need add links to social media profiles to the author, any idea?
Amir
For method #3 which is really the simplest and the fastest (involves some php coding skills) I added a break tag on the line where it shows picture and text as follows. Because it looks odd when only the first line of the bio shows up next to the picture and the rest of the bio separately.
$author_details .= ” . get_avatar( get_the_author_meta(‘user_email’) , 90 ) . ” . nl2br( $user_description ). ”;
Deyo
The hard coding worked perfectly with a little style tweaking, many thanks!
under the // Get author’s biographical information or description is the some kind of way to control the word or character count without having to edit the user bio itself? Maybe similar to controlling the excerpt length on a post page in functions?
King
I dont know how to add codes via my functions.php i might get an error. Any plugin to add codes into functions.php?
Wajiha Rizvi
You have to add it after the closing php tag that looks like this ( ?> ) in you child theme’s functions.php file.
Lorraine Reguly
Hi. I have three sites. For some reason, my author box automatically shows up on one of them. I had to install the Guerilla plugin to get it to show up on the others.
Why would one site show it and not the other two???
Shafi Khan
Hey There, Great article. The video attached to the post is not for instructions on “how to install a plugin” as written above it.
It it is a mistake, please correct it
sonja
Hi there, having trouble with the picture for the author box. I’ve moved the author widget to the sidebar for it to appear and it has along with the text but scratching my head on what to do to get the picture to show up also. I’m using a WordPress theme. Thanks for all your help!
Christopher Simmons
Heya… dealing with this today. Theme has a nice author box, but missing the socials at bottom.
Love your roll your own example, which we’re messing with “right now” — any chance you might expand on the example to include pulling in the “if socials” from the user meta, below the author’s website link ?
TIA ! Thanks for another great article
(12 year WP user — so not just for beginners! )
Peter Brown
Did you ever figure this out Christopher? I’m having the same issue with my theme.
Natanael David
Hi, thanks for this! I’m having a lot of help from you guys! For this and other functions.
One question: How can I set the max lenght in the Author description. Also, can I use a custom text for the box description in the single page and a full description in the Author page?
moon
Hi,
Thanks for your helpful information.
I have a problem, but I don’t know how to describe it. I added a picture into article, and set it style=”float: right; margin-left: 20px;”
It can show the web page well upon browsed on desktop computer, left hand side is content, and right hand side show picture.
but it cannot show the web page well upon browsed on mobile phone, please refer below URL:
Is it possible to show text first, and the picture under the text not around the picture?
If so, how?
Please try to help me out.
Thanks in advance.
Best regards,
Mario
Hi guys,
Do you know a way of inserting the author’s widget next to the post entry, but not in a sidebar? just as here:
thanks!
WPBeginner Support
You may want to add a widget area right next to the content.
Admin