Ti sei mai dimenticato la chiave di casa e ti sei sentito bloccato fuori? Essere esclusi dal tuo sito WordPress può sembrare proprio così. È molto frustrante, soprattutto se gli hacker hanno cancellato il tuo account amministratore. Ma non preoccuparti, puoi rientrare.
Pensa al tuo sito web come a una casa con una porta sul retro segreta. Quella porta sul retro è il database del tuo sito web, e di solito vi si accede tramite codice MySQL. Ora, questo potrebbe sembrare complicato, ma è come un insieme di istruzioni che puoi usare per apportare modifiche al tuo sito web dietro le quinte.
In questo articolo, ti insegneremo come usare MySQL per creare un account amministratore completamente nuovo per il tuo sito web, proprio come farsi fare una nuova chiave per la tua casa. In questo modo, potrai bloccare gli hacker e riprendere il controllo.
Perché aggiungere un utente amministratore al database di WordPress tramite MySQL?
Ci siamo imbattuti in un problema in cui il sito di un utente è stato hackerato e il suo account amministratore è stato cancellato dal database. Questo li ha bloccati fuori dal loro sito web WordPress.
Siamo stati in grado di aiutarli ad accedere al loro sito web creando un nuovo utente amministratore direttamente nel sito web WordPress. Lo abbiamo fatto usando phpMyAdmin, uno strumento basato sul web che ti permette di gestire i database MySQL usando il tuo browser web.
Se ti ritrovi bloccato nell'area di amministrazione di WordPress a causa di hacker o semplicemente perché hai dimenticato la password, allora puoi fare lo stesso.
Tuttavia, dovresti sempre eseguire un backup del tuo database prima di apportare modifiche a MySQL. Quindi, una volta che puoi accedere nuovamente al tuo sito web, potresti dover seguire la nostra guida per principianti per riparare il tuo sito WordPress hackerato.
Detto questo, diamo un'occhiata a come aggiungere un utente amministratore al database di WordPress tramite MySQL.
Aggiungere un utente amministratore al database di WordPress con phpMyAdmin
phpMyAdmin è preinstallato con la maggior parte delle migliori società di hosting WordPress. Puoi trovarlo nella sezione Database del pannello di controllo del tuo account di hosting cPanel.
Ecco uno screenshot dal pannello di controllo di Bluehost:
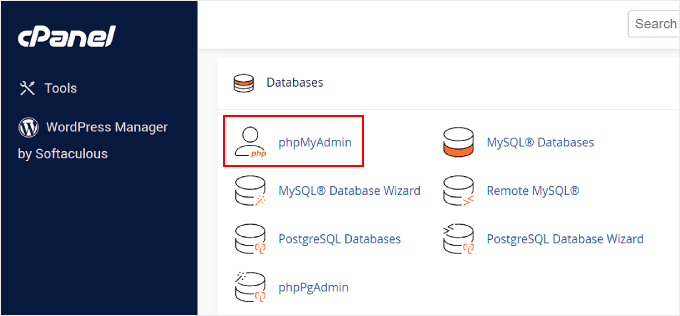
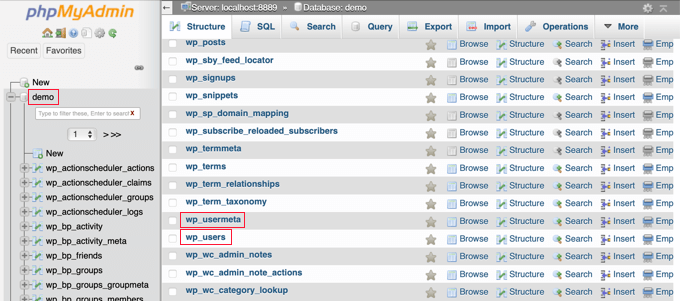
Cliccando sull'icona si aprirà l'interfaccia di phpMyAdmin. Devi selezionare il tuo database WordPress dalla colonna di sinistra.
Dopodiché, phpMyAdmin visualizzerà tutte le tabelle nel tuo database WordPress. Apporterai modifiche alle tabelle wp_users e wp_usermeta.
Aggiungere un utente alla tabella wp_users
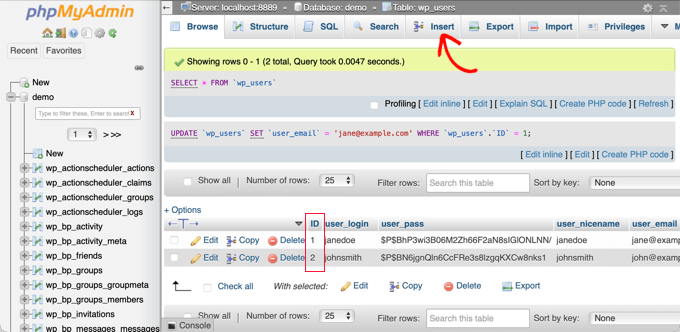
Innanzitutto, devi trovare la tabella wp_users e fare clic su di essa. Questo mostrerà gli utenti attualmente elencati nella tabella.
Si noti nello screenshot sottostante che ci sono due ID utente nella tabella del nostro sito demo, 1 e 2. Quando creiamo un nuovo utente per il nostro sito demo, questo ID deve essere univoco, quindi digiteremo il numero 3.
Devi fare clic sulla scheda 'Inserisci' in alto sullo schermo in modo da poter inserire le informazioni per un nuovo utente amministratore.
Aggiungi le seguenti informazioni ai campi nel modulo di inserimento:
ID: scegli un numero univoco (nel nostro esempio, useremo 3)user_login: il nome utente che verrà utilizzato durante l'accessouser_pass: aggiungi una password e assicurati di selezionare MD5 nel menu a discesa della funzione (vedi lo screenshot sottostante)user_nicename: il nome completo o il nickname dell'utenteuser_email: l'indirizzo email dell'utenteuser_url: l'indirizzo del tuo sito webuser_registered: seleziona la data e l'ora in cui l'utente è stato registrato utilizzando il calendariouser_activation_key: lascia vuotouser_status: imposta questo a 0display_name: il nome completo o il nome visualizzato dell'utente
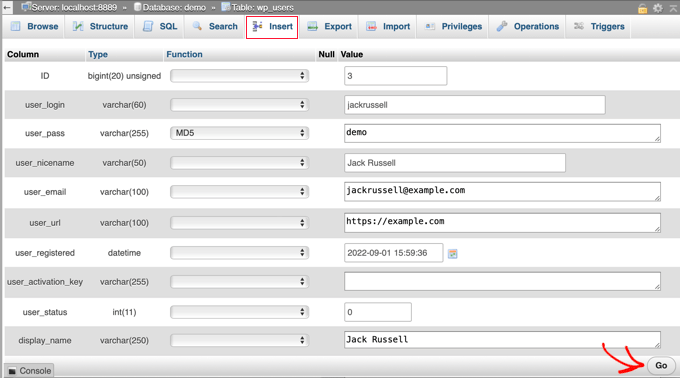
Una volta terminato, assicurati di fare clic sul pulsante ‘Vai’ per memorizzare il nuovo utente.
Aggiungere un utente alla tabella wp_usermeta
Ora, devi trovare la tabella wp_usermeta e fare clic su di essa. Successivamente, dovresti fare clic sulla scheda ‘Inserisci’ come hai fatto nel passaggio precedente.
Successivamente, devi aggiungere le seguenti informazioni al modulo di inserimento:
unmeta_id: lascia questo campo vuoto (verrà generato automaticamente)user_id: l'ID utente che hai utilizzato nel passaggio precedentemeta_key: questo dovrebbe esserewp_capabilitiesmeta_value: inserisci questo:a:1:{s:13:"administrator";s:1:"1";}
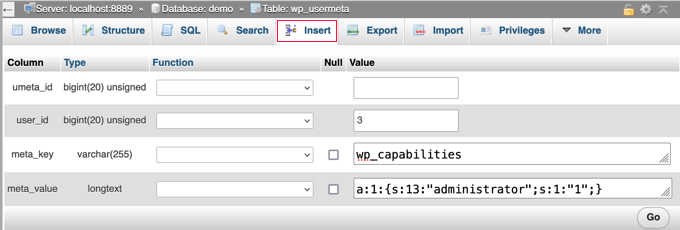
Dopodiché, scorrendo verso il basso, dovresti trovare i campi per una seconda riga. Devi aggiungere le seguenti informazioni:
unmeta_id: lascia questo campo vuoto (verrà generato automaticamente)user_id: l'ID utente che hai utilizzato nei passaggi precedentimeta_key: devi inserirewp_user_levelmeta_value: 10

Una volta terminate l'inserimento delle informazioni nei campi, devi fare clic sul pulsante ‘Vai’. Congratulazioni, hai creato un nuovo nome utente amministratore!
Ora dovresti essere in grado di accedere alla tua area di amministrazione di WordPress utilizzando il nome utente e la password che hai specificato per questo utente.
Non appena accedi, devi navigare su Utenti » Tutti gli utenti, quindi fare clic sul nome utente che hai appena creato.
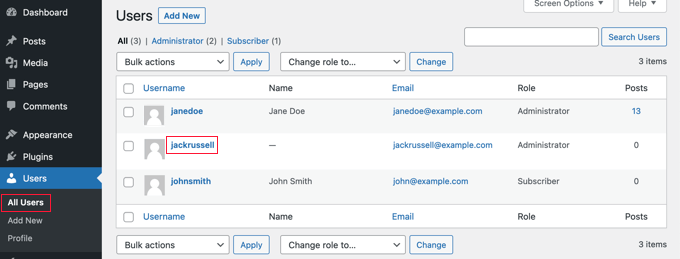
Ora, senza cambiare nulla, scorri fino in fondo alla pagina e fai clic sul pulsante ‘Salva’.
Questo permetterà a WordPress di ripulire l'utente che hai appena creato e aggiungere alcune informazioni aggiuntive necessarie.
Aggiungere un utente amministratore al database di WordPress tramite una query SQL
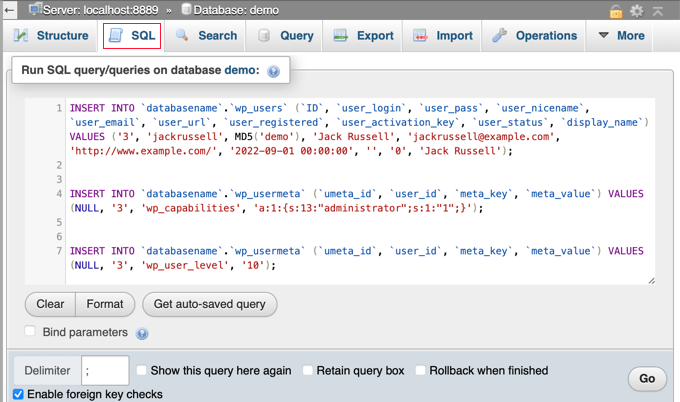
Se sei uno sviluppatore, puoi velocizzare il processo utilizzando il codice.
Inserisci semplicemente questa query SQL nel tuo database:
INSERT INTO `databasename`.`wp_users` (`ID`, `user_login`, `user_pass`, `user_nicename`, `user_email`, `user_url`, `user_registered`, `user_activation_key`, `user_status`, `display_name`) VALUES ('3', 'demo', MD5('demo'), 'Your Name', 'test@example.com', 'http://www.example.com/', '2022-09-01 00:00:00', '', '0', 'Your Name');


INSERT INTO `databasename`.`wp_usermeta` (`umeta_id`, `user_id`, `meta_key`, `meta_value`) VALUES (NULL, '3', 'wp_capabilities', 'a:1:{s:13:"administrator";s:1:"1";}');


INSERT INTO `databasename`.`wp_usermeta` (`umeta_id`, `user_id`, `meta_key`, `meta_value`) VALUES (NULL, '3', 'wp_user_level', '10');
Assicurati di sostituire ‘nomedatabase’ con il database con cui stai lavorando.
Inoltre, non dimenticare di modificare gli altri valori in quelli che desideri per il nuovo utente, come spiegato nel primo metodo.
Guide esperte su cosa fare quando si è bloccati fuori dall'amministratore di WordPress
Ora che sai come aggiungere un utente amministratore tramite MySQL, potresti voler consultare alcuni articoli su come risolvere il tuo sito web quando sei bloccato fuori dall'area di amministrazione di WordPress.
- Cosa fare quando sei bloccato fuori dall'amministrazione di WordPress (wp-admin)
- Come usare la modalità di ripristino di WordPress
- Come reimpostare una password di WordPress da phpMyAdmin
- Come sbloccare il limite di tentativi di accesso in WordPress
- Come disattivare tutti i plugin quando non è possibile accedere a WP-Admin
- Come risolvere il WordPress White Screen of Death (Passo dopo passo)
- Come correggere l'errore critico in WordPress (passo dopo passo)
- Come risolvere il problema di aggiornamento e reindirizzamento della pagina di accesso di WordPress
- Come risolvere l'errore di connessione al database in WordPress
- Come risolvere facilmente l'errore 'Questo sito non è raggiungibile' in WordPress
Speriamo che questo tutorial ti abbia aiutato a imparare come aggiungere un utente amministratore al database di WordPress tramite MySQL. Potresti anche voler consultare la nostra guida definitiva alla sicurezza di WordPress o il nostro elenco di errori comuni di WordPress e come risolverli.
Se ti è piaciuto questo articolo, iscriviti al nostro canale YouTube per tutorial video su WordPress. Puoi anche trovarci su Twitter e Facebook.


zohaib
Grazie mille, Sì, ho risolto il mio problema e questo era dovuto al ruolo assegnato al mio nome utente. Saluti
Bichir Mihail
Grazie, molto utile
Rastislav Nichta
Guida davvero molto semplice e chiara su come creare un utente tramite database MySQL di WordPress, grazie.
Mary Janis
Queste informazioni sono obsolete perché il formato HG è cambiato completamente. Dove diavolo è wp_user?
Susan Marshall VA
Grazie mille per questo. Ho appena avuto un cliente che si è bloccata fuori dal suo sito e sono riuscito a farla rientrare con queste istruzioni.
Kumar Mritunjay
L'ho usato sui miei siti web. Funziona a meraviglia... molto facile da seguire!
Grazie per questa incredibile tecnica che fa risparmiare tempo.
sara asadiha
i did everything u said, but it did not work what else should i do?
Peter Gough
Thanks for this. Really helped when I was locked out of Wordpress
Michael Sineni
Ho cambiato il mio accesso admin in editor perché stavo cercando di modificare le capacità del ruolo per modificare gravity forms. Improvvisamente non vedo più edit cornerstone né ho accesso!! AIUTO!
Ayesi
Davvero buono, tutto funziona perfettamente, grazie un milione!!
Stella
Grazie mille! Questo mi ha salvato la giornata. Uff!
Nilo Velez
Non so se sia un aggiornamento alla struttura dati di WordPress, ma ho appena incontrato un sito in cui ho dovuto inserire i valori meta_key di wp_options come:
[table_prefix]capabilities invece di wp_capabilities
[table_prefix]user_level invece di wp_user_level
Lascio questo qui perché potrebbe essere d'aiuto.
Takis Pan
Lei signore è fantastico!
Immagino che utilizzi il prefisso del database, ma nel caso in cui il sito sia stato spostato, o qualcuno abbia cambiato il prefisso da “wp_” a qualcos'altro, le capacità e il livello utente dovrebbero essere modificati di conseguenza.
Abraham Quilca
Grazie, questo commento ha aiutato molto.
Ho dovuto ricontrollare e ottenere il valore esatto di table_prefix dal nostro file wp-config.php. I nostri valori meta_key erano corretti tranne per la capitalizzazione. Credo che alcune società di hosting con installazioni WordPress con un clic imposteranno i propri table_prefix, quindi assicurati di controllare anche questo.
Cheryl
ha funzionato anche per me, grazie Abraham
Loren Helgeson
L'ho usato su tre siti web diversi finora. Funziona a meraviglia!
Grazie per questo incredibile risparmio di tempo.
Steve Day
BRILLIANT!!!
Thank you – saved my day
Kirst
Sembra che ci sia stato un cambiamento nel database nell'ultima versione di WP, quindi questo post potrebbe dover essere aggiornato.
È stata una risorsa fantastica, grazie!
Loren Helgeson
Non posso verificarlo con versioni precedenti di Wordpress, ma l'ho appena testato con l'ultima versione di Wordpress e ha funzionato bene per me. Qualcuno può anche confermare se è stato un colpo di fortuna?
Abid
Ho eseguito le stesse query SQL per creare un utente amministratore. L'utente è stato creato e ha effettuato l'accesso, ma mostra l'errore "Spiacenti, non sei autorizzato ad accedere a questa pagina". Per favore, aiutami a riguardo.
Jade
GRAZIE MILLE! Ho avuto un problema con WooCommerce Product Vendors, dove mi sono candidato come fornitore mentre ero loggato come amministratore. Da quel momento in poi non sono più riuscito ad accedere e ricevevo il messaggio "Sarai avvisato una volta che il tuo account sarà stato approvato" O_o
Previously I had to re-install WP because of this!!! Now I found your post and it was such a help!!! Thank you so much for sharing this x
x
Ben
Non ha funzionato affatto per me. Ricevo un "ERRORE: Nome utente o password errati."
Sì sì, l'ho controllato. Password e utente sono corretti.
E quindi, cosa facciamo ora? Avevo l'accesso admin ma ora ho solo un livello base inferiore che non mostra le impostazioni utente.
Loren Helgeson
Questo ha funzionato perfettamente sui due siti precedenti su cui ho dovuto usarlo.
SHAILENDRA RAJAVARAM
Fantastico... mi ha salvato un sacco di fatica, come per altri problemi. Ho visto che per qualche motivo tutti gli amministratori del mio sito sono diventati qualcos'altro...
GRANDE AIUTO !!
I ragazzi che hanno discusso dei prefissi wp... perfetto...
Ah !!!
Werner Ullrich
Per me è un post di grande aiuto. Ho modificato questo script SQL e rianimato il mio accesso all'ingresso dell'amministratore della mia homepage di WordPress. Grazie.
Werner Ullrich
Smithg0
Ok, questo video di YouTube è molto migliorato rispetto all'ultimo, questo ha una buona qualità dell'immagine e dell'audio.
Jerry L
Volevo cambiare diverse voci "Nicename" con valori diversi dall'ID di accesso dell'utente. Da PhpMyAdmin, ho esportato la tabella "wp_users".
Poi ho apportato le modifiche necessarie nel mio editor di codice.
Quindi, dopo aver salvato un backup della tabella utenti originale e dell'intero database, ho "importato" solo la tabella "wp_users" nel database usando PhpMyAdmin.
Ha funzionato bene per me.
Brad
Ha funzionato a meraviglia! Grazie!
kali
Ho seguito questo e sono riuscito ad accedere ma non riesco ad andare alla dashboard. Ricevo questo errore: Non hai i permessi sufficienti per accedere a questa pagina.
Oleg
Ho lo stesso problema.
Eileen
Ho avuto lo stesso problema ma in wp_usermeta dove ci viene detto di scrivere:
meta_value – inserisci questo: a:1:{s:13:”administrator”;s:1:”1″;}
Ho cambiato il valore in:
a:1:{s:13:”administrator”;b:1;}
e ha funzionato. Ho trovato questo valore nel valore corrispondente più in alto nella tabella per l'account dell'amministratore originale. Controlla la tua tabella e vedi se ci sono altri amministratori precedenti, e copia lo stesso valore (nel caso in cui differisca dal mio valore).
Mark P
Ha funzionato per me, grazie!
Ardestani
Funziona, grazie, grazie mille
Jason Coleman
This didn’t work for me
Daniel Payne
Affinché ciò funzioni con l'ultima versione di WordPress 4.4.2, ho dovuto aggiornare i nomi di meta_key perché la mia installazione di WordPress utilizzava un prefisso di tabella di wp_brnq_ invece del tipico prefisso wp_.
Rose
Cosa intendi? Non funziona nemmeno per me.
Robert Drummond
Grazie per questo! Mi ha salvato da un plugin errato che ha sovrascritto il mio record di amministratore nella tabella degli utenti!
Nadia
Attualmente sto sistemando il sito web di mia madre per la sua azienda e sono una specie di principiante di WordPress. Non riuscivo ad accedere correttamente perché mi aveva inviato la password sbagliata. Dopo tre tentativi falliti, mi ha detto di controllare i dati. Messaggio: 'Nome utente o password non corretti. Si prega di controllare i dati.'
Ho seguito questi passaggi qui e ho seguito tutti questi passaggi molto precisamente, ma ancora, con il mio nuovo nome utente e password, non riesco ad accedere. Il mio prefisso era diverso da wp_ come indicato in questo articolo, quindi ho cambiato anche il prefisso – ma non riesco a passare. Ora sono bloccato fino a domani.
What happened, can someone maybe help me / explain me what I did wrong and how can I fix this. I really promised my mom to build her website, and it needs to be updated really soon!
Joe Harkins
stavi facendo un ottimo lavoro passo dopo passo fino a quando non sei arrivato a
“meta_key – dovrebbe essere wp_capabilities”
Cosa significa “dovrebbe essere” in questo contesto? Significa che dovrebbe già esserci scritto in quel campo, forse generato da qualcosa di precedente? Se non c'è, cosa è richiesto?
C'è un campo a discesa a destra di meta_key. Quel nome file “wp_capabilities” non esiste come selezione. C'è un campo vuoto alla sua destra. Devo incollarci wp_capabilities? Esiste un valore di quel nome da qualche parte che dovrei inserire in quel campo?
E vedo altri problemi in arrivo. Dici “inserisci un'altra riga”.
Prendo la parola inserisci come verbo. Dove e come lo faccio? Sono già sulla pagina Inserisci. Non c'è niente su di essa che dica “Inserisci nuova riga”.
Guardando più in basso – tutto in fondo – saltando la sezione successiva (che mi è stato detto di fare) vedo un campo che dice “Inserisci come nuova riga”.
Ma “inserisci una nuova riga” ed essere detto di andare a un campo che contiene la frase “Inserisci come nuova riga” non sono la stessa cosa.
e c'è una casella selezionata che dice “ignora” proprio sopra. Qual è il senso di andare avanti se quella casella è ancora selezionata come ignora – e “inserisci una nuova riga” è la stessa cosa di “inserisci una nuova riga”?
E vedo la stessa confusione su “dovrebbe” nelle prossime istruzioni.
Ma sono bloccato sul primo “dovrebbe” perché sono letterale. Potresti chiarire?
Jeff
Ciao Joe,
“meta_key – questo dovrebbe essere wp_capabilities” significa che il valore di meta_key (la casella di testo in phpmyadmin) dovrebbe essere wp_capabilities
Quando si riferisce all'inserimento di una nuova riga, è possibile farlo facendo clic su inserisci dalla navigazione in alto in phpmyadmin. Questo tutorial presuppone che tu abbia già eseguito il primo inserimento e ti trovi nella scheda browse.
Rich
Avevo una configurazione multi-sito. Dopo aver fatto questo, posso accedere a entrambi i siti, tuttavia non ho la capacità di Amministratore di Rete e nessuna gestione dei Plugin… Sotto “I miei siti” vedo i miei due siti, ma nessuna opzione “Rete”. Nell'area del menu verticale per il mio sito, sembra che abbia tutto tranne “Plugin”.
Sembra che non abbia l'amministrazione sulla mia Rete WP per più siti?
sapere aude
that was awesome! thanks.
Bouasone
Molte grazie, è molto utile
Russ
Grazie per l'ottimo tutorial! Sono riuscito ad accedere con successo.
Arpan Das
Grazie mille. Funziona bene…
Rodolfo
Questo mi ha salvato la vita oggi – grazie!
Phil
Questo ha funzionato per me con la seguente modifica: il valore di wp_capabilities doveva essere preso dalla riga di un altro utente amministratore perché aveva permessi aggiuntivi o qualunque cosa siano. copia i valori in quel caso da un utente esistente se necessario
Reid Walley
Se hai seguito tutti i passaggi e stai ANCORA ricevendo il messaggio di errore “Non hai permessi sufficienti per accedere a questa pagina” quando provi ad accedere…
Ho dovuto sostituire il primo meta_key di esempio (wp_capabilities) con il mio prefisso: cambia wp_capabilities in whateveryourprefixis_capabilities
Lo stesso con il secondo esempio di meta_key (wp_user_level). L'ho cambiato nel mio prefisso specifico: cambia wp_user_level in whateveryourprefixis_user_level
Yoana
Thanks, that fixed it
Terry Hale
Such a helpful article. Perfectly done, easy to understand. Thanks for the time you spent putting it together.
Andre
Questo mi è stato molto utile in diverse occasioni. Grazie per averlo preparato!!!
2046
per coloro che hanno ancora "Non si dispone delle autorizzazioni sufficienti per accedere a questa pagina.
Potrebbe essere necessario verificare che il prefisso del database wp_capabilities e le altre impostazioni corrispondano al nome del prefisso del tuo database..
ad esempio, se il tuo normale wp_usersmeta è blab787_usersmeta, allora wp_capabilities sarà blab787_capabilities, ecc."
Lydia B
Grazie, la tua soluzione all'errore "non si dispone delle autorizzazioni sufficienti" ha funzionato perfettamente per me.
Terry Hale
Thanks for posting! I ran into that problem, and you solved it.
Cristian Deraco
Grazie!!! ha funzionato per me, sì!
Rony
Non riesco a vedere la tabella con le informazioni degli utenti, hai qualche idea?
Denny
Fantastica guida. È perfetta per diverse versioni di phpmyadmin, quindi ignorate le differenze negli screenshot. Grazie per la spiegazione!
-D
Denny
WordPress 3.6.1. Lo testerò anche con la versione 4 e confermerò.
Ludwik C. Siadlak
Stessa cosa qui, a settembre 2015 ricevo l'errore "Non si dispone delle autorizzazioni sufficienti per accedere a questa pagina." dopo aver utilizzato il codice SQL fornito. Il che è strano, dato che questo articolo ha solo 6 mesi!
Harm
Ho seguito le tue istruzioni alla lettera ma qualcosa è andato storto (non so cosa) e ora non ho più accesso al mio sito web. Ricevo il messaggio: errore del database.
Posso annullare le modifiche che ho apportato? Aiuto per favore.
Kiel
tutto quello che dovevo fare era ripristinare i metadati all'amministratore e ha funzionato alla grande. Grazie per l'articolo.
Matthew Galvin
Abbastanza inutile in > versione 3. Bel inizio però.
Chris Hewlett
Ciao, ho approfondito un po' il problema e ho scoperto che le voci esistenti nella tabella “usermeta” avevano un prefisso unico per il mio sito. Le mie tabelle di WordPress iniziano tutte con ar_, e una volta modificate quelle 2 righe per riflettere ciò, il mio accesso è stato completato, con tutti i privilegi.
Cordiali saluti,
Chris
Chris Hewlett
Ciao e grazie per la spiegazione qui sopra su questo argomento. Sono stato bloccato fuori dal mio sito locale (XAMPP) e altri articoli che ho letto trattano di cambiare la password dell'utente amministratore esistente usando phpMyAdmin. Non ho avuto successo con quei metodi.
Ho seguito le tue istruzioni sopra e la schermata di accesso ha accettato le credenziali.
Sfortunatamente sono stato reindirizzato a domain//wp-admin/profile.php e alla frase “Non hai permessi sufficienti per accedere a questa pagina”.
Dal front-end del sito, posso vedere che sono loggato ma quando clicco su Dashboard, appare la stessa frase.
Hai qualche suggerimento che mi permetta l'accesso?
Grazie in anticipo,
Chris
Abishai
Ciao, ho provato la soluzione seguendola alla lettera, eppure quando provo ad accedere: url/wp-admin mi porta a una pagina url/25/ come prima. Mi chiedo cosa ho sbagliato. Per favore, consigliami. Grazie in anticipo.