Volete sbloccare ancora più potere organizzativo in WordPress? Provate ad aggiungere campi meta personalizzati alle vostre tassonomie personalizzate.
Le tassonomie personalizzate consentono di organizzare i contenuti al di là di categorie e tag. Ma a volte è utile aggiungere ulteriori dettagli e campi per descriverli, ed è qui che entrano in gioco i meta-campi personalizzati.
In questo articolo vi mostreremo come aggiungere ulteriori campi meta alle vostre tassonomie personalizzate in WordPress.

Quando aggiungere meta-campi personalizzati a una tassonomia personalizzata?
Quando si creano nuovi contenuti sul sito web WordPress, è possibile organizzarli utilizzando le due tassonomie predefinite, le categorie e i tag.
Alcuni siti web traggono vantaggio dall’uso di tassonomie personalizzate. Queste permettono di ordinare i contenuti in modi diversi.
Ad esempio, un sito web che pubblica recensioni di libri potrebbe aggiungere le tassonomie “Soggetti” e “Autori”, in modo che i visitatori possano trovare rapidamente le recensioni a cui sono interessati.
Per ulteriori informazioni, consultare la nostra guida su come creare tassonomie personalizzate in WordPress.
Ogni tassonomia ha solo tre o quattro campi predefiniti: nome, slug, genitore (se è gerarchico) e descrizione.
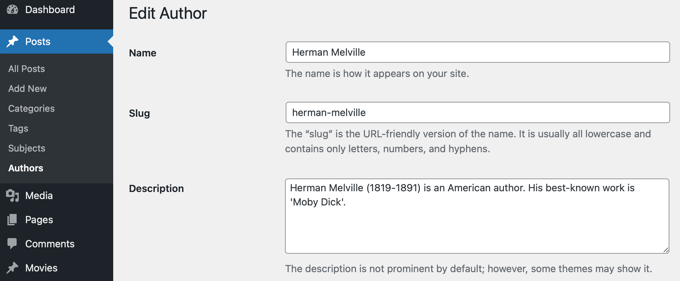
A volte è utile aggiungere campi aggiuntivi per descrivere meglio la tassonomia. Ad esempio, si potrebbe aggiungere un campo “anno di nascita” a una tassonomia “autori”.
Detto questo, ecco come aggiungere meta-campi personalizzati a tassonomie personalizzate in WordPress.
Passo 1: Aggiunta di campi meta personalizzati a tassonomie personalizzate in WordPress
Per prima cosa, è necessario installare e attivare il plugin Advanced Custom Fields. Per saperne di più, consultate la nostra guida passo passo su come installare un plugin di WordPress.
Successivamente, si può accedere alla pagina Campi personalizzati ” Aggiungi nuovo. Qui è possibile aggiungere un gruppo di campi che contiene uno o più campi nuovi.
Verrà chiesto di dare un titolo al gruppo di campi, che verrà visualizzato insieme ai nuovi campi durante l’aggiunta o la modifica della tassonomia. In questa esercitazione, vogliamo aggiungere un campo personalizzato alla tassonomia Autori, quindi chiameremo il gruppo di campi “Dettagli autore”.
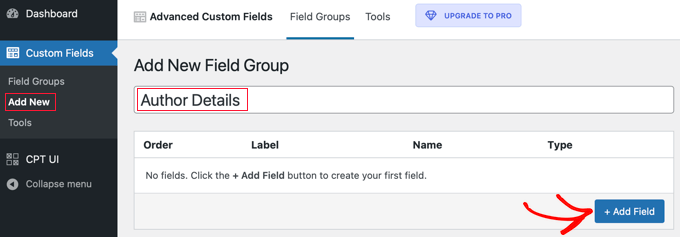
Una volta fatto ciò, si deve fare clic sul pulsante “+ Aggiungi campo” per aggiungere un campo. Apparirà un nuovo modulo in cui si potranno inserire i dettagli del nuovo campo.
Una volta inserita l’etichetta del campo, il nome del campo viene creato automaticamente e può essere modificato a piacere. Il nome del campo dovrà essere utilizzato più avanti nel corso dell’esercitazione, quindi è bene prenderne nota.
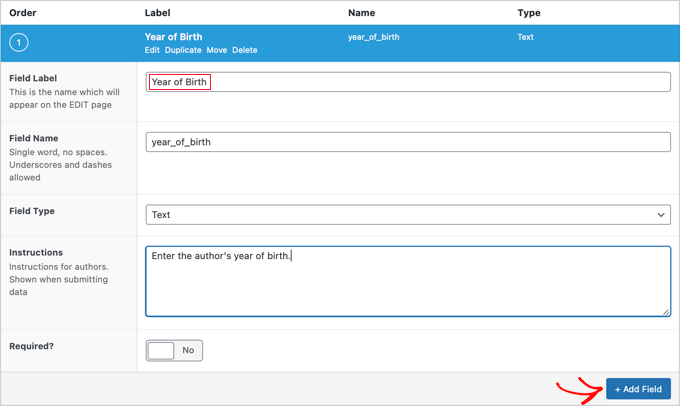
A questo punto è necessario inserire gli altri dettagli del campo, come il tipo di campo, le istruzioni per gli autori che compileranno il modulo e se il campo è necessario. Altre opzioni non mostrate nello screenshot sono il testo predefinito, il testo segnaposto, il limite di caratteri e altro ancora.
Se si desidera aggiungere un secondo campo, fare clic sul pulsante “+ Aggiungi campo” e ripetere la procedura. Altrimenti, è sufficiente scendere fino alla sezione Posizione.
Qui si possono creare regole che descrivono dove visualizzare il nuovo campo. Si dovrebbe selezionare “Tassonomia” dal primo menu a discesa e lasciare il campo centrale come “è uguale a”. Infine, selezionare la tassonomia personalizzata corretta per l’ultimo campo. In questa esercitazione, selezioneremo “Autore”.

Se si vuole aggiungere questo campo a un’altra tassonomia, si può fare clic sul pulsante “Aggiungi gruppo di regole” e ripetere il passaggio.
Ora è necessario regolare le altre impostazioni della pagina. Noi lasceremo semplicemente i valori predefiniti. Una volta terminato, si deve scorrere fino in alto nella pagina e fare clic sul pulsante “Pubblica”.

Congratulazioni, avete aggiunto con successo un meta-campo personalizzato a una tassonomia personalizzata in WordPress. Ma avete ancora un po’ di lavoro da fare.
Fase 2: Aggiunta di dati al nuovo campo meta personalizzato
La tassonomia ha un nuovo campo, ma non contiene ancora alcun dato. È opportuno dedicare un po’ di tempo a questa operazione.
Nel nostro esempio, dobbiamo inserire l’anno di nascita di ciascun autore. Per farlo, occorre navigare in Articoli ” Autori e fare clic sul nome dell’autore che si desidera modificare.

Dopodiché, si possono inserire i dati nel nuovo campo. In questo caso, inseriremo l’anno di nascita dell’autore. Non dimenticate di fare clic sul pulsante “Aggiorna” per memorizzare i nuovi dati.
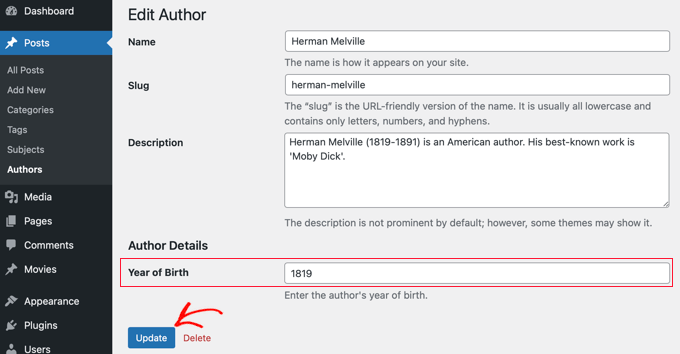
Per aggiungere dati alla tassonomia personalizzata, occorre seguire gli stessi passaggi sul sito web.
Una volta terminato, resta ancora un passo da fare. Sebbene sia possibile vedere il campo personalizzato quando si è connessi all’area di amministrazione di WordPress, i visitatori del sito web non saranno in grado di vederlo. È necessario aggiungere il campo alla pagina dell’archivio della tassonomia personalizzata.
Passo 3: visualizzare un meta-campo personalizzato sulla pagina dell’archivio della tassonomia
In questa fase, dovrete aggiungere del codice ai file del tema. Se non l’avete mai fatto prima, fate riferimento alla nostra guida per principianti su come incollare snippet dal web in WordPress.
La prima cosa da fare è entrare nella cartella del tema e cercare il file di archivio della tassonomia. Avrà un nome come tassonomia-nome del vostro tema.php.
Ad esempio, se si ha una tassonomia personalizzata chiamata “autori”, occorre cercare un file chiamato taxonomy-authors.php.
Se non si vede questo file, cercare archivia.php. È necessario creare un duplicato di questo file e nominarlo come descritto sopra.
Nota: se il vostro tema non include archive.php, probabilmente state usando un framework per temi WordPress e dovrete creare manualmente l’archivio della tassonomia. Un buon punto di partenza per imparare a creare file di archivio è la nostra guida su come creare pagine di archivio personalizzate in WordPress.
Ora è necessario aggiungere il seguente codice all’archivio della tassonomia, subito prima del loop:
1 2 3 4 5 6 7 8 9 10 11 12 | <?php// get the current taxonomy term$term = get_queried_object();// get the taxonomy meta field$taxonomymetafield = get_field('FIELDNAME', $term);// display the taxonomy meta fieldecho $taxonomymetafield;?> |
Si noti che è necessario sostituire “FIELDNAME” con il nome effettivo del campo creato in precedenza. Ricordiamo che vi abbiamo chiesto di prenderne nota.
Nel nostro esempio, il nome del campo è “anno_di_nascita”. Aggiungeremo anche una descrizione, in modo che i visitatori capiscano il significato del campo. Aggiungeremo quindi il seguente codice al file di archivio della tassonomia taxonomy-authors.php:
1 2 3 4 5 6 7 8 9 10 11 12 13 | <?php// get the current taxonomy term$term = get_queried_object();// get the taxonomy meta field$taxonomymetafield = get_field('year_of_birth', $term);// display the taxonomy meta fieldecho "Year of birth: ";echo $taxonomymetafield;?> |
Ecco come appariva quando l’abbiamo testato sul nostro sito demo:
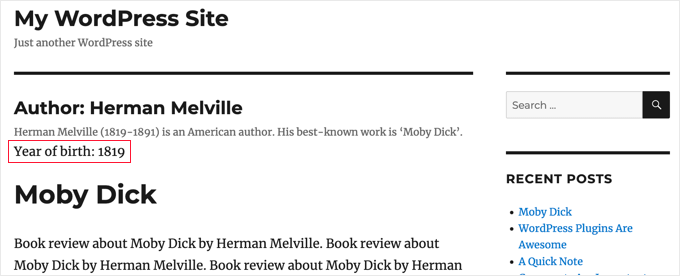
Speriamo che questo tutorial vi abbia aiutato a imparare come aggiungere meta-campi personalizzati a tassonomie personalizzate in WordPress. Potreste anche voler imparare ad aggiungere parole chiave e meta description in WordPress, oppure consultare il nostro elenco di plugin WordPress indispensabili per far crescere il vostro sito.
Se questo articolo vi è piaciuto, iscrivetevi al nostro canale YouTube per le esercitazioni video su WordPress. Potete trovarci anche su Twitter e Facebook.


Tarek Anandan
If you can’t your data to display and you’re using a recent version of WordPress, use get_term_meta() instead of get_tax_meta().
Subin
here’s my code:
$config = array(
‘id’ => ‘tax_meta_box’, // meta box id, unique per meta box
‘title’ => ‘Tax Meta Box’, // meta box title
‘pages’ => array(‘category’), // taxonomy name, accept categories, post_tag and custom taxonomies
‘context’ => ‘normal’, // where the meta box appear: normal (default), advanced, side; optional
‘fields’ => array(), // list of meta fields (can be added by field arrays)
‘local_images’ => false, // Use local or hosted images (meta box images for add/remove)
‘use_with_theme’ => get_template_directory_uri() . ‘/Tax-Meta-Class/Tax-meta-class’
);
/*
* Initiate your meta box
*/
$my_meta = new Tax_Meta_Class($config);
//Image field
$my_meta->addImage(‘image_field’,array(‘name’=> __(‘My Image ‘,’tax-meta’)));
$my_meta->Finish();
———————————————————————————————————————–
term_id;
$saved_data = get_tax_meta($term_id,’image_field’,true);
echo ”;
echo $term_id; // Echoes ‘1’ which is the category ID
echo $saved_data; // Doesn’t show anything . Wonder Why!!
exit;
?>
James Dower
I’m also having issues getting the path for an uploaded image. It just echos:
Array
…text fields are fine.
I’m using:
$prefix = ‘ttp_’;
$my_meta->addImage($prefix.’logo_id’,array(‘name’=> __(‘Logo’,’tax-meta’)));
And on the taxonomy.php page:
$logo = get_tax_meta($term->term_id, ttp_logo_id);
Can anyone help please? I’ve been at this for HOURS!
James Dower
…and is anyone please able to explain how to echo repeater fields?!
James Dower
For all those struggling to get this to read out, I found a stray apostrophe in there, this works for me:
$data = get_tax_meta($term->term_id, ba_text_field_id);
echo $data;
siva
Hi Team very very thank you…..
Ketan
Hi,
I am activate plugin. but i don’t show where i can add custom taxonomy filed in admin side. please replay me.
Thanks,
Ketan.
Francisco
Thanks a lot this has been very useful!!!!
I displayer correclty a text field using this code:
//Get the correct taxonomy ID by slug
$term = get_term_by( ‘slug’, get_query_var( ‘term’ ), get_query_var( ‘taxonomy’ ) );
//Get Taxonomy Meta
$saved_data = get_tax_meta($term->term_id,’ba_text_field_id’);
echo $saved_data;
BUT I need to display an image too, I’m using this php code in my template:
//Get the correct taxonomy ID by slug
$term = get_term_by( ‘slug’, get_query_var( ‘term’ ), get_query_var( ‘taxonomy’ ) );
//Get Taxonomy Meta
$saved_data = get_tax_meta($term->term_id,’ba_image_field_id’);
echo $saved_data;
But it doesn’t display anything!
It just shows a single word “array”
What could be wrong?
David Beastall
Thanks for that, the tutorial seems incomplete imo.
Hemanta Chakladar
I’m also searching for that.
Hemanta Chakladar
I’m stuck.
I can see meta data option in wordpress category and not in my custom taxonomy. Where can I add this option to add custom meta in my custom taxonomy ? Where that is defined ?
Marco Panichi
How to add a multiple checkbox in order to select one or more users?
Ankur
Hi Marco, Did you get any answer on it? I am also looking for the same functionality.
Joe Chow
thanks a lot.I can see there are bunch of fields showed at the post category. However, I just want to know how to make the code to be used for woocommerce product category only.
Can anyone give a tip?
Joe
How would you get the taxonomy information on a custom page template instead of a taxonomy.php page?
Jason Gateman
Thanks for this tutorial! How do I get the meta to show on a custom post page I have created as opposed to just the taxonomy page?
AD
Hi Guys,
For those who are having issues with displaying the content that is saved. Use the prefix in front of the key.
//Get Taxonomy Meta
$saved_data = get_tax_meta($term->term_id,’text_field_id’);
echo $saved_data;
That should be ba_text_field_id (Given that the prefix is ba_) .
Hope this helps cheers.
Dan
I wanted to second this comment, as it can be quite puzzling to figure out why the example doesn’t work. If you look in the “Tax meta class” file you will see at the top that Ohad defines a $prefix variable that is appended to each save function.
So in order to get the result to echo out, you need to include the prefix. You can set the prefix to anything you want, including “”. I have no idea what “ba_” stands for, but that is what is in there by default.
The example should read:
$saved_data = get_tax_meta($term->term_id,’ba_text_field_id’);
Chris
Thanks a lot! Works great. You saved me a lot of time coding.
Ante
Ok, I’m stuck.
//Get the correct taxonomy ID by slug
$term = get_term_by( ‘slug’, get_query_var( ‘term’ ), get_query_var( ‘taxonomy’ ) );
//Get Taxonomy Meta
$saved_data = get_tax_meta($term->term_id,’text_field_id’);
echo $saved_data;
So ‘taxonomy’ is my custom taxonomy, let’s say ‘project_clients’
‘text_field_id’ is the id of input field, it’s $prefix.’text_area’…
What’s ‘term’ ?????
Steve
Ante,
Have you had any progress with this??
I’m wondering the same question – poured over so many comments and pages talking about this, but cannot find a resolution. Any help would be appreciated if you have found the answer.
Simply adding the following to my taxonomy.php file is not working:
//Get the correct taxonomy ID by slug
$term = get_term_by( ‘slug’, get_query_var( ‘term’ ), get_query_var( ‘taxonomy’ ) );
//Get Taxonomy Meta
$saved_data = get_tax_meta($term->term_id,’text_field_id’);
echo $saved_data;
fp-admin
I am trying to add whatever I put in the WYSIWYG to the front end of the website. I honestly have no clue what I’m doing but this is my code so far:
term_id,’wysiwyg_field_id’);
?>
<a href="”>
ELiane
Hi,
I used the plugin but I can get the code on my Taxonomy.php.
I Use this code to display the field
term_id,’text_field_id’);
echo $saved_data;
?>
Do I have to do something else?
Thanks
WPBeginner Support
yes if you have followed all instructions as described above, then it should work.
Admin
Tejas Deshmukh
Hello, Specially Thanks for this Idea. This plugin is working superb. I have added three extra fields in Perticular Term add, edit option. but when i create category in it at that term at that time I can’t store value for that extra three fields. So any suggestion for that?
alexut
But how do I get the data out of the archive page? you should add this also as this is a common request.
Kisshomaru
Brilliant! You have no ideea how much time I spent looking for a way to add “quantities” to “products”. This not being a commerce site, it was cumbersome to have a food post tied to an Ingredients taxonomy and not to be able to modify the number of cucumbers for each post.
Thank You!
Mike Jackson
Hi – I’m having trouble getting this to work. I have the data fields visible in my custom taxonomy but I cannot call the data in my brand-description.php using the php code you pasted at the bottom of your article. It doesn’t show an error, it just doesn’t work.
I’d really appreciate some further explanation with this if you have the time.
Thanks
Mike Jackson
This is quite a find! Been trying to solve this for a few weeks. Any idea how to add the new fields to the columns?
Mike Jackson
I’m also having trouble outputting anything on the page. I have this code applied and data in the fields but nothing showing on the site
term_id,’textarea_field_id’);
echo $saved_data;
?>
Editorial Staff
This code works on taxonomy archive page. If it is not displaying then chances are that the code is not able to get the taxonomy ID. At least that would be my guess.
-Syed
Admin
FJ
Well, this sounds nice and did the trick on the categories but for any reason, it didn’t on a custom taxonomy of mine. Did I miss something ? Is there a hook somewhere I didn’t look at ?
Anyway thanks a lot for those enlightening on Ohad’s work. I hanged around it wondering how on earth I could use it properly. I’m just the do-it-yourself type, not a real developper, I’m sure you’ll have understood already.
Thanks again.
Editorial Staff
In line 24 of example-usage.php, you should be able to specify your custom taxonomy.
Admin
Ben
To clarify – Line 24 of taxonomy-fields.php
‘pages’ => array(‘category’), // taxonomy name, accept categories, post_tag and custom taxonomies
CHANGE the XXX to whatever your custom taxonomy is called
‘pages’ => array(‘xxxxx’), // taxonomy name, accept categories, post_tag and custom taxonomies
Kobbe
@ Editor please forgive me, How do i output a text field
Editorial Staff
You have to use the PHP code that we shared. Make sure to change the field name to the one that you have.
Admin
Kobbe
Thanks editor i really appreciate for the reply, This is how class-usage-demo.php – http://pastebin.com/ctZPeS0w
This is what i’m doing but not displaying/outputting anything what am i doing wrong..? and is it possible to display the code (if possible) anywhere in my theme…Thanks
Editorial Staff
The code you have is simply setting up the admin side of things. To display the code, look at the PHP code that we have shared in the article. You have to use that in your taxonomy archive file.
gaurav kaushik
its cool..
but where it save the data…? in postmeta table or it create a new table?
Editorial Staff
It does it in the options table.
Admin
Gaurav Kaushik
can we change the backend of this plugin..i mean we want to create a termmeta table (meta_id,term_id,meta_key,meta_value) ..and save the taxonomy meta here…or connect it with this plugin? http://wordpress.org/extend/plugins/simple-term-meta/
Jim
Cool stuff. I will implement this on our blog in the future.
Michelle
Oh thanks you so much, I’ve been wondering how to identify tags as being English or Spanish for my bilingual site – this helps enormously
Jaime
I actually just finished coding up custom fields for a custom taxonomy for a project I’m working on. I love the flexibility – will certainly check out the plugin for future projects!
Editorial Staff
Yes that is the best part about it. We love stumbling onto libraries like this one which makes the life of developers much easier.
Admin