L’aggiunta di una favicon al vostro blog WordPress è un passo semplice ma potente per il branding del vostro sito. Una favicon è una piccola immagine che appare accanto al titolo del vostro sito web nelle schede del browser, nei segnalibri e altro ancora.
Il problema è che molti nuovi blogger trascurano questo dettaglio o pensano che sia troppo tecnico da gestire. D’altra parte, la mancanza di una favicon può rendere più difficile per il pubblico identificare il sito a colpo d’occhio, riducendo le visite di ritorno o l’engagement.
In WPBeginner, uno dei motivi per cui utilizziamo una favicon è quello di aiutare i nostri lettori a riconoscere rapidamente il nostro sito tra le schede aperte e i segnalibri. Questo dettaglio contribuisce anche a rafforzare il nostro marchio e a garantire una presenza online più professionale.
Per fortuna, aggiungere una favicon al vostro blog WordPress non deve essere complicato. In questa guida illustreremo i metodi più semplici per impostare l’icona del sito e far risaltare il vostro blog.

Perché dovreste aggiungere una Favicon al vostro blog WordPress?
È essenziale aggiungere una favicon al vostro blog WordPress perché aiuta gli utenti a identificare rapidamente il vostro sito web e a rafforzare l’identità del vostro marchio. Da questa piccola icona, i visitatori del sito possono facilmente riconoscere il vostro blog.
Ecco come appare una favicon in un browser web:

Un altro scopo di una favicon di WordPress è quello di migliorare l’esperienza dell’utente. Quando sono aperte più schede, gli utenti possono guardare le favicon per sapere in quale sito web si trovano e passare a quello desiderato.
Se gli utenti aggiungono un’icona di collegamento o un segnalibro al vostro blog sui loro dispositivi mobili, la favicon apparirà come icona dell’app sulla loro schermata iniziale. In questo modo sarà facile per loro accedere al vostro sito web con un semplice tocco.
Le favicon possono anche contribuire all’ottimizzazione dei motori di ricerca (SEO) di WordPress. Se prestate attenzione alle pagine nei risultati di ricerca, di solito presentano la favicon del sito prima del meta titolo della pagina. Questo può far apparire il vostro sito web come legittimo e affidabile.
Come creare una favicon per il vostro blog WordPress
Per prima cosa, impariamo a creare una buona favicon per il vostro blog.
La dimensione ideale della favicon di WordPress è un’immagine quadrata di massimo 512 pixel sia in larghezza che in altezza. Il formato dell’immagine favicon può essere ICO, JPEG, PNG o GIF.
Anche SVG è un formato comune per le favicon, ma non è accettato da WordPress per impostazione predefinita. Tuttavia, è possibile configurare WordPress per consentire l’aggiunta di file SVG.
Se gestite un blog aziendale, potete utilizzare il logo del vostro marchio come icona favicon. Se non ne avete ancora uno, potete verificare la nostra guida per principianti su come creare un logo per il vostro sito web.
Se avete un logo pronto ma volete rendere lo sfondo trasparente, potete usare Photoshop o uno strumento di modifica delle immagini gratuito con rimozione automatica dello sfondo. Assicuratevi solo che il formato del file sia PNG per mantenere la trasparenza della favicon.
Un’altra opzione che potete utilizzare è un generatore di favicon gratuito come Favicon.io. Questo strumento consente di personalizzare una favicon da zero e di scaricare i file in formato PNG e ICO.
Per questo motivo, ecco come aggiungere facilmente una favicon al vostro blog WordPress. Verranno illustrati 4 metodi e potete cliccare sui link sottostanti per passare al metodo che desiderate utilizzare:
Pronti? Iniziamo.
Metodo 1: Aggiungere una favicon utilizzando il Customizer di WordPress
Questo è il metodo più semplice per cambiare una favicon in WordPress. Tutto ciò che dovete fare è caricare l’immagine della favicon nel Customizer di WordPress e il resto sarà fatto da voi.
Il primo passo è accedere al Customizer di WordPress. Se si utilizza un tema classico, si può navigare in Aspetto ” Personalizzazione per farlo.
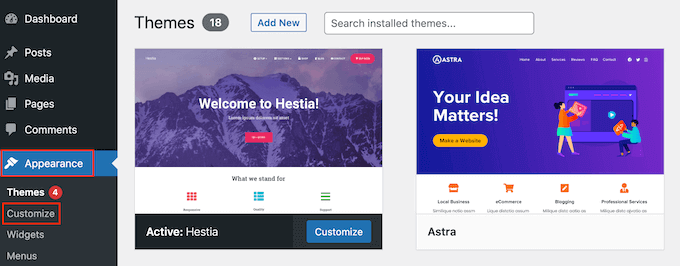
Se state utilizzando un tema a blocchi e non riuscite a trovare il Customizer, consultate la nostra guida su come risolvere la mancanza del Theme Customizer nell’amministrazione di WordPress.
Facciamo quindi clic sulla scheda “Identità del sito” nella barra laterale sinistra.
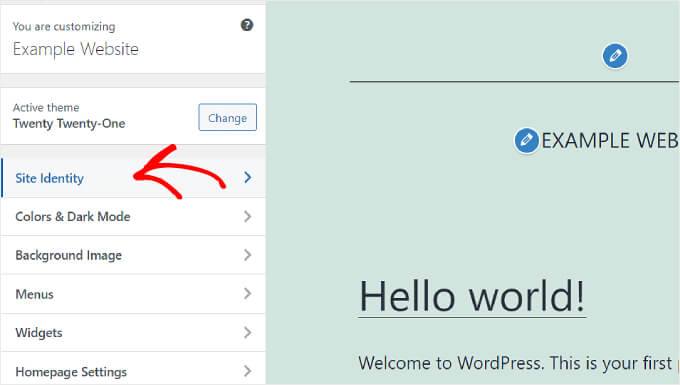
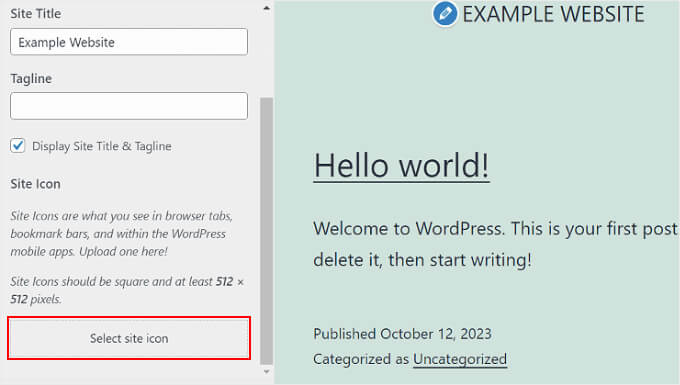
Qui sono disponibili le opzioni per personalizzare il “Logo del sito”, il “Titolo del sito”, la “Tagline” e l'”Icona del sito”.
Se si desidera aggiungere la favicon di un sito, è necessario scorrere fino alla sezione “Icona del sito” e fare clic su “Seleziona icona del sito”.
A questo punto apparirà la libreria multimediale di WordPress. È possibile selezionare un’immagine esistente o caricare una nuova favicon personalizzata dal proprio computer.
In questo esempio, utilizzeremo il logo di WPBeginner come icona del sito WordPress.
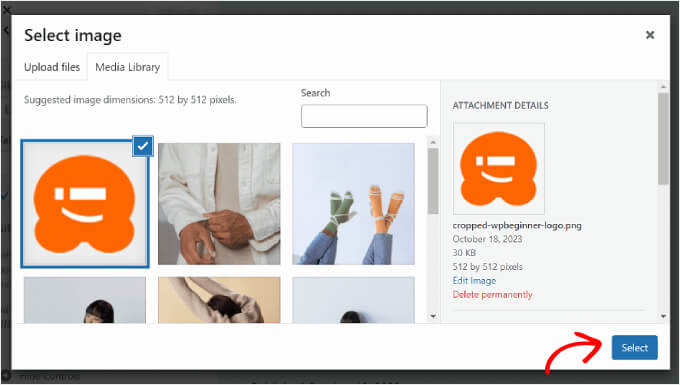
Dopo aver scelto un’immagine, fare clic sul pulsante “Seleziona” nell’angolo inferiore destro della finestra.
Se la favicon è più grande delle dimensioni consigliate, WordPress vi permetterà di ritagliarla. Se invece corrisponde esattamente alle dimensioni consigliate, potete lasciarla così com’è.
Una volta che l’immagine sembra buona, fare clic su “Ritaglia immagine”.
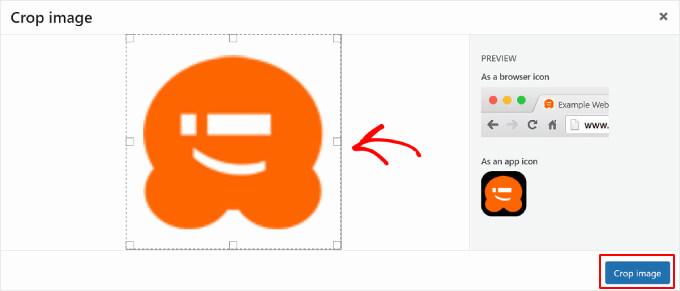
Dopodiché, verrete riportati al Customizer di WordPress. Qui, potete terminare la configurazione della favicon facendo clic sul pulsante “Pubblica” nella barra laterale sinistra.
Ecco fatto! Ora che avete caricato la favicon, potete visitare il vostro sito WordPress per vedere se l’immagine è già attiva.
Metodo 2: Aggiungere una favicon utilizzando l’editor completo del sito di WordPress
Se utilizzate un tema a blocchi e volete aggiungere il logo del vostro marchio sia come parte dell’intestazione del sito che come icona del sito, questo metodo fa al caso vostro.
A tal fine, è necessario andare su Aspetto ” Editor dal pannello di amministrazione di WordPress.
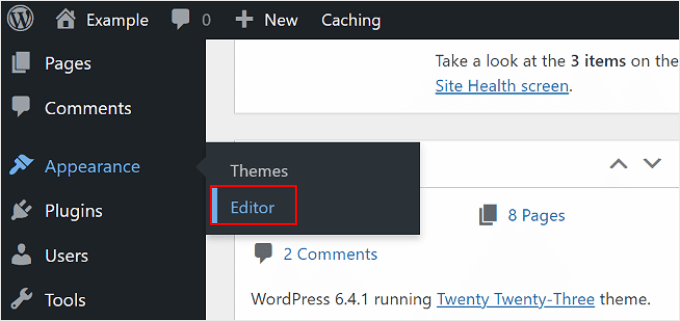
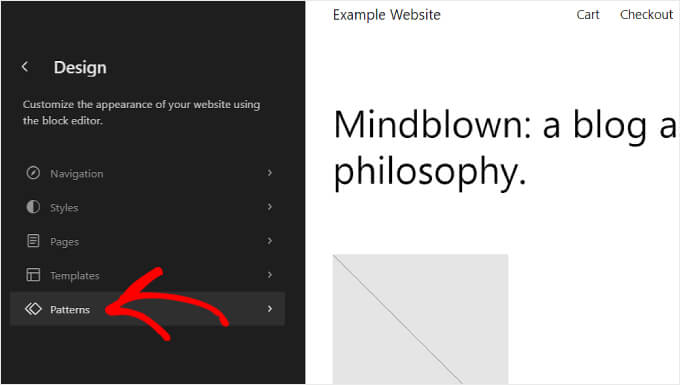
In questa pagina si trovano diversi menu per personalizzare il sito, tra cui “Navigazione” e “Stili”.
Per questa esercitazione, è necessario fare clic su “Modelli” per accedere al modello di blocco dell’intestazione del sito web.
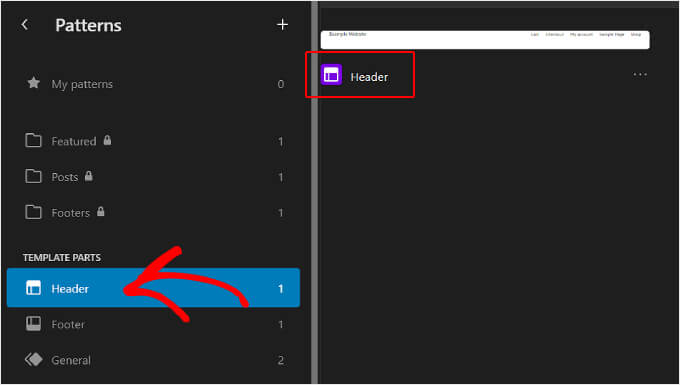
Scorrendo verso il basso, si vedranno diverse parti del modello:“Header“, “Footer” e “General”.
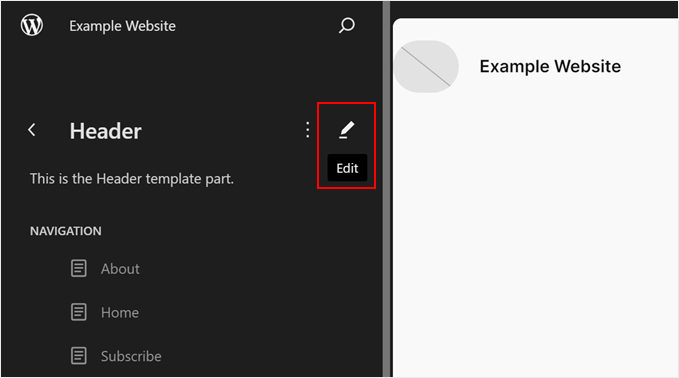
Basta fare clic sul modello “Intestazione” per aggiungere la favicon.
Successivamente, accanto al testo dell’intestazione, apparirà un pulsante a forma di matita.
Fate clic su di esso per modificare il modello e inserire la vostra favicon di WordPress.
Ora siete all’interno dell’esperienza di modifica completa di WordPress.
Da qui, è possibile fare clic sul pulsante “+” del blocco aggiuntivo e cercare il blocco “Logo del sito”. Qui si aggiungerà l’immagine che diventerà la favicon di WordPress.
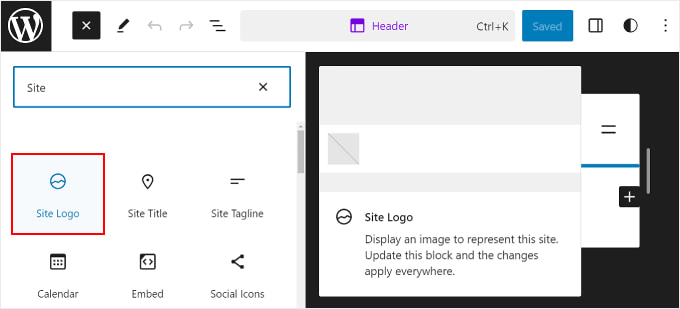
Trascinare e rilasciare il blocco nella posizione desiderata nell’intestazione. In questo esempio, lo abbiamo posizionato accanto al titolo del sito.
La prossima cosa da fare è cliccare sull’icona di caricamento nel blocco “Logo del sito”.
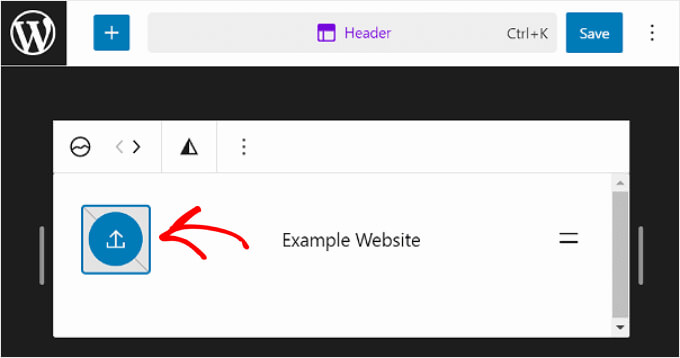
Come per il metodo precedente, è possibile scegliere un’immagine esistente o caricarne una nuova dalla libreria multimediale di WordPress.
Dopodiché, è necessario passare alla barra laterale delle impostazioni del blocco sul lato destro della pagina. Attivare l’impostazione “Usa come icona del sito” per aggiungere il logo come favicon.
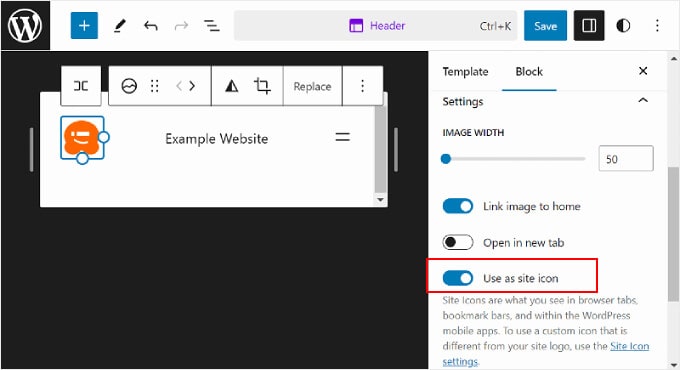
Infine, è possibile premere il pulsante “Salva” nell’angolo superiore destro della pagina per pubblicare la favicon.
Verrà visualizzato un avviso che indica che la modifica interesserà l’intero sito web. Assicuratevi che la casella “Icona” sia selezionata e fate di nuovo clic su “Salva”.
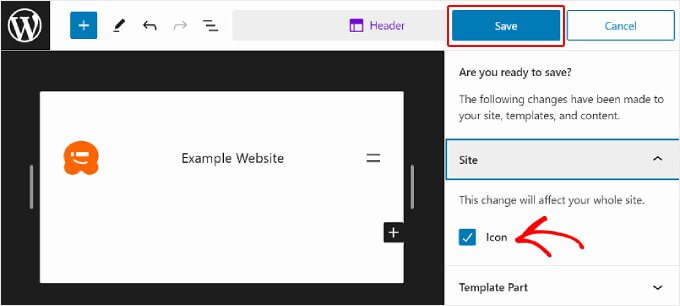
Dopo aver eseguito tutti i passaggi, è possibile aprire il sito web per confermare che la modifica è avvenuta con successo.
Metodo 3: Aggiungere una favicon utilizzando un plugin per le favicon di WordPress
Se preferite utilizzare un plugin per le favicon di WordPress, potete seguire questo metodo per utilizzare il plugin gratuito Favicon by RealFaviconGenerator.
Per prima cosa, è necessario installare e attivare il plugin. Per maggiori dettagli, potete seguire la nostra guida su come installare un plugin di WordPress.
Una volta attivata, potete andare su Aspetto ” Favicon nella vostra dashboard di WordPress.
A questo punto, è sufficiente fare clic sul pulsante “Seleziona dalla libreria multimediale” per caricare una nuova immagine o utilizzarne una esistente.
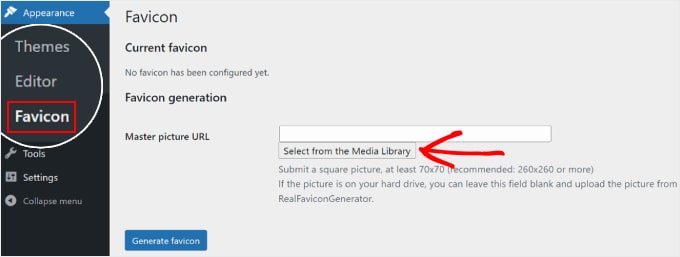
Si noti che è necessario utilizzare un’immagine quadrata. Il plugin raccomanda che le dimensioni dell’icona del sito siano di almeno 260 pixel sia in larghezza che in altezza, ma non inferiori a 70 pixel.
Una volta scelta l’immagine, premere il pulsante “Genera favicon”.
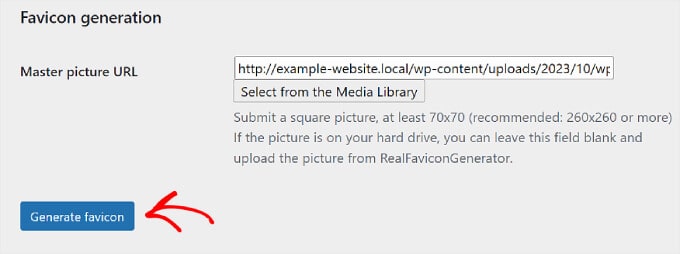
Successivamente, il plugin vi condurrà al sito web RealFaviconGenerator per modificare la favicon.
È possibile personalizzare varie impostazioni, come il colore dello sfondo e l’aspetto delle pagine dei risultati di ricerca di Google (SERP), iOS, Android, macOS Safari, Chrome e Windows Metro.
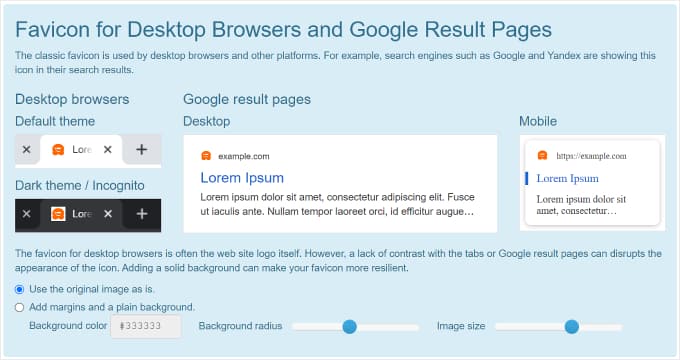
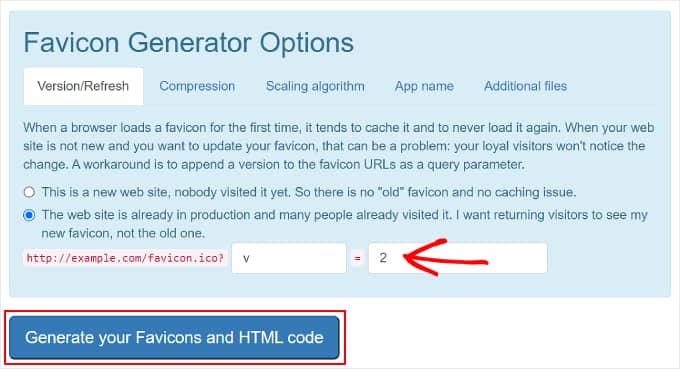
Nella sezione “Opzioni del generatore di favicon”, è possibile selezionare la casella per verificare se il proprio sito web ha già utilizzato una favicon in precedenza. In caso affermativo, è sufficiente inserire un numero nel secondo campo per indicare la versione della favicon in uso.
In questo modo, gli utenti che hanno già visitato il vostro sito vedranno la nuova favicon invece di quella vecchia.
Una volta che tutto sembra a posto, non resta che fare clic sul pulsante “Genera le tue favicon e il codice HTML” per aggiungere la favicon al vostro sito WordPress.
Ora la favicon dovrebbe essere attiva. Assicuratevi di mantenere attivo il plugin WordPress favicon, in modo che la favicon sia sempre abilitata.
Metodo 4: Aggiungere manualmente una favicon al vostro blog WordPress
Infine, potete aggiungere una favicon di WordPress al vostro blog modificando manualmente i file di codice del vostro tema.
Questo è utile se il Theme Customizer non ha la sezione “Site Identity” o se si utilizza un tema a blocchi e si desidera un’immagine favicon diversa dal logo del sito.
Il modo più semplice e sicuro per modificare i file di codice del tema è il plugin WPCode.
WPCode è il miglior plugin per gli snippet di codice per i principianti. Con oltre 1700 snippet già pronti e una gestione sicura degli errori, consente di inserire in modo sicuro codice personalizzato senza interrompere il sito web.

Un’altra cosa fantastica di WPCode è che se si aggiorna il tema, non si perdono le modifiche al codice, compresa la favicon.
Per questa guida è possibile utilizzare la versione gratuita di WPCode. Tuttavia, con l’abbonamento Pro, si ha accesso a funzioni come la logica condizionale intelligente e le integrazioni di terze parti per gestire il codice in modo più efficiente.
Per iniziare, è necessario installare e attivare WPCode. Per maggiori informazioni, potete consultare la nostra guida passo-passo su come installare un plugin di WordPress.
La cosa successiva da fare è preparare i file favicon. A tale scopo, potete utilizzare un generatore di favicon gratuito come Favicon.io.
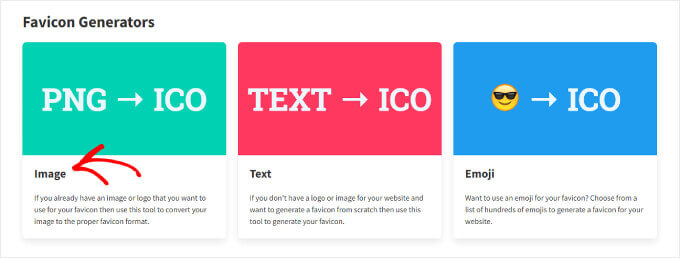
Sul sito web, è possibile fare clic su “Immagine” per convertire un file immagine in un file zip e in un codice HTML. In alternativa, è possibile utilizzare l’opzione “Emoji” o “Testo” per creare una favicon utilizzando le emoji e i font disponibili.
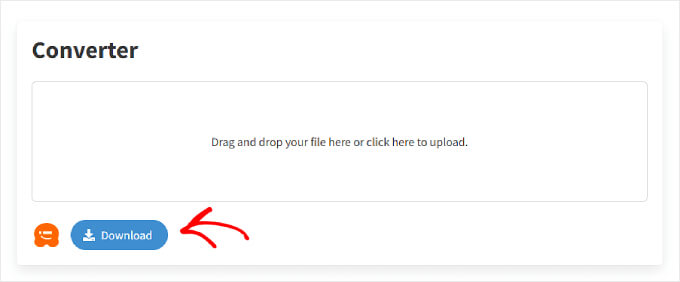
Nella pagina successiva, è possibile caricare l’immagine. Quindi, fare clic su “Download” per salvare il file zip della favicon, che contiene i file favicon.png e favicon.ico.
Assicuratevi di tenere aperta questa pagina web durante le fasi successive.
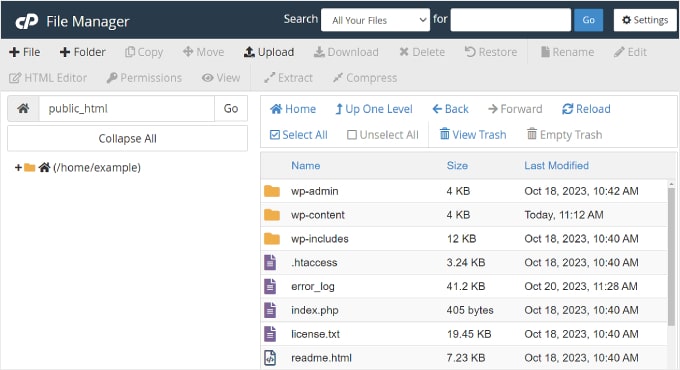
Ora è necessario caricare il file zip della favicon nella directory principale del sito. Per farlo, potete utilizzare il file manager del vostro hosting WordPress.
In alternativa, potete farlo tramite un client FTP come FileZilla. Per maggiori dettagli, consultate la nostra guida per principianti su come usare FTP per caricare file su WordPress.
Una volta aperti i file del sito web tramite il file manager o l’FTP, navigare nella directory principale.
La directory principale di WordPress è solitamente una cartella denominata “public” o “public_html” e contiene cartelle essenziali di WordPress come wp-content e wp-admin.
A questo punto, è possibile estrarre e caricare tutti i contenuti dei file favicon scaricati in precedenza nella directory principale.
Se si utilizza File Manager, è possibile fare clic sul pulsante “Carica” vicino alla parte superiore.

Apparirà quindi una nuova scheda che chiederà di caricare i file.
In questa pagina è possibile fare clic sul pulsante “Seleziona file” e scegliere tutti i file favicon.
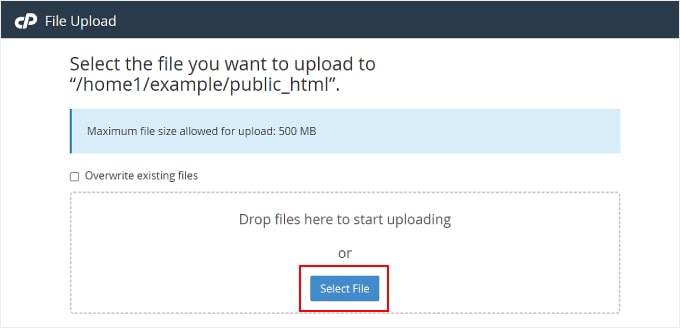
A questo punto, è sufficiente attendere che i file vengano caricati con successo.
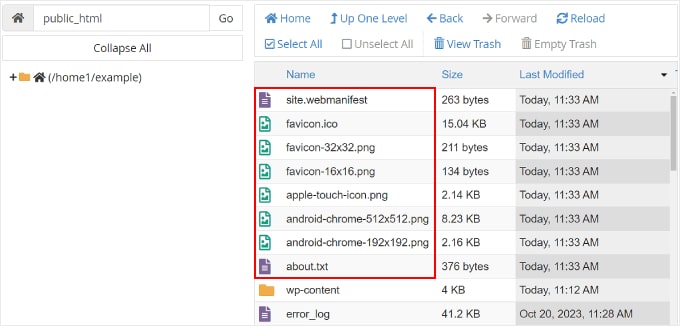
Una volta fatto, si può tornare alla scheda Gestione file. Dovreste ora vedere tutti i vostri file favicon nella directory principale, come nella schermata qui sotto:
Ora torniamo al pannello di amministrazione di WordPress.
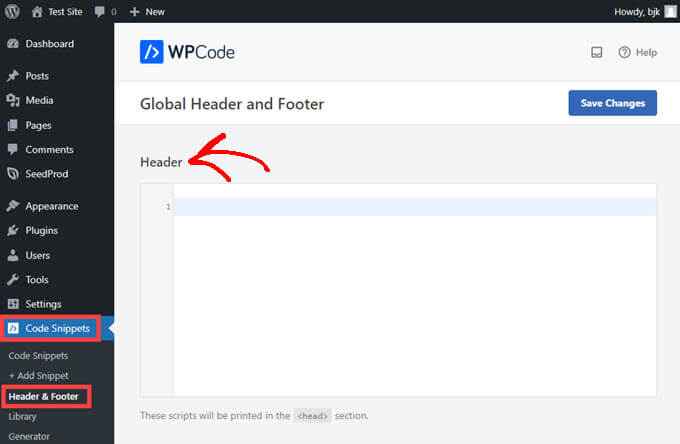
Nella barra laterale sinistra, si dovrà navigare su Code Snippets ” Header & Footer.
Dopodiché, tornate alla scheda Favicon.io di prima.
Quindi, è necessario copiare il codice HTML da lì. Il codice dovrebbe contenere 4 tag rel di collegamento .
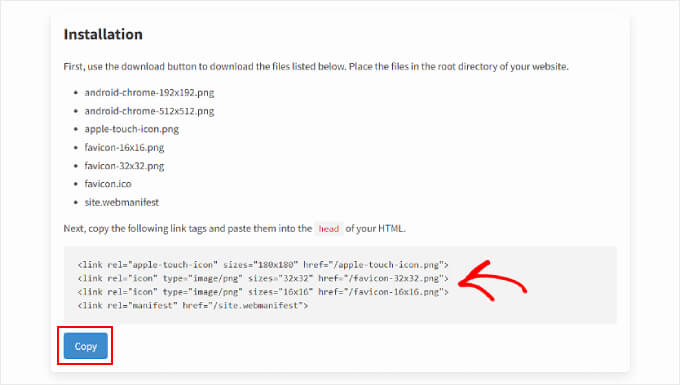
Successivamente, è necessario tornare a WordPress e incollare il codice nella sezione “Header” della pagina WPCode. Questo aggiungerà il codice al file header.php del vostro sito web.
Nel codice, inserire l’URL completo del sito web tra virgolette accanto a tutti gli attributi href, come nell’esempio seguente. Ricordarsi di aggiungere http:// o https:// se il sito utilizza un certificato SSL.
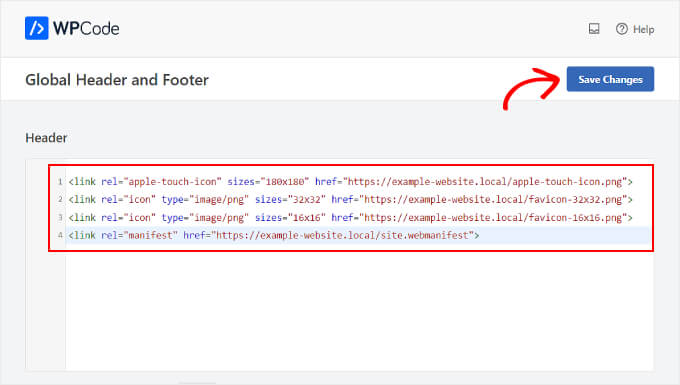
Infine, è possibile fare clic sul pulsante “Salva modifiche” nell’angolo in alto a destra.
E questo è quanto! Non dimenticate di visitare il vostro sito web per verificare se la modifica della favicon ha avuto successo.
Perché la mia favicon di WordPress non viene visualizzata?
Un motivo per cui la favicon di WordPress potrebbe non essere visualizzata è dovuto alla cache del browser. Ciò significa che il browser sta ancora visualizzando la vecchia versione del sito.
Per risolvere questo problema, è necessario cancellare la cache del browser. Se avete bisogno di aiuto, potete seguire la nostra guida su come cancellare la cache del browser.
È anche possibile che si utilizzi un servizio CDN che memorizza ancora la vecchia versione del sito. In questo caso, è necessario eliminare la cache del CDN per aggiornare i contenuti del sito.
Per verificare se l’icona del vostro sito WordPress è stata caricata, potete aprire il vostro sito web in modalità incognito o in una finestra di navigazione privata.
Se l’installazione della favicon non è andata a buon fine, si può provare a ricaricare l’immagine con un nome di file diverso per risolvere il problema.
Anche la funzione icona del vostro sito WordPress potrebbe non funzionare a causa di un errore di contenuto misto. Per risolvere questo problema, consultate la nostra guida su come risolvere gli errori di contenuto misto di WordPress.
In alcuni casi, potreste anche scoprire che il vostro sito web visualizza la favicon del vostro provider di hosting anziché la vostra. In questo caso, contattare il team di assistenza può aiutare a risolvere il problema.
Vi consigliamo di scegliere un servizio di hosting WordPress affidabile e con un’eccellente assistenza clienti per risolvere efficacemente problemi come questo. Potete consultare il nostro elenco dei migliori provider di hosting WordPress per trovare l’opzione migliore per il vostro sito web.
Infine, potreste voler verificare se il vostro tema WordPress ha uno strumento specifico per caricare una favicon. Questo può spiegare perché i metodi di cui sopra non funzionano.
Speriamo che questo articolo vi abbia aiutato ad aggiungere una favicon al vostro sito WordPress. Potreste anche voler consultare le nostre scelte degli esperti sui migliori creatori di loghi gratuiti per aiutarvi ad avere un aspetto da professionisti e la nostra guida su come aggiungere facilmente font di icone al vostro tema WordPress.
Se questo articolo vi è piaciuto, iscrivetevi al nostro canale YouTube per le esercitazioni video su WordPress. Potete trovarci anche su Twitter e Facebook.


Jason
Why does it need to be 512 pixels for an icon? I’m hoping it’s converted somewhere inside WordPress, once and done, and not on every load. 512×512 is crazy for something that would very rarely be bigger than 32X32, unless I am missing something?
John Krawczyk
Article not useful. Everyone tells you to make a path to your favicon & that’s it.
However do you include http: www http do you specify .ico .png?
Nobody says anything in detail.
WPBeginner Support
Hi John,
Yes you need to include full URL like this:
https://www.wpbeginner.com/favicon.pngAdmin
Joe
Using WP4.7 and the Site Icon functionality works, but it just seems off to me. The result is 4 links in the section:
But it creates 10 different versions of the site icon image in addition to the original at sizes of 32×32, 100×100, 150×150, 180×180, 192×192, 250×250, 270×270, 300×300, 360×360, 500×310.
Why so many cropped images if only 4 linked to?
Also, I submit an icon image sized 512×512 as recommended, but the 500×310 version is always cropped so the top and bottom of the icon is cut off. Is there any way around this and/or is it a big deal?
What browser support does this WP Site Icon cover (mostly in respect to how far back in IE)?
Thanks!
Marieke
In Whatsapp, the image which appears left to a link address if you send a link: is that the same icon? Because I don’t see it there.
Sunil
Marieke, It’s featured image, you upload to a particular post.
Cos
The ICO Format plugin for Adobe Photoshop does not allow images more than 256 pixels high or wide. So how do you create one that’s 512px???
Marieke
It doesn’t need to be made an .ico. Just a plain .png or .lpg will do when you work in WordPress.
Salim Ahmed
Informative instruction. Now i following your tips and tricks. Thanks for sharing it.
Taimoor Ahmed
Kindly tell me any website or a software from where I can make an effective favicon for my site in a quick time????
Kirstie
Thank you for another simple to follow tutorial. I’m a true beginner and y’all do a great job explaining things in a way I can understand.
WPBeginner Support
Thanks, glad you find our tutorials helpful.
Admin
Nelson
thanks good tut easy and works
c
the add logo in some themes isn’t for favicon its for the header logo
ccstacyline
how come my side identity menu doesn’t have the service for site icon? I am so frustrated… can you help ?
John Davis Frain
Are the instructions you give here theme-specific? I’m using the Delicacy theme, and it doesn’t give me that option to alter Site Identity and insert a Favicon.
WPBeginner Support
No it is not theme specific. Make sure you are using the latest version of your theme.
Admin
Mad Dog Malcs
Hi There, I also don’t see the site identity tab, I am using the sketch theme, how do I update a theme?
Thanks in advance, Malcs
shashi
i may go to theme custimztion..there u see the option of uploading the favicon icon easliy…
Antonios
You might not see the word “favicon” probably site icon. If you see a scrow bar you might have to scrow all the way down to see the select image box.
a
You can add favicon by WordPress’ “Costumize” editor, which can be found in every wordpress site.
Alan
I upload a PNG file that is exactly 512×512 pixels, WordPress saves it, and then I end up with a cropped image in my media library. Super annoying! WordPress 4.4.
Alan
I should add that the new, cropped image is exactly the same dimensions as the original I uploaded, but now I have two in my library (albeit one has been processed twice, and has actually increased two kilobytes in file size!).
Katherine Johnston
I have gone through the directory, exactly as you described, but my Site Identity tab only has “Site Title”, “Tagline”, and a checkbox for displaying header text. How can I fix that? Or do I have to go the FTP route?
Thanks for the help!
Rahul Thakur
thank you so much, very simple way love it.
Liz
Excellent instructions, took me about 32 seconds to do it. Fabulous! Thank you
Erin
Thanks! This was very helpful.
Marie Bock
Wow! That was so easy with the newer version of WordPress.
Matt
Super-easy! Thanks for that – I just need to go away and design a better logo now
Viscoun
Doesn’t work. When I got to Customize > Site Identity, the site icon option doesn’t show up – it only says “Site Title” and “Tagline”.
david
what version of wordpress are you using?
Harshpreet
Hi same is the problem I am facing and I am using the website of wordpress on my laptop for building up my blog!
Gina
I’m having the same problem. I’m using wordpress directly online, I haven’t downloaded anything. No “site icon” option at all.
WPBeginner Support
Please see our guide on the difference between self hosted WordPress.org vs free WordPress.com blog.
Admin
Lourika
It took me forever to figure it out!!!!
In the top left corner, click on MY SITES
Go to WP Admin
Then click on SETTINGS
and you will be able to change the icon (picture) on the right hand side……
Megan
Yay! It worked perfectly and the instructions were super easy to follow. Thank you so much!
Malcolm Ruthven
I added a 512×512 pixel jog image via Site Identity / Site Icon. The image appears just fine there. But the image does not appear as a favicon in any browser (Firefox, IE, or Chrome).
Shawna Marie
I’ve done all the steps. The image shoes in the customiser but not on the site on any platform…iphone or on my iMac in any of the browsers. Is there a specific file type?
WPBeginner Support
Site icon feature supports PNG, JPEG, and GIF image files.
Admin
Mike Crutcher
This doesn’t work on my site. I’ve got the icon the correct size, but it’s not showing up. Perhaps it’s because of my custom URL?
Maria
Is this option to alter Site Identity and add the Favicon theme-specific? I don’t have that in my self-hosted site.
Dave
Thanks! Worked great.
Arsh
Thank you !
Nikki
I am so glad to have stumbled upon your article. I had quit trying to figure out how to upload my favicon in the past because it felt impossible. But recently, I felt the need to take another stab at it. You made it so easy! I can’t recall it being this easy to upload before.
Thank you!
Nikki
Ruby Dawnbrooke
Hello!
I have a question, recently, I’ve used the plugin All in One Favicon. I uploaded my picture but it doesn’t show up if I’m not logged into WordPress, it just keeps on showing the HostGator favicon (regular), can anyone help?
bg
Here’s a stupid question: Why do they make it so complicated? This should be something that you can do in a couple clicks, like adding an image to a blog post.
WPBeginner Support
Actually, there is a feature currently in testing which will allow users to add favicon from theme customizer.
Admin
dzaken
thankyou so much, easer way to make it. love it
Bert Rinkel
I have a logo which I want to use. Is that possible? It is not in a square format at this point, but can be. How do I do that? Can I “create” one in iPhoto (on a Mac)? Where would I do that in iPhoto, and how? I have one on my dashboard now. Can I drag that somewhere? How do I save it as a PNG file? Where do I do that?
This is a nice general site to understand what a favicon is, but not on how to do it.
Mike
Hi Bert, I’m still feeling my way around this process myself but I am ok up to the point you are trying to reach. Creating your own or editing an existing logo to make it fit can be done in a program like Photoshop. Remember to go to New file, and set the size to 16×16 pixels. Import your image to this and reduce it to fit. If you don’t have Photoshop or any other image editing software you can go to where the instructions are easy to follow. I’m sure it doesn’t necessarily have to be a PNG file. But it does have to be an .icon which the Favicon site will convert for you from the original .jpeg you uploaded. Because I have Photoshop when I clicked on the Edit button in iPhoto it automatically opened Photoshop. See what it does when you do it on your system. It may open an alternative editing method. Hope that helps. I know what it’s like as a beginner.
chukwubueze
Thanks man.. your site has been useful to me and also your videos on youtube. am still working on my site.. you can have a look.
vinayak
Can i add Meta description and meta keyword for my site using this plugin.
4ryan
what is this apple touch icon???
4ryan
thanks this is what i am looking for, but how can i add site logo. wordpress.com has option to add site logo but i cannot find it in self hosted wordpress cms
ConnieKirkpatrick
Thank you, this kept it simple and gives me a way to use this. Now, question: This will show a favicon for every page correct? What if I want a different one for each page?
Apoorva
I managed to add the favicon without the background image. But when I move to another tab on the browser, the background image shows up. For example- if you look up the favicon is perfect. But, when you are on another tab, you will the white background show up. Any advice would be highly appreciated! Thank you!
mohammad raheem
Simply add this line in your header.php at any where before tag.
and upload favicon.ico to root folder of your website. Root folder where your wp installed, do not upload favicon.ico to sub folders. Refresh your browser one or two times your ico will appear on tab.
Daniel Lobo
This definitley fixed the problem, and changed the favicon on all pages, EXCEPT the home page! Why could that be?? Help please! And thank you!
Manuel Echeverry
great! I will do it
joe
dis noob didnt use the transparency
Emma Lock
Thank you so much for making this so easy to follow!
Monu Saifi
Thanks for give the tops to add favicon icon on my blog.
Thanks again
Richard
Is there a way to install the all in one favicon plugin via my /wp-admin/ page via my browser? I’ve built everything straight through the browser, no ftp at all.
shashi
i may go to theme custimztion..there u see the option of uploading the favicon icon easliy…
Lluisrd
Great¡¡¡, Just editing only one line of (header.php) I have a favicon.
But I prefer 128×128 favicons…. like Google
TNXS
Kayode
Thanks so much… I tried the insert header and footer but it didn’t work but when I tried the “All in one Favicon”, it worked.. Thanks a lot..
Joel Mwakasege
Wow thank you, this one was a life savior. My blog was just on default to WordPress Icon.
Rahul
What,s the difference?
I mean why to mess with FTP,if a simple plugin is available and serving the same purpose?
Editorial Staff
Because the task is so simple, it can be by avoiding a plugin. But again personal preference.
Admin
Kelvin Hanratty
Is there any reason why is HAS to be 16×16, because high resolution or, dare I say it, “Retina” screens are at a higher pixel density?
The reason I mention it, as I’ve used a site to convert a picture into a favicon and it gave me multiple sizes as options: 16, 32, 64 pixels. Does WordPress not cater for this?
Excuse my ignorance, I’m pretty new to WordPress!
Kelvin.
Kelvin Hanratty
Sorry, misread the post below about bluehost. Oops!
Praveen Prasad
Without uploading Plugins one can simply apply a Favicon to a Site.
Simple Steps :-
1) Hosting CPanel —> File Manager –>
2) Search for the default image in the Theme folder.
Ex- genesis/images/ favicon.ico
Upload your .ico file to the same folder and remember the name of the default file.
(here favicon.ico)
I don’t think that remembering a simple filename is annoying.
Then delete this file and rename the new image file with the previous file name.
It Works
David
Yes, this how I did that in bluehost. I’ve just overwrite the favicon.ico that was there with my image uploaded. The only thing is that the original was set at 16×16 and I had to add a similar 16×16. It didn’t take a 32×32 though but it’s fine, it worked easily.