Noi di WPBeginner utilizziamo il grande e veloce CDN di Cloudflare per rendere il nostro sito più veloce per gli utenti di tutto il mondo. Questo ci ha aiutato a migliorare significativamente le prestazioni di WordPress, ed è per questo che raccomandiamo spesso Cloudflare ai nostri lettori.
Cloudflare è uno dei migliori servizi CDN per WordPress disponibili sul mercato. Offre un CDN gratuito che velocizza il vostro sito web e potenti caratteristiche di sicurezza per i siti web delle piccole imprese.
Tuttavia, il processo di configurazione iniziale di Cloudflare può essere difficile per i nuovi utenti.
In questa guida vi illustreremo una configurazione completa di Cloudflare in WordPress per aiutarvi a migliorare la velocità del vostro sito web.
Che cos’è una CDN?
Un CDN o content delivery network è un sistema di server distribuiti che aiuta a consegnare più velocemente i file del vostro sito web agli utenti in base alla loro posizione.
In genere, un servizio di web hosting serve i visitatori del vostro sito web da un’unica postazione. Tutti gli utenti accedono allo stesso server, indipendentemente dalla loro ubicazione.
Questo può causare un ritardo nella consegna dei contenuti per gli utenti che vivono più lontano dal server centrale di hosting del vostro sito web.
È per questo che le CDN installano più server periferici in diverse località del mondo.
Questi server CDN salvano copie di contenuti statici dal server di origine del vostro sito web e li presentano agli utenti quando visitano il vostro sito web WordPress.
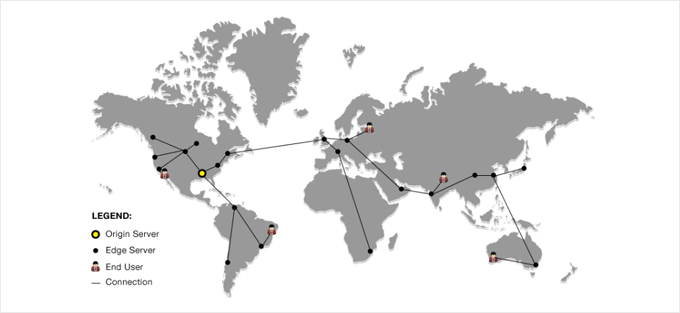
Quando c’è una richiesta da parte dell’utente, il server CDN più vicino alla posizione dell’utente la gestirà.
Ad esempio, se qualcuno negli Stati Uniti vuole accedere a un sito web ospitato nel Regno Unito, sarà un server CDN negli Stati Uniti a servire la richiesta, non il server principale nel Regno Unito.
Con una CDN, tutte le richieste degli utenti vengono gestite dai server CDN più vicini. In questo modo si riduce la distanza fisica tra i visitatori e il server del vostro sito web.
Di conseguenza, una CDN migliora le prestazioni e la velocità del vostro sito web per tutti gli utenti, indipendentemente dalla loro posizione geografica.
Un sito web più veloce migliora anche l’esperienza dell’utente e può dare al vostro sito una leggera spinta nelle classifiche SEO. L’utilizzo di un CDN riduce inoltre il carico sul vostro server primario e lo protegge da eventuali crash durante i picchi di traffico.
Se volete saperne di più, consultate la nostra guida sul perché avete bisogno di un CDN per il vostro blog WordPress.
Che cos’è la CDN di Cloudflare?

Cloudflare è uno dei provider CDN gratuiti più popolari su Internet. Si tratta di un’ampia rete di server distribuiti a livello globale che memorizza automaticamente nella cache i contenuti statici e fornisce rapidamente quelli dinamici.
In alto, oltre a un servizio CDN, Cloudflare è anche un firewall per siti web basato sul cloud e un server proxy distribuito. Ciò significa che monitora tutto il traffico in entrata al vostro sito web e blocca il traffico sospetto ancor prima che raggiunga il vostro server.
Offre un piano base gratuito adatto a siti web e blog di piccole imprese e piani a pagamento a partire da 20 dollari al mese.
Cloudflare è una scelta eccellente per le piccole imprese che cercano un CDN gratuito. Tuttavia, se si desidera utilizzare appieno tutte le funzionalità di Cloudflare, è necessario il piano Business, che costa 200 dollari al mese.

Correlato: Pubblicate il nostro post sul perché WPBeginner è passato da Sucuri a Cloudflare.
Detto questo, vediamo come configurare Cloudflare Free CDN in WordPress. Potete usare i link rapidi qui sotto per passare alle diverse parti del tutorial:
Impostazione dell’account Cloudflare
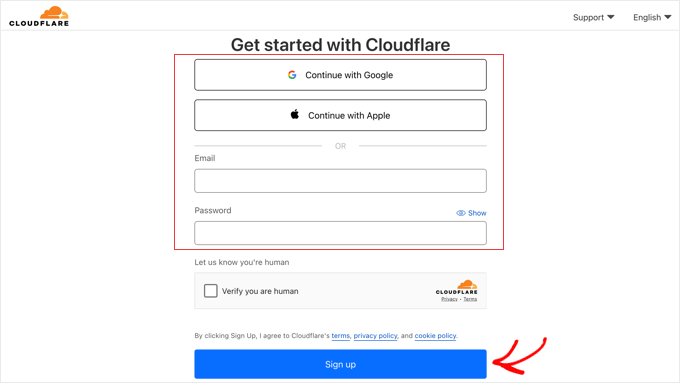
Per iniziare, è necessario visitare il sito web di Cloudflare e fare clic sul pulsante “Inizia gratuitamente”.

Nella pagina successiva, è necessario inserire l’indirizzo email e la password per creare un account Cloudflare. In alternativa, è possibile registrarsi utilizzando le credenziali di Google o Apple.
È sufficiente inserire le informazioni richieste e cliccare sul pulsante “Iscriviti”.
Una volta terminata la registrazione, è possibile collegare il proprio sito per iniziare a inviare il traffico web attraverso Cloudflare. È sufficiente inserire il proprio sito web nel campo “Inserisci un dominio esistente”.
Assicuratevi di digitare solo il nome di dominio del vostro sito, ad esempio example.com. Non è necessario digitare l’URL completo o altri caratteri aggiuntivi.
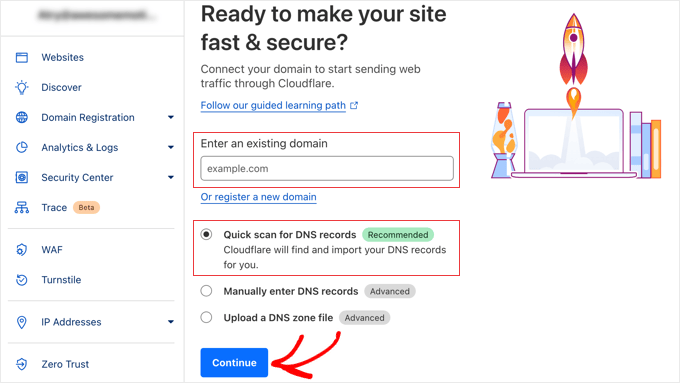
Assicuratevi che sia selezionata l’opzione “Scansione rapida dei record DNS” e fate clic sul pulsante “Continua”.
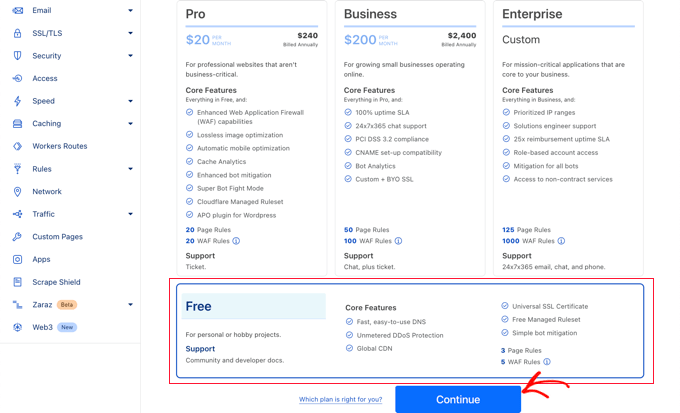
Nella schermata successiva, vi verrà chiesto di scegliere il tipo di piano Cloudflare che desiderate. Per questa esercitazione, sceglieremo il piano Cloudflare gratuito. Quindi, fare clic sul pulsante “Continua”.
Successivamente, Cloudflare mostrerà un elenco di tutti i record DNS trovati dai suoi sistemi. Questi includono anche i vostri sottodomini.
I record DNS che si desidera far passare attraverso Cloudflare dovrebbero avere un’icona a forma di nuvola arancione, mentre i record DNS che bypasseranno Cloudflare avranno un’icona a forma di nuvola grigia.
È necessario rivedere l’elenco per assicurarsi che il dominio primario sia attivo su Cloudflare con l’icona della nuvola arancione. È sufficiente fare clic sulla levetta “Stato del proxy” per modificare lo stato.
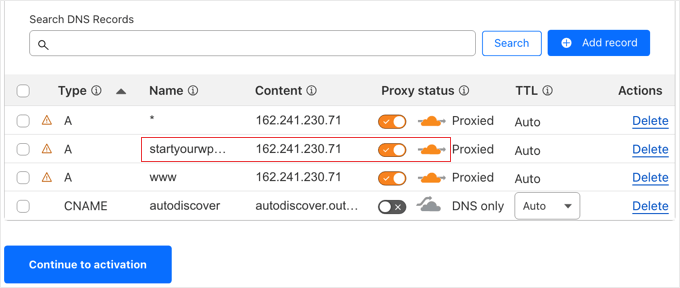
Una volta verificati i record DNS, basta cliccare sul pulsante “Continua l’attivazione”.
Durante la fase successiva della configurazione, Cloudflare chiederà di aggiornare i server dei nomi. Vi verrà chiesto di cambiare i vostri server dei nomi con quelli nuovi assegnati da Cloudflare.
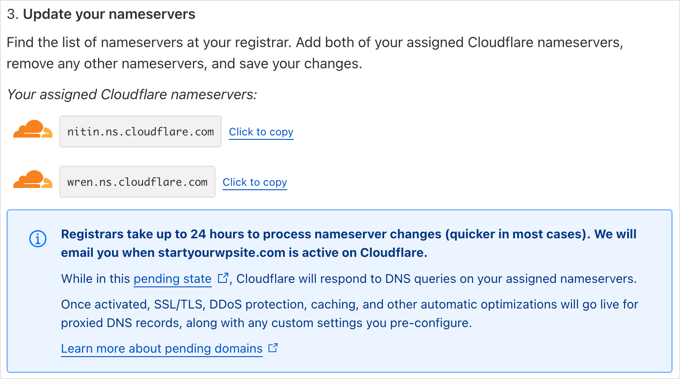
Nota: la modifica dei server dei nomi può richiedere un certo tempo per propagarsi su Internet. Durante questo periodo, il vostro sito web potrebbe diventare inaccessibile per alcuni utenti.
È possibile cambiare i server dei nomi dall’account della società di registrazione del dominio, come Domain.com.
Oppure, se avete ottenuto un dominio gratuito dal vostro fornitore di hosting, dovrete modificare i server dei nomi accedendo al vostro account di hosting.
Per questo tutorial, vi mostreremo come cambiare i nameserver dal pannello di controllo di Bluehost.
Sebbene il processo sia simile per tutte le società di hosting, potete sempre chiedere al vostro provider di hosting istruzioni dettagliate per il suo pannello di controllo.
Una volta effettuato l’accesso alla dashboard di Bluehost, accedere alla sezione “Domini” e fare clic sul pulsante “Impostazioni” accanto al nome del dominio.

Successivamente, è necessario scorrere fino alla sezione Impostazioni avanzate ed espanderla facendo clic sulla freccia a destra dello schermo. Questo mostrerà le impostazioni DNS del vostro sito web, compresi i server dei nomi.
Accanto a ‘Nameservers (DNS)’, si deve fare clic sul pulsante ‘Gestisci’.
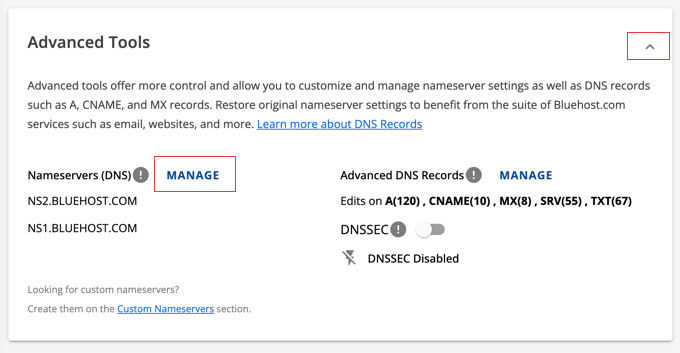
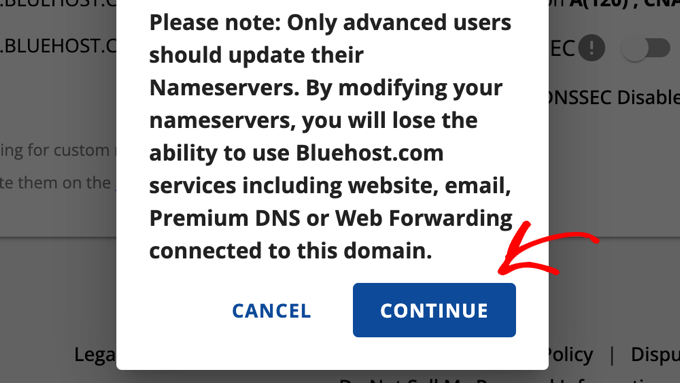
Verrà visualizzato un avviso che indica che solo gli utenti avanzati devono aggiornare i loro server dei nomi.
È necessario fare clic sul pulsante “Continua” per confermarlo e passare alla fase successiva.
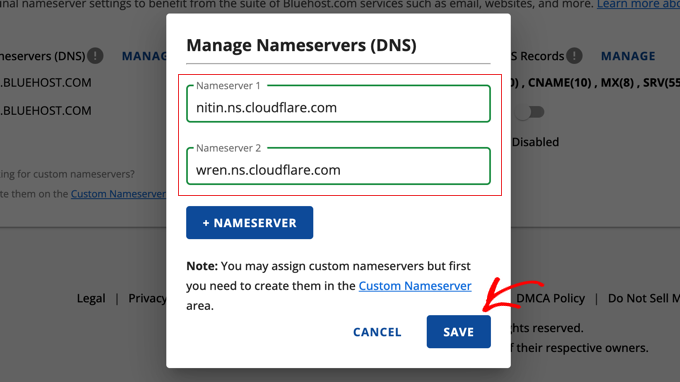
Successivamente, è necessario inserire i nameserver forniti da Cloudflare.
Quindi, fare clic sul pulsante “Salva”.
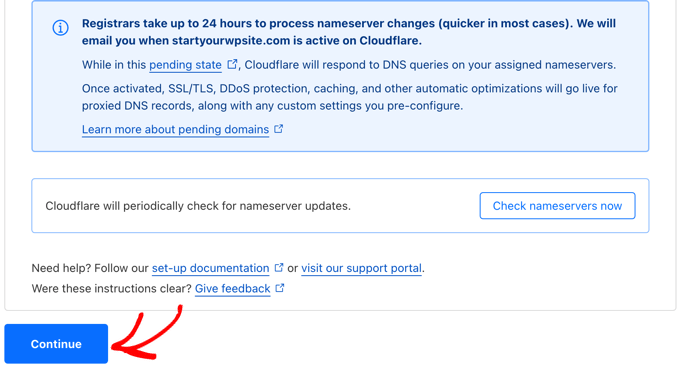
Dopodiché, è necessario tornare alla pagina di configurazione di Cloudflare e fare clic sul pulsante “Check nameservers now”. Cloudflare controllerà periodicamente i vostri server dei nomi e vi invierà un’email quando saranno attivati.
Nel frattempo, è possibile fare clic sul pulsante “Continua” per terminare la configurazione.
Ecco fatto! Ci vorranno alcuni minuti per aggiornare i server dei nomi del dominio e attivare Cloudflare.
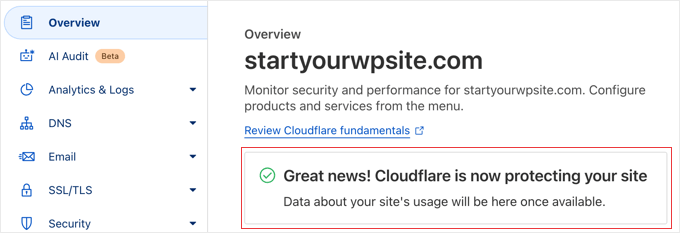
Una volta attivato, verrà visualizzato il messaggio di successo nella dashboard di Cloudflare.
Nota: le schermate sopra riportate mostrano il pannello di controllo di Bluehost. Le impostazioni del nameserver potrebbero essere diverse se si utilizza un altro provider di hosting.
Configurazione di un’impostazione importante di Cloudflare
Mentre Cloudflare sta proteggendo il vostro sito, dovete configurare un’impostazione importante mentre siete ancora sul sito web di Cloudflare. Una volta fatto questo, installerete il plugin Cloudflare sul vostro sito web WordPress per terminare il processo di configurazione.
Si consiglia di configurare Cloudflare con regole di pagina in modo che l’area di amministrazione di WordPress non passi attraverso di esso. In questo modo si evitano potenziali problemi di caching che possono influire sulla funzionalità dell’amministrazione.
Cloudflare consente di impostare tre regole di pagina gratuite. Se si desidera aggiungere altre regole di pagina, è necessario pagare 5 dollari al mese per 5 regole extra.
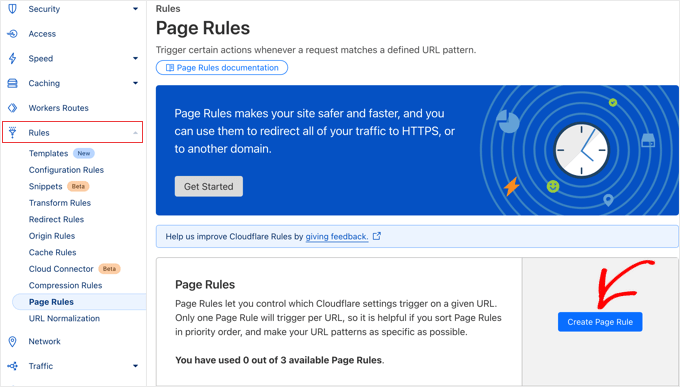
Innanzitutto, è necessario fare clic sull’opzione Regole ” Regole di pagina nel menu a sinistra della pagina. Dopodiché, si può fare clic sul pulsante “Crea regola pagina”.
Ora è necessario digitare le seguenti impostazioni nella regola. È possibile fare clic sul pulsante “+ Aggiungi un’impostazione” per aggiungere nuove disponi in righe per ulteriori impostazioni:
- URL della pagina: example.com/wp-admin*
- Livello di cache – Bypass
- Disattivare le prestazioni
- Disattivare le applicazioni
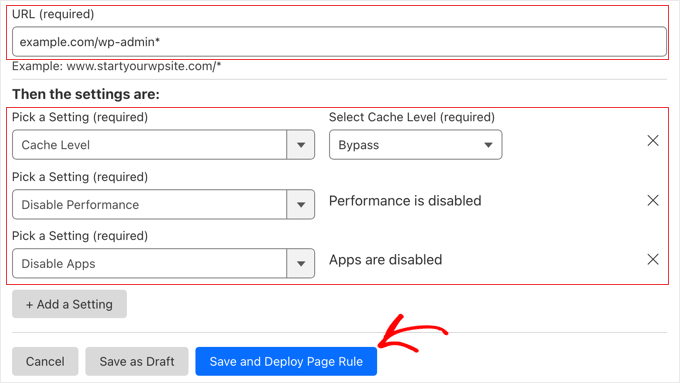
Al termine, fare clic su “Salva e distribuisci” per aggiungere la nuova regola.
Una volta fatto ciò, si completerà la configurazione di Cloudflare utilizzando il plugin ufficiale di Cloudflare per WordPress.
Ottimizzazione di Cloudflare per WordPress con un plugin
Cloudflare offre un plugin WordPress dedicato per le impostazioni ottimizzate per WordPress con un clic. Integra senza problemi le caratteristiche di Cloudflare con WordPress per fornire la migliore compatibilità e funzionalità.
Il plugin consente di configurare rapidamente Cloudflare sul vostro sito WordPress, aggiungere le regole del firewall delle applicazioni web (WAF), eliminare automaticamente la cache e altro ancora.
Per iniziare, installate e attivate il plugin Cloudflare sul vostro sito web. Per maggiori dettagli, consultate la nostra guida passo-passo su come installare un plugin di WordPress.
Nota: sebbene questo plugin non sia stato aggiornato da tempo, lo abbiamo testato e funziona ancora correttamente. Per ulteriori informazioni, consultate la nostra guida sulla sicurezza dell’uso di plugin WordPress non aggiornati.
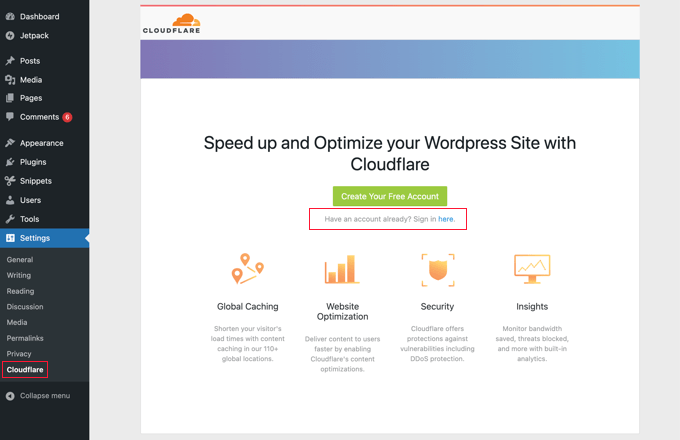
Una volta fatto, è necessario visitare Impostazioni ” Cloudflare nel pannello di amministrazione per configurare le impostazioni di Cloudflare.
Nella pagina delle impostazioni è presente un pulsante “Crea il tuo account gratuito” e un’opzione di accesso per gli account esistenti. È sufficiente fare clic sul link “Accedi qui”.
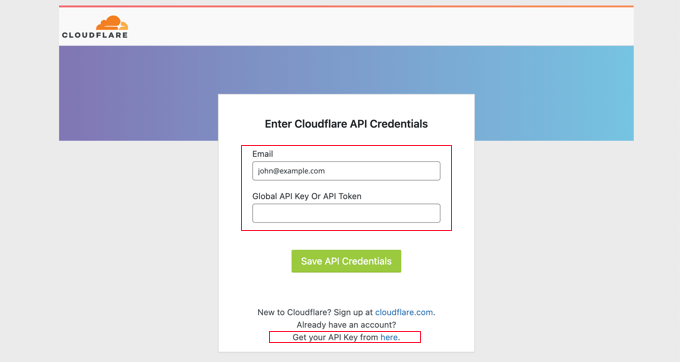
Nella schermata successiva, è necessario inserire l’e-mail e la chiave API di Cloudflare.
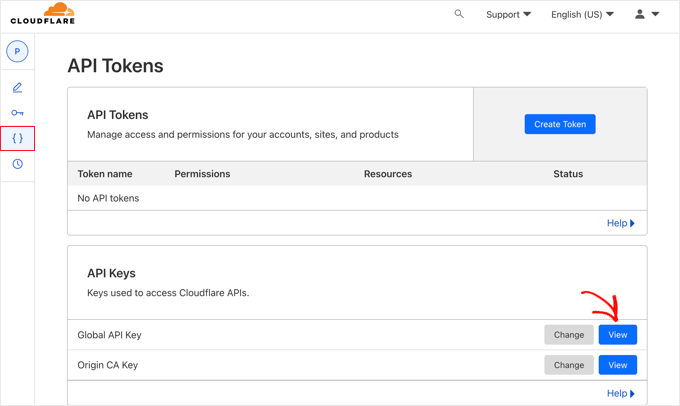
Fare clic sul link “Ottieni la tua chiave API da qui”.
Si aprirà un popup per l’area del vostro account sul sito web di Cloudflare.
Assicuratevi di essere nella pagina “Il mio profilo”, quindi fate clic sulla scheda “Token API” nella barra laterale sinistra.
Successivamente, andare alla sezione “Chiave API globale” e fare clic sul pulsante “Visualizza”.
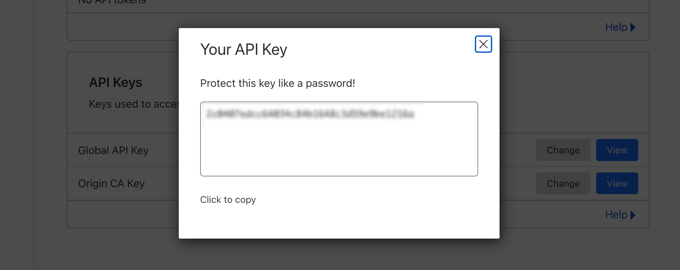
Si aprirà una finestra a comparsa che mostrerà la chiave API.
È sufficiente fare clic sulla chiave per copiarla.
Successivamente, è necessario tornare alla dashboard di WordPress e inserire l’indirizzo e-mail e la chiave API.
Quindi, fare clic sul pulsante “Salva credenziali API”.
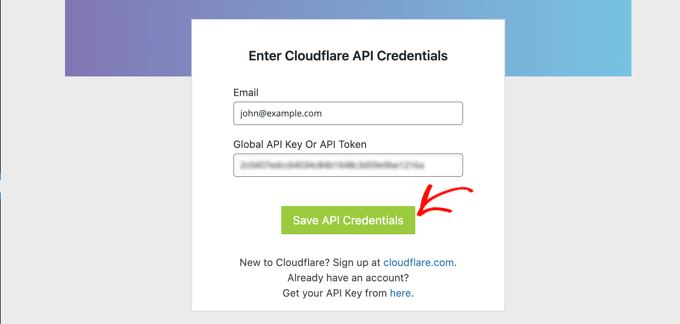
Dopodiché, le impostazioni di Cloudflare appariranno sul cruscotto.
Da qui è possibile applicare un’ottimizzazione di WordPress con un solo clic, eliminare la cache, attivare la cache automatica e altro ancora.
Per ottimizzare il vostro sito WordPress, cliccate sul pulsante “Applica” accanto a “Applica impostazioni predefinite”. In questo modo verranno eseguite alcune modifiche alla configurazione consigliate da Cloudflare per ottimizzare le prestazioni di WordPress.
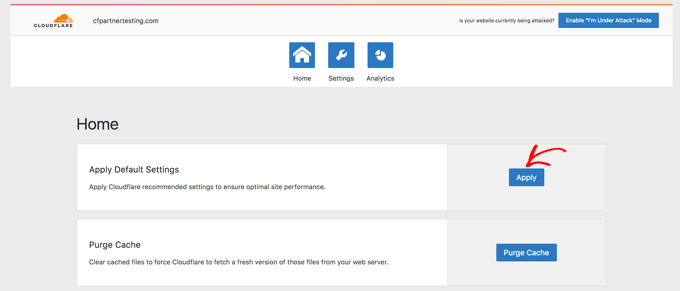
Quindi, fare clic sull’opzione di menu “Impostazioni”.
Qui si trovano altre impostazioni di ottimizzazione del sito.
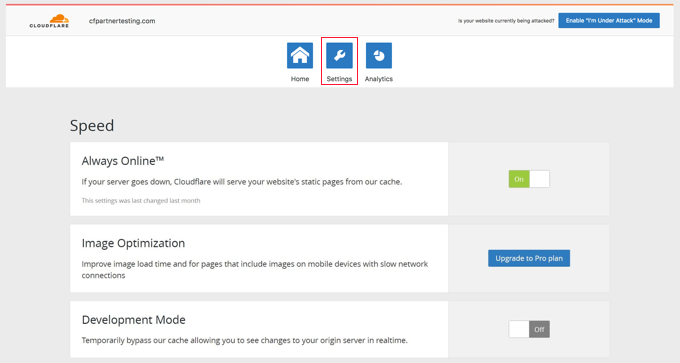
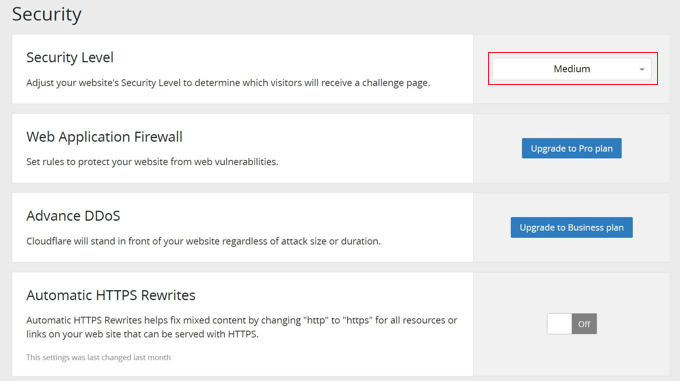
In questa schermata è possibile scorrere verso il basso per trovare la sezione “Sicurezza”.
Il livello di sicurezza predefinito è medio. Per migliorare la sicurezza del sito web, è possibile selezionare “Alto” dall’elenco a discesa.
E questo è quanto! Tutto-in-uno è finito.
Speriamo che questo articolo vi abbia aiutato a capire come impostare la CDN gratuita di Cloudflare in WordPress. Potreste anche voler consultare la nostra guida definitiva su come aumentare la velocità e le prestazioni di WordPress e la nostra scelta dei migliori plugin per la cache di WordPress.
Se questo articolo vi è piaciuto, iscrivetevi al nostro canale YouTube per le esercitazioni video su WordPress. Potete trovarci anche su Twitter e Facebook.


Nelson
My hosting provider connected my website over Cloudflare CDN.
But main problem is with website speed.
Speed with direct access 100% and when accessed via CDN 85%. How can it be fixed?
WPBeginner Support
It would depend on the reason why it says that the speed is lower, we would recommend taking a look at our guide below for understanding and using speed tests:
https://www.wpbeginner.com/beginners-guide/how-to-properly-run-a-website-speed-test-best-tools/
Admin
Andrew Hansen
My hosting plan through Host gator says it has cloudflare installed. Is that good, or should I uninstall it through the hosting plan and manually add it so i can customize my options?
WPBeginner Support
It would depend on how Cloudflare is set up on your account, if you have access to cloudflare’s settings then you can continue to use what is on your account without worrying.
Admin
Andrew Hansen
I do not have control over settings.
WPBeginner Support
Jus to be safe, check with your host as there may be a hidden settings area for Cloudflare in the hosting settings.
Andrew Hansen
I checked the information regarding cloudflare through Hostgator. you can manage what level caching (assets only, assets and web pages, or assets and web pages extended) and you can clear the cache, but hostgator says under the cons of using it “No option to customize – Currently, you cannot customize cache settings (for example, which content gets cached, the cache timing, etc.) for the CDN.”
Jiří Vaněk
I use Cloudflare DNS along with their CDN. The integration of Cloudflare CDN into the WP Rocket plugin, which I use for caching, is fantastic. The CDN can be linked with the caching plugin, allowing for the simultaneous clearing of both the website cache and the CDN cache with a single button in WP Rocket.
WPBeginner Support
Connections like that to help simplify the process are very helpful
Admin
Ralph
I plan on making website from europe server (cheaper) to US users and this guide is godsend! Even better it is possible to do it for free. Thank you for this detailed guide. It will definitely help me setting everything up as I never really understood how to do this. Every other guide was lacking details and was too general.
WPBeginner Support
Glad to hear our guide was helpful
Admin
Salman
Hi, I use the “WPS Hide Login” plugin. While creating a page rule for the login page should I use the default login URL or the new login URL which I am using with the help of the plugin?
WPBeginner Support
If the login page is on a different URL you would want to set the page rule for the active login page that users would visit.
Admin
Neal Umphred
Thanks for another useful how-to article!
Regarding the ‘Always Use HTTPS’ option, you wrote: “Some users have reported issues when using this setting with Cloudflare.”
What are those issues?
WPBeginner Support
The errors vary between sites so we don’t have a specific list of errors to point to at the moment.
Admin
Sohil Jain
If I setup comment on my main domain wil it will be setup automatically to subdomain too? Because I don’t want cloudflare setup to apply to subdomain as I only want on main domain. So where to click so that it will not apply to subdomain
Thanks
WPBeginner Support
There is an option in Cloudflare to exclude a subdomain so you wouldn’t need to worry about that.
Admin
Evindu Shavinda
I added Cloudflare to my website today. So, I had to remove my hosting’s nameservers & replace them with Cloudflare nameservers from my domain registrar.
This is the question – 1. So, how my hosting account still works? I have removed its nameservers from the domain registrar
Aftab
Don’t worry about hosting. Cloudflare doesn’t modify or change your hosting configuration. Your site will be hosted on your current host only. The reason why cloudflare asks you to change the nameserver because it passes your site through their DNS. It routes your web traffic through the Cloudflare network. So they can proxy your traffic through their network. Cloudflare offers security, ddos protection to all the sites that are configured with their nameservers. You don’t need to spend a single penny to configure your site through network. It’s a part of the free plan. No matter how many sites you have.
Nina Cen
When I tried to add the page rules for my wordpress login page, I got message “Not Acceptable! An appropriate representation of the requested resource could not be found on this server. This error was generated by Mod_Security.”
Is anything I did wrong? Or I just need to wait for a little while to try again?
WPBeginner Support
You would want to check with your hosting company for that specific error as that normally means they have a security rule set to prevent certain things on your site.
Admin
Shyam
I s there a way to turn off the second loading screen for security verification purposes and that CAPTCHA page which you have mentioned in the Cons of Cloudflare?
WPBeginner Support
You should be able to change the settings to remove that if you wanted but you would want to check with CloudFlare for the current method.
Admin
Lou
I’m setting up Cloudflare – thanks to your article! I’ve already got W3 super cache plugin – do I need both? Are they going to confuse each other? Total newb question I know!
WPBeginner Support
They have slightly different functions and there is an integration so the two can work with each other without an issue.
Admin
Faith Nte
Thank you for this guide. It helped me reduce the time my page loads
WPBeginner Support
Glad our guide was helpful
Admin
Muntaha
What if someone mistakenly adds the wrong parameters in page rules and then deployed it. Is there any way back to change page rules after deploying it?
WPBeginner Support
You can change your settings after setting them if you need to.
Admin
bali kratom
thanks for sharing this content
WPBeginner Support
You’re welcome
Admin
Will
Probably a noob question, but I have a lot of existing video and photo files on my site. Will they all be migrated to Cloudflare’s CDN or do I have to do that manually? I followed the setup steps, but my content still takes forever to load, and when I view its URL, it’s still showing my site’s URL and path.
WPBeginner Support
You shouldn’t need to transfer your content, for the slow loading you may want to reach out to CloudFlare for them to take a look
Admin
Brooke
Thanks so much for this, helps a lot!
Just to be clear, even though I’ve added my site to cloudflare, I still need to get an SSL cert separately? Cloudflare does not supply ssl cert?
Thanks again!
WPBeginner Support
You would want to take a look again under the Configuring Most Important Cloudflare Settings section for CloudFlare’s SSL
Admin
Ibraham Aali
Admin, kindly answer these question like
After changing the DNS, who is actually will my hosting provider? The hoster OR cloudflare and all editing can be done by same cpanel?
WPBeginner Support
Your hosting provider would still be your hosting provider.
Admin
Soumya
thank you very much, I was looking for a proper step-by-step Cloudflare set up! and TA DA!! you guys are savior.
It would be great if you publish about the best of cloudflare settings, from the plugin.
WPBeginner Support
Glad you found our article helpful
Admin
Alabura
Thank you for such a great publications, it really help me set up my cloud flare account easily. Keep the good work.
WPBeginner Support
You’re welcome, glad our guide was helpful
Admin
Bryan Wagar
Very helpful information and with the pictures for verification i could confirm everything instead of guessing, thankyou very much for compiling this! It is BRILLIANT
WPBeginner Support
You’re welcome, glad our guide could be helpful
Admin
PKV
superb guide, easy to follow thanks
WPBeginner Support
Glad our guide was helpful
Admin
randhir singh
I want to know which is the best CDN ? cloud Flare or max
WPBeginner Support
Hi Randhir,
At WPBeginner, we recommend MaxCDN. However, if you want to use the free CDN, then Cloudflare can be a good solution.
Admin
anurag saxena
If i will use cloudfare free version and will change the nameserver then it means my website will run on cloudfare server then how i can edit my website? through cloudfare or my present hosting provider? pls tell me detail.
andy
The only reason I use cloudflare because you can hide where you hosting the site.
Mehmet
i am wondering..
for cloudflare, we need to point the DNS to theirs..
so how we gonna use custom email set up using our own domain (which also need to point the DNS to the email provider) ?
as far as i know, we can’t use two DNS .. (actually we can, but it is expensive)
Aqib
I am using custom email and cloudflare. Cloudflare doesn’t affect my custom email working.
Abhi
If my domain is from go daddy and hostino is from inmotion hosting and I change my domain name server to my hosting now I want to join cloudfare to it then what can I do?
andy
I try to help answer. from godaddy change nameserver to cloudflare, and from cloudflare, set up your DNS and point to your in motion hosting ip address.
Syed Shan
After Setting Our Host DNS To Cloudfare DNS, Which bandwidth and storage will be used from our local hosting plan e.g godaddy, namecheap etc or Cloudfare ?
Haydrion Rayel
The reasons why I don’t use cloudflare is because of changing the nameservers and second like in this article : it blocks some of the legitime users and that is what I really hate.
I don’t use third party websites where I don’t have full control of it. I saw a couple of times there are you human google click on pictures and it takes forever.
MaxCDN is the only option because you only have to add a cname .. but still ..
Haydrion Rayel
The reasons why I don’t use cloudflare is because of changing the nameservers and second like in this article : it blocks some of the legitime users and that is what I really hate.
I don’t use third party websites where I don’t have full control of it. I saw a couple of times there are you human google click on pictures and it takes forever.
MaxCDN is the onlly option because you only have to add a cname .. but still ..
abhishek purohit
My site is on wordpress and running on godaddy vps server with ssl certificate but it has lots of page load time, now, should I go for cdn cloud flare free account if yes than what about all static IP given with vps account , they will not useable and is vps based site need cloud flare ?
Munna Hossain
Page loading time is an important issue to get good user experience. This LoudFlare helps us to increase the page loading. Can you tell me which one is better to improve page speed, plugin or CDN?
Iain
HI
Just to let you know
I have had a joomla website working on the Free plan and SSL
Not sure if your previous post is now outdated but it is possible.
Regards
Mircea Pop
You can use the provided Cloudflare SSL but you are unable to use your own SSL on free account
koushil
bro can we use this for blogspot blog ?
King Rayhan
of course why not
Ikechukwu
This was very helpful. Thanks.
munetsi
i am actually caught in between-
which provider should i choose for my site,
between cloudfare or maxcdn
Editorial Staff
We use MaxCDN for our sites.
Admin
SOTHEA
This is truly awesome tip. Anyways, I have a question. If my website contents and domain name are hosted in different hosting companies. In this case, I need to change Name Servers to CloundFlare for both. Am I correct?
Anubhav
Did you find the solution for this as i have different hosting provider and domain name provider is different .If you know the solution then please let me know
Ummi Mental
after changing the DNS, who is actually will my hosting provider? The hoster OR cloudflare and all editing can be done by same cpanel?
Captain Asif
Really very helpful article i have setup my wordpress site with cloudflare
Joe
What minification services do you recommend that work well with Cloudfare? This is for a WordPress site that may have potentially high traffic spikes out of the blue. Thanks
bobzyouruncle
I live at the bottom of Africa (Cape Town) with none of their servers close to me am I correct in thinking that Cloud Flare will slow down my website. Most of my traffic is local. I have the same issues with CDNs none of them are close to my location, Europe is the closest. Is my thinking correct?
Damon Billian
CloudFlare would add a little latency because we currently don’t have any data centers in SA just yet (being looked at). Visitors from SA would currently hit a data center in Europe.
On the other hand, if you have visitors from a lot of other locations (EU, America, Asia, etc.), then the site would be faster for them.
munetsi
was just checking ,looks like they have servers in johannesburg.
Adesanmi Adedotun
I have heard about cloudflare but have not tried to make use of it, bout talking about the fact that my site might be down during the propagation of my name server,how long could this take?
WPBeginner Support
It varies, it can take a few hours to a full day.
Admin
Einstein
You will not experience any downtime while you switch to Cloudflare if you do it correctly.
Damon Billian
You should not have any downtime at all switching to CloudFlare’s nameservers.
Robby McCullough
I am a huge fan of CloudFlare. At my shop, we do a lot of sites for professional photographers. CF does an amazing job at making image heavy pages load in a snap!
One tip, don’t forget about CF’s developer mode when you’re making changes. I’ve bashed my head against the wall for some time when my CSS changes weren’t showing up — CF was serving a cached page!
Boby
When my website has ‘heavy load’ CloudFlare will make the users access screenshot of the website.
Abhisek
Cloudflare breaks my site’s design. I have a off-canvas menu and Cloudflare’s rocketloader and minification breaks ,y site’s design. So, I have to stick with basic W3 Total cache. Besides Cloudflare actually speeds up your site.
Damon Billian
Those features are actually optional and easy to turn off. If you’re using a minify service already, then you don’t want to turn ours on as well (something eventually will break running two minify options at the same time). Rocket Loader would have the potential to impact JavaScript and jQuery & would generally impact something like widgets.
Joe
What WordPress theme were you using? That way we can know to avoid using that theme with Cloudfare.