Abbiamo scoperto che impostare immagini in evidenza di fallback per le categorie di WordPress è un enorme risparmio di tempo, specialmente per i blog con un alto volume di contenuti.
Se hai articoli che non hanno un'immagine in evidenza, o se vuoi che tutti i post di una categoria abbiano miniature simili, allora puoi impostare un'immagine di fallback per ogni categoria.
In questo modo, puoi assicurarti che nessun post del blog rimanga senza un'immagine in evidenza e non devi assegnarle manualmente a ogni singolo post.
In questo articolo, ti mostreremo come impostare le immagini in evidenza di fallback predefinite per categorie specifiche in WordPress.

Perché aggiungere un'immagine in evidenza di fallback per la categoria del post?
Supponiamo che tu abbia un blog WordPress in cui assegni una singola categoria a ogni post. Puoi assegnare a tutti i post di quella categoria la stessa immagine di fallback se, per qualche motivo, non hanno un' immagine in evidenza.
Un altro vantaggio dell'aggiunta di un'immagine di fallback per una categoria di post è che se le tue pagine di archivio delle categorie ricevono molto traffico di ricerca, le rende più coinvolgenti e attraenti.
Detto questo, vediamo come puoi aggiungere un'immagine di fallback basata sulla categoria del post utilizzando un plugin WordPress e codice personalizzato.
- Impostazione dell'immagine in evidenza di fallback in WordPress utilizzando un plugin
- Impostare un'immagine di fallback in WordPress senza plugin (codice personalizzato)
Impostazione dell'immagine in evidenza di fallback in WordPress utilizzando un plugin
Per impostazione predefinita, WordPress non offre un'opzione per aggiungere immagini alle pagine delle categorie dei tuoi post. Tuttavia, puoi facilmente impostare un'immagine di fallback per le categorie dei post utilizzando un plugin WordPress.
Innanzitutto, dovrai installare e attivare il plugin Category and Taxonomy Image. Per maggiori dettagli, consulta la nostra guida su come installare un plugin WordPress.
Dopo l'attivazione, puoi accedere a Impostazioni » Immagine tassonomia dal pannello di amministrazione di WordPress. Successivamente, puoi selezionare la casella di controllo 'categoria' per includere immagini tassonomia nelle categorie dei tuoi post come fallback.
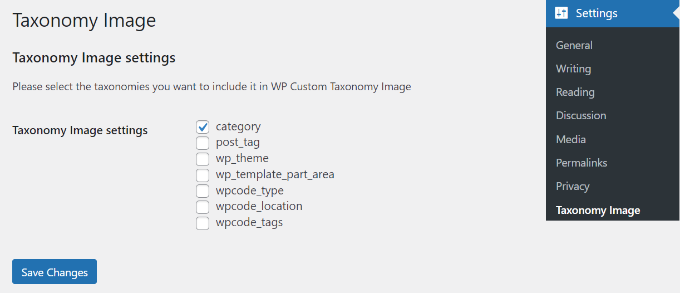
Non dimenticare di fare clic sul pulsante 'Salva modifiche' quando hai finito.
Dopodiché, puoi accedere a Post » Categorie dalla tua bacheca di WordPress. Vedrai apparire un campo 'Immagine' quando aggiungi una nuova categoria o ne modifichi una esistente.
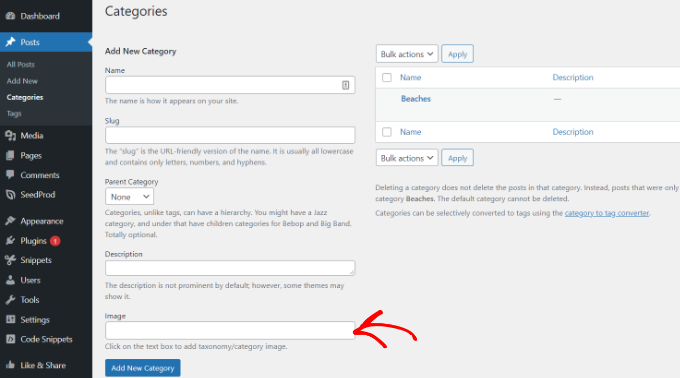
Inserisci semplicemente un URL di immagine che desideri aggiungere alla tua categoria WordPress. Per maggiori dettagli in merito, consulta la nostra guida su come ottenere l'URL delle immagini che carichi in WordPress.
Ora, quando pubblichi un post del blog senza un'immagine in evidenza assegnata, WordPress utilizzerà l'immagine che hai appena impostato per la tua categoria.
Ecco un'anteprima dell'immagine che abbiamo utilizzato sul nostro sito demo.

Tutto qui! Ora hai aggiunto con successo un'immagine di fallback basata sulla categoria del post.
Impostare un'immagine in evidenza di fallback in WordPress senza un plugin
Puoi anche configurare un'immagine di fallback per le categorie dei post senza utilizzare un plugin di WordPress. Tuttavia, questo metodo non è consigliato ai principianti poiché coinvolge snippet di codice.
La prima cosa da fare è creare immagini per le tue categorie di WordPress. Usa lo slug della categoria come nome del file immagine e salvale tutte nello stesso formato, come JPG o PNG.
Successivamente, puoi caricare le tue immagini di categoria sul tuo sito WordPress da Media » Aggiungi nuovo.
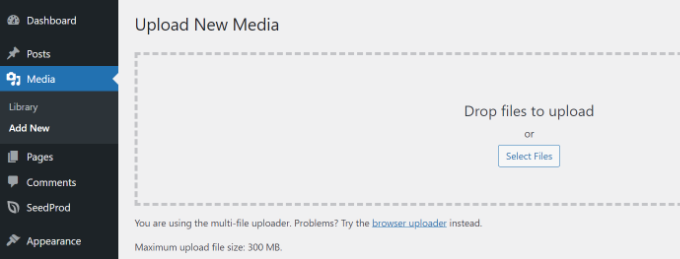
WordPress memorizzerà le tue immagini di categoria durante il caricamento e creerà dimensioni delle immagini definite dal tuo tema.
Dopo aver caricato le immagini di categoria, devi spostarle in una directory diversa. Connettiti semplicemente al tuo sito web utilizzando un client FTP e vai alla cartella /wp-content/uploads/.

Le immagini di categoria che hai caricato verranno memorizzate nella cartella del mese, ad esempio /uploads/2022/08/.
Vai avanti e apri la cartella di questo mese.
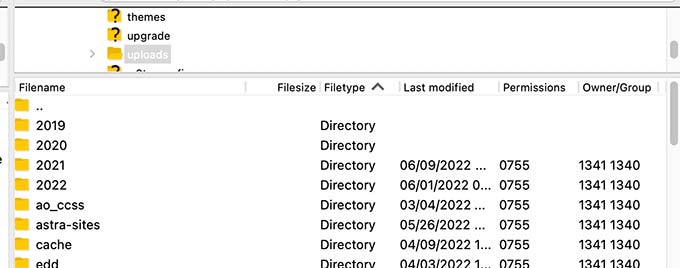
Puoi consultare la nostra guida su dove WordPress memorizza le immagini sul tuo sito per maggiori informazioni.
Successivamente, crea una cartella sul desktop del tuo computer e chiamala category-images. Ora, scarica tutte le tue immagini di categoria e tutte le dimensioni che WordPress ha creato per loro in questa nuova cartella sul tuo desktop.
Una volta terminato il download, devi caricare la cartella category-images nella tua directory /wp-content/uploads. Farlo ti permetterà di avere tutte le dimensioni delle tue immagini di categoria in una cartella separata che è facile da richiamare nel tuo tema.
Per maggiori dettagli, consulta la nostra guida su come utilizzare FTP per caricare file su WordPress.
Visualizzare l'immagine di categoria come immagine in evidenza di fallback predefinita
Successivamente, ti mostreremo come visualizzare una di queste immagini come immagine in evidenza di fallback quando un post in una categoria non ne ha una impostata.
Questo metodo prevede la copia e incolla di codice, e normalmente non raccomandiamo agli utenti di modificare i file del proprio tema. Piccoli errori possono causare grandi problemi sul tuo sito.
Un modo più semplice per aggiungere codice al tuo sito è usare WPCode. È il miglior plugin per snippet di codice WordPress, che ti permette di gestire in modo sicuro e semplice codice personalizzato sul tuo sito.
Per prima cosa, dovrai installare e attivare il plugin gratuito WPCode. Per maggiori dettagli, consulta la nostra guida su come installare un plugin WordPress.
Successivamente, puoi andare su Snippet di codice » + Aggiungi snippet nel tuo pannello di amministrazione di WordPress per aggiungere un nuovo snippet. Quindi fai clic sul pulsante 'Aggiungi nuovo'.
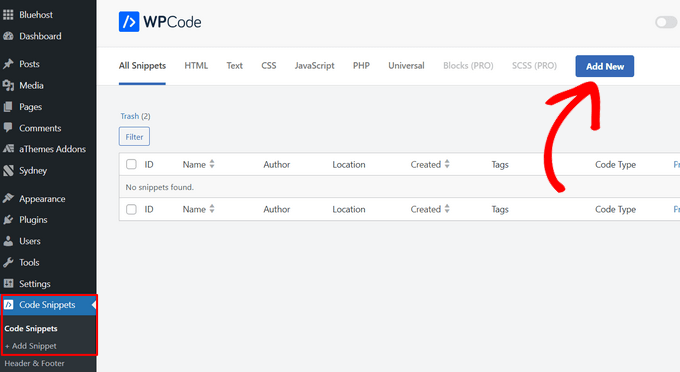
Dopo di che, puoi aggiungere codice personalizzato o utilizzare uno snippet dalla libreria di WPCode.
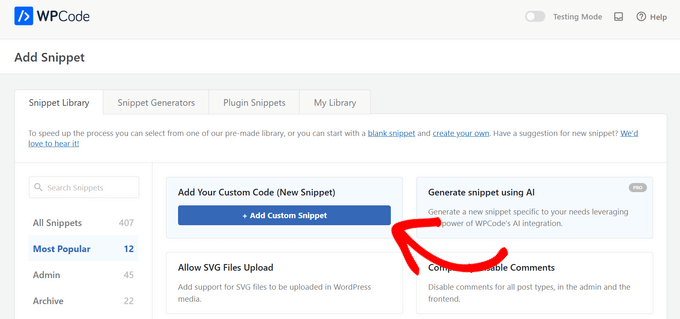
Per questo, utilizzerai il tuo codice personalizzato, quindi passa il mouse sopra l'opzione 'Aggiungi il tuo codice personalizzato (Nuovo snippet)' e fai clic sul pulsante '+ Aggiungi snippet personalizzato'.
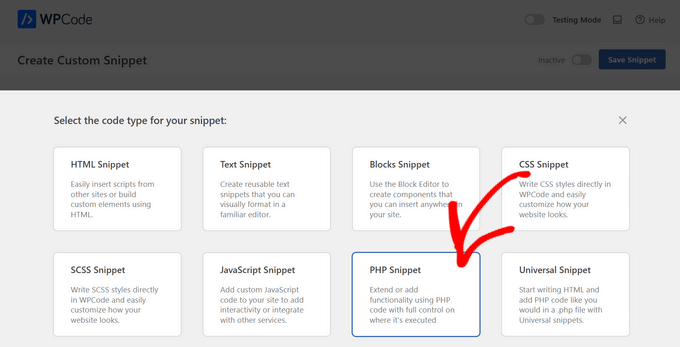
Successivamente, devi selezionare 'Snippet PHP' come tipo di codice dall'elenco di opzioni che appaiono sullo schermo.
Ora aggiungi un nome per il tuo snippet, che può essere qualsiasi cosa per aiutarti a ricordare a cosa serve il codice.
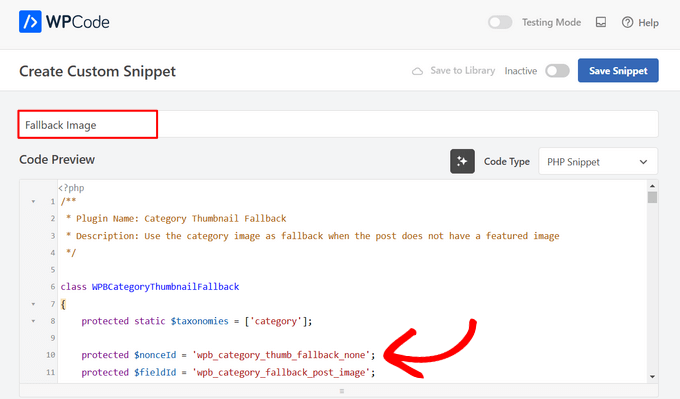
Dopo di che, copia semplicemente lo snippet di codice seguente e incollalo nel campo 'Anteprima codice'.
/**
 * Plugin Name: Category Thumbnail Fallback
 * Description: Use the category image as fallback when the post does not have a featured image
 */

class WPBCategoryThumbnailFallback
{
    protected static $taxonomies = ['category'];

    protected $nonceId = 'wpb_category_thumb_fallback_none';
    protected $fieldId = 'wpb_category_fallback_post_image';

    public $taxonomy;

    protected function __construct($taxonomy)
    {
        $this->taxonomy = $taxonomy;
    }

    public static function init()
    {
        foreach (static::$taxonomies as $taxonomy) {
            $_self = new self($taxonomy);

            add_action('admin_enqueue_scripts', [$_self, 'scripts']);

            add_action("{$taxonomy}_add_form_fields", [$_self, 'add']);
            add_action("{$taxonomy}_edit_form_fields", [$_self, 'edit'], 99, 2);

            add_action("created_{$taxonomy}", [$_self, 'saveTerm'], 10, 2);
            add_action("edited_{$taxonomy}", [$_self, 'editTerm'], 10, 2);

            add_filter("get_post_metadata", [$_self, 'fallback'], 99, 5);
        }
    }

    public function scripts($hook_suffix)
    {
        if (in_array($hook_suffix, ['term.php', 'edit-tags.php'])) {
            $screen = get_current_screen();

            if (is_object($screen) && "edit-{$this->taxonomy}" == $screen->id) {
                wp_enqueue_media();

                wp_add_inline_script('media-editor', $this->inlineScript());
            }
        }
    }

    public function add()
    {
        ?>
        <div class="form-field upload_image-wrap">
            <label for="upload_image">Image</label>
            <input id="upload_image" type="hidden" size="36" name="<?php
            echo esc_attr($this->fieldId)
            ?>" value=""/>
            <div id="wpb-category-image-preview" style="max-width: 150px; max-height: 150px;"></div>
            <input id="upload_image_button" class="button" type="button" value="Upload Image"/>
            <p>Enter a URL or upload an image</p>
        </div>
        <?php
        wp_nonce_field($this->nonceId, $this->nonceId);
    }

    public function edit($term, $taxonomy)
    {
        $value = get_term_meta($term->term_id, $this->fieldId, true);
        $image = wp_get_attachment_image((int)$value);
        ?>
        <tr class="form-field upload_image-wrap">
            <th scope="row"><label for="name">Image</label></th>
            <td>
                <label for="upload_image">
                    <input id="upload_image" type="hidden" size="36" name="<?php
                    echo esc_attr($this->fieldId)
                    ?>" value="<?php
                    echo esc_attr($value)
                    ?>"/>
                    <div id="wpb-category-image-preview" style="max-width: 150px; max-height: 150px;"><?php
                        echo $image;
                        ?></div>
                    <input id="upload_image_button" class="button" type="button" value="Upload Image"/>
                </label>
                <p class="description">Enter a URL or upload an image</p>
            </td>
        </tr>
        <?php
        wp_nonce_field($this->nonceId, $this->nonceId);
    }

    public function saveTerm($term_id, $tt_id)
    {
        $data = array_filter(wp_unslash($_POST), function ($value, $key) {
            return in_array($key, [$this->nonceId, $this->fieldId]);
        }, ARRAY_FILTER_USE_BOTH);

        if (
            empty($data) ||
            empty($data[$this->nonceId]) ||
            ! wp_verify_nonce($data[$this->nonceId], $this->nonceId) ||
            ! current_user_can('manage_categories')
        ) {
            return null;
        }

        if (empty($data[$this->fieldId]) || empty(absint($data[$this->fieldId]))) {
            return delete_term_meta($term_id, $this->fieldId);
        }

        $value = absint($data[$this->fieldId]);

        return update_term_meta($term_id, $this->fieldId, $value);
    }

    public function editTerm($term_id, $tt_id)
    {
        $this->saveTerm($term_id, $tt_id);
    }

    public function fallback($null, $object_id, $meta_key, $single, $meta_type)
    {
        if (
            $null === null &&
            $meta_key === '_thumbnail_id'
        ) {
            $meta_cache = wp_cache_get($object_id, $meta_type . '_meta');

            if ( ! $meta_cache) {
                $meta_cache = update_meta_cache($meta_type, [$object_id]);
                $meta_cache = $meta_cache[$object_id] ?? null;
            }

            $val = null;

            if (isset($meta_cache[$meta_key])) {
                if ($single) {
                    $val = maybe_unserialize($meta_cache[$meta_key][0]);
                } else {
                    $val = array_map('maybe_unserialize', $meta_cache[$meta_key]);
                }
            }

            if (empty($val)) {
                $fallbackImageId = $this->getPostFallbackImageId($object_id, $single);

                if ( ! empty($fallbackImageId)) {
                    return $fallbackImageId;
                }
            }

            return $val;
        }

        return $null;
    }

    public function getPostFallbackImageId($postId, $single)
    {
        $terms = get_the_terms($postId, $this->taxonomy);

        if (empty($terms) || is_wp_error($terms)) {
            return null;
        }

        foreach ($terms as $term) {
            $fallbackIdFromCategoryId = get_term_meta($term->term_id, $this->fieldId, $single);

            if ( ! empty($fallbackIdFromCategoryId)) {
                return $fallbackIdFromCategoryId;
            }
        }

        return null;
    }

    public function inlineScript()
    {
        return "jQuery(document).ready(function ($) {
            var custom_uploader;
            $('#upload_image_button').click(function (e) {
                e.preventDefault();
                //If the uploader object has already been created, reopen the dialog
                if (custom_uploader) {
                    custom_uploader.open();
                    return;
                }
                //Extend the wp.media object
                custom_uploader = wp.media.frames.file_frame = wp.media({
                    title: 'Choose Image',
                    button: {
                        text: 'Choose Image'
                    },
                    multiple: true
                });
                //When a file is selected, grab the URL and set it as the text field's value
                custom_uploader.on('select', function () {
                    console.log(custom_uploader.state().get('selection').toJSON());
                    attachment = custom_uploader.state().get('selection').first().toJSON();

                    var thumbUrl = attachment && attachment.sizes && attachment.sizes.thumbnail && attachment.sizes.thumbnail.url
                    ? attachment.sizes.thumbnail.url
                    : attachment.url;
                    $('#wpb-category-image-preview').html('<img src=\"'+ thumbUrl +'\">');
                    $('#upload_image').val(attachment.id);
                });
                //Open the uploader dialog
                custom_uploader.open();
            });
        });";
    }
}
Successivamente, puoi scorrere verso il basso fino alla sezione 'Inserimento' e scegliere 'Inserimento automatico' per lasciare che il plugin gestisca il posizionamento per te.
Quindi, scegli l'opzione 'Inserisci prima del contenuto' nella sezione 'Pagina, Post, Tipo di post personalizzato' nel menu a discesa 'Posizione'.
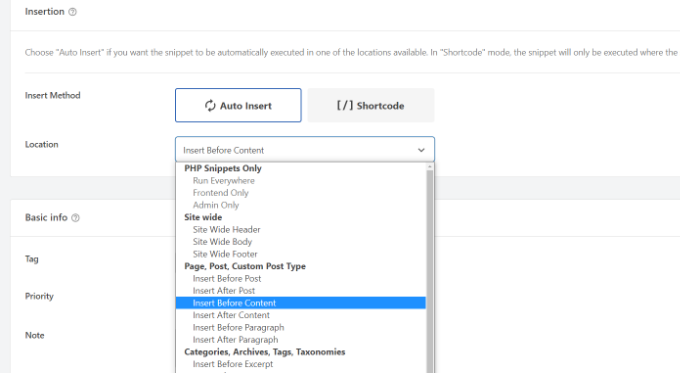
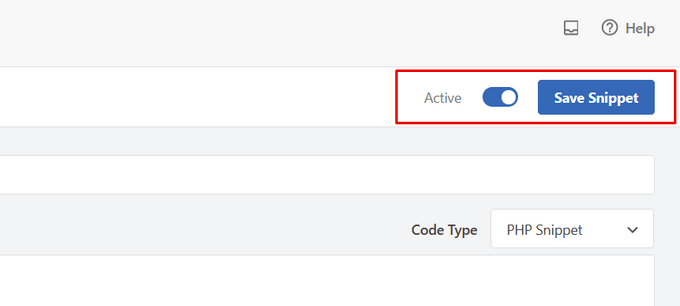
Puoi quindi tornare in cima alla pagina e spostare l'interruttore da 'Inattivo' ad 'Attivo'.
Una volta fatto clic sul pulsante 'Salva snippet' in alto, la tua immagine di fallback sarà attiva.
Potresti anche voler consultare la nostra guida su come aggiungere facilmente snippet di codice personalizzato in WordPress.
Nota: Questo snippet di codice funzionerà solo con la tassonomia 'category'. Tuttavia, puoi aggiungere altre tassonomie inserendo il loro nome nell'elenco nella seguente classe nel codice e modificando il termine tra parentesi in 'tag' o 'post, ad esempio.
protected static $taxonomies = ['category'];
Al termine, visita semplicemente il tuo sito web per vedere l'immagine di fallback.

Speriamo che questo articolo ti abbia aiutato ad aggiungere un'immagine in evidenza di fallback basata sulla categoria del post. Puoi anche consultare la nostra guida su come aggiungere una barra di avanzamento nei post di WordPress e le nostre scelte esperte delle migliori alternative a Canva per la grafica del sito web.
Se ti è piaciuto questo articolo, iscriviti al nostro canale YouTube per tutorial video su WordPress. Puoi anche trovarci su Twitter e Facebook.


Dennis Muthomi
Penso ci sia qualcosa che non va nello snippet WPCode nell'articolo, sta mostrando alcuni numeri di riga sovrapposti, nella colonna di sinistra.
Supporto WPBeginner
Questo è dovuto al fatto che il nostro CSS limita attualmente i numeri a una colonna di un carattere.
Amministratore
Nicola
Sarebbe più interessante avere un hook per sostituire la miniatura da utilizzare nelle funzioni, in modo da non doversi preoccupare di sostituirla ovunque venga utilizzata.
Sohail
Thank you. This works like a charm
Mentre l'immagine in evidenza di fallback viene visualizzata nel post; ci sono idee su come potrei visualizzarle nelle pagine di categoria/archivio, o dove i post vengono visualizzati nella homepage?
Deepak
abbiamo ora un plugin per questo stesso requisito? o dobbiamo ancora usare il metodo manuale?
tina
Ciao!
Per favore, mostra come gli articoli vengono visualizzati in "ALTRO SU ADESSO WPBEGINNER" sopra ?? un modello Wordpress
Grazie
David
I turned off the organize posts by date month in settings/media, and changed url to reflect uploads directory specifically – that way I can avoid the extra step. I’m hoping this won’t cause issues with my host but it certainly makes life a little easier for me. Thank you so much for sharing this info, I have been searching for a looooong time and it’s finally how I want it
Rashid khan
ciao,,, voglio aggiungere un'immagine dinamica alla mia home page di wordpress. dove sono già impostate 5 immagini in diverse posizioni..
voglio solo sostituirle e aggiungere nuove foto per post e categorie…
per favore aiutami
ci ho provato ma senza successo
ho usato la funzione post by thumbian
Richard Stewart
Questo è fantastico, ma ho fallito miseramente cercando di implementare la visualizzazione dell'immagine di categoria come immagine in evidenza di fallback predefinita nel mio tema di annunci classificati. Utilizza categorie diverse dalle categorie dei post 'stock' e l'autore non aiuta.
Offrite servizi tecnici, a pagamento o meno, in cui potete aiutarmi a implementare la visualizzazione dell'immagine di categoria come immagine in evidenza di fallback predefinita nel mio tema?
Matt Cromwell
Questo è davvero fantastico, un consiglio molto utile nel mio caso. L'unico problema è che il primo codice sopra è incompleto. Fortunatamente non avevo bisogno della parte "if", quindi l'ho semplicemente rimossa e tutto è andato bene.
Grazie per alcuni consigli piuttosto avanzati sul tuo sito "per principianti". Continua così!
Supporto WPBeginner
@Matt grazie per averci avvisato, abbiamo risolto.
Amministratore
Damien Carbery
Un'altra idea potrebbe essere quella di impostare l'immagine in evidenza del post quando il post viene salvato. Il vantaggio della soluzione sopra descritta è che l'immagine in evidenza della categoria è facilmente modificabile.