Volete modificare lo stile del modulo di commento di WordPress sul vostro sito web? Noi di WPBeginner abbiamo trascorso anni a sperimentare diversi modi per aumentare l’engagement degli utenti e abbiamo scoperto che un modulo di commento bello e facile da usare può fare un’enorme differenza.
I commenti hanno un ruolo importante nell’engagement degli utenti su un sito web. Se rendete facile e visivamente attraente per gli utenti lasciare commenti, incoraggerete una maggiore discussione e interazione sul vostro sito web.
In questo articolo, vi mostreremo come modellare facilmente il modulo dei commenti di WordPress per aumentare il coinvolgimento sul vostro sito web.

Prima di iniziare
I temi di WordPress controllano l’aspetto del vostro sito web. Ogni tema WordPress viene fornito con diversi file, tra cui file di modelli, file di funzioni, JavaScript e fogli di stile.
I fogli di stile contengono le regole CSS per tutti gli elementi utilizzati dal tema WordPress. È possibile aggiungere il proprio CSS personalizzato per sovrascrivere le regole di stile del tema.
Se non l’avete mai fatto prima, consultate il nostro articolo su come aggiungere CSS personalizzati in WordPress per i principianti.
Oltre ai CSS, potrebbe essere necessario aggiungere alcune funzioni per modificare l’aspetto predefinito del modulo dei commenti di WordPress. Se non l’avete mai fatto prima, consultate il nostro articolo su come copiare e incollare il codice in WordPress.
Detto questo, diamo un’occhiata a come modellare il modulo dei commenti di WordPress.
Poiché si tratta di una guida piuttosto completa, abbiamo creato una tabella dei contenuti per facilitare la navigazione:
- Styling WordPress Comment Form Using SeedProd Theme Builder
- Change WordPress Comments with Default CSS Classes
- Adding Social Login to WordPress Comments
- Adding Comment Policy Text in WordPress Comment Form
- Move Comment Text Field to Bottom
- Remove Website (URL) Field from WordPress Comment Form
- Add a Subscribe to Comments Checkbox in WordPress
- Add Custom Fields to WordPress Comment Form
Modellare il modulo dei commenti di WordPress utilizzando il costruttore di temi SeedProd
Questo metodo richiede SeedProd, il miglior plugin per la creazione di pagine e temi per WordPress presente sul mercato.
È consigliato ai principianti che non hanno esperienza di codifica. Tuttavia, l’aspetto negativo di questo metodo è che sostituisce il tema WordPress esistente con un tema personalizzato.
Per prima cosa, è necessario installare e attivare il plugin SeedProd. Per maggiori dettagli, consultate la nostra guida passo passo su come installare un plugin di WordPress.
Nota: per accedere alla funzione di creazione di temi è necessario almeno il piano PRO.
Dopo l’attivazione, dovrete creare dei modelli per il vostro tema WordPress personalizzato. SeedProd consente di generare facilmente questi modelli utilizzando uno dei temi incorporati.
Per istruzioni dettagliate, consultate il nostro tutorial su come creare un tema personalizzato per WordPress senza codificare.
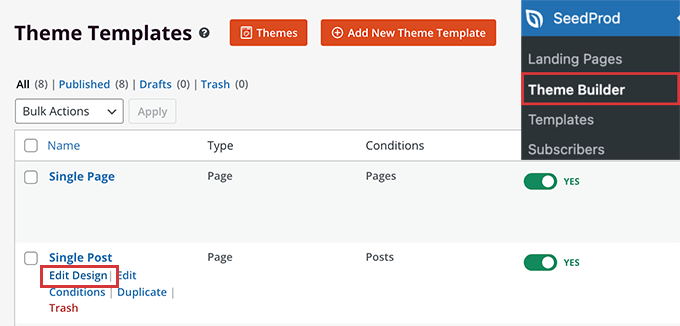
Una volta generati i template del tema, è necessario fare clic sul link “Modifica design” sotto il template del post singolo.
In questo modo verrà caricata l’anteprima del singolo post nell’interfaccia del costruttore del tema SeedProd. Si noterà il blocco del modulo dei commenti in fondo all’anteprima.
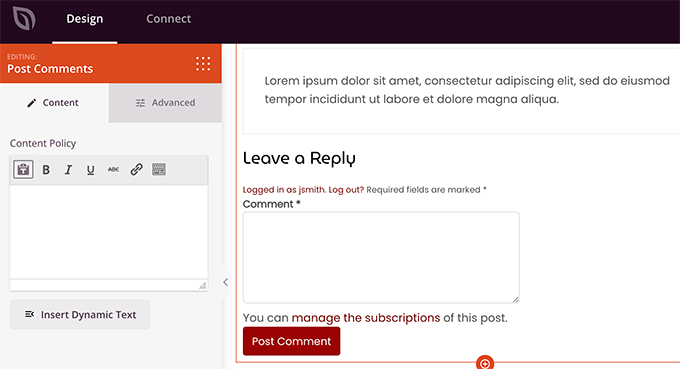
È sufficiente fare clic sul modulo di commento per visualizzarne le proprietà nel pannello di sinistra.
Da qui è possibile aggiungere una nota ai commenti o una privacy policy; si può anche passare alla scheda “Avanzate” per modificare lo stile del modulo di commento senza scrivere alcun codice CSS.
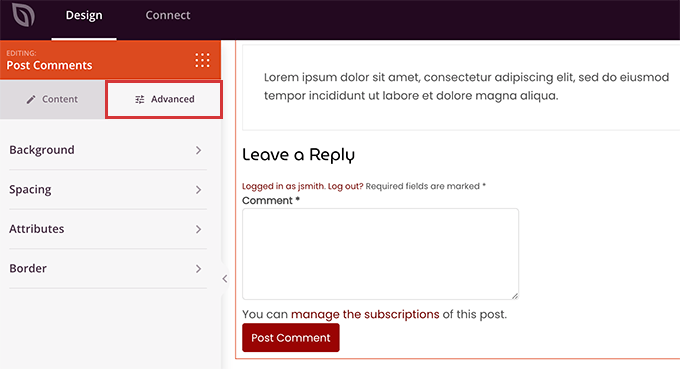
Una volta terminato, non dimenticate di cliccare sul pulsante “Salva” per pubblicare le modifiche.
Con SeedProd è facilissimo modificare lo stile di qualsiasi elemento del sito web senza scrivere codice.
Tuttavia, si tratta di un costruttore di temi e potreste già utilizzare un tema WordPress che vi piace. In questo caso, i seguenti suggerimenti vi aiuteranno a modificare manualmente gli stili dei moduli dei commenti in WordPress.
Cambiare lo stile del modulo dei commenti in WordPress
Nella maggior parte dei temi WordPress è presente un modello chiamato comments.php. Questo file viene utilizzato per visualizzare i commenti e i moduli di commento sui post del blog. Il modulo dei commenti di WordPress viene generato utilizzando la funzione: <?php comment_form(); ?>.
Come predefinito, questa funzione genera il modulo di commento con tre campi di testo (nome, email e sito web), un’area di testo per il testo del commento, un checkbox per la conformità al GDPR e il pulsante di invio.
È possibile modificare facilmente ciascuno di questi campi semplicemente modificando le classi CSS predefinite. Di seguito è riportato un elenco delle classi CSS predefinite che WordPress aggiunge a ogni modulo di commento.
1 2 3 4 5 6 7 8 9 10 11 12 13 14 15 16 17 18 | #respond { }#reply-title { }#cancel-comment-reply-link { }#commentform { }#author { }#email { }#url { }#comment#submit.comment-notes { }.required { }.comment-form-author { }.comment-form-email { }.comment-form-url { }.comment-form-comment { }.comment-form-cookies-consent { }.form-allowed-tags { }.form-submit |
Modificando semplicemente queste classi CSS, è possibile cambiare completamente l’aspetto del modulo dei commenti di WordPress.
Proviamo a cambiare alcune cose, in modo da avere una buona idea di come funziona.
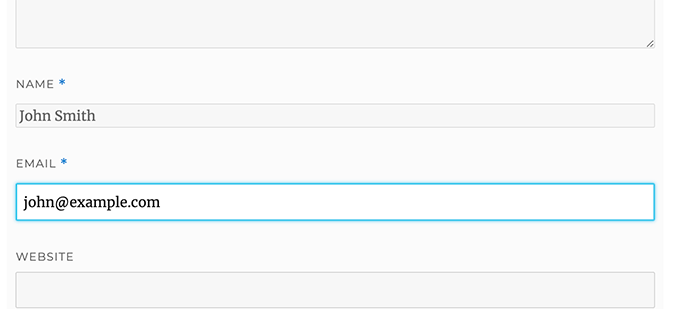
Per prima cosa, inizieremo evidenziando il campo attivo del modulo. L’evidenziazione del campo attivo rende il modulo più accessibile alle persone con esigenze particolari e rende il modulo dei commenti più gradevole sui dispositivi più piccoli.
1 2 3 4 5 6 7 8 9 10 11 12 13 14 15 16 17 18 19 20 21 22 23 24 25 26 | #respond {background: #fbfbfb;padding:0 10px 0 10px;}/* Highlight active form field */#respond input[type=text], textarea { -webkit-transition: all 0.30s ease-in-out; -moz-transition: all 0.30s ease-in-out; -ms-transition: all 0.30s ease-in-out; -o-transition: all 0.30s ease-in-out; outline: none; padding: 3px 0px 3px 3px; margin: 5px 1px 3px 0px; border: 1px solid #DDDDDD;}#respond input[type=text]:focus,input[type=email]:focus,input[type=url]:focus,textarea:focus {box-shadow: 0 0 5px rgba(81, 203, 238, 1);margin: 5px 1px 3px 0px;border: 2px solid rgba(81, 203, 238, 1);} |
Ecco come appariva il nostro modulo nel tema WordPress Twenty Sixteen dopo le modifiche:
Utilizzando queste classi, è possibile modificare il comportamento del testo all’interno delle caselle di input. Procederemo a modificare lo stile del testo dei campi nome dell’autore e URL.
1 2 3 4 5 6 7 8 9 10 11 | #author, #email {font-family: "Open Sans", "Droid Sans", Arial;font-style:italic;color:#1d1d1d;letter-spacing:.1em;} #url {color: #1d1d1d;font-family: "Luicida Console", "Courier New", "Courier", monospace;} |
Se si osserva attentamente la schermata sottostante, il carattere del campo del nome e dell’e-mail è diverso da quello dell’URL del sito web.
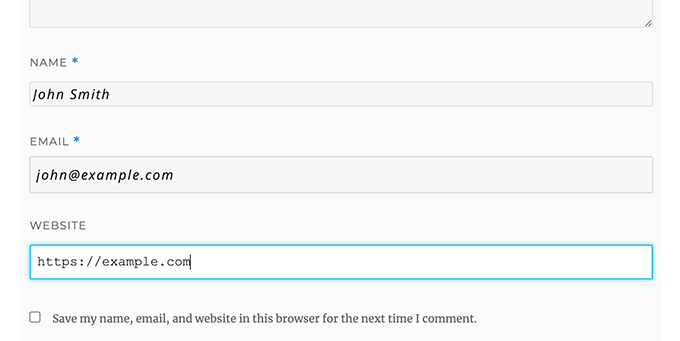
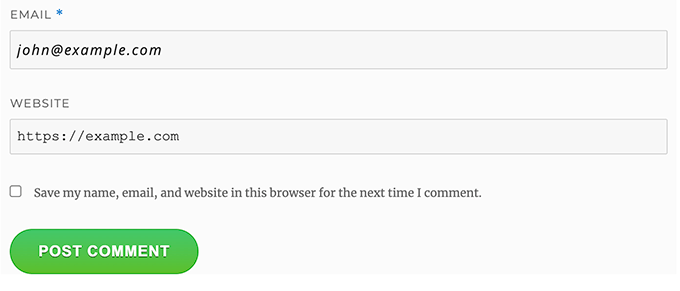
È anche possibile modificare lo stile del pulsante di invio del modulo di commento di WordPress. Invece di usare il pulsante di invio predefinito, diamogli una sfumatura CSS3 e un’ombra boxed.
1 2 3 4 5 6 7 8 9 10 11 12 13 14 15 16 17 18 19 20 21 22 23 24 25 26 27 28 29 30 31 32 33 34 | #submit {background:-moz-linear-gradient(top, #44c767 5%, #5cbf2a 100%);background:-webkit-linear-gradient(top, #44c767 5%, #5cbf2a 100%);background:-o-linear-gradient(top, #44c767 5%, #5cbf2a 100%);background:-ms-linear-gradient(top, #44c767 5%, #5cbf2a 100%);background:linear-gradient(to bottom, #44c767 5%, #5cbf2a 100%);background-color:#44c767;-moz-border-radius:28px;-webkit-border-radius:28px;border-radius:28px;border:1px solid #18ab29;display:inline-block;cursor:pointer;color:#ffffff;font-family:Arial;font-size:17px;padding:16px 31px;text-decoration:none;text-shadow:0px 1px 0px #2f6627;} #submit:hover {background:-webkit-gradient(linear, left top, left bottom, color-stop(0.05, #5cbf2a), color-stop(1, #44c767));background:-moz-linear-gradient(top, #5cbf2a 5%, #44c767 100%);background:-webkit-linear-gradient(top, #5cbf2a 5%, #44c767 100%);background:-o-linear-gradient(top, #5cbf2a 5%, #44c767 100%);background:-ms-linear-gradient(top, #5cbf2a 5%, #44c767 100%);background:linear-gradient(to bottom, #5cbf2a 5%, #44c767 100%);background-color:#5cbf2a;}#submit:active {position:relative;top:1px;} |
Portare i moduli di commento di WordPress al livello successivo
Potreste pensare che sia troppo elementare. Ebbene, dobbiamo iniziare da qui per permettere a tutti di seguirci.
Tuttavia, è possibile portare il modulo di commento di WordPress a un livello superiore, riorganizzando i campi del modulo, aggiungendo l’accesso ai social, gli abbonamenti ai commenti, le linee guida per i commenti, i tag rapidi e altro ancora.
Aggiungere il login sociale ai commenti di WordPress
Iniziamo con l’aggiunta dei login sociali ai commenti di WordPress.
La prima cosa da fare è installare e attivare il plugin Super Socializer. Per maggiori dettagli, consultate la nostra guida passo passo su come installare un plugin di WordPress.
Dopo l’attivazione, è necessario visitare Super Socializer ” Social Login e selezionare la casella “Abilita Social Login”.

Si apre il pannello delle opzioni di accesso sociale. Per prima cosa, fare clic sulla scheda “Configurazione avanzata”.
Quindi, assicurarsi che la casella “Abilita al modulo di commento” sia selezionata.
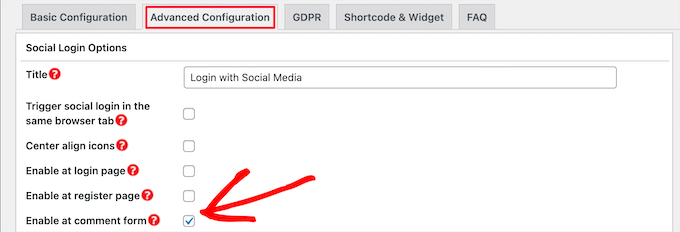
Quindi, fare clic sulla scheda “Configurazione di base”. Qui è possibile scegliere i social network da aggiungere selezionando le caselle nella sezione “Seleziona social network”.

Sotto questo punto, il plugin richiederà le chiavi API per connettersi con le piattaforme sociali. È sufficiente fare clic sull’icona del “punto interrogativo” per visualizzare le istruzioni su come ottenerle per ciascuna piattaforma.

Una volta terminato, fare clic sul pulsante “Salva modifiche” per salvare le impostazioni di accesso sociale.
Ora è possibile visitare il sito web per vedere i pulsanti di accesso ai social sopra il modulo di commento.

Aggiunta del testo della politica dei commenti prima o dopo il modulo di commento
Amiamo tutti i nostri utenti e apprezziamo molto che dedichino qualche minuto a lasciare un commento sul nostro sito. Tuttavia, per creare un ambiente di discussione sano, è importante moderare i commenti.
Per garantire la massima trasparenza, abbiamo creato una pagina dedicata alla politica dei commenti, ma non è possibile inserire questo link nel footer.
Volevamo che la nostra politica dei commenti fosse evidente e visibile per tutti gli utenti che lasciano un commento. Per questo motivo abbiamo deciso di aggiungere l’informativa sui commenti nel nostro modulo di commento di WordPress.
Se volete aggiungere una pagina di politica dei commenti, la prima cosa da fare è creare una pagina WordPress e definire la vostra politica dei commenti (potete rubare la nostra e modificarla per soddisfare le vostre esigenze).
Successivamente, è possibile aggiungere il seguente codice nel file functions.php del tema o in un plugin con snippet di codice.
1 2 3 4 5 6 | function wpbeginner_comment_text_before($arg) { $arg['comment_notes_before'] .= '<p class="comment-policy"">We are glad you have chosen to leave a comment. Please keep in mind that comments are moderated according to our <a href="http://www.example.com/comment-policy-page/">comment policy</a>.</p>'; return $arg;}add_filter('comment_form_defaults', 'wpbeginner_comment_text_before'); |
Il codice sopra riportato sostituirà il modulo di commento predefinito prima delle note con questo testo. Abbiamo anche aggiunto una classe CSS nel codice, in modo da poter evidenziare l’avviso utilizzando i CSS. Ecco il CSS di esempio che abbiamo utilizzato:
1 2 3 4 5 6 7 8 9 | p.comment-policy { border: 1px solid #ffd499; background-color: #fff4e5; border-radius: 5px; padding: 10px; margin: 10px 0px 10px 0px; font-size: small; font-style: italic;} |
Ecco come appariva sul nostro sito di prova:
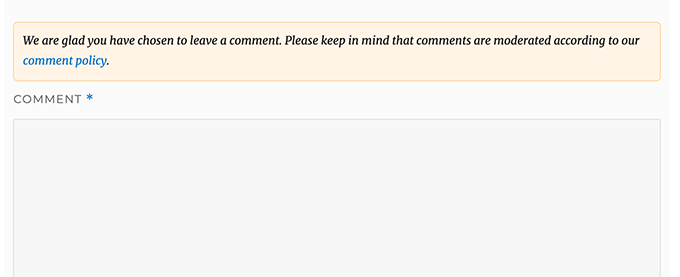
Se si desidera visualizzare il link dopo l’area di testo del commento, utilizzare il codice seguente.
1 2 3 4 5 6 | function wpbeginner_comment_text_after($arg) { $arg['comment_notes_after'] .= '<p class="comment-policy"">We are glad you have chosen to leave a comment. Please keep in mind that comments are moderated according to our <a href="http://www.example.com/comment-policy-page/">comment policy</a>.</p>'; return $arg;}add_filter('comment_form_defaults', 'wpbeginner_comment_text_after'); |
Non dimenticate di modificare l’URL di conseguenza, in modo che vada alla pagina della politica dei commenti anziché a example.com.
Spostare il campo di testo dei commenti in basso
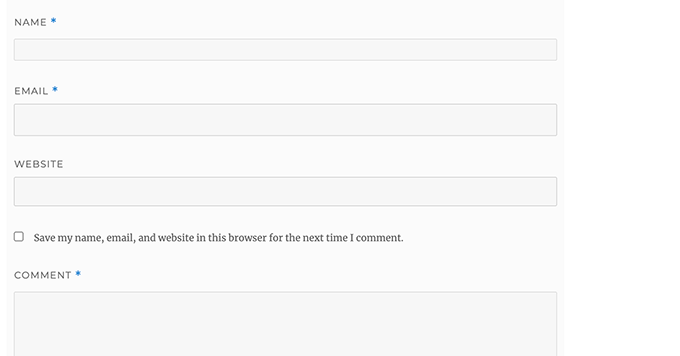
Per impostazione predefinita, il modulo dei commenti di WordPress visualizza prima l’area di testo del commento e poi i campi nome, e-mail e sito web. Questa modifica è stata introdotta in WordPress 4.4.
Prima di allora, i siti web WordPress mostravano prima i campi nome, e-mail e sito web e poi la casella di testo del commento. Riteniamo che i nostri utenti siano abituati a vedere il modulo dei commenti in quest’ordine, quindi utilizziamo ancora il vecchio ordine dei campi su WPBeginner.
Se si desidera farlo, è sufficiente aggiungere il seguente codice al file functions.php del tema o a un plugin con snippet di codice.
1 2 3 4 5 6 7 8 | function wpb_move_comment_field_to_bottom( $fields ) {$comment_field = $fields['comment'];unset( $fields['comment'] );$fields['comment'] = $comment_field;return $fields;}add_filter( 'comment_form_fields', 'wpb_move_comment_field_to_bottom'); |
Consigliamo sempre di aggiungere codice in WordPress utilizzando un plugin di snippets di codice come WPCode. In questo modo è facile aggiungere codice personalizzato senza modificare il file functions.php, senza preoccuparsi di rompere il sito.
Per iniziare, è necessario installare e attivare il plugin gratuito WPCode. Per le istruzioni, consultare questa guida su come installare un plugin di WordPress.
Dopo l’attivazione, andare su Code Snippets ” + Add Snippet dalla dashboard di WordPress.
Da qui, trovare l’opzione “Aggiungi il tuo codice personalizzato (nuovo snippet)” e cliccare sul pulsante “+ Aggiungi snippet personalizzato” sotto di esso.

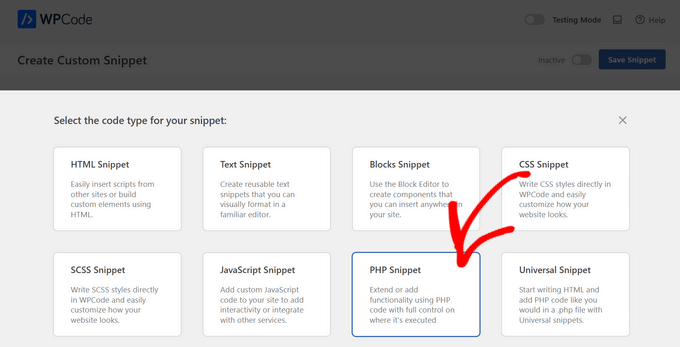
Successivamente, è necessario selezionare “PHP Snippet” come tipo di codice dall’elenco di opzioni che appare sulla schermata.
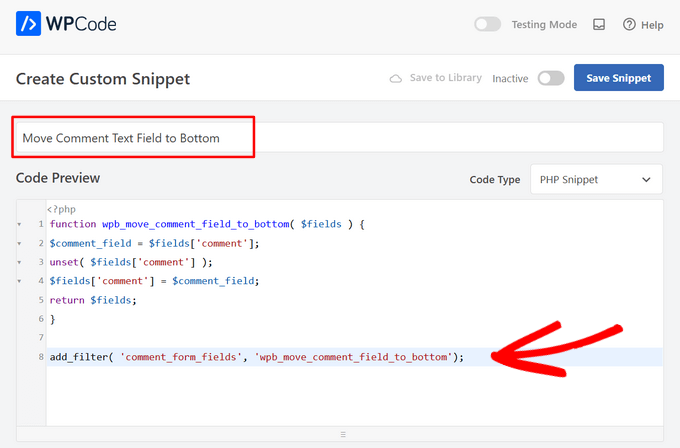
Quindi, aggiungete un titolo per il vostro snippet in alto nella pagina, che può essere qualsiasi cosa per aiutarvi a ricordare a cosa serve il codice.
Quindi, incollare il codice di cui sopra nella casella “Anteprima codice”.
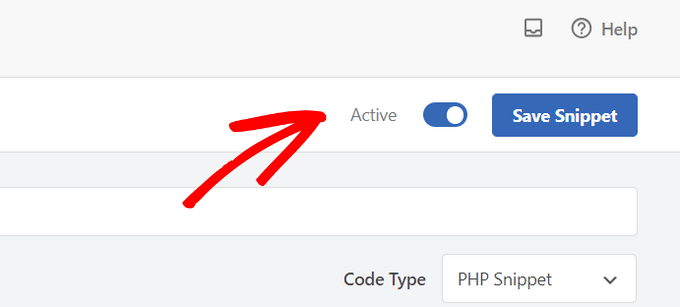
Infine, è sufficiente spostare l’interruttore da ‘Inattivo’ ad ‘Attivo’ e cliccare sul pulsante ‘Salva snippet’.
Questo codice sposta semplicemente il campo dell’area di testo dei commenti in basso.
Rimuovere il campo del sito web (URL) dal modulo di commento di WordPress
Il campo del sito web nel modulo dei commenti attira molti spammer. Anche se la sua rimozione non fermerà gli spammer e non ridurrà i commenti di spam, sicuramente vi eviterà di approvare accidentalmente un commento con un cattivo link al sito web dell’autore.
Inoltre, ridurrà un campo dal modulo dei commenti, rendendolo più facile e intuitivo. Per saperne di più su questo argomento, consultate il nostro articolo sulla rimozione del campo url del sito web dal modulo dei commenti di WordPress.
Per rimuovere il campo URL dal modulo di commento, è sufficiente aggiungere il seguente codice al file functions.php o a un plugin con snippet di codice.
1 2 3 4 5 | function wpbeginner_remove_comment_url($arg) { $arg['url'] = ''; return $arg;}add_filter('comment_form_default_fields', 'wpbeginner_remove_comment_url'); |
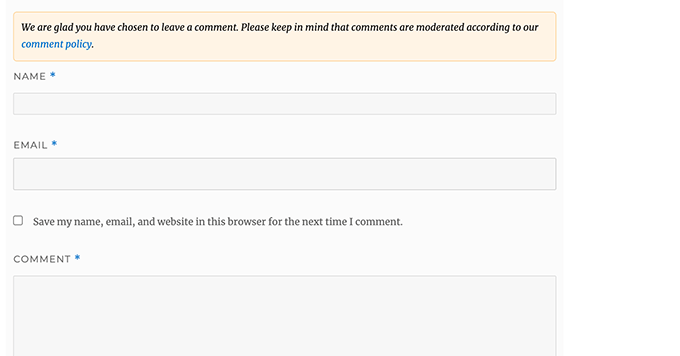
È possibile seguire gli stessi passaggi della sezione precedente per aggiungere in modo sicuro questo codice in WordPress utilizzando il plugin WPCode.
Aggiungere una casella di controllo per l’iscrizione ai commenti in WordPress
Quando gli utenti lasciano un commento sul vostro sito web, potrebbero voler seguire la discussione per vedere se qualcuno ha risposto al loro commento. Aggiungendo una casella di controllo per la sottoscrizione ai commenti, si consente agli utenti di ricevere notifiche istantanee ogni volta che un nuovo commento appare sul post.
Per aggiungere questa casella di controllo, la prima cosa da fare è installare e attivare il plugin Subscribe to Comments Reloaded. Dopo l’attivazione, è necessario visitare la pagina StCR ” Comment Form per configurare le impostazioni del plugin.

Per istruzioni dettagliate passo-passo, consultate il nostro articolo su come consentire agli utenti di iscriversi ai commenti in WordPress.
Aggiungere campi extra al modulo di commento di WordPress
Volete aggiungere campi supplementari al vostro modulo di commento di WordPress? Ad esempio, un campo opzionale in cui gli utenti possano aggiungere il loro profilo Twitter?
È sufficiente installare e attivare il plugin WordPress Comments Fields. Dopo l’attivazione, andare alla pagina “Campi per i commenti” e passare alla scheda “Campi per i commenti”.
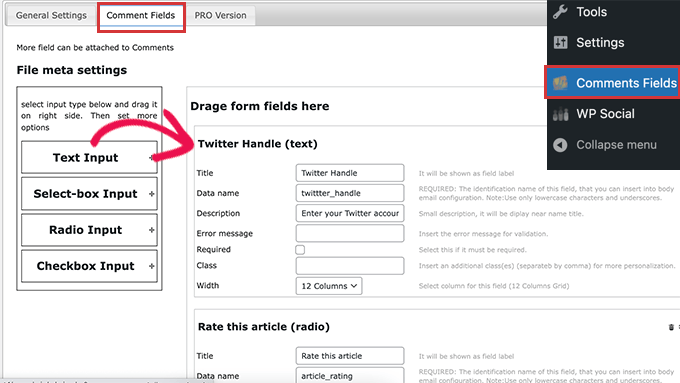
È sufficiente trascinare e rilasciare un campo personalizzato e assegnargli un titolo, una descrizione e un nome di dati.
Una volta terminata l’aggiunta dei campi, non dimenticate di fare clic sul pulsante “Salva tutte le modifiche”.
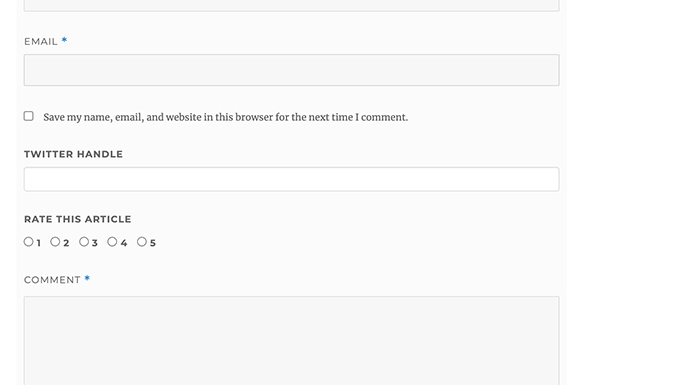
È ora possibile visualizzare il modulo dei commenti per vedere i campi personalizzati in azione.
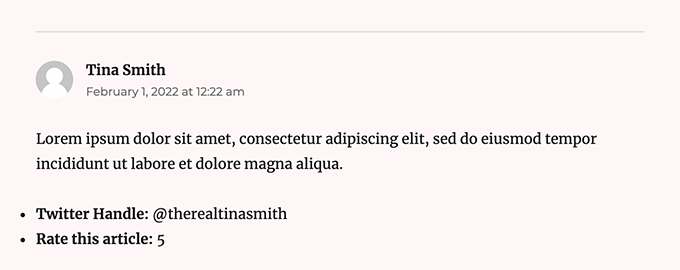
I campi personalizzati vengono quindi visualizzati nella moderazione dei commenti e sotto il loro contenuto.
Per maggiori dettagli, consultate il nostro tutorial su come aggiungere campi personalizzati al modulo dei commenti in WordPress.
Ci auguriamo che questo articolo vi abbia aiutato a capire come modellare il modulo dei commenti di WordPress per renderlo più divertente per i vostri utenti. Potreste anche voler vedere i nostri consigli per ottenere più commenti sui vostri post su WordPress e le nostre scelte di esperti sui migliori plugin per i social media per WordPress.
Se questo articolo vi è piaciuto, iscrivetevi al nostro canale YouTube per le esercitazioni video su WordPress. Potete trovarci anche su Twitter e Facebook.


Moinuddin Waheed
I have seen many different comments section on websites and wondered why do they differed on appearance although all are using the same wordpress comments.
having a good looking comments section is necessary for making good user experience while commenting.
I have a query regarding disqus platform for wordpress comments which I have used for two years.
is it good idea to continue to use it or is there a better alternative?
also just curious to know what does wpbeginner uses for comments?
WPBeginner Support
You can find our opinion on disqus in our article below. For our comments we are currently using the built-in WordPress comment system.
https://www.wpbeginner.com/wp-tutorials/how-to-disable-disqus-on-custom-post-types-in-wordpress/
Admin
Vera Kofyan
Thank you for a great tutorial.
One thing did not work for me: moving the text area to bottom. I added the script in Code snippets, but nothing changed. Has anything changed since you wrote that?
Thank you,
Vera
WPBeginner Support
The snippet should still work correctly, the theme you are using may have added styling to the comment form that could be changing some things, if you check with the support for your specific theme they can help check and confirm this.
Admin
Arischvaran Puvanesvaran
Thank you for sharing
WPBeginner Support
You’re welcome, we hope you found our guide helpful!
Admin
Ali Kaleem
This Blog Is very imformative.
WPBeginner Support
Glad you found our site helpful!
Admin
Asutosh sahoo
really full of knowledge. please keep updating. thanks..
WPBeginner Support
Glad you found our guide helpful!
Admin
saikul
good tutorial . i like this
WPBeginner Support
Thank you, glad you liked it!
Admin
Samyak sharma
Thanks, This is very good article.
WPBeginner Support
Glad you found it helpful
Admin
Vincent Nyagaka
Thank you for guiding us on how to style WordPress form. However I have tried to use almost all the codes, on how to remove the URL field from the comment form but unfortunately, none is working code. Kindly can you give me another code to use
WPBeginner Support
If none of our recommendations were able to assist, we would recommend reaching out to the support for your specific theme and they should be able to assist with targeting their specific target for your comments.
Admin
amr
Hi
How can I delete the url from the author name and date?
Thanks
WPBeginner Support
IF you mean from your comments then you would want to take a look at our article below:
https://www.wpbeginner.com/plugins/how-to-remove-website-url-field-from-wordpress-comment-form/
Admin
lal
good tutorial, loved it
WPBeginner Support
Glad you liked our tutorial
Admin
Adam Rees
Thanks, it helped me a lot in customizing the comment section.
WPBeginner Support
You’re welcome
Admin
fred
Hi, nice tutorial ! but i have a problem to find the location of the right .php to modify the post comments, i’m using oceanwp theme with elementor pro, when i go to the functions.php or comments.php i can’t find any of the command lines, i’v tryed to add your code and nothing happens. so i guess it’s somewhere else but where ?
WPBeginner Support
If you are using a page builder you would need to reach out to that page builder’s support for how to edit the comment form and what tools are available.
Admin
Muhammad Shahzad
how to show to comment box to the top of all comments and after post.
WPBeginner Support
If your theme is not set up that way you would sadly need to modify the theme’s code to do that. As each theme’s code can be very different we do not have a specific guide on how to do that yet.
Admin
HieuBui
Thank you very much
WPBeginner Support
You’re welcome
Admin
tom
Great Article! thanks a lot
WPBeginner Support
You’re welcome
Admin
mobileninja
Thank you so much. It is very helpful article.
WPBeginner Support
Glad it could be helpful
Admin
Emma
Hi. Great tutorial. I wanted to refrain my users from adding their website url to the comment section, because it causes crashes for some users (no idea why). I succeeded, but now it still says the usual “remember my name, e-mail adres and website for the next time I leave a comment”. Do you know how to fix that?
WPBeginner Support
You may want to check with your theme’s support and let them know about the crashing and editing that message.
Admin
WPBeginner Support
Glad our guide could help
Admin
Deepak Bharti
Thanks for sharing this type of article. it is helpful for me and my website.
WPBeginner Support
Glad our article could be helpful
Admin
Rubel Ahmed
Hello
Nice article and I have used some of your suggestions but I found a code error that needs fixing under ‘Adding Comment Policy Text Before or After Comment Form’.
You have placed the add filter within the function or otherwise it won’t get executed, it needs to be moved outside of the function.
Rubel
WPBeginner Support
Both filters should be outside the function but we will certainly take another look and update if we can see the error
Admin
suvo
obviously like your web-site Post Thanks for Shearing. i Read your Blog every day.it very bothersome to tell the reality then again I’ll definitely come back again.Please write more about this topics.
WPBeginner Support
Glad you like our articles
Admin
ARPIT
The Information you’ve provided here is very good. Nice Tutorial. Thanks for sharing. I was looking for a long time for this.It’s really helping me get more familiar with WordPress!
WPBeginner Support
Hi Arpit,
We are glad you found the tutorial helpful.
Admin
Hồ Ngọc Thanh
I can’t find #respond { }
#reply-title { }
#cancel-comment-reply-link { }
#commentform { }
#author { }
#email { }
#url { }
#comment
#submit
in my wordpress theme?
WPBeginner Support
Your theme may have styled it differently, for finding what they are you would want to take a look at our article: https://www.wpbeginner.com/wp-tutorials/basics-of-inspect-element-with-your-wordpress-site/
The # would be for the ID of the object so if something had the ID of button then it would be #button
Admin
Chintan
How to add real-time comment preview?
Paulina
Hello, thank you for this very useful article. I am interested in adding a text before the button “submit”. In the code that you are providing here: would I need to change the words ‘wpbeginner’ to anything else that is connected to my own site?
Akramul Hasan
Hello Paulina,
You can add text or anything before Submit button by using a simple filter hook that works for comments form fields.
Hena
wow!! It’s very good
Woolker Cherenfant
Hi! Great article as usual. But I am wondering how can I change the word “says” in the comment section. I want to translate it into Haitian Creole “di”. Any help with that?
Thanks in advance.
—Woolker
Tisha
Is it possible to copy the code to blogger?. Because I want to make WordPress style comment in my Blogger blog. Thanks for your help.
Mate Hodi
Hey!
Great article! I was looking for a solution to change the “Leave a Reply” part. Do you have any idea how I may change it?
Neeraj
This is a helpful guide which gave thorough guidance to me about Comments Section Optimization.
Kevin Byrnes
Excellent article. I will be facing some of these issues as well..
JP
Hi
I love your tutorials! I still have a question though; is it popular to change the greyish background color of the entire comment form to some thing else? Perhaps even to an image instead of a solid color?
Mahesh
I’m Loving Your Tuts It is very Easy to Understand and More Useful any Where.
Thanks For Sharing Sir.
Lisa Marten
Can I put the comment box to be fill in above the list of posted comments instead of below?
WPBeginner Support
Yes you can.
Admin
SiRetu
Is there any complete tutorial? I mean start from scratch including creating comments.php file from the first time. Thanks, great tutorial as always
Luis Izquierdo
I am customizing my wp themes child theme and I was able to place the policy text above the comment form. But it only shows to logged out users. How do I get it to show to Logged in users?
Luca Morelli
Hello great tutorial: thanks!
I keep improving my knowledge about WordPress thanks to your lessons. I have a question (I don’t know much about php): I managed to add the comment policy text before the submit button, but I noticed that if I click “reply” and see your codes, the php output is inside the paragraph tag together with a class named “commentpolicy”. How did you achieve that (e.g. how to style the php output on an HTML webpage with a tag and a class, which can then be styled with CSS)?
Hopefully I explained it correctly and my question makes sense.
Again many thanks for all your tutorials.
Luca
WPBeginner Support
We are not sure what you are trying to ask. Can you please explain bit more? Thanks.
Admin
Jayanta
I have the same question. Trying to clarify a bit.
I have added your snippet to get the comment policy text before comment field. But This is only some text, no special div class is added for that text. So, I am not able to style it using css (I would like to make the text smaller, or may be put a border-box to it). Please guide us. Hope it makes sense now. Thank you so much.
Erick
How do you make comments look like this website?
gift charles
Thank you very much for this,i was looking for a long time for a way to make the built in comments look better because i prefer them to other services like facebook comments or disqus
Adnan Bashir
As you have noticed, the newest version of WP (4.4) is displaying Name and Email form below Text box, do you have any idea how to revert it to old style (Name and Email box above the Text box) ?
Thanks
WPBeginner Support
Please take a look at How to move comment text field to bottom in WordPress 4.4
Admin
Adnan Bashir
Thank you, now the Comment form is looking better
mario
Hello, great tutorial !
But I’d like to know one more thing: is it possible to add a checkbox for the privacy policy? Since wordpress system collect the ip, I want my users to check teh box before sending the message. Any suggestion ? Thank you !
WPBeginner Support
Please see our article on how to add custom fields to comments form in WordPress.
Admin
Ramon
I would like to have the input comments fields above the comments them self so my customers can leave a comment without the need to scroll all the way down the page.
Is there an easy way to accomplish this?
Thank you.
dragons
Is there any way to ad an EDIT button for the commenters? So they can fix typos and such? Also what if the site wants to allow commenters the ability to upload images in the comments? Is there a way to do that?
Rick Hellewell
Good tutorial. Used it to develop my own customized contact form
plugin, where I re-define the $args for the comment form fields.
But it turns out, while testing, that some themes create their own
‘textarea’ field, which adds to my ‘textarea’ field, resulting in two
comment text fields. Not good.
I have set my add_filter( ‘comment_form_default_fields’…. with a
higher priority (99) so that it happens later in the ‘page build’ (after
the theme does it’s comment_form_default_fields), but the duplicates
comment text boxes are still there. Also tried a priority of 8, and that
didn’t do it either.
So, can you think of a generic (works for any theme) that can
determine if the comment field has already been defined? And, if the
duplicate is found, remove the one in the theme, so I can replace it
with mine?
I understand that the problem is caused by bad coding practices on the theme, but would like to find a workaround.
Thanks….Rick…
Larisa Frolova
Thank you!
I’ve searched the forums and Google for this, but I’m still a little confused as to what to do. If I just want to change the LOCATION of the comment/reply link that appears on posts, how do I do that? It’s not that I want to make it invisible, or change the wording – I just want it to be at the bottom of a post, not at the top.
How do I go about doing that for the Twenty-Twelve theme?
Mikael
I like this layout!
lflier
Very helpful!
I’m really liking the Disqus comment system you’re now using. It’s slick and very inviting. I find myself leaving more comments on sites using Disqus.
But I’m discouraged from using it on my own site by the lack of integration with BuddyPress activity stream. So the more I can do to streamline the native WordPress comment system and make it as inviting as Disqus, the better. Thanks again for your tutorial.
Therese
Thank you so much for all this! It’s really helping me get more familiar with WordPress!
I’ve got the social media logins, I’ve got the border sorted, but now I am totally stuck in trying to find *where* to edit the font for the comment box’s individual boxes.
I can’t figure it out.
Can you please tell me where exactly to find that? You don’t specify this clearly enough in the tutorial.
WPBeginner Support
Please see how we changed fonts for #author and #url input fields in the article. To change font in the comment box you can use something like this:
#comment {font-family:arial,verdana,sans-serif;font-size:16px;}1-click Use in WordPress
Admin
JG
how do I add a required checkbox people have to tick before the form gets submitted? I have tried adding the field in via adding a field under add_filter(‘comment_form_default_fields,) while the field shows the form can still be submitted without ticking the box.
Jewel
Thank you a lot…
Bhushan
I’m trying
Ann
I read through your tutorial… and was wondering if it can be applied to a WordPress site that has a Genesis Framework and Child theme. I am using the Epic Child theme by the way. Thanks for your help.
WPBeginner Support
Yes some parts of the tutorial can be directly applied to your child theme. For CSS styling you need to over ride your childtheme’s CSS.
Admin