Volete dare uno stile diverso a ogni post di WordPress sul vostro sito?
Forse vi sarete imbattuti in alcuni siti web che mettono in risalto i post appiccicosi con uno sfondo personalizzato, oppure che danno a ogni categoria di post un aspetto unico. Potete farlo anche voi, per riflettere i diversi tipi di contenuto e creare un’esperienza visivamente accattivante per gli utenti.
In questo articolo, vi mostreremo come stilizzare facilmente ogni post di WordPress in modo diverso.
Nota: questa esercitazione richiede l’aggiunta di CSS personalizzati in WordPress. È inoltre necessario essere in grado di utilizzare lo strumento Inspect e avere una conoscenza di base dei CSS, quindi potrebbe non essere adatto ai principianti.
Pro e contro di uno stile diverso per ogni post di WordPress
Se avete un blog su WordPress, la scelta di uno stile diverso per ogni post può creare un’esperienza visiva unica, in cui colori diversi sono associati a categorie o tipi di contenuti diversi.
Per esempio, potreste usare un colore di sfondo diverso per tutti gli elenchi, i post del blog e le esercitazioni su come fare sul vostro sito web. Questo può attirare immediatamente l’attenzione degli utenti e aumentare il coinvolgimento.
Tenete presente che questa soluzione può avere anche dei grossi svantaggi. Ad esempio, dovrete mantenere regolarmente il design di ogni post di WordPress, il che può richiedere molto tempo.
Inoltre, può fornire un’esperienza utente incoerente e non aiuta l’identità del marchio. È infatti necessario utilizzare gli stessi colori in tutto il sito web per stabilire l’immagine dell’azienda.
Se siete dei principianti, anche l’aggiunta di CSS personalizzati per lo stile di ogni post può essere difficile. Detto questo, vediamo come si può facilmente stilizzare ogni post di WordPress in modo diverso.
Come creare uno stile per i singoli post in WordPress
WordPress aggiunge classi CSS predefinite a vari elementi del sito web. I temi utilizzano una funzione di base di WordPress chiamata post_class() per indicare a WordPress dove aggiungere le classi CSS predefinite per i post.
Se visitate il vostro sito web e utilizzate lo strumento Ispezione nel vostro browser, potrete vedere le classi aggiunte per ogni post.
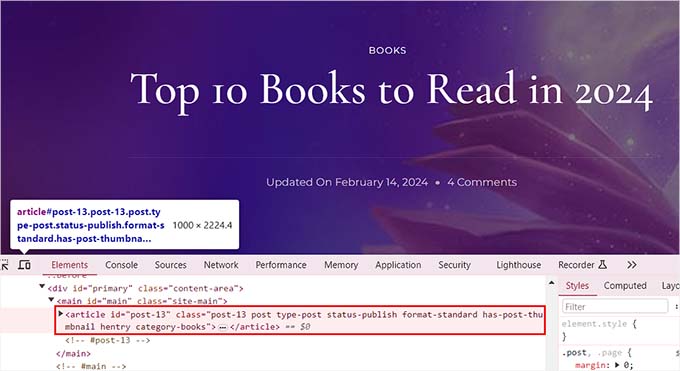
Di seguito sono riportate le classi CSS aggiunte di default in base alla pagina visualizzata dall’utente:
- .post-id
- .post
- .allegato
- .appiccicoso
- .hentry (pagine del microformato hAtom)
- .categoria-ID
- .nome-categoria
- .nome del tag
- .format-{format-name}
- .type-{post-type-name}
- .has-post-thumbnail
Un esempio di output è il seguente:
1 | <article id="post-412" class="post-412 post type-post status-publish format-standard hentry category-news"> |
È possibile creare uno stile diverso per ogni post di WordPress utilizzando le rispettive classi CSS o ID. Per farlo, è necessario trovare l’ID del post per un singolo post.
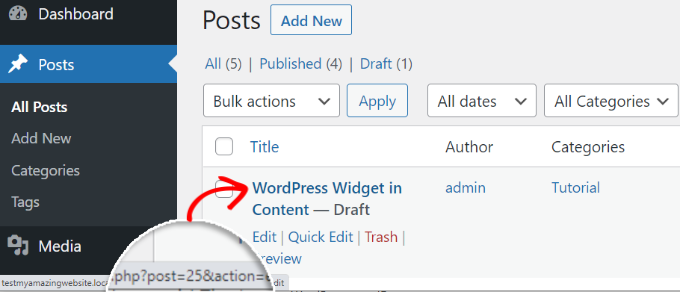
A tal fine, è necessario visitare la pagina Post ” Tutti i post dalla dashboard di WordPress e passare il mouse su un post.
Nell’angolo in basso a sinistra dello schermo apparirà un URL di modifica del post. Qui si può trovare l’ID del post guardando il numero tra “post=” e “&action”.
Nell’esempio seguente, l’ID del post è 25.
Una volta fatto ciò, è necessario aggiungere la classe CSS insieme al codice personalizzato nei file del tema o nel personalizzatore del tema. Tuttavia, questa operazione può essere rischiosa e causare la rottura del sito con un solo errore.
Per questo motivo vi consigliamo di utilizzare WPCode. È il miglior plugin per gli snippet di codice di WordPress e il modo più sicuro per aggiungere codice personalizzato al vostro sito.
Per prima cosa, è necessario installare e attivare il plugin gratuito WPCode. Per maggiori dettagli, consultare la nostra guida per principianti su come installare un plugin di WordPress.
Dopo l’attivazione, visitare la pagina Code Snippets ” + Add Snippet dalla dashboard di WordPress. Qui, fare clic sul pulsante “Usa snippet” sotto l’opzione “Aggiungi il tuo codice personalizzato (nuovo snippet)”.

Si accede così alla pagina ‘Crea snippet personalizzato’, dove si può iniziare aggiungendo un nome al proprio snippet di codice. Successivamente, selezionare ‘CSS Snippet’ come tipo di codice dal menu a discesa sulla destra.
Quindi, è necessario aggiungere la classe CSS e l’ID del singolo post nel riquadro “Anteprima codice”, come segue:
1 | .post-13 { } |
Dopodiché, si può aggiungere qualsiasi tipo di codice CSS personalizzato tra le parentesi per dare stile al post.
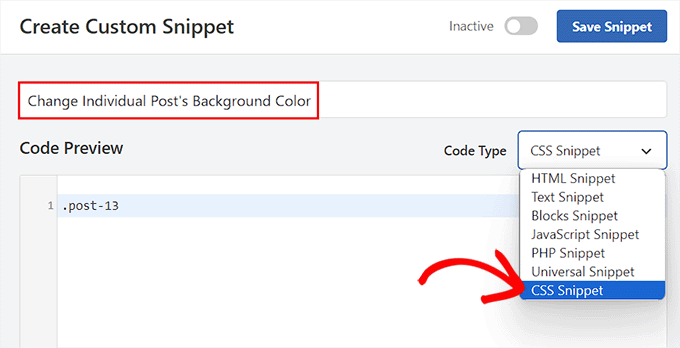
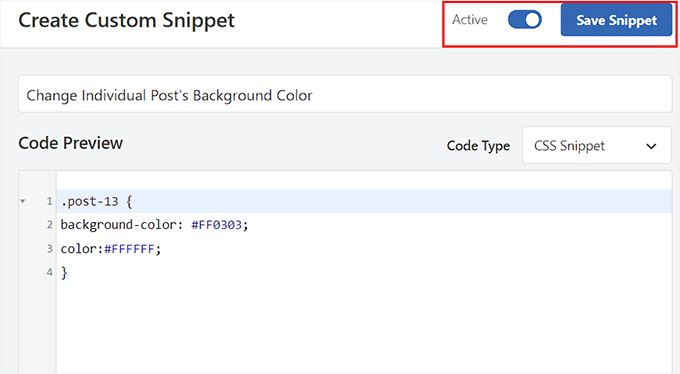
Per esempio, se si vuole cambiare il colore di sfondo di un singolo post, si può aggiungere il seguente codice CSS personalizzato. Si tenga presente che in questo codice si deve sostituire l’ID del post con il proprio ID. Se questo è .post-13, il vostro potrebbe essere .post-23873.
È inoltre possibile modificare il codice esadecimale del colore di sfondo con un colore a scelta:
1 2 3 4 | .post-13 {background-color: #FF0303;color:#FFFFFF;} |
Quindi, spostare l’interruttore “Inattivo” in alto su “Attivo” e fare clic sul pulsante “Salva frammento” per memorizzare le impostazioni.
Il codice CSS personalizzato verrà ora eseguito automaticamente sul singolo post all’attivazione dello snippet.
Visitate il vostro blog WordPress per vedere le modifiche in tempo reale.
È inoltre possibile aggiungere altri snippet di codice CSS personalizzati nella casella “Anteprima codice” per modificare il colore della selezione del testo, il colore del testo, il colore dei collegamenti interni e molto altro ancora.

Per ulteriori informazioni, consultare la nostra guida per principianti su come personalizzare i colori in WordPress.
Come creare uno stile per i post di una categoria specifica
Se si desidera creare uno stile per tutti i post che appartengono a una categoria specifica, è possibile farlo anche con WPCode.
È necessario visitare la pagina Code Snippets ” + Add Snippet e selezionare l’opzione ‘Add Your Custom Code (New Snippet)’.
Quindi, aggiungere il nome di uno snippet di codice nella nuova pagina e scegliere “Snippet CSS” come tipo di codice. Dopodiché, digitate la classe CSS di una categoria specifica nella casella di anteprima del codice, utilizzando lo slug del permalink della categoria dopo il trattino:
.category-books { }
Una volta fatto ciò, è possibile aggiungere qualsiasi snippet CSS personalizzato nella casella per applicarlo a tutti i post delle diverse categorie.
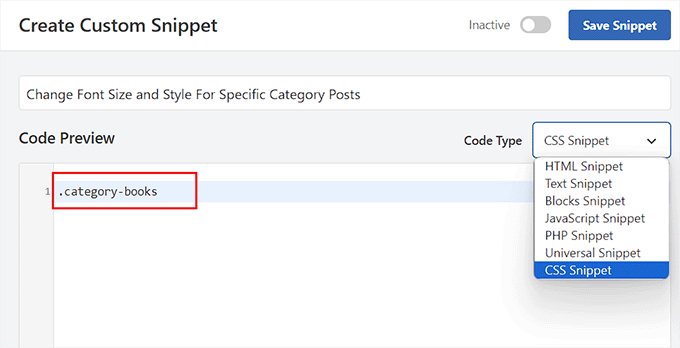
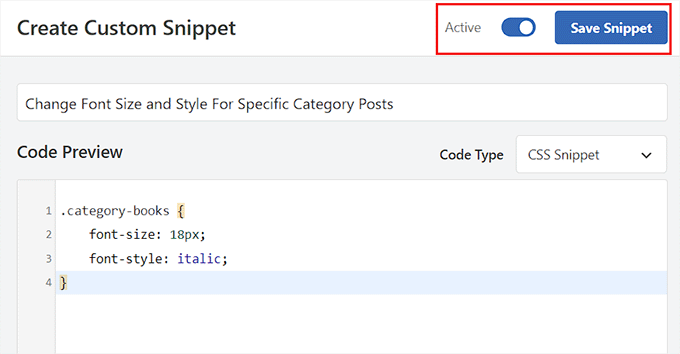
Ad esempio, se si desidera modificare la dimensione e lo stile dei caratteri per tutti i post di una specifica categoria, si può utilizzare il seguente frammento di codice. Ricordate solo di sostituire il nome della categoria in base al vostro sito web.
1 2 3 4 | category-books { font-size: 18px; font-style: italic;} |
Successivamente, spostare l’interruttore “Inattivo” su “Attivo” nella parte superiore.
Quindi, fare clic sul pulsante “Salva frammento” per memorizzare le impostazioni.
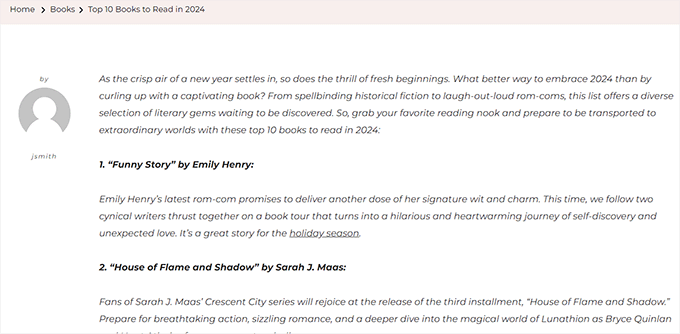
È ora possibile visitare tutti i post di una specifica categoria per vedere le modifiche applicate con il codice CSS.
Ecco come appariva sul nostro sito demo.
Come dare uno stile diverso ai post in base all’autore
Le classi CSS predefinite generate dalla funzione the_posts() non includono il nome dell’autore come classe CSS.
Se si vuole personalizzare lo stile di ogni post in base all’autore, è necessario aggiungere il nome dell’autore come classe CSS.
Per farlo con WPCode, selezionare l’opzione “Aggiungi codice personalizzato (nuovo snippet)”.
Si accede così alla pagina “Crea snippet personalizzato”, dove si deve aggiungere il nome dello snippet di codice e selezionare “Snippet PHP” come tipo di codice.
Successivamente, aggiungere il seguente codice personalizzato nella casella “Anteprima codice” e sostituire “user_nicename” con il nome dell’autore.
1 2 | $author = get_the_author_meta('user_nicename'); ?><article id="post-<?php the_ID(); ?>" <?php post_class( $author ); |
Infine, spostare l’interruttore “Inattivo” su “Attivo” e fare clic sul pulsante “Salva frammento” per memorizzare le impostazioni.
L’aspetto dovrebbe essere il seguente.
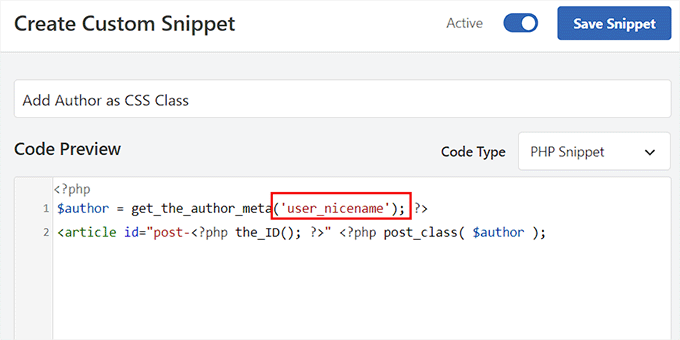
Questo codice aggiungerà il nome dell’utente come classe CSS. Nicename è un nome URL-friendly utilizzato da WordPress. Non ha spazi e tutti i caratteri sono in minuscolo, il che lo rende perfetto da usare come classe CSS.
Ora è necessario visitare nuovamente la pagina Code Snippets ” + Add Snippet e scegliere l’opzione “Add Your Custom Code (New Snippet)”. Nella schermata successiva, aggiungete un nome per il vostro codice personalizzato e scegliete ‘CSS Snippet’ come tipo di codice dal menu a discesa sulla destra.
È quindi possibile aggiungere il nome dell’autore specifico nel riquadro “Anteprima del codice” in questo modo:
1 | .sarahclare |
Successivamente, è possibile aggiungere il codice CSS personalizzato per modificare il colore di sfondo, le dimensioni del bordo, il colore del testo e altro ancora.
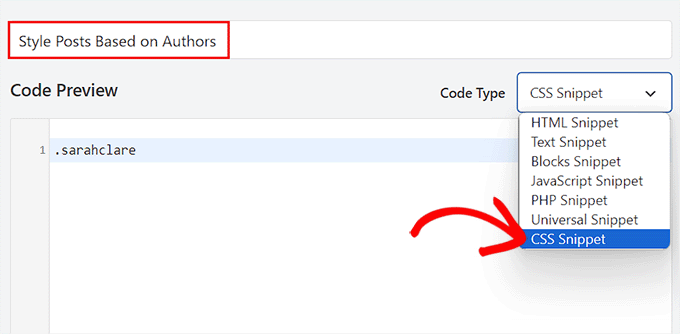
È possibile utilizzare il codice sottostante per modificare il colore di sfondo dei post di un autore e aggiungere un bordo all’area del contenuto.
1 2 3 4 | .sarahclare {background-color:#EEE;border:1px solid #CCC;} |
Una volta terminato, fare clic sul pulsante “Salva snippet” in alto.
Quindi, spostare l’interruttore “Inattivo” su “Attivo”.
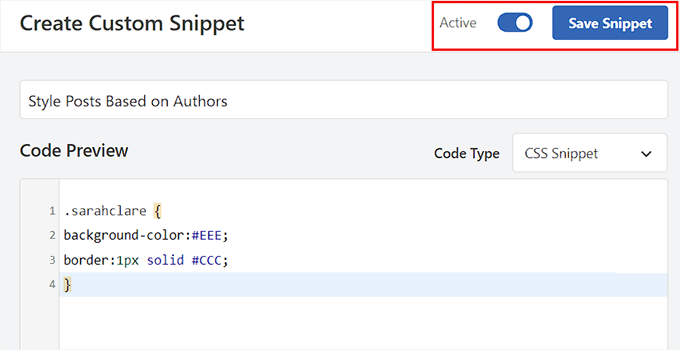
Il codice personalizzato verrà eseguito automaticamente all’attivazione.
È ora possibile visitare il post di un autore specifico per vedere le modifiche.

Come classificare i post in base alla popolarità utilizzando il conteggio dei commenti
Vi sarà capitato di vedere siti con widget dei post più popolari, che a volte si basano sul conteggio dei commenti. In questo esempio, vi mostreremo come stilizzare i post in modo diverso, utilizzando il conteggio dei commenti.
Per prima cosa, dobbiamo ottenere il numero di commenti e associarvi una classe.
Per ottenere il conteggio dei commenti, è necessario aggiungere il seguente codice ai file del tema, oppure è possibile utilizzare un plugin di snippets di codice come WPCode.
Basta scegliere l’opzione “Aggiungi il tuo codice personalizzato (nuovo snippet)” per avviare la pagina “Crea snippet personalizzato” in WPCode.
Qui, selezionare “PHP Snippet” come tipo di codice e quindi copiare e incollare il seguente codice nella casella Anteprima codice:
1 2 3 4 5 6 7 8 9 10 11 12 | <?php $postid = get_the_ID(); $total_comment_count = wp_count_comments($postid); $my_comment_count = $total_comment_count->approved; if ($my_comment_count <10) { $my_comment_count = 'new'; } elseif ($my_comment_count >= 10 && $my_comment_count <20) { $my_comment_count = 'emerging'; } elseif ($my_comment_count >= 20) { $my_comment_count = 'popular'; }?> |
A questo punto, fare clic sul pulsante “Salva frammento” e spostare l’interruttore “Inattivo” su “Attivo” per memorizzare le impostazioni.
Questo codice controlla il numero di commenti del post visualizzato e gli assegna un valore in base al numero di commenti. Ad esempio, i post con meno di 10 commenti ricevono una classe chiamata new, quelli con meno di 20 sono definiti emerging e quelli con più di 20 commenti sono popular.
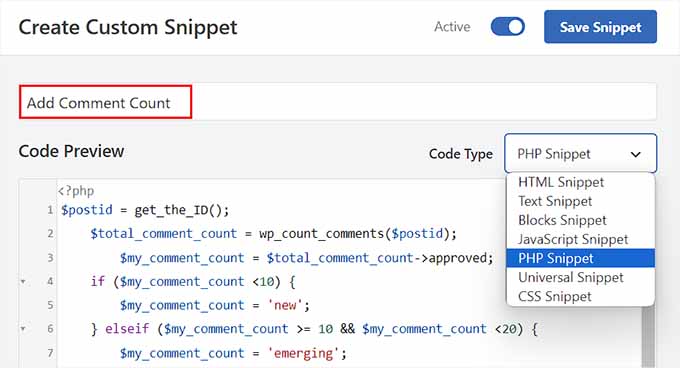
Ora è necessario aggiungere il conteggio dei commenti come classe CSS alla funzione post_class. Per farlo, si deve aprire di nuovo la pagina ‘Create Custom Snippet’ e scegliere l’opzione ‘PHP Snippet’ dal menu a tendina.
Quindi, aggiungere il seguente codice personalizzato nella casella di anteprima:
1 | <article id="post-<?php the_ID(); ?>" <?php post_class( $my_comment_count ); ?>> |
Quindi, fare clic sul pulsante “Salva snippet”.
È ora possibile commutare l’interruttore “Inattivo” in “Attivo”.
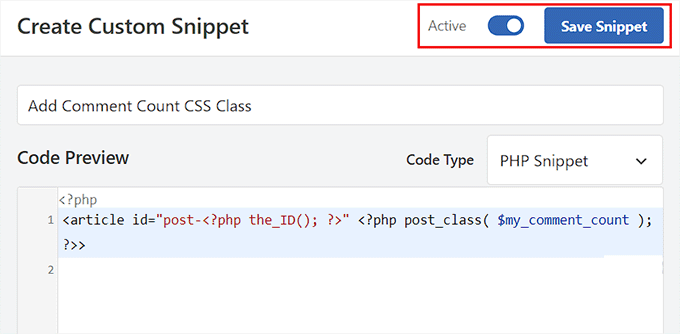
Questo aggiungerà classi CSS nuove, emergenti e popolari a tutti i post, in base al numero di commenti che ogni post ha. È ora possibile aggiungere CSS personalizzati per lo stile di ogni post in base alla sua popolarità.
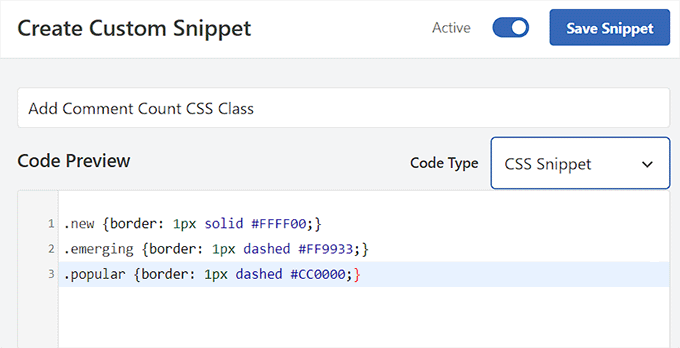
Ad esempio, è possibile utilizzare il seguente codice per aggiungere colori diversi ai bordi dei post in base al numero di commenti inseriti.
1 2 3 | .new {border: 1px solid #FFFF00;}.emerging {border: 1px dashed #FF9933;}.popular {border: 1px dashed #CC0000;} |
Una volta terminato, non dimenticate di fare clic sul pulsante “Salva frammento” per memorizzare le impostazioni.
Bonus: visualizzare una barra laterale diversa per ogni post in WordPress
Dopo aver personalizzato ogni post in modo diverso, si può anche aggiungere una barra laterale unica per ogni post. In questo modo si potranno mostrare i contenuti specifici relativi a quell’articolo che potrebbero interessare agli utenti.
Ad esempio, se avete un blog di viaggi e avete pubblicato un post sui luoghi da visitare in Florida, potete creare una barra laterale specifica che mostri i pacchetti di viaggio in Florida. In alternativa, potreste mostrare un modulo di registrazione per un viaggio in Florida che state organizzando.
Per visualizzare una barra laterale diversa per ogni post, è possibile utilizzare SeedProd, il miglior plugin di page builder per WordPress.
L’interfaccia drag-and-drop, gli oltre 320 modelli predefiniti e le integrazioni con i servizi di email marketing ne fanno un’ottima scelta.
Dopo l’attivazione del plugin, è possibile selezionare una pagina personalizzata come design della pagina di destinazione e quindi un layout con una barra laterale.
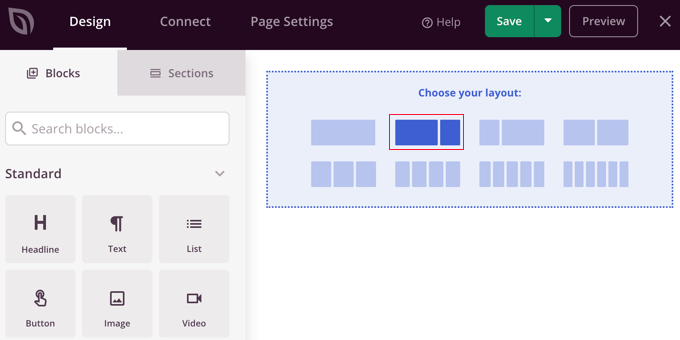
Dopo di che, potete facilmente trascinare e rilasciare i blocchi di vostra scelta dalla colonna di sinistra, compresi i moduli di contatto, gli archivi, gli omaggi, la casella di ricerca, i commenti e altro ancora.
Una volta terminato, basta fare clic sui pulsanti “Salva” e “Pubblica” dal menu a discesa in alto. Ora avete progettato con successo una barra laterale specifica per un post o una pagina di WordPress.
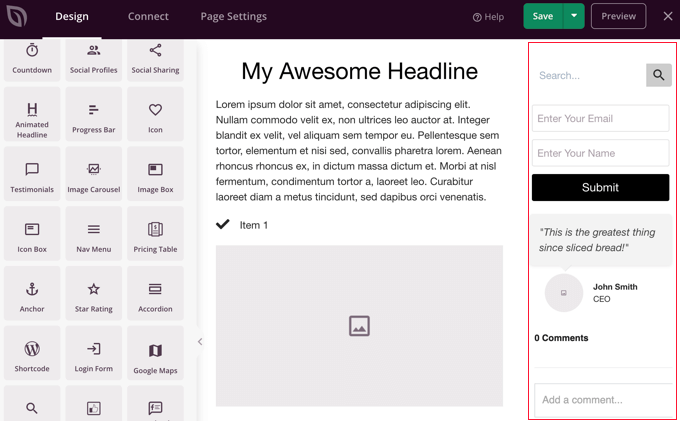
Per maggiori dettagli, consultate il nostro tutorial su come visualizzare una barra laterale diversa per ogni post e pagina in WordPress.
Ci auguriamo che questo articolo vi abbia aiutato a capire come stilizzare ogni post di WordPress in modo diverso. Vi invitiamo a consultare anche la nostra guida per principianti su come creare uno stile per i tag in WordPress e il nostro elenco dei suggerimenti, trucchi e hack più ricercati per WordPress.
Se questo articolo vi è piaciuto, iscrivetevi al nostro canale YouTube per le esercitazioni video su WordPress. Potete trovarci anche su Twitter e Facebook.


Rafael
Nice article. I guess I could use something like this to check the category of a post and place a custom CSS to change the style of part of the website according to the category, right?
I’m looking to set different colors only to the background of the Title of the Post for each Category in a Blog.
Kany
Hi, great article. How to custom css style latest blog news? Just the latest one, any idea? Tnx.
WPBeginner Support
Your theme would need to add something that can be targeted by CSS, at the moment we do not have a recommended method for adding that.
Admin
Les
Great article. I wanted to set the default Font size per category and followed the instruction by adding the code to the Style.css file but when I added a new post the font was the old size. See code? What am I missing?
/* Begin Additional CSS Styles */
.art-blockheader .t, .art-vmenublockheader .t {white-space: nowrap;}
.desktop .art-nav-inner{width: 1200px!important;}
.category-firstg {
font-size: 18px;
font-style: bold;
}
/* End Additional CSS Styles */
William D
Great article, thank you very much. Could the read more button color/text color also be changed in a similar manner? Something (I probably did) has changed my buttons in a very unpleasant way and I’m having a heck of a time trying to figure out how to make them pleasant again.
Thanks in advance for any help you might provide!
Matus
Great tutorial. Simple and clear explanation.
Neon Emmanuel
Hello, if i include this in single.php it echo back the current post title, but works fine in index.php, any suggestion to this?
MayMyatKhine
Hello,Please send to me the new event to use the wordpress.
marisa
This is a great article but I’m having trouble with placing
ID, ‘post-class’); ?>
Where exactly in the loop do I put it? I am using underscore.me with foundation 5 and my new class isn’t appearing.
Alberto Hartzet
Perfect!, ty. What about the first and “the last” post? any ideas?
Nadeem
Thanx alot bro..its very helpful
RW
yet another bookmark! great post! thank you…
Payal
Very informative, thank you. I’ve bookmarked this page.
I also have a question: What if I wanted to style the first (latest) post differently — so that the post displayed at the top of my index page shows up differently?
James
Hey there, I’m struggling with this atm..
My post loop doesnt seem to have a post_class function so I cant figure out where to place the above code…
This is the loop I use for posts, where would I place the above code? Or how could I get custom fields to work using this?
Editorial Staff
You have to add something like this on your post loop:
<div id="post-<?php the_ID(); ?>"<?php post_class(); ?>>1-click Use in WordPress
Admin
Jon Fuller
Hello, I am quite new to making WordPress themes and I am looking for a way to display each post in a box of its own which is seperated by a margin top and bottom. Please explain how this is possible.
Thanks
Editorial Staff
By default each post is inside its own div element. You just have to use CSS to add margin-top and bottom.
Admin
Shaun
Curious, how could this be applied to adding a CSS class to only posts posted that have the same “meta value” or “meta value number”?
Thanks for the great tutorial by the way!
Best
Editorial Staff
We showed how to do it with custom fields, but that’s being done by key. But if you have the same key with multiple values, then you should get_post_custom_values function.
Admin
Em
Just found this post and it is great, clear, succinct and spot on, many thanks
Jim
I would like to do something where post one gets the class “1”, post two gets “2” post three gets “3”, and then it repeats this order, so post four gets “1” again.
Any tips? it’s just repeating three different classes every three posts.
Editorial Staff
You would have to use the super loop option.
Admin
Brit
What I’m trying to do specifically is just make it so when someone lands on my blog, that the thumbnail (which is just a circle with the post title) is a different color for ONLY the most recent post. I’m at a loss of how to make this happen. Everything I’ve found is category or order specific. Thoughts?
Editorial Staff
Brit, you would have to use the last method “Super Loop”. That is probably the only way of doing it because all what you would do is on the first post, you add a unique class such as “first-post” , and then style that using your CSS file.
Admin
Jayaseelan Arumugam
It is very Nice and useful post. Especially I like the way to Style Posts based on Custom Fields. Thanks.
Kathleen
Thanks for this great article! It’s exactly what I searched for and so much helpful!
dina
How do I add unique class to the 3rd, 6th, 9th, and 12nd posts in super loop. Thanks!
vajrasar
Well, that is a very good piece. I got what you said, but can you shed some light on how am gonna implement this on my Genesis driven News Child theme, as I am supposed to do all this with function.php
I would like to style category specific posts differently. Thanks a lot for this piece. very informative.
Editorial Staff
So if you are just using the post class method, then Genesis has the field under their Layout settings for each post. You can enter a custom class and style it that way. The rest can get pretty complicated depending on all the hooks and such. We don’t necessary do genesis specific articles here.
Admin
jim
What do you mean index.php in the loop. which index.php. Mine has nothing like yours. This is the 10th post I’ve read where no one has explained this basic concept properly. And what about the CSS. Last 10 posts didn’t explain that either. Internet is getting worse and worse.
Editorial Staff
Hey Jim,
Every WordPress theme does things differently. The concept of loop is pretty well explained in the WordPress Codex. It requires a simple google search: Loop WordPress which will take you to: http://codex.wordpress.org/The_Loop
Because every theme varies, some utilize a separate loop.php file others are child themes which don’t even have index.php files. It is really hard to explain all of those concepts. When we put tutorials in a theme category, we expect the users to have a fair knowledge of how WordPress themes work (even if you don’t know PHP).
Admin
Haider E Karrar
I think you should be using filters instead in combination with the template tags here http://codex.wordpress.org/Conditional_Tags
For example
function my_post_css_filters($content) {
if(is_category(…))
return ” $content “;
else if (something else)
….
}
add_filter(‘the_content’, ‘my_post_css_filters’, 1) — (priority 1, not sure what else it may affect).
Hossein
Hi..
How i can wrap every 4 posts in a div ?
gashface
Nevermind got that working, but NOW it doesn’t style each post differently, it just styles them all according to the first post author it finds?
gashface
Is there a way to specificy a tag like H2 is styled by author I am trying .username h2{} for example but it won’t work?
gashface
This doesn’t show the author with me just a blank space, pasted your exact code, any ideas? posts made by admin and are private, does that make a difference?
wpbeginner
@gashface not it doesn’t make a difference whether the post is private or public… If it is returning a white page, then you are pasting the code in a wrong place.
gashface
I realised it was because I was putting the code before the call to the loop, I thought you meant before the if have posts etc.. when it needs to go after that, thanks for the heads up
KimeeDoherty
This was a little helpful, but I am still lost Not sure how to include the loop file in order to override the template. You started the <div> tag but not ended them, what’s inside the div? I’m lost
kristelvdakker
Thank you so much for this post! It has been very helpful.
Stuart
Hi, thanks for the ideas – especially the super loop – pleased to have got it working on my site.
But I wonder, complete php beginner here, so is there a way to adapt the code so each subsequent page of posts doesn’t get the styling that posts 1, 2, 3, & 4 get on the first page.
In other words, I only want the first four posts on the first page to look any different to the rest.
Cheers,
Stu
Editorial Staff
Yes. You can use is_paged() conditional tag, so it only shows up on the first page, but not the others. You can also use is_home() … so only on the homepage.
Admin
Stuart
Cool – thank you. Looks like is_paged() is the one for me – but unfortunately, my novice abilities mean I’m struggling to work out how to integrate it in to the code.
Stuart
Got there in the end…
Michael
If you wanted to use this approach to separate posts visually based on their published date. How would you go about it? For example: style the 5 posts published on the 1st with a black background, and then style the posts published on the 2nd with a red background? Thanks in advance!
Editorial Staff
The best way to do this is using the superloop method. Where you use the counter variable to set the post class values.
Admin
Dale
I am trying to style each authors name a different colour on our wordpress website and I have followed your code as below:
Whilst this code is kind of working on my wordpress theme it is putting end quotation marks after class-2 but before the authors name so the class is being closed without the name in it. I only found this out by putting that php inside the body where you can see the full string.
Does anyone have any ideas why this is happening?
Dale
Sorry it stripped out the php I posted but here is the class output of styling my posts by the authors name. The author here is called admin, and as you can see the closing tag is before the author name admin.
“post-395 post type-post hentry category-uncategorized class-1 class-2″admin
Bec
Great post! That info is awesome for adding those extra special custom features to your design.
Adam W. Warner
Indeed a great post, hats off! However, I couldn’t help but keep thinking about when it’s time to upgrade the theme you’re making all these custom edits to. I try to use the functions file whenever possible to avoid overwrites.
I would think it would be better to roll these loop edits into a function. I know that with Parent Themes like Thematic, Hybrid, Genesis, etc…that it’s possible (and advisable) to filter the loop and thus add these changes.
@Ken – Maybe your plugin would negate the need for any functions altogether?
Anyway, just my two cents and congrats Syed and the team on your continuing excellence on this site!
Azad Shaikh
Very useful post indeed. Why don’t you publish some wordpress themes with your awesome ideas and functionality. I would be great success.
Thanks!
Ken
Your article has giving me a few ideas on how to improve my plugin, thanks for that!
I just wrote a plugin (Scripts n Styles) for adding CSS directly to the head element from the post/page editing screen. (Only admin users can do this though.) It’s not as robust (or rather, doesn’t address the same thing) as your solution because the CSS only appears on the single view, not in the lists (archives).
I’m considering adding the functionality to include a class name into post_class, but via a meta box on the admin screen. Then, the admin would only have to add the css to his theme. (Or, perhaps a setting screen to facilitate this?)
Anyway, the Super Loop seems useful for theming in general, I’ll have to include that in my next one!
Connor Crosby
Wow, that is a great post! Perfect timing since I am making a new WordPress theme