I temi child sono uno di quei termini di WordPress che vengono spesso utilizzati per confondere i principianti. Potreste anche averne sentito parlare e aver deciso di non crearli a causa di quanto sembrano complicati.
Lo capiamo. Ma secondo la nostra esperienza, i temi child possono salvare un sacco di grattacapi giù per la strada. Proteggono i vostri preziosi personalizzazioni, vi permettono di sperimentare senza rompere il vostro sito e rendono l’aggiornamento del tema un gioco da ragazzi.
Se siete interessati, abbiamo giù spiegato come funziona un tema child, come personalizzarlo e come apportarvi modifiche in questa guida per principianti.
Come funziona un tema figlio e perché ne avete bisogno?
Un tema figlio eredita tutte le caratteristiche, le funzioni e gli stili di un altro tema di WordPress. Quando si crea un tema figlio, il tema originale viene chiamato tema padre.
L’eredità include il file style.css del tema padre, che definisce lo stile principale del tema. Il tema figlio può sovrascrivere o estendere le proprietà ereditate aggiungendo i propri file o modificando quelli esistenti.
Anche se è possibile personalizzare il tema di WordPress senza installare un tema figlio, ci sono diversi motivi per cui potrebbe essere necessario comunque:
- I temi figlio proteggono le personalizzazioni durante gli aggiornamenti dei temi, evitando che vengano sovrascritte. Se si modifica direttamente il tema principale, queste modifiche potrebbero svanire con l’aggiornamento.
- I temi figlio consentono di provare in sicurezza nuovi design o funzionalità senza rovinare il tema originale del sito, in modo simile a un ambiente di staging.
- Se si conosce il codice, i temi figlio possono rendere più efficiente il processo di sviluppo. I file di un tema figlio sono molto più semplici di quelli di un tema padre. Ci si può concentrare sulla modifica delle sole parti del tema padre che si desidera cambiare o ampliare.
Cosa fare prima di creare un tema figlio di WordPress
Abbiamo visto molti utenti di WordPress entusiasti di immergersi nella tecnica, per poi scoraggiarsi quando compaiono degli errori. Lo capiamo. Ecco perché è importante sapere a cosa si va incontro prima di creare un tema figlio.
Prima di proseguire con questa guida passo-passo, vi consigliamo di eseguire alcune operazioni:
- Siate consapevoli che lavorerete con il codice. È necessario avere almeno una conoscenza di base di HTML, CSS, PHP e, facoltativamente, di JavaScript per capire quali sono le modifiche da apportare. Per saperne di più, consultate il manuale dei temi di WordPress.
- Scegliete un tema genitore che abbia il design e le caratteristiche del sito web che desiderate. Se possibile, trovatene uno che richieda solo poche modifiche. Se necessario, potete seguire la nostra lista di controllo delle cose da fare prima di cambiare tema WordPress.
- Utilizzate un sito locale o un sito di staging per lo sviluppo del tema. Non si vogliono creare errori involontari sul sito live.
- Eseguire primail backup del sito web. Se è la prima volta che lo fate, vi consigliamo di utilizzare un plugin di backup come Duplicator.
Esistono diversi modi per creare un tema figlio dal tema esistente. Uno è quello del codice manuale, mentre altri richiedono un plugin, che è molto più adatto ai principianti.
Il primo metodo può sembrare intimidatorio se non si ha esperienza tecnica. Tuttavia, anche se si sceglie uno dei metodi dei plugin, si consiglia di leggere il metodo manuale per familiarizzare con il processo e i file coinvolti.
Suggerimento: Volete personalizzare il vostro tema senza creare un tema figlio? Utilizzate WPCode per abilitare in modo sicuro nuove funzionalità con snippet di codice personalizzati senza rompere il vostro sito web.
Tenendo presente tutto ciò, passiamo a come creare un tema figlio in WordPress. Potete passare al metodo che preferite utilizzando i link sottostanti:
- Method 1: Creating a Child WordPress Theme Manually
- Method 2: Creating a Child Classic Theme With a Plugin
- Method 3: Creating a Child Block Theme With a Plugin
- Bonus Tip: Find Out If Your Theme Has a Child Theme Generator
- How to Customize Your Classic Child Theme
- How to Customize Your Block Child Theme
- How to Edit a Child Theme's Template Files
- How to Add New Functionality to Your Child Theme
- How to Troubleshoot Your WordPress Child Theme
Metodo 1: Creare un tema Child WordPress manualmente
Per prima cosa, è necessario aprire /wp-content/themes/ nella cartella di installazione di WordPress.
Potete farlo utilizzando il file manager del vostro hosting WordPress o un client FTP. Noi riteniamo che la prima opzione sia molto più semplice, quindi la utilizzeremo.
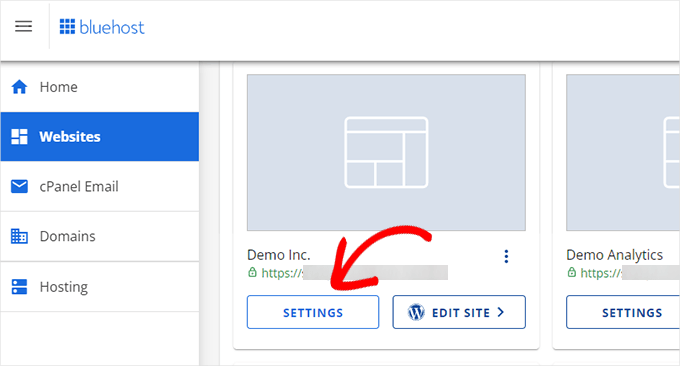
Se siete clienti di Bluehost, potete accedere al cruscotto del vostro account di hosting e navigare nella scheda “Siti web”. Dopodiché, fare clic su “Impostazioni”.
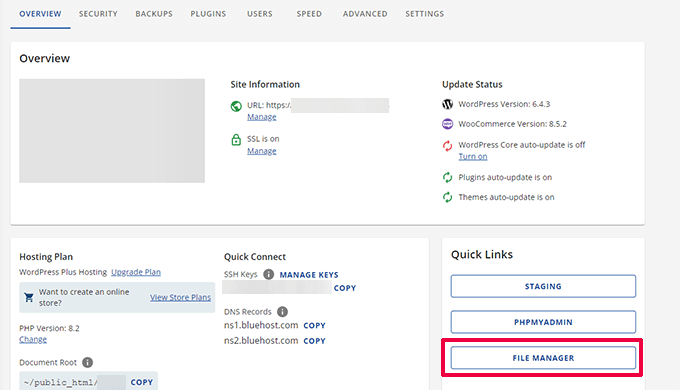
Nella scheda Panoramica, scorrere fino alla sezione “Collegamenti rapidi”.
Quindi, selezionare “Gestione file”.
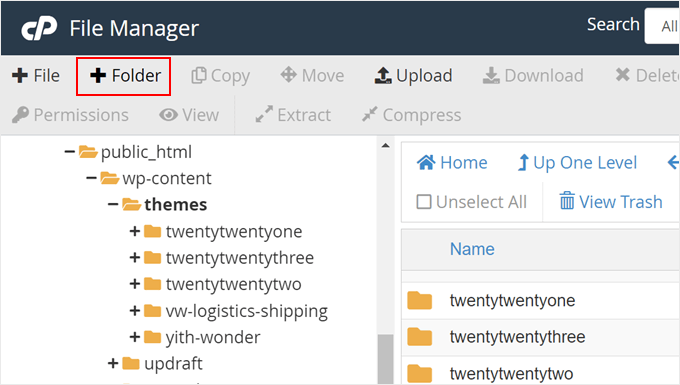
A questo punto, è necessario andare nella cartella public_html del sito web e aprire il percorso /wp-content/themes/.
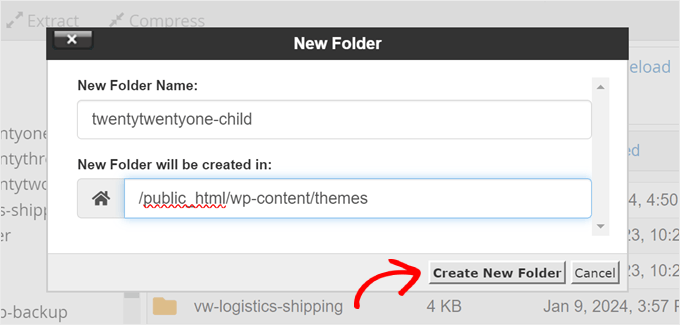
Qui basta fare clic sul pulsante “+ Cartella” nell’angolo in alto a sinistra per creare una nuova cartella per il tema figlio.
È possibile assegnare alla cartella il nome che si desidera.
Per questa esercitazione, utilizzeremo il nome della cartella twentytwentyone-child, in quanto utilizzeremo Twenty Twenty-One come tema padre. Una volta fatto, basta fare clic su “Crea nuova cartella”.
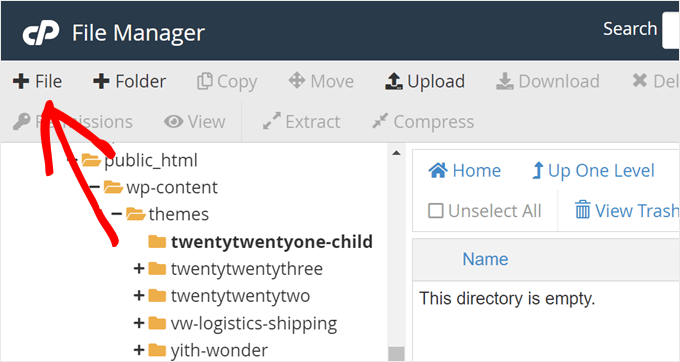
Successivamente, è necessario aprire la cartella appena creata e fare clic su ‘+ File’ per creare il primo file per il tema figlio.
Se si utilizza un client FTP, è possibile utilizzare un editor di testo come Notepad e caricare il file in un secondo momento.
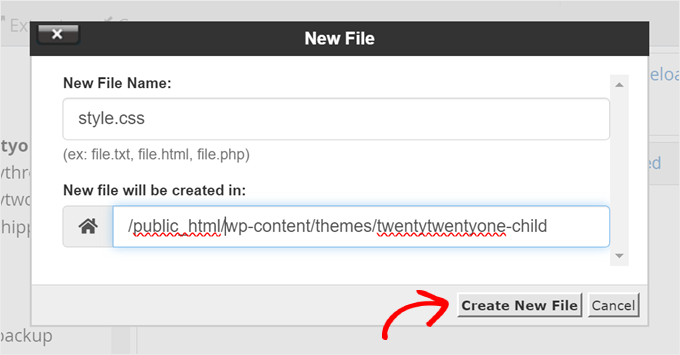
Procedere con il nome di questo file ‘style.css’, poiché è il foglio di stile principale del bambino e conterrà informazioni sul tema figlio.
Quindi, fare clic su “Crea nuovo file”.
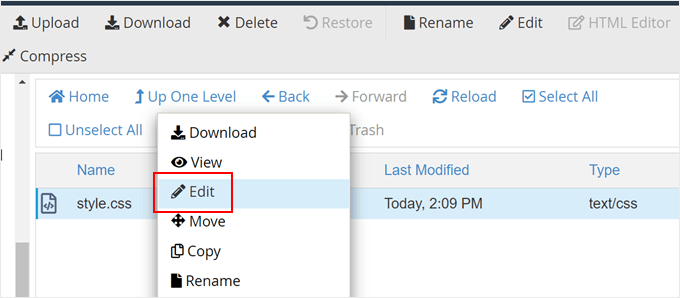
A questo punto, basta fare clic con il tasto destro del mouse sul file style.css.
Quindi, fare clic su “Modifica” per aprire una nuova scheda come nella schermata seguente.
In questa nuova scheda è possibile incollare il testo seguente e modificarlo in base alle proprie esigenze:
1 2 3 4 5 6 7 8 9 10 | /*Theme Name: Twenty Twenty-One ChildTheme URI: https://wordpress.org/themes/twentytwentyone/Description: Twenty Twenty-One child themeAuthor: WordPress.orgAuthor URI: https://wordpress.org/Template: twentytwentyoneVersion: 1.0.0Text Domain: twentytwentyonechild*/ |
Al termine, fare clic su “Salva modifiche”.

La cosa successiva da fare è creare un secondo file e chiamarlo functions.php. Questo file importerà o richiederà i fogli di stile dai file del tema principale.
Una volta creato il documento, aggiungere il seguente codice wp_enqueue:
1 2 3 4 5 6 7 8 9 10 11 12 13 | add_action( 'wp_enqueue_scripts', 'my_theme_enqueue_styles' );function my_theme_enqueue_styles() { $parenthandle = 'twenty-twenty-one-style'; // This is 'twenty-twenty-one-style' for the Twenty Twenty-one theme. $theme = wp_get_theme(); wp_enqueue_style( $parenthandle, get_template_directory_uri() . '/style.css', array(), // if the parent theme code has a dependency, copy it to here $theme->parent()->get('Version') ); wp_enqueue_style( 'custom-style', get_stylesheet_uri(), array( $parenthandle ), $theme->get('Version') // this only works if you have Version in the style header );} |
Una volta terminato, salvare il file come nel passaggio precedente.
Nota: per questo metodo, si consiglia di leggere la documentazione ufficiale sui temi figlio e sull’inclusione delle risorse, per assicurarsi che i fogli di stile del tema figlio siano caricati correttamente.
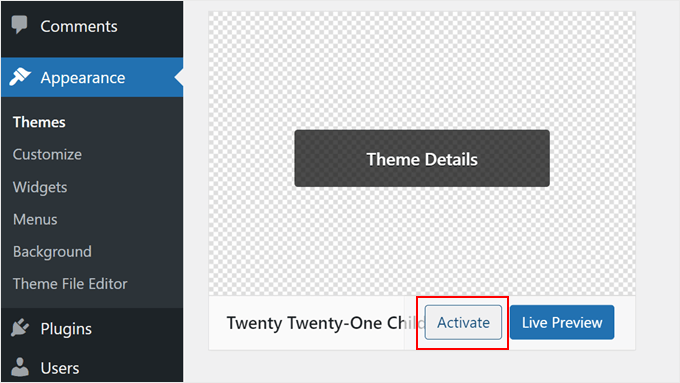
Ora avete creato un tema child molto semplice. Andando su Aspetto ” Temi nel pannello di amministrazione di WordPress, si dovrebbe vedere l’opzione Twenty Twenty-One Child.
Fare clic sul pulsante “Attiva” per iniziare a utilizzare il tema figlio sul proprio sito.
Metodo 2: Creare un tema Child Classic con un plugin
Il prossimo metodo utilizza il plugin Child Theme Configurator. Questo plugin per WordPress, facile da usare, consente di creare e personalizzare rapidamente i temi figlio di WordPress senza utilizzare il codice, ma funziona bene solo con un tema classico (non a blocchi).
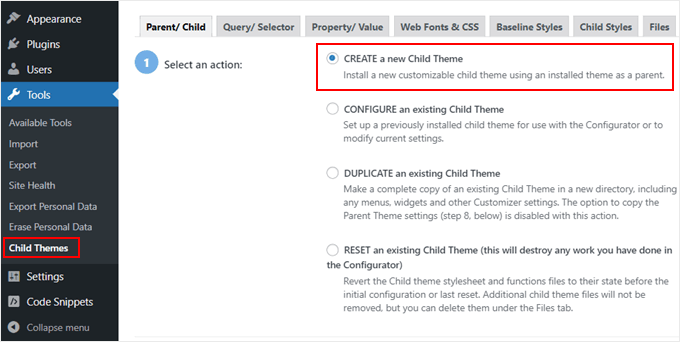
La prima cosa da fare è installare e attivare il plugin di WordPress. Dopo l’attivazione, è necessario andare su Strumenti ” Temi figlio nella dashboard di WordPress.
Nella scheda Genitore/Figlio, vi verrà chiesto di scegliere un’azione. Per iniziare, selezionare “CREA un nuovo tema figlio”.
Quindi, selezionare un tema padre da un menu a discesa. Noi selezioneremo il tema Hestia.
Dopodiché, basta fare clic sul pulsante “Analizza” per assicurarsi che il tema sia adatto all’uso come tema genitore.

Successivamente, verrà chiesto di dare un nome alla cartella in cui verrà salvato il tema figlio. È possibile utilizzare qualsiasi nome di cartella.
Di seguito, è necessario selezionare dove salvare i nuovi stili: nel foglio di stile primario o in uno separato.
Il foglio di stile primario è il foglio di stile predefinito fornito con il tema figlio. Quando si salvano nuovi stili personalizzati in questo file, si modifica direttamente lo stile principale del tema figlio. Ogni modifica sovrascriverà lo stile del tema originale.
L’opzione separata consente di salvare un nuovo stile personalizzato in un file di foglio di stile separato. È utile se si vuole conservare lo stile del tema originale e non sovrascriverlo.
A scopo dimostrativo, sceglieremo la prima opzione. Ma se si diventa più creativi con le personalizzazioni del tema figlio, si può sempre ripetere questo processo e selezionare la seconda opzione.

Scendendo, si deve scegliere come accedere al foglio di stile del tema padre.
Sceglieremo l’opzione predefinita “Usa la coda di stile di WordPress”, in quanto lascerà che il plugin determini automaticamente le azioni appropriate.

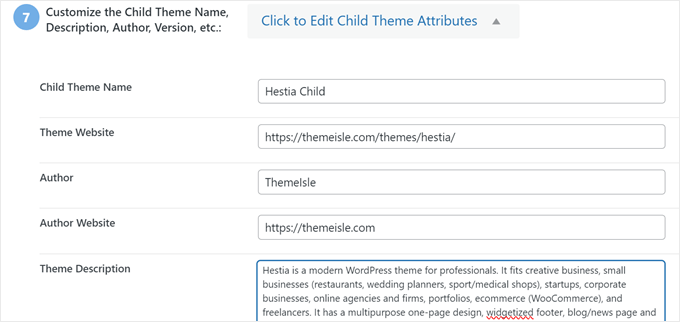
Quando si arriva al passo 7, è necessario fare clic sul pulsante “Clicca per modificare gli attributi del tema figlio”.
È quindi possibile inserire i dettagli del tema figlio.
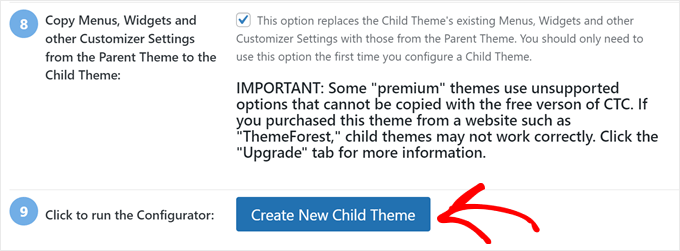
Quando si crea un tema figlio manualmente, si perdono i menu e i widget del tema padre. Child Theme Configurator può copiarli dal tema padre al tema figlio. Selezionate la casella al punto 8 se desiderate farlo.
Infine, fare clic sul pulsante “Crea nuovo tema figlio” per creare il nuovo tema figlio.
Il plugin creerà una cartella per il tema figlio e aggiungerà i file style.css e functions.php che verranno utilizzati per personalizzare il tema in seguito.
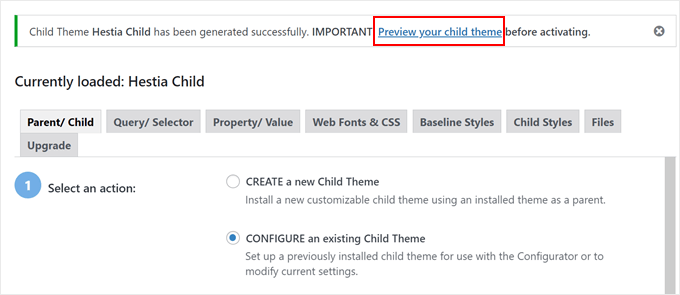
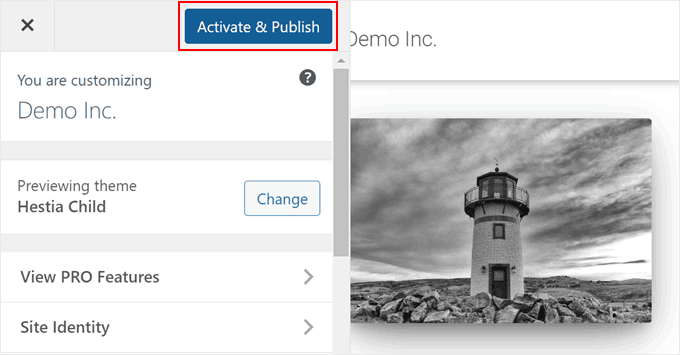
Prima di attivare il tema, è necessario fare clic sul link vicino alla parte superiore dello schermo per visualizzarne l’anteprima e assicurarsi che sia di qualità e non danneggi il sito.
Se tutto sembra funzionare, fare clic sul pulsante “Attiva e pubblica”.
Ora il tema figlio sarà attivo.
In questa fase, il tema figlio avrà un aspetto e un comportamento identico a quello del tema padre.
Metodo 3: Creare un tema di blocco figlio con un plugin
Se si utilizza un tema a blocchi, WordPress offre un modo semplice per creare un tema figlio con il plugin Create Block Theme.
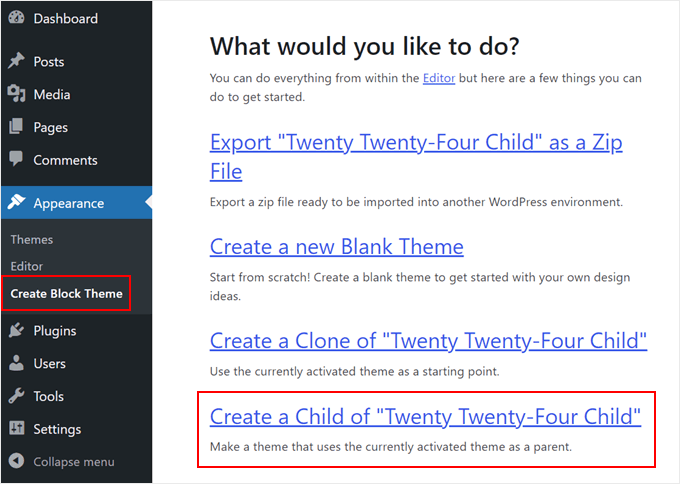
Per prima cosa, è necessario installare e attivare il plugin di WordPress. Dopodiché, andare su Aspetto ” Crea tema di blocco.
Qui è sufficiente selezionare “Crea un figlio/bambino di [nome del tema corrente]”.
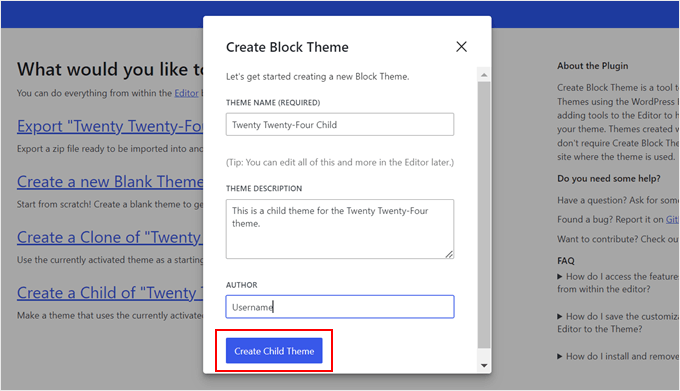
Quindi, compilare le informazioni del tema child. In questo esempio utilizziamo Twenty Twenty-Four, quindi lo chiameremo Figlio/bambino.
Abbiamo anche fornito una descrizione e un autore per il tema child. Una volta fatto, cliccate sul pulsante “Crea tema child”.
Il plugin creerà e installerà il file zip del tema WordPress nell’area di amministrazione.
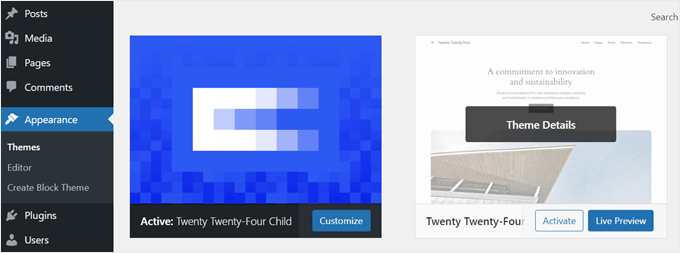
Una volta fatto, il sito web attiverà automaticamente il tema child appena creato. È possibile confermarlo andando su Aspetto ” Temi.
Suggerimento bonus: Scoprire se il tema ha un generatore di temi figlio
Se siete fortunati, il vostro tema WordPress potrebbe già avere una funzione esistente per creare un tema figlio.
Ad esempio, se si utilizza Astra, si può andare al sito web Astra Child Theme Generator. Dopo di che, è sufficiente inserire il nome del tema figlio e fare clic sul pulsante “Generate”.
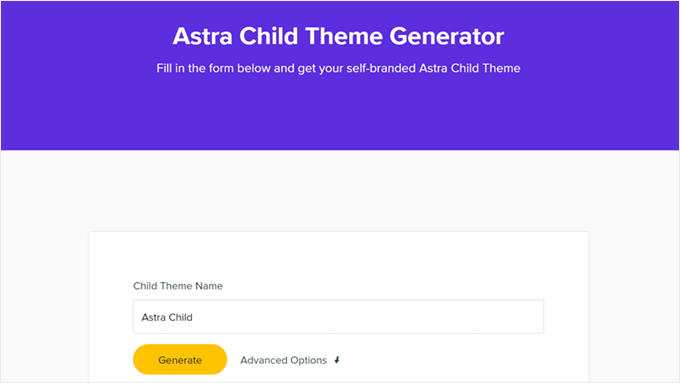
Il vostro browser scaricherà automaticamente il tema figlio sul vostro computer, che potrete poi installare autonomamente su WordPress.
Abbiamo trovato anche altri temi WordPress popolari che hanno un generatore di temi figlio:
Come personalizzare il tema figlio classico
Nota: questa sezione è dedicata agli utenti di temi WordPress classici. Se utilizzate un tema a blocchi, passate alla sezione successiva.
Tecnicamente, è possibile personalizzare il tema figlio senza codice utilizzando il Theme Customizer. Le modifiche apportate non influenzeranno il tema figlio. Se non vi sentite ancora a vostro agio con la codifica, potete usare il Customizer.
Detto questo, si consiglia anche di personalizzare il tema figlio con il codice.
Oltre a imparare di più sullo sviluppo dei temi di WordPress, la personalizzazione del codice consente di documentare le modifiche all’interno dei file del tema figlio, rendendone più facile la tracciabilità.
Il modo più semplice per personalizzare un tema figlio è aggiungere CSS personalizzati al file style.css. Per farlo, è necessario conoscere il codice da personalizzare.
È possibile semplificare il processo copiando e modificando il codice esistente del tema principale. È possibile trovare il codice utilizzando lo strumento Inspect di Chrome o Firefox o copiandolo direttamente dal file CSS del tema principale.
Metodo 1: copiare il codice dall’ispettore di Chrome o Firefox
Il modo più semplice per scoprire il codice CSS da modificare è quello di utilizzare gli strumenti di ispezione forniti con Google Chrome e Firefox. Questi strumenti consentono di esaminare l’HTML e il CSS dietro qualsiasi elemento di una pagina web.
Potete leggere ulteriori informazioni sullo strumento ispettore nella nostra guida sulle basi dell’elemento inspect: personalizzare WordPress per gli utenti fai-da-te.
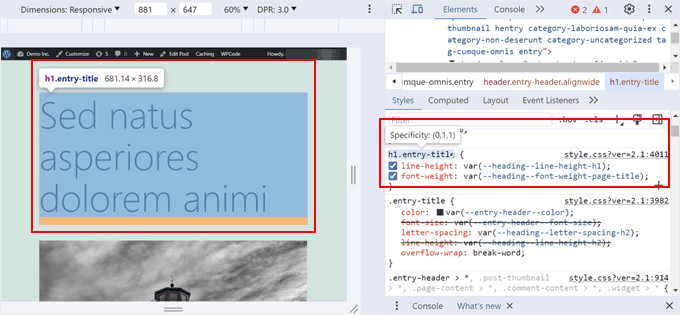
Quando si fa clic con il pulsante destro del mouse sulla pagina web e si utilizza l’elemento ispeziona, si vedranno l’HTML e il CSS della pagina.
Quando si sposta il mouse su diverse linee HTML, l’ispettore le evidenzia nella finestra superiore. Verranno mostrate anche le regole CSS relative all’elemento evidenziato, in questo modo:
Si può provare a modificare il CSS proprio lì per vedere come apparirebbe. Per esempio, proviamo a cambiare il colore di sfondo del corpo del tema in #fdf8ef. Trovate la riga di codice che dice body { e al suo interno il codice che dice color:.
È sufficiente fare clic sull’icona del selezionatore di colori accanto a colore: e incollare il codice HEX nel campo appropriato, in questo modo:
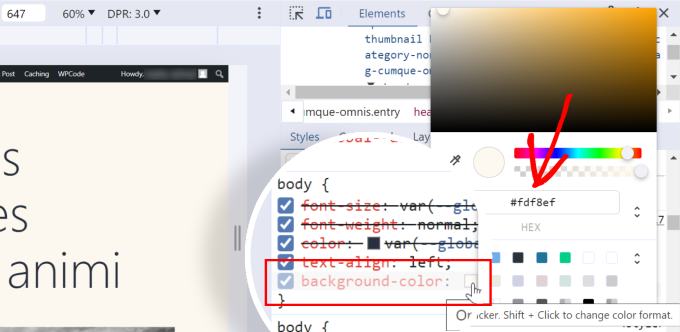
Ora sapete come cambiare il colore di sfondo usando i CSS. Per rendere permanenti le modifiche, si può aprire il file style.css nella cartella del tema figlio (usando il file manager o FTP).
Quindi, incollare il seguente codice sotto le informazioni del tema figlio, in questo modo:
1 2 3 4 5 6 7 8 9 10 11 12 13 14 | /*Theme Name: Twenty Twenty-One ChildTheme URI: https://wordpress.org/themes/twentytwentyone/Description: Twenty Twenty-One child themeAuthor: WordPress.orgAuthor URI: https://wordpress.org/Template: twentytwentyoneVersion: 1.0.0Text Domain: twentytwentyonechild*/body { background-color: #fdf8ef} |
Ecco come apparirà se si accede all’amministrazione di WordPress e si apre Aspetto ” Theme File Editor:
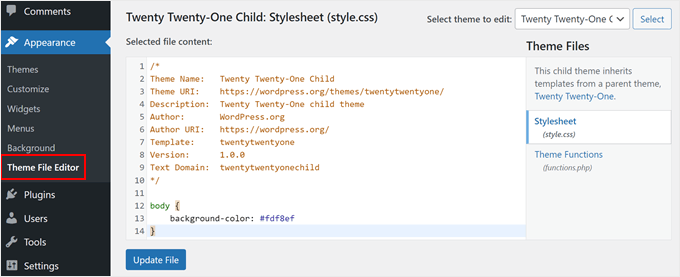
Se siete principianti e volete apportare altre modifiche, vi consigliamo di familiarizzare con HTML e CSS, in modo da sapere esattamente a quale elemento si riferisce ogni codice. In rete si trovano molti fogli informativi su HTML e CSS a cui si può fare riferimento.
Ecco il foglio di stile completo che abbiamo creato per il tema figlio. Sentitevi liberi di sperimentare e modificare:
1 2 3 4 5 6 7 8 9 10 11 12 13 14 15 16 17 18 19 20 21 22 23 24 25 26 27 28 29 30 31 | /*Theme Name: Twenty Twenty-One ChildTheme URI: https://wordpress.org/themes/twentytwentyone/Description: Twenty Twenty-One child themeAuthor: WordPress.orgAuthor URI: https://wordpress.org/Template: twentytwentyoneVersion: 1.0.0Text Domain: twentytwentyonechild*/.site-title {color: #7d7b77;}.site-description {color: #aba8a2;}body {background-color: #fdf8ef;color: #7d7b77;}.entry-footer {color: #aba8a2;}.entry-title {color: #aba8a2;font-weight: bold;}.widget-area {color: #7d7b77;} |
Metodo 2: copiare il codice dal file style.css del tema padre
Forse ci sono molte cose nel tema figlio che si desidera personalizzare. In questo caso, potrebbe essere più veloce copiare del codice direttamente dal file style.css del tema principale, incollarlo nel file CSS del tema figlio e poi modificarlo.
La parte difficile è che il file del foglio di stile di un tema può sembrare molto lungo e opprimente per i principianti. Tuttavia, una volta comprese le basi, non è poi così difficile.
Utilizziamo un esempio reale tratto dal foglio di stile del tema madre Twenty Twenty-One. È necessario navigare in /wp-content/themes/twentytwentyone nella cartella di installazione di WordPress e quindi aprire il file style.css nel file manager, nell’FTP o nell’editor di file del tema.
Verranno visualizzate le seguenti righe di codice:
1 2 3 4 5 6 7 8 9 10 11 12 13 14 15 16 17 18 19 20 21 | :root {/* Colors */--global--color-black: #000;--global--color-dark-gray: #28303d;--global--color-gray: #39414d;--global--color-light-gray: #f0f0f0;--global--color-green: #d1e4dd;--global--color-blue: #d1dfe4;--global--color-purple: #d1d1e4;--global--color-red: #e4d1d1;--global--color-orange: #e4dad1;--global--color-yellow: #eeeadd;--global--color-white: #fff;--global--color-white-50: rgba(255, 255, 255, 0.5);--global--color-white-90: rgba(255, 255, 255, 0.9);--global--color-primary: var(--global--color-dark-gray); /* Body text color, site title, footer text color. */--global--color-secondary: var(--global--color-gray); /* Headings */--global--color-primary-hover: var(--global--color-primary);--global--color-background: var(--global--color-green); /* Mint, default body background */--global--color-border: var(--global--color-primary); /* Used for borders (separators) */} |
Le righe da 3 a 15 controllano il tipo di colori (come giallo, verde, viola) che l’intero tema utilizzerà nei loro specifici codici HEX. E poi, per linee come ‘global-color-primary’ o ‘global-color-secondary’, significa che sono i colori primari e secondari di quel tema.
È possibile copiare queste righe di codice nel foglio di stile del tema figlio e modificare i codici HEX per creare la combinazione di colori perfetta.
Scorrendo il foglio di stile del tema padre, si noterà che anche altre variabili possono avere queste variabili di colore, come in questo caso:
1 2 | /* Buttons */--button--color-text: var(--global--color-background); |
Questo significa che tutti i testi dei pulsanti useranno lo stesso colore dichiarato in --global--color-background:, che è verde menta(--global--color-green: #d1e4dd). Se si cambia l’HEX in --global--color-green:, anche il testo dei pulsanti avrà un aspetto diverso.
Nota: se si utilizza il tema figlio Twenty Twenty-One e non si notano modifiche, potrebbe essere necessario aggiornare la parte “Versione” delle informazioni del file del tema (ad esempio, da 1.0 a 2.0) ogni volta che si aggiorna il file style.css.
Potete anche seguire queste esercitazioni per sperimentare le personalizzazioni del vostro tema figlio:
- Come cambiare il colore del testo in WordPress
- Come modificare le dimensioni del logo di WordPress (funziona con qualsiasi tema)
- Come personalizzare lo stile delle virgolette nei temi WordPress
- WordPress Body Class 101: Suggerimenti e trucchi per i progettisti di temi
- Come aggiungere un effetto parallasse a qualsiasi tema WordPress
Come personalizzare il tema figlio Block
Se si utilizza un tema child/bambino, la maggior parte delle personalizzazioni sarà effettuata nel file theme.json, non in style.css.
Tuttavia, durante i nostri test, abbiamo trovato il processo complicato. A differenza dei classici temi figlio, se si è alle prime armi con lo sviluppo di temi per WordPress, le conoscenze da acquisire sono maggiori (soprattutto per quanto riguarda JSON e la gestione dei CSS).
Detto questo, abbiamo trovato un’alternativa molto più semplice utilizzando il plugin Create Block Theme. Questo strumento è in grado di registrare tutte le modifiche apportate nell’Editor completo del sito di WordPress nel file child theme.json. Quindi, non dovrete toccare alcun codice perché il plugin se ne occuperà per voi.
Mostriamo un esempio. Per prima cosa, aprite l’Editor completo di WordPress andando su Aspetto ” Editor.
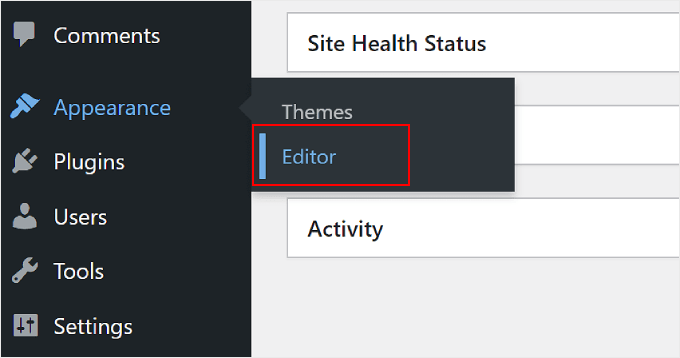
Verranno visualizzati diversi menu tra cui scegliere.
Qui è sufficiente selezionare “Stili”.

Nella pagina successiva, si vedranno diverse combinazioni di stili incorporati tra cui scegliere.
Per il nostro scopo, si può semplicemente saltare tutto questo e fare clic sull’icona della matita.
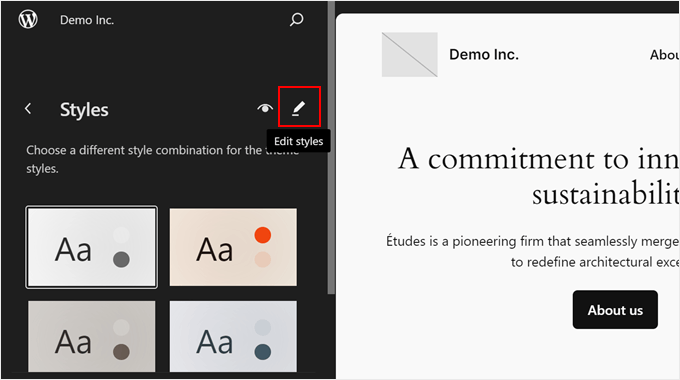
Ora proviamo a modificare alcune parti del tema child, come i font.
Per questo esempio, fare clic su “Tipografia” nella barra laterale destra.
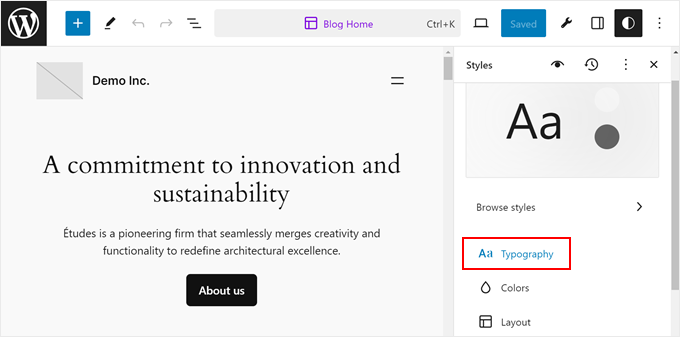
Successivamente, verranno visualizzate alcune opzioni per modificare i variabili globali del tema per il testo, i link, le intestazioni, le didascalie e i pulsanti.
A titolo dimostrativo, facciamo clic su “Heads”.

Nel menu a discesa Font, cambiare il font originale con qualsiasi font disponibile.
Se necessario, è possibile modificare l’aspetto, l’altezza delle righe, l’interlinea e l’intestazione delle lettere.
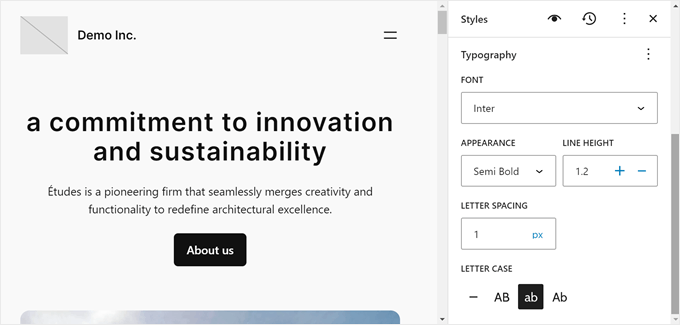
Una volta terminato, fare clic su “Salva”. Successivamente, è possibile fare clic sul pulsante Crea tema di blocco (l’icona della chiave inglese) accanto a “Salva”.
Quindi, fare clic su “Salva le modifiche al tema”.
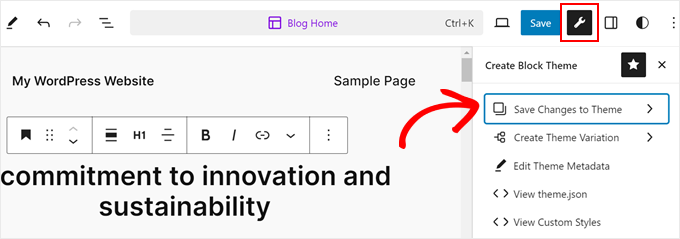
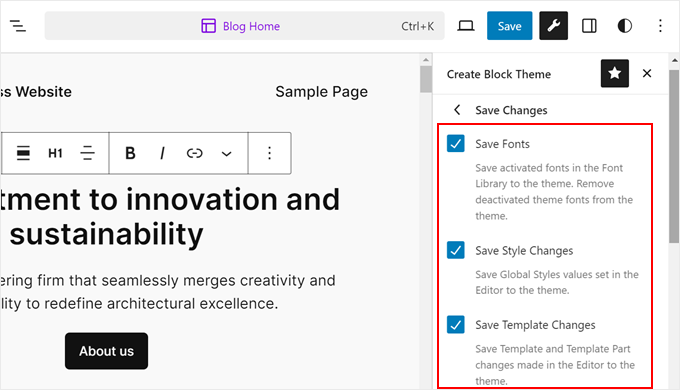
Quindi, selezionare le modifiche da salvare nel tema child.
Esempi sono i font, gli stili personalizzati, le modifiche ai template e altro ancora.
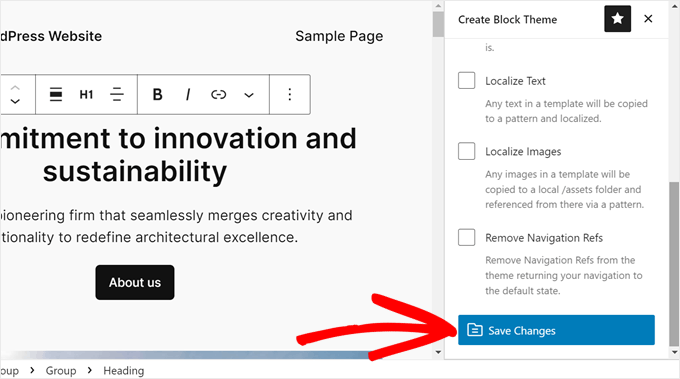
Una volta fatto, basta scorrere fino in fondo alla barra laterale.
Quindi, fare clic su “Salva modifiche”.
Ora visualizziamo il file theme.json, in modo da vedere le modifiche apportate al codice.
A tale scopo, cliccare nuovamente sul pulsante Crea tema a blocchi e selezionare “Visualizza tema.json”.
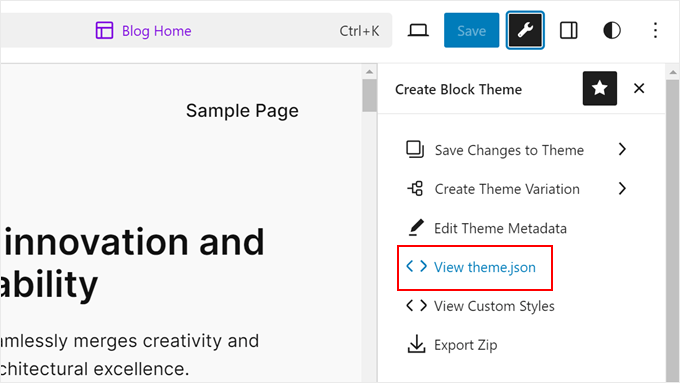
Facendo clic su di esso, si noterà che il file include alcune nuove aggiunte di codice.
Nel nostro caso, il file include un codice che indica che i tag head utilizzeranno il font Inter con aspetto semigrassetto, altezza di riga 1,2, interlinea di 1 pixel e in minuscolo.
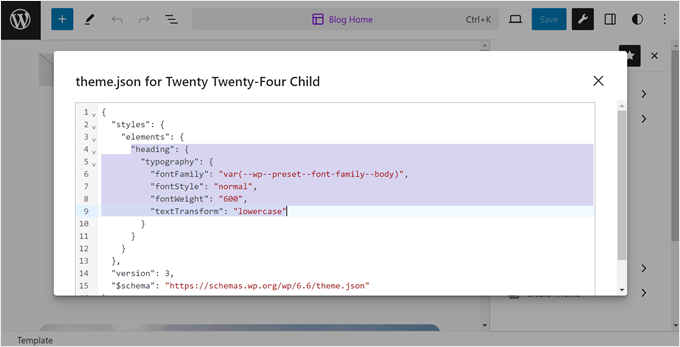
Quindi, ogni volta che si modifica il tema del blocco figlio, assicurarsi di fare clic sull’icona della chiave inglese e salvare le modifiche in modo che siano ben documentate.
Come modificare i file di template di un tema figlio
La maggior parte dei temi WordPress ha dei template, ovvero dei file che controllano il design e il layout di un’area specifica all’interno del tema. Ad esempio, la sezione footer è solitamente gestita dal file footer.php, mentre l’header è gestito dal file header.php.
Ogni tema di WordPress ha anche un layout diverso. Ad esempio, il tema Twenty Twenty-One ha un header, un loop di contenuti, un’area widget per il footer e un footer.
Se si desidera modificare un modello, è necessario trovare il file nella cartella del tema principale e copiarlo nella cartella del tema secondario. Dopodiché, si deve aprire il file e apportare le modifiche desiderate.
Ad esempio, se si utilizza Bluehost e il tema principale è Twenty Twenty-One, si può andare a /wp-content/themes/twentytwentyone nel file manager. Quindi, fare clic con il tasto destro del mouse su un file di modello come footer.php e selezionare “Copia”.
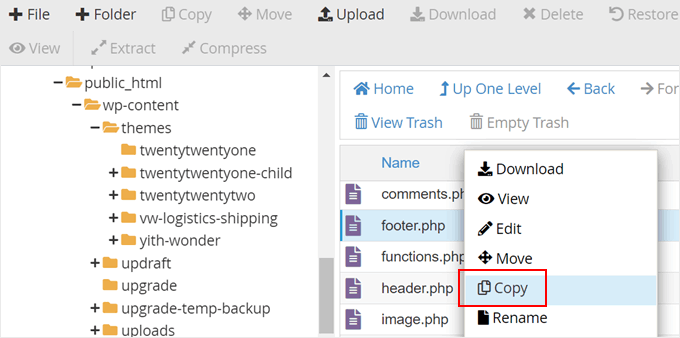
Successivamente, inserire il percorso del file del tema figlio.
Una volta terminato, è sufficiente fare clic su “Copia file”.
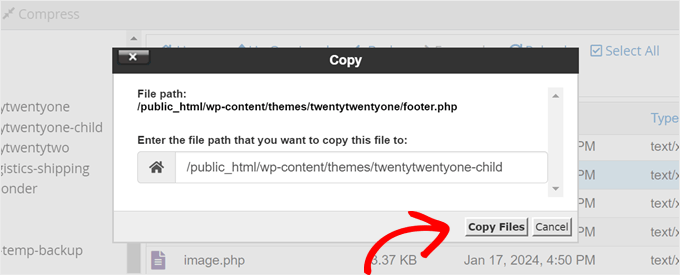
Si verrà quindi reindirizzati al percorso del file.
Per modificare il file footer.php, basta fare clic con il tasto destro del mouse e selezionare “Modifica”.
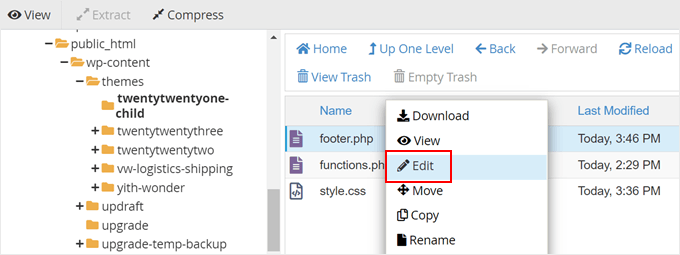
Ad esempio, rimuoveremo il link “Proudly powered by WordPress” dall’area del piè di pagina e aggiungeremo una nota di copyright.
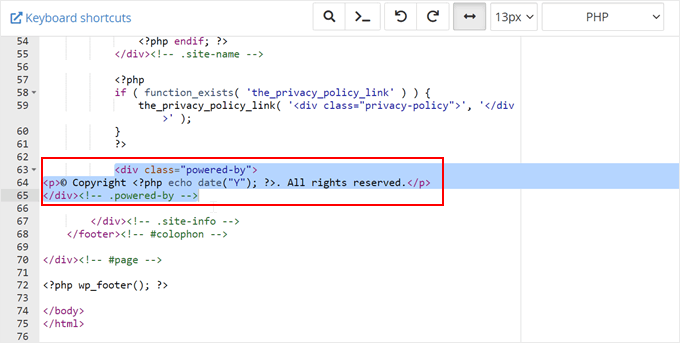
A tal fine, è necessario eliminare tutto ciò che si trova tra i tag <div class="powered-by">:
1 2 3 4 5 6 7 8 9 | <div class="powered-by"> <?php printf( /* translators: %s: WordPress. */ esc_html__( 'Proudly powered by %s.', 'twentytwentyone' ), '<a href="' . esc_url( __( 'https://wordpress.org/', 'twentytwentyone' ) ) . '">WordPress</a>' ); ?> </div><!-- .powered-by --> |
Quindi è necessario incollare il codice che si trova sotto questi tag nell’esempio seguente:
1 2 3 | <div class="powered-by"><p>© Copyright <?php echo date("Y"); ?>. All rights reserved.</p></div><!-- .powered-by --> |
Ecco cosa dovrebbe apparire nell’editor di testo:
Salvare il file per rendere ufficiali le modifiche.
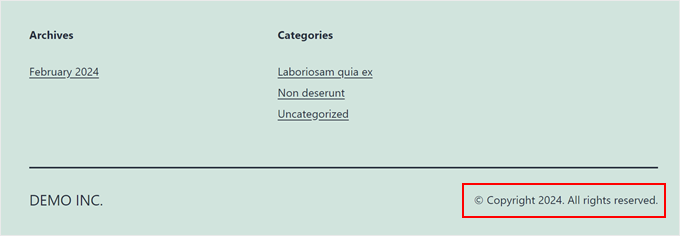
Successivamente, visitate il vostro sito web per vedere la nuova nota di copyright.
Come aggiungere nuove funzionalità al proprio tema figlio
Il file functions.php di un tema utilizza il codice PHP per aggiungere funzionalità o modificare quelle predefinite di un sito WordPress. Agisce come un plugin per il sito WordPress, che viene attivato automaticamente con il tema corrente.
Si trovano molti tutorial di WordPress che chiedono di copiare e incollare frammenti di codice in functions.php. Ma se aggiungete le vostre modifiche al tema principale, queste verranno sovrascritte ogni volta che installerete un nuovo aggiornamento del tema.
Per questo motivo si consiglia di utilizzare un tema figlio quando si aggiungono snippet di codice personalizzati. In questa guida, aggiungeremo una nuova area widget al nostro tema.
Possiamo farlo aggiungendo questo frammento di codice al file functions.php del nostro tema figlio. Per rendere il processo ancora più sicuro, si consiglia di utilizzare il plugin WPCode, in modo da non modificare direttamente il file functions.php, riducendo il rischio di errori.
Per ulteriori informazioni, potete leggere la nostra guida su come aggiungere snippet di codice personalizzati.
Ecco il codice da aggiungere al file functions.php:
1 2 3 4 5 6 7 8 9 10 11 12 13 14 15 16 | // Register Sidebarsfunction custom_sidebars() {$args = array('id' => 'custom_sidebar','name' => __( 'Custom Widget Area', 'text_domain' ),'description' => __( 'A custom widget area', 'text_domain' ),'before_title' => '<h3 class="widget-title">','after_title' => '</h3>','before_widget' => '<aside id="%1$s" class="widget %2$s">','after_widget' => '</aside>',);register_sidebar( $args );}add_action( 'widgets_init', 'custom_sidebars' ); |
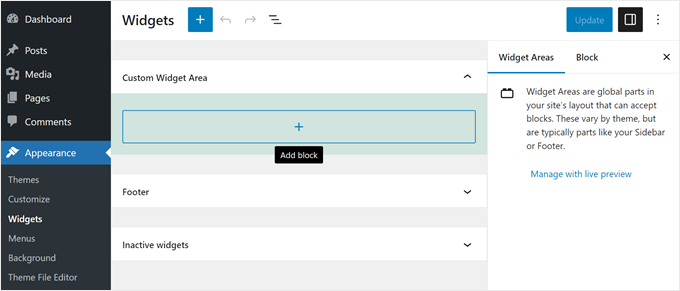
Una volta salvato il file, è possibile visitare la pagina Aspetto ” Widget della dashboard di WordPress.
Qui si vedrà la nuova area widget personalizzata a cui è possibile aggiungere widget.
Ci sono molte altre funzioni che potete aggiungere al vostro tema utilizzando snippet di codice personalizzati. Date un’occhiata a questi utilissimi trucchi per il file functions.php di WordPress e agli snippet di codice WordPress utili per i principianti.
Come risolvere i problemi del tema figlio di WordPress
Se non si è mai creato un tema child prima d’ora, è molto probabile che si commettano degli errori, il che è normale. Per questo motivo si consiglia di utilizzare un plugin di backup, di creare un sito locale o un ambiente di staging e di utilizzare contenuti fittizi per il sito demo.
Detto questo, non arrendetevi troppo in fretta. La comunità di WordPress è ricca di risorse, quindi qualsiasi problema abbiate, probabilmente esiste già una soluzione.
Per cominciare, potete consultare i nostri errori più comuni di WordPress per trovare una soluzione.
Gli errori più comuni che probabilmente vedrete sono errori di sintassi causati da qualcosa che vi è sfuggito nel codice. Troverete aiuto per risolvere questi problemi nella nostra guida rapida su come trovare e risolvere gli errori di sintassi in WordPress.
Inoltre, è sempre possibile ricominciare se qualcosa va storto. Ad esempio, se per sbaglio si è cancellato qualcosa che il tema principale richiedeva, si può semplicemente cancellare il file dal tema figlio e ricominciare da capo.
Speriamo che questo articolo vi abbia aiutato a imparare come creare un tema child di WordPress. Potreste anche voler selezionare la nostra guida definitiva su come testare il vostro tema WordPress rispetto agli standard più recenti e il nostro pezzo di confronto tra temi WordPress gratuiti e premium.
Se questo articolo vi è piaciuto, iscrivetevi al nostro canale YouTube per le esercitazioni video su WordPress. Potete trovarci anche su Twitter e Facebook.


Mahesh Yadav
One thing I want to know, if we make a child theme then we have 2 CSS files to load one parent theme CSS and second child them CSS. Wouldn’t it increase the site load time and It added one more CSS to load?
WPBeginner Support
While the load time would technically increase, it shouldn’t be by a noticeable amount.
Admin
Nadia Shaheen
Great work!
stay blessed and keep sharing awesome content.
WPBeginner Support
Thank you, glad you liked our content
Admin
Fahad
Great Work !
This site is super helpful
Keep it up !!
WPBeginner Support
Thank you, glad our article was helpful
Admin
Daniel Waduka
I am just starting to use child themes, and this article has been of so much help to me.
Thanks so much.
WPBeginner Support
Glad our guide could be helpful
Admin
Marcos Flores
Hi! i’ve been reading this article and it works! but i also read wordpress documentation about this and they say this
“Note that the previous method was to import the parent theme stylesheet using @import: this is no longer best practice, as it increases the amount of time it takes style sheets to load. The correct method of enqueuing the parent theme stylesheet is to add a wp_enqueue_scripts action and use wp_enqueue_style() in your child theme’s functions.php ”
Should i use both method? or if i user the function.php i dont need to write import function inside style.css (located in my child-theme folder)
Khema
Your instructions are missing a step with the functions.php creation. It should mention that needs to wrap the whole file. In this case I didn’t want to add the example you used and to another piece of code from the article you linked to. Naturally those codes didn’t include the php tag.
Thanks for the article. It’s very very helpful.
rReons
So question. I was using my wordpress theme without any child theme and was doing all the changes in to it. I have created a child theme thanks to your guide and I’m using that now as the website theme.
My question is both themes have the same modifications changes. If I update the main theme from now on, will the changes affect the child theme also?
balu
He! wpbeginner. WordPress official site saying this. You need to update the post. Thank You!
Note that the previous method was to import the parent theme stylesheet using @import: this is no longer best practice, as it increases the amount of time it takes style sheets to load. The correct method of enqueuing the parent theme stylesheet is to add a wp_enqueue_scripts action and use wp_enqueue_style() in your child theme’s functions.php. You will therefore need to create a functions.php in your child theme directory. The first line of your child theme’s functions.php will be an opening PHP tag (<?php), after which you can enqueue your parent and child theme stylesheets. The following example function will only work if your Parent Theme uses only one main style.css to hold all of the css. If your child theme has more than one .css file (eg. ie.css, style.css, main.css) then you will have to make sure to maintain all of the Parent Theme dependencies.
Pat
Great info…you made it to my save list!! Thanks!
Alfonso de Garay
I have a Child theme with the theme latest version installed in my site. WP version 4.7.5. Received a notice that says WP version is available please update now.
1. Do I have to backup my site again before updating?
2. Do I have to create another Child theme using Child version 1 one?
2. How can I change the Name, email and URL to Chile version 1
WPBeginner Support
Hi Alfonso,
WordPress updates normally do not affect your themes so you do not need to create another child theme. You should always backup your website before updating WordPress.
Admin
Lisa Bruce
Hi, I can see that this video/post is a few years old, so I’m a little late to the party, but I have a questions I was hoping you could help me with.
I am a relatively new to WP and just came to realize the importance of child themes. I have been working on developing a site for a friend and have made several changes to the theme that I am using. I found a bug in the theme and contacted the theme developer and they said that the bug had been fixed in a recent update.
If I install the update I believe I will loose all my customizations. Is it too late to create a child them? Is it possible to do it now and then install the update? I prefer not to have to start from scratch.
WPBeginner Support
Hi Lisa,
If you know what changes you made and to which files, then first download a backup of your existing theme to your computer. After that, install the updated version. You can now create a child theme and then copy and paste the code from your customized version to the child theme.
Admin
Nell Yang
Thank you for this helpful post. I have always been looking for a video to show me how exactly should I use child theme. It is quite time consuming that each time after I updated my theme, all my styles just went away. It is frustrating to do everything over again. I tried to read the documents from wordpress but still don’t know how to proceed after activate the child theme. Keep up the good work! Thank you again!
Tony Agee
Good instructional video. Most tutorials I have watched tell you to paste the code in the file but they neglect to tell you what medium to paste the code to. I was going to use Notepad++ but I guess you can use regular notepad.
JP
Hello, i just want to say that you are a very good writer, very clear and simple. I past a long time on your article for learn WP.
Thank you!
Rob Brooks
Hi. Thank you for being a great WP resource. I am new to WP and really appreciate your guidance. I have followed the article to the letter but when I go to enable the child template on the site, I get the error “The parent theme is missing. Please install the “Real Estate Lite” parent theme. As you see I am using a free template called Real Estate light. it is located in the ../real-estate-lite/ directory of wp-content/themes. My code is below… did I do something wrong?
Theme Name: Real Estate Lite Child ThemeTheme URI: http://www.example.com/Description: Real Estate Lite child themeAuthor: meAuthor URI: http://www.example.comTemplate: Real Estate LiteVersion: 1.0.0*/@import url("../real-estate-lite/style.css");1-click Use in WordPress
In addition, I will mention the theme was free and is running on WP version 4.7.2 (Running on Plesk). I created style.css file directly on the server so no FTP issues.
I have already made significant changes to the parent style.css file as well as functions.php … I am not sure if this would affect this, but going to test on an unedited dummy domain to see if I get the same results
Any guidance/assistance you can provide would be greatly appreciated.
WPBeginner Support
Hey Rob,
You will need parent theme to be installed on your site and Template value should match parent theme’s actual name which you can see in it’s style.css file.
Admin
Carrie
Hi! Great article! I am finally starting to understand how to edit css so that I get the result I want, thanks to this article.
Thanks much for the simplified explanation!
Nalin
I created a child theme & Using @import for the “style.css” on a child theme. Now I want to change in another css file of parent theme’s folder ….. /font_awesome/css/fontawesome.css
Now, I want to know that where I will put my new fontawesome.css in child theme & how to use @import command.
or any other process to use more css file in child theme.
Rebecca
So, I don’t have the wp content folder on my computer. What should I do?
Should I have downloaded this at some point?
WPBeginner Support
Hi Rebecca,
The wp-content file is hosted on your hosting account not on your computer. You will need an FTP client to connect to your server.
Admin
Brad
Using @ import is no longer best practice
SAppa
Then what is the best practice now? You should be able to back up your comment.
Jual beli rumah
Thankyou
Jean-philippe
I am learning so much since a few hours on your website. Everytime I search something in google related to “how to” in wordpress I find that the best information is here at WPbeginner. It is always well explained and easy to understand. I will always come back for information here without a doubt.
WPBeginner Support
Hi Jean-philippe,
Thanks for the kind words, we are glad you find WPBeginner helpful Don’t forget to join us on Twitter for more WordPress tips and tutorials.
Admin
Smart Rashed
This is the article ,which i am looking for,thanks man.
Kevin
I know this will be a stupid question. I’m so new to this and have no skills at all. If I am creating a file, style sheet, etc. on my wp installation file on my local pc, how does that get onto my website? I guess I’m missing that? I use like 3 different PCs to work on my website and those local files aren’t on all of them. Again, I am sure I am missing something really dumb. Not seeing the connection.
WPBeginner Support
The files you edit on your computer need to be transferred to your website using an FTP client. See our guide on how to upload WordPress files using FTP.
Admin
Kevin
Ok, I got that and made a child theme, but when I activate it, the formatting on the site is all off from the parent theme. What did I do wrong?
Francesco
Hi there,
I’m following your tutorial but WordPress (4.5.3) doesn’t recognise the new folder on my online server. How can I work around this?
Thanks,
F.
Muhammad Moosa
Helpful article indeed, I followed it and created a child theme. Thanks.
Carolina
Hi, thanks for the tutorial, very helpfull. But I have a question. Can I create a child theme from an already established website? I have a client who designed his own website but did not create a child theme. How to go about it?
WPBeginner Support
If their current theme follows WordPress coding standards and best practices then you should have no trouble creating a child theme.
Admin
Mike
Thank you so much for the article and video. Apparently since these were created WordPress has new best practices listed in their codex which is confusing me.
“The final step is to enqueue the parent and child theme stylesheets. Note that the previous method was to import the parent theme stylesheet using @import: this is no longer best practice.”
Do I stick with the steps you outlined herein verbosely, or do I omit the import function and create the PHP file, or do I implement both?
My theme’s style.css file only contains a header so importing that file seems irrelevant, and there are multiple CSS files like main.css located elsewhere in the parent’s file structure. Not knowing any better as a beginner I have already made changes to main.css to achieve some of my goals and only now I realize the child theme is necessary.
Any advice is greatly appreciated.
Best regards,
Mike
WPBeginner Support
You will need to import at least your style.css file it should be in your parent themes main directory. It should automatically import other CSS files.
Admin
Mike
Even if the style.css has nothing but the header?
Jack
If your style.css file do not have imports to other css styles, you can import them directly, just like style.css.
Olamide
Good day. When I did a live preview of the child theme, I noticed that it didn’t have the css of the parent theme. Maybe this is as a result of an error in the way I inserted the code?
This is the code that I inserted:
/*
Theme Name: sparkling child
Theme URI: https://www.wpbeginner.com/
Description: sparkling child theme
Author: djetlawyer
Author URI: http://www.example.com
Template: sparkling
Version: 1.0.0
*/
@import url(“../sparkling/style.css”);
The parent theme is “sparkling”. If there is any error, please correct me.
Thank you.
WPBeginner Support
The code is correct.
Admin
lucia
Hi there,
I am trying to set up a child theme to activate my footer on twenty twelve, but I don’t know what code to use to set it up.
I tried this webpage
with various suggestions , and I have tried to change your suggestion as given on twenty thirteen , but I don’t succeed.
Could you please give me the right working code for setting up a child them for twelve twelve.
Leigh
This was incredibly helpful – especially your HTML for us to copy. I’ve never been so excited to see colors change on a website before. This is easily the best “how-to” out there for this theme!
Bhautik Andhariya
Hello, I have tried same example that you shown. But my child theme is replacing all the style of its parent theme.
It doesn’t have any style of it’s parent. What is the solution? Can you please help me? I am new in wordpress and i am learning it.
Angelo
Hi there!
I’ve just installed the Bose template and also created a child theme for it. However, the following error message appears on the center of my website:
Warning: implode(): Invalid arguments passed in /home/hello582/public_html/teste/wp-content/themes/bose/featured.php on line 12
I’m a very beginner at websites creation, so I haven’t got any clue about what the problem is. Could anyone help me?
Thanks a lot!
WPBeginner Support
Please contact the theme developer for support.
Admin
Djamila
Hi,
Thanks for the article! I could not get my child theme to ‘appear’ in the template section and it turned out I indeed misspelled the way the original template was named. What a difference a capital makes, huh?
However, now that I have my child theme I was able to update the parent theme and when I did all of a sudden I got an issue with a super important plugin ( I am building a review blog on a local database, for now and it’s the wrap up/grading plugin belong to the template designers).
In the parent template they ‘upgraded’ this plugin. I personally prefer the old one, but okay…anyway…underneath my review you now see *both*, the old wrap up with grades and the new one, which looks out of whack too. I have de-activated and re-activated but it stays like that. Super annoying and I don’t know where to look to either keep the old one (prettier) or only the new one and outlines as should.
Where should I start? Thanks for any help you can give me.
WPBeginner Support
Contact the plugin support.
Admin
Amanda
Thanks for a great article!
If I use a child theme, will I still be able to customize it using the Appearance> Theme Options that comes with my theme in the admin panel such as font size, background colors etc. or do I have to go the code route?
If I have activated the Child theme and I use the Appearance tab to update the styling instead of using code, is it essentially still updating the parent theme because the related files are not in the child theme folder?
WPBeginner Support
Yes, your child theme will inherit all these options.
Admin
Amanda
Thanks for your reply.
So if I activate the Child Theme and use the settings in the Appearance tab of my admin panel to change the styling (instead of writing css code), my changes won’t be overwritten when I do a theme or WordPress update on the parent theme?
Would I still need to copy the stylesheet, header, footer files etc. to the child theme folder to make the scenario above work?
Laura
I’ve been following these (and other) steps to create a child theme based on twentytwelve. The issue I’m running into is that wordpress seems to ignore only some of the css I’ve changed from the original theme and it’s driving me nuts. For example, I’ve successfully changed the background colour of the menu, but it simply won’t let me change the text colours of anything. I’ve used your approach of editing it in chrome’s code inspector thing (which worked great, the colour got changed, suggesting my code was correct) and pasting the changed code into the style.css of the child theme, but it doesn’t seem to get picked up at all. I don’t know what to do about this, any insights would be very welcome!
Boyet
Thank you very much for this tutorial. I don’t have problem editing my child theme’s stylesheet, header, and footer files.
My question is, what will I do if I wanted to change something in a file located in my mother theme’s folder like: public_html/wp-content/themes/shopera/woocommerce?
Do I need to create the same path in my child theme?
Thanks in advance…
WPBeginner Support
Yes.
Admin
Tony Arnold
Very helpful and largely understood and executed.
I am trying to make my header image full width.My theme doesn’t ‘allow’ this as standard so do i change the file?
Thank you
Sohail Farooq
Love this article I tried and got it worked at once.
Xander
Hi, there!
It seems I have got stuck a little bit. I have already made some changes in the some .php-files (e.g. header.php, footer.php and so on) of my parent theme without having a child theme installed.
Now I want to create a child theme because updates of the parent one have been coming. What should I do with all those already modified files? Should I copy them in the child theme’s directory? What are folder I need to have it it? Should I create the same folders that the parent theme has got for the child theme?
Thank you,
WPBeginner Support
You don’t need all the folders of your parent theme. You just need to recreate the files where you have made changes. We have a tutorial on how update themes without losing changes. It has a section where you can find out which files you have modified in your theme and what changes you have made to them.
Download a fresh copy of your parent theme on your computer. Download the old theme to your computer and then upload the fresh copy. After that create a new child theme. Copy the files where you have made changes from the fresh theme to your child theme. Copy the changes you have made in the old theme files into the files of your new child theme.
It would take some troubleshooting before you get it right. So we strongly recommend you to backup your site first. If possible test your changes on a local WordPress install first.
Admin
Xander
Thank you. Could you please give me a link on the tutorial mentioned?
There is another obstacle – I have changed functions.php file, how can I reconcile both of them in the parent and child themes?
Chris
Can I load and install my new child theme on another site? If so how?
Thanks!
WPBeginner Support
Download your child theme to your computer. Create a zip file containing the theme folder. Go to the admin area of another site and then visit Appearance » Themes. Click on the add new theme button and then click on the upload button. Upload the zip file you created earlier. WordPress will extract and install your child theme.
You will also need to install the parent theme as well.
Admin
Daniel Garneau
Hello,
I find this tutorial very useful to learn how to create a child theme. But in the process I made the following ajustments. There needs to be two files in the child-theme directory. They have to be named style.css and functions.php.
style.css must contain at least (supposing one is using the TwentyTen theme):
@import url(“../twentyten/style.css”);
Template: twentyten
When I consulted the turorial on 2015-05-12, the “template: twentyten” line was in the comment block. It must be a command that can be read by WordPress.
Also, there must be a functions.php file, and it has to have minimally the following line of command :
<?php
Your tutorial along with the wp codex, helped me creating my first child theme. Thank you.
Maria
Is it safe to say that the changes I made in the custom css field can be placed into my child’s theme style.css?
WPBeginner Support
Yes.
Admin
Louise Mason
I am falling at the first fence – how do i find /wp-content/themes/? Actually where is the WordPress installation folder? In the video i can’t see what you click on or how you open it, the file manager just appears by magic!
WPBeginner Support
You can access File Manager by visiting your web hosting dashboard. Login to your web hosting account and locate File Manager.
Admin
Sonam
when I select the file manager of my web hosting account , I get four options :
1)home directory
2)web root
3)public ftp root
4)Document root
which one should I select to work on.
Kylee
Hi – I go with Home Directory. That takes me to all the files. I click on Public HTML on the left to access my various sites. You probably figured it out at some stage but just in case you didn’t…
Viju
Hi,
I’m using a child theme for my website. What I’m struggling is to give a version to my style.css of the child theme. WordPress seems to append default wordpress version at the end of the file like /style.css?ver=4.1.1
I’m incrementing the value of ‘version’ in my child’s style.css , but wordpress is not picking it.
Because of this my changes to the child theme are not getting reflected to users who has the cached version of the css.
can you advise how to handle this ?
Stephen James
At the very start I am lost. Where did you get the style css code at the start???? You only tell us to past it in but not where it came from. Surely if I am using a different theme it will be a different code.
Vatsal Savani
Hey Stephen,
The code at the start is like general info for the theme, it is nearly the same for every theme, you just have to change the content after the colon, i.e. If your theme name was stephenstheme, you may have the code at the start be like:
Theme Name: stephenstheme
Theme URI: http://www.yourwebsite.com
Description: A Twenty Thirteen child theme made by stephen
Author: Stephen James
Author URI: http://www.yourwebsite.com
Template: twentythirteen
Version: x.x.x
Hope you get what I mean, good luck!
Ariz Khan
Hi WPB, I solved it, reference to my previous mail. Guess what – it was syntax error on my part – I uploaded Style.css, which I renamed to style.css as required and voila it worked. Thanks.
WPBeginner Staff
Did you save the template file as style.css
ada
I also had the same problem. I deleted the numbers on notepad and could see the template.
Kim
I’m trying to create a child theme for twentythirteen following your instructions above. I created the folder and copied the code you have listed above into a text file. I saved the code to the new folder. I am unable to activate the child theme because the “template is missing”. Help!?
canciller
Using @import for the “style.css” on a child theme is not reccommended by wordpress codex
http://codex.wordpress.org/Child_Themes
is it safe to use it ? what are the downsides of using @import ?
Pat
The downside of using @import instead of wp_enqueue_script(), as recommended in the codex, is slower page loading. An employee at Automattic gives an explanation at this link https://kovshenin.com/2014/child-themes-import/
Vatsal Savani
In short, it will decrease the performance of your site and also make it slower.
Praveen Kumar
What about building child themes on Genesis Framework?