Una pagina personalizzata consente di utilizzare un layout diverso dal resto del sito. Molti siti WordPress utilizzano layout di pagina personalizzati per le pagine di vendita, le landing page, le pagine dei webinar e altro ancora.
Nel corso degli anni, abbiamo creato molte pagine personalizzate su WPBeginner per scopi diversi. Le abbiamo usate per mostrare diverse offerte su plugin e servizi di hosting, offrire servizi Pro per aiutare gli utenti con WordPress, mostrare diversi prodotti e altro ancora.
Secondo la nostra esperienza, esistono diversi modi per creare pagine personalizzate. Per alcuni dei nostri progetti abbiamo utilizzato costruttori di pagine come SeedProd. Inoltre, è possibile utilizzare l’editor di blocchi o l’editor completo del sito per aggiungere pagine personalizzate al sito.
In questo articolo vi mostreremo come creare facilmente una pagina personalizzata in WordPress.
Perché creare una pagina personalizzata in WordPress?
Ogni volta che si crea una nuova pagina, il tema di WordPress controlla l’aspetto della pagina utilizzando un file modello.
Questo modello page.php riguarda tutte le singole pagine create in WordPress. Tuttavia, non è detto che si voglia utilizzare sempre lo stesso design.
Lelanding page hanno spesso contenuti diversi rispetto alle pagine normali, come ad esempio un’immagine principale di grandi dimensioni o una chiamata all’azione (CTA). Ciò significa che spesso hanno un aspetto completamente diverso dal resto del sito web.
Tuttavia, cercare di creare design unici utilizzando il modello di pagina standard può richiedere molto tempo. Inoltre, si è limitati dal modello page.php e potrebbe non essere possibile creare il design esatto che si desidera. Questo può rendere difficile ottenere buoni risultati. Ad esempio, se state creando una pagina di vendita, potreste non ottenere molte conversioni a causa di un cattivo design della pagina.
Detto questo, vediamo come creare una pagina personalizzata in WordPress, con l’esatto design, layout e contenuto che desiderate. Utilizzate i link rapidi qui sotto per passare direttamente al metodo che desiderate utilizzare.
- Method 1. How to Create a Custom Page in WordPress Using the Block Editor (No Plugin Required)
- Method 2. How to Create a Custom Page Using the Full-Site Editor (Block-Based Themes Only)
- Method 3. Create a Custom Page in WordPress using SeedProd (Recommended)
- Method 4. Using Thrive Architect to Create a Custom Page in WordPress
Metodo 1. Come creare una pagina personalizzata in WordPress utilizzando l’editor di blocchi (non è necessario alcun plugin)
L’editor di blocchi consente di progettare facilmente i propri modelli utilizzando gli strumenti che già si conoscono.
Questa è una buona scelta se si intende riutilizzare lo stesso design su più pagine, in quanto si può semplicemente applicare lo stesso template. Se si desidera creare un design completamente unico, un’altra opzione è quella di creare la pagina come normale e poi modificarne il layout utilizzando l’editor del sito, che copriremo nel Metodo 2.
Tenete presente che questi metodi funzionano solo con temi a blocchi come ThemeIsle Hestia Pro o Twenty Twenty-Three. Se non si dispone di un tema a blocchi, si consiglia di utilizzare un builder di pagine.
Per iniziare, basta aprire una pagina o un post qualsiasi. Quindi, selezionare la scheda “Pagina” nel menu di destra e fare clic sul testo accanto a “Modello”.
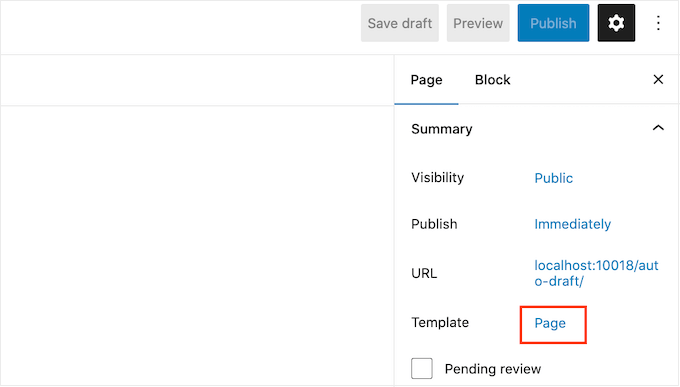
Le opzioni visualizzate possono variare a seconda del tema di WordPress, ma il testo mostrerà in genere “Pagina”, “Modello predefinito” o simili.
Nella finestra di dialogo visualizzata, fare clic sull’icona “Aggiungi modello”.

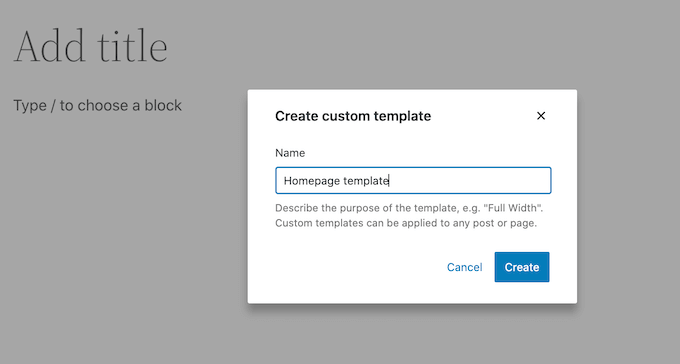
Nel popup che appare, digitate un nome per il vostro modello e poi fate clic su “Crea”.
Il nome è solo un riferimento, quindi si può usare quello che si vuole.
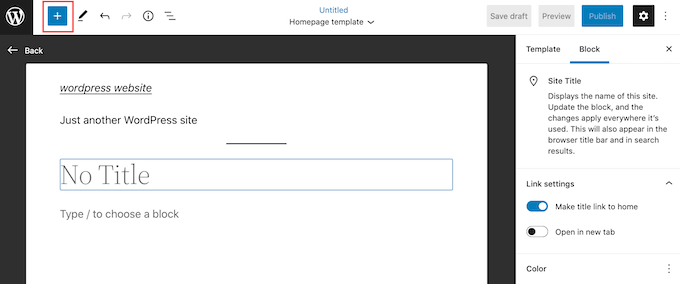
Questo lancia l’editor dei modelli, che funziona in modo simile all’editor dei contenuti di WordPress.
Per aggiungere blocchi al design della pagina personalizzata, è sufficiente fare clic sul pulsante blu “+”. È quindi possibile trascinare e rilasciare i blocchi.
È possibile aggiungere contenuto a un blocco o modificarne la formattazione utilizzando i consueti strumenti di modifica dei post di WordPress. Ad esempio, è possibile digitare del testo in un blocco “Titolo”, applicare la formattazione grassetto o cambiare il testo da H2 a H3.
È anche possibile creare una pagina personalizzata utilizzando i modelli. I modelli sono raccolte di blocchi che vengono spesso utilizzati insieme, come un elenco di eventi, un’immagine con una didascalia o una tabella dei prezzi.
I modelli che vedete variano a seconda del vostro tema WordPress, ma potete vedere quali sono i modelli disponibili facendo clic sulla scheda “Modelli”.
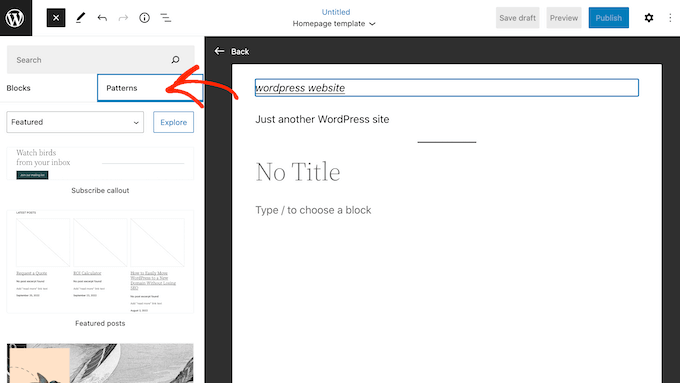
È possibile trascinare e rilasciare un modello di blocco sul layout o fare clic sul modello per aggiungerlo alla parte inferiore del modello. Quando siete soddisfatti dell’aspetto del modello, fate clic sul pulsante “Pubblica” e poi su “Salva”.
È ora possibile applicare questo modello a qualsiasi pagina. Basta aprire la pagina nell’editor e fare clic sul testo accanto a “Modello”.
Nel popup che appare, selezionare il modello appena creato.
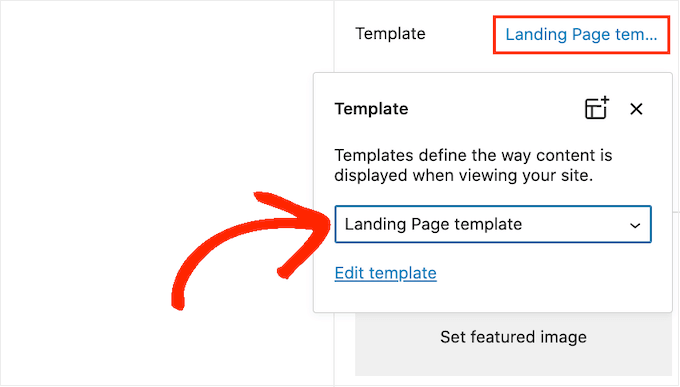
Fatto questo, è possibile aggiungere contenuti alla pagina, proprio come qualsiasi altra pagina di WordPress.
Metodo 2. Come creare una pagina personalizzatautilizzando l’Editor del sito completo (solo per i temi a blocchi)
Se si utilizza un tema a blocchi, è possibile creare una pagina personalizzata utilizzando l’editor del sito. Ciò consente di modificare il layout di una singola pagina, senza creare un template personalizzato.
Per questo motivo, si tratta di una buona scelta se si vuole creare un design completamente unico che non verrà riutilizzato su nessun’altra pagina.
Per iniziare, è sufficiente creare la pagina come di consueto andando su Pagine “ Aggiungi nuovo. È quindi possibile digitare un titolo, aggiungere categorie e tag, caricare un’immagine in evidenza e apportare qualsiasi altra modifica.
Quando si è soddisfatti della pagina di base, salvare le modifiche e poi andare su Aspetto “ Editor.
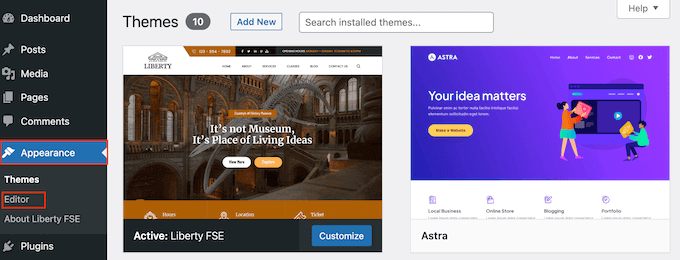
Per impostazione predefinita, l’editor completo del sito mostra il modello di home del tema.
Nel menu di sinistra, fare clic su “Pagine”.
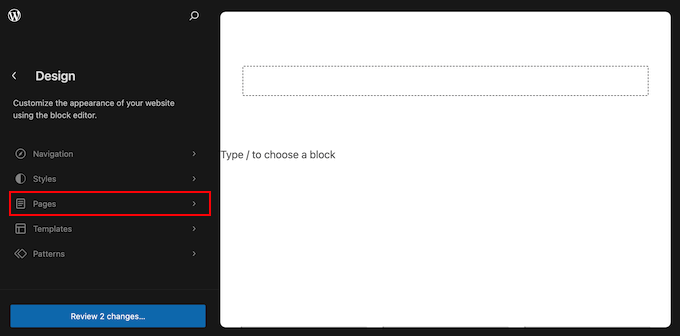
Ora vedrete tutte le pagine che avete creato sul vostro sito WordPress.
È sufficiente trovare la pagina che si desidera ridisegnare e fare clic su di essa.
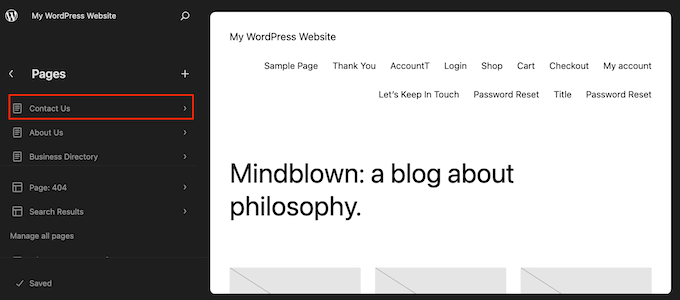
WordPress mostrerà ora un’anteprima del progetto.
Per modificare questo modello, fare clic sull’icona della matita.
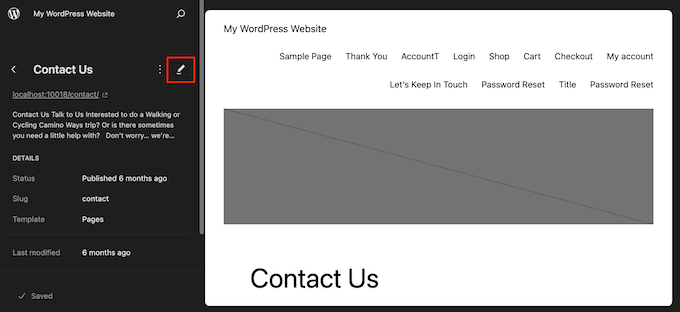
È ora possibile modificare il layout della pagina utilizzando gli strumenti dell’editor completo del sito. Ad esempio, è possibile fare clic sul pulsante blu ‘+’ per aggiungere nuovi blocchi, oppure fare clic per selezionare un blocco che si desidera personalizzare.
Quando si è soddisfatti delle modifiche apportate, fare clic sul pulsante “Salva”.
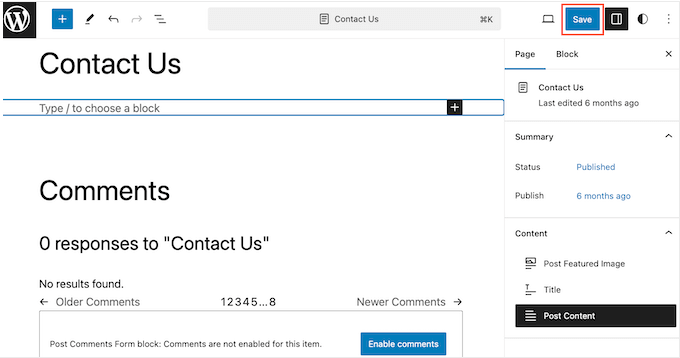
Ora, se visitate questa pagina sul vostro sito web, vedrete il nuovo design della pagina in azione.
Metodo 3. Creare una pagina personalizzata in WordPress utilizzando SeedProd (consigliato)
In passato, si creava una pagina personalizzata scrivendo codice, il che non era molto semplice per i principianti. Se si commetteva un errore con il codice HTML, CSS o PHP, si potevano causare errori comuni di WordPress o addirittura rompere completamente il sito.
Per questo motivo, consigliamo di utilizzare un costruttore di pagine.
SeedProd è il miglior builder di pagine trascina e rilascia per WordPress. Viene fornito con più di 350 template, che consentono di creare pagine personalizzate senza scrivere alcun codice.
Se si utilizza una pagina personalizzata per ottenere maggiori conversioni, SeedProd funziona con molti strumenti di terze parti che si stanno già utilizzando per ottenere conversioni. Tra questi, i migliori servizi di email marketing, WooCommerce, Google Analytics e altri ancora.
Per prima cosa, è necessario installare e attivare SeedProd. Per maggiori dettagli, consultate la nostra guida passo-passo su come installare un plugin di WordPress.
Nota: esiste anche una versione gratuita di SeedProd che consente di creare pagine personalizzate indipendentemente dal budget a disposizione. Tuttavia, per questa guida, utilizzeremo SeedProd Pro, poiché ha molti più template e si integra con tutti i migliori servizi di email marketing.
Dopo aver attivato il plugin, SeedProd chiederà la chiave di licenza.

Queste informazioni si trovano nel proprio account sul sito web di SeedProd. Dopo aver inserito la chiave, fare clic sul pulsante “Verifica chiave”.
Scegliere un modello di pagina personalizzato
Una volta fatto ciò, andate su SeedProd ” Pagine di destinazione e fate clic sul pulsante “Aggiungi nuova pagina di destinazione”.
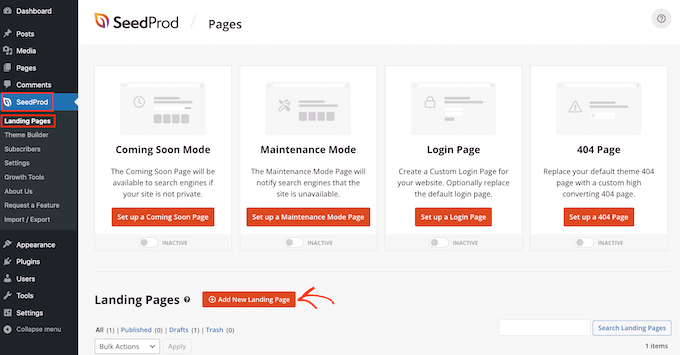
È ora possibile scegliere un modello per la pagina personalizzata.
I modelli di SeedProd sono organizzati in diversi tipi di campagna, come “lead”,“squeeze” e“coming soon“. È possibile fare clic sulle schede nella parte superiore della schermata per filtrare i modelli in base al tipo di campagna.
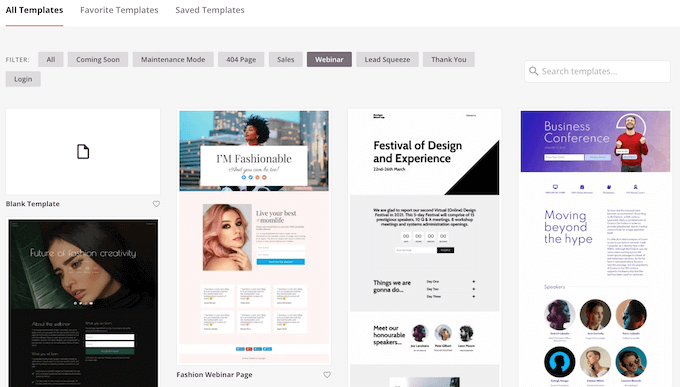
Se volete partire da zero, SeedProd ha anche un modello vuoto che potete utilizzare.
Per dare un’occhiata più da vicino a qualsiasi disegno, è sufficiente passare il mouse su quel modello e poi fare clic sull’icona della lente d’ingrandimento.
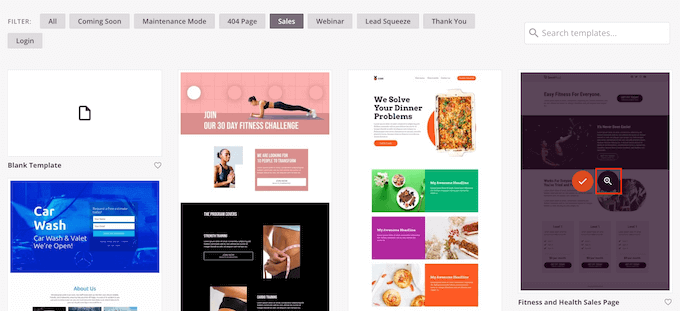
Quando trovate un design che vi piace, fate clic su “Scegli questo modello”. Noi utilizziamo il modello “Pagina di vendita del corso” in tutte le nostre immagini, ma voi potete utilizzare qualsiasi modello desideriate.
Quindi, digitare un nome per la pagina personalizzata. SeedProd creerà automaticamente un URL basato sul titolo della pagina, ma è possibile cambiare questo URL con quello che si desidera.
Un URL descrittivo aiuterà anche i motori di ricerca a capire di cosa tratta la pagina, in modo da mostrarla agli utenti giusti, migliorando così la SEO di WordPress.
Per dare alla vostra pagina personalizzata le migliori possibilità di apparire nei risultati di ricerca pertinenti, potreste aggiungere le parole chiave mancanti nell’URL. Per maggiori dettagli, consultate la nostra guida su come effettuare la ricerca delle parole chiave.
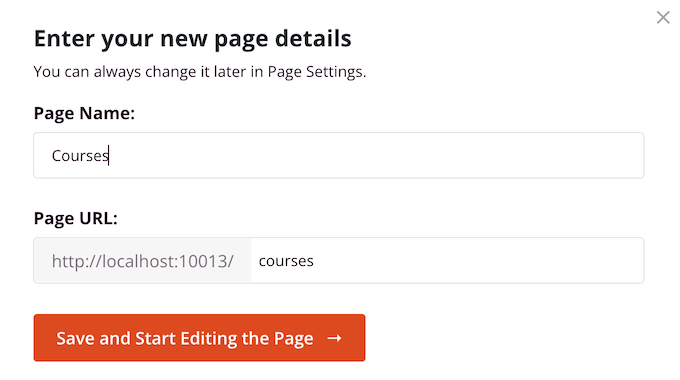
Quando si è soddisfatti delle informazioni inserite, fare clic sul pulsante “Salva e inizia a modificare la pagina”.
Progettate la vostra pagina personalizzata
SeedProd aprirà il modello scelto nel suo intuitivo editor di trascinamento. Vedrete un’anteprima live della vostra pagina a destra e alcune impostazioni di blocco a sinistra.

Per personalizzare un blocco, è sufficiente fare clic per selezionarlo nell’editor di pagina. La barra degli strumenti di sinistra mostrerà tutte le impostazioni di quel blocco.
Nell’immagine seguente, stiamo modificando il testo all’interno di un blocco “Titolo”.
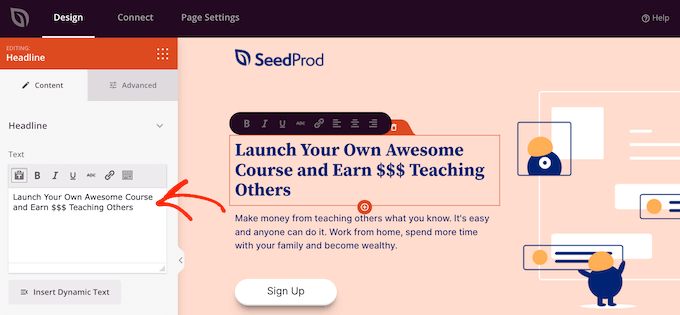
È possibile formattare il testo, modificarne l’allineamento, aggiungere collegamenti e altro ancora utilizzando le impostazioni del menu di sinistra.
È anche facile modificare le immagini utilizzando il costruttore di pagine SeedProd. È sufficiente fare clic su qualsiasi blocco “Immagine” e utilizzare le impostazioni per aggiungere il testo alt, caricare una nuova immagine o apportare qualsiasi altra modifica.
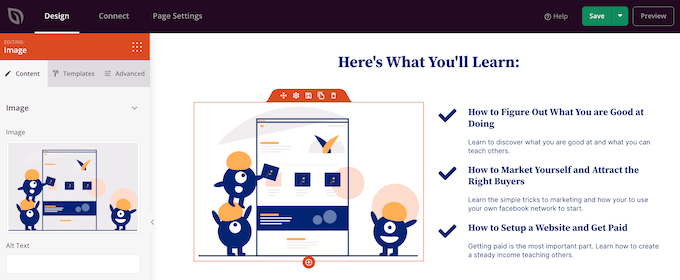
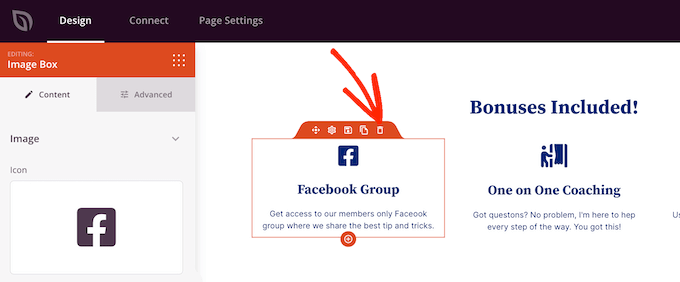
Se si desidera rimuovere un blocco dalla pagina personalizzata, è sufficiente fare clic per selezionarlo.
Quindi, fare clic sull’icona del cestino nella mini barra degli strumenti.
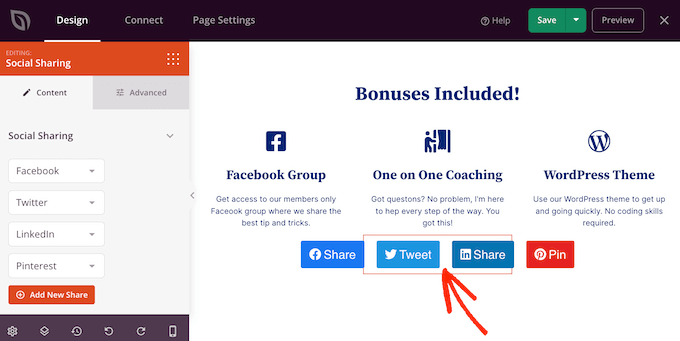
Per aggiungere nuovi blocchi al progetto, basta trovare un blocco nel menu di sinistra e trascinarlo nell’editor.
È quindi possibile fare clic per selezionare il blocco e apportare eventuali modifiche nel menu di sinistra.
SeedProd è dotato anche di “sezioni”, ovvero di modelli di righe e blocchi che possono aiutare a creare rapidamente una pagina personalizzata. Ad esempio, se si sta progettando una pagina di destinazione di annunci Google, si possono utilizzare le sezioni Hero, Call To Action o Features già pronte di SeedProd.
Per vedere tutte le sezioni disponibili, basta cliccare sulla scheda “Sezioni”.
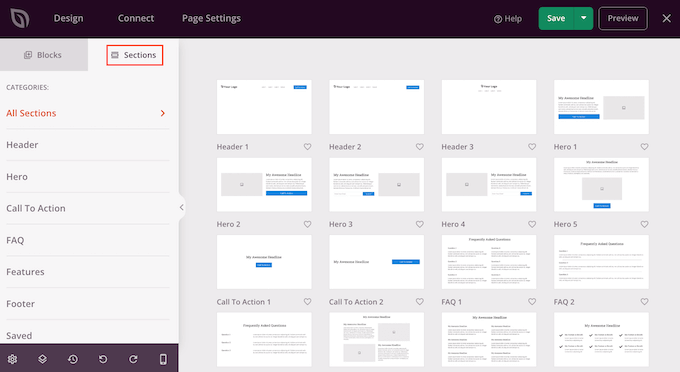
Per osservare più da vicino una sezione, passare il mouse su di essa e fare clic sull’icona della lente di ingrandimento.
Quando si trova una sezione che si desidera aggiungere al progetto, è sufficiente spostarsi con il mouse su di essa e fare clic sulla piccola icona ‘+’.
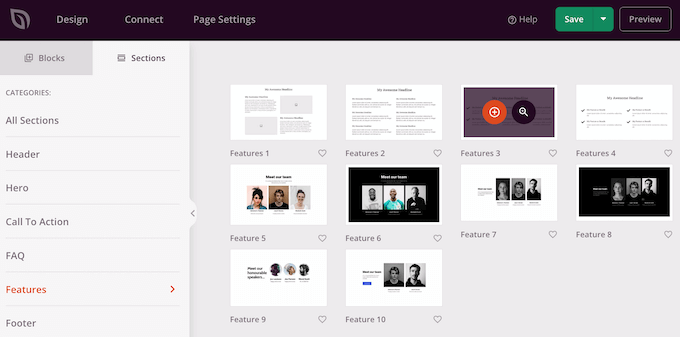
Questo aggiunge la sezione alla parte inferiore della pagina. È possibile spostare sia le sezioni che i blocchi all’interno del progetto utilizzando il drag and drop.
Se si commette un errore o si cambia idea, non c’è da preoccuparsi. È possibile annullare l’ultima modifica facendo clic sul pulsante “Annulla” in fondo alla barra degli strumenti di sinistra.
Qui si trovano anche il pulsante di ripetizione, la cronologia delle revisioni, la navigazione nel layout e le impostazioni globali.
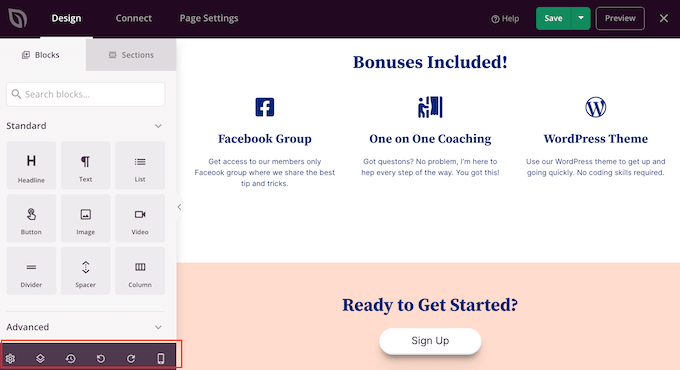
Questi pulsanti aggiuntivi semplificano la creazione di una pagina personalizzata in WordPress.
Nella parte inferiore della barra degli strumenti è presente anche un pulsante di anteprima mobile che consente di visualizzare la versione mobile della pagina personalizzata.
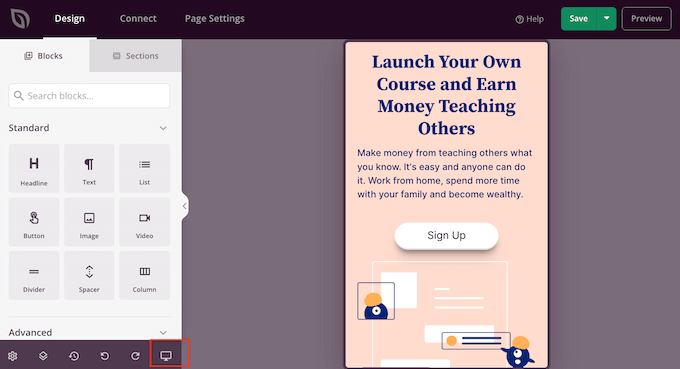
In questo modo è possibile progettare una pagina personalizzata che abbia lo stesso aspetto sui dispositivi mobili e sul computer.
Quando si è soddisfatti della pagina personalizzata, è il momento di pubblicarla facendo clic sulla freccia a discesa accanto a “Salva” e selezionando l’opzione “Pubblica”.
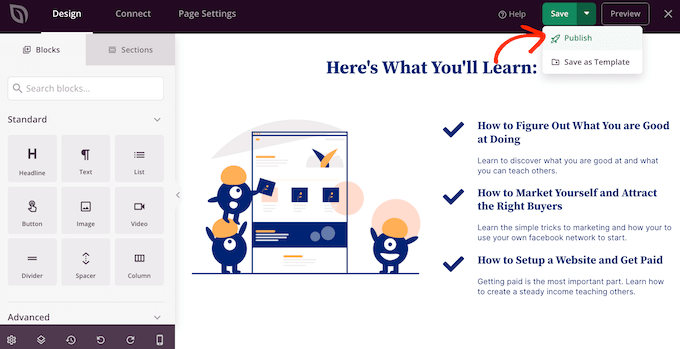
La pagina personalizzata sarà ora disponibile sul vostro blog WordPress.
Se si desidera modificare la pagina personalizzata in qualsiasi momento, basta andare su SeedProd ” Pagine di destinazione nella dashboard di WordPress. Trovare la pagina che si desidera modificare e fare clic sul link “Modifica”.
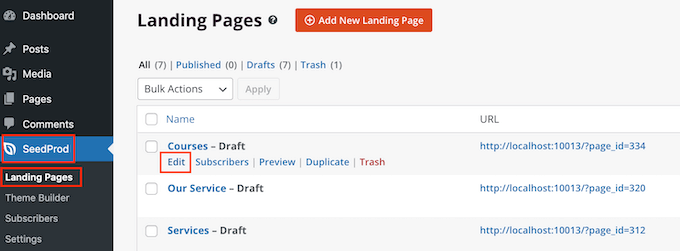
Questo aprirà il disegno nell’editor di SeedProd, pronto per essere modificato.
Metodo 4. Usare Thrive Architect per creare una pagina personalizzata in WordPress
È anche possibile creare una pagina personalizzata utilizzando Thrive Architect. Thrive Architect è un altro popolare builder di pagine trascina e rilascia per WordPress.
È dotato di oltre 300 modelli dal design professionale, progettati per aiutarvi a ottenere più conversioni.

Per prima cosa, è necessario installare e attivare il plugin Thrive Architect. Per maggiori dettagli, consultare la nostra guida passo-passo su come installare un plugin di WordPress.
Dopo l’attivazione, andare su Pagine ” Aggiungi nuovo nella dashboard di amministrazione di WordPress per creare una pagina personalizzata. Quindi, fare clic sul pulsante “Avvia Thrive Architect”.
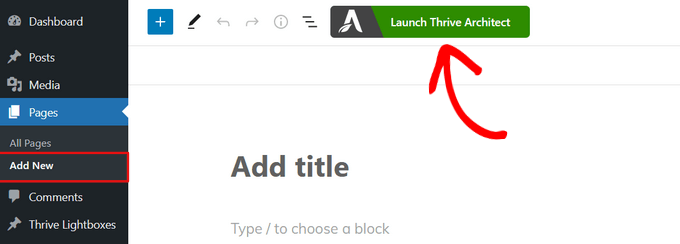
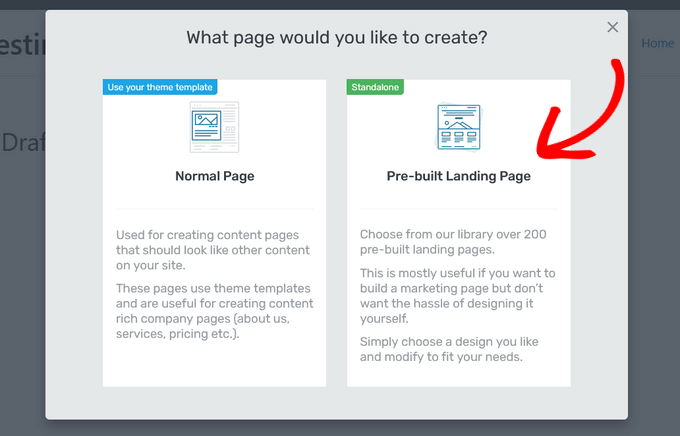
Poi si può scegliere se creare una pagina normale o una landing page precostituita.
Vi consigliamo di cliccare su “Pre-built Landing Page” per accedere a tutti i modelli di landing page di Thrive. Questi modelli sono completamente personalizzabili, in modo da poterli adattare al vostro sito WordPress.
Quando si trova un set di proprio gradimento, è sufficiente fare clic per selezionarlo.
Nell’immagine seguente, selezioniamo “Set di pagine di destinazione intelligenti”.
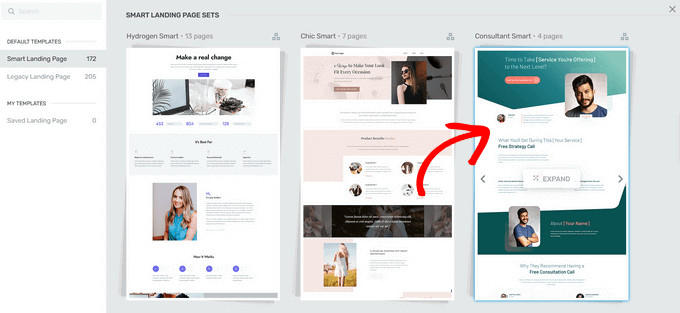
Nella schermata successiva, è necessario scegliere un modello specifico dal set.
Selezionare un modello facendo clic su di esso e premendo il pulsante “Applica modello”.
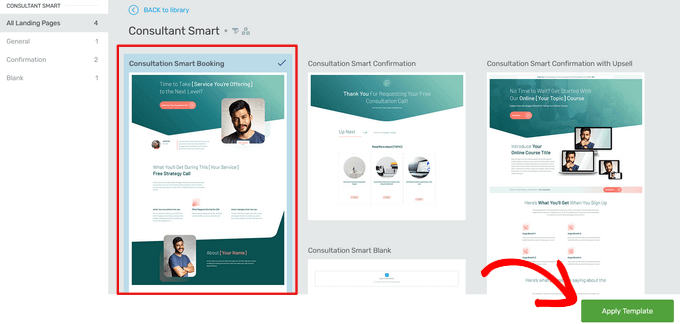
Questo aprirà il modello nell’editor di Thrive Architect. Da qui è possibile personalizzare facilmente il modello di pagina per adattarlo al proprio blog, sito web o negozio online.
Ad esempio, è possibile modificare l’intestazione facendo clic su di essa e digitando un messaggio personalizzato.
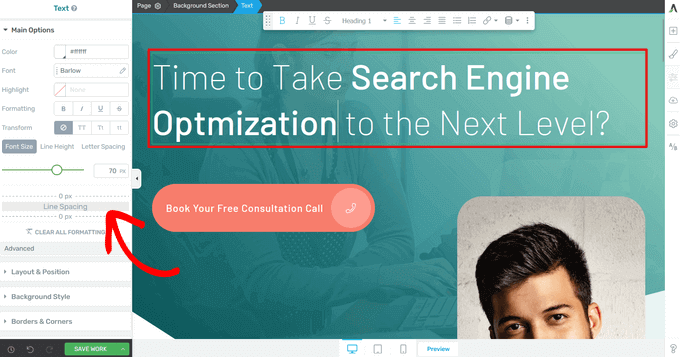
Nel menu di sinistra sono presenti tutte le opzioni di personalizzazione. Qui è possibile modificare la tipografia, la dimensione dei caratteri, il colore, la formattazione e altro ancora.
Dal pannello di sinistra è possibile regolare anche altre impostazioni per la pagina personalizzata, come il layout, lo stile di sfondo, i bordi, le animazioni e il comportamento di scorrimento, solo per citarne alcuni.
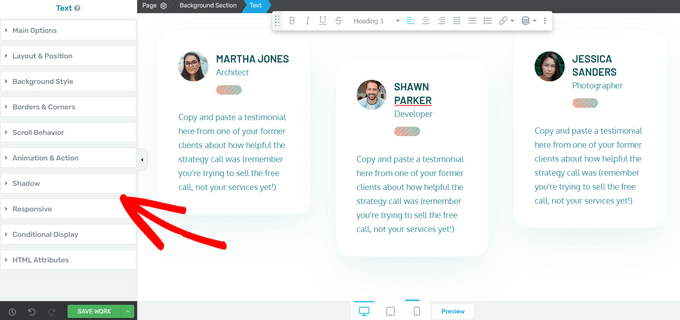
Simile ai blocchi di SeedProd, Thrive Architect è dotato di molti elementi precostituiti che si possono aggiungere alla pagina personalizzata.
Per aggiungere un nuovo elemento alla pagina, fare clic sul pulsante “Aggiungi elemento (+)” sul lato destro dello schermo.
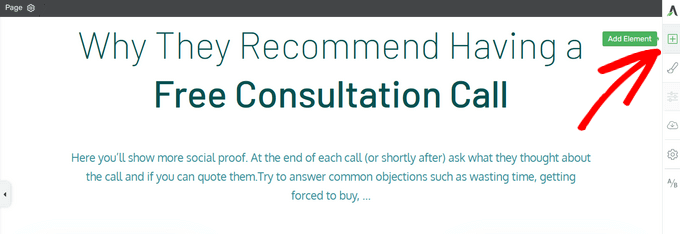
Ora è possibile scegliere tra elementi come immagini, pulsanti, moduli di generazione di lead, tabelle di prezzi, timer di conto alla rovescia e altro ancora.
Per aggiungere un elemento, basta trascinarlo dal menu di destra e rilasciarlo sulla pagina.
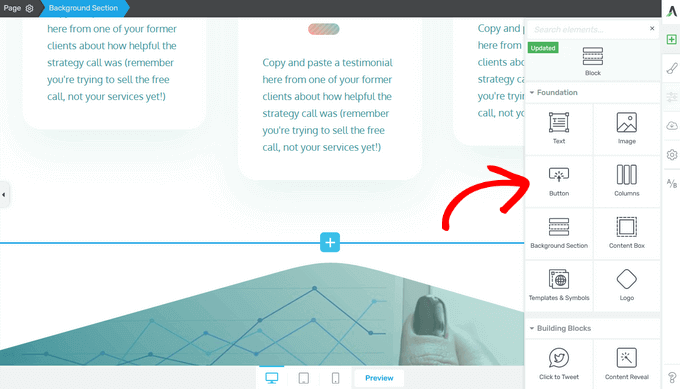
Anche in questo caso, è possibile modificare i nuovi elementi aggiunti alla pagina facendo clic su di essi.
Quando si è soddisfatti dell’aspetto della pagina, fare clic sul pulsante con la freccia (^) accanto al pulsante ‘Salva lavoro’. Quindi, fare clic sull’opzione “Salva e torna all’editor di post”.
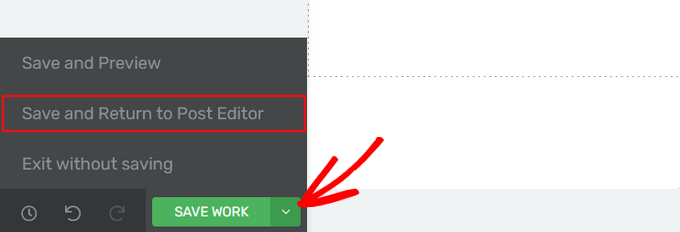
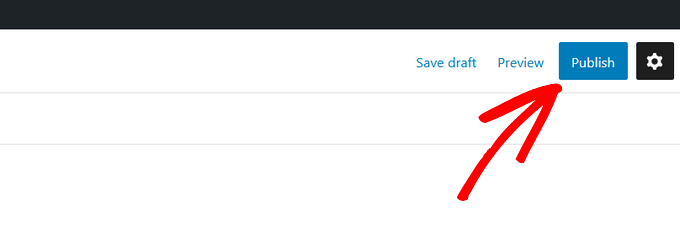
È quindi possibile salvare la pagina come bozza o pubblicarla in modo che venga visualizzata sul proprio sito web WordPress.
Una volta pubblicata la pagina personalizzata, è possibile visitare il sito per vederla in azione.
Speriamo che questo articolo vi abbia aiutato a capire come creare una pagina personalizzata in WordPress. Potreste anche consultare la nostra guida su come creare una landing page con WordPress e su come dividere il titolo di un post o di una pagina in WordPress.
Se questo articolo vi è piaciuto, iscrivetevi al nostro canale YouTube per le esercitazioni video su WordPress. Potete trovarci anche su Twitter e Facebook.


Hemant Kuswah
Hiii, Thanks for the information.
I have a little problem/confusion. I had made the custom page as you described in the tutorial above. But i want to add custom php code to fetch data from other place and display on the custom page i just created.
There will be a dropdown on the custom page and on selecting a value it will display some data on the same page which is either coming from database or from some other website.
How can i do that ?
Any suggestion ?
?
Thanks
Jared
Hi – I was wondering how I can avoid including other plugins css and js files such as woocommerce and various others in my template.
Thanks,
J.
Valerio
What if the theme has a kind of wrapper base.php? I would like to create a new custom page template but I always get also what is in the main wrapper base.php. Did I make myself clear enough?
Dre
how about this one,
I want the sidebar on the very right and all the other content “full width” on the page. How can I do this?
When I choose “Full Width” in the WordPress-Site-Settings, the sidebar of course is gone and my content still isn’t full width.
you can see my page here:
thank you!
Yazhini
How to make FTP client connection?
WPBeginner Support
Hey Yazhini,
You will need to enter your website domain, FTP username and password. For detailed instructions please see our guide on How to use FTP to upload files to WordPress.
Admin
Yiani
Nothing shows up in the drop down in Page Attributes? I am using Storefront theme for Woocommerce. What is the solution? Is Storefront not allowing custom page templates? Any help is much appreciated. Thanks.
Henry
Very educative indeed, thanks alot. However, I have a rather unique situation and after reading your post felt I should ask. I have two lovely pages I long to add to my wordpress theme, but sadly they are static HTML pages with commenting, voting as well as sharing system. Is there a way I can get them into my existing wordpress theme and also get them to use the wordpress commenting, voting and sharing systems?
Ketan Chaudhari
Thank you for this tutorial.
Today, You give me a chance to learn something new in wordpress.
Natacha
Thank you for the tutorial. I am happy to learn new stuff step by step.
But, When I preview the page with the new template, I don’t have a white page, I have my default theme loaded.
How can I change that?
WPBeginner Support
Hi Natacha,
You can click on Appearance and then select a theme. See our guide on how to install a WordPress theme for detailed instructions.
Admin
Natacha
Thank you for the answer.
But, I cannot change the theme of my whole website. I just needed to create a blank page so I can create a forum.
Hero
Instead of reinventing the wheel, why not just use BuddyPress?
Tim
I just want to THANK YOU for posting this. I’ve been trying to get a static front page to work with my custom template and I just couldn’t find a straight and simple answer until stumbling upon this article. Much appreciated.
WPBeginner Support
Hi Tim,
You are welcome Don’t forget to follow us on Facebook for more WordPress tips and tutorials.
Admin
hamed ahmed
thanks, the google search console requires to save .html file to my wordpress website , but .html will not be appeared in the website , can any one help please because i want to register my website to search console
WPBeginner Support
Hi Hamed,
You can also verify by adding the meta tag or by using Yoast SEO plugin which allows you to add the meta tag from its settings page.
Admin
Sameer Kumar
how to remove sidebar Php?
KH
I don’t see the template option in the Page Attributes section of my wp page – is there something I need to do to see this?
Yasser
thanks alot.
It worked perfectly.
Luis
Thanks for the post! It was so difficult to find this simple answer in the wordpress codex. One suggestion, though. Please add to your post that when users create their ‘custom_page.php’ file to add a header tag, i.e. with a text title so they don’t get a white page on the first go. It’s just a quick way of making sure the page is really working. Again, thanks a lot for making this so easy!
ashkan 261
So cool thank a lot dear
AltisB
I m trying to embed some javascipt or html codes into the blank page… how should i do that? Because i now have the blank page but when i embed the embedded codes onto the editor it doesnt seems to work.
kray
How do you do this for WordPress 4.7? No Template shows up when I attempt to create a page in 4.7.
Altisb
“Once you have added the code, save the file to your desktop as, custompaget1.php.”
My notepad save the file as .txt
How to you even save it as .php file???
WPBeginner Support
Hello,
Try using ‘Save as’ instead of save option from the file menu. When using save as write full name for your file. You can also rename the existing custompaget1.php.txt file to custompaget1.php
Admin
Ben
I’m truly a beginner and found the steps easy to follow. I created my new .php file following the instructions, pasting the page.php text at the end of my new .php file. I’m to the point where my new custom page template is available in the drop down when I create a new page. I select the new template for the new page, and when I make changes to the new page in the customizer (delete a text widget from the sidebar), the changes are applied to the other pages that have the default template selected as well, not to just my new page with the new custom template selected. Any ideas?
Marshall
I found this really helpful. However, I did have one problem. When I go to the new page
there is a 32px top margin on it which does not show on the other page.
Logan
Hello,
I have an issue with my WP pages. I have a website up and running and I recently needed to add a new page and a new menu button. I’ve made a new menu button and created a new page (default template) and published it. However, on the website, after clicking on the new button under which this new page should be, it’s only showing header and footer. Not my new page.
Could you be so kind and advise me on this? I’m a total WP beginner so building my own template page is out of the question and I was under the impression that simply adding a new page to my WP website should be only a few clicks away…
Thanks
WPBeginner Support
Hi Logan,
Please check out our guide on adding navigation menus in WordPress.
Admin
Anish
Hi! I did as you said.
I created a .php file with the same code snippet as given and uploaded it onto my /wp-content/themes folder. Now, when i go to the Page section on WordPress, there is no option for the Template choosing. What should i do ? Can you figure out where i might be going wrong ?
Leonardo
Hi. I don’t know any php and I need to creature a custom page for my website.
Is it possible to create an HTML page from scratch, include javascript to the page and put it into the .php file as described?
Thanks.
WPBeginner Support
Hi Leonardo,
You will still need to use PHP for WordPress template tags.
Admin
Mo
@DAN Are you sure that you including the header. Thats usually where WP will enqueue your style.css
Dan
Hi,
I’m trying to create a blank template to be used for a landing page. I succeded in creating the blank template, but now when I try to add content (using the WP editor or Visual Composer or even a CF7 contact form) no style is applied. Is there any way to tell the template to use the theme css style?
Thanks
Marco Milano
This isn’t a new post type but is a new template. They’re two different thing. In fact the you can call a template from a post whereas the custom post type has a personal space in admin panel.
Julie
I followed all the steps and they worked until I tried to select it in the “Page Attributes” part. The “CustomPageT1” is just not an option in the drop down menu!
What can I do so that WordPress and or my theme can pick up that it’s a template?
Thanks in advance!
Julie
WPBeginner Support
Most often users make mistake while copy-pasting code snippets. Please make sure that your custom template file contains exactly the same code
<?php /* Template Name: CustomPageT1 */ ?>Admin
Ubaid
I want to add a full width header image before entire content and sidebar. How can I do that?
Girija Tandel
Thank you so muc for this wonderfull tutorial.
This helps me a lot.
It works great.
Harish S Reddy
Thank You , it works Great !
WPBeginner Support
Hey Harish, glad you found it helpful. Don’t forget to follow us on Facebook for more WordPress tips and tutorials.
Admin
Charmy Dexter
It was like I’m reading 123. I hope a page template of a theme could be used in another theme.
Uchenna
please can you help me out. I have two themes. one for my desktop view and the other for mobile. i used any mobile switcher to get the mobile view working. I designed a static page for desktop theme and this is where my problem begins because once i set from “reading” to use static front page for the desktop theme, the mobile theme homepage stops displaying posts. please is there a way i can get this working? this is the site am talking about thanks in advnce
Matthew
Way easier than I thought this would be. Thank you!
Rahul Tiwari
Hi,
Its really helpful for me and very easy to understand.
Thanks
jass
thank you very much.This article really helps
Steven Denger
For a “beginner” this was not helpful. You did not explain the steps more in detail, like “go to your current theme folder” – how do I do this? And your FTP instructions were way to vague. If I was able to understand your instructions I wouldn’t have needed this wp-beginner in the first place as it is explained for those that have mor tech experience.
These tutorals were not at all helpful and are just targeted for the more tech viewers.
NO HELP HERE AT ALL!!
WPBeginner Support
Hi Steven,
We are sorry that you didn’t find this article helpful. We will try to explain in comments.
To connect to your theme folder you will need an FTP client. These are special software which allow you to connect to your webserver and upload, delete, and manage your files directly.
When you sign up with a WordPress hosting provider, they send you an email with your FTP login credentials. If you did not receive this email then please contact your hosting provider via chat or email and then will send them to you right away.
However, if using FTP seems a bit too difficult, then you can also use File Manager. It is a web based application available under your web hosting account. Login to your web hosting account and look for File Manager.
Let us know if you need more help
We will try to improve and make our articles even more beginner friendly in the future.
Admin
Niki
Many thank you for simple and informative article helped me to start
Chibuike Mba
Thank you very much, this your article about custom page have really pointed me in the right direction for I needed to override theme page in my plugin for some custom post types.
Thank you once again.
WPBeginner Support
We are glad you found it helpful:) Don’t forget to follow us on Twitter for more WordPress tips and tutorials.
Admin
Wayne from Keys English
Hello,
What can I do if I see the successful transfer of the custompageT1 to my FireFTP client, but when I go into WP admin – create a new page – scroll down to template, the custompageT1 is not in the drop down list to select?
Thanks
Wayne
zamaan
Excellent, very useful. Thank you.
but u fogot to tell where i want to add my custom php code in the template file
Jaczkowski
I learnt something new. Thanks alot
Janet Fuller
This is really extra ordinary. Generally, I do add a page and then create that. But today, I have known something new.
nevenx
Hi,
is it possible to integrate another script to wp (e.g. faucetbox script) on this way?
WPBeginner Support
You can, but it would be better to create a plugin for that.
Admin
San
Great article. Helps to ease my confusion
Tak
thanks for the very concise tutorial with simple examples. it was super easy to follow!
Radhakrishnan
Dear sir,
I did what you say. but in my page edit screetn there no template comming in attribute. what i can do sir?
levan
many thanks to you my dear its very helpful
Gabriel
This is a great tutorial. Very simple and easy to follow. Thank you!
Waleed Barakat
Thanks for the tutorial! actually i have a games WordPress template and every time i try to create a page treat it as a game and not show the page content as usual, but i think everything will be okay after reading and applying this tutorial on my website:
Thanks again