Una pagina personalizzata consente di utilizzare un layout diverso dal resto del sito. Molti siti WordPress utilizzano layout di pagina personalizzati per le pagine di vendita, le landing page, le pagine dei webinar e altro ancora.
Nel corso degli anni, abbiamo creato molte pagine personalizzate su WPBeginner per scopi diversi. Le abbiamo usate per mostrare diverse offerte su plugin e servizi di hosting, offrire servizi Pro per aiutare gli utenti con WordPress, mostrare diversi prodotti e altro ancora.
Secondo la nostra esperienza, esistono diversi modi per creare pagine personalizzate. Per alcuni dei nostri progetti abbiamo utilizzato costruttori di pagine come SeedProd. Inoltre, è possibile utilizzare l’editor di blocchi o l’editor completo del sito per aggiungere pagine personalizzate al sito.
In questo articolo vi mostreremo come creare facilmente una pagina personalizzata in WordPress.
Perché creare una pagina personalizzata in WordPress?
Ogni volta che si crea una nuova pagina, il tema di WordPress controlla l’aspetto della pagina utilizzando un file modello.
Questo modello page.php riguarda tutte le singole pagine create in WordPress. Tuttavia, non è detto che si voglia utilizzare sempre lo stesso design.
Lelanding page hanno spesso contenuti diversi rispetto alle pagine normali, come ad esempio un’immagine principale di grandi dimensioni o una chiamata all’azione (CTA). Ciò significa che spesso hanno un aspetto completamente diverso dal resto del sito web.
Tuttavia, cercare di creare design unici utilizzando il modello di pagina standard può richiedere molto tempo. Inoltre, si è limitati dal modello page.php e potrebbe non essere possibile creare il design esatto che si desidera. Questo può rendere difficile ottenere buoni risultati. Ad esempio, se state creando una pagina di vendita, potreste non ottenere molte conversioni a causa di un cattivo design della pagina.
Detto questo, vediamo come creare una pagina personalizzata in WordPress, con l’esatto design, layout e contenuto che desiderate. Utilizzate i link rapidi qui sotto per passare direttamente al metodo che desiderate utilizzare.
- Method 1. How to Create a Custom Page in WordPress Using the Block Editor (No Plugin Required)
- Method 2. How to Create a Custom Page Using the Full-Site Editor (Block-Based Themes Only)
- Method 3. Create a Custom Page in WordPress using SeedProd (Recommended)
- Method 4. Using Thrive Architect to Create a Custom Page in WordPress
Metodo 1. Come creare una pagina personalizzata in WordPress utilizzando l’editor di blocchi (non è necessario alcun plugin)
L’editor di blocchi consente di progettare facilmente i propri modelli utilizzando gli strumenti che già si conoscono.
Questa è una buona scelta se si intende riutilizzare lo stesso design su più pagine, in quanto si può semplicemente applicare lo stesso template. Se si desidera creare un design completamente unico, un’altra opzione è quella di creare la pagina come normale e poi modificarne il layout utilizzando l’editor del sito, che copriremo nel Metodo 2.
Tenete presente che questi metodi funzionano solo con temi a blocchi come ThemeIsle Hestia Pro o Twenty Twenty-Three. Se non si dispone di un tema a blocchi, si consiglia di utilizzare un builder di pagine.
Per iniziare, basta aprire una pagina o un post qualsiasi. Quindi, selezionare la scheda “Pagina” nel menu di destra e fare clic sul testo accanto a “Modello”.
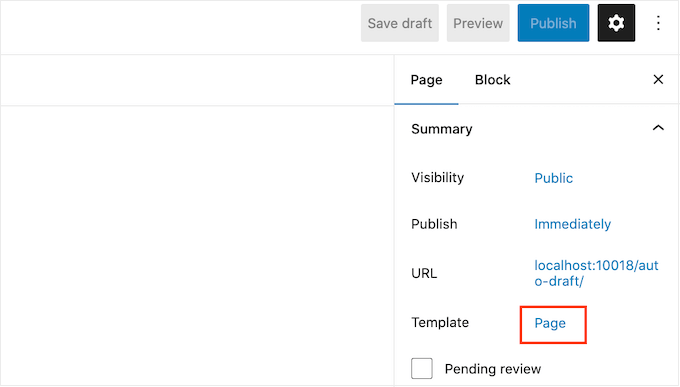
Le opzioni visualizzate possono variare a seconda del tema di WordPress, ma il testo mostrerà in genere “Pagina”, “Modello predefinito” o simili.
Nella finestra di dialogo visualizzata, fare clic sull’icona “Aggiungi modello”.

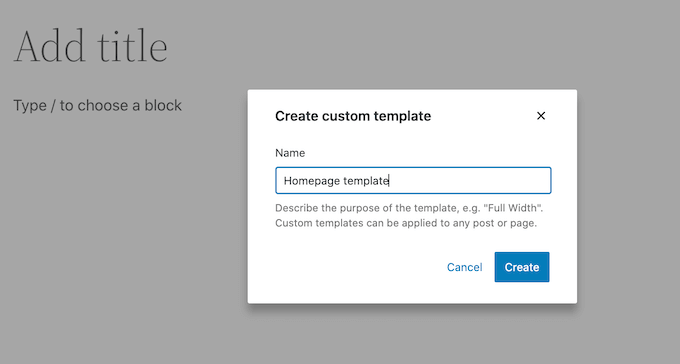
Nel popup che appare, digitate un nome per il vostro modello e poi fate clic su “Crea”.
Il nome è solo un riferimento, quindi si può usare quello che si vuole.
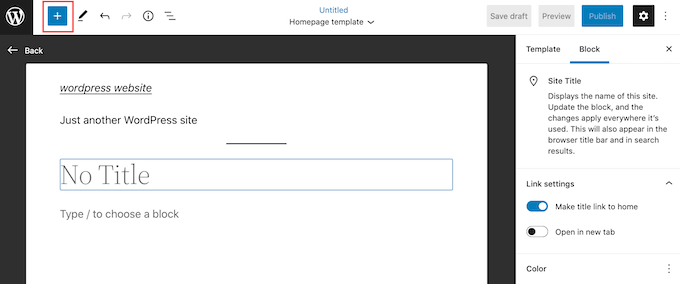
Questo lancia l’editor dei modelli, che funziona in modo simile all’editor dei contenuti di WordPress.
Per aggiungere blocchi al design della pagina personalizzata, è sufficiente fare clic sul pulsante blu “+”. È quindi possibile trascinare e rilasciare i blocchi.
È possibile aggiungere contenuto a un blocco o modificarne la formattazione utilizzando i consueti strumenti di modifica dei post di WordPress. Ad esempio, è possibile digitare del testo in un blocco “Titolo”, applicare la formattazione grassetto o cambiare il testo da H2 a H3.
È anche possibile creare una pagina personalizzata utilizzando i modelli. I modelli sono raccolte di blocchi che vengono spesso utilizzati insieme, come un elenco di eventi, un’immagine con una didascalia o una tabella dei prezzi.
I modelli che vedete variano a seconda del vostro tema WordPress, ma potete vedere quali sono i modelli disponibili facendo clic sulla scheda “Modelli”.
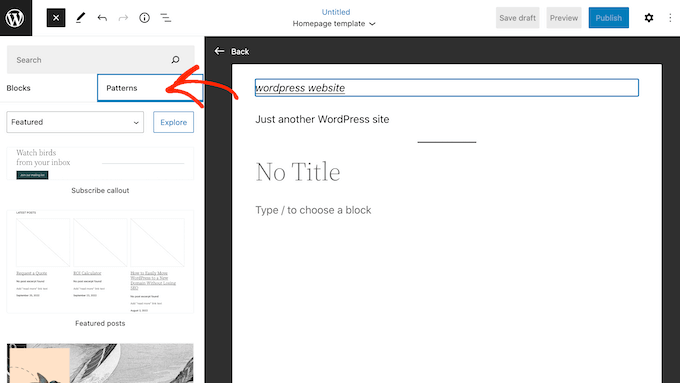
È possibile trascinare e rilasciare un modello di blocco sul layout o fare clic sul modello per aggiungerlo alla parte inferiore del modello. Quando siete soddisfatti dell’aspetto del modello, fate clic sul pulsante “Pubblica” e poi su “Salva”.
È ora possibile applicare questo modello a qualsiasi pagina. Basta aprire la pagina nell’editor e fare clic sul testo accanto a “Modello”.
Nel popup che appare, selezionare il modello appena creato.
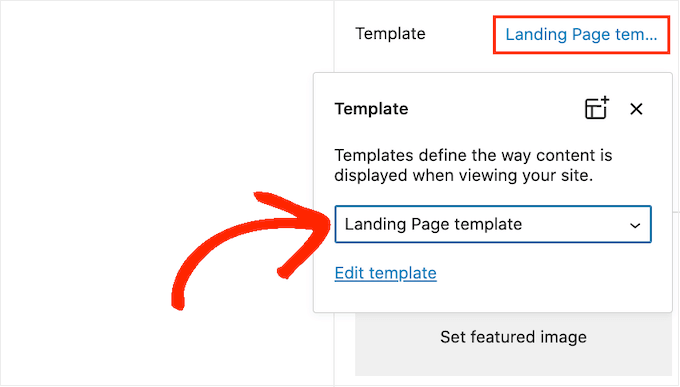
Fatto questo, è possibile aggiungere contenuti alla pagina, proprio come qualsiasi altra pagina di WordPress.
Metodo 2. Come creare una pagina personalizzatautilizzando l’Editor del sito completo (solo per i temi a blocchi)
Se si utilizza un tema a blocchi, è possibile creare una pagina personalizzata utilizzando l’editor del sito. Ciò consente di modificare il layout di una singola pagina, senza creare un template personalizzato.
Per questo motivo, si tratta di una buona scelta se si vuole creare un design completamente unico che non verrà riutilizzato su nessun’altra pagina.
Per iniziare, è sufficiente creare la pagina come di consueto andando su Pagine “ Aggiungi nuovo. È quindi possibile digitare un titolo, aggiungere categorie e tag, caricare un’immagine in evidenza e apportare qualsiasi altra modifica.
Quando si è soddisfatti della pagina di base, salvare le modifiche e poi andare su Aspetto “ Editor.
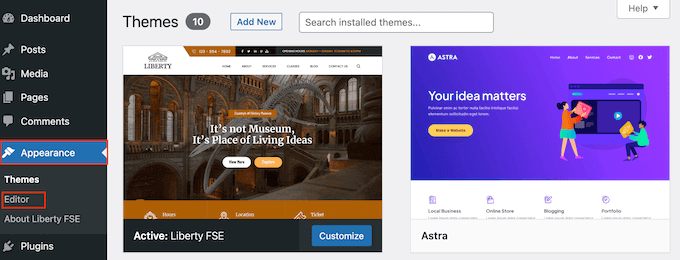
Per impostazione predefinita, l’editor completo del sito mostra il modello di home del tema.
Nel menu di sinistra, fare clic su “Pagine”.
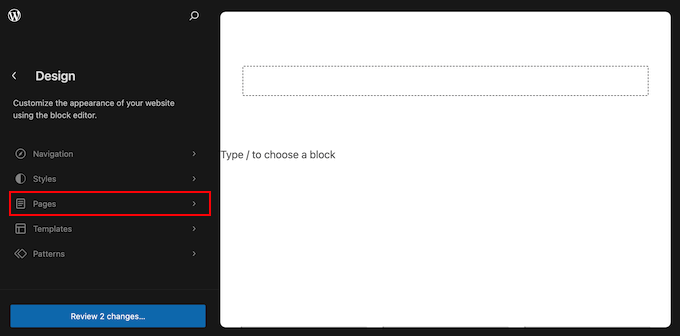
Ora vedrete tutte le pagine che avete creato sul vostro sito WordPress.
È sufficiente trovare la pagina che si desidera ridisegnare e fare clic su di essa.
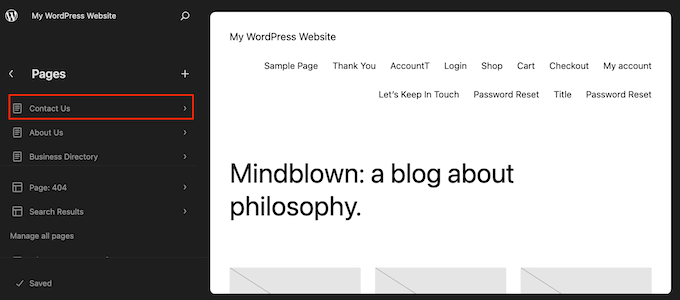
WordPress mostrerà ora un’anteprima del progetto.
Per modificare questo modello, fare clic sull’icona della matita.
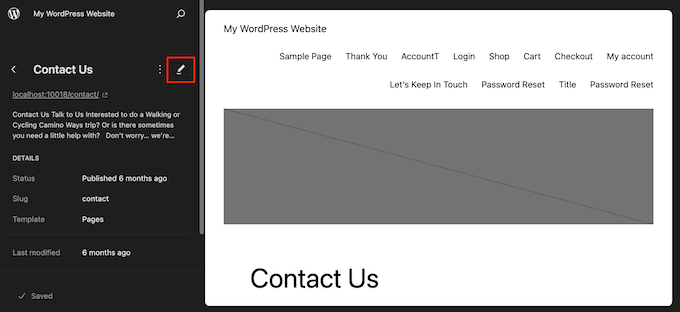
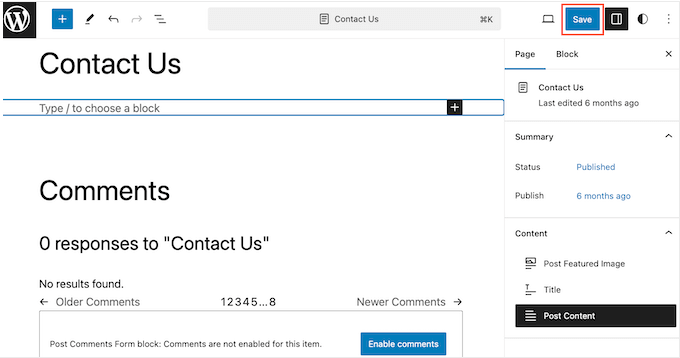
È ora possibile modificare il layout della pagina utilizzando gli strumenti dell’editor completo del sito. Ad esempio, è possibile fare clic sul pulsante blu ‘+’ per aggiungere nuovi blocchi, oppure fare clic per selezionare un blocco che si desidera personalizzare.
Quando si è soddisfatti delle modifiche apportate, fare clic sul pulsante “Salva”.
Ora, se visitate questa pagina sul vostro sito web, vedrete il nuovo design della pagina in azione.
Metodo 3. Creare una pagina personalizzata in WordPress utilizzando SeedProd (consigliato)
In passato, si creava una pagina personalizzata scrivendo codice, il che non era molto semplice per i principianti. Se si commetteva un errore con il codice HTML, CSS o PHP, si potevano causare errori comuni di WordPress o addirittura rompere completamente il sito.
Per questo motivo, consigliamo di utilizzare un costruttore di pagine.
SeedProd è il miglior builder di pagine trascina e rilascia per WordPress. Viene fornito con più di 350 template, che consentono di creare pagine personalizzate senza scrivere alcun codice.
Se si utilizza una pagina personalizzata per ottenere maggiori conversioni, SeedProd funziona con molti strumenti di terze parti che si stanno già utilizzando per ottenere conversioni. Tra questi, i migliori servizi di email marketing, WooCommerce, Google Analytics e altri ancora.
Per prima cosa, è necessario installare e attivare SeedProd. Per maggiori dettagli, consultate la nostra guida passo-passo su come installare un plugin di WordPress.
Nota: esiste anche una versione gratuita di SeedProd che consente di creare pagine personalizzate indipendentemente dal budget a disposizione. Tuttavia, per questa guida, utilizzeremo SeedProd Pro, poiché ha molti più template e si integra con tutti i migliori servizi di email marketing.
Dopo aver attivato il plugin, SeedProd chiederà la chiave di licenza.

Queste informazioni si trovano nel proprio account sul sito web di SeedProd. Dopo aver inserito la chiave, fare clic sul pulsante “Verifica chiave”.
Scegliere un modello di pagina personalizzato
Una volta fatto ciò, andate su SeedProd ” Pagine di destinazione e fate clic sul pulsante “Aggiungi nuova pagina di destinazione”.
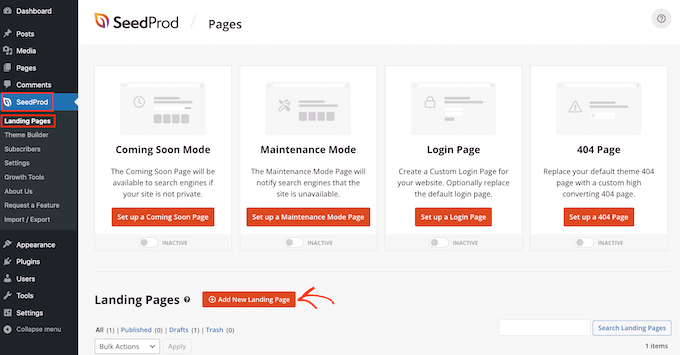
È ora possibile scegliere un modello per la pagina personalizzata.
I modelli di SeedProd sono organizzati in diversi tipi di campagna, come “lead”,“squeeze” e“coming soon“. È possibile fare clic sulle schede nella parte superiore della schermata per filtrare i modelli in base al tipo di campagna.
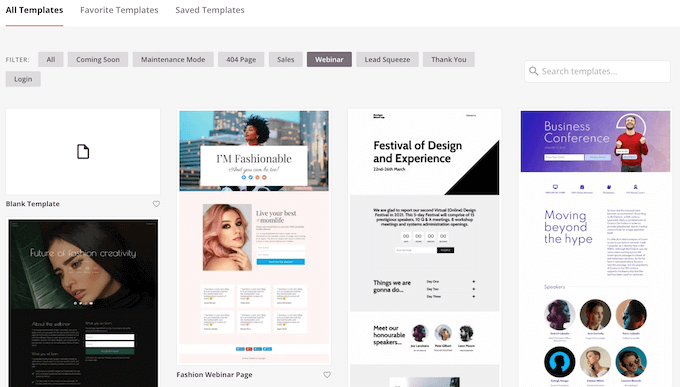
Se volete partire da zero, SeedProd ha anche un modello vuoto che potete utilizzare.
Per dare un’occhiata più da vicino a qualsiasi disegno, è sufficiente passare il mouse su quel modello e poi fare clic sull’icona della lente d’ingrandimento.
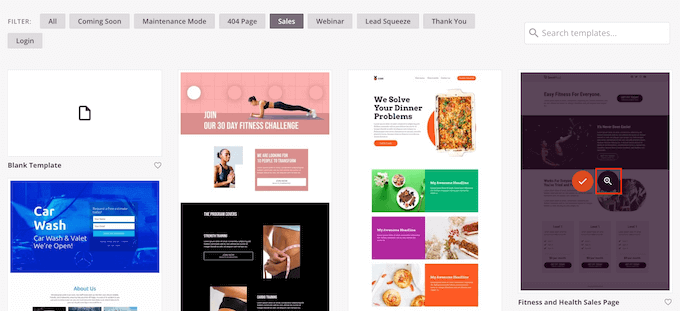
Quando trovate un design che vi piace, fate clic su “Scegli questo modello”. Noi utilizziamo il modello “Pagina di vendita del corso” in tutte le nostre immagini, ma voi potete utilizzare qualsiasi modello desideriate.
Quindi, digitare un nome per la pagina personalizzata. SeedProd creerà automaticamente un URL basato sul titolo della pagina, ma è possibile cambiare questo URL con quello che si desidera.
Un URL descrittivo aiuterà anche i motori di ricerca a capire di cosa tratta la pagina, in modo da mostrarla agli utenti giusti, migliorando così la SEO di WordPress.
Per dare alla vostra pagina personalizzata le migliori possibilità di apparire nei risultati di ricerca pertinenti, potreste aggiungere le parole chiave mancanti nell’URL. Per maggiori dettagli, consultate la nostra guida su come effettuare la ricerca delle parole chiave.
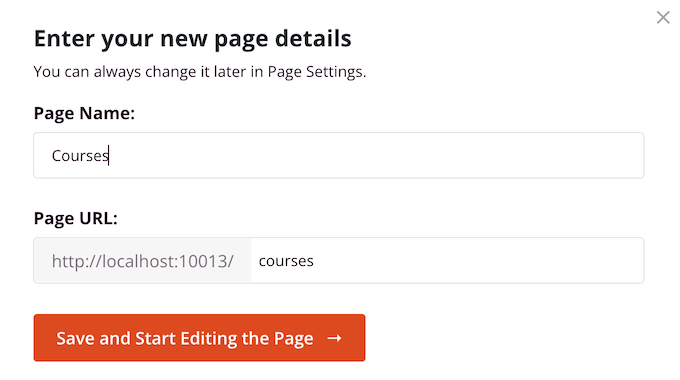
Quando si è soddisfatti delle informazioni inserite, fare clic sul pulsante “Salva e inizia a modificare la pagina”.
Progettate la vostra pagina personalizzata
SeedProd aprirà il modello scelto nel suo intuitivo editor di trascinamento. Vedrete un’anteprima live della vostra pagina a destra e alcune impostazioni di blocco a sinistra.

Per personalizzare un blocco, è sufficiente fare clic per selezionarlo nell’editor di pagina. La barra degli strumenti di sinistra mostrerà tutte le impostazioni di quel blocco.
Nell’immagine seguente, stiamo modificando il testo all’interno di un blocco “Titolo”.
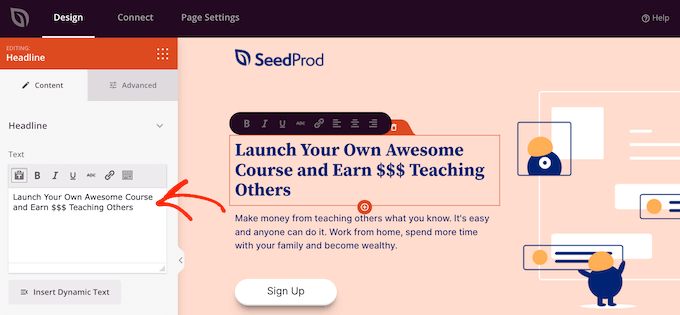
È possibile formattare il testo, modificarne l’allineamento, aggiungere collegamenti e altro ancora utilizzando le impostazioni del menu di sinistra.
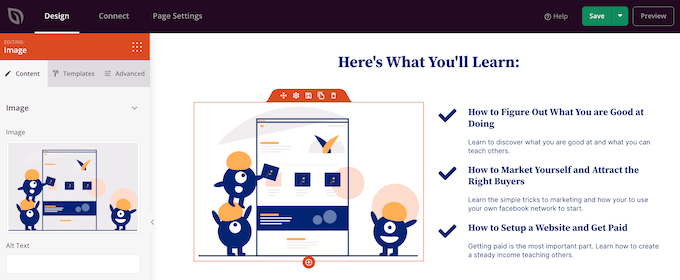
È anche facile modificare le immagini utilizzando il costruttore di pagine SeedProd. È sufficiente fare clic su qualsiasi blocco “Immagine” e utilizzare le impostazioni per aggiungere il testo alt, caricare una nuova immagine o apportare qualsiasi altra modifica.
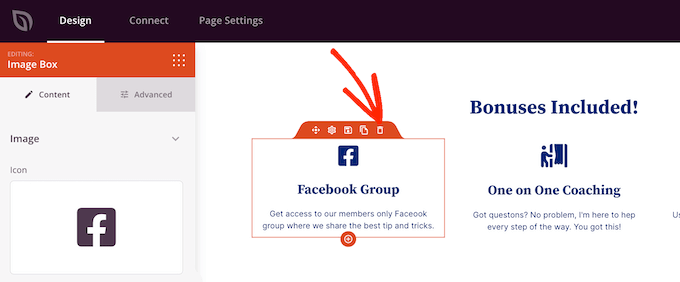
Se si desidera rimuovere un blocco dalla pagina personalizzata, è sufficiente fare clic per selezionarlo.
Quindi, fare clic sull’icona del cestino nella mini barra degli strumenti.
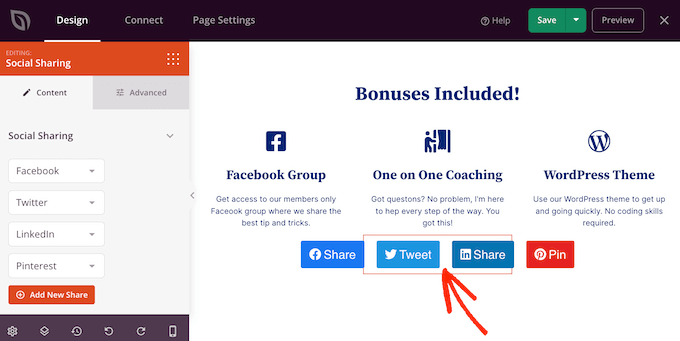
Per aggiungere nuovi blocchi al progetto, basta trovare un blocco nel menu di sinistra e trascinarlo nell’editor.
È quindi possibile fare clic per selezionare il blocco e apportare eventuali modifiche nel menu di sinistra.
SeedProd è dotato anche di “sezioni”, ovvero di modelli di righe e blocchi che possono aiutare a creare rapidamente una pagina personalizzata. Ad esempio, se si sta progettando una pagina di destinazione di annunci Google, si possono utilizzare le sezioni Hero, Call To Action o Features già pronte di SeedProd.
Per vedere tutte le sezioni disponibili, basta cliccare sulla scheda “Sezioni”.
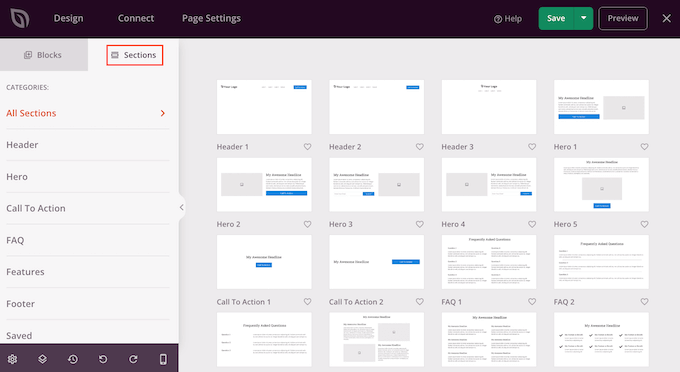
Per osservare più da vicino una sezione, passare il mouse su di essa e fare clic sull’icona della lente di ingrandimento.
Quando si trova una sezione che si desidera aggiungere al progetto, è sufficiente spostarsi con il mouse su di essa e fare clic sulla piccola icona ‘+’.
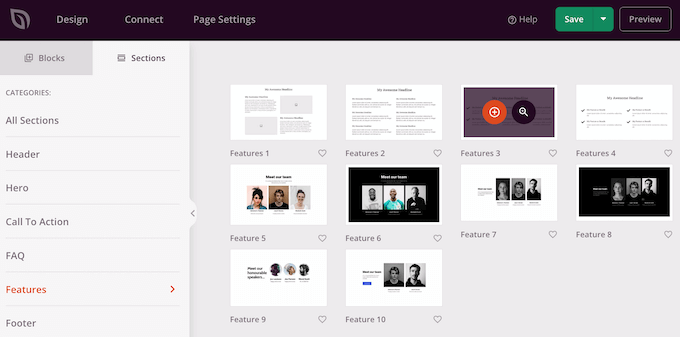
Questo aggiunge la sezione alla parte inferiore della pagina. È possibile spostare sia le sezioni che i blocchi all’interno del progetto utilizzando il drag and drop.
Se si commette un errore o si cambia idea, non c’è da preoccuparsi. È possibile annullare l’ultima modifica facendo clic sul pulsante “Annulla” in fondo alla barra degli strumenti di sinistra.
Qui si trovano anche il pulsante di ripetizione, la cronologia delle revisioni, la navigazione nel layout e le impostazioni globali.
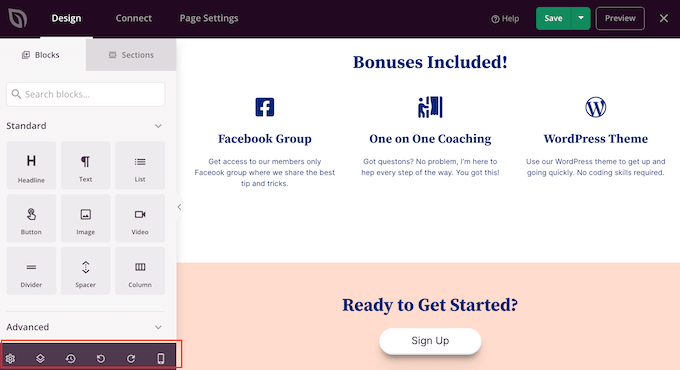
Questi pulsanti aggiuntivi semplificano la creazione di una pagina personalizzata in WordPress.
Nella parte inferiore della barra degli strumenti è presente anche un pulsante di anteprima mobile che consente di visualizzare la versione mobile della pagina personalizzata.
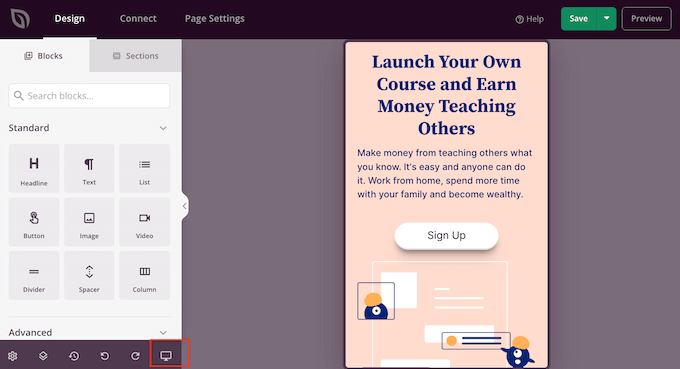
In questo modo è possibile progettare una pagina personalizzata che abbia lo stesso aspetto sui dispositivi mobili e sul computer.
Quando si è soddisfatti della pagina personalizzata, è il momento di pubblicarla facendo clic sulla freccia a discesa accanto a “Salva” e selezionando l’opzione “Pubblica”.
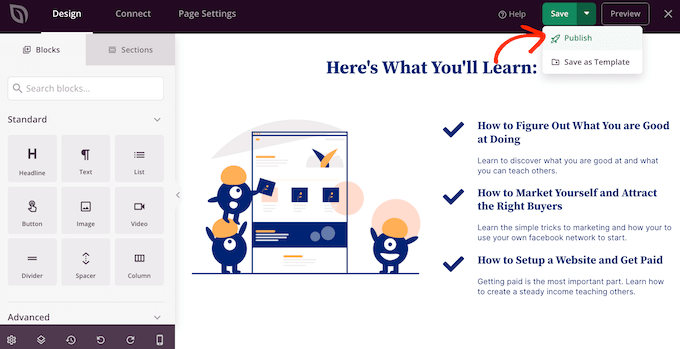
La pagina personalizzata sarà ora disponibile sul vostro blog WordPress.
Se si desidera modificare la pagina personalizzata in qualsiasi momento, basta andare su SeedProd ” Pagine di destinazione nella dashboard di WordPress. Trovare la pagina che si desidera modificare e fare clic sul link “Modifica”.
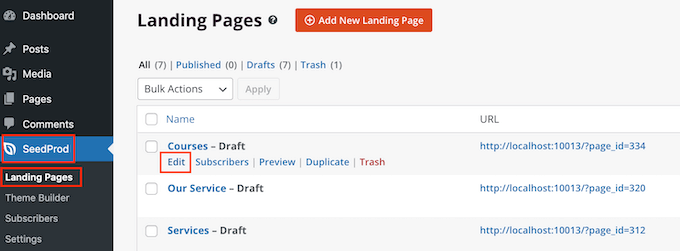
Questo aprirà il disegno nell’editor di SeedProd, pronto per essere modificato.
Metodo 4. Usare Thrive Architect per creare una pagina personalizzata in WordPress
È anche possibile creare una pagina personalizzata utilizzando Thrive Architect. Thrive Architect è un altro popolare builder di pagine trascina e rilascia per WordPress.
È dotato di oltre 300 modelli dal design professionale, progettati per aiutarvi a ottenere più conversioni.

Per prima cosa, è necessario installare e attivare il plugin Thrive Architect. Per maggiori dettagli, consultare la nostra guida passo-passo su come installare un plugin di WordPress.
Dopo l’attivazione, andare su Pagine ” Aggiungi nuovo nella dashboard di amministrazione di WordPress per creare una pagina personalizzata. Quindi, fare clic sul pulsante “Avvia Thrive Architect”.
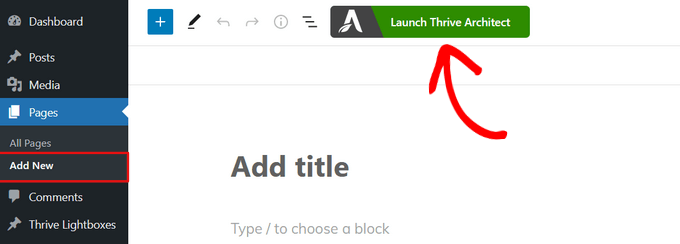
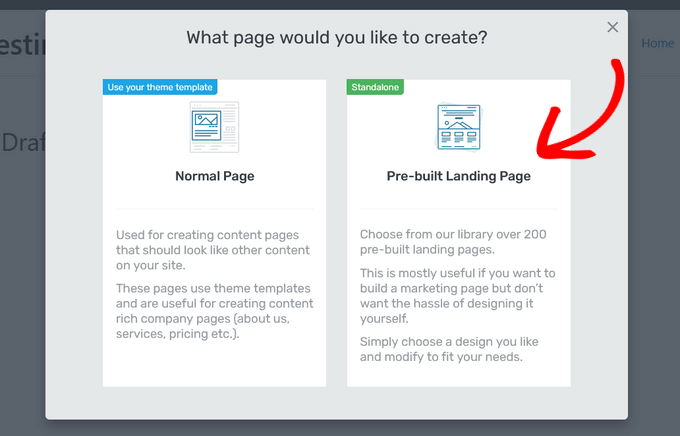
Poi si può scegliere se creare una pagina normale o una landing page precostituita.
Vi consigliamo di cliccare su “Pre-built Landing Page” per accedere a tutti i modelli di landing page di Thrive. Questi modelli sono completamente personalizzabili, in modo da poterli adattare al vostro sito WordPress.
Quando si trova un set di proprio gradimento, è sufficiente fare clic per selezionarlo.
Nell’immagine seguente, selezioniamo “Set di pagine di destinazione intelligenti”.
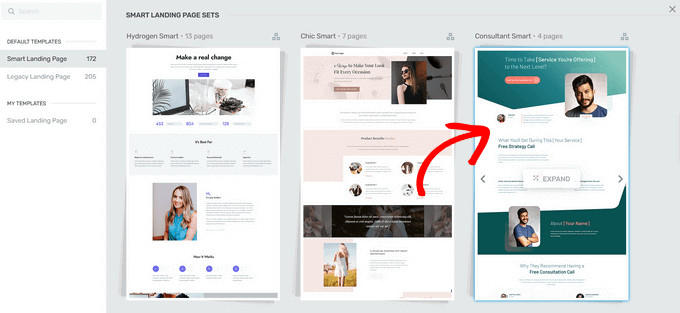
Nella schermata successiva, è necessario scegliere un modello specifico dal set.
Selezionare un modello facendo clic su di esso e premendo il pulsante “Applica modello”.
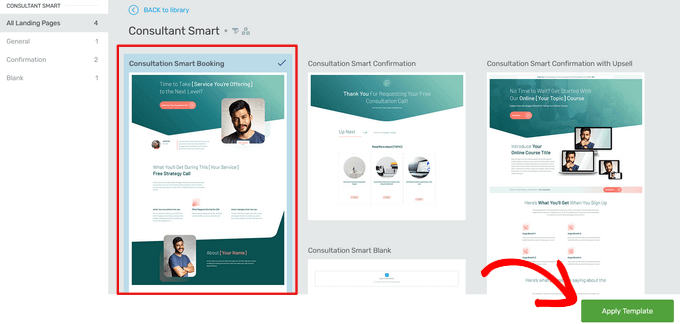
Questo aprirà il modello nell’editor di Thrive Architect. Da qui è possibile personalizzare facilmente il modello di pagina per adattarlo al proprio blog, sito web o negozio online.
Ad esempio, è possibile modificare l’intestazione facendo clic su di essa e digitando un messaggio personalizzato.
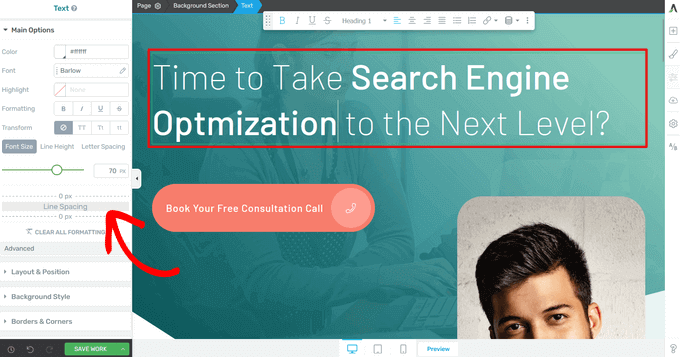
Nel menu di sinistra sono presenti tutte le opzioni di personalizzazione. Qui è possibile modificare la tipografia, la dimensione dei caratteri, il colore, la formattazione e altro ancora.
Dal pannello di sinistra è possibile regolare anche altre impostazioni per la pagina personalizzata, come il layout, lo stile di sfondo, i bordi, le animazioni e il comportamento di scorrimento, solo per citarne alcuni.
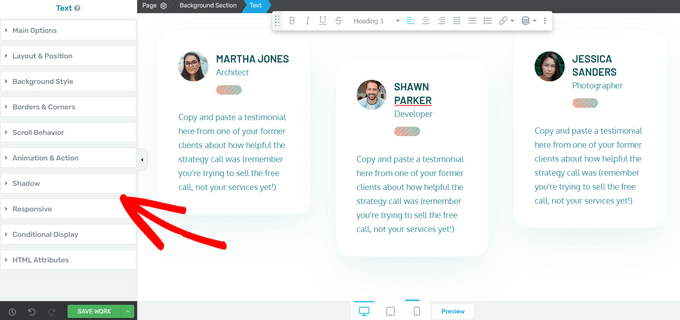
Simile ai blocchi di SeedProd, Thrive Architect è dotato di molti elementi precostituiti che si possono aggiungere alla pagina personalizzata.
Per aggiungere un nuovo elemento alla pagina, fare clic sul pulsante “Aggiungi elemento (+)” sul lato destro dello schermo.
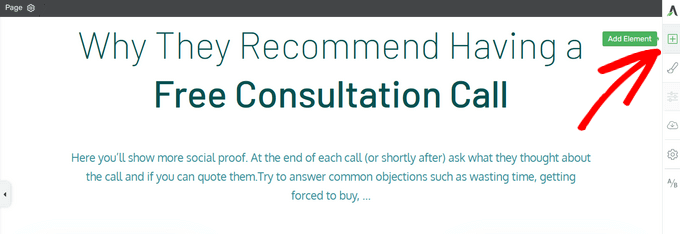
Ora è possibile scegliere tra elementi come immagini, pulsanti, moduli di generazione di lead, tabelle di prezzi, timer di conto alla rovescia e altro ancora.
Per aggiungere un elemento, basta trascinarlo dal menu di destra e rilasciarlo sulla pagina.
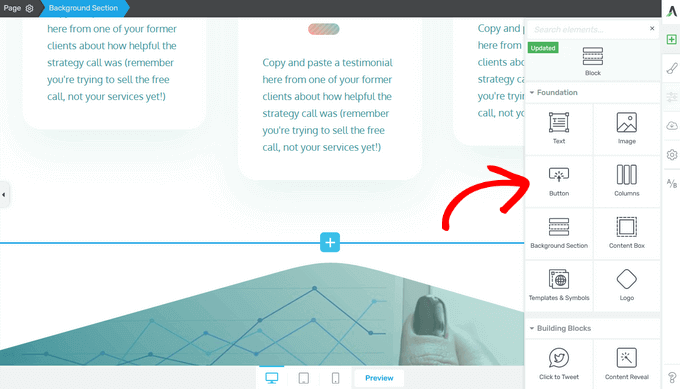
Anche in questo caso, è possibile modificare i nuovi elementi aggiunti alla pagina facendo clic su di essi.
Quando si è soddisfatti dell’aspetto della pagina, fare clic sul pulsante con la freccia (^) accanto al pulsante ‘Salva lavoro’. Quindi, fare clic sull’opzione “Salva e torna all’editor di post”.
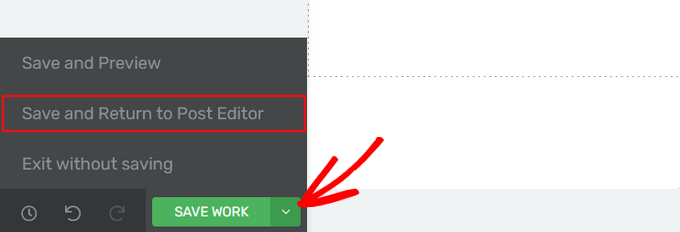
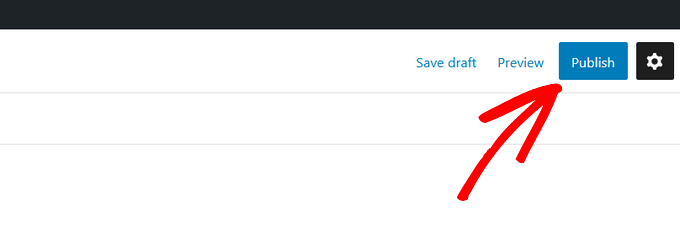
È quindi possibile salvare la pagina come bozza o pubblicarla in modo che venga visualizzata sul proprio sito web WordPress.
Una volta pubblicata la pagina personalizzata, è possibile visitare il sito per vederla in azione.
Speriamo che questo articolo vi abbia aiutato a capire come creare una pagina personalizzata in WordPress. Potreste anche consultare la nostra guida su come creare una landing page con WordPress e su come dividere il titolo di un post o di una pagina in WordPress.
Se questo articolo vi è piaciuto, iscrivetevi al nostro canale YouTube per le esercitazioni video su WordPress. Potete trovarci anche su Twitter e Facebook.


NG SHAIKH
Dear WPB Team,
I created the template named MyTemplate.php and copied it into /wp-content/themes/ directory. The template is not reflected in drop down menu of Page Attribute -> Templets. Please guide.
Is it necessary to use FTP server for this? Please guide.
Thanks.
NG SHAIKH
NG SHAIKH
Kudos to WPBeginner Team. This is an excellent article which can give guidance to a beginner from the scratch. What a help!
However, if there is further guidance as to how to remove sidebar, create and add custom sidebar and where to put PHP code or HTML.
With lot of regards and love,
NG SHAIKH
Ajay
Hi great tutorial!
One question… I am adding new HTML template files that use css and js files etc. How can I link these files in my template file? I added the files to the same directory as the other stylesheets and assets but no luck. They do not render on the new template page. Any ideas?
Thanks!
The Last One
Im confused.. i hink this site has written years ago, but if i do understand it, you cannot do custom pages anymore in wordpress unless you have some sort of subscription?
i was trying to “edit” my wordpress site but all feature was missing.
Rob
Thanks – once again – how to remove header/footer/sidebar?
Thanks
Editorial Staff
Remove get_sidebar(), get_footer(), and get_header().
This will break all the styling because your stylesheet won’t load. So you need to make sure that wp_head() and wp_footer() are added in your template.
Fore more customization help, you may want to look here:
https://codex.wordpress.org/Theme_Development
Admin
Jeff
thanks great help
Deepan
Thanks for this tutorial,this tutorial help me to understand the concept easily.Good Work keep continuing like this.
-Deepan
tony kh tan
Thank you for this tutorial. I use cPanel to add the customPage.php onto wp-content/.. and it works. Without using FTP.
Njoroge Mathu
Thanks for the great article. Tried the steps and it works perfect. Seems like the file ‘CustomPageT1.php’ has to always be uploaded into the active theme folder or if working offline with wamp save it in wamp/www/wordpress/wp-content/themes/active theme.
Amit Prasad
Great Article. Exactly what I was looking for. Keep up the good work pal!
Osvaldo
This article, pure and simple, works like charm to me!!!
Jean-Charles de Geekarts
So it works perfectly bur when I put the file in a plugin file (because it make more sense) it doesn’t work. Do you have anyidea on what to do to make it work.
Thanks anyway for all your great tutorial
Ronny
Great work, guys. Thank you very much. But one question please… How do i make this custom template pull posts from one particular category or categories? I’ve been building websites with wordpress for a while now but, this one seems knotty to me. I know there’s a plugin that does this, but I’ll rather go with the custom template method. Thanks, again…
Chadly
hey guys, is their a plugin you recommend for WP that creates great looking pages like this:
You know, the pages that have the arrows pointing to things and almost a hand drawn look about the page.
Thanks…
irfan
Sir my websites homepage is in the form of custom link in wordpress menu and is not present in all pages also.I am a totaly newbie in website development so kindly help to convet this custom link into a page.
2:kindly also help to remove read more from posts.
Thanks
Irfan
website Address:www.fishysms.com
karlonc
Does this tutorial still apply to the newest wordpress?
Also will it keep any of the attributes of the theme you are using?
WPBeginner Support
Yes, it applies on latest WordPress and will keep all attributes of the theme you are using.
Admin
Musarrof
Please give details more and write it easily with screenshot. new word-press user cant understand your reading tutorial.
WPBeginner Support
Thanks for your feedback. Please let us know which part you did not understand and we will try to explain it.
Admin
Carol H.
I didn’t understand this part…
Once you have completed editing this file save it and upload it in your theme directory (/wp-content/themes/yourthemedirectory/) where files like single.php and index.php are located.
How does one upload to one’s theme directory? (I have a wordpress.com site; does this have anything to do with this?)
WPBeginner Support
Yes, you cannot upload files on WordPress.com sites. Please take a look at our guide on the difference between WordPress.com and Self hosted WordPress.org sites.
vinay
Hi,
where do we find the pages that were created with the add-new page link in wordpress.could someone help me out to figure out the pages.Thanks in advance
terance perera
go to appearance -> editor -> then you can see page templete or page.php
Joanna Gasdogas
oops. please ignore previous note.
Thank you for these instructions.
I have followed all your instructions, I believe correctly. However when I go to my WP editor to add content to this new template, nothing shows up on the page. It remains as a completely blank page.
kuldeep
how to create a simple template in wordpress
Joanna Gasdogas
Thank you for this. I followed all the instructions. I have a blank template now. But when I go to my wp editor to add content, the content doesn’t appear in the new page.
Samsher
Hey plz upload snap shot..
Marow95
How can I change the url ?
I mean instead of “blog/?page_id=2” , I want it to be “blog/about” .
Thanks in advance
WPBeginner Staff
Check out our guide on how to create SEO friendly URL Structure in WordPress.
Asim
Checkout Permalinks at the very beginning of the page.
Kikky
hallo, thanks for the post on creating a custom template, its helped greatly. But i have some issues i need answers to, this is my first time at wordpress and on the site i’m creating, i already have a custom template as the home page and then i have another page (with the theme’s initial homepage look, which is a custom page). the challenge i’m having now is : i want the custom template page i designed to load first but the theme’s custom page keeps coming up instead. i figured there’s some sort of conflict going on since they both have thesame url …so, preeeetyyy please, how do i get through this huge problem…thanks
WPBeginner Support
Seems like you resolved your problem. In this case, you could have specifically told WordPress to use a template for a specific page. For example if you wanted to create a custom template for http://www.example.com/home-2 then you name your template file to be page-home-2.php. You can also use a page’s id in the template, like page-33.php will only work on page with 33 as the unique id.
Admin
Pol Alvarez
Hi! I have always coded my webpages from scratch but now I need to add one to a wordpress website. I mean I have good html/css and this kind of stuff but little of wordpress.
I have followed the instructions and succesfully uploaded the file. The problem is that it is not listed on the template dropdown. I am not sure whether this happens because the file I created is not valid or any other problem. My file is composed of your header
and then following it a normal webpage (opening with etc…) without any styles now external files (just to check it out).
What am I doing wrong? any help would be appreciated.
Thanks you are my last resort!
WPBeginner Support
Pol, we can provide you some tips to troubleshoot.
Please study the file page.php in your theme’s directory. Your custom page template should follow the same structure as page.php except the header part where you need to insert your own template name so that it can distinguished.
Make sure that you have uploaded your template to the right directory. It should be in /wp-content/themes/your-theme-name/ folder.
Let us know if this helped.
Admin
Ansar
I have a problem with this.when i add new page there is no option of template in page attributes. I’m using wordpress 3.8.1
And also what is the name given to the page we are newly creating
ReNet
This is Great! BUT HELP!
I created a template that pulls in a form, I currently have it with a Captcha but want to remove the captcha and use WordPress’ password protect functionality for this page so I can speedup multiple form entries.
The issue is that WordPress displays the template’s content before entering the password.
Your help would be greatly appreciated.
WPBeginner Support
ReNet, thats because the password protect functionality implements password on the contents of the post/page that is protected not on your template. So the form you want to hide should be executed inside the post. You can create a shortcode for that and add it to your post/page.
Admin
Sean
Thanks for this – who knew it could be so simple!
Troy
Ok so I think Im missing a step or two…
1) I opened up a blank text document, copied this “1” into the first line of the notepad
2) Saved it to my desktop and loaded it into the proper wp-admin//themes/mythemedirectory/
3) Got it to show up on wordpress. Then I copied and pasted my html code for my splash page that I created in dreamweaver into the text(html) portion on wordpress.
4) Saved it as a draft and when I previewed it I get a bunch of strange text.
Can you explain to me what steps am I forgetting or missing. I think its something with the other php markups? or maybe where I post my html code. Im looking to have splash page without any menus or anything else besides my splash page coding. Any help or assistance would be greatly appreciated. The information you provided has gotten me farther then any of the other blogs Ive looked at so thank you very much!
WPBeginner Support
It seems like you are trying to design a page in Dreamweaver and trying to import it in WordPress. This will not work. Because your page already has a structure and style defined by your WordPress theme.
Admin
Troy
thanks for the reply. Can I just take the html body from dreamweaver and paste it into the theme?
WPBeginner Support
No it will still have the similar effect.
Surya
You can do that but try pasting the code in notepad first and then copying it again to WordPress. This usually eliminates some unwanted things like DOM.
niharika
I have one question please……………. help me. I want to store marks of student in Mysql database and once user go to the result page he has to enter his roll no and class, then he see his result. I have done this project but I really don’t know how to go through it in wordpress i.e where to write html and php coding in wordpress.
I am using WordPress.org on my localhost.
WPBeginner Support
For that you will have to create your own custom solution using Custom Post Types, Custom Fields, and User Meta Data. If you look around you might find some WordPress plugin that already does all that.
Admin
Andrea
Thanks for the post – this was exactly what I was looking for, and so helpful!
Stuart Alsop
Thank you sooooo much for this tutorial. solved a big headache for me! Keep up the good work!
Darren
This page is fantastic! Thank you! I was messing around a little (a lot) with plugins when I did a search, came across this page, and figured this is way better than the other methods I was looking at to do something.
One thing is that in the article, it isn’t immediately obvious that the code should be put on the page before being uploaded. I mistook it as inputting the code on the ‘add a new page’ text box. Second time I tried it, I stuck the code in the text file (also, it isn’t obvious that they should choose all files, and change the text file extension to .php), and it worked like a charm. You can even add blog1 / blog2 / etc… to get multiple themes up there if you so need.
Thank you!
Tim Reeves
THANK YOU SO MUCH!!!!!!!!!!!!!!!!!!!!!!!!!! I have been trying to figure this out for 3 months now, came across your tutorial up and running with my new page template in 5 minutes.. I completely
understand some of the comments above, as when you are first starting out everything is so confusing. But when you get a grasp of things it is so easy. AGAIN YOU ARE A LIFE SAVER,SCHOLAR,AND A GENTLEMAN !!!! : )
lucas
This is suppose to be for beginners? I can’t even pass the first step “You can start out by calling WordPress header and footer”
what does it mean? whoever wrote this article has forgotten that is writing for beginners who tend to be clueless.
I tried to call header and footer but nobody answer, maybe i got the wrong number.
A screen shot will be quite useful.
Editorial Staff
I think you misunderstood the site. WPBeginner caters for beginners of all level. This article is in the Themes category, and this is for beginner theme designers. The article clearly says that you need to have HTML / CSS knowledge before you can do this.
We do have a beginners guide category – https://www.wpbeginner.com/category/beginners-guide/
Instead of being really sarcastic, sending 2 separate emails and leaving a comment, you should consider being more polite. We do not get paid to write these tutorials. It is a kind gesture for the community, and many folks have learned from our site. It would be one thing to be pissed off, if you paid for something, and you didn’t receive it. This site is entirely FREE. We try to help as many folks as we can without charging a dime.
-Syed
Founder of WPBeginner
Admin
eduardo
thaaaaannnksssssssss im a front end developer and i consider myself a wp beginner i found this article really helpful
Markus Freeman
I’ve tried this and it worked like a charm, but the there’s one problem. The Posts didnt show, only the sidebar. what could be the problem?
Thanks,
Markus
Editorial Staff
That means that there is something wrong with the code in your template.
Admin
James
I tried this too and like above only the sidebar shows. What could be wrong with the code in my template?
Joe
Try copying the WordPress hook ( if statement) from the page.php file. Then paste it into the new file.
Karla Porter Archer
Thanks for this tutorial.
I’m trying to do this in order to create the author page (https://www.wpbeginner.com/wp-tutorials/how-to-display-an-author-list-with-avatars-in-wordpress-contributors-page/).
I’m using a child theme. Does this file get added to the main theme file directory or the child theme?
Karla Porter Archer
I just tried it in the main theme and it finally showed. So I’m assuming the answer is ‘main theme’ and that I haven’t broken it
Editorial Staff
No this file has to be added in the child theme directory. While it would work in the main genesis folder, it is best practice to never modify anything in the parent theme.
Admin
Karla Porter Archer
ah – thanks — that was my original presumption, but it didn’t show the template as an option for the page, so I second-guessed myself. I obviously didn’t add it correctly then, so off to try again!
Max Garcia Jr
WITHLOVEASH31 posted a question on 10/24/2011. Could one of the Editor’s please respond. I’d really like to know. I could really use this feature. Thanks in advance!
Editorial Staff
We didn’t reply because they also commented right after that they figured it out. You have to use FTP to login and upload a new theme file.
Admin
LJSkool
Completely newbie here. I was fine right up until you got to “begin creating a custom page by opening a blank file in your text editor”. Um, yeah…. Would that be the “editor” link under “Appearances” within my site? How do I “open” this? My purpose to have a page with all my blog posts on one page. My theme does not do this. Thanks!
Editorial Staff
Hey Jackie,
Yes this article does require prior HTML/CSS knowledge. Text Editor can be Notepad, Dreamweaver, Notepad++ etc.
Admin
Ruth
this is the first help page that’s helped me without creating another set of problems.
It worked! I never built a php page before and I pasted everything in exactly
Thank you!
Taika
“Since you have already written down all the text and settings in the php file, simply name the page and leave the content area blank”
How to do that ? My WP does not allow me to leave the content blank, it requires to type something on title before it lets create/edit page name, then if I type something, name the page and remove the text leaving it blank and publish it publishes whatever I typed on title before I removed the text…any advice ? Thanks,
Taika
withloveash31
Oh never mind. I figured it out
withloveash31
I was following your guide and everything went well until this- “upload it in your theme directory (/wp-content/themes/yourthemedirectory/) where files like single.phpand index.php are located.” This might stupid but how do i upload the file to my theme directory? I did find a page under the name “Editor” where single.php, index.php etc are located, i just don’t know how to upload the file i created. Please help :S
nola
Excellent! I thought this would be a hard process. You explained it simply. I still need to work out a few things with how my theme displays the custom template, but now I’ve learned something new. Thank you!
saro.verhees
Really awesome, exactly what i was looking for. Thanks
scarab
great post. This information was just what I was looking for. It took me about 40 minutes but I built a ‘squeeze’ page just like I wanted.
I still need to do some of the header work but is minor in my opinion.
Thanks
Nina
Brilliant!
Alex Batista
How to create a custom page in WordPress and put it how default?
Editorial Staff
https://www.wpbeginner.com/wp-themes/how-to-create-a-custom-homepage-in-wordpress/
Use the page link above.
Admin
Frank
freakin phantastic blog! This may be the best project site on the web…
Marc Shaw
Hey, I read a lot of blogs on a daily basis and for the most part, people lack substance but, I just wanted to make a quick comment to say GREAT blog!…..I”ll be checking in on a regularly now….Keep up the good work!
– Marc Shaw
Missy
Hi,
I’m on here now trying to do this. Let me see if I can pull it off.
MOMO
Excellent tutorial. cheers guys.
Momo